
Introduction
Prepare your site for ready-mixed concrete delivery by ensuring access, space, and timing are ready for a smooth placement.
In this guide you’ll learn how to assess site readiness, coordinate deliveries, and apply practical tips to prevent delays and rework.
Key takeaways
- Verify site grade, slope, and drainage before any formwork or concrete work.
- Schedule pour windows to align with weather and truck availability.
- Calculate bulk concrete volumes with waste margin and aisle clearance.
- Ensure truck access, turning radii, and clearance from structures and utilities.
- Install formwork plumb, level, and securely tied to prevent leaks.
- Verify reinforcement, embeds, and utilities are correctly placed before pour.
Table of Contents
- Introduction
- Key takeaways
- Why Proper Preparation Matters
- Pre-Pour Planning and Scheduling
- Calculating Quantity and Choosing the Right Mix
- Site Access and Truck Logistics (Clearance & Turning Radius)
- Clearing, Excavation and Subgrade Preparation
- Formwork Installation and Layout
- Reinforcement, Embeds and Utilities
- Tools, Equipment and Crew Organization
- Receiving and Inspecting the Delivery
- On-Site Safety and PPE
- Weather Considerations and Seasonal Curing Strategies
- Concrete Pumping vs Truck Chute vs Wheelbarrow
- Final Pre-Pour Checklist (Day Before & Morning Of)
- Pouring, Finishing and Testing Procedures
- Immediate Post-Pour Care and Curing
- Cleanup, Waste Management and Truck Departure
- Common Mistakes, Troubleshooting and Corrective Actions
- Cost Guidance, Ordering Strategy and Contract Tips
- Legal, Permits and Local Compliance Considerations
- Visual Checkpoints and Site Diagrams to Reduce Risk
- Post-Pour Maintenance and When to Call a Pro
- Ready-Mix Delivery Day Communication Template
- Quick Reference Tools & Checklists
- Conclusion
- FAQ
Why Proper Preparation Matters
Proper site preparation sets the foundation for concrete quality by controlling base moisture, ensuring a clean, uncompacted subgrade, achieving proper compaction and formwork alignment, and preventing laitance or dust that can weaken the pour. It also drives the project schedule and cost, because lead times for subbase, forms, rebar, and ready-mix deliveries must be coordinated with weather, site access, and the need for a clean, stable window on pour day. Common failure modes—laitance, settlement, frost heave, improper moisture, and contamination—often trace back to inadequate prep, and they are best avoided through practical detectors, moisture tests, and timely remedies.
A concise pre-pour plan helps you catch issues early and reduce rework by confirming subbase moisture, verifying forms and rebar readiness, ensuring mixer access, and establishing dust control and safe drainage, including how moisture tests were performed and the outcomes. Safety and regulatory considerations matter too: ensure stable access, trench edge protection, drainage plans, erosion control, and coordination with authorities or inspectors for drainage, utilities, and permit requirements. Documenting prep work with photos and notes creates a reliable record for the delivery crew and future maintenance, supports accountability for quality, and helps guide adjustments if conditions change for future audits.
Risks of Poor Preparation
Poor prep shows up fast on pour day. Uneven or contaminated subgrade and excessive dust lead to segregation and weak surfaces that crack or spall within weeks. Improper compaction or soft spots let slabs settle or heave later, creating trip hazards and costly repairs.
Delivery can be delayed or refused if access, forms, or reinforcement aren’t ready. That wastes ready-mix time, adds haul-back charges and forces rushed fixes that compromise quality. Weather and drainage issues magnify these problems and increase the chance of rework.
Expect added cost from wasted material, extra labor, and potential replacement of damaged subbase. A quick check for contamination, moisture and form integrity prevents most of these failures.
Benefits of a Well-Prepared Site
A tidy, stable site makes the pour predictable. When forms, compaction, and moisture control are correct you get faster placements and fewer stops. That reduces truck waiting time and keeps the mix within its design window.
Good prep limits rework and waste. Accurate subbase checks and clear access let you order the right quantity and sequence, saving money on overages and haul-back fees. Consistent compaction and clean reinforcement ensure the slab performs as intended.
Preparation also improves safety. Clear routes for mixers, proper slope and drainage, and dust control protect crews and neighbors. Documenting prep with photos and notes helps communicate expectations to the delivery crew and inspectors.

Pre-Pour Planning and Scheduling
Pre-pour planning sets the schedule and logistics for a concrete pour, ensuring materials arrive when the crew needs them and avoidable delays are minimized. Plan orders 2–7 days in advance based on project size and supplier policy, build in buffers for weekends and holidays, and confirm minimums, backorder policies, and any potential changes to the requested mix designs. Identify ideal delivery windows, prefer cooler morning hours, align with pour rate and crew availability, and plan staggered deliveries for multiple pours to prevent bottlenecks.
For a DIY or jobsite, this forethought translates into fewer trips, safer workflows, and a smoother sequence from formwork to finish. Keep a site readiness checklist in view: complete formwork, secure reinforcement, verify subgrade moisture and compaction, place joints correctly, and ensure unobstructed truck access and a clean, level staging area. Meanwhile, plan for permits, access, traffic, and a weather contingency so you can reschedule with the supplier without scrambling, reducing downtime and protecting your timeline.
How Much Lead Time to Give Your Supplier
For small pours (single yard or two) call 2–3 days ahead. For medium jobs (driveways, patios) book 3–5 days. Large pours or specialty mixes need 5–7 days. That gives the plant time to schedule trucks and reserves your mix.
Always check with your plant for their minimums and weekend policies. Ask if same-day or short-notice deliveries are possible and what fees apply. Confirm your mix design and any admixtures before the cut-off to avoid substitutions on delivery day.
Choosing Delivery Time for Best Conditions
Morning deliveries are usually best. Cooler temperatures slow initial set and help finishing. Early runs also avoid peak traffic and give your crew the whole day to place and finish the concrete.
If you must pour in the afternoon, plan for higher temps and faster set—use retarder admixtures or extra hands. Match delivery rate to your crew’s placement speed and allow for staggered trucks so you don’t sit waiting for equipment or space.
Permits, Noise and Neighbour Notifications
Check local requirements for street closures, truck access permits, and working-hour restrictions. Some municipalities require road-use approval for large trucks or oversize loads. Get permits well before the pour to avoid last-minute delays.
Tell neighbours or site managers the delivery window and likely noise. A simple notice avoids complaints and allows them to move cars or expect truck movements. Coordinate access, height and width clearances with suppliers so trucks can reach the site without surprises.
Calculating Quantity and Choosing the Right Mix
Accurate quantity starts with defining the project volume: measure the footprint, track thickness, stairs, and dropped areas, then convert everything to cubic yards (or cubic meters) and document a primary calculation along with a contingency buffer for spillage and on‑site losses. Use a setback margin, typically 5–10%, to the final quantity and explain how that buffer translates into additional loads, while keeping units consistent from mix design to delivery and placement. For planning, outline the target compressive strength, typical slump range for your method, and the common admixtures you might consider, so you can match performance, durability, and code requirements without overcomplicating the job.
With the numbers in hand, you gain practical guidance on formwork, placement method (truck, pump, or wheelbarrow), and finish type, which in turn shapes workability and timing. This helps you avoid waste, ensures timely delivery aligned with site readiness, and makes it easier to adjust slump and dosage using water or superplasticizers without overstressing the mix or accelerating set beyond your window. Keep a simple worksheet for unit checks, weather and temperature considerations, and a quick round of on‑site verifications to document assumptions and support a smooth, predictable pour.
Concrete Volume Math & Buffer Percentages
Measure the pour area: length × width × thickness. For footings or steps, break into rectangles or trapezoids and total them. If using inches, divide the result by 27 to get cubic yards; if using millimetres, convert to cubic metres by dividing by 1,000,000.
Always add a buffer for waste and spillage. I typically use 5–10% on flatwork and 10%+ for complex pours or deep footings. Multiply your base volume by 1.05–1.10 and round up to the next quarter yard (or 0.1 m3) when ordering to avoid coming up short.
Mix Selection: Strength, Slump, and Admixtures
Pick compressive strength to suit the job: around 3,000–4,000 psi for residential slabs, 4,000–5,000 psi or higher for driveways and structural elements. Check local code or engineer specs for critical members.
Match slump to placement: low slump (2–3″) for wheelbarrow and tough forms, higher slump for pumping or intricate finishes. Use water reducers or superplasticizers to increase workability without extra water. Add air-entraining agents for freeze-thaw exposure, accelerators for cold weather, and retarders for hot conditions. Avoid mixing incompatible admixtures—confirm with your supplier.
Cost Impact of Mix Choices and Additives
Standard mixes are cheapest. Increasing strength, adding admixtures, or specifying special aggregates raises unit price. Expect noticeable markup for high-strength, high-slump, or specialty blends like sulfate-resistant concrete.
Spend extra where it matters: air entrainment for exterior slabs in freeze zones, accelerators to meet schedule in cold, or corrosion inhibitors for exposed steel. For small non-structural pours, saving on additives often makes sense. Get a price breakdown from the supplier and weigh long-term durability against upfront cost.
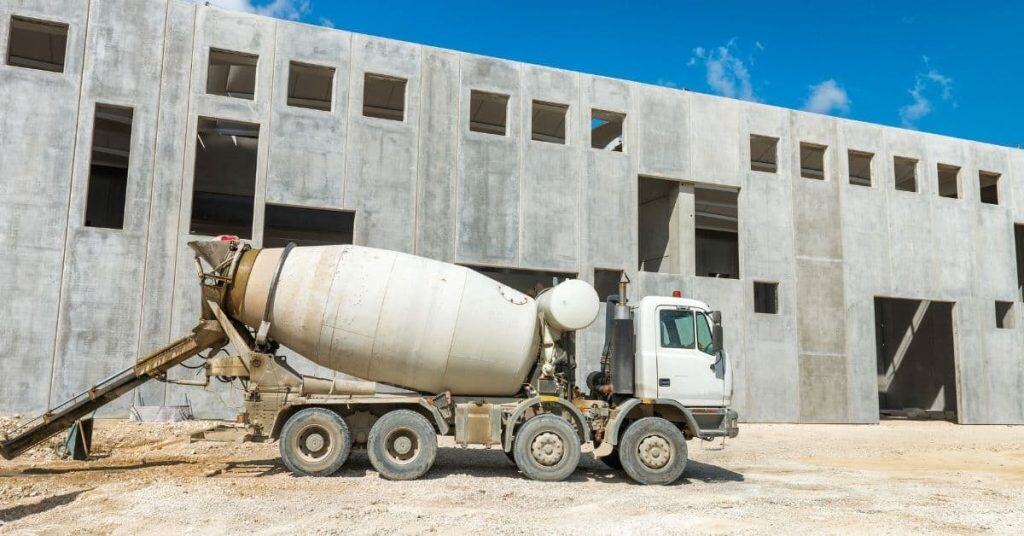
Site Access and Truck Logistics (Clearance & Turning Radius)
Site access and truck logistics specify minimum lane widths, curb cutouts, and whether escort vehicles or flaggers are required so a ready-mix truck can safely enter, negotiate turns, and pass through the site without hitting obstacles or creating bottlenecks. They also spell out on-site grade, slope, and drainage limits, including acceptable pavement transitions and the size and shape of the laydown area, along with surface prep such as compaction and grading to support precise chute placement and a clean pour line. Additionally, utilities, overhead hazards like power lines or branches, underground services, and staging needs for bags, rebar, cones, barriers, and signage are identified, together with a coordinated scheduling window and a pre-delivery walk-through checklist for access viability.
Understanding these requirements helps you plan routes, avoid unloading setbacks, and protect the pour area from runoff, while ensuring the ready-mix truck can reach the pour site without blocking traffic or causing damage. Knowing the constraints lets you secure timely deliveries, align with the site contact, and set up appropriate barriers and signage so the path remains clear for equipment, pedestrians, and other trades. In practice, a clear plan reduces on-site guesswork, speeds setup, improves safety, and yields a smoother, more controlled pour by coordinating delivery windows, weather contingencies, and equipment access.
Typical Ready-Mix Truck Dimensions & Turning Radii
Most single-axle mixer trucks are about 8–9 ft wide and 25–30 ft long. Tandem or larger mixers and chippers can reach 10–12 ft wide and 35–45 ft long. Expect mirrors and chute swing to add another 2–3 ft of operational clearance.
Turning radius matters more than overall length. A typical loaded mixer needs a 45–55 ft outer turning radius for comfortable manoeuvres. For tight sites allow at least an extra 3 ft beyond the truck body on both sides to avoid scraping curbs or fences.
Plan gate clearances no less than 10 ft high and 12 ft wide for safe entry. If space is marginal, request an escort or smaller truck from the supplier. Always verify actual truck dimensions with your ready-mix vendor before delivery.
Ground Load Limits and Driveway/Bridge Checks
Check pavement and driveway ratings—typical loaded mixers weigh 30,000–60,000 lb. Gravel or compacted subgrade may hold up, but thin asphalt or timber decking can fail. Walk the route and note soft spots, frost-heaved areas, and visibly cracked pavement.
Use plywood or steel plates to spread the load over weak sections when necessary. For residential driveways consider temporary 3/4″ plywood mats under wheels and outriggers. If a bridge or elevated driveway exists, get an engineering stamp or supplier confirmation on allowable axle loads first.
Mark any unsafe areas and communicate restrictions to the driver and supplier. Protective matting and signage prevent damage and liability claims.
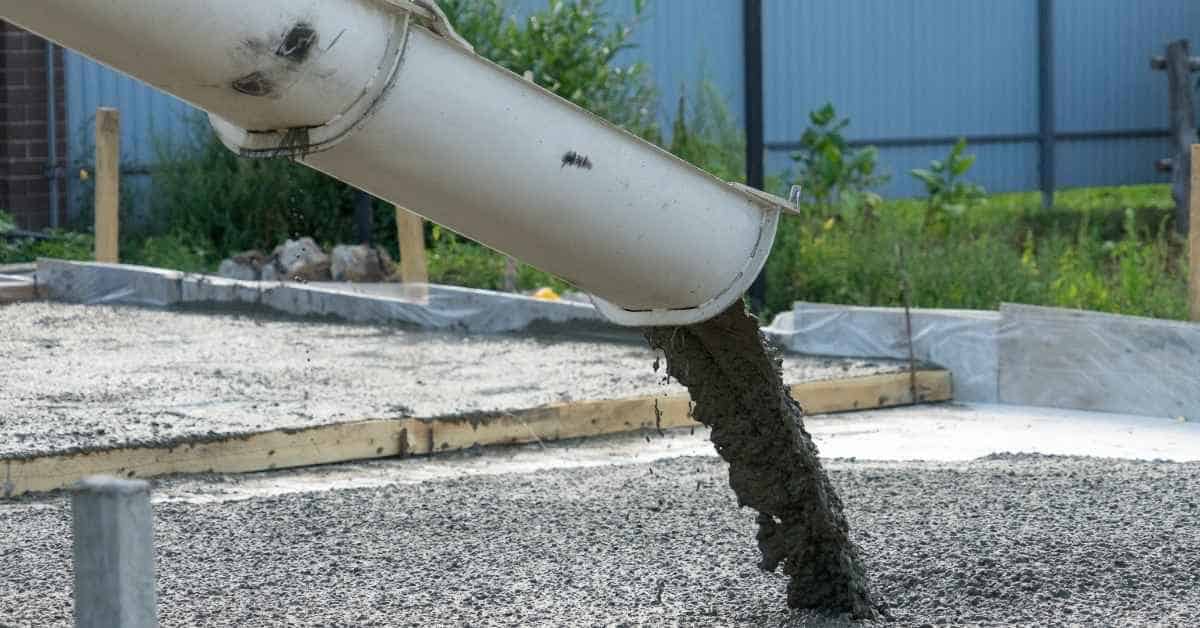
Chute, Pump, or Wheelbarrow Decision Flow
Use the truck chute when the pour point is within 20–25 ft of the truck and surface access is level. Chutes are fastest and cheapest but need stable truck positioning and short horizontal reach.
Choose a line or boom pump when distances exceed 25 ft, there are vertical drops, or the truck can’t get close. Line pumps are good for mid-range runs; boom pumps handle long reaches and tight access but add cost and require set-up space for outriggers.
Reserve wheelbarrows only for tiny isolated pours or when access forbids equipment. They’re labor intensive and slow. Discuss the site plan with the supplier so they confirm the right delivery gear and any extra crews or permits needed. Make the call based on reach, speed, and site stability.
Clearing, Excavation and Subgrade Preparation
Clearing, excavation, and subgrade preparation lay the groundwork for a successful slab by defining scope, confirming slab type, dimensions, and thickness, and planning exact excavation depths that account for subbase, slope, and drainage while coordinating utility locations, permits, weather windows, and site access. It also covers clearing vegetation and debris, identifying any contaminated soils, establishing waste disposal and safety zones, detailing necessary haunching or edge forms, and specifying moisture conditioning targets and the compaction method and tests (such as Proctor/Modified Proctor or California bearing ratio) to verify target density before pour readiness.
This approach matters for DIY and jobsite readers because it reduces rework, prevents costly moisture and strength failures, and ensures a stable, well-drained base that supports the concrete and long-term performance. By documenting testing frequency, cross-slope and positive drainage, edge support, and inspection punch lists aligned with the ready-mixed supplier’s schedule, you gain clarity, improve coordination with trades, and navigate weather contingencies with confidence, ultimately making the pour smoother and the finished slab more reliable.
Achieving Proper Compaction and Bearing Capacity
Get the subgrade to the density your engineer called out—typically a percent of Proctor or a CBR value. Start by testing moisture; too dry soils won’t compact, too wet soils pump under loads. Condition the soil to the target moisture before rolling.
Use the right equipment: hand tamps or plate compactors for small fills, and a smooth drum roller for large areas. Work in uniform lifts (usually 4–6 inches loose). Compact each lift to target density and keep records of each test location.
Good compaction prevents settlement and edge cracking. Spot-check with a handheld gauge or request lab tests at a few points. If you find soft areas, cut out and replace rather than over‑compacting—they rarely improve with more passes.
Slope, Drainage and Site Level Checks
Set finished grades with a string line or laser level to ensure a positive slope away from the slab—minimum 1/8″ to 1/4″ per foot for paved areas and at least 2% for open surfaces where water must run off. Mark high and low spots before forming.
Check cross‑slope and flow paths after compaction. Walk the site during a light spray to spot ponding. Fix low spots by removing fill or adding properly compacted material; do not rely on the concrete to solve drainage problems.
Confirm forming lines and edge support align with the grade. Double‑check elevations near utilities and thresholds so water won’t collect against footings or doors. A final grade certificate or simple level log helps coordinate with your supplier for pour timing.
Formwork Installation and Layout
Formwork installation and layout defines the shape, thickness, and finish lines of concrete elements by establishing accurate temporary walls, supports, and edges that carry the poured material through set times and curing windows. It emphasizes selecting materials and bracing plans that resist pour pressure and vibration while maintaining true dimensions, with tolerances aligned to the concrete mix, delivery schedule, and project requirements. Critical details include precise alignment, plumb and level, joint treatments, corner reinforcement, release agent control, and seamless integration with reinforcement, embeds, and surrounding structures to minimize leakage, misalignment, and delayed pours.
For a DIY or jobsite reader, this means a clear, actionable plan for sequencing form setup, bracing intervals, tie spacing, and load ratings that prevent bowing or failure during a live pour and allow efficient stripping and reuse after cure. It also highlights safety, inspection, and documentation steps—checklists for stability, fastener integrity, voids, and leak potential, plus pre-pour sign-off and punch-list resolution—that help avoid missed work or rework. Well-considered planning, ground protection, and access for concrete trucks translate into smoother operations, reduced waste, and lower overall costs while preserving finish quality and enabling reuse across multiple pours.
Stakes, Bracing, and Form Material Choices
Pick the right form material and secure it well. The choice—timber, steel or modular—affects edge finish, reuse, and whether forms will bow or leak under pour pressure.
- Treated timber Widely available and easy to trim. Look for straight, knot-free boards at least 2″ thick. Avoid soft or warped wood; it will bow and cause uneven edges.
- Plywood faces Use B-grade or concrete-grade sheathing for a smooth finish. Check for delamination and 18mm+ thickness. Thin or damaged plywood stains and peels when wet.
- Steel/formwork Best for repeat jobs and tight tolerances. Confirm plate gauges and weld integrity. Cheap thin steel can flex and misalign under vibration.
- Modular systems Fast setup and consistent dimensions. Verify manufacturer load ratings and connector types. Mismatched panels leak and create honeycombing.
- Stakes and pins Drive hardwood or steel stakes at regular intervals. Space to resist lateral pressure—typically 600–900mm for tall forms. Loose stakes let forms bow and crack concrete.
- Cross bracing Install diagonal braces and rakers to transfer thrust to ground. Use adjustable rakers for final alignment. Insufficient bracing leads to blowouts during pumping.
- Form ties Choose ties rated for hydrostatic loads of the mix. Replace corroded ties and pack voids. Incorrect ties allow leaks and surface blemishes.
Checking Dimensions, Levels and Expansion Joints
Verify every critical dimension before the truck arrives. Measure wall thicknesses, slab edges and column widths with a tape and a square. Confirm setout lines against the plan; once concrete is placed, changes are costly.
Check elevations with a spirit level or laser. Snap a chalk line for long runs and mark finished levels on batter boards. Allow for screed thickness and tolerance of the selected mix—overlook this and your tops will be off grade.
Plan control and expansion joints where slabs change direction or meet fixed structures. Use preformed joint strips or sawcut locations scheduled within the allowable time. Mark joint positions clearly on forms and protect edges so joints are straight and effective.
Reinforcement, Embeds and Utilities
This section explains how to place reinforcement and embeds for a concrete pour, including rebar, welded wire fabric, anchors, and conduit sleeves. It emphasizes aligning with structural drawings and pour specs, with clear requirements for bar size, spacing, cover, lap splices, and bend radii to prevent issues during the pour.
Getting these items right reduces rework, keeps forms stable, and protects utilities from damage during vibration and backfill. Following clear placement, sleeve detailing, and inspection steps helps DIYers coordinate with the project, stay code-compliant, and keep pours on schedule.
Rebar and Mesh Placement Best Practices
Place rebar and welded wire fabric to the dimensions on the structural drawings. Use chairs and concrete spacers to keep reinforcement at the required cover; never rely on wire ties alone. Maintain specified lap lengths, bar spacing and bending radii so you don’t create on-the-fly fixes during the pour.
Tie and secure bars to resist vibration and concrete flow. Check clearances at edges, joints and form ties—insufficient cover leads to cracking and corrosion. Before the truck arrives, do a quick layout check against the markups and confirm bar sizes, spacing and lap splices match the specs.
Sleeves, Embedments and Utility Protection
Set sleeves and embedments to exact elevations and offsets called out on the drawings. Fix sleeves so they can’t move when concrete is placed—wire them to rebar or brace them to formwork. Cap or plug sleeves to keep debris out and clearly mark penetrations on the forms.
Protect pipes and cables with conduit, wrapping or isolation plates as required. Coordinate with utility owners, obtain permits and call before you dig to confirm locations. Inspect all embeds, anchors and sleeves for alignment and clearance, then sign off before the pour.
Tools, Equipment and Crew Organization
A clear, practical overview covers the essential tools for a concrete pour—screeds, floats, rakes, vibrators, and pumps—plus PPE and any site-specific accessories, followed by a focused look at equipment readiness, maintenance, and backups. It also maps out site layout, staging, and access to keep the pour area and forms, control lines, and equipment routes organized. Finally, it identifies the core crew roles—foreman, operators, and laborers—with simple signaling and task assignments to keep the workflow smooth from start to finish.
By emphasizing pre‑use inspections, fuel, lubrication, and calibration, the guide helps you prevent downtime and ensure reliable performance on pour day. Understanding how to arrange forms, access routes, and control lines reduces clutter and hazards, while a defined sequence for delivery windows, vibration/compaction, finishing, and curing improves quality and timing. For DIY builders, this context translates into safer, more predictable pours, better finish, and fewer surprises when coordinating multiple tools, operators, and tasks on the job site.
Essential Tools & Rental Options
Pack the basics and a couple rentals for smooth placement. Bring hand tools for detail work and rent heavy gear only when the job demands it.
- Screeds & straightedges Level concrete and strike off excess. Use a 1–2% slope tolerance. Keep extras in case of warping.
- Bull floats Smooths surface after screeding. Choose 18–24″ for slabs. Replace worn pads before use.
- Hand floats Finish edges and tight spots. Magnesium for open textures, wood for burnishing. Clean immediately to avoid resin build-up.
- Concrete rakes Pull mix toward edges and eliminate voids. Use hooked teeth for control. One per laborer prevents delays.
- Vibrators Consolidates and removes air pockets. Internal needle vibrators run 9,000–12,000 VPM. Rent extras; avoid over-vibrating.
- Concrete pump Moves mix fast for large or tight jobs. Rent when wheelbarrow chores exceed crew capacity; expect daily rents $300–$800.
- Power trowel (rent) For medium/large slabs and a smooth finish. 20–36″ sizes common. Rental runs $80–$200/day; hire an operator if inexperienced.
- PPE & accessories Gloves, boots, eye protection, rakes, edgers. Stock spare gloves and knee pads. Safety saves time and claims.
Crew Roles and Minute-By-Minute Pour-Day Timeline
Assign clear roles: a foreman to run the job, two finishers for edges and float work, a pump or chute operator, and laborers for wheelbarrows and cleanup. The foreman tracks time, delivery, and coordinates signals. Use simple hand signals for chute stop/start and pump flow.
For a mid-sized 600–800 sq ft slab: T minus 30 — crew checks forms, rebar, and tools. T minus 10 — crew positions wheelbarrows, pump line, and PPE. Delivery arrives at T; foreman confirms slump and mix. T to T+30 minutes — laborers place and rough screed the concrete. T+30 to T+60 — vibrators and bull floats run; finishers start edge work. T+60 to T+90 — power trowel or hand trowel passes for final finish. T+90 — curing starts; apply curing compound or wet covers.
Keep a backup laborer for chute clears and extra trowel blades on hand. Communication and timing prevent costly rework.
Receiving and Inspecting the Delivery
On arrival, verify the delivery ticket matches the job details, including project name, order number, mix design, quantity, and scheduled delivery time, and confirm the driver paperwork aligns with the requirements. Perform immediate on-site checks for slump, air content if specified, and concrete temperature, along with appearance cues like color, aggregates, and consistency. Confirm delivery logistics and access, ensuring clean, unobstructed routes for the truck, proper chute placement, and a prepared site with approved forms and a clear path to the pour area, while noting any deviations for later action.
Following a clear, documented checklist helps prevent pouring unsuitable concrete, reduces on-site delays, protects personnel by ensuring receiving conditions, joints and controls are ready, and confirms that formwork, vibration capability, and safe access are in place before the pour begins. It also creates a verifiable record of temperature, slump, and other test results, supporting quality control, traceability, and accountability if specs are later challenged. This disciplined routine gives DIY crews confidence to catch issues early, coordinate promptly with the driver or supplier, and maintain site safety and logistics, so the project stays on schedule even when surprises arise.
What to Check on the Delivery Ticket
First thing: read the ticket. Confirm the project name, order number and delivery time match your schedule. Check the mix ID and design strength (PSI), the total cubic yards delivered, and any specified admixtures or water/cement limits.
Verify batch time and truck number so you can trace any issues later. Make sure the driver’s paperwork matches what you ordered and the plans — especially special mixes like pumpable or air-entrained concrete. Note any hold or placement instructions printed on the ticket.
If anything doesn’t match, sign the ticket only after you’ve recorded the discrepancy. Take a photo of the ticket and the truck load, and tell the driver and the supplier immediately so they can advise acceptance or corrective steps.
Slump and Temperature Checks on Arrival
Ask the driver for the slump test and temperature results done at discharge. Slump indicates workability; most flatwork falls between about 2–5 in., but follow your spec. Temperature affects set time and strength — hot mixes stiffen faster, cold mixes take longer to cure.
Quickly compare the recorded slump and temperature to your project specs. If either is outside tolerance, record the values, take photos, and request a retest or corrective action from the supplier. Don’t guess — document and communicate.
If the mix is marginal and you must pour, note acceptance conditions (extra vibration, shorter pours, or admixture adjustments) and confirm the supplier accepts responsibility in writing.
On-Site Safety and PPE
On-Site Safety and PPE focuses on identifying concrete-specific hazards on the worksite, such as pour zones, formwork, slip and trip hazards, vibration, silica dust, and the risk of back strain from wheelbarrows or multi-person lifts. It also defines the required PPE by task—hard hats, safety glasses or face shields, chemical-resistant gloves, steel-toe boots, high-visibility clothing, hearing protection, and respirators or dust masks where silica or dusty conditions exist—along with traffic control measures and proper exclusion zones around pouring operations. Finally, it outlines legal and first-aid obligations, including training and certifications, accessible eyewash and shower stations, burn and eye-injury response protocols, immediate reporting of injuries, and liaison with on-site medical services.
For the DIY or jobsite reader, these controls translate into practical, repeatable steps: establish a hazard map and daily checklists, coordinate with ready-mixed deliveries through clear communication and load visibility, and implement quick safety briefings and ongoing monitoring with supervisor sign-offs and near-miss reporting. This framework helps prevent injuries, keep pours moving smoothly, and ensure compliance with safety and health requirements despite changing site conditions. Emphasizing task-based PPE, clear traffic routes, and ready access to first-aid resources reduces risk for workers and improves overall jobsite reliability.
Personal Protective Equipment & Hygiene
Keep everyone covered and ready — concrete burns fast and dust hides in wet mix. Make PPE a non‑negotiable before the truck backs in.
- Safety boots Steel‑toe, oil‑resistant boots stop crush injuries and chemical soak. Choose boots with concrete‑resistant uppers. Replace if soaked through — do not work in wet boots.
- Chemical gloves Nitrile or neoprene protect hands from cement alkali. Use gloves rated for alkali and solvents. Carry extras — change gloves after heavy contact.
- Eye protection Safety glasses or face shields prevent splash injuries. Use side‑shielded glasses for dusty pours. Keep an eyewash bottle nearby for immediate rinse.
- Long sleeves Durable, breathable long shirts protect skin from burns. Cotton is ok for short exposures; use chemical‑resistant sleeves for prolonged contact. Wet clothing traps alkalinity — remove and rinse immediately.
- Respiratory protection N95 or half‑mask respirators for dusty jobs or saw cutting. Fit and filter choice matters; match to silica risk. Rent powered air units for extended work — expect $40–$100/day.
- Hygiene station Eyewash, shower or clean water and soap must be easily accessible. Post the location and train crews on use. Portable units can be rented for the day at modest cost.
Traffic Management and Truck Spotting Safety
Control vehicle flow before the mixer arrives. Establish a single marked haul route and clear it of trip hazards and loose material.
Use cones, barriers and a dedicated spotter to guide the driver into position. The spotter wears high‑visibility apparel and a radio or hand signals. Keep pedestrians and tools out of the exclusion zone around the pump and hopper.
Set up signs and a simple flagging plan at site entries. Coordinate pump placement with the driver and operator so hoses avoid walkways. If access is tight, use a second spotter for rear clearance and a pre‑pour walkthrough to confirm routing and emergency egress.
Relevant editor notes for this section:
- Safety and liability notes should be deeper and clearer for DIYers — Safety is mentioned but lacks a concrete decision framework for when to escalate to a pro (e.g., complex site, limited access, or high-risk pours). Strengthen with a “DIY vs Professional Help” guideline outlining clear triggers to call a pro, and a quick decision checklist tied to specific H2 headings like “On-Site Safety and PPE” and “Ready-Mix Delivery Day Communication Template.”
Weather Considerations and Seasonal Curing Strategies
Weather considerations and seasonal curing strategies emphasize planning pours around reliable forecasts, coordinating with the ready-mix supplier for heat or cold adjustments, and applying appropriate curing methods to protect moisture and temperature during curing. Practical steps include tracking ground and air temperatures, using insulating forms or blankets in cold weather, and deploying shade, misting, or cooling water strategies in hot weather, all while maintaining worker safety and controlling timing to avoid delays. The approach also covers wet or changing conditions, where protecting the subgrade, managing runoff, and preparing for moisture adjustments help prevent surface dusting, segregation, or unexpected strength loss.
This guidance matters on a DIY jobsite because it translates weather forecasts into actionable actions that reduce cracking, improve strength gain, and keep projects on schedule. By prioritizing substrate moisture checks, form integrity, and slump consistency under shifting conditions, crews can adapt mix choices and curing methods without sacrificing quality. Coordinating delivery windows and communicating last-minute changes with the crew further minimizes risk, helping achieve reliable results across seasons and varying climates.
Weather windows and concrete temperature thresholds: plan pours within defined weather windows to minimize temperature swings that slow strength gain or cause premature setting. Target fresh concrete temperatures in the 50–85°F (10–29°C) range for optimum workability and strength development. Avoid pours when ambient or ground temperatures push concrete well beyond this window or when heat-related evaporation risks are high.
Practical steps to implement temperature controls:
- Hot weather: strive to pour during cooler parts of the day (early morning or late afternoon) and limit onsite heat exposure. Request ready-mix loads to arrive at lower concrete temperatures (typically 50–75°F / 10–24°C) and use chilled water or ice to reduce mix temperature. Use evaporation-control curing methods (moist curing, curing blankets) to prevent moisture loss.
- Cold weather: plan deliveries for when air and ground temps are above the project minimum (commonly above 40°F / 4°C, check local code and supplier guidance). Pre-warm aggregates or mixing water as needed, and keep the pour area enclosed or shielded from wind. Use insulated forms and curing blankets to maintain temperatures during the initial curing period (first 48–72 hours).
- Weather window discipline: reserve a continuous pour window (e.g., 2–4 hours) to minimize stopping and starting, which can affect slump and surface finish. Have a contingency plan for delays (forms ready, reinforcement in place, and finishing crew staged).
Hot Weather Pouring: Retarders and Cooling Tips
High temperatures speed up set time and increase cracking risk. Book earlier deliveries and pour in the coolest part of the day. Ask the ready-mix plant to lower concrete temperature and bring the load sooner rather than later.
Cool aggregates, shade the stockpiles and use chilled mixing water or ice to drop mix temperature. Use retarding admixtures when you need extra working time, but confirm dosage with the supplier — too much retarder can hurt finishing.
Keep material shaded on-site, mist forms and subgrade lightly to reduce suction, and rotate crew breaks to manage heat stress. Small changes in temp and timing often prevent big problems.
Cold Weather Pouring: Heaters, Blankets and Accelerators
Cold slows strength gain and risks freeze damage. Track both air and ground temps and avoid pours below your project minimum without protection. Coordinate with the supplier for warm deliveries and consider pre-warming aggregates or mixing water.
Use insulated forms, heated enclosures or thick curing blankets to keep concrete above critical temps during the first 48–72 hours. If space allows, tent and heater systems work well for slabs and footings.
When early strength is needed, use accelerating admixtures or higher cement content as specified. Always extend your curing window — cold cures slower — and keep monitoring temperature until the concrete reaches safe strength.
Rain and Wind Mitigation on Pour Day
Rain and wind can ruin a finish and wash cement from the surface. Check forecasts and set a contingency window. If light rain is possible, cover the subgrade and forms before trucks arrive and protect delivered material.
Use quick-deploy tarps, temporary canopies, and windbreaks to shield the pour area. Place catchment to control runoff and avoid pooling on the slab. Postpone finishing if steady rain hits — finishing wet concrete causes dusting and weak surfaces.
After rain, verify slump and surface moisture before placing. Communicate delays to the crew and supplier early; a short hold is better than repairing a ruined slab.
Concrete Pumping vs Truck Chute vs Wheelbarrow
Concrete pumping, truck chutes, and wheelbarrows are three common ways to place concrete, each with distinct reach, equipment needs, and suitability for small versus large pours, including how material flows and what gets compacted. Pumps and chutes involve rental or operator fees and faster delivery, but require lead time and setup, while wheelbarrows rely on manual labor with lower upfront costs but slower progress and more site disruption. Pumps minimize on-site labor but can cause vibration, segregation risks, and rebar considerations, whereas wheelbarrows may damage forms through wheel tracking and require careful finishing to avoid cold joints.
Planning when to pre-book with the supplier depends on access, overhead lines, and terrain, as downtime or limited truck access can stall pours. For smaller projects, a chute or wheelbarrow may be cost-effective but slower, while larger pours benefit from a pump’s reach and speed, provided you arrange the crew, permits, and safety measures in advance. Understanding these trade-offs helps you align concrete placement with your schedule, protect finishes, and avoid surprises by mapping logistics, safety, and surface requirements before any concrete arrives.
When to Book a Pump in Advance
Book a pump ahead when the truck can’t reach the pour location or when you need a fast, continuous placement—large slabs, multi-level decks, deep footings, or long-distance runs. If your site has narrow access, steep driveways, or you plan to pump over fences or barriers, arrange the pump early.
Lead times vary: commercial yards and busy suppliers often need 3–7 days’ notice for a boom pump, and longer in spring/summer. Line pumps may be easier to secure but still benefit from 48–72 hours’ notice. Confirm concrete arrival time and pump window with your supplier so the crew and truck are synchronized.
Also plan for contingencies: if site access could change (weather, permits, neighboring works), reserve a backup option—extra pump time or a chute option—so you’re not held up when the truck arrives.
Setup and Safety for Boom/Line Pumps
Position the pump on stable, level ground with outriggers fully deployed and pads under each foot. Keep the pump clear of overhead lines and maintain required distance from edges and trenches. If space is tight, prefer a line pump where you can run hoses manually.
Protect hoses and boom lines from contact with sharp edges and rebar; use timber, rubber mats, or hose ramps to prevent kinks and abrasion. Secure hose joints and keep the line as straight and short as possible to reduce wear and segregation.
Establish clear hand signals and radio/phone contact between the finish crew and the pump operator. Have one person coordinate flow rate and stop/start calls. Never stand under the boom and keep bystanders out of the drop zone during operation.
Final Pre-Pour Checklist (Day Before & Morning Of)
This final pre-pour checklist combines the day-before and morning-of tasks to lock in delivery windows, confirm concrete grade and slump, verify additives and pour rate, and align crane or pump requirements so the pour starts on schedule. It also demands thorough verification of forms, joints, reinforcement, and embedments—making sure rebar is secured, chairs and spacers are in place, formwork is intact with the required release agents, and that access, routing for mixer trucks, and a designated washout and staging area are clearly established, with on-site readiness of vibration tools, screeds, floats, wheelbarrows, and PPE and the crew roles and tickets or inductions confirmed in advance.
Following these checks helps a DIY crew avoid delays, material waste, and safety issues by establishing clear responsibilities, weather contingency planning, and a documented day-of pour communication plan, so everyone knows who coordinates each task and where to find the needed water, curing supplies, and containment for runoff. The result is a smoother workflow from batching to curing, with fewer surprises from delivery timing, access constraints, and site conditions, which translates into improved surface quality, consistent cure, and reduced rework on the project.
Day-Before Tasks
Confirm the ready-mix ETA and delivery window with your supplier. Re-check the concrete grade, slump, additives and any pump or crane needs so there are no surprises at the gate.
Walk the forms and subgrade. Make sure forms are tight, release agent applied, and embedments are set. Verify rebar is tied, chairs in place, and spacers positioned to maintain cover.
Pre-wet the subgrade if required and protect finished surfaces and landscaping near the pour. Assign crew roles, confirm supervisor contact and ensure tickets or inductions are completed. Keep one person in charge of washout location and truck staging.
Morning-Of Quick Walkthrough
Do a final perimeter sweep when trucks arrive. Check form integrity, slump ticket on arrival, and that slope markers and screed guides are visible. Make sure pump lines or chute route are laid out and clear of trip hazards.
Confirm tools and consumables are ready: vibrators, screeds, floats and water for curing. Verify PPE is on and the chain of command is understood. Keep the supplier contact and emergency numbers handy.
Last-minute weather or access changes? Call the supplier immediately and brief the crew. A quick, focused walkthrough saves time and prevents rework.
Pouring, Finishing and Testing Procedures
Pouring, Finishing and Testing Procedures guide you through the placement sequence, formwork readiness, and the access plan (pumping, gravity, or belt line) needed to minimize cold joints and segregation, followed by consolidation, finishing, curing, and testing steps. It emphasizes achieving the right slump, air content, and concrete temperature, ensuring continuous supply to avoid partial pours, and using vibration, rodding, and appropriate timing for corner and detail work. It also covers when to pause for consolidation, how to control finishing timing, and how to place control joints and curing products for durable results.
This matters on a DIY or jobsite scale because proper sequencing and checks prevent surface imperfections, reduce rework, and protect the investment with documented testing and curing. You’ll gain practical, actionable steps for each stage—placement pace, finishing order, and post-pour sampling—so that safety, quality, and record-keeping are built into the process. Following these guidelines helps you predictably meet strengths and finishes while avoiding common issues like bleed water, voids, or thermal cracks, and it provides a clear framework for remediation if measurements fall outside targets.
Proper Placement and Consolidation (Vibrators)
Place concrete close to its final position. Avoid long drops that cause segregation. If you’re using a pump, stagger the head to follow the pour sequence so fresh concrete overlaps previous lifts by at least 300–600 mm to reduce cold joints.
For internal vibrators, insert vertically, withdraw slowly and overlap passes by about half the head diameter. Keep the head submerged; don’t drag it along forms. For surface vibration or screed-mounted vibrators, use short, controlled passes to consolidate without bringing excessive fines to the surface.
Watch for over-vibration — it bleeds water and separates aggregates. If voids appear at corners or around embeds, rod those areas manually and apply a brief local vibration. Pause the pour only if you need time to properly consolidate a troublesome section.
Finishing Stages and Timing
Start finishing in clear stages: strike off (screed) while concrete is plastic, then bull float to close the surface. Delay edging and joint cutting until bleed water has dissipated; too-early work pulls paste and weakens the surface.
Begin power trowelling or hand trowelling after the surface can support weight without ruts — use a light pass first and increase pressure in later passes. For broom or non-slip textures, wait until final set but before full curing.
If the surface skins over, stop aggressive finishing and protect until you can resume. Match timing to jobsite conditions rather than a clock — temperature and mix design change the windows for each operation.
Sampling, Cylinder Tests and QA
Collect test cylinders or compressive-strength specimens from each batch or truck as the pour progresses. Record batch number, time, location on the pour, and the sampler’s name on each sample to keep traceability tidy.
Make samples at the same slump and temperature checks taken in-pour. Cure and store cylinders according to standards (moist room or pond) and label with pour section so any failing test points back to the exact area for remediation.
Keep a punch-list of in-pour checks — slump, temperature, air content — and attach test results to the pour record. Use failing results to trigger follow-up: cores, additional curing, or localized repairs as required.
Immediate Post-Pour Care and Curing
Curing Duration and Methods by Mix Type
Different mixes reach strength at different rates. Normal portland cement mixes generally need a minimum of 7 days of effective curing to reach most design strengths, while high-early mixes can be protected for 3 days. Mixes with fly ash or slag gain strength more slowly and benefit from longer moist curing—aim for at least 10–14 days when possible.
Choose a curing method based on your mix and site conditions. Wet curing (continuous water, wet burlap) keeps moisture in and is best for slow-gaining supplementary cementitious materials. Curing compounds are quick and practical on large slabs; apply within 2–4 hours after finishing and ensure full, even coverage. Insulating blankets help in cold or windy weather by retaining heat and moisture; combine with wet curing where long strength gain is expected.
Record the start time of curing and match the method to your mix spec. If unsure, longer moist curing is safer than cutting corners.
Temporary Traffic and Load Restrictions
Keep traffic off fresh concrete until it has enough strength. Edge forms can usually be stripped in 24–48 hours for light work, but avoid concentrating loads at the edges. For pedestrian access, wait at least 24–48 hours and use protected walkways to prevent scuffs and contamination.
Light equipment can be allowed after several days if early strength tests (cylinders or cores) confirm capacity. Typical rule-of-thumb: allow normal vehicle loads after 7 days for light traffic and 28 days for full design loads unless tests say otherwise. Use barricades and clear signage to enforce limits.
Document the time of pour and test results before any load is applied. If weather or mix slowed strength gain, extend restrictions and re-test before permitting heavy traffic.
Cleanup, Waste Management and Truck Departure
After concrete placement, thoroughly clean chutes, pumps, and hoses using the recommended washout procedures, and capture washwater in a containment system to prevent runoff and environmental exposure. Verify all lines are free of hardened concrete before the next use, establish a defined containment area for surplus concrete, and assess reuse opportunities (such as curbs or footing formwork) or arrange approved off-site disposal per local regulations. Coordinate truck departure by confirming funneling routes, keeping the approach clear, staging equipment away from travel lanes, and agreeing on a precise handoff window with the mixer to ensure a smooth, safe exit.
Implement a concrete washout plan that aligns with environmental rules, addressing spill prevention, sediment control, proper labeling, and ensuring containers remain intact, with trained personnel to monitor waste streams and report any leaks or overflows. Remove obstacles and secure the pour area with barriers, verify drainage paths, and perform a post-delivery site check with clear signage to guide future crews and prevent tripping hazards. Document any incidents or deviations for regulatory audits and site records, helping you avoid fines, maintain compliance, and improve safety and efficiency on the next pour.
Proper Disposal of Wash Water and Hardened Waste
Contain wash water immediately. Use a designated washout container or lined berm so runoff doesn’t reach soil, storm drains, or bodies of water. Keep the container labeled and sited on impervious ground. Pump or decant clear water only when allowed by local rules; solids must be left to settle.
Hardened concrete and slurry should be broken out and disposed of as construction waste or recycled where accepted. Never bury washout or leave it to harden on-site in unapproved locations. If you expect surplus, set up a reusable containment pad before the pour and arrange approved off-site disposal or recycling in advance.
Inspecting Site Before Truck Leaves
Do a final walkaround with the driver before they pull away. Confirm chutes, pumps, and hoses are cleared and secured. Stow loose tools, barriers, and cords away from travel lanes. Check that the approach and exit are free of fresh debris or trip hazards.
Verify signage and barriers are intact and drainage paths are open. Document any spills, equipment damage, or deviations from plan with photos and notes for records and reporting. Hand the truck driver a clear window for departure and keep a spotter available during the exit.
Common Mistakes, Troubleshooting and Corrective Actions
Common mistakes in ready-mixed pours include mis-sized forms, incorrect slab slope, inadequate subgrade prep, and the wrong concrete mix or slump. This section pairs each failure with quick diagnostic checks and immediate and long-term fixes, such as reworking contaminated surfaces, adjusting moisture or additives, partial re-pours versus full redo, and temporary drainage solutions. It also emphasizes practical safety considerations and when to pause the pour to reassess before proceeding.
For a DIY or jobsite reader, the guidance translates to actionable steps you can take on delivery and during the pour—verifying timing, checking slump consistency, spotting air voids, and clearing pump or line blockages—while knowing how to communicate with the supplier for on-site adjustments. The emphasis on preventive strategies—pre-pour site checks, form and reinforcement verification, subgrade compaction and drainage planning, and suitable curing methods—helps minimize repeat issues over time. Use the simple decision tree or checklist to detect problems, choose corrective actions, and recognize when expert help is needed to avoid costly rework.
If the Truck Is Late or Overloaded
First call the plant and confirm ETA and mix batch number. If the truck is late but still within 30–45 minutes, keep forms damp, protect steel and subgrade from drying, and recheck slump on arrival. If the batch has sat longer than that or shows stiffening, refuse the load — do not salvage by adding water on site unless the supplier authorizes adjustments.
If you get a partial delivery or overloaded axle forces a split drop, coordinate immediate sequencing: pour the usable portion where finishing can proceed without interruption, then hold off new pours until the next truck arrives. Ask the supplier for a retarder or adjusted slump for the follow-up load to match consistency.
Key rule: communicate clearly and document times/temps. Safety first — never rush a pour with visibly separated or prematurely set concrete; stop the operation and bring in a fresh, compatible batch.
Fixing Surface Defects and Minor Structural Issues
For honeycombing and voids near the surface, chip out loose material back to sound concrete, wire-brush, clean, then use a bonding agent and a repair mortar or epoxy grout. Small pockets can be filled after initial set but before full cure. For deeper voids or exposed rebar, protect steel from corrosion and plan a structural repair — this may need an engineer.
Plastic shrinkage cracks should be treated immediately by correcting curing: mist, cover with plastic, or apply curing compound to stop further moisture loss. If cracks are hairline and non-structural, monitor during curing; if they widen or appear with deflection, consult a pro.
Don’t cover up inadequate cover or embedded issues with thin skim coats. If cover is insufficient over reinforcement, remove concrete to proper depth and patch per spec or get an engineer’s repair plan. Small cosmetic fixes differ from structural fixes — know when to call for expert assessment.
Cost Guidance, Ordering Strategy and Contract Tips
This section outlines cost guidance, ordering strategy, and contract tips by identifying the core cost drivers—unit price per cubic yard, travel and fuel surcharges, minimum delivery charges, site prep, forms, reinforcement, curing and finishing materials—and turning them into a transparent budgeting framework that includes a baseline estimate, a 5–15% contingency, and what-if scenarios for weather or resin changes. It also emphasizes strategies to avoid over- or under-ordering, such as determining optimal batch sizes, aligning deliveries with pour schedules, and considering staged deliveries to reduce on-site waste, while clarifying cancellation policies and essential supplier terms around change orders and potential penalties.
For DIY and jobsite readers, the practical value lies in knowing how to plan purchases that match actual workflow, track remaining mix on-site, log daily usage, and implement waste-reduction practices that keep material costs in check without slowing progress. Understanding supplier contracts helps you protect your time and budget by outlining payment terms, load-out and back-scheduling rights, insurance, lien waivers, and dispute resolution processes, so you can negotiate clearer terms and respond calmly to changes.
How to Avoid Overstocking or Short Orders
Running out of concrete or ordering too much costs time and money. These are the common mistakes and simple fixes I use on site.
- Use buffer math — add a realistic allowance (typically 5–10%) for waste, over-excavation and spillage so you don’t short the pour.
- Stage deliveries — split large pours into sequenced loads to match how fast you can place and finish. It cuts waste and reduces on-site congestion.
- Match batch sizes — order in whole-yard or batch-friendly increments that your mixer can supply to avoid partial-yard leftovers.
- Communicate tempo — tell the plant your pour rate and any breaks so they can hold or speed mixes. Clear radio or text windows prevent surprises.
- Plan contingency — keep a short-notice plan with the supplier for a small top-up load or a scheduled hold if weather or crew issues arise.
Do the simple math, split deliveries when practical, and keep the supplier in the loop. It saves rework and cost.
Understanding Supplier Cancellation and Retention Fees
Suppliers usually set a cancellation window—common is 24 to 48 hours before the scheduled load. Cancel inside that window and expect a fee or the full invoice for that load. Outside the window most plants waive charges.
Retention fees can apply if you change quantities last minute or refuse a partial delivery. Ask the plant to define notice periods, exact fee amounts, and what triggers a full load charge. Put those numbers in writing.
Negotiate better terms for larger or repeat jobs. Offer flexible start times or commit to a volume minimum in exchange for shorter cancellation windows or lower retention charges. Always get the agreed terms in the contract and confirm them before each pour.
Legal, Permits and Local Compliance Considerations
Legal, permits, and local compliance set the framework you must navigate before any residential or public works delivery. Identify all required permits and licenses, and map which agency handles city or county approvals, utility clearances, and environmental considerations. Outline critical pre-approval steps like plan reviews, site diagrams, drainage and erosion control plans, and any required utility locates to ensure everything is ready before materials arrive.
This matters for a smooth, legally compliant project and helps prevent delays or fines that can stall work. By organizing permit numbers, inspection schedules, contractor registrations, and project diagrams up front, you can align delivery timing with permit windows and weather, reducing last‑minute logistics. Understanding local nuances such as noise limits, setbacks, disposal methods, stormwater controls, and temporary access needs empowers safer, cleaner job sites and clearer communication with inspectors and neighbors.
When an Inspection is Required
Inspections commonly trigger at three clear stages: before concrete is placed to check forms and reinforcement, during placement for compaction and joint layout, and after finishing for proper slopes and curing setup. Know your permit conditions—some jurisdictions also require a subgrade or utility sign‑off before the truck rolls in.
Typically the general contractor or permit holder schedules inspections with the city or county. Call early to book a slot and get a confirmation number. If weather or delivery timing shifts, notify the inspector immediately. Bring permit numbers, plan sheets and the mix ticket to every inspection so there’s no delay.
Public Works & Contract-Specific Rules
Public projects carry extra paperwork: certified payroll, prevailing wage records, approved mix designs, and sometimes mill certificates. Specs may require specific compressive strengths, admixtures, or testing frequencies. Review the contract and the project manual so you don’t assume a residential standard applies.
Check with the awarding agency or project engineer for deviations and submittal rules. Some contracts restrict delivery hours, traffic control methods, and staging areas. Keep copies of contractor registrations and any agency pre-approvals on site, and have a point person responsible for compliance and for handing documents to inspectors on demand.
Visual Checkpoints and Site Diagrams to Reduce Risk
Visual checkpoints identify common concrete pour risks like site access, ground stability, and distance to intake points. Pair these with simple site diagrams that map truck routes, pour area boundaries, pump setups, and laydown zones. Clear diagrams and checkpoints help crews plan layouts and avoid bottlenecks and safety gaps.
Having defined routes, zones, and labeling supports faster setup, reduces damage to equipment, and improves communication on busy jobsites. Diagrams should show scale, labeling, and emergency egress, plus sequencing visuals for crane and hose paths to keep safe distances from formwork and people. A simple on-site quick-check: verify diagrams pre-pour, monitor during setup, and update drivers and crew anytime conditions shift so everyone stays aligned.
Example Diagrams to Sketch Before Delivery
Draw a simple plan for each job type. For a residential driveway sketch the truck approach, a clear swing path, pour boundaries and where the chute or pump will sit. Mark the nearest intake point and a laydown area for tools and forms.
For a mid-size slab show truck parking, pump placement, hose runs and sequencing of pour bays. Include turning radii and any slope notes so the driver can judge clearance. Label the concrete feed point and emergency egress for crew.
On a tight urban site map narrow access, overhead restrictions and pedestrian zones. Show alternate routes for delivery and a tight pump hose plan with anchor points. Keep sketches readable—use scale blocks and big labels so drivers and crew read them at a glance.
What an Inspector or Supplier Will Look For
Inspectors and suppliers scan for obvious risks. They check safe truck access, firm ground, and clear turning radii. If the entry is soft, steep, or blocked, they may refuse to enter to avoid getting stuck or damaging the truck.
They’ll look for correct formwork, exposed rebar spacing, and unobstructed pump placement. Standing water, poor drainage, missing safety barriers or unsafe egress are common reasons for holds. Labelled diagrams and clear on-site verification reduce these issues.
Also expect scrutiny of site housekeeping—materials stacked in the truck path, poor lighting or unsecured hose runs can trigger a stop. Verify your diagram has these elements and name who signs off before the truck arrives. One named verifier on site speeds approval.
Post-Pour Maintenance and When to Call a Pro
Post-pour maintenance integrates a clear sealing schedule, thorough surface cleaning, curing monitoring, and proactive defect inspection to preserve long-term performance of concrete after it sets. It explains when to apply sealers based on curing times, how different sealants interact with ready-mix concrete, and which products best resist moisture, chemicals, and wear without trapping moisture or causing unwanted color changes. It also guides you to routinely check for scaling, crazing, pop-outs, color variations, and texture inconsistencies that could reveal curing issues or finishing mistakes before they become costly problems.
Because timing matters, the section also covers cleaning strategies that keep the surface free of curing compounds and residues, methods to remove excess water without smearing the finish, and how to monitor ambient conditions such as temperature and humidity to prevent staining or premature drying that compromises durability. It outlines saw cutting, control joint placement, and finishing steps after pour, including safe timing to avoid cutting into fresh concrete and how to align joints with structural and expansion requirements to minimize cracking. Finally, it explains when to call a pro or engineer—significant cracks wider than 1/4 inch, sudden movement, persistent water intrusion, subgrade concerns, or complex drainage issues—that exceed typical DIY capabilities.
When to Seal and Protect Concrete
Wait for the concrete to reach initial cure before sealing. For typical ready-mix slabs that means 28 days for full cure, but you can apply many topical sealers after 7–14 days if moisture tests (plastic sheet or moisture meter) show surface moisture below manufacturer limits. Cold or wet weather delays this timeline; hot, windy conditions speed it up and can trap moisture under a sealer if you go too soon.
Pick the sealer to match exposure: penetrating silanes/siloxanes for freeze-thaw and moisture protection, acrylics or urethanes for wear and stain resistance on driveways and patios. Apply per label and avoid heavy film-formers on surfaces that still outgas or breathe. Test a small area for appearance and adhesion, especially with colored or stamped concrete.
Reapply on a schedule based on traffic and product life—typically every 2–5 years for penetrating sealers and 1–3 years for surface films. Keep gutters, salts and petroleum off sealed areas to extend life.
Troubleshooting Long-Term Issues
Monitor the slab for changes after curing: widening cracks, stepped cracks, settling near edges, spalling or recurring damp spots. Small shrinkage hairlines are common and often cosmetic. But look for patterns: cracks that widen beyond 1/4 inch, differential settlement, or hollowness under the slab are red flags.
For minor surface spalling or small cracks, clean, fill with appropriate epoxy or cementitious patch, and reseal. Deeper issues—exposed or corroded reinforcement, persistent water intrusion, or voids under concrete—need professional evaluation. A structural engineer or experienced contractor should assess load transfer, subgrade failure, or drainage that impacts the slab.
When in doubt, document the problem with photos and dates, limit use of the area, and call a pro. Early assessment can save money compared with full slab replacement later.
Ready-Mix Delivery Day Communication Template
The Ready-Mix Delivery Day Communication Template captures the essential details you need to confirm with the supplier, driver, and site crew before the pour. It centers on the order number, supplier and driver contact details, concrete mix type and tonnage, an estimated delivery window, and the required on-site staging such as entrance, gate, and unloading area, plus a ready-made script toggle for live use. It also outlines the core roles and responsibilities so everyone knows who speaks to whom and what to verify at handoff.
Useful context follows the delivery-day flow: who communicates changes, who handles delays with the crew, and the escalation steps if issues arise, along with clear on-site access and safety prerequisites like vehicle routes, parking limits, wheel stops, cone placement, and a designated person signaling the driver during offloading. The template also specifies documentation and sign-off items, including purchase orders, master delivery tickets, slump/mresh requirements, and a concise job-site map and check-off form for driver and crew. With fill-in fields for time stamps, weather notes, and deviations, the ready-to-use template covers supplier, driver, and site crew and includes a short script for confirming details verbally or via SMS/email.
Safety and escalation note: Use these concrete decision points to determine whether to proceed with a DIY pour, pause for a safety review, or call in a professional. If any item below triggers a pro involvement, pause the pour and consult a licensed contractor, site safety supervisor, or engineer as appropriate.
- On-Site Safety and PPE If the site has uneven ground, poor lighting, restricted access, overhead hazards, limited space for maneuvering equipment, or potential trip/fall hazards near the unloading zone, escalate to a site safety professional before proceeding. Ensure PPE is appropriate for all workers (hard hats, safety glasses, gloves, high-visibility vests, safety boots with steel toes) and that a dedicated spotter or signal person is in place.
- Site Access and Logistics If you cannot secure a clear, level unloading area with proper wheel stops, chocks, and a stable grade, or if the route from truck to pour site requires tight turns or restricted access, involve a pro to assess load placement, staging, and conduit/pump placement.
- Weather and Timing If forecasted weather includes heavy rain, high winds, freezing temps, or rapidly changing conditions that could affect slump, set-up, or truck stability, pause and consult the supplier or a qualified contractor about safety and timing adjustments.
- Structural or Subgrade Concerns If the premises involve untested subgrades, elevated slabs, or loads near existing structures or utilities, bring in a professional to review compaction, formwork, and load distribution requirements.
- Permits and Inspections If permits, inspections, or site-specific restrictions could pause the pour, contact the appropriate authority or a pro to confirm compliance and scheduling.
Key Info to Communicate to Your Supplier
Tell the supplier the exact job address and the preferred gate or entrance. Note any height or weight restrictions, guardhouse procedures, parking limits, and tight turns. If the pour location is off the main access, describe the route and staging area clearly.
Give the concrete mix spec and total quantity, plus the required slump or mesh notes. Include the purchase order or order number and the forecasted pour time window. Name the on-site contact with a mobile number and a backup contact in case the primary can’t answer.
Confirm the contingency plan: where trucks wait if delayed, who signs off on changes, and the threshold for adding toppings or extra mix. Mention weather concerns and any permit or inspector hold that could pause delivery.
On-Arrival Communication with Driver
Greet the driver and verify the master delivery ticket before unloading. Read aloud the order number, mix type and batch, and the total cubic meters/tonnage. Check the truck’s temperature and any visible damage.
Walk the driver to the exact unloading point and confirm where chutes, pumps, or wheel stops will go. Give a clear signal person and confirm who will direct the truck during offloading. If using a pump, confirm hose placement and pump operator details.
Sign acceptance only after the ticket matches the verbal check and the on-site contact inspects slump or mesh values. Note arrival and start times, then text or email a brief confirmation to the supplier and crew with any deviations or weather notes.
Quick Reference Tools & Checklists
This section highlights a compact, on-site quick-reference kit that keeps essential tools and PPE within reach and provides printable checklists for tools, pre-pour, safety, and ordering to speed on-site decisions. It outlines the core items to keep on-site—measurement devices, level and straightedge, mixer/hopper controls, PPE, and a simple materials map. Ready-made printable checklists support fast reference during critical moments on the job.
For a DIY or small crew, having a clear readiness flow reduces guesswork around deliveries, batching, routing, and access, while highlighting safety controls and documentation to stay compliant and minimize delays. A simple site layout, contact sheet, pour log, and quick-reference signs help prevent missteps during delivery day and pour operations.
Tools & Materials Checklist
Keep a compact, weatherproof kit on-site so the crew can act fast. Include spares for consumables and one-pocket check items for the driver and crew leader.
- Personal PPE Hard hats, gloves, eye protection and high-vis vests. Replace torn items; keep spares for visitors. Store in a dry box near the pour boundary.
- Measuring tools Tape measure, long rule, laser level. Verify calibration and battery charge. Keep a spare tape and extra batteries.
- Screed & straightedge Aluminum straightedge and bull float. Match length to pour width. Rent extra long screeds if needed (~$25–$60/day).
- Vibrators & hoses Internal vibrator and spare shaft/heads. Prevent honeycombing and settle concrete. Bring backup or rent pump (~$200–$500/day) if consolidation is critical.
- Forms & stakes Form panels, stakes, and sight rails. Confirm height and camber before pour. Have extra stakes and a small framing hammer ready.
- Mix controls & thermometers Concrete temperature gauge and slump cone. Confirm mix temp and slump on arrival. Keep the supplier contact and expected spec handy.
- Consumables & cleanup Burlap, curing compound, buckets, rags and trash bags. Stock extra trowel blades and tie wire. Small expense but saves hours.
Pre-Pour & Safety Checklists
Day-before: confirm forms, elevations, and subgrade compaction. Check anchor bolts, control-joint layout, and pour boundaries. Verify delivery window with supplier, pump/crane booking and weather forecast.
Morning-of: confirm mixer arrival time, concrete temperature target and batch numbers. Walk the truck route, clear staging area, set signage and flag traffic points. Ensure on-site first-aid, emergency contacts and a charged phone for the driver.
Use one-line prints taped in the site trailer and driver window for quick confirmation. Keep a pocket checklist for the crew lead to initial as tasks are completed.

Conclusion
Get this right and your concrete job pays you back with safety, durability and a good look that lasts. The core is strong site prep, solid planning, and strict adherence to the plan you’ve built with your crew and the ready-mix supplier.
Now, close out with a final, practical check-in: verify site access and clearance, confirm forms and subgrade readiness, double‑check calculated concrete quantity and the selected mix, inspect embeds and utilities so nothing gets struck or mislocated, confirm equipment and crew roles for the pour, set the pour window and weather window, review the delivery timing and pump vs chute vs wheelbarrow option, lock in the finishing and curing plan, ensure PPE and barriers are in place, and recheck waste containment and cleanup arrangements before any truck wheels touch the site.
Common mistakes to avoid are rushing the final checks, ignoring subgrade drainage, and skipping a clear communication plan with the driver. Keep safety rules simple: never pour on unstable or uneven ground, always keep a clear zone for vehicles and people, and do a quick test section first to catch issues before they become costly fixes. If you’re unsure about utilities, subgrade integrity, or local permits, pause and call in a pro rather than risk a failed pour or a costly rework.
If the situation calls for it, a professional should handle complex formwork, deep embeds, or intricate drainage and zoning requirements, and you’ll know it when you run into oversized projects or tight access. Stay focused on the basics, keep the plan visible on site, and move forward with confidence—you’ve got this, and the concrete will reward your careful preparation.
FAQ
What should I check before the concrete truck arrives?
Clear the path from the mixer to where you’ll pour. Have a solid, level frame and a clean, dry area for the wheelbarrow. Don’t wait for the last minute to prep.
Do I need to prep the forms and ground first?
Yes. Set sturdy forms and compact the ground so it won’t shift. Loose soil or soft ground will crack your slab fast.
How much space do I need for the pour?
Leave room for the truck to back in and swing the boom. Keep at least 10 feet of clearance and a clear path for chute placement. No parked cars blocking the way.
What are common mistakes during a ready-mixed pour?
Pouring too fast, not using a vibrator, and failing to screed and finish properly. These things lead to air pockets, weak spots, and rough surfaces.