
Introduction
You can tell if your base is tight enough without a lab test by using simple on-site checks and observable indicators.
This article explains practical signs, how to perform quick field checks, and the kinds of results that indicate adequate compaction so you can proceed with confidence.
Key takeaways
- Field checks gauge compaction level when lab tests are unavailable on site.
- Visual and tactile cues indicate firm base without excessive roughness or voids.
- Plate, dynamic cone, and rod probing provide quick, repeatable field assessments.
- Maintain uniform moisture within optimal range to prevent over or under compaction.
- Follow layering recommendations and lift thickness to minimize consolidation and cracking.
- Document visual checkpoints, contract notes, and test results for traceability.
Table of Contents
- Introduction
- Key takeaways
- Why field checks matter and when to use them
- Visual and tactile indicators of a well-compacted base
- Simple DIY tests: plate, dynamic cone, and rod probing
- Moisture control: the most common hidden variable
- Layering and lift thickness best practices
- Visual checkpoints and documentation for contractors and DIYers
- Tools and materials checklist for field compaction checks
- Common mistakes, troubleshooting, and quick fixes
- Conclusion
- FAQ
Why field checks matter and when to use them
Field checks matter because quick tests on site can save time and money when the job is simple. Lab tests aren’t always necessary for small projects or obvious conditions. Use field checks to spot obvious issues, but know their limits.
For DIY homeowners, field checks help you move fast but stay safe. They show when you can proceed, when to pause, or when to call in a pro for formal testing. If the risk is high or results are unclear, escalate sooner rather than later.
Risk assessment and acceptable tolerances
When you do a field check, it’s all about spotting issues before they can turn into real problems. With compaction tolerance, what’s okay for one part of your project might not be good enough for another. If you’re working on a driveway, minor bumps and dips may not cause major trouble—just keep an eye on how it holds up to wear over time. But if you’re dealing with a structural slab, even the slightest under-compaction can lead to significant issues down the road. Don’t risk foundation cracks or uneven flooring by cutting corners now.
The key is understanding what’s at stake with each part of your project. Always remember why those field checks are crucial. You’ve already learned that regular inspections save you from costly repairs later on. For a driveway, an acceptable tolerance for compaction might be somewhat loose—the surface needs to be stable enough without being perfect stone. With structural elements like slabs and footings though, zero tolerance means you must have each layer rock solid before moving forward.
To wrap up, never skip the risk assessment phase after your field checks. It’s where you decide if what you see is acceptable for the job at hand. If there’s any doubt about the base compaction or how well a surface will hold up over time, don’t settle. Get it right from day one and avoid headaches down the line.
When to call for lab testing or an engineer
If you encounter poor soils, it’s time to bring in the experts. Don’t guess; call a soil engineer. They’ll recommend proper groundwork and might suggest using special additives to improve ground stability.
For critical structures like foundations, if field checks show signs of instability or subsidence, step back and call for formal density tests. These rigorous tests are crucial for ensuring the longevity of your project. If your initial compaction testing shows issues, don’t ignore it—formal analysis can confirm whether you need to reinforce grounds or adjust your design.
Failing field checks on any part of a critical structure should trigger immediate lab tests and engineering oversight. Don’t cut corners; safety and structural integrity are non-negotiable requirements in construction. When in doubt, ask for help from professionals who specialize in ensuring that every detail is correct before moving forward with your build.

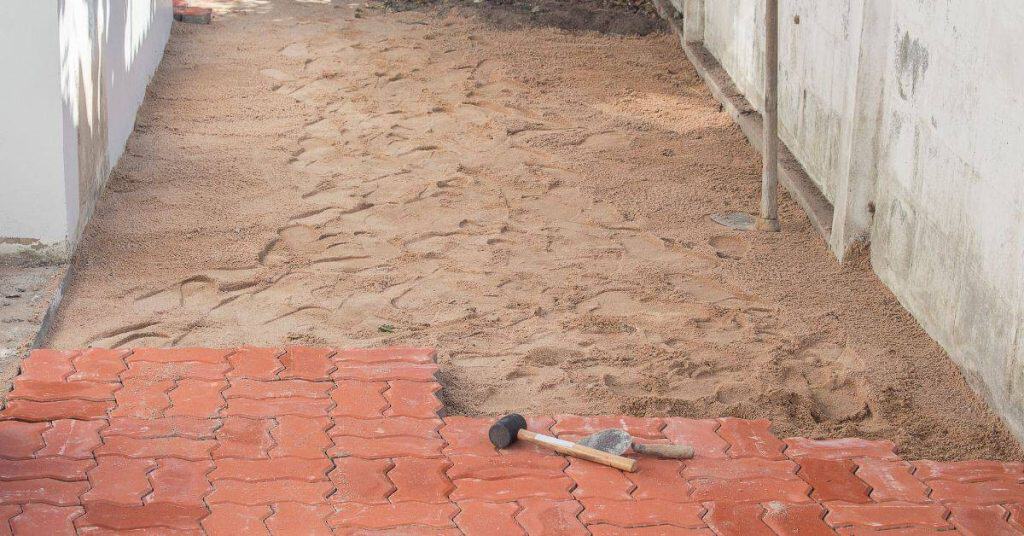
Visual and tactile indicators of a well-compacted base
Look for a uniform texture and no visible voids in the base. The aggregate should be well-mated and sit solid underfoot or with a tool. Confidence levels: uniform texture—High; no voids—High; well-mated aggregate—Medium; firm underfoot—High; solid tool test—Medium.
Why it matters: these signs mean you have a stable base for the surface you’re installing, which reduces settling and edge breaks. If you see irregular texture, gaps, or a soft feel, fix it now before you pour or lay.
Surface appearance checklist
This quick visual check should be performed right after completing each lift of material to ensure that your base is properly compacted and ready for the next layer.
- No ruts present: Check the surface underfoot. Look for any tire marks or depressions created by rollers. If you find ruts, it means the area needs more compaction before moving on.
Rewind warning: Ignoring this can lead to uneven settlement over time. - Consistent surface gradation: Inspect the lift for a uniform distribution of aggregate sizes. Larger stones should be evenly spaced with smaller fill material to provide stability.
- No water pooling: Observe how water sits on your compacted base after light rain or watering test. Water should spread evenly and not collect in low spots.
- Smooth finish: Check for any bumps, ridges, or uneven patches that stand out visually against the surrounding area.
- Clean edges: Verify that edges are cleanly defined with no loose material that could erode. Smooth and regular lines indicate proper compaction at the perimeters.
- Uniform surface color: Look for any dark patches or other discoloration which might suggest wet spots or overly moist areas.
- No excessive dust: Rollers can easily produce a fine layer of dust if too much material wasn’t added, making your base dry and prone to cracking. Make sure the lift is adequately saturated.
- Sufficient thickness: Confirm that each compacted lift reaches its planned thickness as specified in your specs. This avoids problems with insufficient support for future structures.
Quick rule: If it looks right and doesn’t puddle water, you’re likely good to go to the next phase.
Hand and foot tests for consistency
To quickly check if your base is well-compacted, try a few hand and foot tests. Start by walking over the surface with moderate steps and notice if there’s any sinking or springiness. This indicates that you haven’t reached optimal compaction yet.
Next, use your hands to dig into the material just an inch or two and stomp down hard nearby. The ground should resist firmly without cracking. If it cracks easily, you know more stomping is needed in those areas.
Finally, for a knife edge test, slide a straight metal rod across the surface at a shallow angle. Look for grooves or depressions as an indicator of uneven compaction. A good base will show almost no marks from the blade.
Simple DIY tests: plate, dynamic cone, and rod probing
These simple tests let you gauge soil compaction with rental or inexpensive gear. A plate, a dynamic cone, and a rod probe reveal how packed the ground is and where you need to work. They show relative compaction, not precise numbers.
Use them to spot weak spots before laying a slab or filling a trench. Calibrate by testing known good soil and note that results can mislead in rocky or clayey soils. Always follow manufacturer tips, keep gear clean, and don’t rely on a single test.
Plate/thumper test (percussion and plate feel)
To check if your base layer is firm enough, grab a hand tamper or rent a plate compactor. Hit the ground and see how much it bounces back. If the tool thuds deeply, soil’s still loose; aim for that satisfying clunk bounce-back.
Feel under your feet with every strike. Ground should get steadily harder, not mushier. Look out: if compaction goes south too fast or too slow mid-test, you have issues that need fixing.
This test works well for shallow lifts and is a quick check alongside your plate loading device buddy. Remember, aim for solid but don’t overdo it—perfect results vary by soil type and layer depth.
Rod probing and penetrometer alternatives
If you’ve tried the plate or dynamic cone tests but are still unsure about your site’s soil quality, consider rod probing. This method is quicker than digging trenches for manual inspection, plus it helps pinpoint weak areas that could cause problems later on.
For DIYers, a simple penetrometer offers another cost-effective option. It measures the resistance of the ground when you push it down, giving you an estimate of soil density and strength. Before testing with a penetrometer, check base compaction by eye; loose soil will give misleading readings.
Rod probing should be done systematically across your site, ideally in a grid pattern at set intervals—like 20 to 30 feet apart—to get a balanced view of the whole area. Remember, skip soft patches or wet ground; testing these won’t give you accurate data for firm footing.
Visualizing relative bearing with a dynamic cone concept
To simulate a simple dynamic cone test, find a sturdy rod about 1 meter long and attach a weighted cone at the bottom. The cone should weigh around 5 to 6 kilograms for soil tests. This setup mimics the equipment used in professional testing.
Insert your improvised tool into different points of the ground and pay attention to how deep it penetrates. Deeper penetration suggests softer, less compacted layers; resistance means better bearing capacity. Aim to test uniformly across your site, especially around areas where you’re planning to build foundations or support structures.
Remember to check base compaction by repeating tests in the same spot multiple times before and after any ground improvement efforts. This helps verify if your work is effective at strengthening the soil. Always compare results from various locations, as consistency across the entire area is crucial for a stable structural foundation.
Moisture control: the most common hidden variable
Moisture content is the hidden variable that decides how tightly you can pack soil or concrete mix. Too dry, it won’t compact; too wet, it stays mushy. You can judge by feel and sight—no lab needed.
Check by hand: grab a handful and squeeze. It should hold shape but crumble a little when pressed. If it stays too soupy, let it dry or use less water next mix; if it stays stiff and dusty, add a touch of water.
How to judge “optimum” moisture by feel
To gauge if your soil is at the right moisture for compaction, start with a handful of dirt. For cohesive soils, give it a firm squeeze test. The soil should hold its shape when you open your hand but crumble slightly under light pressure from your fingers—no squeezing into a rigid ball or crumbling to dust.
With sandy mixes, the goal is not as sticky but more like damp sandcastles. Gently squeeze the dirt and see if it holds together well enough for minor shaping without falling apart. If it’s too dry, add water in small amounts and mix thoroughly before retesting. Get this right, and you’ll check base compaction that sticks.
Misjudging moisture levels can mean weak foundations. Skip the guesswork by checking soil type and consulting site conditions or local weather history for guidance on expected optimal moisture levels. A little upfront know-how saves major headaches down the road when you’re dealing with a wobbly house due to poor compaction.
Fixing too wet or too dry base on site
When your soil is off balance—too moist or too dry—it’s crucial to address it right away. If the base is too wet, delay work until it dries enough for proper compaction and stability. In a pinch, you can aerate by raking and letting the sun help bake out excess moisture.
To fix overly dry soil, start by light watering to reintroduce some needed dampness without saturating it. After that, blend in water gradually while checking base compaction to avoid overworking the mix. Aim for consistency throughout your site before proceeding with construction.

Layering and lift thickness best practices
Lift thickness is the distance you pack with each pass. If it’s too thick, you’ll never get tight compaction and you’ll waste effort. Use the recommended lift depths for your equipment and material so you get solid, uniform results.
Common rules: plate compactors work best with 2-4 inch lifts on base gravel; asphalt lifts are usually 1-2 inches; sand or bedding lifts stay around 1-2 inches. If the roller bogs, you see ridges or hollow sounds, the lift is too thick. Too-thick lifts waste effort and invite voids and cracks, so keep it in the target range.
Matching lift thickness to compactor power
You got your plate, tandem, and rammer compactors picked out? Great. Now you need to know their limits for laying down material layers—what we call ‘lifts’. A common mistake is piling too much on at once and figuring you can whack it into place later with the compactor. Don’t do that.
A small plate compactor? Forget about lifts over 6 inches (15 cm). They’ll struggle, and your back will suffer. Tandems? You’re in for better results up to a foot (30 cm) as long as you’ve got the right weight behind them—lighter materials need lighter duty machines.
Rammers can handle thicker lifts—around 12 to 18 inches (30 to 45 cm)—but only if you have the brute force version. And always check base compaction before adding new layers, no exceptions. If a layer’s not down right in the first pass, it won’t get better with more passes; take out that chunk and start over.
How to detect poorly compressed deeper layers
Surface tests won’t tell you everything. After compaction, grab a probe, set it deep enough—aim for 12 inches or more—to test base integrity without disturbing the top layer. If your probe sinks in soft spots or meets resistance unevenly, there’s trouble underneath.
Localized re-compaction is key to fixing these deeper issues. Use your compactor to pound out any soft areas found during probing until they match surrounding solid ground. Remember, quick fixes now save headaches later when the road gets traffic or foundations settle wrong.
Always check base compaction by digging test holes randomly across your site after each lifting process. It’s a bit laborious but crucial to avoiding weak points that weaken over time and create hidden sinks and cracks. This diligence ensures solid construction from the ground up.
Visual checkpoints and documentation for contractors and DIYers
This section explains a simple photo and note workflow for field checks. Use clear images and short notes to support quality control and future troubleshooting. Capture the key moments: what to photograph and what details to write down.
It matters because good visuals and notes keep you honest and speedy on the job. You’ll know what changed, why, and when to act, even months later. Capture date, site, measurements, material specs, faulty work, and clear before/after shots.
Key photos to take and why
Pre-compaction shots: Get before pictures of your base material. This shows the starting point, how much work there was to do, and helps if you need to redo any areas due to base issues.
Lift-by-lift photography is essential. Snap a photo after each layer compacts down. These images serve as a guide for even lifts and help spot inconsistencies or low-lying spots that might cause problems later on.
Document problem spots immediately, no matter how small they seem. A tiny imperfection now could be the start of major issues if left unattended. Take close-ups to see details clearly. This habit builds a reliable record for future reference and prevents finger-pointing down the line.
Simple field log template
A simple field log can be your best friend on the job site. It tracks important data for future reference and helps avoid common oversights. Start with the basics:
Note down the time of day, because it impacts how materials set or cure. Include weather details like temperature, wind, and moisture levels. These will affect your work progress.
Log equipment used and the number and type of passes made. Don’t forget to check base compaction before and after working—this is critical for structural integrity.
Tools and materials checklist for field compaction checks
Keep it practical with affordable tools: a shovel, a rake, a straightedge or level, a tape measure, and a hand tamper.
Add a rubber mallet and a soil probe or rod to feel density and identify soft spots, plus rental options for a dirt-sieve or lightweight density gauge if you want a check more formal.
Don’t skip PPE—hard hat, safety glasses, gloves, steel-toe boots, and hearing protection when you’re pounding and digging.
These tools give you fast feedback on where the soil needs more compaction and when it’s ready for the next lift.
Doing it right saves money, prevents settlement, and keeps a jobsite safe for the long haul.
Rent a density gauge or lightweight penetrometer if you want a formal read, but keep the inspections simple and consistent.
Must-have basic tools
You need a few essential tools to make sure your soil is properly compacted before laying down a slab or pavement. First, get yourself a hand tamper. It’s handy for testing if the top layer of soil holds its shape after compaction. Also, grab a steel probe rod; you’ll use it to measure how deep your base material is and see if you hit any soft spots.
A moisture judge tool or simply squeezing the dirt in your hand will tell you if the ground has the right amount of water for compaction. Too wet, too dry, and the compactor won’t do its job properly. Oh, and don’t forget a camera. Documenting your work ensures accuracy later on when double-checking numbers or sharing data with others. Lastly, always have a shovel around to adjust material levels as needed.
Optional Rentals for Better Assurance
Renting additional equipment can give you better peace of mind when checking base compaction. A plate compactor, while not always necessary, might be worth the cost if you plan to handle a large volume of work. For instance, on big projects where traffic loads will compress your soil, using this tool ahead of time ensures your subbase won’t cave under pressure later.
If you’re concerned about achieving optimal density or want professional confirmation that your compaction meets standards, consider bringing in a light roller. This equipment is especially handy when dealing with cohesive soils. Alternatively, hire a technical service to use their nuclear gauge or other high-tech devices for the most accurate readings.
Renting these extras pays off if you’re working on an important project and aim to remove any doubt about your base quality. However, avoid overspending on equipment unless the job truly warrants it—you might find basic tools sufficient for many DIY needs.
Common mistakes, troubleshooting, and quick fixes
Common mistakes ruin compaction fast: you can overlook moisture, lay lifts too thick, or skip proper passes. Fix these on the spot with a quick plan: test moisture, split lifts, and run enough passes to reach the right density. If you spot a problem early, you can salvage the job without backing up the whole deck.
Moisture control matters, and ignoring it costs you density down the line. Thick lifts trap air and slow curing, while too few passes leave soft spots you can see and feel. Keep lifts thin, dry the surface as needed, and run steady passes to finish strong and save yourself a comeback.
Fixes for soft spots after paving or finishing
If you spot weak areas in your newly paved surface, don’t shrug it off. First, check base compaction; if the ground isn’t tight enough, it will cause trouble down the road. You’ll likely need one of three fixes: localized milling to even out dips and re-paving, removal and rework for deep problem spots, or adding stabilizers like lime or asphalt emulsions to strengthen weak patches.
Localized milling is fast but can expose more issues if not done right. Spot removal requires patience and exact work but gives the best results when it’s a major blemish. Adding stabilizers might save cash and time for smaller soft spots but be cautious—bad application leads to bigger problems over months.
No matter your choice, always patch consistently across affected areas or hire a pro if you’re unsure. Ignoring these steps can mean big headaches and costly redo jobs later on.
Preventing rework: pre-check routines
Before you lay your final surface, whether it’s concrete, asphalt, or gravel, give the base a quick once-over. Check base compaction to make sure everything is snug and solid. Soft spots now mean major headaches later.
Sweep away any debris on top of your prepared ground. It just takes a moment but can save you from big problems down the line due to loose material beneath your new surface. Ensure you have all necessary tools at hand—compactors, levels, and measurement tapes—but more importantly, know how and when to use them.
One quick tip: If you’re not sure if your base is ready, don’t hesitate—ask someone who’s done it before or consult an expert for a second opinion. It’s much easier (and cheaper) to fix issues now than after the final surface layer is down.

Conclusion
Keep it safe, keep it solid, and verify as you go. When you understand what a tight base looks and feels like, you reduce the risk of settling, cracks, and expensive repairs down the line.
To move forward, perform a quick, practical check in this order: inspect the surface texture and color for uniformity, probe for firmness with a rod in a few representative spots, reassess moisture relative to the mix and the lift you applied, and document your observations and any adjustments you made. Use the plate, dynamic cone, or rod tests only after you’ve scanned for evenness, then confirm you’re within expected tolerances before moving to the next lift. Keep your tools ready, and record lift thickness, moisture targets, and any visual cues in one tidy sheet for everyone on site.
Avoid these common missteps: guessing based on look alone, skipping moisture checks, and rushing lifts without enough compaction time or proper tool use. Don’t work in wet or frozen conditions, and never try to press a base beyond what your last pass can safely handle. Always PPE up, keep a clear work area, and verify with a small trial area first before scaling up.
If you’re halfway through and something doesn’t feel right—unexpected softness, inconsistent tone, or water pooling—step back and call in a pro. A quick expert check can save you from costly rework later. Stay intentional, document what you do, and you’ll build a base that lasts and looks good long after the project is done.
FAQ
How can I tell if the base is compact without a lab test?
Push on the soil. If it feels solid and doesn’t move under pressure, you’re close. Look for a firm, even surface with no soft spots.
What should I do to prep before checking compaction?
Remove loose material. Smooth the surface with a rake and lightly moisten dry soil if it’s dusty and hard. Don’t soak it; you want damp, not muddy.
What tools do I need for a proper check?
A hand tamper or plate compactor, a straight edge, a level, and a tape measure. You’ll also want a shovel to trim edges and a bucket to keep samples small.
What signs mean I did a bad job or what mistakes to avoid?
Don’t rely on water or guesswork to hide soft spots. Don’t overwork already compacted zones. Avoid testing on uneven layers or near voids.