
Introduction
The timeline of building DIY concrete footings for pergolas is crucial to ensure a sturdy, long-lasting structure. Understanding the duration of each step helps you plan your project efficiently.
From digging to pouring and curing, let’s break down the process into a clear timeline so you can complete your footings in the right amount of time.
For the full guide, see DIY Concrete Footings for Pergolas: Sizing Basics, Rebar Cages, and Inspection Prep.
Step-by-Step Timeline for DIY Concrete Footings
The entire process of building concrete footings for pergolas can take around 7 to 10 days, depending on weather conditions and your availability. Here’s a step-by-step timeline:
- Day 1-2: Planning and Permits – Confirm permits, setback rules, and gather materials.
- Day 3: Site Preparation and Soil Assessment – Clear the site, assess soil conditions, and mark footing locations.
- Day 4: Excavation – Dig out footings using a shovel or mini-excavator (2-4 hours per footing).
- Day 5: Form Setup – Build and secure forms, ensuring they’re level and square.
- Day 6: Rebar Cage Installation – Fabricate and place rebar cages, maintaining proper overlap and cover (1-2 hours per footing).
- Day 7: Concrete Pour – Mix and pour concrete into forms, ensuring a smooth surface and avoiding cold joints (2-4 hours per footing).
- Day 8-10: Curing and Inspection Prep – Keep footings moist and monitor curing progress. Prepare for inspection by setting anchor bolts accurately.
Key takeaways
The timeline of building DIY concrete footings for pergolas is crucial to ensure a sturdy, long-lasting structure. Understanding the duration of each step helps you plan your project efficiently.
- Confirm permits and setback rules before staking any footings and forms.
- Size footing to loads, soil bearing, and pergola post spacing per plan.
- Check frost depth and local codes; adjust depth and anchoring as required.
- Build square, centered rebar cages; maintain proper overlap and cover.
- Use clean concrete, proper pour sequence, wear PPE, and avoid cold joints.
- Inspect anchors and post bases before final pour; resolve gaps or corrosion risks.
Table of Contents
- Introduction
- Key takeaways
- Project Planning and Permits
- Understanding Loads and Sizing Basics
- Site and Soil Assessment
- Depth, Frost Line, and Setback Considerations
- Rebar Cage Design and Reinforcement Basics
- Forms, Concrete Mix, and Pouring Technique
- Anchors, Post Bases, and Connection Details
- Inspection Prep, Visual Checkpoints, and Troubleshooting
- Conclusion
- FAQ
Project Planning and Permits
Before you dig, confirm whether your city or county requires a permit and what drawings or information are needed for approval. Call your local utility-locate service to mark underground lines and check property lines so you don’t encroach on a neighbor’s land.
Review local building code requirements and any homeowners association rules that affect placement or appearance. If permit conditions, site constraints, or load assumptions are unclear, engage a licensed pro to avoid rework or failed inspections.
Permits and local code checks
Before you start digging, check your local building department for footing requirements. They’ll tell you the minimum size, depth, and reinforcement needed.
Building permits are usually required too. Your local government issues these. You’ll need to submit plans showing your pergola’s size, location, and footings.
Inspectors will expect detailed drawings, including dimensions, materials, and rebar placement. They might also want to see soil test results if you’re not using standard footing sizes.
Utility locate and site layout
Before digging, call 811 or your local utility service. They’ll mark where underground lines are buried for free.
Once marked, stake out your post locations. This helps avoid conflicts with utilities and ensures your pergola’s square.
Leave some space between your stakes and the utility marks. You don’t want to hit them while digging.
When to consult an engineer
For large spans, poor soil, or unusual loads, hire a structural engineer. They’ll design footings that can handle the weight and forces.
Provide them with details like pergola size, material type, snow load (if applicable), and any special considerations. They might need soil test results too.
Engineers can also help if you’re not sure about your site’s conditions or local codes. It’s better to be safe than sorry.
Understanding Loads and Sizing Basics
Footing size starts with the loads the pergola will impose: self-weight, wind uplift, and any applied live loads such as hanging fixtures or planters. Use conservative assumptions when you lack exact values and plan for the worst credible loading scenario for safety.
Confirm exact design loads and allowable bearing pressures from local code, span tables, or an engineer before finalizing footing dimensions. When you see differing guidance, follow the most stringent local requirement or ask a structural professional.
Vertical and Lateral Loads Explained
Pergolas impose two main types of loads on their footings: vertical and lateral.
Vertical loads are the weight of the pergola itself (dead load) plus any additional weight it might bear, like snow or people (live load). These push down on the footing.
Lateral loads come from wind forces. They push the pergola sideways and try to topple it. Understanding these loads is crucial for designing footings that can handle them safely.
Converting Loads to Footing Size
The first step in sizing your footings is to divide the total load (vertical plus lateral) by the soil’s bearing capacity. This gives you the minimum required footing area.
Soil bearing capacity varies, so it’s best to get a professional test done. If that’s not possible, use conservative default values from your local building code.
Here’s a simple formula: Footing Area = Total Load / Soil Bearing Capacity
Safe Sizing Ranges and Margin Guidance
When you’re unsure about load or soil conditions, it’s better to err on the side of caution. Choose a larger footing diameter and depth than calculated.
As a general rule, aim for a minimum footing depth of 12 inches below frost line. For diameter, start at around 16 inches and adjust based on load and soil conditions.
Always confirm your sizing with local code. Don’t rely solely on examples from this guide or others. Codes vary by location, so what works here might not work there.
Site and Soil Assessment
Walk the site and inspect surface conditions for signs of poor drainage, fill pockets, or soft spots that can undermine a footing. Perform simple field checks like probing with a rod or digging a test pit, and note high groundwater or organic layers that reduce bearing capacity.
If soil looks questionable or you need reliable bearing values, get a geotechnical report or a soil-bearing test. Follow the recommendations on any report or product data sheet when adjusting footing size or depth.
Visual soil indicators and simple tests
First, look at the surface. Clay soils are usually smooth and sticky. Silt feels gritty but not sandy. Sand is rough to touch. Organic soils have a dark color and may smell.
For hand tests, try these:
- Squeeze some soil in your fist. If it sticks together when you open your hand, it’s likely clay or silt.
- Drop a handful of soil from about 12 inches. If it falls apart quickly, it’s probably sand.
- Add water to the soil. Clay will turn into a plastic-like substance, while sand and silt will remain grainy.
When to order a soil report
You should get a geotechnical report when:
- The site is always wet or has standing water.
- The ground is filled in, especially if it’s not well-compacted.
- Your structure is large and heavy.
A soil report gives you these parameters for footing design: bearing capacity, compaction, moisture content, and soil classification.
Dealing with high water table and saturated soils
If your site is always wet or has a high water table, you’ve got a problem. Here’s what to do:
- Consider deeper footings. They can rest on drier soil.
- Add gravel drainage around the footing to help water move away.
- Consult local codes and an engineer for engineered solutions, like pile foundations or mat slabs.
Depth, Frost Line, and Setback Considerations
Footing depth must account for the frost line in your area, as well as any site setbacks, easements, or buried utilities that affect placement. Frost depths and setback requirements vary significantly by region, so check local code or building department guidance for the correct minimum depth and clearances.
If you can’t find local frost-depth info, use conservative practices such as digging deeper than surrounding disturbed soil and ensuring positive drainage away from the footing. When in doubt, get direction from the authority having jurisdiction or a licensed engineer.
How frost depth affects footing depth
The frost line, also known as the freeze-thaw line, is where the ground freezes and thaws each year. It varies by region – from 12 inches in warmer areas to 6 feet or more in colder zones.
Footings must extend below this line to prevent ‘frost heave’. When water freezes, it expands. If there’s no stable layer beneath your footing, the expanding ice can lift and shift your concrete, damaging your structure.
Check municipal frost-depth maps or consult local building codes to determine your area’s frost line. It’s crucial to follow these guidelines to ensure your footings are deep enough.
Sloped sites and setbacks from structures
On sloped sites, footings need to be deeper on the downhill side to prevent erosion. The steeper the slope, the more critical this becomes.
Also, footings should be set back a certain distance from existing foundations to avoid undermining them. This distance varies but is typically around 10 feet for most residential structures.
Erosion control measures like retaining walls or drainage systems may also be necessary on sloped sites. Always consider these factors when planning your footings.
Safe depth ranges and verification steps
As a general rule, footings should extend at least 12 inches below the frost line. In colder regions or for heavier structures, this could be as much as 4 feet.
However, these are just guidelines. Always verify exact requirements with your local building authority. They can provide specific depth ranges based on your location and structure type.
Once you’ve determined the required depth, mark it clearly at each footing location before excavation begins. This ensures everyone involved in the project is aware of the necessary depth.

Rebar Cage Design and Reinforcement Basics
Rebar cages control cracking and provide tensile capacity for footings; their layout should reflect the expected bending and shear demands rather than aesthetics. Principles include placing reinforcement where tensile stresses occur, maintaining clear cover, and tying bars to form a stable cage before pouring.
Do not invent bar sizes or spacing—refer to code tables, an engineer’s details, or manufacturer guidance for the correct schedule. If you have conflicting recommendations, default to the more conservative option or consult a structural engineer for clarification.
Rebar types, sizes, and bending basics
The rebar you’ll need is typically #4 or #5, with #4 being the most common for small structures like pergolas. Rebar size markings look like this: #4 means it’s 1/2 inch in diameter. You’ll see ‘R’ after the number; that’s the grade (strength).
Bend rebar using a rebar bender, not by hand. Follow manufacturer or code guidelines for bend radii to maintain strength.
Pro tip: Buy more than you need. It’s cheaper and easier than running out mid-project.
Cage geometry: spacing, laps, and clearances
Space rebar in your cage about 6 to 12 inches apart. This provides enough strength without using too much steel.
Lap splices should be at least twice the bar diameter plus 4 inches for proper overlap. Concrete cover (distance from rebar to form surface) should be at least 3 inches.
Use stirrups or ties where cages intersect to keep them aligned and stable during pouring.
Prefabrication and on-site assembly tips
Building cages on-site is usually easier, but prefabricating ensures consistency. If you prefab, keep them clean to avoid contamination.
Use rebar caps or chairs to space bars off the formwork. This keeps your cage centered and allows concrete to flow around it.
Anchoring cages is crucial to prevent movement during pouring. Use anchor bolts or tie wires through the forms.
Forms, Concrete Mix, and Pouring Technique
Build sturdy forms for round or square footings that hold shape under vibration and pour pressure; ensure forms are plumb and braced and provide access for finishing. Select a concrete mix with appropriate strength and exposure resistance by checking the mix design on the bag or product data sheet.
Place concrete continuously to avoid cold joints, consolidate with a vibrator or hand tools, and strike off and finish to the required elevation. Follow the manufacturer’s curing recommendations and local practices for protecting the new concrete from rapid drying or freezing.
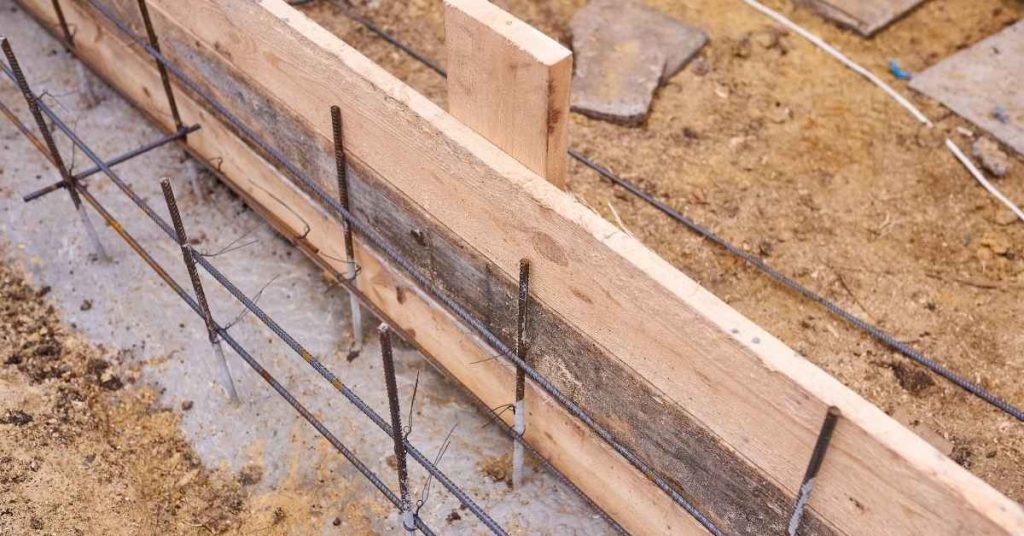
Formwork options and bracing
For your concrete footings, you’ve got a few formwork choices. Wood is classic, but it’s labor-intensive to build and remove.
Cardboard sonotubes are cheaper, easier to set up, but they’re not as durable as wood. They can blow out if not braced properly.
Snap-together forms are pricey, but they’re fast, easy to use, and can be reused. No matter which you choose, brace them well. Use stakes, ties, or clamps to keep them from bulging during the pour.
Choosing a concrete mix and additives
For footings, you want a strong mix. Aim for a minimum of 2500 psi strength. Check with your supplier or local code for specifics.
As for additives, air entrainment is usually a good idea. It makes the concrete more resistant to freezing and thawing cycles. Use it if your area sees frost.
Accelerators can speed up setting time, but use them sparingly. Too much can cause excessive heat and weaken the concrete. Always follow supplier or code recommendations.
Pouring, consolidation, and curing
When pouring, start at one corner and work your way around. This helps prevent voids from forming.
Use a vibrator or rod to consolidate the concrete. This removes air pockets and ensures a solid pour. Do this until you see no more bubbles rising.
Finish the top with a straight edge, but don’t overwork it. You want a smooth surface, not a polished one. After that, cure it right. Follow product guidance for curing methods and durations. This is crucial for strength development.
Anchors, Post Bases, and Connection Details
Decide whether posts will be embedded in concrete, set on a cast-in-place anchor, or attached with a post base; each method has different implications for durability and inspection. Accurately locate and set anchors or bolts in the footing before the pour using templates or jigs to maintain layout and embedment depth.
Follow manufacturer instructions for any proprietary anchors or post bases and check tolerance requirements for bolt location and verticality. If adjustable or field-bent anchors are needed, document the deviations and discuss them with the inspector or engineer ahead of time.
Embedded posts vs. anchor bolts
When it comes to connecting your pergola posts to the concrete footing, you’ve got two main options: embedding the posts directly into the concrete or using anchor bolts. Let’s weigh the pros and cons of each.
Embedded Posts: Pros include a solid, secure connection and no additional hardware needed. Cons are that it’s permanent – you can’t easily remove the post if needed – and it may require more concrete to encapsulate the post properly.
Anchor Bolts: These give you flexibility; you can remove or replace posts as needed. They’re also quicker to install, but they do add cost with the hardware itself and labor for installation. The choice depends on your specific needs and budget.
Setting anchor bolts and templates
Before you pour your concrete, you need to accurately position your anchor bolts or hold-downs. Here’s a step-by-step checklist:
- Mark the centerline: Use a plumb bob or laser level to mark the exact center of where each post will sit.
- Create templates: Cut out cardboard or plywood templates with holes for your bolts, using your marks as guides.
- Position templates: Place these templates on top of your footing forms, aligning them with your marks.
- Drill bolt holes: Using a masonry bit that matches your bolt size, drill through the template and into the ground to create pilot holes for your bolts.
- Insert bolts: Thread your anchor bolts or hold-downs into these pilot holes. Ensure they’re properly seated and extend the correct length above the concrete surface.
- Protect bolts: Wrap the threads of your bolts with tape to keep concrete out during the pour. This ensures you can remove them later if needed.
- Check spacing: Ensure all bolts are evenly spaced and aligned with your post layout.
- Verify bolt length: Measure from the bottom of your footing form to the top of your bolt to ensure it’ll be long enough to secure your post but not so long that it sticks out above the concrete.
Quick rule: Always double-check your measurements and positions before pouring. Once the concrete sets, it’s hard – and expensive – to fix mistakes.
Corrosion protection and fastener specs
Anchor bolts and other fasteners can rust over time, weakening their grip on your posts. To prevent this, choose hardware with good corrosion resistance based on your exposure conditions.
Exposed areas: Opt for stainless steel or hot-dipped galvanized bolts. Stainless is more expensive but offers better long-term protection; galvanized is cheaper but may require repainting over time to maintain its protective layer.
Indoor or protected areas: Regular, black bolts can be used here as they’re less likely to corrode due to reduced exposure. Always check manufacturer specs for exact corrosion resistance ratings and follow their installation guidelines.
Inspection Prep, Visual Checkpoints, and Troubleshooting
Prepare for inspections by documenting layout, reinforcement, anchor locations, and any soil or footing notes inspectors typically review before and after the pour. Common visual checkpoints include proper excavation depth and width, rebar placement and spacing, form stability, and correct anchor positioning.
If the inspector points out issues, photograph the condition, read the cited code or spec, and correct things like missing cover, loose ties, or improper anchors before proceeding. For complex or recurring problems, get written guidance from the inspector or consult a qualified engineer to avoid costly fixes later.
Pre-pour inspection checklist
Before concrete is poured, use this checklist to ensure everything is in order for a smooth inspection.
- Staked layout: Verify all stakes are present and accurately mark the footing dimensions.
- Depth: Measure from the top of the form to the bottom to confirm it matches your plans.
- Form alignment: Check that forms are level, plumb, and square. Use a laser level if available.
- Reinforcement placement: Ensure rebar cage is centered and at the correct elevation within the form.
- Anchors and bolts: Verify anchor bolts or post bases are properly placed and secured.
- Form ties: Check that form ties are tight and secure to prevent leakage.
- Water access: Ensure a water source is nearby for mixing and curing concrete.
- Photographing: Take photos of the layout, forms, reinforcement, and any notable details for records.
Quick rule: Always double-check measurements and placements. A few inches off can cause big problems later.
Common inspector comments and fixes
Inspectors often find similar issues. Here’s how to address them:
- Insufficient cover: Ensure concrete covers rebar by at least 2 inches. If not, add more concrete or adjust forms.
- Wrong depth: Measure and adjust forms if footing is too shallow or deep.
- Missing laps: Check rebar cage for proper lap lengths. Add additional bars if needed.
- Improper spacing: Verify rebar is spaced correctly within the footing. Adjust if necessary.
- Unprotected bolts: Ensure anchor bolts have corrosion protection. Wrap in plastic or use a coating.
- Inadequate curing: Plan for proper water access and temperature control during curing.
- Settlement issues: If footing sits on unstable soil, consider underpinning or soil stabilization.
- Engineering required: Consult an engineer if you’re unsure about any changes or fixes.
Quick rule: Don’t guess. If you’re uncertain, ask an expert before making changes.
Post-pour verification and maintenance
After concrete has been poured, use this checklist to ensure proper curing and monitor for any issues.
- Cure check: Verify concrete has cured properly. Use a moisture meter if unsure.
- Backfill: Ensure backfill material is compacted in layers to prevent settlement.
- Settlement monitoring: Keep an eye on the footing and structure for any signs of settling or movement.
- Cracking check: Inspect for cracks, especially at joints or where rebar emerges from concrete.
- Water management: Ensure water drains away from the footing to prevent erosion or washout.
- Temperature control: Keep concrete within proper temperature ranges during curing to avoid cracking or weak spots.
- Remediation steps: If issues arise, address them promptly. Consult an engineer if necessary.
Quick rule: Regular inspection and maintenance can prevent small problems from becoming big ones.
Conclusion
Get this right because sturdy footings protect the whole pergola, keep it square, and stop water or wind from undoing your work. Safety first, and use solid planning to prevent costly rework.
Confirm your permits and site constraints, verify soil conditions, lock in the frost depth and setback rules, design the rebar cage and anchors, set up proper forms, choose the correct concrete mix, and plan the pour with inspection checkpoints in mind. Do this in that order and document the steps as you go so you can verify each requirement before moving forward.
Common mistakes to avoid are skipping the frost line and depth, under- or over-reinforcing the cage, and pouring without a solid plan for forms, drainage, and curing. Always keep edges clean, verify alignment before pour, and maintain good surface moisture and curing conditions. Wear protective gear, work with a partner, and test a small area or practice run before committing to the full footing.
If the footing area has unstable soil, complex drainage, or unusual loads, or you’re unsure about permits, ground conditions, or final connections, call a professional now. Otherwise, follow the plan, check it twice, and keep pushing forward with confidence—the project isn’t finished until the pergola sits solid and safe for years to come. Plan, verify, and act deliberately.
FAQ
How do I verify my footing size and spacing without exact numbers?
Check the pergola plan and any manufacturer instructions for guidance. If in doubt, ask for the label or datasheet, or contact the local supplier for the recommended range. Don’t guess; use the documented requirements for your situation.
What should I look for when inspecting the rebar cage before pouring?
Make sure the cage is tied solidly and centered in the form. Ensure there’s adequate clearance from the form and soil, and that the bars aren’t bent or damaged. Follow the manufacturer or local rules for minimum overlap and spacing.
How can I tell if my forms and supports are ready for concrete?
Forms should be square, level, and firmly supported. Double-check that the forms won’t bow under load and that release agents or watertight liners are in place if required. If you’re unsure, test with a small draft pour or consult the instructions on the form product.
What are common red flags during inspection prep for pergola footings?
Watch for loose forms, misaligned posts, or a shaky stake system. Look for exposed rebar that isn’t adequately covered by the concrete, and any gaps where water could pool. If in doubt, stop and verify with the plan, label, or manufacturer suggestions.