
Introduction
Preventing concrete form blowouts means building strong, well-braced forms that can hold fresh concrete pressure until it cures. Think of it like framing a wall that must resist fluid pressure—proper bracing patterns and tight joints keep the forms from bulging or splitting. Check product labels and manufacturer instructions for recommended pressures and allowable pour rates.
Common DIY weak points are under-braced sides, inadequate nailing or fasteners, and soft or warped formwork material that lets joints open under load. Walk the forms, add diagonal bracing where needed, and pour in controlled lifts while watching for any movement; if you see movement, stop and reinforce before continuing. When in doubt, consult local rules or an experienced pro for plan review.
Key takeaways
- Inspect bracing frequency and alignment at regular intervals per guidelines.
- Ensure corner and opening bracing uses redundant supports to prevent failure.
- Avoid common DIY weak points by sealing joints and securing scheme.
- Follow proper alignment and pour technique to minimize pressure spikes.
- Keep safety first: never remove formwork before concrete cures enough.
- Prepare tools, materials, and hardware checklist to prevent last-minute failures.
Table of Contents
- Introduction
- Key takeaways
- What a Concrete Form Blowout Is and Why It Happens
- Most Common Causes and DIY Mistakes That Lead to Blowouts
- Bracing Patterns for Straight, Single-Story Walls
- Advanced Bracing Patterns for Corners, Openings, and Tall or Complex Walls
- Identifying DIY Weak Points and Practical Reinforcement Fixes
- Proper Alignment, Placement, and Pour Technique to Reduce Risk
- Tools, Materials, and Hardware Checklist with Material Guidance
- Safety Practices, Emergency Responses, and Cost Implications
- Conclusion
- FAQ
What a Concrete Form Blowout Is and Why It Happens
A concrete form blowout is when formwork bulges, splits, or fails suddenly under the load of fresh concrete rather than simply showing minor deflection or settlement. In plain terms it’s a localized or full rupture caused when the pressure on the form exceeds the capacity of the panels, ties, or bracing at a weak point.
The main driver is hydrostatic pressure from the fluid concrete mixed with any excess water, combined with the weight of the pour; that pressure seeks out gaps or weaker members and concentrates at seams, corners, and openings. Common DIY failure modes include loose or missing ties, misaligned panels, insufficient base support, inadequate bracing, and poorly handled corners—each one can let pressure create a bulge or sudden rupture that risks injury, wasted concrete, and costly rework.
Mechanics of pressure and form failure
Concrete is a liquid when poured, but it exerts lateral pressure on forms as it settles. This pressure comes from the weight of the concrete itself and the water in it. Inadequate support or joints can’t handle this load and fail.
Imagine a tall glass of water. The water at the bottom pushes against the sides with more force than the water at the top. Same principle applies here, but with much greater force.
Proper bracing and form alignment are crucial to distribute this pressure evenly and safely. Weak points, like improperly braced forms or misaligned panels, can’t handle the load and fail, leading to blowouts.
Severity levels and signs to watch for
Blowouts don’t happen suddenly. There are warning signs. Early detection can prevent major failures and costly repairs.
Mild bulging: You might see slight form distortion or hear a low rumble. This is your first warning. Tighten braces, ensure panels are properly aligned, and check for any loose ties.
Moderate bowing: The form may start to bow out in places. This is serious. Stop work immediately, assess the situation, and reinforce or replace weak areas before proceeding.
Severe rupture: The form has failed, concrete is leaking, and there’s a risk of collapse. This is an emergency. Clear the area, stop all work, and contact a professional for repair or replacement.
Most Common Causes and DIY Mistakes That Lead to Blowouts
Many blowouts trace back to straightforward issues: damaged or modified panels, skipped or inadequate bracing, incorrect tie placement, and pours that move faster than the form system can resist. A clean inspection of the form system before the pour—panels, joints, ties, and any field modifications—will reveal warped or compromised components that should be repaired or replaced.
DIY patterns to watch for are over-trusting old ties, using patched panels in high-stress areas, and pouring too aggressively without staging or controlling consolidation. Check tie hardware depth and condition, verify that the bracing grid is even and corners are properly braced, watch pour rate and vibration to prevent form movement, and consult product labels or manufacturer data sheets when uncertain about hardware or reuse limits.
Incorrect modifications and damaged components
Modifying forms on-site is a common DIY mistake. Cutting blocks, notching panels, or using cracked forms weakens the form system. These alterations create stress points where failures often start.
Inspect your forms thoroughly before pouring. Damaged or warped components can’t handle the load and may cause blowouts. Remember, a small crack can turn into a major failure under pressure.
Pro tip: Always use undamaged, unmodified forms. If you must alter them, reinforce those areas with extra bracing.
Inadequate ties, spacers, and rebar placement
Missing or misplaced ties and reinforcement allow forms to spread. This increases lateral pressure, putting more stress on the form system than it can handle.
Check your tie spacing. Too far apart, and they won’t hold the forms in place. Too close, and you’re wasting material. Aim for even spacing throughout the form.
Rebar placement is crucial too. If it’s not properly placed or secured, it can’t reinforce the concrete effectively. Ensure rebar is centered within the form and tied securely to prevent movement.
Improper pour sequencing and excessive pour rate
Pouring too quickly or without staging increases lateral pressure. This can cause blowouts, especially if your bracing isn’t up to the task.
Start at the lowest point of your form and work upwards. This allows concrete to flow naturally, reducing pressure on the forms. Pour in stages, giving each section time to set before moving on to the next.
Monitor your pour rate. Too fast, and you’ll increase lateral pressure. Too slow, and you risk segregation or cold joints. Find a controlled pace that works for your form system and concrete mix.
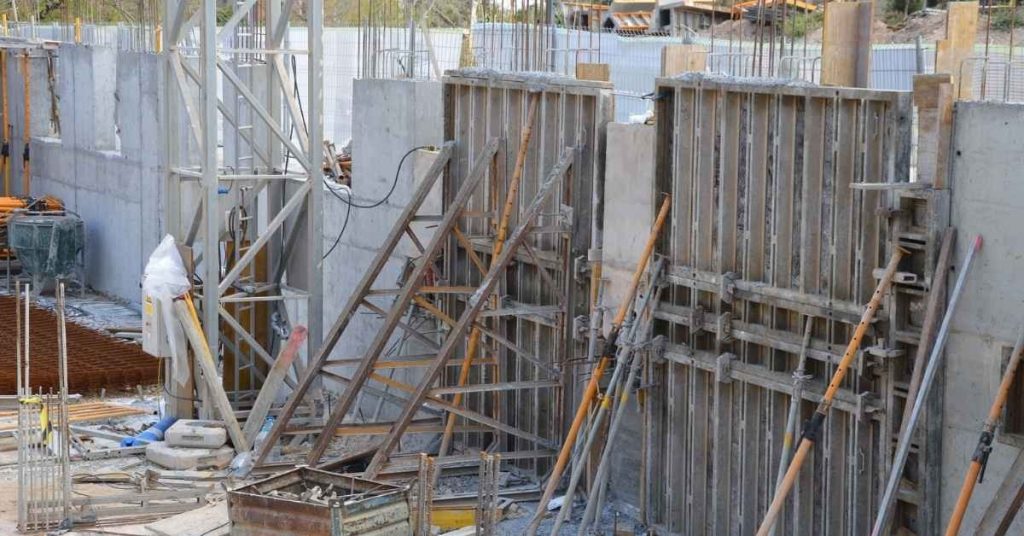
Bracing Patterns for Straight, Single-Story Walls
The goal for straight, single-story walls is a bracing layout that prevents lateral movement and distributes concrete pressure evenly so panels stay plumb and true. Continuous walers running along the face help gather point loads and pass them to diagonal and vertical braces without relying on individual fasteners alone.
Think in terms of load distribution rather than a single spacing number: place walers to span stiff panels, use diagonal braces to triangulate the system, and stagger braces so loads don’t align on the same weak line. Near openings and corners add local reinforcement—short blocking or extra braces—and perform plumb and level checks after final tightening to confirm the assembly will hold under load.
Waler and Strongback Placement Principles
Walers and strongbacks are crucial for distributing loads evenly across formwork. They’re horizontal members that connect vertical braces, preventing them from racking under pressure.
Position walers near the top and bottom of your forms, and at every 4 to 6 feet in between. This spacing may vary based on wall height and pour conditions – stiffer walls need less bracing.
Strongbacks should be placed just above and below any openings or corners to provide extra support where forms are weakest.
Diagonal and Temporary Bracing Strategies
Diagonal braces add stiffness to your formwork, preventing movement during the pour. They’re especially important for tall walls or when using lightweight forms.
Add diagonal braces from the base of your forms, running up at a 45-degree angle to the top. Secure them with clamps or nails every 2 feet.
Temporary shores can be added where needed for extra support. Use them near openings, corners, or anywhere you see signs of form movement before pouring.
Advanced Bracing Patterns for Corners, Openings, and Tall or Complex Walls
Corners, openings, offsets and taller walls require supplemental measures beyond the basic bracing grid because pressure concentrates and geometry changes create leverage on the forms. Use diagonal or X-bracing at corners with short blocking and staggered ties to lock joint faces; for openings add knee braces and temporary lintel supports to relieve pressure near headers.
For offsets and stepped forms plan progressive bracing and consider removable panels or adjustable props so each step is supported during its pour phase. Taller or complex walls benefit from staged pours with intermediate ties or back-press bracing and careful control of vibration and pour sequencing; perform a pre-pour check focused on corners, openings, and any nonstandard geometry before placing concrete.
Corner reinforcement and return walls
Corners are where your forms take the most beating. They concentrate load, so you need to brace them right.
Use diagonal bracing across corners. It spreads pressure evenly. Run it from bottom to top, outside to inside.
Add X-bracing at the joints. This stops inward/outward bowing during pours. Make sure your form ties are staggered and plumb for solid corners.
For return walls, use internal backing. It supports the forms from behind, preventing blowouts where two walls meet.
Handling openings and offsets
Openings like windows and doors cause stress concentration. Bucking out can happen if you’re not careful.
Add knee bracing around headers. It supports the form where it’s weakest – at the top of openings.
Use a temporary lintel for extra support. This spreads load across the opening, preventing blowouts.
Reinforce corner posts with additional ties or braces. They take a lot of pressure during pours. And always check your alignment at offset joints to prevent weak points.
Identifying DIY Weak Points and Practical Reinforcement Fixes
DIY weak points commonly show up as cut blocks, unsecured seams, misaligned panels, or inadequate footing anchors that let forms wobble or bow under pressure. A thorough pre-pour assessment should verify plumb and level, examine block integrity, and confirm anchor or starter-rebar placement before any concrete is placed.
Fixes include underpinning or re-seating seams, adding temporary studs or extra bracing lines, installing stake pockets or screw-anchors at the base, and reinforcing corners with short blocking or internal bracing. During setup consider redundant supports where you see movement, plan staggered pours to reduce peak pressure, and be prepared to pause the pour and shore up any flexing you observe.
Inspecting and repairing modified or damaged forms
Before you pour, check every form panel for damage. Cuts, fractures, or weak seams can lead to blowouts.
Check: Corners, edges, and seams for cracks or gaps. Inspect cut blocks for proper alignment and support.
If you find issues, repair them before pouring. Use compatible patch materials, reinforce with plaster or flowable concrete in stages, and ensure proper dowel/overlap between blocks or panels.
Strengthening footing connections and stakes
The connection between your forms and the footing or slab is crucial. If it’s weak, your forms can shift during pour.
Verify: Anchor bolts are secure and properly placed. Check starter rebar for proper alignment and support.
If needed, reinforce. Install stake pockets or screw-anchors to secure your forms to the footing. Consider using additional temporary studs or bracing lines for extra support.
Proper Alignment, Placement, and Pour Technique to Reduce Risk
Proper layout and alignment reduce unequal loads that cause localized overpressure on forms; check plumb, level, and square for panels and string lines before committing to the pour. Make sure batter boards and stakes reflect the true plan so form faces line up and load paths run where the bracing expects them.
Plan your pour sequence so concrete placement minimizes lift loads and avoids displacing braces—decide pour direction, drop heights, and consolidation technique in advance. Verify all ties, braces, and joints are tight and clean, and use a short pre-pour checklist to document any deviations and corrective actions that must be taken before placing concrete.
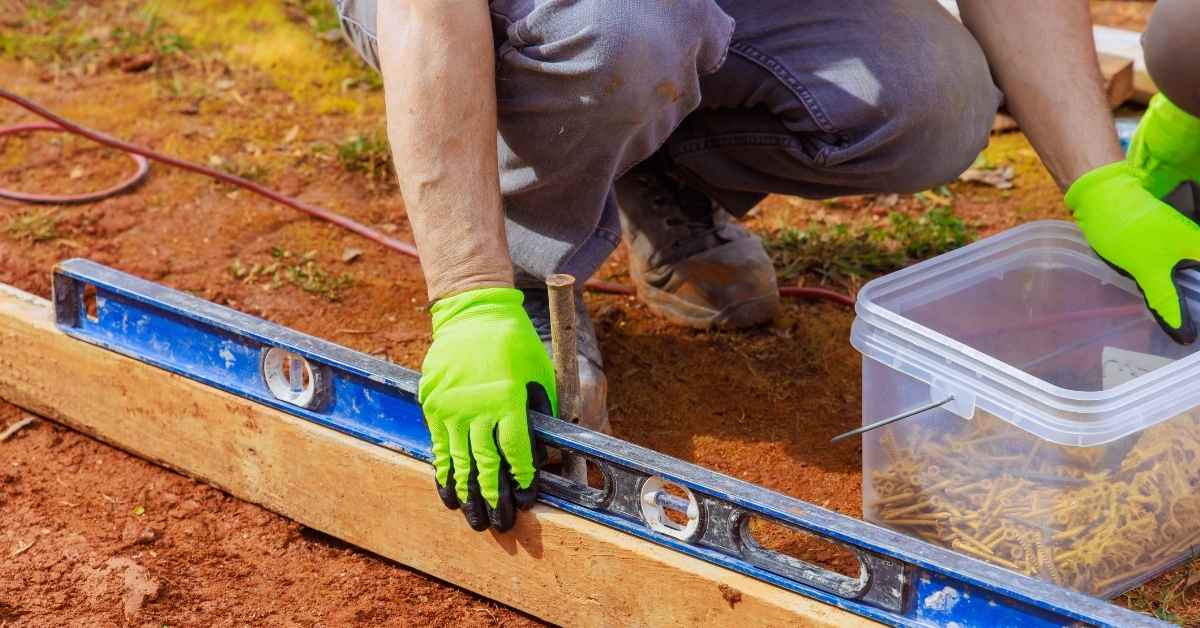
Visual checkpoints and measurement routines
Before pouring concrete, it’s crucial to verify the formwork’s alignment. Use this checklist to ensure everything is set up correctly.
- Check plumb: Ensure forms are vertical using a level or plumb bob at every stake line. A crooked form can lead to blowouts and weak walls.
- Check level: Confirm the base of your forms is level to prevent settling and uneven pours.
- Check square: Measure diagonally across the form to ensure it’s square. A rectangle will have unequal diagonals, causing stress on forms.
- Verify joint locations: Mark control joints with a pencil or chalk at regular intervals to relieve stress and prevent cracking.
- Check batter board alignment: Ensure batter boards are accurate and reflect the true layout of your formwork.
- Confirm string line accuracy: Check that string lines are taut and true, following the planned layout.
- Inspect form panel alignment: Make sure all panels align properly with no gaps or overlaps to prevent weak points.
- Verify brace placement: Ensure braces are installed correctly and evenly distributed to support forms during pour.
- Measure reinforcement clearances: Confirm that rebar is properly placed, centered in the form, and clear of sides to avoid bulging at seams.
Quick rule: Recheck critical points every 30 minutes during pour to maintain form stability.
Staging pours and managing concrete consistency
Staging your pour helps control the load on forms and prevents blowouts. Here’s how to manage it:
Start pouring at the lowest point of your formwork, allowing concrete to flow downhill. This minimizes lift loads and reduces pressure on forms.
Control pour rate: Pour concrete slowly and steadily, giving it time to consolidate and fill voids. A rapid pour can cause excessive hydrostatic pressure, leading to blowouts.
Consider the consistency of your concrete mix. Slump affects lateral pressure – higher slump means more fluid concrete, which increases pressure on forms. Use admixtures to control slump if needed. Aggregate size also plays a role; larger aggregates create more friction and reduce lateral pressure.
Tools, Materials, and Hardware Checklist with Material Guidance
Assemble core components before setup: braces (diagonal and adjustable), continuous walers, appropriate ties and fasteners, plus inspection tools like levels, plumb bobs, and straightedges. Decide whether wood or metal walers and braces suit your project, and check product labels or manufacturer instructions for load guidance when in doubt.
Selection should consider expected pour size and formwork type; lightweight DIY options differ from professional-grade hardware and may limit pour height or rate. Make a simple checklist for quantities and placement, include PPE and storage notes, and plan to consult an engineer or the manufacturer for heavy or unusual pours rather than guessing capacity on-site.
Recommended hardware types and selection criteria
Use this checklist to select the right hardware for your formwork. The wrong hardware can lead to blowouts, leaks, or even structural failures.
- Ties: Choose ties with a load rating that matches your pour size. Galvanized ties offer better corrosion resistance than black ones.
- Brackets: Opt for brackets with sufficient grip strength to hold forms securely in place. Check manufacturer specs for load ratings.
- Timber walers: Select pressure-treated or composite timber for better durability and longevity. Avoid green (unseasoned) wood as it can warp or shrink over time.
- Steel walers: Choose steel walers with a yield strength suitable for your pour size. Hot-dip galvanized steel offers superior corrosion resistance.
- Fasteners: Use appropriate fasteners like screws, nails, or bolts based on the formwork material and manufacturer recommendations.
- Hardware grade: Always use hardware of a suitable grade for your pour size. Consult manufacturer specs if unsure.
- Corrosion resistance: Prioritize hardware with good corrosion resistance to extend its lifespan, especially in harsh environments.
- Consult engineer/specs: For heavy pours or complex formwork, consult a structural engineer or follow manufacturer specs for hardware selection.
Quick rule: Always match hardware to the size and complexity of your pour. Don’t skimp on quality to save a few bucks – it’s not worth the risk.
How mix design and additives affect form pressure
Understand how your concrete mix design and additives can impact lateral pressure on forms. This knowledge helps you brace forms appropriately.
- Water-cement ratio: Lower water-cement ratios produce less bleed water, reducing hydrostatic pressure on forms.
- Admixtures: Some admixtures like accelerators or water reducers can increase form pressure. Check manufacturer data sheets for potential effects.
- Aggregates: Coarse aggregates create more friction and thus higher form pressures than fine aggregates.
- Slump: Higher slump mixes exert less lateral pressure due to their fluidity, but they may also increase hydrostatic pressure.
- Air entrainment: Air-entrained concrete has lower form pressure due to the presence of tiny air bubbles that reduce friction and cohesion.
- Fiber reinforcement: Fiber-reinforced concrete can exert higher lateral pressures due to increased cohesion and reduced slump.
- Mix specifications: Review mix design and admixture details in the project specs or consult with your concrete supplier.
Quick rule: Be aware that changes in mix design or additives can alter form pressure. Always brace forms according to the specific mix being used.
Safety Practices, Emergency Responses, and Cost Implications
Maintain basic site safety: PPE, controlled access, fall protection where needed, and clear hazard communication so everyone knows stop-work conditions. If you see bulging, rumbling, or a visible form breach, stop the pour immediately, evacuate if required, and secure the area before attempting any temporary containment.
For minor leaks apply shoring or temporary bracing and use rapid-seal methods only if safe; for partial or full blowouts prioritize people over material and document the event with photos and notes. Prevention costs for proper bracing, inspection, and staging are typically much lower than the combined expense of wasted concrete, repair, downtime, and possible structural rework; keep a log of lessons and update bracing checklists after any incident.
On-site monitoring and safety during pours
Safety’s top priority when pouring concrete. Keep a safe distance – at least 20 feet from the forms. Use radios or walkie-talkies for clear communication.
Monitor the pour in real-time. Watch for any signs of stress on the forms, like bulging or cracking. If you spot something, alert your crew immediately.
Have a plan ready if problems arise. Know where extra bracing and shoring materials are stored. Keep emergency contact numbers handy – call your supervisor or structural engineer if needed.
Emergency repair steps and minimizing concrete loss
If a blowout happens, act fast. First, stop the pour. Then, if it’s safe, seal any partial openings with wooden plugs or wedges.
Divert the concrete flow using shovels or rakes. Try to contain it within the formwork area. If you can’t, use sandbags or other barriers to prevent it from spreading.
Salvage usable material. If some concrete has leaked out, try to reuse it. Mix it back into the main pour if possible, or use it for fill where strength isn’t critical.
When to call an engineer or professional
Know your limits. If a problem’s beyond DIY repair, don’t hesitate to call in a pro.
Signs you need help include large cracks, significant bulging, or if the formwork seems unstable. Also, if you’re unsure about how to proceed, it’s better to pause and consult an expert.
Contact your project lead or supervisor first. They can advise you on whether to continue, pause, or hire a professional. If needed, they’ll connect you with a structural engineer who can assess the situation and provide guidance.
Conclusion
Preventing form blowouts is about keeping the forms rigid, the braces properly placed, and the pour controlled. Do the checks, test small areas first, and keep the work tight to protect safety, appearance, and durability.
Run a quick, sequential check as you go: verify braces are plumb and square, confirm fasteners are tight and not overdriven, double-check anchor points and bracing patterns for straight walls, and confirm openings and corners have appropriate extra support. Then verify alignment, placement, and pour technique in the current section before moving on, and finish with a final pull of the forms to confirm no movement is possible during concrete placement.
Common mistakes to avoid include under-bracing or over-tightening, guessing at brace spacing, and skipping checks at corners or openings. Never skip safety gear, never pour with loose or damaged supports, and never trust memory—double-check each step against your plan and material list. Safety rules are simple: test in a small area first, fix any obvious wobble before proceeding, and stop if anything looks off or sounds hollow under load.
If your wall plan becomes overly complex, or if you see persistent movement or loud form flex during testing, consider bringing in a pro rather than pushing ahead. When in doubt, pause, reassess, and call for help early. Stay disciplined, stay safe, and you’ll finish with clean lines, solid strength, and fewer costly fixes. You can do this—steady, deliberate, and right results come from good prep and smart habits.
FAQ
What are the main causes of concrete form blowouts I should watch for?
Blowouts usually happen when form braces fail or are not tight enough, when panels bow under pressure, or when joints leak. Improperly built corners, openings, and tall walls put extra load on the form. Check braces, anchors, and fasteners before you pour.
Why are proper bracing patterns so important for DIY projects?
Bracing patterns control where the pressure goes as the concrete sets. If the pattern is weak or wrong for the wall shape, panels can bulge or break. Use patterns that fit your wall height, length, and any openings.
What are common DIY weak points in formwork I should fix before pouring?
Poorly supported corners, loose panel joints, and insufficient bracing for openings are top weak points. Also watch for uneven footing or ground movement under formwork. Tighten and secure all connections, and add extra support where there’s an opening or a bend.
What steps can I take now to prevent concrete blowouts?
Double-check the form is square and level, then secure braces at regular intervals per the wall shape. Inspect all fasteners, planks, and edge forms for tightness and alignment. Edge clean-up and removing any debris prevent odd pressure points during pour.