

Introduction
Straight plaster corners are corners finished flush and square, with no bulges or waves. This article walks you through a simple, hands‑on approach to repair work that you can do using common tools. It’s written in plain terms for a DIY job, not a textbook.
Start by inspecting the corner for damage, clean away dust, and roughen the surface so the patch will key. Apply the appropriate joint compound, set any corner bead if required, and smooth with a trowel, keeping the edge light and even. Let it cure, then sand lightly and recheck for flat, straight lines; if in doubt, follow the product label and local rules.
Key takeaways
- Choose a compatible corner system matching plaster weight and finish.
- Inspect for bulges before repair; mark high points and plan skim coat.
- Use straight edge and level during setting to avoid waves.
- Drying times vary; follow manufacturer guidelines and maintain ventilation and temperature control.
- Safety: wear eye protection and respirator when sanding plaster or dust.
- Check local codes and product labels for corner fastener requirements.
Table of Contents
- Introduction
- Key takeaways
- Common Causes of Bulges and Waves in Plaster Corners
- Tools and Materials Checklist
- Choosing the Right Corner System
- Step-by-Step Repair: Minor Dents to Full Replacement
- Techniques to Achieve Perfectly Straight Corners
- Visual Checkpoints and Quality Inspection
- Troubleshooting Common Problems
- Material Specs, Drying Times, and Environmental Guidance
- Conclusion
- FAQ
Common Causes of Bulges and Waves in Plaster Corners
Distorted corners usually point to underlying issues rather than just a patch. Look for signs of structural movement, substrate irregularities, or poor initial plastering. Identifying the root cause will guide whether you repair, reframe, or replace the corner.
If you see persistent bulges or waviness after a patch, consider whether a cosmetic fix will hide the problem or if a full corner replacement is warranted. Check product labels or manufacturer instructions for guidance on suitable repair methods for the corner type you’re working with.
Structural and substrate issues
Before you start patching those bulging plaster corners, step back and inspect the underlying causes. It’s not always about the application; sometimes, it’s what’s beneath that’s causing the trouble.
Check your framing first. If it’s out of square or twisted, your drywall won’t sit right, and neither will your plaster. Square up any crooked studs before you start patching.
Moisture can also wreak havoc on your walls. Warping from excess moisture can cause bulges. Inspect for water damage or high humidity issues. If you find any, address the source of the moisture before you attempt to repair the corners.
Lastly, look at how your drywall was installed. If it’s not properly aligned and taped, your plaster won’t sit right either. Make sure your seams are straight and taped well before applying any compound.
Poor application techniques
Even with the best materials and perfect substrates, a sloppy application can leave you with waves in your corners. Here’s what to watch out for:
Over-troweling is a common culprit. Don’t overwork the compound. Too much spreading can cause it to lose its structure and create waves.
Incorrect compound thickness can also lead to problems. Aim for a thin, even coat. Too thick, and it won’t set properly; too thin, and it won’t fill in gaps.
Inadequate bead embedding is another common error. The corner bead needs to be fully embedded in the compound for a smooth finish. Press down firmly on the bead while applying the compound to ensure it’s well-seated.
Material incompatibilities
The right materials matter, and using the wrong ones can lead to all sorts of problems, including bulging corners. Here are some common material mismatches to avoid:
- New compound over old: Old compound can contain contaminants that prevent new compound from adhering properly. Clean the area before applying new compound.
- Wrong compound for bead type: Lightweight compound won’t set well on heavy-duty beads, and vice versa. Match your compound to your bead type.
- Low-quality materials: Cheap materials can lead to weak bonds and bulging corners. Invest in quality for a lasting finish.
- Incorrect setting time: Using a fast-setting compound on a slow-drying bead can cause cracking as the bead continues to dry after the compound has set. Match your compound’s setting time to your bead’s drying time.
- Moisture-resistant vs. regular: Using moisture-resistant materials in areas with high humidity or water exposure is crucial. Check your local climate and use the appropriate materials.
Tools and Materials Checklist
Start with core hand tools: backing trowel, finishing trowel, corner trowel, and a straightedge for alignment. Add a hawk, mixing tub, and a few durable scrapers for cleaning and feathering edges. Keep a damp sponge handy to smooth joints as you work.
For materials, choose plaster or mortar appropriate for your project, plus a compatible corner bead or system. Consider optional pro-grade tools like a coping saw, pliers, or a seam roller if you’re dealing with tape or paper-faced systems. Always verify that your selected products match the manufacturer instructions and job conditions.
Essential tools
Before you start, make sure you have these tools on hand to ensure a smooth and professional finish.
- Straightedge (4ft or longer): Essential for checking corners and applying straight lines. Without it, your corners may be crooked.
- Corner trowel: This tool helps apply compound to corners with ease. Skipping this can lead to messy, uneven corners.
- Joint knife (4in or 6in): Used for embedding mesh tape and applying final coats. Missing this can result in visible seams and waves.
- Cutting tool: A sharp utility knife or corner cutter is crucial for trimming mesh tape and corner bead. Without it, you’ll struggle to achieve clean cuts.
- Sandpaper (120-grit): For smoothing out final coats and removing any imperfections. Skipping sanding can leave your corners feeling rough and looking uneven.
- Taping knife (4in or 6in): Used for applying compound in thin, even layers. Without it, you may end up with bulges and waves.
- Hawk: A small board to hold your compound while working. Not having one can make application messy and difficult.
- Tape measure: To ensure your cuts are accurate and corners are square. Without it, you may end up with crooked or misaligned corners.
Quick rule: Always double-check your tools before starting to avoid frustration and rework.
Recommended materials and compounds
Choosing the right materials is key to achieving a smooth, durable finish. Here’s what you need:
- Joint compound: Lightweight or all-purpose compound works best for corners. Heavy-duty compound may be too thick and cause bulges.
- Setting-type compound: For embedding mesh tape and providing a strong base. Skipping this can lead to weak, crumbly corners.
- Pre-mixed compound: Convenient for small repairs but can dry out quickly. Consider mixing your own for larger projects.
- Corner bead: Metal or plastic corner bead helps protect corners from damage and provides a clean edge. Without it, your corners may be weak and prone to cracking.
- Mesh tape: Reinforces corners and prevents cracks. Skipping tape can result in cracked, crumbling corners.
- Primer or PVA: Applies before compound to seal the surface and improve adhesion. Without it, your compound may peel or flake off.
- Sandable sealer: Applies as a final coat to provide a smooth, paint-ready surface. Skipping this can leave your corners feeling rough and looking uneven.
Quick rule: Always check manufacturer datasheets for compatibility before mixing compounds.
Safety gear
Protecting yourself from dust and potential hazards is crucial when working with plaster corners. Here’s what you need:
- Dust mask or respirator: Protects against harmful drywall dust. Without it, you may inhale irritants and experience respiratory issues.
- Goggles: Shields your eyes from dust and debris. Not wearing goggles can lead to eye irritation and injury.
- Work gloves: Protects hands from cuts and scrapes. Without gloves, you may injure your hands while working.
- Ear protection: If using power tools, protect your ears from loud noises. Prolonged exposure can cause hearing damage.
- Long sleeves and long pants: Protects skin from dust and potential chemical irritation. Without proper clothing, you may experience skin irritation or allergic reactions.
- Damp cloth or vacuum: For controlling dust indoors. Not controlling dust can lead to a messy work environment and potential health issues.
Quick rule: Always prioritize safety gear before starting any project to protect yourself from potential hazards.
Choosing the Right Corner System
Metal bead, vinyl, and paper-faced systems each have pros and cons. Metal beads offer durability for high-traffic areas but can be stiffer to install. Vinyl and paper-faced options can be easier for DIY but may vary with finish and substrate.
Base your choice on damage severity and the desired finish, then weigh durability against ease of installation. Always consult product data or manufacturer guidelines to ensure compatibility with your plaster mix and substrate.
Bead types explained
Choosing the right bead is crucial for a smooth finish. Here’s what you need to know:
Metal Beads: These are durable, long-lasting, and suitable for high-traffic areas like hallways or commercial spaces. They’re typically powder-coated for corrosion resistance.
Vinyl Beads: Vinyl beads are flexible, making them great for corners with slight imperfections. They’re also cheaper than metal but less durable.
Paper-Faced Beads: These have a paper backing that sticks to the wall, providing extra support and reducing the need for additional adhesive. They’re ideal for new construction or major repairs.
When to replace versus repair existing bead
Deciding whether to repair or replace your corner bead depends on its condition:
If the bead is loose but still straight, you can likely just reattach it with more adhesive. If it’s bent or damaged, you might need to replace a section or the whole thing.
For cosmetic issues like scratches, you can often just sand and paint. But if there are major cracks or gaps, replacement is usually best.
Adhesive and fastener options
Securing your corner bead properly ensures a lasting finish. Here’s how:
Adhesive: Use a quality, lightweight joint compound or spackling adhesive. Apply it evenly along the length of the bead using a trowel.
Fasteners: For metal beads, use pop rivets for extra strength. For vinyl, drywall screws work well. Always follow product guidance for spacing and embedment.
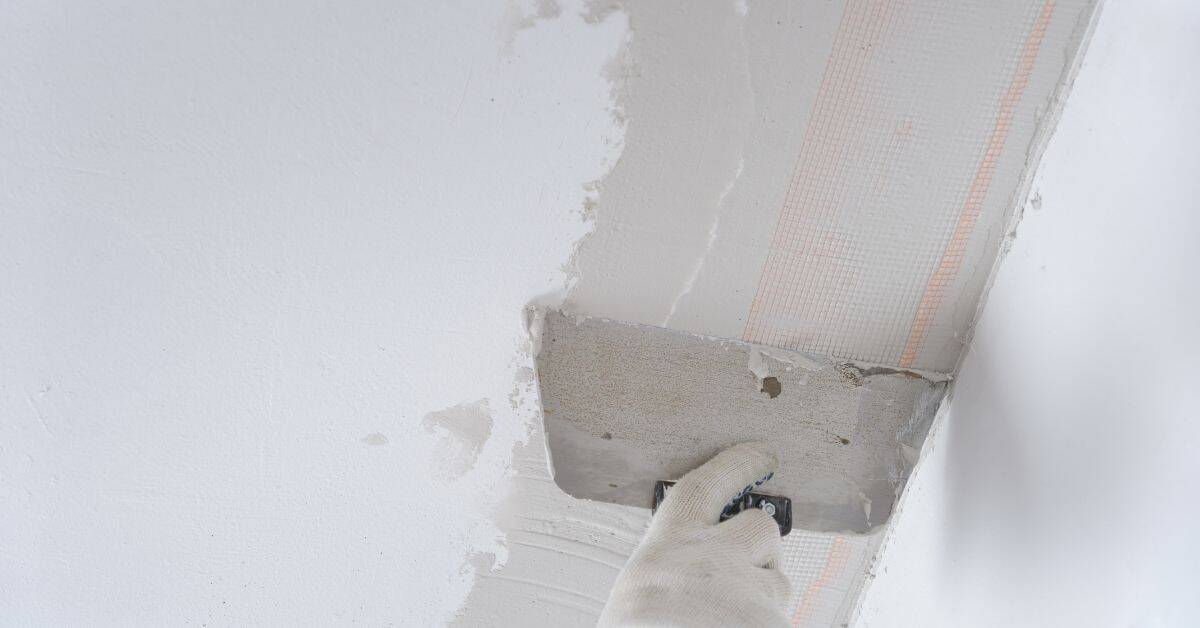
Step-by-Step Repair: Minor Dents to Full Replacement
Begin with a simple spot repair to gauge how the corner responds. If the repair holds, you can proceed with feathering and finish work. If waviness or cracking reappears, plan for corner removal and reinstall of the bead.
You should avoid guessing at timeframes; instead, estimate ranges based on your product and conditions and verify these with the datasheet. Between steps, check that the line is straight and the surfaces are flat before moving on to the next stage.
Step-by-Step Repair Process
This section guides you through a clear, numbered sequence of practical steps to repair your plaster corners, from minor dents to full replacement.
- Preparation and safety checks: Inspect the area, clear debris, and wear appropriate PPE. Check for structural issues as mentioned earlier.
- Main work – Quick patch: For minor dents, follow the ‘Quick patch for small bulges’ section below. If larger, proceed to ‘Removing and replacing corner bead’.
- Re-plastering: Apply new plaster following the ‘Re-plastering and feathering technique’ guide.
- Finishing touches: Sand lightly, wipe clean, and let it dry. Prime before painting.
- Final checks: Inspect your work for any missed spots or imperfections. If unsure, don’t hesitate to call a professional.
Quick patch for small bulges
For localized bulges without bead removal, follow these steps:
Prepare the surface by lightly sanding and wiping clean. Apply joint compound using a flexible taping knife, feathering outwards to blend with the surrounding wall.
Let it dry, then lightly sand again. Wipe off dust, apply a thin layer of joint compound for a smooth finish, and let it dry before priming and painting.
Removing and replacing corner bead
To safely remove the old bead, use a utility knife to score along both sides. Gently pry off with a flathead screwdriver or putty knife. Remove any remaining adhesive.
Prepare the substrate by sanding lightly and wiping clean. Align the new bead, ensuring it’s level and plumb. Embed and secure using joint compound, following manufacturer’s guidelines for embedding depth and setting time.
Let it dry, then sand lightly to ensure a smooth surface before proceeding with re-plastering.
Re-plastering and feathering technique
For consistent results, follow this layering strategy: Apply the first coat thinly, building up to the bead edge. Let it dry.
Apply a second, slightly thicker coat, feathering outwards from the bead to blend with the surrounding wall. Ensure no step lines form by maintaining a consistent thickness and working quickly.
Let it dry, then lightly sand, wipe clean, prime, and paint as needed.
Techniques to Achieve Perfectly Straight Corners
Use straightedges and temporary guides as you apply compound to maintain a true corner line. Set up jig-like supports to hold the corner during drying, then steadily feather edges to blend with surrounding surfaces. Keep the line consistent with repeated checks along both faces.
Timing strategies matter: avoid rushing the set and rechecking after each pass helps prevent waves. If you notice deviation, pause and adjust before the compound hardens, then recheck the line with your straightedge.
Using straightedges, levels, and jigs
Start by snapping a chalk line along the wall to create your reference line. This will help keep your corner true.
Use a straightedge that’s long enough to span the entire repair area. Hold it firmly against the wall and your reference line while troweling. A level on top can help ensure you’re working plumb.
For wider repairs, consider using jigs or temporary guides. These can be made from scrap wood or purchased. They’ll help maintain a consistent angle across the entire corner.
Applying compound in controlled coats
Mix your joint compound according to manufacturer instructions, aiming for a consistency similar to peanut butter. This will help prevent sagging.
Apply the first coat thinly and evenly. Let it set until it’s no longer shiny but not completely dry (check manufacturer working times). Lightly sand off any high spots.
Apply a second, slightly thicker coat. Again, let it set, then lightly sand. This staggered drying process helps reduce shrinkage-induced waves. Remember, thicker isn’t always better. Too much compound can lead to waves as it dries.
Sanding and burnishing without creating waves
Start with 120-grit sandpaper. Sand lightly, working in small sections. The goal is to smooth out any rough spots, not remove material.
Once you’ve achieved a smooth surface, switch to 220-grit. This will refine the edge without creating dips or waves. Again, sand lightly and in small sections.
Finally, use a burnishing tool or even a damp sponge to burnish the corner. This helps seal the surface and gives it a smooth, finished look. Be gentle; too much pressure can create waves.
Visual Checkpoints and Quality Inspection
Inspect at key stages: after bead install, after initial fill, and after final finish. Look for any local bulges, pinholes, or waviness along the corner line. Run a light touch to feel for hardness and uniformity of the surface.
Describe photographs that show a true corner: straight lines, clean feathering, and uniform texture. Record what each photo should capture to compare progress later and catch subtle issues before painting.
What to look for at each stage
Use this checklist during and after each phase of your concrete work to ensure quality and prevent costly rework.
- Form preparation: Check formwork alignment, plumb, level, and square. Ensure all joints are tight with no gaps or overlaps.
- Reinforcement inspection: Verify steel reinforcement is properly placed, secured, and follows the approved design.
- Concrete batching: Confirm concrete ingredients (cement, water, aggregates) match the specified mix design. Check slump for proper workability.
- Placing concrete: Watch for any signs of segregation or bleeding during placement. Ensure concrete is properly consolidated with no voids.
- Finishing operations: Look out for gaps, shadow lines (indicating low spots), and edge ridges while bull floating, floating, and edging.
- Curing inspection: Check that curing compounds or coverings are applied evenly and correctly to prevent moisture loss and ensure proper hydration.
- Final visual check: Inspect for any signs of cracking, discoloration, or other defects before releasing the project.
- Post-tensioning (if applicable): Verify post-tensioning tendons are properly tensioned and grouted according to manufacturer’s instructions.
Quick rule: Always inspect concrete work at each stage, as skipping any step can lead to hidden defects or expensive rework down the line.
Final acceptance criteria and tolerances
Use this checklist once the concrete has cured to ensure it meets quality standards before you proceed with final finishing or move on to other tasks.
- Straightness: Check for any significant deviations from horizontal or vertical lines. Use a level or straight edge for verification.
- Shadow-free edges: Inspect the edges where concrete meets formwork. No visible gaps or shadows indicate proper curing and form release.
- Seamless texture: Look for any abrupt changes in color, texture, or level that might indicate cold joints, honeycombing, or other defects.
- Curing time: Ensure concrete has cured for the recommended time (usually 28 days) before final acceptance. Check manufacturer’s instructions to confirm.
- Moisture content: Test for proper moisture content using a calcium chloride test or a non-destructive moisture meter. This is crucial for preventing issues with flooring adhesives and finishes.
- Flatness (FF) and Levelness (FL): Measure flatness and levelness using a 10-foot straight edge. Tolerances vary, but check local rules or F-number requirements.
- Cracking: Inspect for any cracks, even hairline ones. Cracks can lead to further damage and should be addressed promptly.
- Delamination: Tap the surface with a hammer; listen for a dull sound that might indicate delamination from the substrate.
Quick rule: If in doubt, recheck or consult with a professional. Minor imperfections can lead to major issues down the line, so it’s better to be safe than sorry.
Troubleshooting Common Problems
If bulges reappear, recheck the substrate and bead installation for movement or improper adhesion. Delamination of the compound often means moisture or incompatible products, so verify materials and environmental conditions. For cracks, assess whether joints are too rigid or the substrate is moving.
Escalate persistent problems by consulting product instructions or seeking a professional opinion if the issue continues despite steps taken. Keep notes on symptoms and remedies to guide future repairs and prevent repeats.
Bulge returns after drying
If that bulge comes back after drying, something’s not right. Here’s what to check:
Hidden substrate movement: Check for any hidden issues behind the wall like moisture or structural problems.
Poor adhesion: Make sure your compound stuck well to the wall. If not, you might need to re-plaster and feather better.
Shrinkage: Sometimes, compounds shrink as they dry. To fix, remove and replace the corner bead, re-profile the area, and apply new compound.
Cracking and edge lifting
Cracks and lifted edges are signs of trouble. Here’s what to do:
Insufficient bedding: If your compound didn’t stick well, you might need to re-plaster. Make sure to apply a thick enough base coat.
Movement: Check for any movement behind the wall. If there’s a problem, reinforce the area before re-applying compound.
To fix, remove and replace the corner bead. Consider using a different type of bead that offers more support.
Texture mismatch and blending fixes
When new compound doesn’t match the old, here’s how to blend them:
For small areas, use a quick patch. Apply thin coats of compound, sanding lightly between each.
For large areas or when the texture is significantly different, it’s best to reskim the entire wall. This ensures a uniform finish. Follow your step-by-step repair process, applying compound in controlled coats.
Always do a visual check at each stage to ensure you’re on track.
Material Specs, Drying Times, and Environmental Guidance
Compound chemistry and bead materials influence how the system cures and how stable the finish will be. Always consult the product datasheets for compatibility and recommended use with your substrate. Check label instructions for any temperature or humidity limitations.
Record safe ranges for conditions and follow recommended cure sequencing to prevent premature drying or warping. Since exact times vary by product and site conditions, rely on the datasheet and tester observations rather than fixed numbers.
Compound types and working times
When it comes to joint compounds, you’ve got two main types: setting-type and ready-mix. Each has its own working characteristics.
Setting-type compounds are powdered and need to be mixed with water on-site. They start to set as soon as they’re mixed, giving you around 30-60 minutes of working time before they harden. Check the label for exact times.
Ready-mix compounds come pre-mixed in a tub. They have a longer working time, usually around 2-4 hours, but they can dry out faster once opened. Again, check the label for specifics.
Fastener spacing and embedment depth
The way you fasten your joint tape is crucial for a strong, lasting repair. Follow your bead manufacturer’s guidance for the best results.
As a general rule, space your fasteners about 4-6 inches apart along the length of the tape. This provides even support and helps prevent warping or lifting.
The depth you embed the fasteners also matters. You want them just below the surface of the compound, not too deep or too shallow. Aim for around 1/8 inch to 1/4 inch below the surface. Too deep, and they won’t provide enough support; too shallow, and they’ll be visible after sanding.
Recommended environmental conditions
Temperature and humidity play a big role in how your joint compound dries and adheres. Stick to the recommended ranges on the product label for best results.
Temperature: Most compounds work best between 70-90°F (21-32°C). Too cold, and they won’t set properly; too hot, and they can dry out too fast. If it’s too chilly or too hot, consider heating or cooling the area before you start.
Humidity: Ideal humidity levels are between 40-70%. If it’s too dry, your compound might crack as it dries. If it’s too humid, it could take too long to set. Use a dehumidifier or humidifier if needed, but give the area time to stabilize before you start work.
Conclusion
Clean, straight plaster corners come from a solid plan and careful work. Protect people and the surface, test in a small area first, and keep the job aligned with the right corner system for durability and a sharp look.
Start with a simple, natural checklist: inspect for bulges, remove dust, set up the chosen corner system, mix and apply materials to spec, fit and secure backing, skim and shape, observe the drying and environmental guidance, then do visual checkpoints and a final quality check before calling it done.
Common mistakes to avoid are rushing the process, skipping moisture or temperature tests, using the wrong materials for the system, or not securing the corner hardware properly. Never work with wet or frozen substrates, and always wear eye and skin protection. Keep cure times and working conditions within the manufacturer’s guidance to prevent future waves or cracks.
If you see structural damage, persistent moisture, or corners that don’t respond to standard repairs, don’t push on alone. A professional can assess framing, provide proper backing, and ensure long-term straightness. Stay focused, follow the steps, and you’ll finish with corners that stay true and look solid.
FAQ
What should I check on the corner system before starting the repair?
Read the manufacturer instructions and label on the corner system. Look for recommended patching methods and curing guidance. If unsure, stick to a simple repair method that matches your system and local rules.
How can I tell if my corner is ready for repair?
Make sure the area is clean and dry. Remove loose material and dust, then verify there’s a solid backing. If the surface still feels soft or crumbly, wait and follow drying guidance from the product or manufacturer.
What’s the safest way to blend a repaired corner with the surrounding plaster?
Use a straightedge to keep the line true while applying the patch. Build up in light layers and feather the edges toward the wall. Check with a level or plumb line as you go to avoid creating new bulges.
What can cause a repaired corner to fail later, and how do I prevent it?
Common causes are underprepared surfaces, improper mix consistency, or insufficient cure time. Clean, dry, and properly primed surfaces help. Always follow product instructions and allow adequate curing before finishing.