
Introduction
DIY Concrete Color Sampling: Pouring Mini Slabs lets you preview the final shade by casting small patches. Use simple forms or shallow molds, mix a small batch, and pour a few test slabs in a controlled area so you can compare with the goal color. Mark the curing conditions and plan to observe how the color changes as it dries and cures.
Tools and materials range from basic trowels and molds to pigment types, and you should check the pigment label for compatibility with your mix. Watch for color changes during curing and note any blotchy or uneven spots, then plan adjustments for future pours to better match older concrete. For reliable results, rely on manufacturer instructions, local rules, and practical tips from experienced builders to guide your choices.
Key takeaways
- Choose pigment types (liquid, granular, powdered) and test shade with mini slabs.
- Plan color-sampling test timing around curing and weather exposure; record results.
- Document dosage guidelines and mix-design decisions for repeatability and comparisons.
- Color changes during curing require monitoring; blotchy issues show uneven absorption.
- Safety: wear eye protection, gloves, and mask when handling pigments and admixtures.
- Use consistent slab size, curing conditions, and sealers to compare final shade.
Table of Contents
- Introduction
- Key takeaways
- Planning Your Color-Sampling Test
- Tools and Materials Checklist
- Choosing Pigments, Cement, and Admixtures
- Determining Pigment Dosage and Mix Design for Consistency
- Step-by-Step: Pouring and Finishing Mini Slabs
- Curing, Monitoring Color Changes, and Visual Checkpoints
- Post-Cure Treatments: Sealers, Wet-Look Preview, and Finish Testing
- Interpreting Results, Matching Existing Concrete, and Documenting Decisions
- Conclusion
- FAQ
Planning Your Color-Sampling Test
Define clear objectives for the color-sampling test: identify a pigment system and finish that achieve the desired shade, understand how sealer or topcoat affects final color, and determine whether a new slab can reliably match an existing surface. Decide which variables to test and how many to run at once: typically limit pigment type, dosage, and curing conditions per batch; explain why a controlled matrix yields actionable insights and reduces confounding results.
Plan the physical samples and layout: create miniature slabs or tiles that simulate the real application, including size, thickness, slump, and curing conditions; include duplicates and a control sample without pigment for baseline comparison. Establish documentation and decision criteria: set objective shade targets and note blotching or color unevenness, and use consistent photography or a colorimetric reference to compare results. Address practical constraints and best practices: list required tools, safety considerations, sealer compatibility, curing time, and cost implications; plan for potential retesting if results are inconclusive. Design the testing matrix and workflow: lay out randomized sample placement, labeling scheme, and cross-checks to prevent mix-ups; outline data capture and the decision workflow for proceeding to full-scale pours.
Define Objectives and Acceptance Criteria
Before you start, set clear goals for your color-sampling test. You’re aiming to identify the right pigment system, finish, and sealer effect that’ll give you the desired shade. Also, you want to see if a new slab can match an existing one.
Now, define your acceptance criteria. How close is ‘close enough’ when it comes to matching the target shade? Consider texture and sheen too. Be realistic, but don’t compromise on quality.
Get stakeholders involved early. If you’re working with an architect or designer, make sure they sign off on your objectives and criteria. That way, everyone’s on the same page.
Determine Sample Variables and Matrix
To get reliable results, test one variable at a time. For example, if you’re testing pigments, keep everything else – like cement type and sealer – the same.
Your matrix should look something like this:
- Sample 1: 2% pigment A + no sealer
- Sample 2: 4% pigment A + sealer
- … and so on
Why one variable at a time? It helps you pinpoint what’s causing any differences in your samples. That’s how you get actionable insights.
Site, Timing, and Logistics
Choose a site for your samples that mimics the final pour location. This way, they’ll experience similar conditions – like temperature and humidity.
Control your curing environment too. Keep samples covered and moist during the initial cure to prevent premature drying. Follow the same schedule you’d use for the real pour.
Plan ahead. Set aside enough time for each sample to fully cure before testing. And don’t forget about clean-up – it’s a messy job!
Tools and Materials Checklist
Core tools and safety: outline a concise list of essential hand tools, a compact mixer if used, measuring cups, a dust mask, eye protection, gloves, and knee pads; note any site-specific PPE requirements. Materials and consumables: specify lightweight, reusable mini-slab molds, release agents, sealants or curing compounds, pigment options and their compatibility with cement, water, and additives.
Mold management and labeling: emphasize mold material choices, cleaning routines between pours, simple labeling and clear reuse guidelines to avoid cross-contamination. Mix design and measurements: summarize basic mix planning for mini-slabs, and how to document each trial. Documentation and supplier checks: remind readers to confirm material specs with suppliers and provide a quick checklist for recording results and any deviations.
Materials to source and compare
Before you start, ensure you have all the necessary materials for your mini-slab pours. This checklist helps you gather everything you need.
- Cement types: Consider different cement types like Portland or masonry cement for various applications.
- Aggregate options: Choose aggregates based on the desired strength and finish – fine, medium, or coarse.
- Pigment forms: Have liquid, granular, or powder pigments ready to test different color shades.
- Admixtures: Include air-entraining agents, accelerators, or retarders for specific mix designs.
- Sealers: Consider sealants or curing compounds to protect and enhance your mini-slabs’ surfaces.
Quick rule: Always confirm material specs with suppliers to ensure compatibility and performance.
Tools and measuring equipment
Gather the right tools for accurate mixing, pouring, and finishing your mini-slabs. This checklist ensures you have everything needed.
- Lightweight molds: Reusable plastic or silicone molds help create consistent mini-slab sizes.
- Scale or measuring cups: Accurate measurement of cement, water, and aggregates is crucial for consistent results.
- Mixer or mixing containers: A compact mixer or large bucket helps blend materials evenly.
- Finishing tools: Trowels, floats, and edging tools help achieve a smooth, professional finish.
- Moisture meter: Monitor your mini-slabs’ moisture content to ensure proper curing.
- Marking/tagging materials: Label each mini-slab with color name, batch ID, and date for easy tracking.
Quick rule: Regularly clean and maintain your tools to prevent cross-contamination between pours.
Safety and cleanup supplies
Prioritize safety during your mini-slab pours with the right personal protective equipment (PPE) and cleanup supplies. This checklist helps keep you safe and organized.
- Gloves: Protect your hands from cement burns and irritation.
- Eye protection: Wear safety glasses or goggles to shield your eyes from debris.
- Respirator (for powders): Use a respirator when handling powder pigments to avoid inhalation.
- Disposal containers: Have designated containers for waste materials like cement bags and plastic wrap.
- Surface protection: Cover work surfaces with drop cloths or plastic sheets to protect them from spills and stains.
Quick rule: Always follow local regulations for disposing of construction waste materials.
Choosing Pigments, Cement, and Admixtures
Clarify pigment options with practical pros and cons for concrete projects, including handling, dispersion, clean-up, and how each type can influence final shade, blotching tendency, and color uniformity in mini slabs. Explain how cement color and aggregate choice impact the palette, including how grey or white Portland cement shades interact with pigments and how aggregate size, color, and exposure affect perceived hue after curing.
Identify key manufacturer checks: compatibility of pigment with cement type, approved dosage ranges, recommended mixing order, and any cautions about water reducers or set-controlling admixtures. Provide a practical testing workflow: small test mixes, number of test slabs, labeled samples, curing in similar conditions, and a simple visual compare method to select pigment type and dosage before scale-up. Outline common color blotching and color-matching issues: root causes and targeted remedies, plus notes on documenting results for future batches.
Pigment types and pros/cons
Choosing the right pigment type is crucial for your concrete project. Here’s a quick rundown of liquid, granular, and powdered pigments:
Liquid Pigments: Easy to handle, great for small batches. They disperse well but may require more mixing time. Less prone to blotching.
Granular Pigments: Preferable for large projects due to easy storage and handling. They can be a bit tricky to disperse evenly, so extra mixing is needed. May cause slight variation in color uniformity.
Powdered Pigments: Offer vibrant colors but are messier to handle. Require thorough mixing to avoid clumping. Can lead to blotching if not dispersed properly.
How cement and aggregate influence final shade
The color of your cement and the type of aggregate you use can significantly impact your concrete’s final hue:
Cement Color: White cement allows pigments to shine, while gray cement dulls colors. Always consider this when choosing your pigment.
Aggregate Color & Fineness: Lighter aggregates result in lighter shades, darker ones in darker hues. Smaller aggregates increase color vibrancy, while larger ones can mute it.
Remember, aggregate exposure affects perceived hue too. Exposed aggregate surfaces show more variation in color than smooth finishes.
Using admixtures and accelerators
Admixtures can enhance your concrete’s properties, but some may affect its color. Here’s what to watch out for:
Air-Entraining Admixtures: These can lighten the concrete’s shade slightly. Chloride-based ones should be avoided as they can cause corrosion in reinforced concrete.
Accelerators & Set-Control Admixtures: These speed up or slow down setting times but generally don’t affect color. Always check with manufacturers to ensure compatibility with your chosen pigment.
For best results, follow the manufacturer’s guidelines for mixing order and dosage. If in doubt, consult a concrete specialist.
Determining Pigment Dosage and Mix Design for Consistency
Plan a small, repeatable dosage matrix: define target shade anchors and apply pigment in small, incremental steps with clear rules for which increments to test and how many repetitions per dosage. Establish a rigorous measurement and recording system: decide between weight-based dosage or volume, and create a template capturing batch details, pigment type and amount, water-to-cement ratio, admixtures, slump, curing conditions, and observed color results.
Enforce a consistent water-to-cement ratio and compatibility checks: verify manufacturer dosage recommendations, confirm pigment compatibility with any admixtures, and document any deviations or surface treatments that could affect color. Standardize sample preparation and curing: specify slab size, form release, curing method, and timing for color observation to minimize blotching or color shifts. Plan analysis and next steps: set criteria for color stability and variance, record environmental factors, and outline how results will guide scaling to full-size pours and final shade matching.
Creating a Dosage Progression
Start with your target shade. Let’s say you want a soft gray. You’ll need to find the right pigment dose.
Begin with a low dose, like 1% of cement weight. Increase it in small steps, maybe 0.25% at a time. This way, you can see how each tiny bit changes the color.
For example:
- Sample 1: 1% pigment
- Sample 2: 1.25%
- … and so on until you reach your desired shade.
Rule of thumb: Keep increments small to avoid missing the sweet spot.
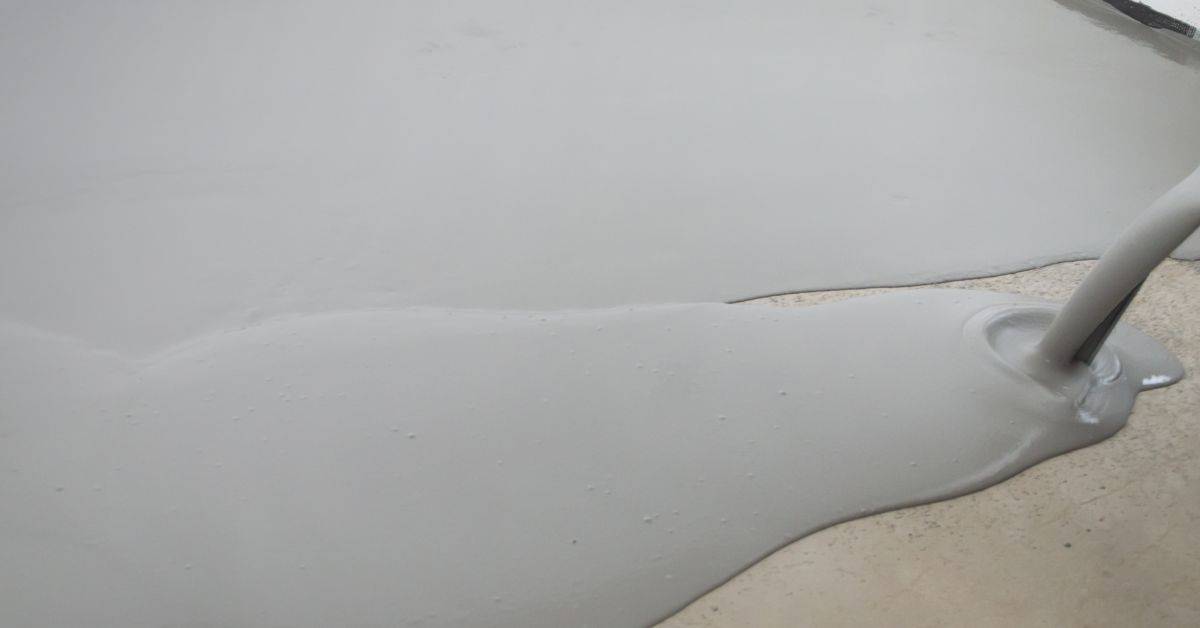
Controlling Water-to-Cement Ratio and Mixing
Water makes a big difference in color. Too much, too little – it’s a balancing act.
First, decide your water-to-cement ratio. Let’s say 0.5. Stick to this for all samples. Consistency is key.
Wet your aggregates before mixing. This helps with consistency and prevents clumping.
Never add finishing water on-site. It’ll throw off your ratios and colors.
Recording Mix Data for Repeatability
Keep a simple record of each sample’s batch details. This helps you replicate results later.
Here’s what to note:
- Cement source (brand, type)
- Pigment type and batch number
- Water-to-cement ratio
- Admixtures used (and amounts)
- Mixing time
For example:
Sample 1: Type I cement, Gray pigment #12345, W/C 0.5, Retarder X at 0.2%, Mixed for 5 minutes.
Step-by-Step: Pouring and Finishing Mini Slabs
Define a repeatable mold prep and production workflow: surface priming, edge sealing, release agent choice, and consistent mold dimensions to minimize variability between mini slabs. Outline pigment and mix guidelines specific to mini slabs: recommended pigment-to-batch ratios, consistent water-cement ratios, and accounting for batch-to-batch differences in cement and water demand.
Specify safe sample sizes and thicknesses: ideal slab dimensions and minimum curing thickness to avoid micro-cracking or drying stress artifacts. Detail finishing and curing checks: sequence from trowel or floating technique to sealant or topical finish, plus interim color checks at set cure intervals. Include labeling, documentation, and quality controls: labeled molds, color lot tracking, and a simple rubric for assessing blotching, uniformity, and how to translate mini-slab results to the full project, with caveats about site conditions and thickness.
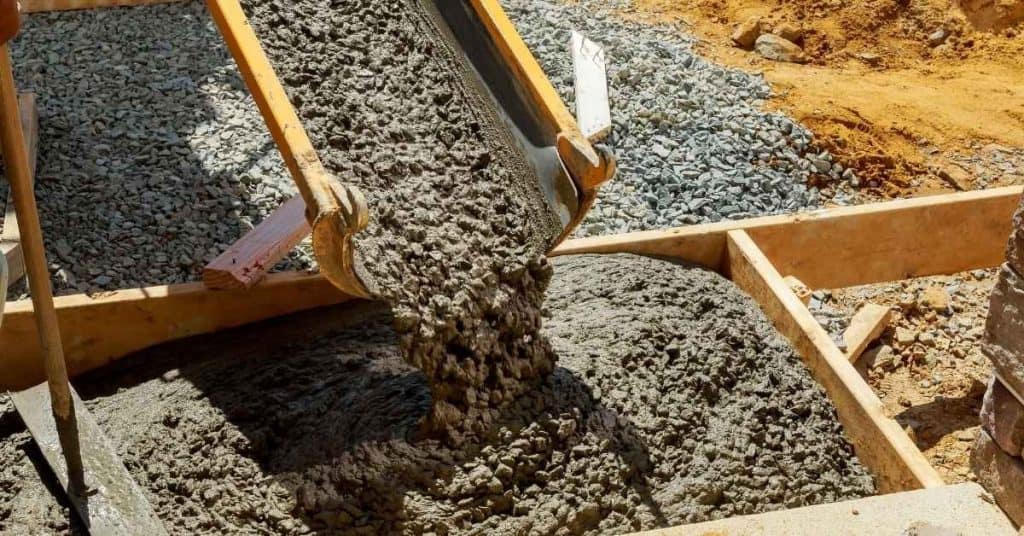
Step-by-Step Pouring Process
Follow this clear, numbered sequence to pour and finish your mini slabs efficiently and consistently.
- Preparation: Gather tools, safety gear, and materials. Check project constraints like slab size and curing time.
- Safety first: Put on gloves, goggles, and a dust mask. Work in a well-ventilated area.
- Mixing: Follow your recorded mix design. Mix dry ingredients thoroughly before adding pigment and water. Use consistent mixing times to avoid variation.
- Pouring: Pour concrete into molds level with the top edge. Use a straight edge or screed for consistency.
- Finishing: Float, trowel, or texture each slab at the same plastic state. Let them cure according to your project’s needs.
- Cleanup: Remove excess material and clean tools promptly to maintain their condition.
- Final checks: Inspect slabs for proper curing, color consistency, and any signs of cracking or defects.
Mold setup, leveling, and marking
Prepare your molds on a flat surface to ensure consistent slab dimensions. Use release agents sparingly to avoid color contamination.
Level each mold using shims or a straight edge. Ensure they’re secure and won’t shift during pouring.
Permanently label each sample with its mix ID, using a marker or engraver. This helps track and compare results accurately.
Mixing and batching best practices
For consistent mini slabs, follow these mixing and batching guidelines:
Dry ingredients first: Mix cement, aggregates, and admixtures thoroughly before adding pigment. This ensures even distribution.
Add pigment last: Pour in your measured pigment, mixing well to distribute it evenly throughout the dry mix.
Water and mixing time: Add water slowly while mixing continuously. Maintain consistent mixing times to achieve the same concrete consistency for each batch.
Combining pigments: If using multiple pigment containers, combine them thoroughly before adding to your mix to avoid color variation between batches.
Finishing technique and timing
Apply finishing methods that mimic field practice for accurate results:
Broom finish: Use a stiff-bristled broom to create texture, working perpendicular to the slab’s longest edge.
Trowel finish: Float and trowel each slab at the same plastic state using consistent pressure. This ensures even surface appearance across all samples.
Textured finish: Use a texturing tool or stamp to create patterns, ensuring consistency by applying them at the same stage of curing for each sample.
Consistent timing: Finish each slab at the same plastic state to maintain color consistency. This helps predict how your full project will look once poured and finished.
Curing, Monitoring Color Changes, and Visual Checkpoints
Outline the typical color evolution during curing and the key timeframes readers should monitor, from initial tint to final shade stabilization. Identify factors that influence color change and how each can shift final appearance, including cement type, pigment type, water content, admixtures, curing method, and finishing.
Establish clear timing for observation checkpoints and criteria for each, plus documentation protocol with standardized lighting, controlled white balance, and a simple color-reference chart for photos. List environmental conditions to verify before and during curing and how these conditions influence color development. Include troubleshooting tips for common issues and guidance on when to reseal or re-treat to achieve desired results.
Expected color evolution and timeline
Use this checklist to track your mini slabs’ color development during curing.
- Initial tint: Check the color immediately after pouring. It should match your pigment dosage.
- Early set (0-24 hours): Moisture and hydration start to change the surface sheen. Don’t rely on color yet.
- First 24-72 hours: Blush or blotch tendency may appear as moisture evaporates. This is normal.
- 1 week: Color should be more stable, but not fully cured. Expect slight variations.
- 2 weeks: Final shade should be reliable now. Any blotchiness or unevenness will likely persist.
- 3-4 weeks: Concrete reaches 90% of its final strength. Color is stable but may still darken slightly.
- 12 weeks: Full curing takes time. Final color and strength are achieved now.
- Quick rule: Don’t panic if your mini slabs don’t match the final shade immediately. Curing takes time.
Detecting and diagnosing blotchy or uneven color
Use this checklist to troubleshoot blotchiness in your mini slabs.
- Inconsistent batching: Check if pigment dosage varied between batches. Blotchiness may result.
- Finishing water: Too much water during finishing can cause blotchiness as it evaporates.
- Plastic sheeting: Inadequate coverage or removal too early can lead to inconsistent curing and blotches.
- Variable curing: Uneven exposure to sun, wind, or temperature can cause blotchy curing.
- Quick rule: Early detection helps. Address issues promptly to minimize blotchiness.
Environmental factors to monitor
Use this checklist to track environmental conditions affecting your mini slabs’ curing.
- Temperature: Ideal curing temp is 50-90°F (10-32°C). Too hot or cold slows curing and affects color.
- Humidity: High humidity promotes slower, more even curing. Low humidity speeds up curing but can cause blotchiness.
- Wind: Strong winds increase evaporation, leading to faster curing and potential blotchiness.
- Sun exposure: Direct sunlight increases surface temperature, speeding up curing and darkening color.
- Quick rule: Monitor these factors daily. Adjust your curing strategy as needed.
Post-Cure Treatments: Sealers, Wet-Look Preview, and Finish Testing
Outline how each sealer type shifts color depth, translucency, and sheen, and note pigment compatibility considerations to avoid unexpected shifts. Describe a practical wet-look preview method on mini slabs with a light dampening approach and timing relative to cure, plus how to interpret results for final appearance.
Define finish-testing protocol post-sealing: check gloss level, color uniformity, blotching or banding, surface slip resistance, and resistance to staining or UV exposure; specify repeatability and documentation steps. Include essential compatibility checks before sealing: verify sealer compatibility with the pigment system, confirm substrate cleanliness and prior coatings. Create a concise documentation plan: label samples with mix specs, sealer type, batch numbers, environmental conditions, and take standardized photos at set intervals for comparison to the final slab.
How sealers alter color and sheen
Sealers change the look of your concrete. They can darken it, make it shinier, or give it a matte finish.
Penetrating sealers soak in, protecting from within. They usually darken color slightly and add a subtle sheen.
Film-forming sealers sit on top, creating a barrier. They can enhance contrast, making colors pop, or give a high-gloss look. Water-based are easier to clean up but may not last as long as solvent-based.
Performing a sealer compatibility and adhesion test
Before sealing, do a quick test. Mix some sealer, apply it to a small patch on your mini slab.
Check for any discoloration. If it turns yellow or changes color, that sealer’s not right.
Let it dry, then try to scratch it off. If it peels easily, the adhesion is poor. Do this test on a hidden area first, just in case.
Replicating final surface treatments
Before you seal your whole slab, test your finishing sequence. This could be texturing, densifiers, or polishes.
Mix up your sealer, apply it to a sample. Let it dry. Then do the same with any other treatments you plan to use.
Check how they all work together. Do colors look right? Is the surface slippery or rough?
Interpreting Results, Matching Existing Concrete, and Documenting Decisions
Align criteria for judging color compatibility: define what constitutes a good match between mini-slab color and in-place concrete under the same lighting, and recognize acceptable deviations due to batching or curing. Establish a standardized comparison protocol: how to set up lighting, angle of view, moisture state, and surface cleanliness to ensure consistent results across samples.
Document decision thresholds and workflow: when to proceed with a match, when to adjust mix design, and how to record decisions for replication, including color targets, pigment doses, and curing conditions. Provide guidance on when to consult external resources: criteria for involving a color lab, pigment supplier, or professional verifier, and what data to share. Include practical notes on documentation and reproducibility: how to archive sample data, labeling conventions, and a template for recording final mix, batch number, additives, and curing regime for future pours.
Practical tips for comparing colors in-place
When comparing your mini-slab samples to the existing concrete, consistency is key. Here’s how:
View at the same time of day. Concrete color can change throughout the day due to sunlight. Matching under consistent lighting ensures accurate comparisons.
Clean both surfaces before viewing. Dirt and stains can skew your perception of color. Use a damp cloth to wipe down both samples and in-place concrete.
Consider age-related changes. Older concrete may appear duller or have a different patina than fresh samples. Account for this when judging the match.
Adjusting your mix and re-testing
If your first sample doesn’t match, don’t worry. It’s a process of refinement. Here’s how to adjust:
Change one variable at a time. Whether it’s pigment dose, cement type, or aggregate size, altering one factor lets you pinpoint its effect on color.
Pour a new sample with the adjusted mix. Follow your established pouring and curing process to maintain consistency.
Document results. Note what you changed, how much, and the resulting color. This helps track progress and replicate successful mixes.
Documentation and final spec sheet
A thorough record of your process ensures replicability and helps troubleshoot any future issues. Here’s what to include:
Photos: Snap pictures of the mini-slabs, in-place concrete, and any relevant details like mix proportions or pigment lot numbers.
Batch numbers, pigment lots, cement source: Track these for consistency and to help diagnose any quality issues down the line.
Mix proportions, finishing, curing, sealer details: Note every step of your process. This includes water-cement ratio, aggregate type, finishing techniques, curing conditions, and any sealers applied.
Conclusion
Color accuracy in the final batch hinges on disciplined testing, careful curing, and keeping safety at the front. When you nail the mini-slab results, you reduce guesswork and protect against costly mistakes later.
Start with safety gear and a clean work area; collect pigments, cement, and admixtures; mix small test batches that match your planned proportions; pour the mini slabs in a controlled layout, finish them consistently, and cure them as you planned; compare the color against the target under the same lighting and document every result and decision. This is how you build a reliable color baseline you can trust for the full pour.
Avoid common missteps like rushing the mix, skipping a proper seal or cure, and changing materials midstream. Do not ignore moisture, temperature, or outdated pigments, and never skip a visual check under the same lighting as your final area. safety first and follow the plan at every step to keep the project under control and avoid surprises.
If the project scope grows beyond small patches or color requirements become critical for a matched look, consider bringing in a pro before proceeding. Stay steady, document your decisions, and you’ll finish with confidence and a durable, accurate color match.
FAQ
Why does concrete color change as it cures, and what should I expect to see?
Color often shifts during curing as moisture evaporates and pigments oxidize. Expect a pale or muted shade early, then a few days of darkening or lightening as the slab dries. Check pigment label for typical cure-time color changes and compare against test panels.
What causes blotchy or uneven color, and how can I prevent or fix it?
Uneven color comes from inconsistent mix, improper pigment dispersion, or curing conditions. To tighten it up, ensure thorough mixing, pour evenly, and protect the slab from rapid drying. If blotch persists, test a small batch with adjusted dispersion or sealer timing and note the results for the next pour.
How do I match new colored concrete to existing or older slabs?
Match with a test panel that mirrors finish, shade, and exposure. Compare under the same lighting and note how the color changes as it cures. Document pigment type, dosage range, and cement/aggregate details to guide future pours.
What are the different pigment types, and how do they affect color consistency and dosage?
Pigments come in liquid, granular, and powder forms. Each type disperses differently in the mix, so follow the manufacturer’s mixing instructions and use a representative sample for dosage testing. If in doubt, check the label for recommended dosage ranges and mixing guidance.