

Introduction
You can screed a flat slab solo by using a simple rail setup to pull a level, even surface. The guide explains how to position and use the rails, and what to watch for to keep the slab thickness consistent. You’ll learn practical steps, tips for avoiding common mistakes, and simple rules of thumb that help you work efficiently on your own.
Key takeaways
- Use solo rail screed for small to medium slabs, saving time and labor.
- Ensure site is flat, level, and free of debris before setting up rails.
- Design rail system with proper spacing; tighten as pours get taller.
- Level rails accurately for a smooth, even slab surface.
- Mix, place, and consolidate concrete promptly to avoid delays.
- Pull screed in steady, smooth motion for consistent results.
- Float, finish, and cure slab immediately after rail removal for best outcomes.
Table of Contents
- Introduction
- Key takeaways
- Quick Project Overview and When to Use a Solo Rail Screed
- Tools and Materials Checklist
- Site Preparation and Layout for Accurate Rails
- Designing the Rail System: Types and Spacing
- Step-by-step Rail Installation and Leveling
- Mixing, Placing, and Consolidating Concrete for Solo Screed
- Pulling the Screed: Technique and Motion
- Floating, Finishing, and Curing After Rail Removal
- Troubleshooting, Common Mistakes, and Visual Checkpoints
- Safety, Time and Cost Estimates, and Project Planning Tips
- Conclusion
- FAQ
Quick Project Overview and When to Use a Solo Rail Screed
A solo rail screed allows one person to level a small to medium slab quickly using a screed rail and straightedge. It works best on clean forms for slabs up to about 6 by 6 feet (larger projects get tricky and slow). If the slab is wider, longer, or has more contour, bring in help.
Doing it solo can save money and speed up small jobs like patios or sidewalk sections under 100 square feet. However, larger slabs are prone to low spots or sags if rushed, so know when to stop and call a professional. If you cut corners, you’ll waste concrete and redo joints.
Best-case Use Cases
Solo screeding works well for small DIY projects like patios, shed floors, and garage slabs under 100 square feet. It’s cost-effective when you don’t need a full crew.
Avoid overcomplicating things—stick to straightforward designs without intricate details or curves that require multiple hands. Solo screeding is ideal for simple, flat surfaces where precision isn’t overly critical.
When Not to Attempt Solo Screed
Avoid solo screeding on large slabs over 100 square feet or when pouring concrete higher than a few inches. These conditions often need more control and manpower.
If your project involves complex designs, tight tolerances, structural requirements like reinforced floors, embedded plumbing, or building permit/inspection needs, it’s best to hire professionals who can ensure the job meets all necessary standards.
Tools and Materials Checklist
This section provides the essential tools and consumables for a solo rail screed setup. It focuses on DIY-friendly options you can buy cheap and upgrade later, prioritizing no-fluff items.
Essential Tools
You need these tools to ensure your solo rail screed setup runs smoothly:
- Rails or straightedges for guiding the screeding process.
- A bull float for smoothing out the concrete surface.
- Screed rails or supports to hold your screed in place.
- A level to maintain perfect flatness.
- A wheelbarrow for easy material transport.
- A tamper to compact the concrete before finishing.
- Concrete vibrator to settle out air bubbles.
- Hose and water supply for cleaning tools.
- Safety glasses and gloves for protection.
- Shovel or trowel for initial placement of concrete.
- Chalk line tool for marking screed rail positions.
- Measuring tape to ensure accurate spacing between rails.
If you notice any movement in your setup, stop and adjust immediately to avoid uneven surfaces.
Materials and Accessories
The right materials are crucial for a successful concrete pour:
- Concrete mix suitable for your project needs.
- Spacing blocks to maintain consistent rail height.
- Stakes to secure the screed rails in place.
- Stringline to mark out the pouring area accurately.
- Shims to fine-tune rail positioning.
- Safety gear including hard hats and steel-toe boots.
- Concrete release agent for easy removal of forms.
- Adequate water supply for hydration during curing.
- Plywood sheets or plastic as a base layer under concrete.
- Rebar or wire mesh if reinforcing is needed; consult local codes and project requirements to determine the appropriate reinforcement type, clear cover, and spacing.
- Safety cones and warning signs to mark the work area.
If you notice any movement in your setup, stop and adjust immediately to avoid uneven surfaces. Consider calling a professional if issues persist or are beyond your expertise.
Site Preparation and Layout for Accurate Rails
Measure carefully, set elevations, form the edges, and compact the subbase. A level subbase keeps rails from shifting and helps long-term accuracy.
If your subbase is uneven or poorly compacted, you’ll face frequent adjustments and rework during screeding. Ensure it’s level to avoid rail movement and maintain accurate levels.
Establishing Finished Elevation and Slope
Measure the elevation at both ends of your slab area for a level surface or calculate necessary slope for proper drainage. Use stakes and string lines to mark these points clearly.
A typical starting point is setting up rail supports about 1 inch above finished grade, accounting for compaction during pour. Adjust based on soil conditions and expected settlement.
For sloped areas, use a level or slope finder tool to ensure consistent incline across the slab. Aim for at least one-quarter-inch per foot for adequate drainage.
Formwork and Edge Support
Build formwork using straight, sturdy lumber for clean edges and support during concrete pour. Ensure forms are level and plumb to avoid unevenness in the slab.
To anchor rail supports, use sandbags or stakes driven into the ground to keep them stable during screeding. Supports must withstand pressure from poured concrete without shifting.
For corners, reinforce with additional bracing to prevent movement and ensure a smooth transition between walls. Use common sense when placing fasteners; they should be strong enough but not overkill for your specific setup.
Designing the Rail System: Types and Spacing
Select appropriate rail materials based on your slab thickness and desired level of rigidity.
Rail Material Pros and Cons
- Aluminum: Lightweight but can bend under pressure if not reinforced properly. Avoid using aluminum in unsupported spans over 4 feet to prevent bending.
- Steel: Provides sturdiness and durability, though it is heavier than aluminum. Steel rails are less likely to sag or bend even with wider spacing.
- Plywood: Cost-effective for curved edges but prone to warping if not stored correctly. Ensure plywood is straight and flat before use; warped materials can lead to uneven screeding.
Avoid using weak or warped materials as they can result in uneven screeding.
Rail Spacing and Support Intervals
Maintain proper spacing between rail supports to keep a straight edge during screeding. Adjust intervals based on material stiffness and slab thickness:
Typically, 4 to 6 feet between supports works well but can vary by site conditions.
For thicker slabs or more rigid rails, wider spans may be suitable; for thinner slabs or less sturdy materials, closer support intervals are necessary. Place intermediate supports strategically to prevent sagging under wet concrete weight.
Step-by-step Rail Installation and Leveling
This section explains how to install rails and establish a reference plane so a single operator can pull a flat surface reliably. Install the rails, set rough heights, then fine-tune until the surface stays true.
Step-by-step Installation Process
Start by setting up your tools and materials, ensuring all rails are ready for installation.
- Mark the slab edges where rail supports will go. Use a level to ensure accuracy.
- Install support brackets at marked points, spacing them evenly across the pour area.
- Attach rails to the support brackets, using temporary fasteners to allow adjustments later.
- Use a laser or stringline to establish your reference plane and adjust rail heights accordingly. Ensure rails are level within acceptable tolerances before proceeding.
- Tighten all connections securely once all rails are in place to prevent movement during screeding.
Double-check that all rails are level and secure before beginning the pour.
Setting a Master Rail and Working Direction
Select your master rail at one end of the slab, typically where access is easiest. This will be your starting point for screeding.
Align the master rail with stringlines to ensure it’s perfectly straight and level. Use shims or small adjustments as needed to fine-tune its position.
The direction you work from the master rail is crucial. Always move toward the master rail, ensuring each new section aligns precisely with your established reference plane.
Tensioning and Locking Rails for One-person Use
To prevent rails from moving during screeding, use simple tensioning methods. Tighten all connections securely to keep the rail stable.
Consider using temporary braces or supports between rails to add extra stability. This is especially important if you’re working alone and need both hands free for screeding.
If your rails are slightly out of alignment, use shims under the feet of the support brackets to level them correctly. Ensure all adjustments are made before pouring concrete to avoid delays during the pour.

Mixing, Placing, and Consolidating Concrete for Solo Screed
Mix concrete carefully to achieve a workable consistency. Aim for a slump between 4 to 6 inches for easy placement but avoid weakening the mix with excessive water.
Use admixtures like plasticizers or retarders sparingly as per manufacturer instructions to enhance flow and working time without compromising strength.
Test small batches first to ensure your mix meets requirements before full-scale application.
Choosing the Right Slump and Admixtures
The slump of your concrete mix is crucial for workability. Aim for a range between 4 to 6 inches if you’re pouring with a solo screed, providing enough fluidity without compromising strength.
Add plasticizers or retarders carefully following manufacturer instructions to avoid weakening the concrete. Retarders can be useful in hot weather to extend setting time, giving more working time.
Always test a small batch first if unsure about additives or slump adjustments to ensure quality and consistency.
Placing Sequence to Maintain a Consistent Head of Concrete
Pour concrete in manageable bays and maintain continuous flow. Start at one end and pour each bay sequentially, ensuring the next section is ready when the previous one is complete.
Maintain close proximity with your chute or wheelbarrow for smooth transitions between pours. Adjust pouring speed or bring more material if delays occur to avoid gaps that can affect screed rail pull.
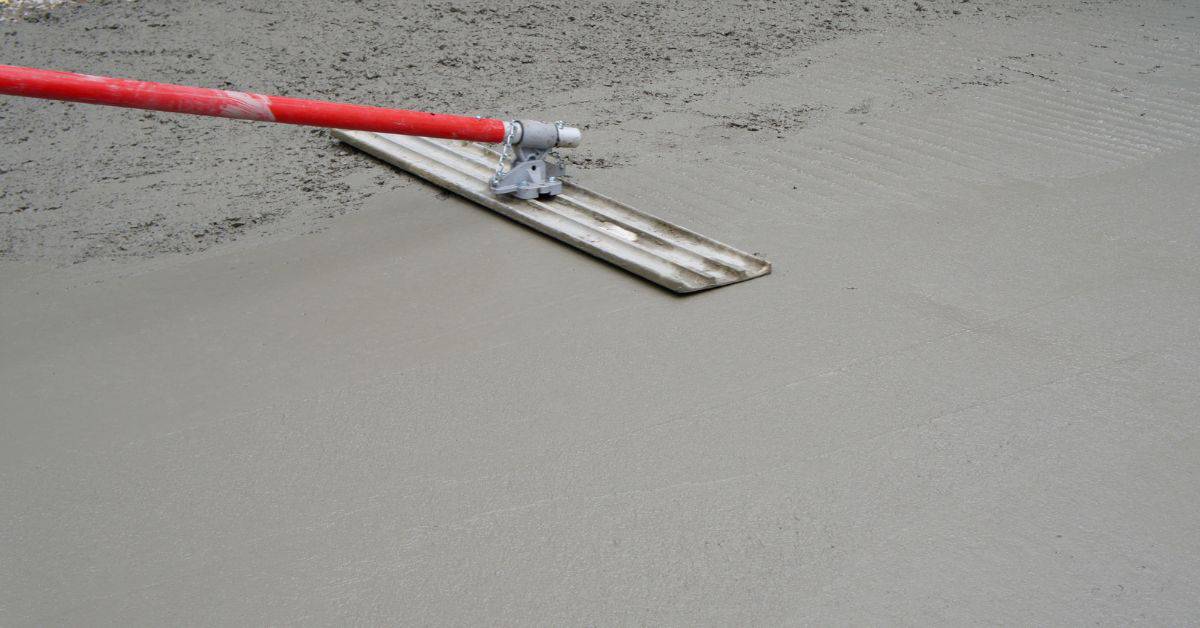
Pulling the Screed: Technique and Motion
Pull the screed steadily in a straight line with good posture and squared shoulders, guiding it smoothly along the rails at an even pace for a flatter surface.
Single-pass vs. Multiple-pass Strategy
Aim for a single continuous pull with consistent mix and well-placed concrete to minimize disruptions and achieve uniform finish. If areas have inconsistent thickness or high spots, break into smaller sections to correct unevenness before continuing. Consider multiple passes if necessary.
Dealing with High or Low Spots Mid-pull
Lift the screed gently over high spots to allow more concrete to flow in; move slowly and steadily. For low spots, stop briefly to add small amounts of concrete without overworking it.
If significant fixes are needed, pause and use a smaller trowel to fill in low spots carefully before resuming screeding from where you left off to maintain consistency across the surface. Ensure high or low spots do not exceed acceptable thresholds; if unsure, stop and reassess or call a professional for assistance.
Floating, Finishing, and Curing After Rail Removal
After removing the rails, use a bull float to smooth the surface when it stiffens but still shows a sheen. Follow with an edge tool for clean edges and plan joint cuts to prevent future cracks.
Timing and Sequence of Finishing Tools
- Bull float: Use shortly after screeding when the concrete stiffens enough to hold its shape but still shows a sheen, leveling out minor imperfections.
- Darby: Follow bull floating with a darby for finer texture before final finishing. Ensure the surface is firm enough to support the tool without sinking in too deeply.
- Trowel: Use trowels when the concrete can hold an impression without significant indentation, creating a smooth, hard-wearing finish.
- Broom: For a non-slip finish, broom the concrete after it’s set up enough that you can leave slight marks but not deep grooves. Ensure the surface is firm enough to prevent damage from foot traffic.
- Cutting joints: Use a hand-held or walk-behind saw to cut control joints when the surface is stiff enough to hold an impression from your thumb. This prevents cracking by allowing controlled shrinkage.
Renting tools like trowels and joint cutters can be cost-effective if you’re only doing this project once, while buying them might make sense for frequent concrete work.
Curing Methods and Protection
Proper curing is crucial to ensure the slab gains strength and durability. Start curing as soon as you finish floating and cutting joints.
Maintain moisture on the surface for at least a week, using methods like wet burlap or plastic sheeting. This keeps the concrete from drying out too quickly, which can cause cracking. Alternatively, apply a curing compound immediately after finishing to seal in moisture. Follow manufacturer instructions for application rates and coverage.
Protect the slab from foot traffic and heavy loads until it reaches at least 70% of its design strength, typically around three weeks but check local conditions and concrete mix specifics.
Troubleshooting, Common Mistakes, and Visual Checkpoints
Common rail mistakes include movement, incorrect slope, and overworking the material, which can ruin the finish. Test for movement, check slope with a level, and avoid overworking to maintain flatness.
Quick visual checks during the pour help prevent rework and weak spots later. However, excessive stopping can also cause issues if not managed properly.
Visual Checkpoints During the Pour
Monitor these signs to ensure your slab remains flat and smooth:
- Screed marks that are too deep or inconsistent indicate overworking.
- High ridges along the screed line suggest concrete is being pushed up rather than spread evenly.
- Slack, sagging concrete between rails means you’re moving too slowly; speed up your pour rate.
- Uneven spots that appear after screeding may be due to improper slope or rail movement.
- Check for air bubbles surfacing as you float the slab; they indicate areas needing more attention.
- Slight waves in the concrete surface can point to unevenness in your rails or base.
- Rough edges on the sides of the pour show where water has evaporated too quickly, causing raveling.
- Cracks forming at corners or along rail lines suggest localized settlement issues.
If you notice any unusual behavior or inconsistencies in your concrete, stop immediately to reassess and address them promptly.
Fixes for Common Issues
Tackle these common issues as they arise:
- For raveling edges, use a trowel or float to smooth out rough spots and apply a thin layer of fresh concrete if necessary.
- If you see tears in the surface, carefully fill them with fresh concrete and work it into place using a float.
- To fix unevenness, go over high spots with a bull float to level them out before they set too hard.
- Localized settlement can be addressed by adding more concrete under low areas and smoothing it out.
- If you notice rail movement causing dips or bumps, stop the pour and realign your rails for better support.
- For air pockets, use a poker tool to break up bubbles before they harden; then float over them again.
- To prevent future issues, ensure proper tensioning of rails and consistent concrete placement throughout the pour.
If you encounter any major problems that affect the integrity of your slab, stop pouring immediately and consult with a professional for advice.
Safety, Time and Cost Estimates, and Project Planning Tips
Safety comes first. Plan the job, estimate time and cost, and set a realistic schedule before you start screeding alone.
A rough plan helps you buy the right mix, tools, and amount of material to avoid delays and save money. Stay aware of overheads and weather conditions that can disrupt your work.
Safety Checklist and Ergonomics
Before starting, ensure you have all necessary safety gear and follow ergonomic practices:
- Wear hard hats, gloves, and steel-toed boots.
- Use a dust mask or respirator.
- Lift concrete buckets with proper form: bend at the knees, keep back straight.
- Take breaks every hour to rest and hydrate.
- Alternate hands when holding tools to avoid repetitive strain injuries.
- Wear safety glasses or goggles.
- Have a first aid kit nearby.
- Use knee pads for kneeling work.
- Avoid overreaching; use ladders or scaffolding if needed.
- Keep your workspace clean and free of clutter to prevent tripping hazards.
- Wear long sleeves and pants to protect from concrete burns.
- Have a buddy system in place for emergencies.
If you feel dizzy, weak, or overly tired, stop immediately and rest before resuming work. Consult a professional if unsure about any aspect of the project.
Rough Cost and Time Calculator
For a small 10×10 slab, expect to spend around $250-$400 on materials and approximately 6-8 hours of labor.
A larger 20×20 slab might cost you between $700-$1200 in materials and take about 12-16 hours to complete.
Optimize your schedule by planning the pour during cooler parts of the day, like early morning or late afternoon, to avoid rapid drying that can cause cracking. Rushing the process can lead to improper curing or inadequate reinforcement.
To save on costs, consider using ready-mix concrete trucks for larger pours and renting specialized tools instead of buying them outright.

Conclusion
With the rail system set up and the concrete in the mix window, you get a flat, solid slab that looks right and holds up to load and weather. The key is staying deliberate about safety, monitoring the levels, and keeping the process tight so there’s no wasted material or rework.
Do this: confirm the rail layout and spacing, verify the surface and form levels, mix and place in small batches, consolidate without overworking, pull the screed with steady, even motion, float and finish before the bleed seals in, and cure properly after removing the rails. Move through those steps in order, and keep your work area clean and guarded so you don’t trip or drop tools mid‑pour. Safety first and test small area first before committing to the full deck.
Two common mistakes to avoid are overworking the concrete or riding the screed too aggressively, which causes segregation or wobble, and skipping proper curing, which leads to cracking. Keep your hands on the project, wear appropriate PPE, and stay within the recommended mix and timing windows. If you’re unsure about layout, structural loads, or local codes, don’t push through solo—call in a pro for a quick review. Stay focused, follow the plan, and you’ll finish strong with a durable, good‑looking slab.
FAQ
Can I screed a slab alone?
Yes, with the right setup and technique. A simple “rail” method works well for small to medium-sized slabs.
What if my slab is too large?
A big slab needs more than one person to avoid mistakes. If you must do it alone, divide the work into smaller sections.
Should I use a laser level for screeding?
Laser levels make it easier to get a flat surface. But if you’re on a tight budget, use a simple water or plumb bob line instead.
Avoid “floating” the rail – what does that mean?
“Floating” means putting the rail directly on top of the fresh concrete without support. Don’t do it! It can mess up your slab’s level and ruin all your hard work.