
Introduction
Achieving a consistent broom finish on wide concrete slabs eliminates zebra stripes.
You’ll learn practical steps, timing tips, and texture controls that help the finish read evenly across large areas.
The guide walks through real‑world considerations and common pitfalls to help you know what to adjust for reliable results.
Key takeaways
- Choose a consistent broom style and fiber for uniform traction across slabs.
- Pre-wet the formwork and surface to minimize suction and pull variations.
- Maintain steady pull pace and blade angle; avoid stopping mid-sweep.
- Use a consistent concrete slump and proper pop-out timing to reduce stripes.
- Schedule joints and broom passes to minimize crossflow across wide areas.
- Inspect during curing with visual checkpoints; fix small zebra issues promptly.
Table of Contents
- Introduction
- Key takeaways
- What is a broom finish and what causes zebra stripes
- Planning for wide slabs to prevent striping
- Proper concrete mix and consistency to reduce zebra effects
- Tools, brooms, and accessories for consistent broom finishes
- Step-by-step timing and technique for broom finishing without stripes
- Safety and ergonomic tips for large-area broom finishes
- Troubleshooting and fixing zebra stripes after they appear
- Visual checkpoints, cost comparison, and best-practice checklist
- Conclusion
- FAQ
What is a broom finish and what causes zebra stripes
A broom finish is created by dragging a broom across freshly placed concrete to create a textured, slip‑resistant surface. It contrasts with smoother troweled finishes and is common on wide slabs where texture helps traction. This intro explains how texture and light interact across large surfaces.
Zebra stripes are alternating light and dark bands caused by texture variation, moisture movement, and shading from aggregate exposure. Surface angles and lighting can make the stripes more or less visible as you move across the slab. Tooling, timing, and mix factors all contribute to stripe formation and consistency.
Mechanics of brooming and surface texture
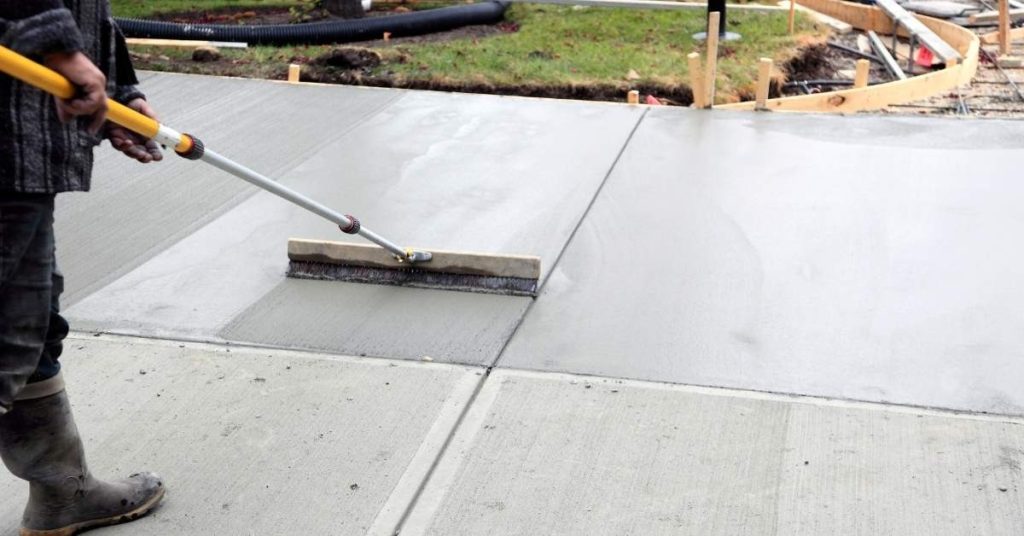
The broom finish is created by dragging a broom across freshly placed concrete. This action leaves ridges and valleys, creating a textured, slip-resistant surface. Unlike smoother troweled finishes, the broom’s bristles push aggregate particles to the surface, giving wide slabs a distinct appearance.
The type of broom used, its angle, and the pressure applied all influence the resulting texture. Natural fiber brooms create deeper, more pronounced ridges than synthetic ones. A steeper broom angle and heavier pressure result in coarser textures.
Stroke direction also plays a role. Brooming parallel to joints creates longer, more visible stripes. Diagonal strokes can help mask them but may require more passes for consistency.
Common causes of zebra striping
Zebra striping is caused by variations in texture, moisture movement, and aggregate exposure. Here are the key culprits:
Uneven slump: Inconsistent concrete mix can lead to varying degrees of slump, causing some areas to be broomed differently than others.
Inconsistent broom strokes: Varying broom pressure, speed, or stroke direction across the slab can result in alternating light and dark bands. Even slight differences can show up as stripes under certain lighting conditions.
Variable bleeding/evaporation: Differential moisture loss due to evaporation or bleed water movement can cause texture variations. Areas where water evaporates quickly may have a lighter, more exposed aggregate appearance.
Slab segmentation: Wide slabs often have control joints to prevent cracking. These joints can act as barriers to concrete flow and finishing, leading to slight textural differences on either side of the joint.
Planning for wide slabs to prevent striping
Pre‑planning for wide slabs focuses on joint layout and broom direction to minimize visible variation. Consider how control joints and broom paths align across pours to reduce patterns that stand out. This section helps you map the workflow before the first pour.
Map pour sequencing and timing to keep movement continuous and avoid mismatches at transitions. Define edge laps or gaps between slabs and establish clear crew responsibilities to maintain consistent tooling pressure and finish quality. Also verify material and equipment parameters to reduce variation lift to lift.
Crew coordination and workflow timing
To avoid zebra stripes, it’s crucial to keep the broom finish continuous across wide slabs. Here’s how:
Assign roles clearly. Divide your crew into teams responsible for placing concrete, screeding, and finishing. Each team should have a lead who communicates with others.
Time your workflow so that one team starts brooming as soon as the previous team has finished screeding. This keeps the concrete at the right consistency for brooming throughout the slab.
Use flags or markers to indicate where each team should start and stop, helping maintain a smooth transition between pours.
Pour and screed strategy for uniform surface moisture
Maintaining consistent surface moisture is key to avoiding stripes. Here’s how to achieve this:
Control pour rates. Pour concrete at a steady rate across the entire slab. Too fast, and you’ll have dry spots; too slow, and you’ll get stripes from uneven curing.
Use a staggered pour approach for wide slabs. Start pouring at one end, then move back and forth like mowing a lawn to keep the concrete fresh across the entire width.
Screed carefully. Make sure your screed is level and true. Pass it over the surface evenly, removing any high or low spots that could cause stripes. Keep the screed moving at a consistent pace to maintain uniform surface moisture.
Proper concrete mix and consistency to reduce zebra effects
Mix and workability influence how the broom grabs the surface and how texture holds across wide slabs. Too much or too little slump can worsen zebra stripes and texture inconsistencies. This section covers how to observe the fresh mix and plan the finish accordingly.
Water/cement ratio affects bleed, surface dust, and finish cohesion, which in turn impacts shading bands. Admixtures and aggregate grading interact with broom strokes to either minimize or emphasize alternating light and dark bands. Practical timing and monitoring help keep color and texture uniform.
Target mix characteristics and what to check
Before pouring, ensure your concrete mix is right for a consistent broom finish. Use this checklist when ordering or checking your mix.
- Slump: 4-6 inches. Too high (over 8) causes excessive bleeding and striation. Too low (under 3) leads to poor workability and inconsistent texture.
- Water/Cement ratio: Aim for 0.45-0.55. Too much water promotes bleeding and dusting, while too little makes the mix hard to finish.
- Aggregate size: Maximum aggregate size should be no more than 3/8 inch for wide slabs to minimize stripe formation.
- Aggregate type: Rounded aggregates help reduce stripes. Angular ones can create more texture and potential striping.
- Air content: Around 5-7% helps with workability, finish cohesion, and reduces bleeding.
- Admixtures: Check if any are added to influence setting time or workability. Ask your supplier for details.
- Consistency: The mix should be uniform throughout the batch to avoid variations in finish.
- Practice pour: If possible, do a small practice pour to check the mix’s behavior before starting on the main slab.
Quick rule: Moderate slump ranges (4-6 inches) and proper water/cement ratio are key for consistent broom finishes. If unsure, consult your concrete supplier.
Admixtures and finishing aids
Admixtures can help control setting time and improve finish consistency. Here’s how they work:
Retarding admixtures: Slow down the setting process, giving you more time to finish the slab. This is particularly useful for wide slabs where finishing may take longer.
Plasticizers: Improve concrete workability without increasing water content. They help reduce segregation and improve finish cohesion, minimizing striping.
Evaporation retarders: Reduce water loss from the surface during finishing, helping maintain consistent slump and preventing dry spots that can cause stripes.
Tools, brooms, and accessories for consistent broom finishes
Different push broom types and bristle materials influence texture outcomes on wide slabs. Natural fiber, synthetic, or blends interact with concrete consistency and cure time in distinct ways. This intro guides tool selection for even texture.
Bristle stiffness and broom width affect coverage and uniformity across large areas. Auxiliary texture tools like edgers, darbies, and magnesium floats help achieve clean edges and smooth mid‑slab transitions. Pair the right tools with proper technique to avoid drag marks.
Choosing the right broom and accessories
When it comes to concrete finishing, a good broom makes all the difference. Here’s what you need to know:
Bristle type: Synthetic bristles are durable and long-lasting, while natural bristles provide a more traditional look but wear out faster. Choose based on your budget and desired finish.
Broom width: For large slabs, use a broom that’s at least half the width of the slab to ensure consistent strokes. Check the label or manufacturer instructions for size recommendations.
Stiff vs. soft bristles: Stiffer bristles are better for leveling and compacting fresh concrete, while softer bristles are ideal for texturing and finishing. Consider your specific application when choosing.
Tack Cloths, Primers, and Surface Preparation Alternatives
Fresh concrete doesn’t need tack cloths or primers. They’re for old surfaces, not new slabs. Here’s what you do:
Check base compaction. Make sure your subgrade is solid before pouring. No point in fixing a bad surface with products.
For fresh concrete, evaporation retarders are your friend. They keep the top layer moist while curing. Apply as soon as the bleed water disappears. Light brooming can help too, but don’t overdo it – you’re not trying to remove material, just level the surface.
Don’t use surface products if you’ve got a good finish already. They won’t improve what’s already smooth and even. And remember, no matter what you do, concrete will always have some imperfections. It’s natural. Don’t expect perfection.

Step-by-step timing and technique for broom finishing without stripes
Timing from initial screed to first broom pass matters, with attention to when the surface is matte or glossy and how bleed water affects the finish. Ambient conditions and slab characteristics influence the finishing window. This section outlines safe timing cues to minimize stripes.
Prescribe a consistent stroke pattern with a fixed stride and uniform broom angle. Overlap passes in a controlled way and maintain parallel motion to reduce ridges. A well‑planned sequence keeps texture even across long runs.
Step-by-Step Process
Follow these practical steps to achieve a consistent broom finish across wide slabs, minimizing the risk of zebra stripes.
- Preparation: Inspect the slab for level and moisture. Ensure no standing water or dry spots. Wear appropriate safety gear.
- Initial Screeding: Use a straight edge to screed off excess concrete, creating a flat surface. Work quickly but carefully to avoid overworking the concrete.
- Float: Once the concrete has set slightly (around 15-30 minutes), use a magnesium float to smooth out any imperfections and bring bleed water to the surface. Work in overlapping passes.
- First Broom Pass: When the surface becomes matte, start brooming. Use a synthetic broom with moderate pressure and consistent stroke length. Keep strokes parallel to slab edges.
- Subsequent Passes: Continue brooming at 15-30 minute intervals until the desired texture is achieved. Feather edges between passes to prevent build-up lines.
- Final Check: Inspect the surface for any visible stripes or inconsistencies. Address any issues by re-brooming or adjusting pass pattern as needed.
- Cleanup: Remove excess concrete and debris from brooms, tools, and work area. Allow slab to cure according to manufacturer’s recommendations.
Timing windows and visual checkpoints
Use this checklist to determine when to float, broom, and test wetness across the slab to avoid zebra stripes.
- Float: When concrete has set slightly but is still soft enough for float to glide easily (around 15-30 minutes after pour).
- First Broom Pass: When surface becomes matte and bleed water has been absorbed or evaporated (usually around 45-60 minutes after pour).
- Subsequent Passes: Every 15-30 minutes until desired texture is achieved. Check for glossy spots, which indicate unset concrete.
- Wetness Test: Before final pass, perform a wetness test by sprinkling water on the surface. If it’s absorbed quickly and evenly, proceed with final pass. If not, wait or adjust pass pattern.
- Edge Check: Ensure edges are properly finished and do not have visible ridges or alignment flaws.
- Temperature Check: Monitor ambient temperature. Colder temperatures may require longer curing times to avoid zebra stripes.
Quick rule: Always check the surface for glossy spots, dry patches, or moisture pockets before brooming. These can cause zebra stripes if not addressed.
Stroke patterns, overlap, and edge treatment
Use consistent stroke patterns, controlled overlap, and proper edge treatment to achieve an even broom finish across wide slabs.
Start at one corner of the slab. Use a fixed stride length (around 2-3 feet) and keep strokes parallel to the slab edges. Maintain a steady pressure on the broom, neither too light nor too heavy. Work at a consistent speed to ensure even overlap.
Overlap each pass by about 40-60% to ensure full coverage but avoid overworking the concrete. At edges and joints, feather your strokes to blend with adjacent areas and prevent build-up lines. Do not broom right up to the edge; leave a small gap (around 1/2 inch) to avoid damaging the edge.
Quick tip: Always keep your broom wet but not dripping. This helps maintain consistent texture and prevents streaking.
Safety and ergonomic tips for large-area broom finishes
PPE selection and health monitoring keep crews protected during long finishing days. Eye and face protection, hearing gear, gloves, and footwear are essential. Establish simple daily checks to catch heat stress or fatigue early.
Ergonomic technique focuses on neutral spine and balanced loads to minimize strain. Proper tool height and handle length reduce bending and reaching on fresh concrete. Clear crew communication and short safety briefings add another layer of protection.
Personal protective equipment and heat stress
The sun’s beating down, concrete’s curing fast. You need protection that’s lightweight and breathable.
- Eye and face protection: Safety glasses with side shields or a full-face shield. Protect your eyes from dust and splashes.
- Hearing protection: Disposable earplugs or earmuffs. Concrete tools can be loud.
- Gloves: Lightweight, flexible gloves for grip and chemical resistance. Avoid cotton; it absorbs sweat and concrete juice.
- Footwear: Safety boots with steel toes and slip-resistant soles. Protect your feet from dropped tools and falls.
- Lightweight, breathable PPE: Long-sleeved shirts and pants in light colors to reflect heat. Consider renting cooling vests for hot days.
Ergonomic methods and team rotation
Proper posture keeps your back safe, reduces fatigue, and helps maintain consistent broom strokes. Keep your spine neutral, knees slightly bent, and shoulders relaxed.
Use long-handled tools with a height that lets you work without excessive bending or reaching. A good rule of thumb: when standing upright, the tool’s handle should reach about chest height.
Rotate workers regularly to keep brooming pressure consistent. Fatigue can cause varying stroke depths, leading to stripes. Swap out finishers every 15-30 minutes, depending on slab size and heat.
Communicate clearly when rotating tasks. A quick ‘switch!’ or hand signal can prevent collisions and dropped tools.
Troubleshooting and fixing zebra stripes after they appear
Immediate fixes for newly formed stripes include rewetting the surface and reworking with a consistent broom direction. Light re‑troweling can blend stripes without creating new ridges. Avoid overworking the slab while restoring uniform texture.
For hardened slabs, use grinding and polishing techniques with dust control, followed by a compatible sealer to even appearance. Longer‑term options include overlays or skim coats to achieve a uniform look after cure.
Quick on-the-spot corrections
If stripes appear during the finishing process, act fast. You’ve got a narrow window to correct them.
First, stop all work. More brooming or troweling can make stripes worse. Reassess your technique and conditions.
If stripes are shallow, re-wet the surface lightly with a fine mist. Be careful not to over-saturate. Then, rework the area with consistent broom strokes in the same direction. Use a trowel to blend stripes into surrounding areas gently, avoiding new ridges or gouges.
If stripes are deep or won’t budge, stop. It’s time for a different approach once the slab has cured.
Repair and cosmetic remedies for cured slabs
Once concrete has cured, stripes become more challenging to remove. But don’t despair; there are still options.
For surface-level stripes, use a diamond cup grinder or high-grit diamond pad with vacuum attachment. Flatten and blend the stripes, then gently polish to minimize contrast. Apply a compatible sealer to even appearance and slow further staining.
For deeper stripes or those extending into the matrix, consider surface overlays. Apply a cementitious or epoxy-based overlay, skim coat, or micro-topping for uniform texture and color. Ensure proper substrate profiling and cure before applying.
To mask stripes, use stains. Choose a color-tinted sealer that matches your slab’s base color. Apply evenly to blend stripes into the surrounding area. Always test on a small, hidden area first.
Visual checkpoints, cost comparison, and best-practice checklist
Pre‑pour visual checks cover surface prep, broom texture selection, slump control, and environmental factors. Alignment of formwork and forms helps ensure consistent broom passes. These checks set the stage for a smooth finish.
In‑process cues and best practices guide you from pour to cure. Recognize proper aggregate exposure, drag consistency, and corrective actions on the fly. A concise checklist supports field decisions and helps compare finish options over time.
Pre-pour and Finishing Checklist
Use this checklist before pouring and during the finishing process to ensure a consistent broom finish.
- Confirm mix design: Ensure concrete mix meets required slump, strength, and aggregate size for your chosen broom texture.
- Inspect forms: Check formwork alignment and securement. Misaligned forms cause inconsistent broom passes.
- Select broom: Choose the right broom type (e.g., push broom, rotary) and size for your slab width.
- Check surface prep: Ensure substrate is clean, dry, and primed to prevent adhesion issues or striping.
- Monitor slump: Keep an eye on concrete slump. Too much or too little can lead to stripes.
- Consider weather: Adjust timing based on temperature and humidity to avoid curing problems.
- Plan crew rotation: Schedule breaks to prevent fatigue-related mistakes like inconsistent broom passes.
- Test surface: Perform a small test pour to confirm concrete consistency, slump, and finish quality.
Quick rule: Use this checklist before each pour to minimize striping risks.
Cost and Durability Considerations vs. Other Finishes
Compare broom finish with alternatives to make an informed decision.
- Broom finish: Labor: $2-$5/sq ft; Material: $1-$3/sq ft; Equipment amortization: $0.50-$2/sq ft.
- Trowel finish: Labor: $1-$4/sq ft; Material: $0.50-$2/sq ft; Equipment amortization: $0.25-$1/sq ft.
- Exposed aggregate: Labor: $3-$7/sq ft; Material: $2-$5/sq ft; Equipment amortization: $0.50-$2/sq ft.
- Maintenance: Broom and trowel finishes require occasional cleaning, while exposed aggregate needs sealing every 2-5 years.
- Durability: Trowel finish is most durable but least slip-resistant; broom and exposed aggregate offer better traction.
- Repair costs: Fixing zebra stripes in broom finish can cost $1-$3/sq ft, while redoing entire slabs for other finishes may be necessary.
Quick rule: Consider initial and long-term costs, maintenance needs, and durability trade-offs when choosing a finish.
Conclusion
The trick to durable, even broom finishes on wide slabs is planning, steady technique, and safety. Start with a solid plan, test a small patch, and protect yourself from fatigue and trips as you work.
Check the work in this order: confirm the slab size and finish goals, verify your mix and consistency in a representative area, set up the broom and accessories for uniform strokes, apply the finish while watching timing cues, and pause to check visually for stripes before the concrete sets. Move section by section, keep the pace steady, and adjust based on how the surface looks at each visual checkpoint. If you see zebra patterns forming, stop, reassess timing and stroke direction, and fix in a controlled pass rather than rushing through.
Common mistakes to avoid are trying to fix stripes by piling on pressure, using a dirty or worn broom, and rushing across a large area without breaks or proper ergonomics. Safety rules are simple: wear eye protection and sturdy footwear, take breaks to reduce fatigue, and test any change on a small area first before full-scale application. If you’re unsure about slab size, mix quality, or the right broom for your conditions, don’t push through a bad setup—revisit the plan or call in help.
FAQ
Why do wide slabs show zebra stripes after broom finishing?
The stripes come from uneven trowel pressure and inconsistent broom texture. If the slab is wide, any small variation shows up more, so you need steady technique from edge to edge.
What should I do to keep the finish uniform across the whole slab?
Work in straight, continuous passes and maintain a consistent broom angle and rhythm. Don’t rush the pass or change brushes mid-task, or you’ll create patches that stand out.
Should I adjust water or slump to fix stripes?
Keep the mix and slump within the same range you used elsewhere on the job. Too wet or too dry changes the finish; small adjustments matter a lot on wide slabs.
Is it okay to use a higher skill broom for wide slabs?
A stiffer or finer broom can help, but only if you apply the same speed and pressure across the surface. If you switch broom types mid-job, you’ll see new stripes right away.