
Introduction
You can achieve a uniform radius with an edger tool without dragging aggregate.
The guide walks through practical steps, tips, and rules of thumb to help you reproduce a smooth, consistent edge.
Key takeaways
- Define uniform radius as consistent curve at edge while avoiding aggregate drag.
- Select edging tools with smooth lips and non-marking contact to prevent scratches.
- Establish edge zone prep: compacted base and stable formwork to hold radius.
- Measure consistently with a calibrated gauge or ruler and reference marks.
- Apply edging technique with steady pressure and slow passes to avoid dragging.
- Check visual checkpoints frequently: uniform curve, no gaps, and even surface sheen.
Table of Contents
- Introduction
- Key takeaways
- What “uniform radius” means and why avoiding aggregate drag matters
- Tools and materials checklist
- Material specs and standards explained
- Preparing the pour and edge zone
- Step-by-step edging technique for a uniform radius
- Visual checkpoints and measurement methods
- Common mistakes and how to avoid them
- Troubleshooting and repair options
- Conclusion
- FAQ
What “uniform radius” means and why avoiding aggregate drag matters
Uniform radius means the concrete edge is finished with a consistent, rounded curve along the whole edge, not sharp corners or uneven nicks. When you drag aggregate during finishing, the stones can ride up and create visible drag marks, leaving a rough, patchy edge. A true uniform radius makes edges stronger and the surface look clean by reducing exposed aggregate and chipping risk.
Keeping a consistent radius matters for durability and beauty, and helps you hit those performance goals: consistency, clean aggregate coverage, and edge strength. For DIYers, it means less fiddling after pour, easier edging, and a surface that you can seal or finish evenly. If you’re unsure about achieving the radius, check the label or datasheet for guidance on finishing tools and methods.
Functional vs. aesthetic goals
A uniform radius on concrete edges serves two main purposes: structural integrity and finished appearance.
Structural integrity is crucial for the edge’s durability and longevity. A consistent radius ensures even stress distribution, preventing cracks and breakage over time.
The finished appearance of your concrete work can greatly impact its overall aesthetic appeal. A smooth, uniform edge gives a professional look that homeowners strive for.
Common causes of aggregate drag
Aggregate drag occurs when the edging tool pulls or scrapes aggregate from the concrete surface, leaving an uneven edge. This can be caused by several mechanical and material factors.
Mechanically, using a dull or improperly adjusted edger tool can lead to aggregate drag. Similarly, applying too much pressure while edging can cause the tool to dig into the concrete, pulling out aggregate.
Material-wise, working with wet concrete that hasn’t reached its initial set can result in aggregate being pulled out easily. Conversely, edging dry concrete may also cause drag if the surface is too hard and brittle.

Tools and materials checklist
Here’s the core kit you’ll rely on for a clean radius. Gather edging tools, jigs, templates, and the right finishing brushes. Decide which widths and radii will match your project and budget.
Include a basic edger, a compatible radius template, a float with the right profile, and template spacers. Note trade-offs in cost, control, and ease of use, and be ready with optional specialty tools for tighter radii or decorative edges. Check manufacturer guidance for tool compatibility and local rules if needed.
Essential hand and power tools
Before you start edging, make sure you have these must-have tools on site.
- Edger: Power or manual, for creating the initial edge.
- Radius templates: For maintaining a consistent curve.
- Screeds: To level and smooth the concrete surface.
- Bull floats: For smoothing and consolidating the concrete.
- Hand trowels: For final finishing and smoothing.
- Tape measure: To ensure your edge is straight and consistent.
- Level: To check for any low spots or high spots in your surface.
- Shovel: For moving concrete around as needed.
Quick rule: Always double-check your tools before starting. A missing tool can slow down your work and affect the final result.
Jigs, templates, and guides
These tools help you maintain a clean radius and prevent wandering edges.
- Radius template: A simple DIY template can ensure your edge has the right curve. Use a piece of wood or plastic cut to your desired radius.
- Adjustable jig: Commercial jigs allow for easy adjustment of your radius. They’re more expensive but offer better control.
- Guide string: A taut string can help you create a straight edge and maintain it throughout the pour.
- Formwork: Well-constructed formwork helps prevent concrete from leaking out and maintains your edge’s shape.
Quick rule: Invest in good quality jigs and templates. They might cost more, but they’ll save you time and effort in the long run.
Consumables and helpers
These items are essential for a smooth edging process. Make sure to have them on hand before you start.
- Release agent: Spray this onto your formwork to prevent concrete from sticking.
- Marking chalk: Use it to mark out your edge and radius before pouring.
- Tape: For securing your templates and jigs in place.
- Clean water: Keep a bucket of clean water nearby for wiping blades and tools.
- Plastic sheeting: To protect your formwork from damage or contamination.
Quick rule: Regularly check and replace consumables. They might seem small, but they play a big role in the final result of your edge.
Material specs and standards explained
Aggregate size, gradation, and the concrete mix all influence how edges behave during edging. A coarser mix or poorly graded aggregate can drag more easily and leave visible texture. Slump, cement content, and any admixtures also shape paste behavior at the edge.
When unsure, compare against the project specs, local codes, or the concrete supplier’s data. Verify slump ranges, cement content, and any admixtures with the product label, mix design sheet, or manufacturer instructions.
Aggregate size and gradation effects
Coarse aggregate makes edging tough. It resists your tool’s curve, causing drag.
Fine aggregate is easier to edge. But too fine can lead to a weak surface that pulls out under the tool.
Check project specs: Aim for well-graded mixes with a balance of sizes (e.g., 3/8″ to 1/2″).
Poorly graded mixes – too much fines or coarse – make edging hard. Avoid these.
Slump and workability guidance
Low slump (stiff) concrete is hard to edge. It doesn’t flow, so you’ll struggle to get a smooth curve.
High slump (soft) concrete is easy to edge but can slump out of place. It may also segregate, leading to weak spots.
Safe range: Aim for a 3″ to 5″ slump. This gives good workability without excessive flow.
Always follow mix instructions and adjust water as needed on-site to hit your target slump.
Admixtures and timing influences
Retarders slow setting time, giving you more edging time. But too much can cause delays.
Accelerators speed up setting. They’re useful in cold weather but can make edging rushed if used too early.
Air entrainers add tiny bubbles to concrete. This improves freeze-thaw durability but can make edging slightly harder due to increased surface tension.
Timing is key: Add admixtures as per mix instructions, and start edging when the concrete is at initial set (around 30 minutes after placement).
Preparing the pour and edge zone
Start with solid site prep to reduce dragging risk. Align forms accurately, consolidate properly, and screed to a true surface. Keep moisture and bleed water in check before you begin edging.
Note inspection points before using the edger: form tightness, a clean joint, and an even surface. Time the edging pass to avoid pulling paste as the concrete bleeds or stiffens. Have the crew ready to adjust spacing and tool angle as needed.
Formwork alignment and secure edges
The first step to a smooth edging pass is ensuring your forms are square, level, and secure. Here’s how:
Square: Measure diagonally across the form from opposite corners. If it’s not square, adjust until both measurements are equal.
Level: Use a laser level or 2-foot level to ensure the forms are level all around. Any low spots can cause aggregate to collect and drag.
Secure: Check that all form ties and bolts are tight. Loose forms can shift during edging, leading to uneven edges.
Screeding and consolidating without overworking
Proper screeding leaves a uniform surface ready for edging. Here’s how to do it right:
Screed: Use a straightedge screed board, not wider than the form, to strike off excess concrete. Move it in smooth, steady strokes from one end of the form to the other.
Consolidate: After screeding, use a vibrator or poker vibrator to remove air pockets and consolidate the concrete. But be careful – overworking can bring fines to the surface, causing drag during edging.
Rule of thumb: Vibrate until you see water rise to the surface, then stop. That’s when you know it’s consolidated without bringing up too many fines.
Bleed water and timing checks
Timing your edging pass right is crucial to avoid aggregate drag. Here are two quick checks to know when:
Visual check: Look for bleed water on the surface. When it starts to disappear, that’s a sign the concrete is starting to set.
Touch test: Gently touch the surface with your finger or a trowel. If it leaves a slight impression but doesn’t stick, it’s ready for edging. If it sticks, wait a bit longer.
Remember, every mix is different. Don’t rush – waiting too long can cause the concrete to stiffen and become difficult to edge.

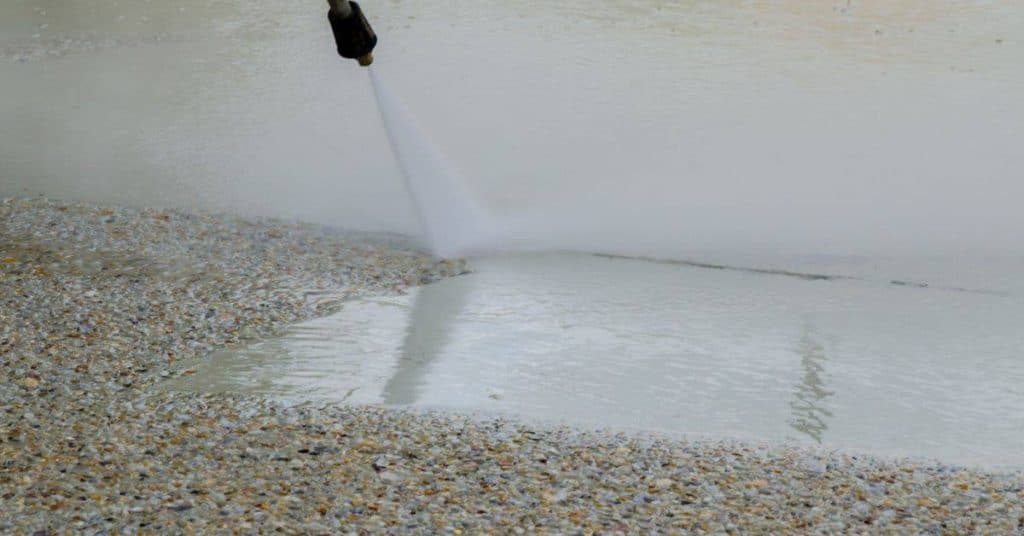
Step-by-step edging technique for a uniform radius
Set your radius guide first and confirm the curve you want. Make the first controlled pass with the tool at the correct angle and steady pressure. Keep the pace slow enough to seat paste without dragging aggregate.
Follow with finishing passes that nearly overlap the edge and maintain light compaction. Use light strokes to seat the paste and avoid pushing aggregate outward. Note recommended stroke direction, speed, and contact pressure cues from the tool instructions and your observations.
Step-by-Step Process
Follow these practical steps to achieve a uniform radius on your concrete edge without dragging aggregate.
- Preparation: Check safety, gather tools (edger tool, radius guide, trowel), and ensure the formwork is secure and aligned.
- Set up the radius guide: Locate and clamp a template or string-line guide to keep your edger on the intended curvature. Refer to the ‘Setting and using a radius guide’ section for detailed instructions.
- Main pass: Make a controlled first pass with the correct tool angle (45°) and pressure, cutting and seating the edge. See ‘First pass: cut and seat the edge’ for details.
- Finishing passes: Follow up with lighter strokes to smooth the bead, remove minor imperfections, and blend the edge into the slab. Check out ‘Follow-up passes and blending’ for more information.
- Final checks: Lightly compact and finish the surface with a trowel to seat paste without pulling aggregate. Ensure no aggregate is exposed before moving on to the next step or section.
Setting and using a radius guide
To maintain a consistent curvature, you’ll need to set up and use a radius guide effectively. Here’s how:
First, determine the desired radius for your edge. This will help you choose or create an appropriate template or string-line guide.
Next, locate the center point of your curve on the formwork. From this point, measure out the radius and mark it. This will be where you’ll place your template or secure your string line.
Securely clamp or attach your chosen radius guide to the formwork at the marked point. Ensure it’s level and won’t move during the edging process. If using a string-line guide, make sure it’s taut and follows the intended curvature accurately.
First pass: cut and seat the edge
The initial pass is crucial for defining your radius and minimizing aggregate dragging. Here’s how to make it count:
Start at one end of the formwork, holding the edger tool at a 45° angle to the surface. Apply firm, continuous pressure as you pull the tool along the edge, following your radius guide.
Aim for a smooth, even stroke that cuts through the concrete’s surface layer without pulling aggregate up or leaving visible tool marks. Keep your strokes consistent in length and speed to maintain a uniform radius.
If you feel resistance or see aggregate being pulled, ease off on the pressure slightly and adjust your angle or stroke direction. If problems persist, consult a professional before continuing.
Follow-up passes and blending
After the initial pass, you’ll want to refine the edge with lighter finishing strokes. Here’s how to blend it seamlessly into the slab:
Start at the same end as your first pass, but this time use a lighter touch and reduce the tool angle to around 30°. Your goal is to smooth out any minor imperfections and create a consistent bead along the edge.
Aim for short, overlapping strokes that follow the curvature of the edge. Work in a consistent direction (e.g., clockwise or counterclockwise) to maintain a uniform appearance.
As you approach the end of each pass, reduce your stroke length and pressure to blend the bead into the main slab surface smoothly. If you notice any exposed aggregate or rough spots, revisit them with lighter strokes until they’re smoothed out.
Visual checkpoints and measurement methods
Use objective checks to verify consistency: a smooth edge with a uniform curve and no pulled aggregate. Look for even coverage of the surface near the edge.
Measure with templates, calipers, or straightedge gauges to quantify uniformity. Decide acceptance criteria and document when rework is needed.
Visual signs of dragged aggregate
Before you start mixing or placing concrete, use this checklist to visually inspect the surface for signs of dragged aggregate. This helps ensure a smooth, strong finish and prevents costly rework.
- Exposed coarse particles: Check for any exposed large aggregates (gravel, stones) on the surface. These should be well-covered by paste to ensure a solid bond with the new concrete.
- Feathered paste: Look for areas where the cement paste is thin or non-existent, exposing the aggregate below. This can lead to weak spots in your concrete.
- Torn mortar lines: Inspect the surface for any cracks or tears in the existing mortar layer. These should be repaired before placing new concrete to prevent them from propagating.
- Uneven surface: Check for low spots, high spots, or other unevenness that could cause issues with your new pour. Fill or level these areas as needed.
- Dry patches: Look for any dry, powdery areas on the existing concrete. These need to be cleaned and rewetted before placing new concrete to ensure proper bonding.
- Chipped edges: Inspect the edges of the existing concrete for chips or cracks. These should be repaired to prevent them from propagating into your new pour.
- Contaminants: Check for any dirt, grease, paint, or other contaminants on the surface that could interfere with bonding. Clean these areas thoroughly before placing new concrete.
- Curing condition: Assess the existing concrete’s curing condition. If it’s too dry, you may need to damp-cure it before placing new concrete to ensure proper bonding.
Quick rule: Always remember: a clean, moist, and even surface is key for a strong bond between old and new concrete.
Quick measuring techniques
Before you start pouring concrete, use these quick checks to ensure your forms are square and level. This will help prevent costly rework later on.
- Check form corners: Use a right angle to confirm all corners are 90 degrees. Concrete doesn’t forgive sloppy angles.
- Measure diagonals: Check both diagonals of your forms. If they’re equal, your form is square. Unequal diagonals mean you’ve got a problem.
- Use a level: Ensure your forms are level in both directions. Out-of-level forms lead to sloped surfaces and trip hazards.
- Check for voids: Tap the forms with a hammer or use a vibrator to ensure no voids form under the surface. Voids can cause cracking and weakening.
- Measure thickness: Use a measuring tape to confirm your forms are set at the correct height. Inconsistent thickness causes stress points and cracks.
- Check for leaks: Before pouring, check for any gaps or holes in your forms that could cause leaks. Leaks waste concrete and create unsightly edges.
- Use a radius template: For curved surfaces, use a radius template to ensure consistency along the edge. Inconsistent curves look unprofessional.
- Flexible curve check: For complex curves, use a flexible curve or simple caliper measurements to confirm consistency. Skipping this can result in wavy edges.
Quick rule: Always double-check your measurements and levels before pouring. A few extra minutes upfront saves hours of rework later.
Acceptable tolerances and when to rework
Use this checklist before final finishing or handover. It helps ensure your concrete work is structurally sound and cosmetically acceptable.
- Levelness: Check with a 4′ level. Tolerance: ±1/8″ in 10′. Too much variance? Rework by adding or removing material, then screed.
- Flatness (FF): Use a straightedge and feeler gauges. Acceptable FF: F75-F125. Too low? Rework with additional aggregate or cement.
- Curing: Check moisture content. It should be around 4-6%. Too dry? Rewetted and cured again.
- Cracking: Look for hairline cracks. Acceptable: none visible to naked eye. Any cracks? Check reinforcement, rebar spacing, or jointing.
- Color uniformity: Compare with adjacent areas. Too much variation? Check mix design, water-cement ratio, or aggregate source.
- Surface texture: Feel and look for rough spots. Acceptable: smooth, no sharp edges. Rough? Lightly grind or sand.
- Joints: Check width and alignment. Tolerance: ±1/4″. Too wide/narrow? Rework with jointing tools.
- Rebar exposure: No exposed rebar. Any exposed? Clean, cover, or replace.
Quick rule: If it’s off by more than 1/4″ or looks out of place, fix it before moving on. Small issues now prevent big problems later.
Common mistakes and how to avoid them
Common mistakes include using the wrong tool for the radius and setting angle or pressure too aggressively. Edging too early or too late can drag concrete and pull aggregate.
Follow a checklist: verify tool width and radius, confirm your angle, then re-test with a light pass. Pause to inspect for drag and rework only the affected area rather than the whole edge.
Overworking and excessive pressure
Using too much pressure while edging can scrape off the cement paste, leaving aggregate exposed. This results in a rough finish and increases the risk of dragging aggregate.
Apply light, controlled strokes with your edger tool. Think ‘tickling’ rather than ‘scrubbing’.
Tip: Hold the tool lightly but firmly, like you would a pen. Too tight a grip can lead to excessive pressure.
Wrong tool size or dull edge
Using an edger that’s too wide for your radius increases resistance, making it harder to control and more likely to drag aggregate.
- Tool width: Match the edger’s width to your desired radius. A wider tool for a larger radius, narrower for smaller.
- Dull edges: Dull tools increase resistance and can’t cut through set concrete properly. Sharpen or replace dull tools.
- Rentable options: Consider renting edger tools if you don’t have the right size. Prices vary, but expect around $20-$50 per day.
- Adjustable tools: Some edgers are adjustable, letting you change the width to match your radius. These can be a good investment for varied projects.
- Dull edge warning: A dull tool might seem like it’s working fine, but it’s actually pushing aggregate around, not cutting through it.
Poor timing relative to set
Edging too early can result in dragging aggregate as the concrete isn’t strong enough yet. Edging too late might leave a rough finish or even damage the surface.
Wait until the bleed water has disappeared and the surface is starting to lose its gloss, but before it becomes too hard.
Tip: Use your finger to lightly touch the concrete. If it leaves a slight imprint but doesn’t stick, it’s time to edge.
Troubleshooting and repair options
If dragging shows up while the slab is setting, address it while the surface is still workable with a light re-pass along the edge to re-seat paste. Use careful pressure and keep the tool at the correct angle to blend with the surrounding edge.
For larger areas, you may patch with repair mortar or re-finishing techniques, following the product label and local guidance. Decide whether the repair is acceptable structurally or if a larger remediation is required, and plan to re-finish the area accordingly.
Small localized drag repairs
First, clean the affected area with a wire brush to remove any loose aggregate and debris. This ensures a good bond for your repair.
Slough out any loose material using a trowel or chisel. Be careful not to damage the surrounding concrete.
Apply a thin layer of repair mortar or bond coat, following the original radius as closely as possible. Use a small trowel or putty knife for precision.
Larger area correction
If the drag is extensive, you might need to grind back the affected area. This allows you to re-edge and restore the original radius.
Alternatively, if the damage is severe, you may need to form and pour a replacement strip. This involves removing the damaged concrete, forming a new edge, and pouring fresh concrete.
The choice between grinding and replacing depends on factors like the extent of the damage, time constraints, and available resources.
Preventing recurrence after repair
To avoid repeating this issue, check your edger tool regularly. Ensure it’s in good condition and the correct size for your job.
Also, keep an eye on your timing. Apply too much pressure or work the edge too late in the set process, and you’ll risk dragging aggregate again.
Lastly, consider using a radius guide for your first pass. This can help establish a uniform radius and reduce the likelihood of drags.

Conclusion
Keeping a true, uniform radius along the edge is essential for durability, neat appearance, and easy maintenance. Do it right and you reduce drag marks, chips, and the chance of costly rework.
Check your edging tool and guides match the radius you want, confirm the edge forms are secure and the base is prepped, and verify material specs and curing requirements. Practice on a small patch to dial in grip and pressure, then make steady edging passes, watching the curve with a straightedge at key points and adjusting as needed.
Mistakes to avoid include pressing too hard and dragging aggregate, missetting the radius or skipping prep, and rushing past visual checkpoints. Stay safe: wear eye protection, gloves, and sturdy boots; keep the work area dry and clear; test on a small area first; don’t rush the passes or work when fatigued.
If you see persistent irregularities, edge settling, or large cracks, or you cannot reach the required radius with your tool, call a professional. For everything else, stay methodical, follow the checks, and finish with a clean edge you can be proud of. You can do this.
FAQ
What tool settings help get a uniform radius?
Keep a steady pace as you roll the tool along the edge. Let the blade do the work with light pressure, not push hard. Angle the tool so the curve follows the edge and make small, overlapping passes to keep the radius even.
How do I avoid dragging aggregate when smoothing the edge?
Let the edger roll with a smooth arc and don’t pull the material along the surface. Lift and reset after each pass to prevent dragging the aggregate ahead of the blade. If you see bumps, slow down and take shorter, overlapping passes to keep it even.
What mistakes cause an uneven radius?
Rushing a pass or using heavy pressure can shave off the curve in spots. Changing pressure mid-pass makes the radius wobble. Skipping overlapping passes leaves gaps and a jagged edge.
How do I test the radius and adjust as I go?
Look at the edge from the side to judge the curve and feel for even contact along the length. If you spot a flat spot or thin area, go back with short overlapping passes to fill it in. Recheck after the touch up until the radius is consistent along the entire edge.