

Introduction
A weep screed retrofit can protect your foundation and moisture management even if one was never installed. You’ll learn how to assess your walls, choose a retrofit approach, and apply practical steps and tips to improve drainage and siding performance.
Key takeaways
- Verify exterior walls lack a weep screed before planning retrofit scope.
- Obtain local permits and schedule weather-safe phased work to avoid leaks.
- Document wall condition, dry rot, and moisture intrusion to guide materials.
- Select corrosion-resistant flashing and weep screed compatible with existing wrap.
- Expose base, remove damaged paper, staples, and wire without causing damage.
- Reinstall metal lath and tie into existing mesh for stability.
- Apply scratch, brown, and finish coats with proper curing guidelines.
Table of Contents
- Introduction
- Key takeaways
- How to Identify Walls That Lack a Weep Screed
- Planning the Retrofit: Permits, Scope, and Sequence
- Tools, Materials, and Material Specs
- Safety and Site Preparation
- Demolition Techniques to Expose the Wall Base
- Removing Old Wire, Staples, Paper, and Damaged Materials
- Installing the Weep Screed and Flashing Correctly
- Counter-Flashing Housewrap and Paper Integration
- Reinstalling Metal Lath and Tying Into Existing Mesh
- Applying the Scratch, Brown, and Finish Coats — Step-by-Step
- Inspection, Common Mistakes to Avoid, and Post-Work Maintenance
- Cost Estimates, Timeframes, and When to Hire a Pro
- Alternative Solutions When a Retrofit Isn’t Feasible
- Conclusion
- FAQ
How to Identify Walls That Lack a Weep Screed
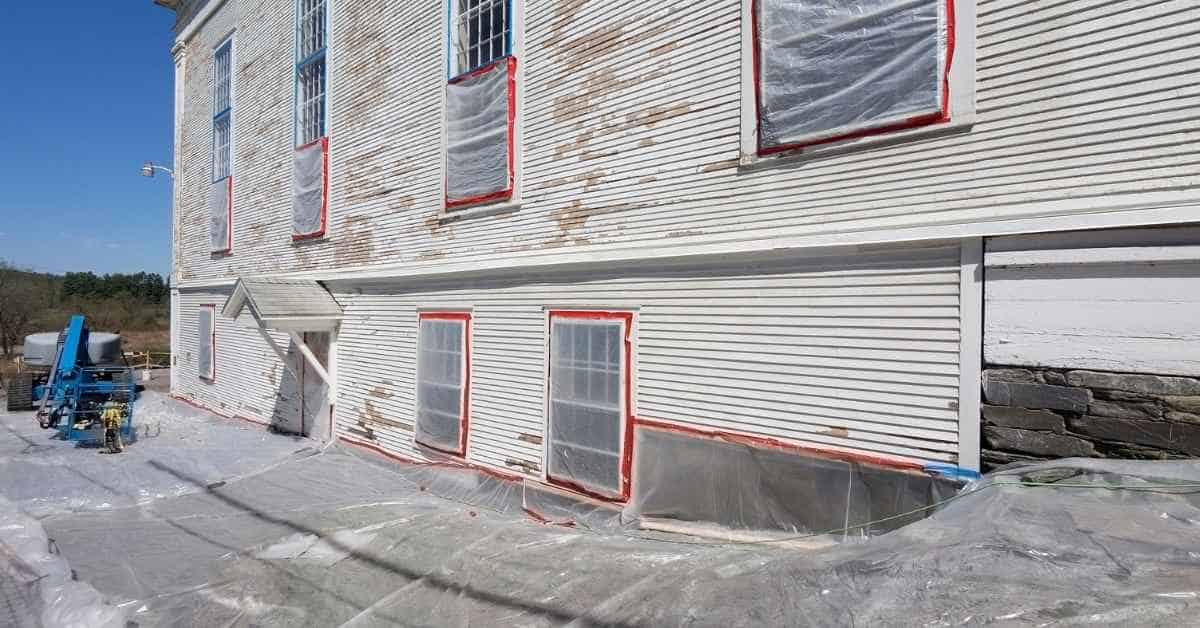
A missing or blocked weep screed shows up first at the base of the stucco. Look for gaps that are missing or inconsistent, a bottom edge that looks solid instead of perforated, and a lack of a continuous bottom course. You’ll also notice clues outside and inside: moisture stains near grade, efflorescence, a musty odor, interior wall dark spots or cracking, and signs that flashing or weep hole placement isn’t right.
These signs matter because they point to how moisture can travel behind the finish and into the wall, or be trapped there. Verifying with photos, noting exact locations, and measuring from grade helps plan a retrofit to restore proper drainage and a continuous air/moisture barrier. In short, spotting the absence early saves you from bigger damage and bigger repair costs later on.
Step-by-Step Process
This sequence will help you identify walls that lack a weep screed, ensuring your DIY project is safe and effective.
- Action: Inspect the bottom of exterior walls for gaps or holes.
Reason: Weep screeds are designed to allow water drainage; their absence means water can’t escape properly.
Check: Look for a continuous gap at the base of each wall section, about 1/4 inch wide. If you see none, proceed with caution.
Professional Call: If walls are visibly damaged or if you’re unsure about structural integrity. - Action: Use a flashlight to peer into any gaps found.
Reason: This helps confirm the absence of weep screed holes and ensures no debris is blocking drainage.
Check: Shine light in from both sides; if you see clear through, there’s likely no weep screed. If blocked or unclear, investigate further.
Professional Call: If gaps are too small to inspect properly. - Action: Measure the height of any standing water near wall bases.
Reason: Standing water indicates poor drainage and could be a sign that weep screeds are missing or blocked.
Check: Water should drain within minutes after rain stops. If it doesn’t, suspect missing weep screed holes.
Professional Call: If water levels rise significantly during heavy rains. - Action: Use a moisture meter to check wall dampness near the base.
Reason: Excess moisture can indicate water is not draining properly, suggesting missing weep screeds.
Check: Moisture levels should be similar to other areas of the wall. If higher at the base, suspect drainage issues.
Professional Call: If walls show signs of significant dampness or mold. - Action: Take photos and notes for documentation.
Reason: This helps track findings and serves as evidence if you need to consult a professional later.
Check: Ensure all areas lacking weep screeds are clearly marked in your records. If unsure, take multiple shots from different angles.
Pro tip: Always wear protective gear like gloves and safety glasses when inspecting walls to avoid injury from sharp edges or debris.
Visual checkpoints (base of wall, stucco plane, soil contact)
This checklist helps you spot walls that need a weep screed to prevent water damage.
- Base inspection: Look for clean gaps between the base and ground. Confirm by measuring at least 1-inch clearance.
- Stucco plane check: Ensure stucco ends before the wall base. Verify with a straight edge to see no direct contact.
- Contact with soil: Avoid soil touching the bottom of walls. Dig away any dirt within 6 inches from the wall’s base.
- Foundation drainage: Check for proper slope away from foundation. Confirm by ensuring water flows outward, not inward.
- Weep holes visible: Look for weep holes at regular intervals along the bottom of walls. Ensure they are clear and unblocked.
- No mortar joints: Inspect for no mortar joints below grade level. Confirm by checking that there’s a clean break in stucco or masonry.
- Wall material continuity: Verify wall materials above and below grade differ to prevent water penetration. Check for changes like from brick to concrete.
- No standing water: Ensure no standing water near the base of walls after rain. Confirm by checking drainage patterns post-rainfall.
- Proper flashing installation: Look for flashing correctly installed at the bottom of walls. Verify with a straight edge to ensure proper overlap.
- No cracks or gaps: Inspect for no visible cracks or gaps in stucco or masonry near ground level. Confirm by checking all sides and corners.
- Correct weep screed placement: Ensure weep screeds are installed at the base of walls where needed. Confirm with a visual inspection.
- No vegetation encroachment: Remove any plants or grass growing near wall bases to prevent moisture buildup. Check for clearance around the perimeter.
- Proper grading: Ensure ground slopes away from all sides of the foundation. Confirm by checking that water drains properly after watering test areas.
- No debris accumulation: Clear any debris or mulch near wall bases to prevent moisture retention. Check for clean, dry conditions around the base.
- Wall material integrity: Inspect for no signs of deterioration in materials at ground level. Confirm by checking for cracks, spalling, or other damage.
Quick rule: If you see soil touching walls or stucco extending to the ground, chances are a weep screed is needed.
Probing and moisture testing
After checking the base of your wall for a weep screed, it’s time to dig deeper. Use a small probe to poke around near the bottom of the wall where it meets the soil. If you hit soft spots or wet material, that’s a red flag. Also, run a multipurpose moisture meter along the sheathing and any exposed wood. High readings mean water is trapped inside.
If your probe hits damp soil or soggy sheathing, it’s likely there’s no proper drainage system in place. This can lead to serious issues like rot and mold over time. Don’t ignore these signs; address them now before they become bigger problems.
Remember, a solid base is key. While probing, check base compaction. If the ground feels soft or squishy around your wall, it’s not supporting the structure properly. Fixing this early can save you from costly repairs later on.
When to call a pro for a diagnostic
If you find extensive damage, mold growth, or signs of structural rot while checking your walls for weep screeds, it’s time to stop and call in the pros. These issues can be more than just cosmetic problems; they’re red flags that indicate deeper trouble.
Mold is a clear sign of moisture intrusion. If you spot any mold or see water stains at your wall’s base, don’t hesitate—get an expert to assess the situation before it worsens. They’ll know how to properly address these issues without causing further damage.
Similarly, if probing reveals soft spots in the concrete or soil around the foundation isn’t well compacted, you need professional help. These are signs of potential structural instability that could lead to serious problems down the line. Don’t risk it; let a pro check base compaction and assess any weak points.

Planning the Retrofit: Permits, Scope, and Sequence
Before you lift a hammer, lock down local permits and codes and map a clear retrofit scope for the weep screed project, so you don’t end up chasing rework or last‑minute surprises. Check with the city, county, and any HOA or historic district rules, confirm required inspections, and document the exact walls and areas affected by the retrofit, so demolition, replacement, or bypass options are chosen with purpose. Then plan the sequence from assessment and prep to installation and finishing, including access, containment, weather contingencies, and any coordination needs with other trades, so the work flows and waste is controlled.
Prepare a concise scope brief, a material list, a measurement plan, and permit numbers, plus a clear checkpoint schedule, so deviations have a recorded path and inspectors can verify progress without guessing. Assess risks and coordination needs early: identify utilities, possible lead or asbestos concerns, scaffold or lift requirements, and safety protocols, so crews stay safe and you avoid costly hold points. Keeping this planning honest saves you time, money, and headaches by reducing surprises, keeping the job on track, and making the actual retrofit details simpler to execute.
Permit and code considerations
Before you start retrofitting your concrete foundation, make sure to check with your local building department for permit requirements. You’ll need permits if you’re changing the grade around your house or adding significant new elements like a retaining wall over a certain height.
Weep screed height and flashing are crucial for water management. Codes often specify that weep holes start at least 4 inches above finished grade to prevent clogging from surface debris. Flashing should extend up the foundation wall, typically no less than 6 inches, to direct water away from your home’s interior.
Always check base compaction and soil type before pouring concrete; this can affect how you design drainage and weep systems. If your site isn’t stable or has poor drainage, you might need additional permits for structural changes or landscaping adjustments to prevent future issues.
Scope assessment and priorities
When planning your concrete retrofit, start by assessing the scope of work. Focus on areas that need immediate attention first. Prioritize walls near corners and grade lines since these spots are most prone to cracking and shifting due to soil movement.
Check base compaction before pouring new concrete around existing structures. Poorly compacted bases can lead to future cracks and settling issues. Also, pay extra attention to areas close to pavement or driveways where water might collect and cause damage over time.
Don’t forget about corners—these are stress points that often require reinforcement with rebar or fiber mesh to prevent cracking. If you’re unsure about any part of the job, consult a professional before proceeding to avoid costly mistakes later on.
Scheduling and weather window
Timing is critical. Stucco work should ideally be scheduled for spring or fall when temperatures are moderate, usually between 50°F to 85°F. Avoid winter months due to freezing issues and summer heat that can dry out the stucco too quickly.
Before you start, check base compaction. The concrete needs to be fully cured—typically at least a month old—to ensure it’s stable for stucco application. Rushing this step can lead to cracking and other structural issues down the line.
Plan your work around weather forecasts. Keep an eye on humidity levels too; high moisture can slow drying times, while low humidity speeds them up. Adjust your schedule accordingly to avoid problems with curing time.
Tools, Materials, and Material Specs
This section gives you a practical checklist for retrofit stucco work, covering tools, fasteners, weep screed types, paper, lath wire, and stucco mixes with spec notes. It lays out a categorized toolkit, corrosion resistant fasteners in the right gauges and lengths for paper, wire, and stucco lath, and models of weep screed in metal, vinyl, and fiber cement with attention to widths, heights, weep hole geometry, and backer compatibility. It also details exterior paper types, weather resistive barriers, lath configurations, wire meshes, overlaps, and sequencing, plus cement sand ratios, lime content, water cement targets, workability, pot life, curing, and the required scratch, brown, and finish coats with tolerances. It includes a pre check style reminder to verify tool readiness, condition, and safety gear before you start.
This matters because retrofit work sticks to your existing wall and any mismatch shows up as cracks, leaks, or failed coatings. A thorough, spec aware kit helps you avoid common errors, speeds up work, and keeps you compliant with local code and climate needs. Skipping the details here invites rusted fasteners, wrong screed types, poor paper or lath compatibility, and finish coats that fail early, so follow the specs and double check everything before you mix and lay a single coat.
Weep screed profiles and material choices
Choosing the right weep screed can make your concrete walls look sharp and prevent water damage. Pick the wrong one, and you’ll have a mess on your hands.
- Metal weep screeds: Used for durability in high-wear areas. Look for galvanized or stainless steel to resist rust. Avoid cheap metal if it’s not coated; it will corrode fast. Best for long-term projects where water resistance is key. Typical width recommendations range from 2-1/2″ to 4″ overall face, with a minimum 1/8″ to 1/4″ weep hole/opening geometry every 12″ to 18″ along the length. Ensure the base flange sits flush against the sheathing with a 1/4″ to 1/2″ drainage gap behind it.
- PVC weep screeds: Cheaper and easier to install than metal. Check that the PVC is UV-resistant, as regular plastic can crack in sunlight. Good choice for DIYers on a budget or temporary structures. Target width is typically 2-1/2″ to 3-1/2″, with weep holes or slots sized about 3/16″ to 1/4″ and spaced every 12″ to 18″. Confirm compatibility with backing (lath, paper, and barrier) before installation.
- Aluminum weep screeds: Lightweight and easy to handle. Ensure it’s anodized aluminum to prevent oxidation. Great for quick projects where weight matters but avoid if you need something that will last decades. Standard widths mirror metal screeds (~2-1/2″ to 4″), with weep features sized to 3/16″–1/4″ holes or slots and keel clearances that maintain at least 1/4″ backer clearance.
- Concrete weep holes: For a seamless look with your concrete walls. Use precast blocks or drill holes in the formwork before pouring. Avoid this option if you’re not confident about precise placement and alignment.
- Sand-filled channels: A DIY alternative for small projects. Fill gaps between forms with sand to create weep holes. Works well for quick fixes but won’t look professional on larger jobs.
Pro tip: Always check the weather forecast before installing PVC or aluminum weep screeds, as extreme temperatures can affect their flexibility and durability.
Fasteners, housewrap, metal lath, and accessories
When it comes to fastening your concrete forms, go for screws over nails. Screws hold better in wet conditions and won’t rust as quick. For the housewrap, use a good quality tape that seals well against water but lets moisture out. Don’t skimp on this; cheap tapes can let rain seep through.
Metal lath is crucial for reinforcing concrete walls. Make sure it’s galvanized to resist corrosion and check that it fits snugly over your forms without gaps. For accessories like flashing, pick materials that match the lifespan of your building—no point in having a 50-year roof if your flashing rusts out in ten.
Actionable specs to cover before you start: use corrosion-resistant fasteners (stainless steel or hot-dip galvanized) sized for the substrate: #8 or #10 screws, 1-1/2″ to 2-1/2″ length for 1/2″ to 5/8″ sheathing with lath; use washers where needed to seal against moisture. For paper, staple or nail patterns per manufacturer’s instructions—typically 6″ vertical and 12″ horizontally and at seams. Ensure housewrap overlaps are at least 6″ and taped with an approved flashing tape rated for exterior use. Lath should be installed with 1/2″ to 3/4″ seam overlaps and stapled or nailed per lath spec, leaving no gaps. Flashing should extend a minimum of 2″ past each joint and terminate with a drip edge at the sill or base detail.
Stucco base, brown, and finish mixes
For your stucco job, start with a solid base mix. Typically, this is a 1:2:9 ratio of Portland cement to lime to sand. Make sure you get the proportions right or it won’t stick well. If you’re buying pre-bagged mixes, look for ones that are specifically labeled as base coat.
The brown mix is similar but with a bit more sand—aim for about 1:2:10 ratio. This layer helps smooth out the base and adds texture before the finish coat goes on. Again, pre-bagged mixes can save time if you’re not mixing your own.
The finish mix is where you get creative with color and texture. Stick to a 1:2:3 ratio for this layer—Portland cement to lime to sand. Additives like acrylic bonding agents will help the finish coat stick better and resist cracking over time. Don’t forget, good housewrap and metal lath are crucial under all these layers.
Actionable curing and application timing: after applying the base coat, allow for initial set per product manufacturer guidelines (typically 24–48 hours in moderate temperatures). The brown coat should cure for a minimum of 5–7 days before applying the finish coat in dry conditions. In hot or windy weather, protect from rapid moisture loss with misting or shading. Final cure for stucco assemblies generally reaches handling strength in 7 days and full cure at 28 days, with moisture management steps (such as curing membranes or light misting) recommended in warm or windy climates. Maintain substrate temperatures above 40°F (4°C) during cure and avoid applying coats over damp or frozen surfaces.
Safety and Site Preparation
Safety on the jobsite starts with a solid plan: do a quick hazard assessment, decide what PPE is required (gloves, eye and face protection, and a respirator if dust is present), and agree on a simple, practiced rescue procedure in case something goes wrong. Then set up ladders and scaffolds the right way—level footing, secure base, proper height, guardrails in place, tie-offs, and clear load limits—and inspect everything carefully before you climb, sweep the area of trip hazards, and keep a ready exit route.
Containment and dust control keep your house and neighbors from getting sprayed with debris and concrete dust, so use tarps or plastic sheeting, rolling containment that moves with the work, and run a negative-air or HEPA-equipped vacuum to collect fine dust at the source. Protect landscaping and adjacent finishes with drop cloths, curb and planter shields, and drop zones that shield siding, masonry, and mulch from concrete splatter. Finally, map utilities and access routes before you start, shut off services if needed, create a clean, separated path for material handling, and plan the sequence to minimize rework and exposure.
Personal protective equipment and safe demolition practices
Before you start any demolition, make sure you have your gear on. You need a respirator to keep the dust out of your lungs, gloves to protect your hands from sharp edges, and eye protection like safety glasses or goggles.
When cutting concrete or brick, use a wet saw if possible. It keeps down the dust and makes for cleaner cuts. If you don’t have access to a wet saw, wear a respirator and keep water handy to mist the area as you cut.
Safe demolition isn’t just about your gear; it’s also about how you approach the job. Start with the non-load-bearing parts first—like walls—and always check for any hidden pipes or wires before you swing that sledgehammer. And remember, if something looks too tricky or dangerous, call in a pro.
Containment, dust control, and waste disposal
When you’re prepping your site for concrete work, containment is key. You need to keep the dust in one spot so it doesn’t spread everywhere. Use tarps or plastic sheets around your work area to contain debris and limit how far dust can travel. Don’t forget to check base compaction before you start pouring.
Dust control isn’t just about keeping neighbors happy—it’s a legal requirement in most places. Make sure you have water hoses or misters handy to keep the dust down as you break up old concrete or mix new stuff. If you’re doing big jobs, consider renting an air scrubber to suck up airborne particles.
When it comes to waste disposal, know your local rules. Don’t just pile stucco and demolition scraps on the curb hoping someone will take them away. Check with your city’s recycling center or a reputable contractor for proper disposal methods. Fines for dumping improperly can be hefty, so do it right.
Protecting windows, doors, and trim
Before you start pouring concrete around existing structures, make sure to cover up anything that could get damaged. Use plastic sheeting and thick cardboard to shield windows and doors from splashes and spills. Trim is delicate, so wrap it in bubble wrap or foam padding for extra protection.
Check your coverage before you start mixing the concrete. You don’t want any surprises later on when you’re halfway through pouring. Also, keep an eye out for any gaps where water might seep in and cause damage.
Remember, it’s easier to protect things now than to fix them after the fact. Take your time setting up this protection; it’ll save you headaches down the line.
Demolition Techniques to Expose the Wall Base
Demolition around stucco starts with a careful plan to expose the wall base. Check safety first, inspect moisture risk, and identify what hides behind the plaster, including electrical or plumbing. Decide whether to remove partial sections or the whole wall so you can reach the bottom plate without wrecking the framing, then cut and remove fasteners in a steady, staged way.
Work methodically to preserve substrates where possible and document each section as you go. Slice and reposition paper and wire where feasible, and prepare to re-install weep screed beneath those layers once the base is exposed. The goal is a clean base path that lets you counter-flash, re-lay materials, and move to the next stucco step without creating loose debris or hidden damage that bites you later.
Where to start cuts and how deep to go
Start your demolition at the corners of the wall. This is where you’ll find the strongest structural points, so it’s easier to control the cut depth without overdoing it. Work your way back towards the sheathing or foundation lines, making sure not to damage any underlying support beams.
Cut deep enough to expose the base but avoid going too far and compromising the integrity of the wall. A good rule is to stop when you see a clear transition from concrete to wood or masonry. If in doubt, check base compaction before proceeding deeper.
Remember, precision here saves time later on when fixing any issues that might arise from overcutting. Take your time and use the right tools for the job—don’t rush it.
Tools and methods (hand tools, grinders, small demo)
For controlled demolition, you need a few key tools: a circular saw, angle grinder, chisel set, hammer, and safety gear like goggles and gloves. Start by marking your cut lines with chalk or masking tape to avoid mistakes.
Use the circular saw for cutting through concrete blocks or bricks. Set it at a depth just enough to slice through but not too deep to damage underlying materials. For plaster or lath, switch to an angle grinder with a metal blade for clean cuts without damaging the wall base.
Check base compaction before you start cutting. Weak spots can cause uneven demolition and may need reinforcement or repair first. Work slowly and methodically, checking your progress often to avoid over-cutting or missing areas that need attention.
Minimizing interior disturbance and plaster damage
When you’re cutting into walls, dust control is key. Use a wet saw with water spray to keep the mess down. If you’ve got an existing wall that needs opening up, start by masking off nearby surfaces with plastic sheeting. This stops plaster chips from ruining your paint jobs.
Before you begin any cuts, check base compaction. Weak spots can cause major cracks and damage to the surrounding walls. Work slowly and carefully around corners and edges where plaster is most fragile. A grinder can be handy for tight spots but keep it damp to avoid dust clouds.
Remember, a little extra care upfront saves big headaches later. Don’t rush through this step or you’ll end up redoing more than just the demo area. Take your time, use the right tools, and protect what’s around you from plaster damage.
Removing Old Wire, Staples, Paper, and Damaged Materials
We start by separating removable components like old wire lath, staples, torn paper, and damaged housewrap from sound, reusable sheathing, setting clear criteria for what counts as sound versus damaged and planning the work so the wrecking doesn’t touch the intact backer. Safety and containment come next, with PPE, scaffold or ladder rules, dust control, and debris containment to keep interior spaces clear and the job site from turning into a mess.
The removal sequence matters: disconnect and take out the reinforcement first, then remove fasteners and film, then assess and remove only the damaged portions of the wrap while protecting the sound sheathing for later steps. I also document moisture, rot, and mold behind the wall, photograph the hotspots, and mark sections for replacement or reinforcement so nothing important gets missed. This approach saves you time, preserves structure, and keeps weather barriers intact for the next stages like re-wire prep, counter flashing, and applying new weep screed, while avoiding costly repairs from tearing sound materials. Finally, plan disposal per local rules, keep a debris-free workspace, and set up temporary barriers if the project spans multiple days to prevent cross-contamination and keep the crew moving toward a solid, long-lasting install.
How to remove nails, staples, and rusted wire mesh
When you’re prepping your concrete slab area, getting rid of old fasteners is a must. Start by cutting out any rusty wire mesh that’s still holding on with pliers or bolt cutters. If the mesh is in good shape and not too rusted, you can salvage it for reuse. Just make sure to clean off any dirt or debris before storing.
Nails and staples are easier to deal with once you have a hammer and pry bar handy. Tap around each fastener to loosen it from old concrete or wood, then use the pry bar to lift them out cleanly. Be careful not to damage your tools on rusted nails; they can be tough to remove.
Once all fasteners are out, give the area a quick sweep and check for any leftover bits of wire or metal shavings that could cause problems later. This step is crucial before pouring new concrete to ensure you don’t end up with weak spots in your slab.
Assessing and replacing damaged sheathing and framing
When you’re tearing out old materials, keep an eye on the condition of your sheathing and sill plates. If these are rotten or severely damaged, they need to be replaced, not patched up. Check base compaction too; if it’s soft, the whole foundation is suspect.
If you find damage but it’s minor—like a few small holes or cracks—you can patch it with new wood and fasteners. But don’t skimp on quality here; use treated lumber for exterior sill plates to prevent future rot.
Remember, replacing sheathing isn’t just about aesthetics—it’s crucial for structural integrity and weatherproofing. If in doubt, err on the side of safety and replace rather than repair.
Preparing substrate for new paper and weep screed
After you’ve cleared out the old wire, staples, and damaged materials from your concrete surface, it’s time to prep that base. Make sure everything is clean and dry before moving on. Any leftover debris or moisture can cause issues later down the line.
Check base compaction and ensure there are no cracks or uneven spots. If you find any weak areas, address them now by filling in with concrete patch or leveling compound. This step is crucial for a solid foundation that will hold your new paper and weep screed firmly in place.
Dry the surface thoroughly if it’s damp from cleaning. Use a fan or dehumidifier to speed up drying time, especially in humid conditions. Skipping this step can lead to poor adhesion of flashings and paper, causing future problems with water penetration.
Installing the Weep Screed and Flashing Correctly
Installing the weep screed correctly starts with precise placement relative to the stucco finish and grade, with minimum clearance from soil, vegetation, and siding to ensure proper drainage and airflow. Use a consistent fastener pattern for the substrate you’re on—sheathing, studs, or masonry—while choosing corrosion-resistant materials that keep the wall assembly continuous and leak-free. Integrate flashing up and over the weep screed at windows, doors, and roof details, and maintain drip line clearance so the bottom edge of the stucco stays above capillary action and the weep holes stay clear.
Keep the sequence simple around corners, openings, and transitions, and document inspection checkpoints to catch errors early rather than after the job is done. This matters because proper placement, flashing continuity, and unobstructed weep paths prevent water intrusion, rot, and costly rework, especially where weather barriers meet openings and transitions. Post-install checks and a quick water spray or air leakage test verify that lines drain freely and flashing is continuous, with clear remediation steps if issues are found.
Setting the Weep Screed Height and Slope
Check base compaction before setting your weep screed. A solid foundation means no settling later, which could mess up your slope.
The weep screed should sit at least 6 inches above grade level. This ensures proper drainage and prevents water from seeping into the concrete slab. Make sure to maintain this height across the entire project area for consistency.
To ensure good drainage, angle the weep screed slightly downward towards your storm drain or catch basin. A 1/4 inch per foot slope is ideal. Use a level and string line to check your work as you go. This small detail can save you big headaches down the road.
Fastening pattern and corrosion protection
When fastening your weep screed, follow the manufacturer’s guidelines for spacing. Typically, you’ll want to space nails about 6 inches apart. Edge nailing is crucial; make sure every edge of the flashing gets a nail or two to prevent any movement.
Corrosion protection is key in wet areas. Use stainless steel or zinc-coated fasteners to avoid rusting. Don’t skimp here—cheap, untreated nails will lead to big headaches down the road. If you’re unsure about your materials, ask at the hardware store for advice.
Check base compaction before installing any flashing or screed. A solid foundation prevents movement and keeps everything in place when concrete is poured. This small step saves a lot of trouble later on.
Integrating flashing, sealants, and backstops
Once you’ve set your weep screed height and slope correctly, the next step is to integrate flashing properly. Flashing stops water from seeping into wall cavities by creating a barrier at corners and around openings like windows and doors. Make sure to install it beneath the siding or cladding material so that water flows down and away.
Sealants are crucial where flashing meets other materials, such as brick or stone. Apply sealant in these joints to prevent water from getting behind your wall covering. Use a high-quality silicone-based product for durability and flexibility. Don’t skimp on this step; it’s the first line of defense against leaks.
Backstops are essential at the base of walls, especially where they meet grade or other surfaces like patios. They prevent water from traveling back up into your foundation wall. Install them tightly against the weep screed and ensure there’s a clear path for drainage to the exterior. Remember, proper installation here can save you big headaches later.
Counter-Flashing Housewrap and Paper Integration
Goal: pair counter-flashing with existing housewrap and new building paper to form a continuous drainage plane that pushes water toward the weep screed. Start with the substrate; inspect laps, staples, penetrations, and any delamination, and note where overlaps must extend or be reinforced for a seamless transition. Plan the materials and layout—choose counter-flashing height, compatible self-adhesive flashing tape, new building paper, sealants, and fasteners, and set overlaps of 6–12 inches where practical to maintain drainage flow. Install along the base line, then overflip with new paper, keeping vertical and horizontal overlaps continuous and a clear path for drainage.
Now, understand why this matters: a well-executed overlap and flashing detail prevents water from getting trapped and rotting the wall assembly, saving you future headaches. It gives you a predictable, performance-driven results you can rely on during wind-driven rain and seasonal shifts. Check slope and overlaps, perform a lightweight water test, and address corners, transitions, and penetrations methodically so there are no sagging joints or ‘trap’ zones. This approach makes maintenance easier and reduces the chance of leaks around windows, doors, wiring, and vents.
Laps, shingling, and sealing details
When it comes to laps in your counter-flashing setup, make sure you’re giving yourself at least a 6-inch overlap. This isn’t just a suggestion—it’s the bare minimum to keep water out. If you’re working around windows or doors, bump that up to 8 inches where there are more chances for leaks.
Shingle direction is crucial too. Always go with the flow of your roof’s main shingles. If they run from bottom to top, so should your counter-flashing paper and housewrap. This way, water naturally slides down without getting caught in any crevices or folds.
Sealing around penetrations like pipes or vents is where you really need to pay attention. Use a good quality sealant that’s rated for the job—don’t skimp here. Apply it liberally but neatly along all edges and joints, especially where your counter-flashing meets the housewrap. A thin bead won’t cut it; make sure there’s enough to form a solid barrier against water.
Repairing or replacing old WRB
If your existing weather-resistant barrier (WRB) is in decent shape but has some small issues, you can patch it up. Look for any gaps, tears, or areas where the sealant has failed and fix those spots with new material. But if more than 20% of the WRB needs repair, consider a full replacement to avoid future leaks.
When transitioning new WRB to old materials, make sure there’s no overlap that could trap moisture. Instead, use a shingle-style lap where the new WRB is tucked under the existing material by at least 4 inches. Seal all edges and laps with high-quality sealant to prevent water intrusion.
Before you start cutting into your old WRB, check base compaction. If the ground isn’t solid enough, any repairs or replacements won’t last long. Also, ensure that counter-flashing is in place and properly integrated with the new WRB for a complete water barrier system.
Visual checkpoints to ensure proper WRB function
This checklist helps you quickly verify that your weather-resistive barrier (WRB) and counter-flashing are correctly installed before moving on to the next step.
- Laps visible? Check each layer of housewrap overlaps the previous one by at least 6 inches. Look for a clean, straight edge where laps meet.
- No gaps around windows? Inspect around window openings for any gaps between WRB and flashing. Confirm no water can seep through.
- Counter-flashing installed? Ensure counter-flashing is securely fastened above the siding, overlapping the WRB by at least 2 inches. Missing or improperly placed counter-flashing leads to leaks.
- No exposed nails/screws? Make sure all fasteners are covered with flashing or tape. Exposed fasteners can puncture the WRB and cause water damage.
- Shingling pattern correct? Confirm shingles overlap correctly, starting from the bottom up. Any gaps in this pattern could lead to leaks at roof edges.
- Sealant applied properly? Check that sealant is evenly spread and not squeezed out of joints. Missing or poorly applied sealant can cause water intrusion.
- No wrinkles in WRB? Ensure the housewrap is taut without any wrinkles, which could trap moisture behind walls.
- Flashing under siding? Confirm flashing is tucked underneath siding for a clean finish and proper protection. Missing this step can leave openings for water entry.
- No debris between layers? Inspect for any debris or loose material that might interfere with the WRB’s performance. Debris can cause moisture buildup and damage.
Quick rule: If it looks clean, tight, and properly sealed from all angles, you’re likely on track to avoid future water issues.
Reinstalling Metal Lath and Tying Into Existing Mesh
Overlap requirements and fastening
When reinstalling metal lath, make sure to overlap the new pieces with existing mesh by at least 2 inches. This ensures a solid connection. If you’re tying into old work, use wire ties every 4 inches along the edges where they meet.
Fasten your lath securely to the base using concrete nails or staples spaced no more than 6 inches apart. Don’t skimp on this step—loose lath can lead to cracks in your finished surface. Also, check base compaction before you start; a weak foundation means trouble later.
Mistakes here are costly and time-consuming to fix. Take the extra minutes now to do it right. Remember, good work upfront saves headaches down the line.
Reinforcing seams and corners
When reinstalling metal lath, make sure to reinforce the seams and corners with corner beads. This prevents hairline cracks from forming later on. Use paper tape over these areas for added stability.
Check base compaction before installing any reinforcement. Weak ground can cause major issues down the line. Also, ensure that your metal lath overlaps existing mesh by at least 4 inches and is securely fastened to prevent movement.
Corners are especially tricky; use corner beads designed for concrete work to give them extra strength. Don’t skimp on this step—it’s where most cracks start.
Preventing cold joints and shrinkage cracks
When you’re reinstalling metal lath, make sure to tie it into the existing mesh properly. Cold joints happen when pours are interrupted, so plan your work to avoid stopping in the middle of a pour. If you can’t finish one day, leave a control joint where you’ll pick up again.
Check base compaction before pouring concrete and ensure there’s no standing water. This helps prevent shrinkage cracks from forming due to uneven drying or settling issues. Use a straightedge across the surface after screeding; if it sags, you’ve got low spots that need fixing.
Metal lath should be tied into existing mesh with wire ties every few inches at seams and corners. This reinforcement is key for preventing cracks from forming along weak points where pours meet or around sharp angles in your structure.
Applying the Scratch, Brown, and Finish Coats — Step-by-Step
The key to a durable scratch, brown, and finish coat is strict control of mix design and the timing between coats. Define the water-to-mix ratio and pot life for each coat, prep the surface so it can grip, score the scratch coat to create a solid key, and then apply the brown coat with uniform thickness before finishing with a smooth, properly mixed finish coat. Don’t skip curing steps or hurry through the process, because small mistakes here will show up as cracks or pinholes later. Plan work for mild, dry weather and avoid applying coatings if rain or freezing temperatures are forecast within 24 hours.
This matters for DIY homeowners because it sets the stage for a long-lasting finish that resists weather and movement without needing frequent repairs. Proper bonding, consistent thickness, and careful curing prevent voids and delamination, saving you time and money. If you follow the sequence and pay attention to weather, moisture retention, and window timing between coats, you’ll get a smooth, durable exterior that looks right and lasts. Ignore these steps, and you’ll face slower cures, weaker bonds, and costly touch-ups in the near future.
Step-by-Ensure Proper Coating Application
This sequence will guide you through applying scratch, brown, and finish coats to your concrete surface effectively.
- Action: Prepare the surface by cleaning with a stiff brush and, if needed, a light etch or shot blasting to remove laitance. Reason: A properly prepared surface promotes mechanical bonding and prevents dust from inhibiting adhesion. Check: Surface is clean, dry, and free of loose particles; test with a tack cloth. Professional Alert: If concrete is damp or there is efflorescence, delay coating and address moisture first.
- Action: Dampen the surface lightly with water or use a curing agent compatible with your product to improve grip, but avoid standing water. Reason: Humidity and moisture management help the scratch coat bond without washing out.
- Action: Apply the scratch coat using a trowel to create texture. Reason: This provides grip for subsequent layers and ensures durability. Check: The surface should have visible scratches but still be smooth enough to lay the next layer without issues. Timing: Start back-rolling or troweling within the product’s pot life to prevent edge dragging.
- Action: After scratching, let the coat cure according to the product instructions before applying the brown coat. Reason: Proper curing ensures a strong bond between layers. Check: The scratch coat should be dry and hard but not cracked or flaking. Tip: If you see slight surface dusting, mist lightly to keep surface workable for the next step.
- Action: Apply the brown coat evenly over the scratch coat, feathering it out to blend with edges. Reason: This layer fills in any imperfections left by the scratch coat. Check: The surface should be even and free of visible gaps or ridges. Timing: Allow sufficient open time per product directions to avoid tearing when finishing.
- Action: Allow the brown coat to cure as per instructions before applying the finish coat. Reason: Curing ensures that the coating is stable enough for the final layer without compromising quality. Check: The surface should be dry to the touch, with no flexible or soft areas. Pro Tip: Use a water-resistance check (noting absorbency changes) to verify cure progress before proceeding.
- Action: Test moisture and ambient conditions (temperature, humidity) and adjust if needed. Do not apply the finish coat if temperatures are below 50°F (10°C) or above 90°F (32°C), and ensure wind is minimal to prevent rapid drying. Reason: Improper conditions can cause cracking, crazing, or dusting of the finish coat. Check: Surface is firmly cured, dry, and within recommended application window.
- Action: Apply the finish coat using a trowel to create a smooth, even surface. Reason: This is your final layer that will determine the overall appearance of the concrete. Check: The surface should be free of any imperfections or rough spots and feel smooth when touched. Tip: Work in small sections to maintain uniform texture and minimize cold joints.
- Action: If your finish coat is pigment-enhanced, add pigments gradually while mixing to avoid blotches, and perform a sample swatch on a hidden area first. Reason: Gradual color development yields more even results. Check: Color matches your sample and is consistent across the treated area.
- Action: Perform a final sealing or weatherproofing step if your coating system requires it, after the finish coat has fully cured per manufacturer instructions. Reason: Sealing provides UV resistance and moisture protection. Check: Sealer is fully cured before exposure to rain or prolonged sun.
Pro tip: Always work in small sections to maintain control over each coat’s quality, especially during curing times. This prevents issues like cracking or unevenness that can arise from rushing through the process. Keep a moisture meter and a simple dew point reference handy to schedule outdoor work or to pause when conditions threaten quality.
Scratch coat: mix, embed lath, and keying
Mix your scratch coat to a consistency that’s not too wet. It should hold its shape when you scoop it up with the trowel but still be workable. Check base compaction before you start; loose ground will cause problems later.
Embed lath properly by pressing it into the mortar bed, leaving about half an inch of space between each strip for proper coverage. Make sure it’s secure and won’t move when you apply more coats.
Key your scratch coat with a notched trowel to create grooves that help the next layer stick better. Aim for a depth of about 1/4 inch, but don’t go too deep or you’ll weaken the base. After scratching, cover and cure it according to the manufacturer’s instructions.
Brown coat: leveling and cure schedule
The brown coat is all about getting your surface nice and level. Aim for a thickness of 1/8 to 1/4 inch. Make sure you straighten out any bumps or dips from the scratch coat, but don’t worry if it’s not perfectly smooth yet—this layer just needs to be even.
After applying the brown coat, let it cure properly. Start by lightly misting it with water every few hours for the first day. Keep this up until you see a thin film of moisture on the surface, which means it’s starting to set but not yet dry. This usually takes around 24-36 hours. Don’t rush this step; proper curing is key to avoiding cracks later.
Once your brown coat has cured and feels firm underfoot but still slightly damp, you’re ready for the finish coat. Make sure it’s not too dry or you’ll have trouble getting a smooth surface. If in doubt, mist it lightly again before moving on.
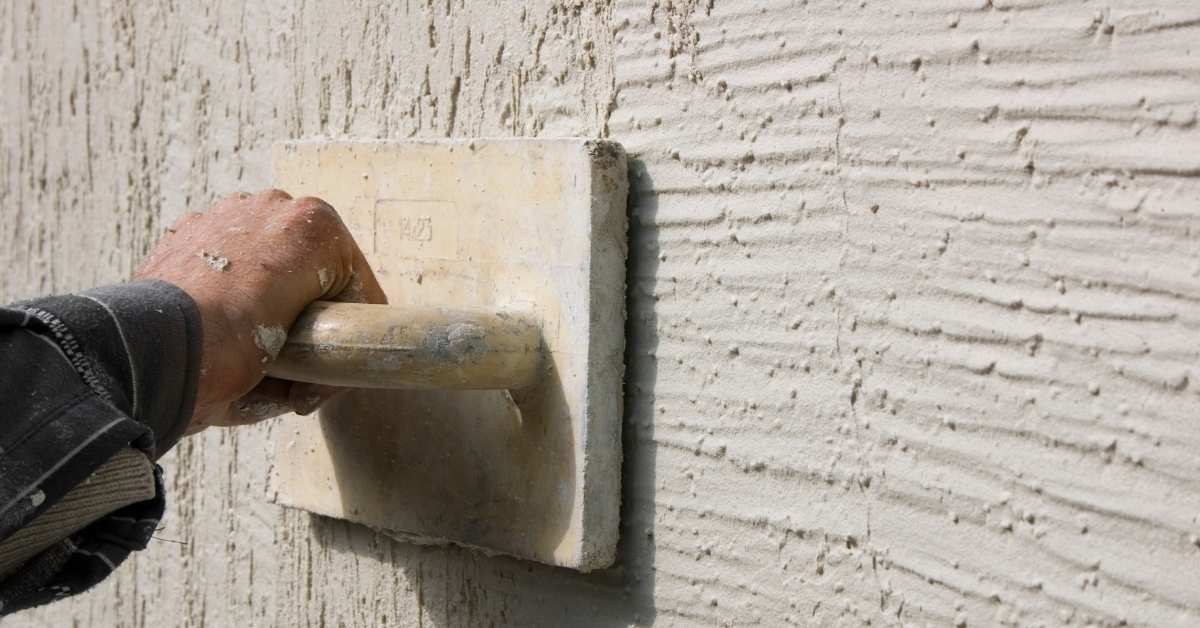
Finish coat: textures, colors, and water addition
The finish coat is your last chance to make the concrete look great. Start by checking that the brown coat is fully cured. If it’s not, wait until it is before you start this step.
Mix your finish coat with care. Adding too much water can weaken the bond and ruin the texture. Stick to the mix ratio from earlier steps. For colors, add pigments slowly while mixing to avoid blotches or uneven shades.
When applying, focus on getting the right texture. Use a float for smooth finishes, trowels for broom textures, or stamps for patterns. Each tool gives a different look, so pick one that matches your project needs and existing surfaces if you’re fixing an area.
Inspection, Common Mistakes to Avoid, and Post-Work Maintenance
This section lays out an honest, practical approach to inspecting a retrofit job: check wall condition, disclose existing moisture issues, verify leak signs, measure wall cavities for proper weep screed height and spacing, and document siding, paper, and flashing status before you retrofit.
Avoid errors by building a full water management plan, getting screed height and placement right, backing venting or bypassing damaged paper, using matched fasteners, and protecting the job site from weather during work. A clear plan saves you from costly rework and rotten framing hiding behind the wall. Finally, lock in a maintenance routine that reseals joints after heavy rains and runs a yearly moisture check to extend the life of the retrofit.
Final inspection checklist (weeps, flashings, fasteners, slope)
Use this checklist right before you sign off on your concrete work to ensure it’s watertight and ready for the elements.
- Weep holes: Check they’re clear of debris. Confirm water can drain freely; blockage leads to moisture buildup.
- Flashings installed: Look at all joints, corners, and edges. Flashing should be visible and properly sealed; missing flashings let in rainwater.
- Slope towards drains: Use a level or straight edge to check slope. Water should run off without pooling; incorrect slope causes standing water.
- Fasteners tight: Inspect all screws, bolts, and anchors for snug fit. Loose fasteners can lead to structural issues over time.
- No cracks visible: Scan surface with a flashlight at night. Cracks need repair before they worsen; even small cracks let in water.
- Expansion joints filled: Check that all expansion joints are properly sealed and free of gaps. Unfilled joints allow moisture to enter.
- No standing water after rain: Observe your work area after a light rain or simulated test with a hose; standing water indicates improper slope or drainage issues.
- Proper concrete mix ratio: Look for uniform color and texture. Inconsistent appearance may indicate poor mixing, leading to weak spots.
- No exposed rebar: Ensure all reinforcing bars are adequately covered by concrete. Exposed rebar rusts quickly, compromising strength.
- Sealant around penetrations: Check for proper sealing around pipes and conduits. Missing sealant allows water to seep in.
- No gaps at transitions: Inspect where different materials meet (e.g., concrete to brick). Gaps can cause leaks; ensure a smooth transition.
Quick rule: If it looks like water could get in, fix it before you walk away.
Common retrofit mistakes and how to avoid them
This checklist helps you spot common issues during a concrete retrofit project. Use it when inspecting your work or before finalizing any retrofits.
- Check clearances: Ensure there’s at least 1 inch between the new concrete and existing structures to allow for expansion. Measure with a ruler; if too tight, cracking can occur.
- Overlap flashing: Verify that all flashings overlap by at least 6 inches to prevent water intrusion. Look closely where old meets new; insufficient overlap means leaks.
- Inspect weep holes: Confirm every 2 feet of concrete has a properly placed weep hole for drainage. Use a flashlight to check; missing or blocked weeps cause moisture buildup.
- Check curing time: Ensure new concrete cures at least 7 days before applying any sealant or paint. Wait and observe the surface hardness; premature sealing leads to poor adhesion.
- Evaluate fastener depth: Make sure all fasteners are set no deeper than half their length into the concrete. Measure with a tape measure; too deep can cause structural issues.
- Test slope accuracy: Confirm that your retrofit maintains proper drainage slope, typically 1/4 inch per foot. Use a level to check; incorrect slope leads to water pooling.
- Check for cracks early: Look for any hairline cracks immediately after pouring and curing. Inspect visually; ignoring them can lead to larger structural problems later.
- Verify concrete mix: Ensure the new mix matches the existing one in terms of strength and composition. Compare notes or samples; mismatched mixes cause inconsistent performance.
Quick rule: Always double-check clearances, overlaps, and slopes to avoid costly repairs down the line.
Ongoing maintenance and signs of failure to watch for
Use this checklist every six months or after harsh weather events to catch issues early before they become costly repairs.
- Check weeps: Ensure water drains freely. Blockages can lead to moisture damage.
- Inspect flashings: Look for gaps or rust. Proper sealing prevents leaks.
- Verify slope: Water should run off, not pool. Use a level to check.
- Look for cracks: Small cracks can grow into major issues if ignored.
- Check paint condition: Repaint areas showing wear or rust to prevent corrosion.
- Inspect fasteners: Loose bolts weaken the structure. Tighten as needed.
- Evaluate sealant: Cracked or missing caulk lets in water and pests.
- Check for algae growth: Clean regularly to prevent structural damage.
- Look at roof edges: Ensure proper overhang. Missing coverage can cause leaks.
- Inspect gutters: Clear debris weekly during rainy seasons.
- Test downspouts: Water should flow freely without clogs or splits.
- Evaluate deck supports: Check for rot and ensure stability. Weaknesses can cause collapse.
- Look at window seals: Replace damaged weatherstripping to prevent drafts.
- Check for water stains: Early signs of leaks or moisture issues.
Quick rule: If it looks wet, cracked, loose, or dirty, fix it before it gets worse.
Cost Estimates, Timeframes, and When to Hire a Pro
Expect rough material and labor cost ranges for a weep screed retrofit, with DIY versus contractor pricing and waste allowances. Timelines depend on wall size and condition, from small patches to full-wall retrofits, including demolition, moisture checks, and finish curing. Red flags like structural concerns, water intrusion, permits, scaffolding needs, and warranty questions signal when you should hire a pro.
Before you quote, nail accurate measurements, photos, and wall condition notes, plus access constraints and a disposal plan. Understanding these factors helps you compare bids fairly and avoid costly surprises. A clear plan keeps DIY work safe and compliant while sizing expectations for time and cost.
DIY vs professional cost comparison
When you tackle concrete work yourself, initial costs can look lower. You save on labor and avoid hiring fees. But don’t forget the hidden costs: mistakes that need fixing later, materials wasted due to inexperience, and the time you spend learning on the job instead of getting it right the first try.
Hiring pros might cost more upfront but offers big savings down the road. Professionals have the tools, experience, and know-how to do the job right from day one. They can spot issues like base compaction that you might miss, preventing costly repairs later on. Plus, they often offer warranties that cover defects for years.
If your project is complex or in a tricky location, it’s wise to hire pros. Their expertise saves time and money by avoiding common pitfalls. For simple jobs like small patios or sidewalks, DIY can work if you’re willing to put in the effort and learn from mistakes.
Time estimates by scope and crew size
For a single wall, you’re looking at about 2 to 4 days if you’ve got the right tools and materials. It’s all about how much prep work you need to do—like check base compaction and formwork setup.
If you’re tackling multiple walls or a full-house retrofit, it’s best to break it down into smaller sections. A pro crew might finish one wall per day, but if you’re doing this on your own, plan for 1-2 days per section. Remember, the bigger the project, the more time you’ll need for curing and adjustments.
For a full-house retrofit, expect to spend at least two weeks or longer, depending on how many walls are involved and if there’s any coordination with other trades like plumbing or electrical. Don’t rush it; take your time to get everything right from the start.
When to stop DIY and call a specialist
If you’re dealing with structural rot, it’s time to step away from the hammer. Structural issues can compromise your home’s safety and integrity. Don’t risk it; call in a pro.
Complex flashings around chimneys or roof valleys are another red flag for DIYers. These areas require precision work that’s tough to get right without experience. A mistake here could lead to serious leaks, so don’t hesitate to hire someone who knows how to handle it.
Multilayer assemblies in basements or crawl spaces can be tricky too. If you’re unsure about the sequence of materials and their installation, it’s better to consult a professional. They’ll ensure everything is done correctly to prevent future issues like mold growth or water damage.
Alternative Solutions When a Retrofit Isn’t Feasible
When a retrofit isn’t possible, you still have solid moisture-management options that can keep a wall dry, including installing a rainscreen, regrading to shed water away from the surface, upgrading flashing and kick-out details, or performing targeted repairs to damaged barriers, fascia, or joints that otherwise trap moisture. Start by honestly assessing the wall’s condition, how moisture has behaved over time, the climate exposure, and your budget to decide which approach makes sense without weep screed, so you’re not throwing good money after bad. A rainscreen changes drainage and drying by creating a ventilated gap behind the finish, works best with compatible wall assemblies, requires careful placement of drainage planes and vents along with practical installation steps, and it’s not a cure-all if the underlying structure is failing.
Regrading and proper grading adjustments shift water away from the wall and blend with existing drainage planes, reducing water loading and buying time for any finish, but you’ll need to verify soil conditions, slope, and drainage routes to avoid new problem areas. Targeted repairs, sealant replacements, crack patches, and routine inspections are cheap insurance when a full retrofit isn’t on the table, helping catch problems early and extend wall life while you plan next steps, because procrastination just makes the damage harder to fix.
Rainscreen and drainage plane retrofits
If you can’t do a full stucco retrofit, adding a ventilated cladding system is your next best bet. This setup uses furring strips to create an air gap between the wall and the new siding or cladding material. The key here is that this space acts as both a drainage plane and a rainscreen. Water that sneaks past the exterior layer can drain away, preventing it from soaking into your walls.
When you’re setting up furring strips, make sure they are evenly spaced and securely attached to the wall. This isn’t just for looks; proper spacing is crucial for air circulation and drainage. Also, check base compaction before installing anything new. A solid foundation means your retrofit will last.
This approach might seem like overkill if you’re only dealing with minor water issues, but it’s a smart long-term fix that can save you from bigger headaches down the road. Remember, doing it right now could mean avoiding costly repairs later on.
Localized repairs and protective measures
If a full retrofit isn’t doable, focus on localized fixes. Add flashing around windows and doors to stop water from seeping in. Trim overgrown landscaping away from the foundation to prevent moisture buildup.
Check base compaction before pouring new concrete patches. Weak soil can cause cracks right away. Use continuous trim or sealant along walls where different materials meet to keep out water and pests.
Avoid cheap fixes that won’t last, like caulk alone for major leaks. It’ll crack and peel in no time. Spend the extra dough on quality materials and proper installation for lasting protection.
Long-term replacement vs patching decision guide
If a full retrofit isn’t doable, you gotta decide between long-term replacement and periodic patching. First thing to check base compaction. If it’s weak, patches won’t stick. Next, look at the overall condition of your concrete. Lots of cracks or spalling? That means bigger issues under the surface.
If you’re seeing widespread damage, think about replacing sections or even all of it. It’s a big job but saves money in the long run. If only small areas are damaged and base is solid, go for patching. But remember, patches need to match the rest of your concrete closely or they’ll stand out like a sore thumb.
Before you start any work, make sure you’re up to code with local building regulations. Don’t cut corners on materials either; cheap fixes are just gonna cost more later when they fail. And always wear safety gear—this stuff can be dangerous if you don’t handle it right.
Conclusion
Protecting the wall system from moisture is non‑negotiable: do this right and you keep the structure durable, look clean, and avoid costly repairs later. A solid retrofit starts with a clear plan, careful safety steps, and following the correct sequence from exposing the base to finishing coats.
Start by verifying which walls lack a weep screed, secure the necessary permits, define scope and sequence, gather the right tools and materials, and then prep the site for safe demolition to expose the base. Move through removing old wire, staples, paper, and damaged materials in a controlled way, install the weep screed and flashing correctly, then counter-flash, integrate housewrap and paper, reattach metal lath to the existing mesh, and finally apply the scratch, brown, and finish coats in the proper order. Finish with a thorough inspection and any small touch‑ups, plan post‑work maintenance, and keep a tight eye on cost estimates and timeframes, including when a pro is needed.
Common mistakes to avoid are skipping or misordering steps, neglecting proper flashing or moisture pathways, and rushing through demolition or coating work. Don’t cut corners on permits or safety gear, and never skip testing new work in a small, non‑critical area to confirm performance before full application. Use the rule of thumb: if you’re unsure about the wall condition, flashing detail, or tying into existing mesh, pause and recheck before proceeding.
If structural damage, uncertain permitting, or a scope that feels beyond your comfort level arises, call a pro rather than forcing it. When you push ahead correctly, you reduce risk, stay on schedule, and protect your investment—you’ve got this, and the next step is taking action with a concrete plan and steady, deliberate progress.
FAQ
What is a weep screed and why do I need one?
A weep screed is the bottom edge of a siding system that lets moisture escape. It also creates a small air gap so the siding doesn’t soak up water. Without it, you risk rot, mold, and costly repairs.
How can I tell if my house has a missing or improper weep screed?
Look at the bottom of the siding. If water sits against the wall or there is visible moisture damage, you may be missing a proper screed. A gap at the base and drainage channels should be clear—if not, you have a problem.
What are my retrofit options if there was never a weep screed installed?
You can add a proper drip edge and install a compatible siding system with a weep screed. This usually means removing a portion of siding, adding flashing, and sealing joints. It’s a job you can do, but follow the manufacturer and local code rules strictly.
What common mistakes should I avoid during a retrofit?
Avoid sealing the bottom tightly or blocking the drainage path. Don’t skip flashing or use the wrong materials. Poor installation means moisture stays in and you’ll pay later with rot and mud-daubed walls.