
Introduction
A concrete splash curb along siding is a small raised strip of concrete cast against the wall to deflect water away from the foundation and siding. It’s a hands-on job that involves forming a narrow curb, leaving a movement gap (expansion joint) where the curb meets the wall, and planning a path for water to run away from the house. Before you start, check product labels and local rules for recommended joint materials and acceptable curb dimensions.
You’ll be doing basic formwork, mixing and placing concrete, and sealing or finishing the joint so water can’t wick back to the siding. Think like a site foreman: plan drainage slope, protect the siding while you work, and pick joint materials and sealants to match your climate and movement expectations. If you’re unsure about joints, sealants, or slope requirements, check manufacturer instructions or local building guidance.
Key takeaways
- Plan permits and site assessment before any mixing or forms; verify setbacks.
- Build simple, level forms with bracing; check alignment against siding.
- Use appropriate reinforcement and pour strategy suited for curb along wall.
- Place expansion joints correctly and waterproofing at joints to prevent leaks.
- Ensure drainage slope directs water away and integrate outlet properly.
- Cure, protect, and maintain the splash curb; monitor for cracks and settling.
Table of Contents
- Introduction
- Key takeaways
- Planning, Site Assessment, and Permits
- Tools and Materials Checklist
- Site Preparation and Measurements
- Form Construction, Alignment, and Bracing
- Reinforcement, Concrete Mix, and Pouring Strategy
- Expansion Joint Placement and Waterproofing Detail
- Drainage, Slope, and Outlet Integration
- Finishing, Curing, Cleanup, and Maintenance
- Conclusion
- FAQ
Planning, Site Assessment, and Permits
Before breaking ground, walk the run and note the siding type, any trim or flashing details, and the existing grade relative to the foundation. Check local building department rules and HOA covenants to see if a permit or approval is required; consult product labels or local code guidance for specifics.
Also consider how the new curb will interface with utilities, downspouts, and landscaping so you can avoid conflicts during installation. If anything is unclear, contact the manufacturer, your local building official, or a qualified inspector for confirmation.
Inspect siding, foundation, and adjacent materials
The material you choose for your splash curb can affect its longevity and appearance. Here’s what to check:
- Siding material: Vinyl, wood, or fiber cement? Each has different expansion rates and moisture tolerance.
- Attachment details: How is the siding attached? Nails, screws, or staples? This affects how you’ll secure your curb.
- Foundation condition: Check for cracks, settling, or other issues. A stable base ensures a solid curb.
- Adjacent materials: Consider windows, doors, and trim. Ensure your curb complements these elements.
- Avoid: Don’t use materials that don’t match the siding’s expansion rate. This can cause cracking or staining.
Check local codes, setbacks, and permit triggers
Before you start, verify your plans with your local building department. Here’s what to ask about:
Setbacks: Ensure your curb doesn’t violate any property line or zoning restrictions.
Drainage rules: Make sure your curb won’t cause water issues on neighboring properties.
Frost protection: Check if your area requires additional measures to protect the concrete from freezing and thawing cycles.
Permits: Ask when you need one. It’s usually required for structural work or when the value of the project exceeds a certain threshold.
When to hire a pro vs DIY
Some splash curb projects are better left to professionals. Here’s when:
Hire a pro: If your siding is complex, like brick or stone masonry, or if there are significant slope issues or utility lines in the way.
DIY: For simple, straightforward projects where you have basic tools and experience. Ensure you understand how to mix, pour, and finish concrete.
Consider: If you’re unsure about any aspect of the project, it’s better to hire a professional to avoid costly mistakes.
Tools and Materials Checklist
Gather hand tools (shovel, trowel, level, screed board), power tools (concrete mixer or wheelbarrow and hoe), form materials (lumber or metal forms), and consumables like concrete, reinforcement, joint material, and fasteners. Read product data sheets and labels for any special handling instructions and choose better-quality or heavier-duty tools if a contractor will be hired.
Include safety gear—gloves, eye protection, knee pads, and respirator if cutting or mixing dry materials—and plan extras for waste and mistakes. If you need to upgrade tools for a professional install, make a short list of rentals that match contractor-grade equipment and verify compatibility with the job scope.
Essential hand and power tools
Before starting your concrete project, ensure you have all the necessary tools. Use this checklist to verify each item.
- Tape Measure: Check it against a known length (e.g., 12 feet) to ensure accuracy. A wrong measurement can lead to incorrect amounts of concrete and rework.
- Level: Test on a flat surface. It should show a perfect bubble in the center. An inaccurate level can result in uneven surfaces and costly repairs.
- Straightedge: Verify it’s straight by laying it across a known straight line (e.g., a door frame). A crooked straightedge can cause lines to be off, affecting the overall look of your project.
- Circular Saw or Hand Saw: Ensure blades are sharp and in good condition. Dull blades can cause slow cuts, leading to increased effort and potential safety hazards.
- Tamper/Rake Combination: Check for any damage or wear on the tamping end. A damaged tamper can leave marks on your concrete surface, requiring additional finishing work.
- Wheelbarrow: Inspect tires for proper inflation and check for any cracks in the wheelbarrow itself. A faulty wheelbarrow can cause spills and make transporting concrete difficult.
- Concrete Finishing Tools (Float, Edger): Verify they’re clean and free of debris. Dirty tools can leave marks on your concrete surface, ruining its finish.
- Optional Power Tools (Mixer, Bull Float): If using, ensure they’re in good working order. A malfunctioning tool can cause delays and poor results.
Quick rule: Always check your tools before starting a project to avoid costly mistakes and rework.
Materials: concrete, forms, reinforcement, joint materials
Use this checklist when you’re ready to mix and pour your small curb. It’ll help you gather the right materials and avoid common mistakes.
- Concrete Mix: Check the bag label for a mix suitable for small curbs (usually C30 or C40). Ensure it’s fresh and within its shelf life.
- Water: Use clean, drinkable water. Avoid using water with high salt or mineral content as it can affect concrete strength.
- Forms: Inspect your formwork (usually plywood or OSB) for any cracks or weak points. Ensure it’s well-supported and level.
- Form Release Agent: Apply a suitable release agent to prevent the concrete from sticking to the forms. Check that it’s compatible with your chosen concrete mix.
- Rebar/Wire Mesh: Verify rebar size (usually #3 or #4) and spacing (typically 6″ to 12″ on center). For wire mesh, check the aperture size (around 1/2″ to 3/4″).
- Rebar Chairs/Supports: Ensure rebar chairs are level and stable. Check that they’re supporting the rebar at the correct height.
- Expansion Joints: Inspect expansion joint material (usually preformed foam or rubber strips) for any damage. Ensure it’s compatible with your concrete mix and environmental conditions.
- Sealant: Check that the sealant is suitable for expansion joints in concrete. Verify its compatibility with your chosen expansion joint material.
Quick rule: Always follow manufacturer instructions for concrete mixing, formwork assembly, and reinforcement placement to ensure a strong, durable curb.
Safety and protection supplies
Before you start mixing concrete or setting up forms, make sure you have all the safety gear and protective materials in place. This checklist will help you ensure a safe and efficient job.
- Hard Hat: Inspect for cracks or damage before use. Ensure it fits properly with a chinstrap secured.
- Safety Glasses: Check for scratches that could impair vision. Make sure they fit well and provide adequate eye protection.
- Ear Protection: Choose either earplugs or earmuffs, depending on your preference. Ensure they’re in good condition and fit correctly.
- Gloves: Inspect for holes or worn-out spots. They should provide a good grip and protect your hands from cuts and burns.
- Steel-Toed Boots: Check that the steel toes are intact and provide adequate protection. Ensure they fit well and have good grip to prevent slips.
- Temporary Siding Protection: Lay down drop cloths or plastic sheeting on adjacent walls to protect them from concrete splatter. Check that they’re secure and cover the entire area.
- Erosion Control Fabric: Measure out enough fabric to cover the entire work area. Ensure it’s in good condition and will effectively prevent erosion.
- Landscaping Protection: Cover any nearby plants or landscaping with plastic sheeting. Check that they’re secure and won’t be disturbed during the pour.
Quick rule: Always prioritize safety first. If you’re unsure about any item, check the manufacturer’s instructions or consult a professional to ensure you’re using it correctly.
Site Preparation and Measurements
Measure the full run and mark start and end points, then calculate the curb width and height based on the siding clearance and required protection; verify any critical dimensions against product instructions or local code. Snap layout lines and use stakes and string to maintain straight lines along the entire run.
Excavate to the proper subgrade depth, remove organic material, and compact the soil to provide uniform support for the curb. If a granular base or bedding is recommended, check the material specifications and compact it in lifts to achieve a stable, even surface.
Measuring and marking layout
Start by measuring the length of your siding where you want to install the curb. This is your run.
Next, decide on your curb’s width and height. A common width is 4 inches, with a height matching your siding’s bottom trim. Mark these dimensions on a scrap piece of wood or foam board as a guide.
Using your measurements, mark layout lines along the base of your siding. Set offsets from the siding to maintain consistent spacing for your curb’s width and height. Use control points every 8-10 feet to keep your line straight and level.
Subgrade preparation and compaction
Remove any organic material, like grass or weeds, from the area where you’ll pour. This ensures a stable base for your curb.
Check the soil’s stability. If it’s soft or has high clay content, consider adding granular fill or sand to improve compaction. Spread evenly and compact using a plate compactor or hand tamper.
Your subgrade should be well-compacted, level, and at least 4 inches deep to match your curb’s height. Use a straight edge and level to ensure it’s flat and true.
Protecting siding, flashing removal, and temporary covers
Temporarily remove or protect lower flashing and siding trim to prevent concrete from damaging them. Use a pry bar and hammer to carefully lift flashing, then cover with plastic sheeting.
Place protective barriers along the base of your siding to avoid concrete splatter. You can use plywood, OSB, or even cardboard secured with screws or staples. Ensure they’re level with your layout lines.
Before pouring, check that all protection is in place and secure. This will save you clean-up time later and protect your home’s siding from damage.
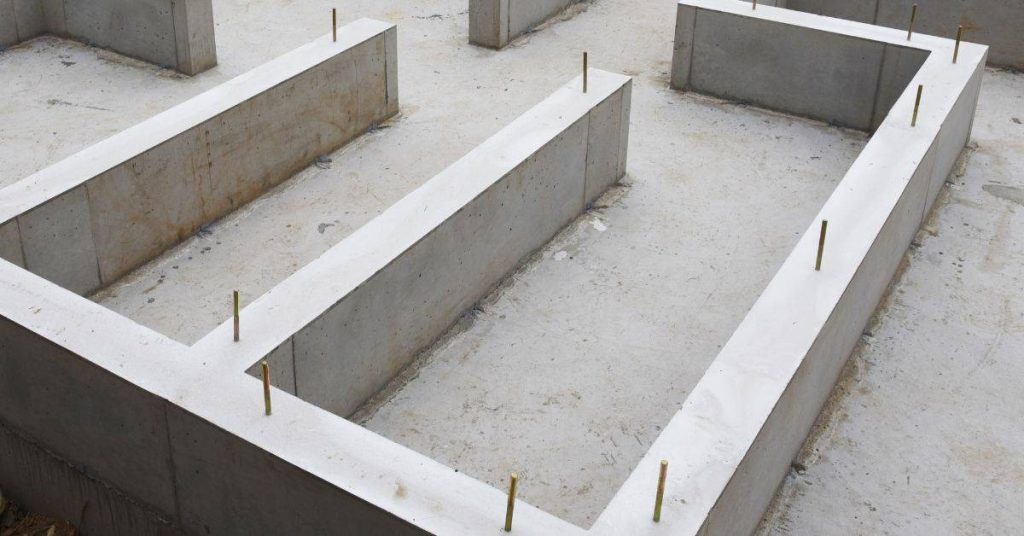
Form Construction, Alignment, and Bracing
Build forms that match the curb profile using straight, stiff materials and set them to the required height and alignment; use a level and string to maintain continuity along the run. Anchor forms with stakes and bracing positioned so they won’t pull out under pour pressure and avoid driving fasteners into siding or structural sheathing.
Check form top elevations at multiple points and shim or adjust as needed for consistent height and slope toward the desired drain location. Use diagonal bracing and blocking to prevent bulging; if in doubt about siding clearance, refer to the siding manufacturer or a building official for guidance.
Selecting form materials and profiles
The right materials and profiles for your concrete forms will determine how durable, long-lasting, and attractive your finished project is. Don’t skimp on quality here.
- Plywood: Cheap but flexible. Good for small projects. Look for CDX or better, at least 3/4″ thick. Avoid if you need a smooth finish.
- OSB (Oriented Strand Board): Strong and stable. Better for larger forms. Check for exterior grade. Not recommended for below-grade applications.
- Metal (Aluminum or Steel): Durable, reusable, and provides a smooth finish. Expensive but worth it for complex shapes. Rent if you don’t own.
- Plastic: Lightweight, easy to handle. Good for small, simple forms. Not as durable as other options. Avoid for large or complex projects.
- Profiles: Choose profiles with a reveal (overhang) that directs water away from the house. This prevents water intrusion and ice buildup.
Pro tip: Always check product labels for compatibility with your concrete mix. Buy materials in quantities you can use within their shelf life. Store them properly to maintain quality.
Setting, aligning, and bracing forms
First things first, check base compaction. You don’t want your forms floating on a weak foundation. Use a plate compactor if needed.
Now, set those forms. Level ’em off, use a laser level or string line to get it right. Concrete’s heavy, so precision matters here. Remember, you’re building up, not down.
Stakes go in next. Drive ’em deep enough to resist that concrete pressure. We’re talking at least 2 feet below grade for most jobs. Use a sledgehammer if your post driver’s on vacation.
Bracing time. This is where you prevent those forms from bulging like a kid trying to hide cookies. Space braces every 4-6 feet, top and bottom. Tie ’em tight with wire or ratchet straps. You want that form as rigid as your grandma’s Sunday roast.
Attachment and clearance near siding
When setting your forms near siding, remember: you’re not there to damage it. Here’s how to keep your work clean:
Non-invasive attachment: Use form ties or straps that hook over the top of the form and under the bottom plate of the wall. This way, you’re not nailing into the siding or damaging it.
Clearance is key: Keep your forms at least 1″ away from the siding to avoid any damage during pouring. Check your local building codes for exact clearances. Use form spacers or shims to maintain this gap.
Reinforcement, Concrete Mix, and Pouring Strategy
Place reinforcement—wire mesh or rebar—so it sits in the mid-depth of the curb section and is supported on chairs or concrete blocks to avoid touching the subgrade. Select a concrete mix suited for curbs and exterior exposure; check the bag label or mix data sheet for strength and slump recommendations before ordering or mixing.
Pour in controlled segments to reduce form pressure and consolidate concrete with a tamper or vibrator to eliminate voids and honeycombing, working from one end to the other. Strike off and screed to the form top, then use a jointing tool or edging as required while the mix is still workable.
Reinforcement layout and support (rebar, wire)
Lay out your rebar first. It’s the backbone of your curb.
Use chairs or spacers to keep it centered within the formwork. This ensures strength and prevents cracking.
Pro tip: Use a grid pattern for added support, spacing bars about 6 inches apart.
Choosing a concrete mix and delivery method
Go for an exterior-rated mix. It’s designed to handle weathering.
Wheelbarrow or pump? Depends on your site. Wheelbarrows are manual, pumps are faster but need power.
Check manufacturer instructions for slump (wetness) and admixtures (additives).
Pouring, consolidating, and working in tight runs
Pour in small sections or ‘runs’. This helps control the pour and reduces cold joints.
Use a vibrator or tamping bar to consolidate the concrete. Remove air pockets and ensure it’s well-compacted.
Pro tip: Work quickly but carefully. Concrete sets fast, so keep your runs short and manageable.
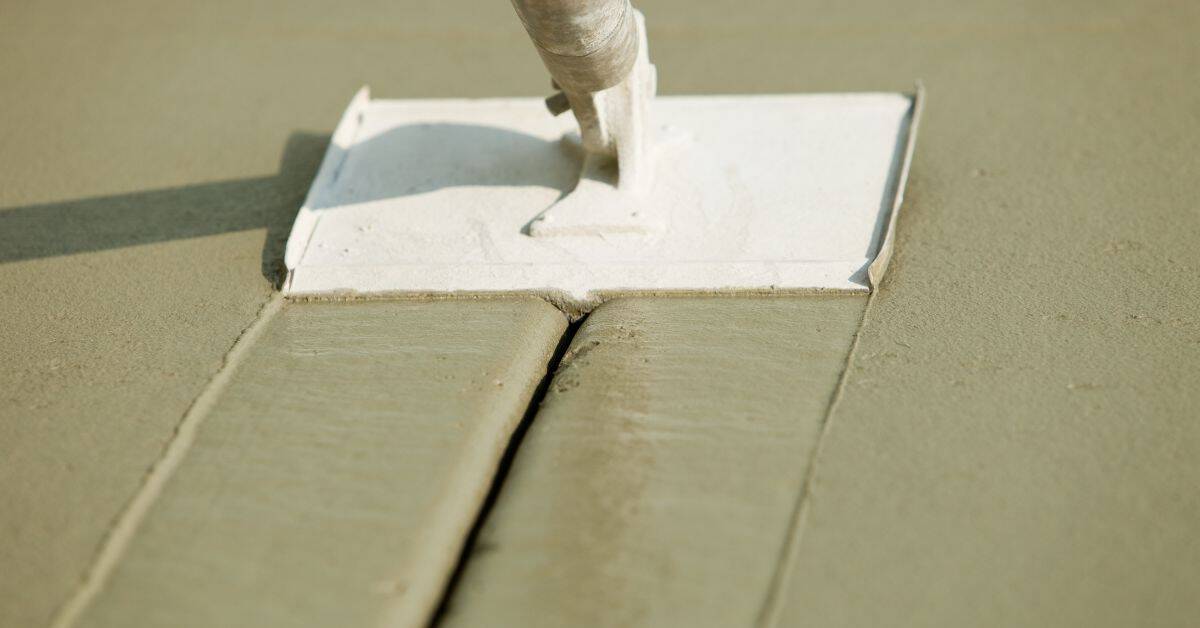
Expansion Joint Placement and Waterproofing Detail
Plan expansion or control joints at intervals and at transitions to the house so thermal movement doesn’t transfer stress to the siding or foundation; locate joints relative to doors, corners, and changes in plane. Choose joint material compatible with the concrete and siding system and follow the product instructions for installation depth and width.
Integrate flashing and a watertight seam where the curb meets the siding by following manufacturer recommendations and local practice to prevent water infiltration. If you’re unsure about sealants or flashing details, check the siding manufacturer guidance or consult a qualified waterproofing contractor.
Where and how to place expansion joints
Expansion joints are crucial to let your slab move with temperature changes. Here’s where and how to place ’em:
Joint spacing: Aim for about every 20-25 feet in both directions. Check the concrete mix design or manufacturer’s instructions for specific recommendations.
Place joints at these spots:
– Every 10-15 feet from slab ends.
– At transitions between different slab types or thicknesses.
– Where slabs connect to walls, buildings, or other structures.
– Over any hidden steel reinforcement.
To install compressible joint filler or backer rod:
– Cut a groove into the concrete at your marked joint locations. Use a saw with a diamond blade for clean cuts.
– Insert the joint filler or backer rod, ensuring it’s fully seated and flush with the slab surface.
– Pro tip: Don’t skimp on joint filler. Too little can cause cracking. Too much can lead to excess water pooling.
Integrating joint materials with siding and flashing
The right materials here keep water out, let your siding move, and look good. Choose wrong, you’ll see cracks and leaks.
- Backer Rod: Fills expansion joint gap. Look for closed-cell polyethylene (cheap & durable). Don’t use open-cell foam – it absorbs water.
- Expansion Joint Tape: Goes over backer rod, prevents mortar from sticking to siding. Choose acrylic or butyl tape, not cheap paper tape that tears easily.
- Type N Mortar: Fills joint after taping. It’s strong yet flexible, perfect for expansion joints. Don’t use Type S – it’s too rigid and cracks.
- Flashing: Protects joint at siding interface. Use galvanized steel or aluminum, not cheap plastic that degrades fast.
- Silicone Sealant: Seals final joint after mortar dries. Choose paintable, UV-resistant silicone. Don’t use acrylic caulk – it’s not waterproof enough.
Pro tip: Buy materials in small quantities to avoid waste. Store them right (keep mortar dry, tape & backer rod cool) and mix only what you need at a time.
Membranes, sealants, and backfill considerations
When it comes to waterproofing behind your concrete curb, you’ve got two main options: sheet membranes or liquid-applied barriers. Both have their place, so check the product labels and decide based on your specific job.
Sheet Membranes: These are great for larger areas with fewer joints. They’re quick to install once you’ve got a solid base – check base compaction. Use construction adhesive to stick ’em down, then seal the edges and overlaps with a compatible seam sealer.
Liquid-Applied Barriers: These are your go-to for complex shapes or lots of joints. They’re flexible, so they can move with the concrete without tearing. Apply them according to the manufacturer’s instructions, usually with a paintbrush or roller, and let ’em cure before backfilling.
Now, about those sealants. You’ll need one for the joint between your curb and slab. Use a polyurethane or silicone-based sealant – they’re flexible and can handle movement. Apply it in a continuous bead along the joint, then tool it smooth. Let it cure before backfilling.
Finally, backfilling. You want to avoid stressing those joints, so here’s how: use clean, well-graded material, and place it in layers no more than 6 inches deep at a time. Compact each layer with a plate compactor – check the manufacturer’s instructions for the right pressure. Keep that joint open during backfilling to avoid stressing it.
Drainage, Slope, and Outlet Integration
Design the curb with a continuous slope that directs water away from the foundation toward designated outlets or collection points; determine outlet locations before finalizing form height. Tie outlets into existing downspout or drainage systems using compatible fittings and confirm connection requirements with the drainage product instructions.
Create positive drainage paths and avoid trapping water against the house by checking slope over the full run and adjusting forms as needed during installation. If routing to a storm sewer or other public system, verify connection rules with the local authority before proceeding.
Slope and pitch guidance for runoff
When adding a concrete splash curb, it’s crucial to design a continuous slope away from your siding. This prevents water from pooling and causing damage.
Start with a gentle 1/8 inch per foot slope. This is a common standard but check local building codes for specifics.
Use a level or laser level to ensure consistent pitch along the entire length of your curb. Remember, water will follow the path of least resistance – make sure that’s away from your home!
Creating outlets, scuppers, or drains
To direct water away efficiently, you’ll need to create discharge points in your curb. Here are a few options:
Weep holes: Small holes drilled into the bottom of the curb allow water to seep out slowly. They’re simple but can clog over time.
Scuppers: These are open channels cut into the top edge of the curb, directing water over the side. They’re great for larger volumes of water but may require more maintenance.
Buried drains: Connecting to your existing underground drainage system can be a clean and effective solution. Just ensure they’re properly sloped and sized to handle the expected water flow.
Tie-ins to existing drainage and frost considerations
Connecting your new curb to your home’s existing drainage system is key. This could mean tying into gutters, downspouts, or underground drains.
Use appropriate connectors and ensure they’re securely fastened. Consider using flexible couplings to accommodate any movement due to temperature changes.
Frost heave can be a problem in colder climates. To prevent damage from freezing and thawing, ensure your curb has proper expansion joints. Also, consider using air gap connectors at tie-in points to allow for expansion and contraction.
Finishing, Curing, Cleanup, and Maintenance
Choose finishing textures that match the surroundings and apply them while the concrete is plastic, then start curing according to product guidance to achieve intended strength and durability. Use curing compounds, wet coverings, or other approved methods and confirm the chosen method on the material label or technical sheet.
Clean forms and tools promptly to extend their life, and establish a maintenance schedule to inspect joints, sealants, and drainage periodically. For any repairs or sealant replacements, follow manufacturer instructions and local practices to maintain a watertight and durable curb over time.
Surface finishing and visual checkpoints
After the concrete has set, it’s time to inspect and finish the surface. Here’s a checklist to ensure everything is up to par.
- Broom finish: Use a broom to create texture for better traction. Check that the pattern is consistent across the entire curb.
- Trowel finish: For a smooth surface, use a trowel. Inspect for any missed spots or inconsistencies.
- Rounded-edge finish: Ensure edges are rounded to prevent sharp corners that could cause injury or damage. Check all edges thoroughly.
- Slope check: Verify the curb has a consistent slope (usually 1/4 inch per foot) for proper water runoff. Use a level or string line to confirm.
- Joint alignment: Ensure expansion joints are straight and evenly spaced. Check with a tape measure and level.
- Flashing exposure: Make sure flashing is properly installed and not exposed. Inspect all seams between the curb and siding.
- Crack check: Look for any hairline cracks that may have formed during setting. Seal immediately if found.
- Color consistency: If using integral color, ensure it’s consistent throughout. Check different areas of the curb.
Quick rule: Always inspect and finish the surface within 24 hours after pouring to prevent damage or inconsistencies.
Curing methods and inspection timeline
Proper curing is crucial for concrete’s strength and durability. Here’s a checklist to ensure your curb cures correctly.
- Moist-curing: Keep the concrete damp for at least 7 days. Check daily that it remains moist, but not waterlogged.
- Curing compounds: Apply according to product directions. Inspect after application to ensure full coverage.
- Temperature check: Ensure temperature stays above freezing during curing. Concrete can’t cure below 50°F (10°C).
- Plastic sheeting: If using, check daily that it remains in place and isn’t allowing the concrete to dry out.
- Inspection milestone – Day 3: Check for any cracks or signs of distress. Seal if necessary.
- Inspection milestone – Day 7: Recheck for cracks, and ensure curing is complete before backfilling.
- Final inspection: Before loading the area, inspect one last time for any issues that may have arisen during curing.
Quick rule: Never rush curing. Allow at least 7 days before backfilling or using the area to ensure maximum strength.
Long-term maintenance and common repairs
Maintaining your concrete splash curb is crucial for its longevity. Here are some simple maintenance steps:
Seasonal maintenance: Inspect the curb annually, before winter. Remove any debris or dirt that could trap moisture. Apply a fresh sealant if necessary.
Crack inspection: Check for cracks regularly. Small cracks can be sealed with concrete caulk. Larger cracks may require professional repair.
Sealant failure: Inspect sealants around joints and edges. If they’re cracked or peeling, replace them to prevent water intrusion. Regular cleaning and reapplication of sealants will extend their life.
Drainage integrity: Ensure drains are clear and functioning properly. If not, clean or repair as needed to maintain proper runoff.
Conclusion
This curb will guide water away from the siding, keep the edge solid, and look built to last if you respect the layout, form work, and curing. Safety comes first, then a clean, straight pour that resists cracking and damage from weather.
Check in this order as you finish: confirm permits and site readiness, confirm measurements and alignment, prepare and brace the forms, install any reinforcement, mix and place the concrete with a steady pour, place the expansion joint and waterproofing correctly, ensure proper drainage, finish and cure carefully, and finally inspect for any issues and clean up. Do the work in small, deliberate steps, test a small area first, and stay within your plan if adjustments are needed.
Common mistakes to avoid are skipping or misplacing the expansion joint, failing to achieve proper slope toward the drainage outlet, and rushing the pour or curing. Never neglect safety: wear PPE, keep power tools dry and away from water, and avoid working when the ground is unstable or weather is harsh. Also avoid guessing on soil support or drainage paths—verify with measurements and plan for a reliable outlet before pouring.
If the site has unstable soil, a high water table, or complex drainage where the curb ties into other systems, consider bringing in a pro. When in doubt, or when you see signs of movement or poor drainage after a test area, stop and consult a professional. Stay steady, follow the plan, and you’ll have a durable, clean finish that serves you for years to come.
FAQ
How do I ensure proper drainage away from siding after I pour the splash curb?
Make sure the curb creates a low point that guides water away from the siding. Check that the surface slopes away from the wall and that there is a clear path for runoff to a designated outlet or drainage area. Verify with a level or straightedge and adjust as needed before the concrete sets.
What should I know about expansion joints and the curb connection to existing concrete?
Use an expansion joint where the new curb meets existing concrete or siding to prevent cracking. Follow the joint material and backer rod recommendations from the product you’re using. If in doubt, ask the manufacturer or read the labeling for gaps and sealant types.
How long before I can walk on or rain protect the new curb?
Get a realistic curing plan from the concrete mix you used and the label instructions. Keep the surface free of foot traffic until the recommended cure time has passed. Protect from rain and rapid drying if the instructions call for it.
What are common mistakes to avoid during form removal and finish around the curb?
Don’t remove forms too early; the curb can deform if it’s not set. Remove forms carefully and check for burrs or rough edges that can collect dirt or cause leaks. If you need to grind or smooth, do it gently and only after the concrete has firmed up enough per the product guidance.