
Introduction
A clean expansion gap at a slab-to-house line prevents cracking and unsightly edges by allowing for movement.
You’ll learn how to plan the gap, make clean cuts, and manage edge finishes with practical steps and best practices.
Key takeaways
- Ensure expansion gap is consistent along the slab-house joint for movement.
- Use masking tape and a straightedge to guide clean edge cuts.
- Cut only after marking exact width and verifying with a level and string.
- Install backer rod before sealant for a durable, flexible joint.
- Dress edges with a chisel or rasp for a smooth transition.
- Edge trim options include foam, metal, or color-matched profiles for seamless aesthetics.
Table of Contents
- Introduction
- Key takeaways
- Why expansion gaps matter at a slab-to-house joint
- Tools and materials checklist
- Safety and site prep before cutting
- Marking and measuring the correct gap
- Cutting techniques for clean edges
- Repairing and dressing the cut edges
- Installing backer rod and sealant for a durable, neat joint
- Edge trim and transition solutions for aesthetics
- Conclusion
- FAQ
Why expansion gaps matter at a slab-to-house joint
Expansion gaps are the built‑in allowance between the slab and the house. They help the concrete breathe and move without fighting against the wall or footing. If you skip or poorly cut the gap, you risk transfers of movement that show up as cracks or unsettled edges.
Without a proper gap, water can wick into the joint and freeze, loosening the finish and inviting damage to nearby structure. You may also see floor separation where finishes meet the foundation, which looks uneven and can create tripping hazards. Planning the gap carefully now prevents costly repairs later.
Thermal and moisture movement basics
Concrete slabs expand and contract with temperature changes. In summer, they grow; in winter, they shrink.
Moisture also plays a role. When it’s wet, the slab swells slightly. When dry, it shrinks.
Expansion gaps let the slab move without cracking or damaging adjacent surfaces. They’re sized based on expected temperature and moisture changes.
Building code and manufacturer expectations
Check your local building codes for minimum gap widths. Typically, it’s 1/4″ to 3/8″ per foot of slab length.
Manufacturers recommend specific sealant types for expansion joints. Use what they suggest to avoid water intrusion and maintain joint flexibility.
Always verify local requirements. Codes vary by region, and some projects may have additional restrictions.

Tools and materials checklist
Gather a concrete saw or angle grinder with a diamond blade, a jointing tool, and a backer rod. Have a grading or finishing tool on hand for smoothing the cut face. Pick a compatible sealant and a basic protective setup for dust control.
If you’re on a tight budget, consider alternatives like a rental tool, a smaller blade, or a basic caulking method with a backer rod. Always check the product label and manufacturer instructions for any tool or material you choose, and adjust to local rules or recommendations as needed.
Blade and cutter selection
Choose the right blades for a clean cut at the slab-to-house line.
- Diamond blades: Use these for concrete cuts. They last longer and give cleaner edges than abrasive blades.
- Blade size: Match blade size to your saw. Common sizes are 12″ and 14″.
- Teeth per inch (TPI): Lower TPI (6-9) for faster cuts, higher TPI (18-30) for smoother edges.
- Wet or dry cutting: Use water with diamond blades to keep dust down and prevent overheating.
- Abrasive blades: Avoid these if possible. They dull quickly and leave rough edges.
- Grinder discs: For tight spaces, use a grinder with resin fiber or diamond discs (6″-8″).
- Blade condition: Inspect blades before each use. Replace if worn or damaged to prevent kickback.
- Cutter type: For narrow gaps, use a thin kerf blade (less than 1/8″ thick).
Quick rule: Always match blade size to your saw and choose diamond blades for best results.
Sealants, backer rod, and edge trim options
Select the right materials to create a neat, functional expansion gap.
- Sealant type: Choose between polyurethane, polysulfide, or silicone. Polyurethane is most durable but can be harder to apply.
- Sealant color: Match sealant color to your home’s exterior for a seamless look.
- Backer rod size: Use 1/4″-3/8″ backer rod for most gaps. Larger sizes may be needed for wider gaps.
- Backer rod material: Foam or rubber backer rods work well. Avoid felt as it can absorb moisture and deteriorate.
- Edge trim profile: Consider using a trim profile to cover the gap and provide a neat finish.
- Trim material: Aluminum, vinyl, or stainless steel trims are common choices. Avoid wood as it can rot or warp.
- Trim size: Match trim size to your gap width for a snug fit.
- Sealant application method: Use a caulking gun with a smooth, consistent squeeze to apply sealant.
Quick rule: Always match backer rod and trim sizes to your gap width for a proper fit.
Safety and site prep before cutting
Start with a quick safety review: eye and ear protection, gloves, and a dust mask or respirator as required. Control dust and noise with barriers or shields when possible. Protect nearby siding, footings, and landscaping from sparks and debris.
Mark the cut line precisely using a chalk line or laser setup. Double‑check that the line won’t cut into the house drywall or exterior finishes. Clear the area of loose objects to minimize kickback or trips during cutting.
Protecting the structure and utilities
Before you start cutting, walk around the area to identify what needs protection. You’re looking for house siding, weep holes, door thresholds, and any buried utilities near your cut line.
Siding: Use cardboard or plywood to cover it. Secure with tape or nails, but don’t damage the siding itself.
Weep holes: These help water drain from behind the siding. Make sure they’re not blocked during cutting and cleanup.
Door thresholds: Protect them with a piece of 2×4 or similar, to prevent damage from your saw or feet.
Utilities: If you’re unsure about buried lines, call your local utility company. They’ll mark them for free.
Dust suppression and environmental considerations
Cutting concrete creates silica dust, which is harmful to inhale. Wet cutting helps control this, so keep your blade wet while working.
Use a vacuum with a HEPA filter attached to your saw. This collects the dust at the source. Make sure it’s compatible with your saw and follows safety guidelines.
Set up barriers around the work area to contain dust and water runoff. Drop cloths or plastic sheeting works well for this.
After cutting, clean up thoroughly. Sweep and vacuum any remaining dust. If you’ve used water, make sure it doesn’t pool anywhere, as this can cause other issues.
Marking and measuring the correct gap
Determine the gap width based on the slab, climate, and sealant you’ll use, then mark it along the joint line. Establish the depth you’ll cut so the backer rod sits at the proper level for sealant performance. Account for anticipated movement over time and any local requirements for joint depth to width ratios.
Check the manufacturer guidelines for your sealant and backer rod. If unsure, verify with the product data sheet or local code recommendations before proceeding. Keep the layout consistent across the entire joint for a clean look.
Templates and straight-edge techniques
Before you start mixing concrete, use this checklist to ensure your forms are properly marked and measured. This will help you create a strong, level foundation for your project.
- Check form alignment: Ensure the form is square by measuring diagonally from corner to corner. The difference should be no more than 1/2 inch; adjust as needed.
- Use a straight edge for lines: Run a straight edge (like a level or a long, straight piece of wood) along the top of your form to ensure it’s level and even. Check both sides.
- Mark chalk lines: Using a line level, snap a chalk line along the top of your form for a clear, straight reference point. Recheck after each pour section.
- Use string lines for long gaps: For longer gaps, use a string line pulled taut between two points to create a straight guide for your edge.
- Check temporary guides: Ensure any temporary guides (like stakes or boards) are secure and level. Wiggle them; if they move, re-secure.
- Verify form height: Measure the inside of your form at several points to ensure it’s at the correct height. Adjust as needed.
- Avoid overhangs: Ensure your form doesn’t overhang supports; this can cause concrete to spill and create an uneven surface. Keep forms flush with support edges.
- Check for levelness: Use a laser level or line level to ensure the entire form is level. Pouring on an angle can lead to cracks and weak spots.
Quick rule: Always double-check your measurements and levels after any adjustments to avoid costly mistakes.
Determining depth and width based on conditions
The gap between your concrete slab and adjacent surfaces isn’t one-size-fits-all. It depends on a few factors. Here’s what you need to consider:
Slab thickness: Thicker slabs need wider gaps for expansion. As a rule of thumb, aim for a gap that’s about 1/8″ (3mm) wider than your slab’s thickness.
Expected movement: Check the expected temperature and moisture changes where you’re pouring. More movement means you’ll need a bigger gap. A safe range is 1/4″ to 1/2″ (6-12mm), but check local rules or consult with a pro if you’re unsure.
Finish type: Broom-finished slabs can handle smaller gaps than smooth or exposed aggregate finishes. Always follow the finish manufacturer’s recommendations for gap sizes.
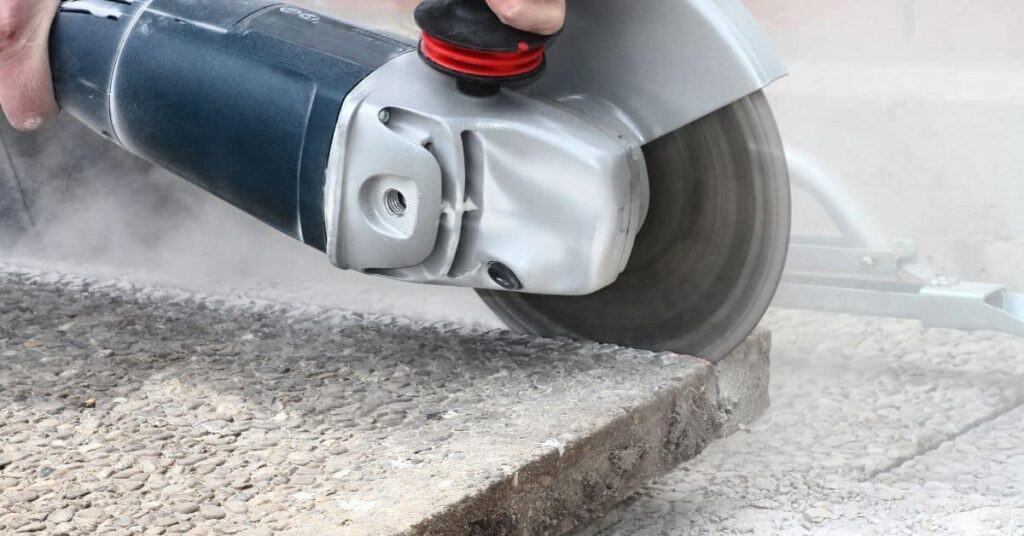
Cutting techniques for clean edges
Compare methods: a concrete saw, an angle grinder with a diamond blade, or a joint saw. Each tool has a different cutting speed, kerf, and control, so pick the one you can handle confidently and safely.
Use a slow, steady pass and let the blade do the work to minimize chipping at the house line. Keep the blade perpendicular to the surface, and pause to clear debris so the cut stays true. Check the cut edge as you go and adjust technique if you see roughness.
Two-pass cutting and scoring strategy
To cut a clean expansion gap at the slab-to-house line, use a controlled two-pass approach. This method reduces blowout at the wall edge.
First, score the concrete shallowly using an angle grinder with a diamond blade or a joint saw. Keep your cuts straight and level, following your marked lines.
Next, make your full-depth cut. Start from one end of the gap and work towards the other. This way, you’re cutting away from the wall edge, reducing the risk of chipping.
Using sacrificial guides and edge support
Protect your expansion gap’s edge during cutting with clamps, straight-edge guides, and temporary backing boards. These serve as sacrificial supports, taking the brunt of any vibrations or forces.
Clamp a straight piece of wood or metal along the line you’ve marked for your cut. This gives you a guide to follow and helps prevent the blade from wandering.
Place temporary backing boards against the wall behind where you’ll be cutting. These absorb vibrations and reduce the risk of chipping at the house line. Make sure they’re secure, but not so tight that they restrict your blade’s movement.
Repairing and dressing the cut edges
For minor chips, use a grinder with a careful, feathered approach to smooth the face. Dress the edge until it looks uniform with the surrounding concrete. A light touch helps avoid removing too much material.
If the cut edge still looks uneven, a tuckpointing tool can help even out the surface and bring it to a neat finish. Work in small passes and keep your grinder aligned with the joint line for a consistent appearance.
Patching small chips versus replacing edge sections
When you’re done cutting, you might find minor chips on the slab’s edge. Here’s how to decide whether to patch or replace:
Patch with compound: If chips are small (less than 1/2 inch) and don’t expose rebar, use a concrete patching compound. Clean the area, apply the compound, and let it cure.
Replace edge sections: For larger chips or exposed rebar, you’ll need to recut and replace the section. Mark out the area, cut along your marks, remove the damaged piece, and install a new one using fresh concrete.
Finishing textures to blend with existing slab
To make your newly cut edge look like it’s always been there, match or complement the surrounding texture:
Grinding: For smooth surfaces, use a concrete grinder with progressively finer grits. Start coarse, then finish with a fine grit to achieve a consistent sheen.
Brooming: If your slab has a broom-finished surface, use a push broom to mimic the texture on your new edge. Work the broom perpendicular to the cut, applying even pressure.
Light sanding: For light textures, use a random orbital sander with 80-120 grit sandpaper. Sand lightly, following the direction of the existing texture.
Installing backer rod and sealant for a durable, neat joint
Select a backer rod diameter that lets it sit just below the surface so the sealant can fill the joint without sagging. Install the rod to the correct depth in the joint before applying sealant. This creates the right geometry for a clean, watertight finish.
Tool the sealant with steady strokes and a proper contour to avoid overfilling. Smooth edges along the joint to match the surrounding finish and prevent air entrapment. Follow manufacturer instructions for cure times and application conditions.
Sealant tooling and color choices
The final touch is tooling the sealant for a smooth, clean look. Color choice matters too.
- Concave finish: Use a concave tool to create a slight groove, helping water drain away.
- Flush finish: For a flat surface, use a flush tool to level the sealant.
- Color selection: Match the sealant color to your slab for a seamless look. Most home improvement stores offer a range of colors.
- Optional tools: You can rent special tools like concave or flush tools for around $20-$30 per day. Worth it for a professional finish.
- Tip: Always tool the sealant within 15-30 minutes of application, before it fully cures.
Curing times and protection after sealing
Sealants need time to cure properly. Keep your joint protected during this period.
Typical cure times: Most sealants take 24-72 hours to fully cure, but they’re touch-dry in about an hour.
During the first few days, keep traffic off the joint. Use temporary barriers if needed. Precipitation can also affect curing, so cover the joint with plastic sheeting during rainy periods.
UV protection: Direct sunlight can cause the sealant to cure too quickly on the surface, leading to a weak top layer. Keep the joint shaded for the first few days, using cardboard or temporary shading structures.
Edge trim and transition solutions for aesthetics
Consider trim pieces, metal profiles, or small fascia transitions to hide imperfect edges while still allowing movement. Choose fasteners and accessories that won’t trap moisture or restrict joint movement. Ensure compatibility with both the slab finish and house siding.
Attach trims per manufacturer guidance and verify they align with the joint line for a seamless look. If you’re not using trim, plan for a clean chamfer or bevel that reduces visibility of the edge and helps shed water effectively.
When to use metal or composite edge profiles
Metal and composite edge profiles serve different purposes, so choosing the right one depends on your project’s needs.
Metal Profiles: These are durable, long-lasting, and resistant to weathering. They’re ideal for high-traffic areas or where you need a robust edge. However, they can corrode over time if not properly maintained or if exposed to harsh chemicals.
Composite Profiles: Composite edges offer a low-maintenance option with a wide range of colors and styles to match your slab’s finish. They won’t rust or rot but may not be as durable as metal for heavy use. They’re great for residential driveways, patios, or pool decks.
Consider your project’s demands, maintenance requirements, and desired aesthetics when deciding between metal and composite edge profiles.
Integrating thresholds, flashing, and siding transitions
To maintain a waterproof seal and consistent look, your expansion gap should blend seamlessly with the rest of your home’s exterior.
Thresholds: Install door thresholds that match or complement your slab’s color and texture. Ensure they’re level with the slab to prevent tripping hazards and water pooling.
Flashing: Use flashing at the house-to-slab line to direct water away from your home’s foundation. Coordinate the flashing material and color with your edge profile for a cohesive look.
Siding Transitions: If your home has siding, ensure it transitions smoothly over the expansion gap. You may need to install a small fascia or trim piece at the slab line to create a neat, waterproof joint between the siding and the slab.

Conclusion
Get this right and the joint will move with the house, stay neat, and last for years. Safety first, then steady work—don’t rush a cut or skip the finish that keeps water and dirt out.
Now check the practical steps in one go: confirm the joint location and required gap, gather the right backer rod size and sealant, wear eye and skin protection, mark a clean line, cut with a straight edge to depth that matches the gap, test the fit with the backer rod in place, then install the backer rod and sealant and finish with the edge trim for a tidy transition.
A few common mistakes to avoid: don’t cut too deep or wander off the line, which can nick utilities or loosen the slab; don’t skip backer rod or sealant, which leads to poor adhesion and leaks; and don’t skip testing a small area first or rush the cure step, which can trap moisture or create mushrooms and cracks. Follow the safety rules: keep the work area dry, use proper PPE, unplug power tools when moving, and let cuts cool if you’re using heat or friction tools.
If the slab is cracked badly, the joint is undersized or out of plum, or you’re unsure about subsurface conditions, it’s wise to call a professional. When in doubt, proceed with caution and plan around any sign of structural issue. Stay deliberate, finish it clean, and you’ll have a durable, neat joint you can be proud of.
FAQ
What is the purpose of an expansion gap at the slab-to-house line?
The gap lets the slab move with temperature changes. It keeps cracks and buckling from forming near the house. Don’t skip it just to save a little time.
How wide should the gap be?
A good rule is about half an inch to three quarters of an inch. If you live in a hot or cold climate, you can go small adjustments, but don’t go too wide. Keep it noticeable, not sloppy.
What are common mistakes to avoid?
Don’t fill the gap completely or seal it shut. Don’t leave jagged edges or uneven ends that catch debris. Don’t pour right up to the foundation or into the house line.
How do you finish the edge for a clean look?
Trim the edge flat with a straight tool. Install a simple joint filler and a flexible sealant to bridge the gap. Keep the finish neat and parallel to the house for a tidy line.