
Introduction
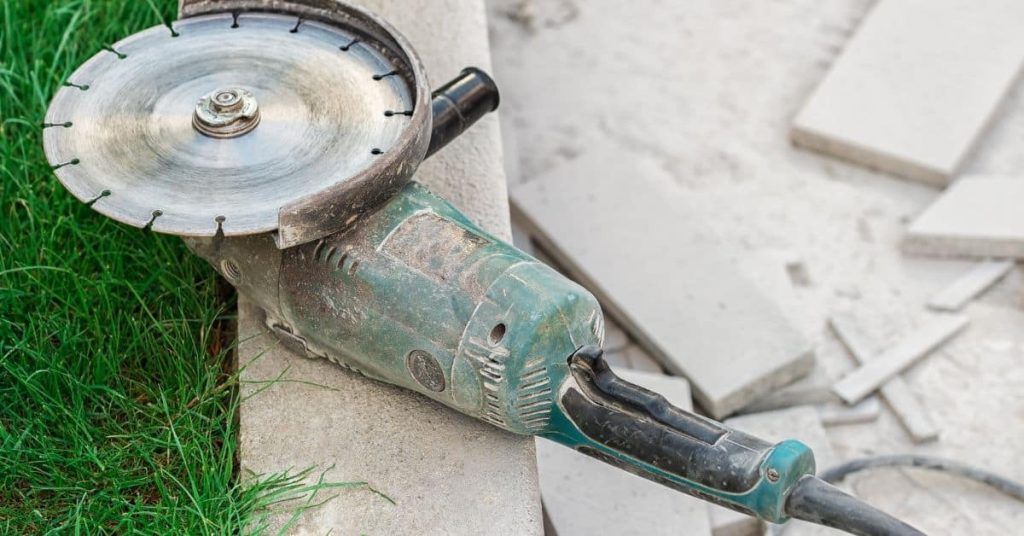
A drip groove is a shallow notch cut into a concrete ledge to channel water away. You’ll use an angle grinder with a suitable blade to mark and cut the groove along the edge. Check the ledge for cracks or damage and confirm local rules before you begin.
Plan where the groove sits and how deep it should be based on the ledge profile, then work in light passes. Keep your area clean, wear eye protection, and cut in manageable steps to reduce chipping and heat. Finish by lightly smoothing the cut and cleaning the dust before you finish.
Key takeaways
- Assess ledge condition and dryness before starting any groove modifications.
- Choose appropriate blade type and guard setup for cut depth control.
- Wear eye, ear, and hand protection; secure nearby surfaces and utilities.
- Mark groove position clearly and maintain consistent line during grinding.
- Cut in steady passes, allow cooling and clean grooves for sealing.
- Follow manufacturer guidance and local codes for safety and structural integrity.
Table of Contents
- Introduction
- Key takeaways
- Quick Overview and When to Add a Drip Groove
- Tools and Materials Checklist
- Material Specs and Standards Explained
- Safety Precautions and PPE
- Preparing the Ledge
- Angle Grinder Setup and Blade Selection
- Step-by-Step Cutting Technique (Angle Grinder Method)
- Finishing, Cleaning, and Sealing the Groove
- Conclusion
- FAQ
Quick Overview and When to Add a Drip Groove
A drip groove helps direct water away from a concrete ledge to reduce runoff and staining. It can also help keep surfaces drier and easier to keep clean over time. Add one when you notice water pooling near the edge or when the ledge projects into walkable space.
Use your judgment based on how the ledge is used and the local climate. If you are unsure, check manufacturer guidance or local building recommendations for groove placement and depth. Consider the visual impact and how the groove will interact with any sealant or coating you plan to apply later.
Purpose and benefits
A drip groove is a simple yet effective way to improve your concrete ledge’s performance. It’s a small channel cut into the underside of the ledge, encouraging water to run off instead of dripping down.
Without a groove, water can sit on the ledge, leading to staining and potential damage over time. The groove prevents this by creating a path for water to follow off the ledge.
Physically, it works like a tiny gutter. Water hits the groove, follows its path, and drips off at the end instead of collecting or running down the face of the ledge.
Suitable ledge types and limits
A retrofit drip groove works best on ledges that are at least 2 inches thick. Thinner ledges may not have enough material to safely cut a groove.
The overhang of the ledge should be considered too. If it’s too small, cutting a groove might weaken the ledge. Aim for an overhang of at least 4 inches.
Grooves are suitable for most concrete finishes, but they’re not recommended for textured or stamped surfaces as they can disrupt the pattern.
Structural and code considerations
Before you start cutting, check if your ledge is structurally sound. A weak ledge could crumble or break under the stress of cutting.
If your ledge is part of a waterproofing system, consult with a professional before proceeding. Cutting into it might compromise its integrity.
Lastly, check local building codes and any heritage requirements. Some areas may have restrictions on modifying existing structures.
Tools and Materials Checklist
Set aside an angle grinder with a suitable guard and a compatible diamond blade. Gather safety gear like eye protection, hearing protection, and a dust mask or respirator. Have clamps, marking tools, and a means to protect adjacent surfaces ready to use.
Keep a shop vacuum or dust collection setup on hand to control dust. Have a spray bottle or water source to help cool the blade during cuts. Include optional items such as a straightedge or guide to help keep the groove straight.
Grinder, discs and backup tools
Use this checklist before starting any cutting or grinding task to ensure you have the right tools and accessories for the job.
- Angle Grinder: Check it’s in good working condition. Test by turning it on briefly, ensuring it spins freely and smoothly.
- Discs (Cutting Wheels): Ensure they match the material you’re cutting. Common types include abrasive, metal cut-off, and masonry discs. Check for any cracks or damage before use.
- Disc Size: Make sure it fits your grinder. Standard sizes are 4.5″, 9″, and 12″.
- Disc Arbor Hole: Confirm it matches your grinder’s spindle size (usually 5/8″ or 3/4″).
- Guard and Side Handle: Ensure they’re properly attached for safety. The guard should cover the disc’s side face, and the handle should be on the non-cutting side.
- Cold Chisel (optional): For starting cuts in hard materials like concrete or metal. Check it’s sharp and fits your hammer.
- Wire Brush: To clean the work area before and after cutting to prevent contamination or injury.
- Shop Vac (optional but recommended): For collecting dust during cutting, especially indoors. Ensure it’s rated for dust collection and has a suitable filter.
Quick rule: Always wear appropriate safety gear when using an angle grinder, including safety glasses, hearing protection, and gloves. Keep the work area clean to prevent accidents.
Measuring, marking and protection supplies
Use this checklist before you start any concrete work to ensure you’ve got the right tools and materials for accurate measuring, marking, and protecting adjacent finishes.
- Tape Measure: Check it’s at least 25 feet long. Test by measuring a known distance to confirm accuracy.
- Straightedge: Ensure it’s long enough for your job (at least 4 feet). Check for warping by laying it on a flat surface.
- Chalk Line: Test the line before use. What goes wrong if you skip this: Inaccurate marking can lead to crooked cuts or misaligned forms.
- Masking Tape: Check it’s wide enough (at least 1.5 inches) and has a strong adhesive. Test by sticking it to a surface and trying to pull it off.
- Plastic Sheeting: Ensure it’s thick enough (at least 4 mils) for edge protection. Check for tears or holes before use.
- Bubble Level: Test on a flat surface. What goes wrong if you skip this: Inaccurate leveling can cause uneven surfaces and trip hazards.
- Marking Paint: Check it’s the right color for your job (usually red or orange). Test by applying a small amount to ensure it’s visible on your surface.
- Edge Protection: Ensure it’s suitable for your job (e.g., foam, plywood, or metal). Check local rules if unsure about requirements.
Quick rule: Always double-check your measurements and marks. A few extra minutes spent verifying can save hours of rework later.
PPE and dust-control consumables
Before you start grinding or cutting concrete, make sure you’ve checked off this list to ensure your safety and a clean work environment.
- Respirator: Check it fits properly and is in good condition. Ensure it’s rated for silica dust (P100 filter).
- Ear protection: Choose the right type – earplugs or earmuffs, depending on your preference and noise levels.
- Safety glasses: Ensure they’re in good condition and provide adequate eye protection. Consider using goggles for extra safety.
- Gloves: Check they fit well and are suitable for the task – some tasks may require heavy-duty gloves.
- Dust extraction equipment: Ensure it’s in working order. If using a HEPA vacuum, check its filter.
- Replacement blades/grit: Have extras on hand to avoid downtime when they wear out or break.
- Concrete grinder: Check it’s in good working order. Ensure the guard is intact and functioning properly.
- Measuring tape: Quick check to ensure it’s calibrated correctly for accurate measurements.
Quick rule: Always prioritize safety first. If you’re unsure about any item, double-check the manufacturer’s instructions or consult a professional.
Material Specs and Standards Explained
Understand the groove width, depth, and spacing in relation to the ledge thickness and edge profile. Compare any planned groove to what is recommended by the blade manufacturer and your project requirements. Rely on product data sheets or installation guides for guidance rather than guessing.
Check if local rules or standards specify minimums or environmental considerations for surface edges. If you are unsure about a specification, consult the manufacturer instructions or a qualified professional. Document the verified specs before cutting.
Recommended groove dimensions and tolerances
A typical drip groove is V-shaped, about 1/4″ to 3/8″ deep and wide. The setback from the ledge’s edge should be around 1/2″ to 1″.
Verify these dimensions with local building codes or product guidelines. They might suggest different depths for specific ledge types.
Tolerance: Keep it within 1/32″ to 1/16″ of the specified dimension. This ensures a neat, functional groove.
Concrete type and reinforcement considerations
Grooving cast-in-place concrete is straightforward. For precast or lightweight concrete, check manufacturer guidelines to avoid damaging the ledge.
If you encounter rebar or mesh, stop cutting. Groove around it, then consult a structural engineer before proceeding.
Use a grinder with a diamond blade for best results. It’s tough enough for reinforced concrete and gentle on unarmed ledges.
Compatibility with existing finishes and coatings
Check if the ledge has any paint, sealant, or waterproof membrane. If so, ensure your groove won’t compromise their integrity.
For painted surfaces, test a small area first to see if grinding affects the paint’s adhesion. If it does, you might need to repaint after grooving.
Waterproof membranes are trickier. Grooving could weaken them. Consult the manufacturer or a professional before proceeding.
Safety Precautions and PPE
Dust from concrete is a health concern, so wear a suitable respirator and eye protection at all times. Protect your ears from prolonged grinder noise and ensure a stable stance to avoid slips. Be aware of kickback and keep hands well clear of the blade path.
Secure the work with clamps and keep bystanders away from the work area. Use a guard on the grinder and manage dust with a tool or barrier to prevent it from spreading. Have a plan to stop work quickly if the tool binds or you notice unusual movement.
Personal Protective Equipment Details
Protecting yourself is the first step before you start working. Here’s what you need:
- Respirator: Protects from dust. Choose a P100 filter for concrete work. Maintain it by replacing filters regularly.
- Safety Glasses: Shields eyes from debris. Ensure they fit well and meet ANSI Z87.1 standards.
- Ear Protection: Protects hearing from grinder noise. Use earplugs or earmuffs, or both for extra protection.
- Work Gloves: Protects hands from cuts and vibrations. Choose gloves with good grip and vibration dampening.
- Safety Shoes/Boots: Protects feet from falling objects. Ensure they have good grip and meet ANSI Z41 standards.
Dust Control and Ventilation
Concrete dust is harmful. Here’s how to manage it:
Use a HEPA vacuum connected to your grinder for extraction. This reduces dust significantly.
Consider using a wet cutting attachment. It sprays water onto the blade, suppressing dust. However, it might not be suitable if you’re working near electrical components.
Always use a respirator with P100 filters. They protect against 99.97% of particles. Change filters regularly for maximum protection.
Site Safety and Fall Prevention
Working with concrete often means working at heights. Here’s how to stay safe:
Edge Protection: If you’re working above ground level, use edge protection systems to prevent falls.
Work Platform Stability: Ensure your work platform is stable and secure before starting work. Use safety harnesses if necessary.
If you’re working near foot traffic, follow these procedures:
Signage: Clearly mark the area where you’ll be working to warn others.
Communication: Communicate with those around you about your work schedule and any potential hazards.

Preparing the Ledge
Inspect the ledge for cracks, spalls, or loose edges before starting. Mark the groove location clearly with a straightedge and a pencil or marker. Protect nearby surfaces with tape or scrap material to prevent chipping.
Double check measurements and the line you intend to follow. Remove loose debris that could affect your cut and make sure the ledge is dry and stable. Plan for a clean edge by practicing a dry run if needed.
Inspecting and documenting condition
The first step is to carefully inspect your concrete ledge. Look for any cracks, delamination (flaking or peeling of the surface), or embedded reinforcement like rebar.
Cracks: Check for hairline fractures or wider gaps. Record their length, width, and location for future reference in case repairs are needed.
Delamination: If you find any flaking or peeling, note the size of the affected areas and their positions. This could indicate underlying issues that need addressing before adding a groove.
If you spot any embedded reinforcement, mark its location to avoid hitting it with your grinder. Document all findings for future reference.
Measuring and marking the groove line
To determine the optimal groove location, consider the ledge’s width, height, and any existing features. Typically, grooves are placed about one-third of the way up from the bottom.
Using a tape measure and a pencil, mark out where you want your groove to be. Make sure it’s straight and level using a spirit level or laser level.
For consistent results, create a simple template using cardboard or thin wood. Trace your groove line onto it, then use this as a guide when marking the ledge. This ensures all your marks are identical and evenly spaced.
Before you start cutting, double-check that your layout lines are accurate and level. It’s easier to adjust now than mid-cut.
Protecting adjacent surfaces and finishes
Before you start grinding, protect any nearby windows, trim, paintwork, or landscaping from sparks, dust, and slurry. This will save you clean-up time later.
Windows: Cover them with cardboard or plastic sheeting secured with tape. Leave a small gap at the bottom for ventilation to prevent suction from breaking the glass.
Trim and paintwork: Use painter’s tape and paper or plastic drop cloths to shield these areas. Press down firmly on the edges of the tape to create a good seal and prevent dust from getting underneath.
Landscaping: Lay down tarps or drop cloths around plants and flowers to catch any falling debris. This will also make clean-up easier afterwards.
Angle Grinder Setup and Blade Selection
Choose a grinder that feels balanced and is in good working order with a properly mounted guard. Select a diamond blade suitable for concrete and the intended groove profile. Ensure the blade is compatible with your grinder’s arbor and rotation direction.
Set the grinder to run smoothly and make sure all attachments are secure. Prepare any guides or guides accessories to help control the cut. Verify cooling and dust-control options available for the setup.
Blade/disc types and selection criteria
The first step is choosing the right blade for your angle grinder. You’ve got three main options:
Diamond Segmented Discs: These are ideal for wet cutting, offering longer life and cooler operation. They’re great for tougher concrete jobs.
Continuous Rim Discs: These work well on dry cuts and are cheaper than diamond discs. They’re suitable for lighter duty tasks.
Turbo Discs: These have a rim with teeth that can cut through concrete, but they generate more heat and dust. Use them sparingly and with proper ventilation.
Grinder compatibility and guard setup
Before you start, ensure your grinder is compatible with the chosen blade. Check these:
Arbor Size: The arbor (spindle) must match the disc’s center hole size.
RPM Compatibility: Your grinder’s RPM should match or exceed the disc’s recommended speed.
Guard Position and Handle Mounting: Adjust the guard to expose only the outer 1/3 of the blade. Ensure handles are secure for stable operation.
Blade mounting and pre-checks
Mounting the blade correctly is crucial. Here’s how:
1. Insert the arbor through the disc’s center hole.
2. Tighten the nut using a wrench, applying even pressure until it’s secure.
Before you start cutting, perform these pre-checks:
Check for Damage: Inspect the blade for cracks or chips that could cause it to fail during use.
Spin Test: Hold the grinder securely and spin the blade by hand. It should turn smoothly with no wobble. If not, check your mounting.
Step-by-Step Cutting Technique (Angle Grinder Method)
Begin with a light scoring pass to establish the groove line, then progressively deepen in controlled steps. Use steady, slow motions and maintain a cool blade to prevent glazing. Pause to clear dust and observe heat buildup as you proceed.
Take the final passes with careful, even pressure to reach the intended depth. Avoid forcing the blade through hard edges and let the blade do the work. Keep the groove straight by following the marked line and using guides if available.
Step-by-Step Process
This section guides you through the practical steps of adding a drip groove to an existing concrete ledge using an angle grinder. Follow these steps for a safe and efficient job.
- Double-check your safety gear: helmet, gloves, goggles, and hearing protection. Ensure your grinder is compatible with the blade and has a proper guard setup.
- Start the grinder at a low speed (around 5000-6000 RPM) to establish the groove line. Keep the blade flat against the surface and maintain steady pressure.
- Make initial shallow passes along your marked lines, following the same direction each time. This helps create a consistent starting point for deeper cuts.
- Increase the grinder’s speed (up to 10000-12000 RPM) and gradually deepen the cut with controlled passes. Keep the blade at a consistent angle to maintain groove depth.
- Regularly inspect your work, checking for any signs of binding or overcutting. If you encounter rebar or other unexpected obstructions, stop, reassess, and adjust your approach as needed.
- Once you’ve reached your desired depth, make a final pass to smooth out any rough edges. Be sure to maintain the same angle and speed for consistency.
- After completing the cut, inspect your work one last time. If satisfied, clean up the area, store your tools properly, and dispose of any debris according to local regulations.
Making the initial score/pass
Starting with a shallow initial pass helps establish the groove line and reduces chipping. Here’s how to do it safely:
First, ensure your angle grinder is set up correctly with a compatible blade for concrete cutting. A diamond blade or turbo cup wheel works best.
Begin at one end of your marked line, applying steady pressure and keeping the blade flat against the surface. Maintain a slow speed (around 5000-6000 RPM) to control the cut and prevent excessive chipping.
Tip: Go slow and steady. It’s better to make multiple shallow passes than to try forcing the blade through the concrete too quickly.
Progressive deepening and maintaining angle
Increasing cut depth in controlled passes helps you maintain a consistent groove. Here’s how to do it safely:
After making your initial shallow pass, increase the grinder’s speed (up to 10000-12000 RPM) for deeper cuts. Keep the blade at a consistent angle – around 45 degrees – to maintain groove depth and prevent overcutting.
Apply steady pressure as you make progressive passes, following the same direction each time. If you feel the blade binding or struggling, reduce speed and adjust your approach.
Remember: Patience is key. Taking your time ensures a clean, consistent cut without damaging the concrete or your tool.
Handling reinforcement and unexpected obstructions
Concrete often contains hidden reinforcements like rebar. Here’s how to deal with them safely:
As you cut, be alert for signs of reinforcement – sudden resistance, sparks, or a change in the blade’s sound. If you encounter metal, reduce speed immediately to prevent binding and damaging your tool.
If you hit rebar or another obstruction, stop cutting, turn off the grinder, and reassess your approach. You may need to adjust your cut line, use a different blade, or consult a professional if the reinforcement is extensive.
Never force the blade through an obstruction. This can cause the tool to bind, overheat, or even break, posing a serious safety hazard.
Finishing, Cleaning, and Sealing the Groove
Dress the groove edges for a clean appearance and remove slurry and dust from the surface. Inspect the groove for any chips or irregularities and address them promptly. Allow the area to dry before applying any sealant or coating if planned.
Choose a sealing or treatment option based on the project needs and product guidance. Follow the manufacturer’s instructions for application and cure times. Clean up the work area and store tools properly after finishing the job.
Cleaning dust, slurry and residue
First off, safety first. Wear a respirator to avoid breathing in concrete dust.
Use a wet-dry vacuum to suck up the loose dust and slurry from your newly cut groove. Keep the area damp while you’re doing this to prevent dust clouds.
Next, use a stiff-bristled brush with some water and mild detergent to scrub away any remaining residue. Rinse thoroughly with clean water.
Finally, let it dry completely before moving on to the next step. You don’t want any moisture trapped in there causing issues later.
Smoothing and visual checkpoints
Once your groove is clean, it’s time to give it a final touch. You want smooth edges that won’t catch on anything.
- Check for sharp edges: Run your hand along the edge. If it feels sharp, use a small angle grinder with a 24-grit disc or a file to smooth it out.
- Inspect for deep scratches: Look closely at the groove. If you see any deep scratches, use a fine-grit sandpaper (80-150) to smooth them out.
- Check for unevenness: Use a straight edge and a level to ensure your groove is even all the way across. If it’s not, go back over any low spots with your grinder or sander.
- Ensure no residue remains: A quick wipe with a damp cloth should reveal any remaining dust or slurry that needs to be cleaned up.
- Check for proper depth: Measure the groove again to ensure it’s at the correct depth. If not, you may need to make another pass.
- Inspect surrounding area: Ensure there’s no damage to adjacent surfaces or finishes from your cutting or cleaning process.
- Check for moisture: Make sure the groove is completely dry before sealing. Moisture can prevent proper adhesion of sealants.
- Verify alignment: Double-check that your groove is straight and aligned properly with any existing lines or patterns in your concrete.
Quick rule: Always inspect your work thoroughly after each step to ensure everything is as it should be before moving on.
Sealants and water-repellent options
Now that your groove is clean, smooth, and dry, it’s time to protect it. Water repellents and sealers can help prevent moisture from getting in and causing damage.
There are many types of masonry sealers out there. Look for one that’s compatible with concrete and won’t affect the surrounding finishes. Some good options include silane/siloxane-based sealers, acrylic sealers, or penetrating water repellents.
Before applying any sealer, do a test patch in an inconspicuous area to ensure it doesn’t cause discoloration or other issues. Follow the manufacturer’s instructions for application and drying times.
Pro tip: For added protection against water intrusion, consider using a combination of a penetrating water repellent and a surface sealer.
Conclusion
Getting the drip groove right matters for drainage, durability, and the look of the ledge. Do it with care, test as you go, and keep safety front and center so you don’t create costly damage or a weak edge.
Start by confirming your setup is solid, the blade and guard are correct for the job, and you test a small area first. Make sure you know the groove depth and width you’re aiming for, set up your guide or ruler, wear proper PPE, and proceed with controlled, shallow passes, pausing to cool and check progress before moving deeper. After cutting, clean the groove, dry-fit any pieces, and seal the edge to protect against moisture and staining.
Common mistakes to avoid include cutting too deep or too wide, rushing the passes, and skipping a test patch or cooling pauses. Don’t skip safety: keep hands clear of the blade, use hearing and eye protection, and maintain a firm stance. If the ledge carries structural load, or if the edge is unusually hard or embedded with rebar, consider calling a professional instead of pushing on alone—the right move today saves headaches tomorrow. Stay steady, stay safe, and you’ll finish with a clean, effective groove that lasts. You’ve got this.
FAQ
How deep and wide should the drip groove be when using the angle grinder method?
Check the manufacturer instructions for your grinder blade and the concrete mix you used. If no specs are given, aim for a groove that starts at a practical depth without weakening the edge, and make the width comfortable to remove excess water. Don’t guess—verify with product labels or local guidance.
What should I do if I hit embedded material or rebar inside the ledge?
Stop cutting and inspect what you hit. If you can safely proceed, adjust your approach or blade choice. If you’re unsure, pause and consult the material’s manufacturer instructions or a professional before continuing.
Can I extend the groove past the end of the ledge or into adjacent surfaces?
Extension can change drainage and how the surface dries. If you decide to extend, plan it so runoff stays directed away from walkways and foundations. Check local rules or guidelines and ensure the modification won’t compromise structural edges.
How should I clean up and seal after finishing the groove?
Sweep and vacuum the dust, then wipe with a damp rag before sealant application. Follow the sealant manufacturer’s instructions for curing times and recoat windows. If you’re unsure about products, ask the supplier or read the label for surface prep notes.