

Introduction
Repairing plaster over brick requires using a compatible bonding agent and a properly applied scratch coat to create a durable, crack-free finish. You’ll learn how to choose the right bonding agent, prepare the brick surface, and mix and apply the scratch coat with the right thickness and texture.
The article also shares practical tips and common pitfalls to help you achieve long-lasting adhesion and a smoother final surface.
Key takeaways
- Assess damage; repair if minor, replace if extensive.
- Use proper tools: trowel, hawk, brush, bonding agent, plaster.
- Prepare brick surface: clean, dampen, remove loose material.
- Choose bonding method based on substrate condition and project needs.
- Mix bonding agents and plaster according to manufacturer’s guidelines.
- Apply scratch coat technique in thin layers, scoring each layer before next.
- Wet surface before application; control environment for best results.
Table of Contents
- Introduction
- Key takeaways
- Assess: Repair vs Replace
- Tools and Materials Checklist
- Surface Preparation for Brick Substrates
- Choosing a Bonding Method: Mechanical vs Chemical
- Mixing and Preparing Bonding Agents and Plaster
- Applying the Scratch Coat Technique Step-by-step
- Pre-application Surface Wetting and Environmental Controls
- Quality Checks, Testing, and Troubleshooting Bond Failures
- Cost Estimates, Timeframes, and Project Planning
- Safety, Common Mistakes, and Best Practices
- Conclusion
- FAQ
Assess: Repair vs Replace
Assess whether plaster repair is viable or full replacement is needed by weighing structural integrity against cosmetic condition. Look for cracks, delamination, or hollow spots that signal replacement; assess brick substrate, mortar, and moisture to judge long-term durability. Set clear thresholds for patching, re-scratch coats, and when a new plaster system is warranted, including acceptable crack widths and bonding agent compatibility.
This matters on the job because it guides cost, time, and safety decisions before you cut into the wall. A sound quick test and a loyalty to proper bonding and moisture control save you from chasing failed repairs later. The aim is a predictable lifespan and a plan you can follow step by step, whether you repair with bonding agents or demolish and re-plaster.
Red flags that warrant hiring a licensed professional include:
- Cracks wider than about 1/4 inch (6 mm) or cracks that run horizontally and indicate potential structural movement
- Delamination affecting more than about 20% of the wall surface or widespread hollow-sounding plaster
- Visible movement, bulging, or cracking at brick joints, mortar beds, or around openings
- Persistent moisture problems, efflorescence, damp staining, or mold indicating ongoing water intrusion
- Soft, powdery, crumbling brick mortar or brick damage that suggests compromised substrate
- A history of seismic or significant settlement-related movement in the structure
- Uncertainty about lead paint or asbestos in older plaster systems that requires abatement or specialized removal
- Brickwork or plaster removal that would expose concealed wood framing or structural ties needing professional evaluation
If you identify these signs, stop work and engage a masonry contractor or structural engineer to assess and outline the proper remediation.
This matters on the job because it guides cost, time, and safety decisions before you cut into the wall. A sound quick test and a loyalty to proper bonding and moisture control save you from chasing failed repairs later. The aim is a predictable lifespan and a plan you can follow step by step, whether you repair with bonding agents or demolish and re-plaster.
Structural Inspection Checklist
Start by checking the plaster for signs of structural issues like cracks wider than a credit card, loose sections that sound hollow when tapped, or visible movement in brick joints.
- Inspect for large cracks indicating significant movement.
- Check if delamination affects more than 20% of the wall surface.
- Note any soft mortar pointing between bricks.
- Look for water stains or efflorescence on the plaster and brick.
- Test adhesion by gently prying at loose sections with a flathead screwdriver.
- Evaluate if there are signs of moisture penetration through the wall.
- Check for unevenness in the brick surface that suggests settling.
- Note any bulges or depressions in the plaster indicating structural instability.
- Inspect corners and edges for cracks running vertically, suggesting vertical movement.
- Look for horizontal cracking across walls, signaling lateral movement.
- Evaluate if there are multiple small cracks forming a network pattern.
- Note any gaps between brick joints or mortar lines that have widened over time.
If you find significant signs of structural issues, it’s best to stop and address the underlying problems before proceeding with repairs.
When Cosmetic Repair Is Sufficient
In many cases, small cracks or surface crazing can be addressed through cosmetic repair methods. These minor issues often don’t affect the structural integrity of your wall.
If you notice isolated areas where plaster has delaminated but the underlying brick is sound and stable, patching these spots with a bonding agent followed by a scratch coat can restore the appearance without major work.
Remember to assess each area individually. If only small sections need attention, consider repairing them rather than replacing large portions of the wall.
Safety note: assume plaster in older homes may contain lead paint or asbestos-containing materials. Do not disturb those materials without proper testing and containment. Use appropriate PPE, dust control measures, and containment when cutting or patching.
Cost vs Longevity Considerations
When deciding between repair and replacement, it’s crucial to weigh short-term costs against long-term benefits. A quick plaster fix might save money upfront but could lead to repeated repairs over time.
A full replacement can be more expensive initially but offers a longer-lasting solution that may prevent future issues from arising due to underlying structural problems.
Consider the expected lifespan of each option and how it fits into your overall home maintenance plan. A well-executed repair with quality materials can last several years, while a complete overhaul might provide decades of trouble-free service.
Tools and Materials Checklist
You need the core tools first: trowels, a hawk, a plaster mixer or drill with a paddle, a mixing bucket, a margin trowel, and a putty knife, plus solid safety gear like a dust mask or respirator, safety glasses, gloves, and hearing protection. Keep a rule of thumb for PPE and site prep: use scaffolds or ladders properly, vent the area, and contain dust so you don’t turn your house into a mess. Before you mix or apply plaster, complete surface preparation per Surface Preparation for Brick Substrates: clean the brick of dust and efflorescence, remove loose and damaged plaster or mortar, repair any major substrate defects, dampen the brick to a dark, surface-moist condition (no standing water), abrade the brick to create a key, and fix any cracks or movement in the wall.
This helps the bonding coat and scratch coat adhere reliably. For materials, know the plaster options—cement-based plaster, veneer plaster, or gypsum-based plaster where appropriate—and how bonding agents work, from polymer-modified admixtures to lime-putty or cement-based bonding agents, plus a bonding coat as needed. Don’t skimp on lath: galvanized wire lath or metal lath, proper spacing, and secure attachment, with the scratch coat keyed to the substrate to grab the plaster and keep it from popping off.
The second part is planning: estimate rough quantities with a waste factor, nail down mix ratios, and note curing times and the right sequence from substrate prep to scratch coat to final plaster. This matters because a loose plan saves real time, money, and elbow grease on a DIY job, guides tool use and material choice, and helps you spot bad practices before you commit to a full coat. For quick reference, use the consolidated workflow below as you work: 1) Inspect and test the substrate for moisture and soundness; 2) Dampen brick and abrade a key for adhesion; 3) Prime or bond with the chosen agent; 4) Apply a scratch coat with the appropriate mix; 5) Scratch and cure before any finish layer.
Safety Equipment and Prep Items
Before you start plastering over brick, make sure you have the right safety gear and prep items ready.
- Dust mask or respirator to protect your lungs from dust.
- Safety glasses to shield your eyes from debris.
- Gloves for hand protection against rough materials.
- Hearing protection if using power tools like mixers.
- Drop cloths and plastic sheeting to cover floors and furniture.
- Dust containment bags or containers for clean-up.
- Scaffold or ladder for reaching high areas safely.
- Ventilation fans to keep air moving and reduce dust buildup.
Stop work if you notice any movement in the structure or materials. It’s better to address issues early than risk damage later.
Bonding Agents and Primers
Select the right bonding agent for your plaster job based on the condition of the brick surface and desired durability.
- Polymer-modified admixtures for added flexibility and water resistance.
- Lime-putty for breathable, traditional finishes that allow moisture to escape.
- Cement-based primers for strong adhesion in areas with high moisture or structural movement.
Stop work if you notice any cracks forming during application. Address these issues before proceeding.
Scratch Coat Materials and Reinforcement
The scratch coat is crucial for providing a key surface for the plaster to adhere properly. Choose materials that suit your project’s needs.
- Cement-sand mix for durability and strength.
- Lime-cement mix for flexibility and breathability.
- Galvanized wire lath for reinforcement, spaced appropriately.
- Metal ties or clips to secure the lath firmly to the brick surface.
Stop work if you notice any movement in the substrate. Ensure stability before proceeding with plaster application.
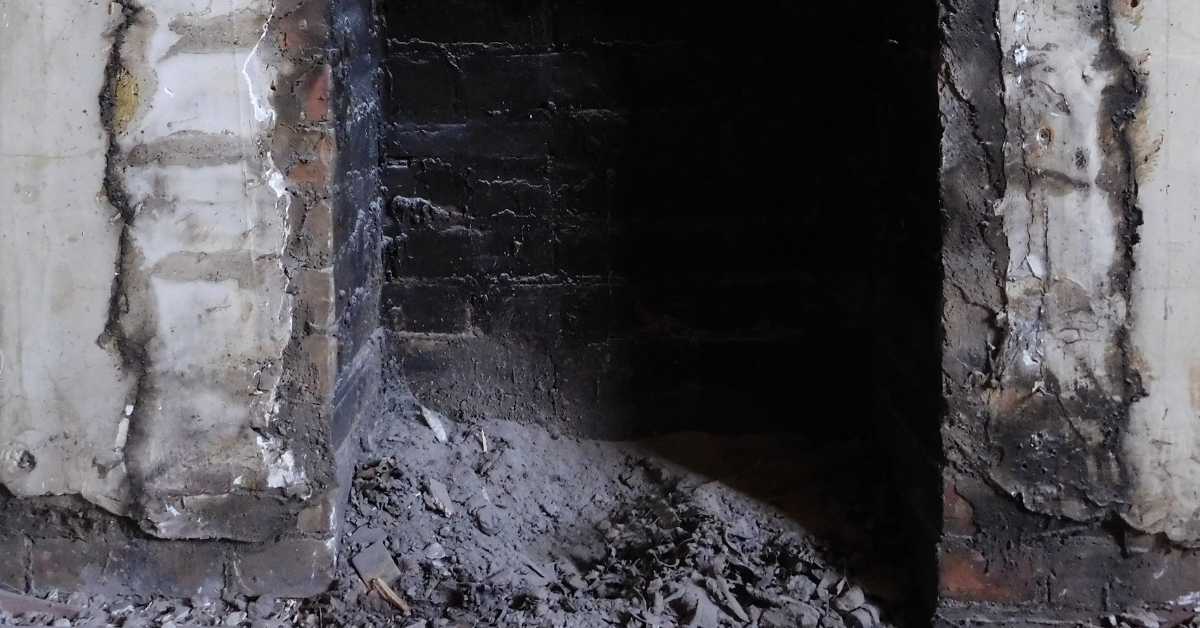
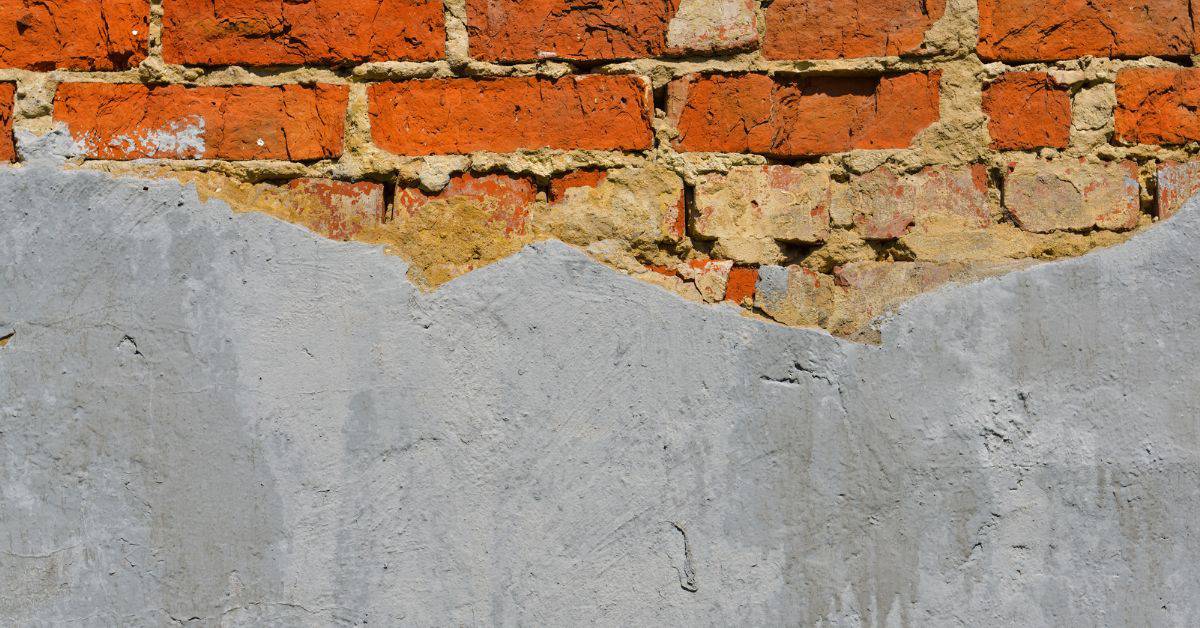
Surface Preparation for Brick Substrates
Surface readiness means a clean, stable brick substrate with no loose mortar, missing bricks, or embedded contaminants that will sabotage plaster bonding and invite cracks down the line. Begin with a careful inspection, remove loose or deteriorated mortar, and replace or repoint damaged bricks, while identifying stubborn efflorescence, oil or grease, dust, and any old coatings that must be removed before adhesion can occur. Decide between mechanical and chemical prep based on surface condition, using brushing, light low‑pressure washing, or gentle scoring for a sound key, and applying neutral pH cleaners when needed to preserve mortar integrity.
For moisture-sensitive projects, test the substrate with a simple plastic sheet moisture test or a durable moisture meter; plan to delay plastering until readings indicate a dry, stable base. Document all repairs and surface conditions to support inspections and future maintenance. Include a written surface condition log, note potential contamination sources (nearby landscaping, leaks, or recent renovations), and outline a budget for repairs to avoid delays on site.
Moisture control is critical; check for dampness, leaks, or rising humidity and plan drying time and protective measures between prep and plaster so the bond will cure without trapped moisture. A clear repair plan that documents loose brick replacement, joint re-pointing, and defect filling ensures substrate stability and makes it easier to pass inspections. Keep a practical checklist and notes for inspectors or DIY readers—surface cleanliness tests, a tackiness test, and a record of repairs performed—so you can proceed with confidence when the scratch coat goes on. Include expected drying times for your climate, and specify protective measures such as plastic containment or dehumidification if wet conditions persist. Also plan for energy costs or equipment rental if you need extended drying, and consider temporary enclosure strategies to protect the substrate during cure.
Cleaning Methods (Brush, Wash, Pressure)
To prep your brick surface for plastering, start by brushing off any loose dirt and debris with a stiff bristle brush. For stubborn stains like efflorescence or paint residue, use a wire brush to scrape away the top layer. If the brick surface has a glaze or heavy coating, abrade lightly with synthetic pad to avoid gouging the mortar joints, then vacuum the debris to keep profiles clean.
For larger areas or more persistent contaminants, consider using a low-pressure water wash. This helps remove oils, grease, and other residues that could hinder plaster adhesion. Avoid high pressure as it can damage the brick surface. Allow the wall to dry fully before applying bonding agents or plaster, and cover adjacent areas to protect from overspray.
If chemical cleaners are needed for tough stains, apply them according to manufacturer instructions and rinse thoroughly afterward. Always test on a small area first to ensure no adverse effects. Wear appropriate PPE (gloves, goggles, respirator if spraying) and observe ventilation and local code requirements when using solvents or acids.
Repairing Damaged Brick and Mortar Joints
Before plastering, inspect the brick wall for any loose or missing mortar. Use a chisel and hammer to carefully remove damaged sections and clean out debris from joints. For exposed or hollow sections, consolidate with a compatible patching mortar, then re‑tuckpoint to restore joint integrity. Keep joints slightly recessed to prevent capillary draw after plaster application.
To repoint these areas, mix fresh mortar in small batches and apply it with a trowel into the cleaned-out joints. Press firmly but gently to ensure good contact between new mortar and existing brick. Trowel flush and cure according to the mortar manufacturer’s guidelines, protecting from rapid drying or freezing conditions. If a bonding agent or primer is recommended for your mix, apply per product instructions before the scratch coat.
For spalled or cracked bricks that cannot be repaired, replace them entirely by cutting out the damaged piece and inserting a new one. Ensure all repairs are stable before moving on to plaster application. After repair, clean the surface again to remove dust and stray particles that could impede adhesion.
Profiling and Keying the Surface
If your brick surface is smooth or glazed, mechanical keying can help improve adhesion. Use a hammer and chisel to score shallow grooves across the bricks in a crisscross pattern. For larger or flat areas, consider a shallow skim of bonding mortar or a dedicated bonding primer designed for brick substrates to improve the keying effect and reduce plaster risk of delamination.
An alternative method involves applying a mortar fillet around each brick edge to create texture. This technique not only provides a better grip for plaster but also helps mask any minor imperfections on the surface. If using a bonding additive or primer, follow manufacturer guidance for compatibility with your plaster mix and substrate.
For glazed or painted surfaces, lightly sanding with coarse grit paper can roughen up the area enough to enhance bonding without damaging the underlying material. After abrading or priming, wipe the surface to remove dust and allow any cleaners or primers to dry fully before applying the scratch coat.
Choosing a Bonding Method: Mechanical vs Chemical
Choosing a bonding method comes down to whether you want a mechanical key or a chemical seal. Mechanical bonding uses lath, scratch grooves, or keys to grab the plaster, while chemical bonding relies on bonding agents and primers to stick to the brick surface. For plaster over brick, pick the method that fits the brick condition and the tools you have, then prep aggressively so the bond isn’t a guess.
Surface prep matters most: clean off dust, efflorescence, and loose mortar, then assess moisture history and substrate compatibility. Mechanical keys work fastest on sound, rough brick and a proper scratch coat, but they can fail on damp or highly uneven surfaces; chemical bonds need careful primer choice and sometimes pore enhancers to reach a durable tie-in with the plaster mix. Expect tradeoffs—fast install with mechanical methods, or potentially longer cure times and more meticulous product matching with chemical bonding—and plan for testing bond strength before the scratch coat goes on.
When to Use Mechanical Bonding (Lath/scratch)
Mechanical bonding, such as using lath and scratch coats, is essential when dealing with brick surfaces that have poor suction or are too smooth for plaster to adhere properly. This method also works well on historic substrates where preserving the integrity of the original surface is crucial.
For heavy plaster applications, mechanical keys provide a robust base to ensure the plaster stays in place without sagging or cracking during curing. If your brick has been recently repointed and requires a thick layer of plaster for repair, lath can be a lifesaver by providing additional grip points for the plaster to adhere to.
When working with uneven or recessed surfaces where creating keys manually is challenging, mechanical bonding offers a practical solution. Lath acts as an intermediary layer that bridges gaps and irregularities, ensuring a more uniform surface for your plaster work.
When to Use Chemical Bonding Agents
Chemical bonding agents like acrylic emulsions or cement slurries are ideal when you’re working with sound brick that has good suction. These products enhance the bond between plaster and substrate, making them particularly useful for small repairs where a strong initial adhesion is critical.
If your project involves thin layers of plaster over well-prepared surfaces, chemical bonding agents can save time by eliminating the need for mechanical keys or lath. They are especially beneficial when you’re dealing with moisture-sensitive areas that require quick drying times without compromising bond strength.
For small patches and touch-ups where a scratch coat isn’t practical due to limited space or surface condition, using a bonding agent can be a smart choice. It ensures the plaster adheres well even in these challenging scenarios, providing long-term durability and stability.
Combining Methods for Best Performance
In situations where neither mechanical nor chemical bonding alone provides sufficient security, combining both methods can yield the most durable results. For instance, when repairing large areas of damaged brick with high moisture content or poor suction, using lath along with a bonding agent ensures maximum adhesion.
When working on historic buildings where preserving original materials is paramount but ensuring structural integrity is equally important, a hybrid approach offers a balanced solution. Lath provides the necessary mechanical keys while chemical bonding agents enhance the bond strength, creating a robust repair that respects the building’s heritage.
In cases of extensive plaster work over uneven or irregular brick surfaces, integrating lath with a primer can help create a stable base for your plaster. This combination not only improves adhesion but also reduces the risk of future cracking and delamination, ensuring long-term performance and aesthetic appeal.
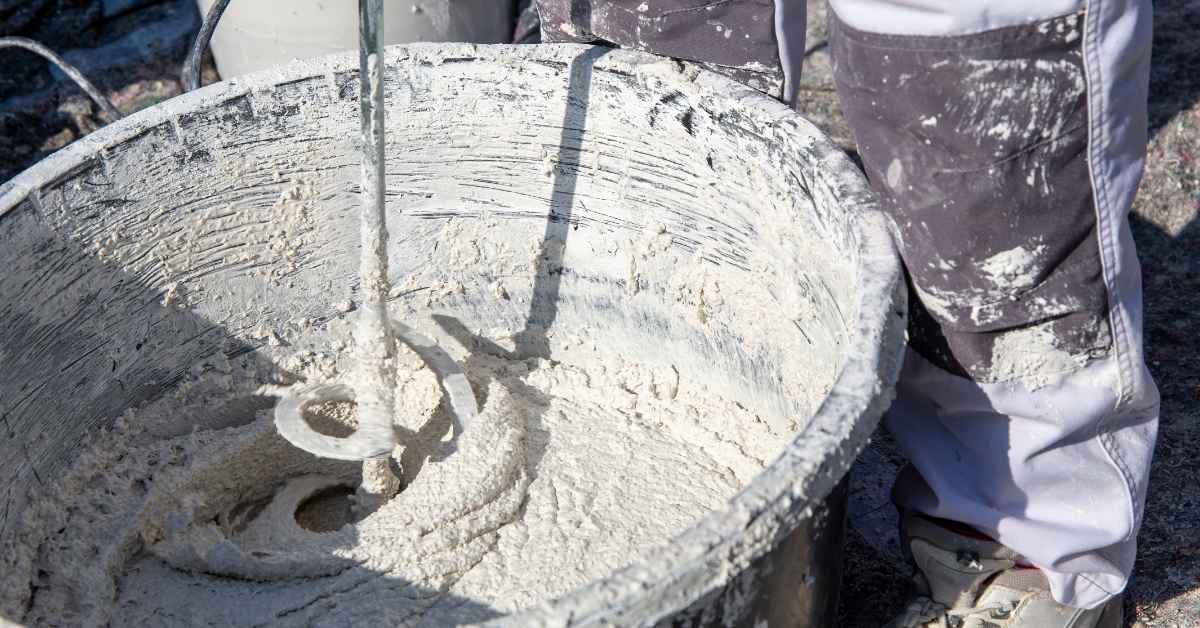
Mixing and Preparing Bonding Agents and Plaster
Mix bonding agents and plaster with clear ratios and water guidance. Use polymer-modified cement or PVA primers at about 2–6% polymer by weight of cement, and keep cement to water around 1:0.5–0.6 for most mixes. For scratch coats, aim stiffer mixes; for finish coats, a slightly wetter mix helps slip and finish but watch for sagging.
Add the bonding agent first, then cement, lime (if used), and finally sand, in a clean mixer with a steady pace and short rest to prevent lumping. Use tap water or tempered water, and avoid over-watering that causes slump or loss of cohesion, or under-watering that creates dry pockets and poor bonding. Test bond on a small area, dampen the substrate as needed, and pick primers compatible with plaster and brick to ensure long-term adhesion.
Proper Mixing Technique and Consistency
Mixing plaster for a scratch coat requires a careful balance between water and cement to achieve the right consistency. Start by adding just enough water to wet all the dry ingredients thoroughly, then gradually add more until you reach a workable paste that holds its shape but isn’t too stiff.
For finish coats, aim for a smoother mix with less aggregate. This will help in achieving a finer surface texture and better adhesion without compromising strength. Overwatering can lead to poor bonding and weak spots, so keep an eye on the slump of your mixture—too much water means it’s too runny.
Use a clean mixer to avoid contamination from previous batches or debris. Mix for at least 3 minutes to ensure all components are well blended but don’t overmix as this can cause air pockets and weaken the plaster. Letting the mix rest briefly before use helps settle any lumps, improving its workability.
Using Polymer Modifiers and Latex Additives
Polymer modifiers like acrylic or styrene butadiene can significantly improve the adhesion and flexibility of your plaster. They help prevent cracking by reducing shrinkage during curing, making them ideal for repairing plaster over brick.
A typical starting point is to add about 10% polymer by weight of cement. This dosage enhances bond strength without causing excessive air entrainment or delaying set times. Always follow the manufacturer’s guidelines closely as too much can negatively affect performance.
When mixing, start with water and polymers first, then gradually add cement and other aggregates. Ensure thorough blending to distribute the additives evenly throughout the mix for consistent results across your repair area.
Shelf Life, Storage, and On-site Handling
Premixed bonding agents have a limited pot life once mixed. This means they need to be used promptly before the mixture starts to set up or lose its workability. A typical starting point is around 2 hours under normal conditions but this can vary based on temperature and humidity.
Store dry materials in cool, dry places away from direct sunlight and moisture until ready for use. Keep them covered to prevent dust contamination which could affect the quality of your repair job.
On-site, keep mixed bonding agents shaded and protected from wind or other elements that might cause rapid drying. Regularly check the consistency as you work; if it starts to stiffen up too quickly, add a little more water but be cautious not to overwater.
Applying the Scratch Coat Technique Step-by-step
Before you even mix, assess substrate readiness: inspect brick for cracks or loose units, verify moisture content is suitable for plaster, chunk out any efflorescence, and confirm the bonding agent will work with both brick and any existing plaster. Define the scratch coat specs clearly—target thickness about 3/8 to 1/2 inch, a uniform surface, a deliberate keying pattern, and a consistent texture that will improve grip for the subsequent coats. Mix and prepare with the right Portland cement-to-sand ratio, proper water content, and optional bonding additives; then prime or bond as recommended, burnish to a smooth base, and verify pot life before you start.
When you apply, spread evenly, maintain consistent thickness, control tool marks, and immediately scratch while the surface is set enough to hold ridges; these ridges create a reliable mechanical key for bonding the next coat. Curing is critical—keep it moist or protected as conditions demand, avoid rapid drying, and time the next plaster layer only after proper set to prevent cracks or curling. Doing this correctly saves you hassles later: a solid scratch coat with a good key and proper cure means fewer repairs, stronger adhesion, and a long-lasting, professional-looking finish.
Step-by-step Process
Before you start, ensure the brick surface is clean and dry. Wear safety gear like gloves and goggles.
- Assess the condition of the brick substrate for readiness.
- Mix your plaster with a bonding agent to improve adhesion.
- Apply a primer or bonding agent if needed.
- Spread the scratch coat evenly, aiming for a thickness between 3/8″ and 1/2″.
- Create ridges in the wet plaster using a notched trowel or comb tool to enhance grip for subsequent layers.
- Cure the scratch coat by keeping it moist until it sets properly. This usually takes about two days but can vary depending on weather conditions.
After curing, check that the surface is firm and ready before applying the next layer.
Setting up Lath and Reinforcement
Attach galvanized lath to brick using appropriate fasteners. Ensure proper overlap for stability, typically around 1-2 inches depending on the application.
Space out your fasteners evenly, usually about every six inches or so, but adjust based on site conditions and load requirements.
Overlap edges of adjacent pieces by at least one stud width to ensure a continuous layer without gaps.
Applying the Scratch Coat: Mix, Thickness, and Tooling
Mix your plaster with water until it reaches a consistency that holds its shape when poured but is still workable.
- Tool: Use a notched trowel to spread the plaster evenly. Aim for a thickness of 1/2 inch or less.
- Tool: Once applied, use a comb tool to create ridges in the wet plaster. This helps the next layer adhere better.
- Tool: A scratch rake can also be used to score lines into the surface for improved grip.
If you’re unsure about purchasing tools, consider renting them from your local hardware store.
Curing and Timing Before Finish Coats
After applying the scratch coat, allow it to cure for at least two days. Keep the surface moist by misting or covering with plastic.
The scratch coat is ready when it feels firm but not dry. It should be slightly damp to touch without any visible moisture.
Avoid applying finish coats until you see no more water marks on the surface and the plaster has hardened enough to resist minor pressure from your finger.
Pre-application Surface Wetting and Environmental Controls
<pbegin< pbegin=””>Oops, we must output pure HTML with two paragraphs only. Here is the correct content:
How Much Water to Use and When
To prep your brick surface, you want it damp but not soaked. A light misting is best; avoid pooling water that could wash away bonding agents later on.
The hand test helps judge the right moisture level: press a dry palm against the brick face. If your skin sticks slightly and feels cool, the brick has enough moisture without being overly wet.
Timing is key too. Let the brick absorb the water for about 15 to 20 minutes before applying plaster. This ensures the surface stays damp but not dripping, giving you a good bonding window.
Working in Cold, Hot, or Humid Conditions
The ideal working temperature for plaster over brick is between 50°F and 85°F. In colder weather, use cold-weather accelerators to speed up the setting process without compromising strength.
In hot conditions, protect your work area from direct sunlight with shade cloth or temporary enclosures. High humidity can slow drying times; ensure good ventilation to prevent condensation issues.
For humid days, aim for morning hours when dew points are lower and air is drier. This helps control the moisture in the plaster mix and prevents rapid drying that could weaken the bond.
</pbegin<>
Quality Checks, Testing, and Troubleshooting Bond Failures
Quality checks start with clear benchmarks for plaster over brick and practical DIY tests you can actually do. Expect adhesion indicators like a firm pull when you test a small area, and watch for surface prep that’s clean, etched, and dampened just enough to bite; poor prep sinks bond strength fast. Common failure shows up as debonding at the scratch coat, a weak key between plaster and bonding agent, or moisture getting in and carrying dust or oil into the mix.
Performing tests at the right times matters, so plan simple scrape tests, light tapping for hollow sounds, and safe adhesion checks during curing, not after it’s set. Keep a plain log of results, ambient humidity and temperature, and any rework you do, so you can spot patterns and act before big problems creep in. If adhesion looks off, re-scratch the surface, reapply or refresh the bonding agent, and tighten up cleaning, etching, and dampening to keep the cure on track and prevent repeat failures.
Simple On-site Bond Tests
To ensure your plaster adheres well to the brick, start with a tap test. Lightly tap the surface; if it sounds hollow or you feel any give under your fingers, there might be an issue.
A simple scrape test can also reveal weak spots. Use a flat-edged tool to gently scrape along the plaster’s edge. If chunks come off easily, this indicates poor bonding and needs addressing.
Visual inspections are crucial too. Look for any signs of delamination or cracking patterns that suggest instability in the bond between plaster and brick.
Diagnosing Common Issues (Hollow Sounds, Cracking, Blistering)
Hollow sounds often indicate insufficient bonding or trapped air. This can happen if the scratch coat wasn’t properly keyed into the surface or if there was too much suction from dry brick.
Cracks usually point to either a weak mix ratio or improper curing conditions. Make sure your plaster isn’t drying out too fast, which could cause it to crack as it shrinks.
Blistering can be caused by moisture trapped beneath the surface or poor mixing of materials. Ensure that all components are thoroughly mixed and that there’s no standing water on the brick before applying plaster.
When to Remove and Redo vs Repair Locally
If you find widespread issues like extensive cracking or delamination, it might be best to remove the entire layer of plaster and start over. This ensures a solid base for new plaster.
For localized problems such as small cracks or blisters, patching can save time and materials. Focus on cleaning the area thoroughly before applying fresh plaster to ensure good adhesion.
The decision often comes down to cost versus effort. Full removal is more labor-intensive but guarantees a strong bond across all areas. Local repairs are quicker but may need monitoring for future issues.
Cost Estimates, Timeframes, and Project Planning
This section lays out ballpark costs for materials (bonding agents, scratch coat mix, plaster and durability additives), tools, rental equipment, and waste disposal, with a clear DIY versus pro pricing swing and a small contingency for unexpected repairs. It breaks down each phase—surface prep, bonding and scratch coat application, curing times between coats, and the final finish—and gives rough labor hours for DIYers and pros, plus a stepwise timeline with milestone targets like a prepped surface, product mix and application window, cure/rehydration periods, inspection, and the final skim coat and finish. It also flags risk and constraint checks (brick and ventilation, weather impact on curing, material handling safety, potential need for multiple coats) and includes decision points for budget versus scope, such as when to stop and call a pro or adjust plan if bond failure or moisture is suspected.
With these numbers in hand, you stay on plan, pace crews, and spot when a pro is warranted before bad bond or hidden moisture wrecks your effort. Weather, ventilation, and brick condition drive cure times and dust or spill risks, so you build in buffers, plan for contingencies like additional coats, and track progress against your timeline. Use the milestones to document changes for a project plan or permit note, keep safety front and center on chemical handling and waste disposal, and make clear decisions whether to proceed, revise scope, or bring in specialized trades.
Materials Cost Breakdown
For a small repair, expect to spend around $50 to $100 on materials like bonding agents and plaster mix. Medium-sized projects might cost between $200 and $400, including lath and additional tools if needed. Larger repairs can range from $500 up to over $1,000, factoring in waste disposal and potential rental equipment.
DIY homeowners will find materials at local hardware stores or online retailers, while professionals often buy in bulk for better pricing but may incur higher tool costs due to specialized equipment. Always set aside a small contingency fund to cover unexpected repairs or material shortages.
Labor Time and Sequencing
The surface preparation phase typically takes about 2-4 hours for DIYers, while professionals can complete it in less time due to experience. Applying the scratch coat usually requires another 2-4 hours of labor.
Curing times vary but generally allow a day or two between coats. Finishing touches like the final skim coat and any touch-ups might take an additional hour or two for DIYers, while pros can often complete this phase more efficiently.
Permits, Historic Considerations, and Hiring Professionals
In some areas, especially in historic districts or when working on older buildings, permits may be required for plaster repairs. Check with your local building department to ensure compliance.
If you’re dealing with a historically significant structure, consult conservation experts who understand the unique requirements of preserving such sites. They can provide guidance on materials and techniques that won’t compromise the integrity of the building.
When in doubt or if the repair is extensive, hiring a professional plaster contractor ensures quality workmanship and adherence to local regulations. Look for contractors with experience in similar projects and check references before proceeding.
Safety, Common Mistakes, and Best Practices
Safety comes first on every plaster over brick job, so gear up with PPE, reference a quick pre-work checklist, and follow ventilation, respirator, eye and skin protection, ladder, and electrical safety rules to prevent injuries and costly mistakes. Get the surface ready: check moisture and temperature, inspect the brick and plaster for loose material, clean and abrade as needed, and set up containment to keep dust from spreading. Before you mix anything, plan bonding and primer use, run a small adhesion test, and ensure the bonding agent is compatible with plaster over brick, or you risk bond failure later.
Common mistakes bite hard: over-wetting or under-wetting, wrong scratch coat thickness or timing, poor surface cleaning, incompatible products, and skipping proper curing and humidity control. Best practices build durability: use the right scratch coat mix-to-water ratio, re-wet and re-scratch on schedule, keep a steady trowel technique, build gradually, and add reinforcement if needed while managing curing with masking and humidity. This approach saves time and money by preventing bond failures, cracks, and rework, so your plaster over brick stays strong and weatherproof for years.
Jobsite Safety and Waste Disposal
Before you start, put on your safety gear: gloves, goggles, a dust mask, and sturdy boots. Make sure the area is well-ventilated to avoid breathing in harmful particles.
Set up containment barriers around the work zone to catch debris and keep it from spreading. Use drop cloths or plastic sheeting to protect floors and other surfaces nearby.
When you’re done, dispose of all hazardous waste properly. This includes empty chemical containers and any leftover materials that could be harmful if not handled correctly.
Top 10 Mistakes to Avoid
Making these common errors can lead to weak bonds, cracking, or other issues. Here’s a quick rundown:
- Mistake: Not cleaning the surface properly before applying plaster.
Fix: Use a wire brush and clean water to remove all loose material. - Mistake: Using too much water in your mix.
Fix: Adjust the ratio of water to cement for better consistency. - Mistake: Not letting the scratch coat dry enough before applying a finish coat.
Fix: Wait until it’s slightly damp but not wet. - Mistake: Overlooking electrical safety around your work area.
Fix: Turn off power at the circuit breaker and use non-conductive tools.
The fastest on-site correction is often a quick re-scratch of the surface to improve adhesion before applying another coat.
Long-term Maintenance and Inspection Schedule
To keep your plaster repair looking great, regular checks are key. Here’s what you need:
- Inspect for cracks or signs of movement every six months.
- Clean the surface with a mild detergent to remove dirt buildup.
- Check corners and edges where damage is more likely to occur.
- Look for any areas that might need touch-ups due to wear.
If you notice any signs of movement or cracking, it’s time to address them before they become bigger issues. Regular maintenance can extend the life of your repair significantly.
Conclusion
Finish with a solid, bonded scratch coat to protect brick and keep the plaster from popping off. Safety, proper prep, and a careful mix are non‑negotiable for a durable, good‑looking repair.
First, confirm you’re repairing what’s actually damaged, prepare the brick surface, choose the right bonding method, mix and apply the bonding agent and plaster in the correct order, and pre‑wet the wall while controlling temperature and ventilation. Then follow a steady, repeatable sequence: verify substrate cleanliness, mix to the right consistency, apply the scratch coat evenly, keep the surface damp as you work, and perform quick quality checks and simple tests as you go.
Common mistakes to avoid include skipping a test area, skipping or rushing surface preparation, using the wrong bonding method for the brick, and applying plaster when the wall is too cold, too hot, or too dry. Stay safe: wear goggles and gloves, keep a clean work zone, and never mix or apply plaster in exposed or windy conditions that could cause rapid drying or dust inhalation. Test small areas first and stop if bond shows signs of failure.
If the brick substrate is unstable, the surface is severely deteriorated, or the project scale is large, call in a professional instead of pushing on. With careful prep, the right bonding approach, and steady work, you’ll get a solid, long‑lasting finish that you can be proud of. You’ve got this—plan, test, and execute with care.
FAQ
What’s the difference between a bonding agent and a primer?
Their job is similar, but they’re not one and the same. A bonding agent helps plaster adhere directly to brick. It’s usually tinted to protect your walls from moisture. A primer, on the other hand, is more about providing a good base for paint, offering better coverage.
Can I skip the bonding agent?
No, don’t be a DIY hero here. Skipping the bonding agent means your fresh plaster has a higher chance of falling off over time, especially in humid areas. It’s worth the extra effort and cost to avoid rework.
How do I correctly apply the first layer, the scratch coat?
Mix plaster smooth, not too watery or lumpy. Load your hawk, spread onto the wall using a floated held at a 45° angle, pushing it into any crevices. Let it set slightly then use a comb to ‘scratch’ lines for better keying of the next layers.
How much water should I add to my plaster mix?
Follow manufacturer’s guidelines, but remember, less water is better. Too much makes your plaster weak and hardens too fast. It might look right when you pour it, but if it doesn’t stick the next day, it’s a sign of too much water.