
Introduction
An exposed aggregate window is a small patch that reveals decorative stones after removing a portion of concrete to match the surrounding finish.
Plan to cut a window in the existing slab, clean and dampen the area, and set up a simple form to keep edges neat. Check local rules and the patch will need to blend in texture and color with the nearby surface.
Prepare the concrete surface by removing loose material and feathering the edges so new concrete will accept an even finish. Mix exposed aggregate materials according to the product instructions and combine them so the mix sits evenly in the patch. Work toward an even finish by carefully compacting and surface-troweling, checking that the window sits level with the surrounding slab and matches the finish.
Key takeaways
- Prepare the concrete surface by cleaning, profiling, and roughening for bonding.
- Match exposed aggregate finish by sampling aggregates and testing color under light.
- Mix repair material with chosen aggregate, ensuring uniform dispersion and no voids.
- Create a consistent, even surface before curing to reveal the window.
- Cutting and inserting the window frame requires precise alignment and PPE.
- Seal and cure following manufacturer guidance; protect from weather and traffic.
Table of Contents
- Introduction
- Key takeaways
- Project Overview and Planning
- Tools and Materials Checklist
- Assessing and Matching the Existing Exposed Aggregate Finish
- Preparing the Concrete Surface and Removing Existing Finish
- Mixing and Customizing the Exposed Aggregate Repair Mix
- Applying the Repair and Creating the ‘Window’ Reveal
- Cutting, Inserting, and Sealing the Window Frame
- Curing, Finishing, and Sealing to Match Sheen and Durability
- Conclusion
- FAQ
Project Overview and Planning
This section lays out the project scope, goals for visual match, and a clear step-by-step plan before you start. It explains how to decide whether a repair or a replacement is appropriate and what to check to keep the finish integration tight with the wall texture.
You’ll define opening size constraints, texture, edge sharpness, color, and your material list so nothing changes mid‑job. Following the planned sequence helps you avoid rework, manage curing, and catch problems early like mismatched texture or weak substrate. Always check the product label and manufacturer instructions for mixes and safety, and confirm any local rules or permit requirements if they apply.
Site assessment and measurements
Before you start, document your work area. Take photos of the damaged section from different angles. These will help you match the existing finish later.
Measure the size of the window opening. Note down any unique features or patterns around it. This helps ensure your repair integrates seamlessly with the surrounding texture and depth.
Pro tip: Check for any underlying issues, like cracks or crumbling substrate. These could affect your repair work.
Planning the repair sequence and timeline
Plan your tasks in order. First, clean and prep the surface. Then, apply the bonding agent. Next, mix and place your patch. Finally, cure and seal.
Key timing: Allow 24-72 hours for curing, depending on weather conditions. Plan your work around this.
Weather can surprise you. Have a backup plan if it rains or gets too cold before the patch cures.
Pro tip: If you’re using decorative patterns, plan how you’ll achieve them in your repair.
Permits, access, and neighbor considerations
Check local permitting requirements. Some repairs may need permits, especially if they affect structural integrity or require utility disruptions.
Ensure you have safe access to the work area. This might mean setting up scaffolding or protecting nearby surfaces from debris.
Consider neighbors: If your repair affects adjacent properties (like shared walls), inform them beforehand. They may need to take precautions too.
Tools and Materials Checklist
This section gives you a practical checklist of hand tools (masonry chisel, stiff-bristle brush, margin trowel, carbide grout float) and power tools (hammer drill with the right bit, slow-speed mixer, vacuum aid), plus safety gear and material options. You’ll also want to mind texture matching, burr-free edges, and uniform aggregate exposure, and you should always check product labels and manufacturer recommendations for compatibility with patch and concrete products. Follow the labels for how tools work with the patch and when to stop or adjust.
Why it matters: reading labels, substrate prep guidance, moisture considerations, and cure instructions helps you avoid rework and weak patches. Check the label or datasheet for shelf life, mixing guidance, pot life, and application temps, and always stick to patch thickness and curing guidance exactly. Do a test patch on a hidden area and plan for formwork release and joint filling before you start.
Tools required
Before you start, ensure you have the right tools for the job. This checklist helps you gather everything needed for a small repair.
- Masonry chisel: For cutting and removing damaged concrete.
- Hammer drill: With appropriate bit (e.g., SDS-plus) for drilling into concrete.
- Stiff-bristle brush: To clean the repair area.
- Margin trowel: For applying and spreading patch compounds.
- Carbide grout float: To finish and level the patch.
- Slow-speed mixer: To mix patch compounds evenly.
- Vacuum aid: To clean up masonry dust safely.
- Tape measure: For accurate measurements of the repair area.
- Level: To ensure the patch is even and flat.
- Safety glasses: To protect your eyes from debris.
- Dust mask/respirator: To protect against masonry dust inhalation.
- Knee pads: For comfort during extended periods of kneeling.
Quick rule: Always double-check your tools before starting. Missing a tool can slow down your repair and cause mistakes.
Materials and aggregate selection
Choosing the right materials is crucial for a successful, matching repair. This checklist helps you select the best options.
- Binder type: Select a patch compound that matches your existing concrete’s binder (e.g., cement-based or polymer-modified).
- Aggregate size/grading: Match the size and grading of exposed aggregates in your existing concrete to maintain consistency.
- Color sources: Use color-match pigments or pre-colored patch compounds to achieve a close visual match.
- Bonding agent: Apply a bonding agent to improve adhesion between the new and old concrete.
- Surface-retarder: Use one to control the rate of curing and help achieve uniform aggregate exposure.
- Sealer: Choose a sealer that matches your existing finish for protection and aesthetics.
- Curing blanket: Use one to maintain moisture levels during curing, promoting strength development.
- Release agent: Apply before installing formwork to ensure easy removal after curing.
- Tape: For securing formwork and creating clean edges.
Quick rule: Always test your materials on a small, hidden area first to ensure they match your existing finish.
Material specs and standards explained
Understanding material specifications helps you choose the right products for your repair. This checklist outlines key attributes to verify.
- Compressive strength class: Ensure the patch compound’s strength matches or exceeds that of your existing concrete.
- Recommended use: Check if the product is suitable for repairing exposed aggregate finishes.
- Compatibility: Verify that the new materials are compatible with your existing finish and substrate temperatures.
- Mixing ratios: Follow manufacturer guidelines for mixing patch compounds to achieve desired results.
- Pot life: Pay attention to how long the mixed product remains usable before it hardens.
- Application temps: Ensure substrate and ambient temperatures are within recommended ranges for application.
- Patch thickness: Follow manufacturer guidelines for optimal patch thickness to avoid structural issues or delamination.
- Curing time: Allow sufficient curing time for the patch to develop its full strength.
Quick rule: Always consult manufacturer data sheets and follow their recommendations for best results.
Assessing and Matching the Existing Exposed Aggregate Finish
You’ll start by carefully assessing what’s on the surface: measure granule size where you can, note color differences, and watch how the aggregates sit in the cement matrix. Look at the tint of the surrounding concrete, any moisture effects, and how sealers or gloss change the hue. Check how deep the exposure goes and what the texture feels like, so your repair can replicate the same look and roughness as the rest of the finish.
Map any variation across the area and identify zones with different colors or aggregate types, plus any residues or seams that could throw off color matching. Plan material compatibility and mix design by choosing patch materials and pigments that align with the existing concrete and sealers, and decide on cement content, slump, and aggregate replacement by checking the label or datasheet. Do a small test patch behind a hidden area to verify color, texture, and exposure before committing to the main repair, and document results to guide the broader finish.
Identifying aggregate, cement color, and texture
Start by examining the existing concrete. What you’re looking for are visual and tactile cues to determine the type of aggregate used, the background cement tint, and how deeply aggregates are exposed.
Aggregate: Measure granule diameters with a ruler or caliper. Note any color variations. Observe how aggregates are dispersed – evenly spread or clustered?
Cement color: Compare the hue of the surrounding concrete. Check for moisture effects and any sealers or gloss that might affect color perception.
Exposure profile: Estimate top layer thickness lost, and how deeply aggregates are exposed. Feel the surface to understand its level of roughness.
Test patch strategy and visual checkpoints
Before you start your main repair, create a small test patch in a hidden area or sample panel. This helps verify color, texture, and exposure match.
- Timing: Photograph the test patch at different times of day to see how light affects its appearance.
- Color match: Compare the test patch with existing concrete under various lighting conditions. Check for any discrepancies in cement matrix tint and aggregate color.
- Texture match: Feel both surfaces. The test patch should have a similar level of roughness to the existing finish.
- Exposure depth: Ensure aggregates are exposed at the same depth as the surrounding concrete.
- Sealer compatibility: Apply any sealers or finishes used on the existing concrete to the test patch. Check for any adverse reactions.
- Uniformity: Inspect the test patch for any inconsistencies in aggregate distribution or color.
- Mortar/joint color: Ensure the mortar or jointing material used in the test patch matches the existing finish.
- Edge definition: Check that the edges of the test patch blend seamlessly with the surrounding concrete.
Quick rule: If any aspect doesn’t pass these visual checkpoints, adjust your mix design or application method before proceeding with the main repair.
Preparing the Concrete Surface and Removing Existing Finish
Begin by sizing up the existing surface: look for loose topping, degraded material, cracks, and laitance that could stop a good bond. Plan safe removal choices, focusing on mechanical options like grinding or light scabbling and selective removal, plus any approved chemical or adhesive-stripping methods, all chosen for compatibility with the concrete and the surrounding finish. Aim to protect adjacent areas with proper masking or barriers, control dust, and keep debris contained while you expose a clean, textured substrate that will accept the new work without pulling away or flaking.
Why this matters: a solid, bond-ready base saves you headaches later and keeps your finish looking right for a long time. It’s worth the extra steps to achieve a proper SCAR/anchor pattern and to remove contaminants such as oil, curing compounds, or efflorescence before you test the surface with a quick bond test, like a scratch/pond test or an adhesive pull test, to verify you’re on the right track. Work in a logical sequence, wear appropriate PPE, vent for dust and chemicals, and dispose of removed material properly to protect yourself and the rest of the project.
Safe removal techniques and tools
Start with low-impact methods to preserve the existing finish. Escalate to power tools only when necessary.
- Hand chipping: Uses a cold chisel and hammer. Inexpensive, but labor-intensive. Ideal for small areas or where vibration is a concern.
- Light grinding: A walk-behind grinder with diamond blades removes material quickly. Creates dust, so wear PPE and consider water suppression.
- Micro-blasting: Uses compressed air and fine abrasives to remove concrete gently. Rentable equipment; expect around $100/day plus media cost.
- Scabbling: A power scabbler with tungsten carbide tips removes material aggressively. Ideal for large areas or heavily degraded surfaces. Creates significant dust.
- Chemical removal: Acid-based solutions can dissolve concrete. Use sparingly, following manufacturer’s guidelines. Compatible with existing finish and concrete type is crucial.
Cleaning, profile, and bonding preparations
Thorough cleaning ensures a strong bond. Use a stiff-bristle broom or wire brush to remove loose material.
Pressure rinse with clean water to remove dust and debris. A detergent can help break down contaminants, but rinse thoroughly afterwards.
Create a mechanical profile using a power scabbler or grinder. Aim for a surface with a 10-15% profile – not too rough, not too smooth. This provides enough ‘teeth’ for the new concrete to grip onto.
Bonding agents or primers can enhance adhesion. Use when existing and new concrete have different compositions or ages. Follow manufacturer’s instructions for application and drying times.
Mixing and Customizing the Exposed Aggregate Repair Mix
Choose between preblended repair mortars for consistent color and faster setup, or site-mixed blends when you need to customize the matrix and accommodate edge conditions that aren’t nicely handled by off-the-shelf products. Either route affects color uniformity, pot life, and compatibility with the existing finish, so plan a small trial mix to verify how the chosen path performs under your actual conditions before you commit to a full repair.
Plan the color matrix by selecting pigments or integral color options, aiming to match the cement tone and then adjusting the mix to blend with the surrounding concrete; test color under lighting that matches your job site to avoid surprises at install. Determine aggregate size, type, and proportion to reproduce the exposed texture, choosing local aggregates when possible and recording target ratios so you can reproduce the look consistently. Implement a trial-mix protocol with 2–3 small batches that vary proportions, and document slump, color, and surface appearance after cure; use those results to finalize the mix recipe and the application plan, while checking product labels or datasheets for any limits on additives, timing, or compatibility with your finish.
Choosing mix type and adjusting color
First, decide between preblended repair mortars and site-mixed blends. Preblends offer consistent color and faster setup but may not match unique edge conditions or custom textures. Site-mixed blends give you more control over matrix color and aggregate proportions.
To adjust the matrix color, use pigments or integral colors that match your cement tone. Test small amounts under similar lighting to ensure a good match. You can also pre-tint aggregates by mixing them with a small amount of repair mortar before adding to the main mix.
Remember: Preblended mixes may have shorter pot lives and could stain if not used promptly. Site-mixed blends might require more trial batches for color consistency.
Wetting, workability, and aggregate distribution
Start by wetting the substrate to improve bond strength. Use a sprayer or dampen with a sponge, but avoid over-saturating.
For optimal workability, adjust your water-to-cement ratio based on temperature and humidity. Too much water weakens the mix; too little makes it hard to place.
To distribute aggregates evenly, use a shovel or rake to spread them across the repair area before placing the mixed mortar. Work from one side to the other, ensuring even coverage. You can also add small amounts of bonding agents or accelerators to improve workability and cure time, but be cautious not to over-timing or stain.
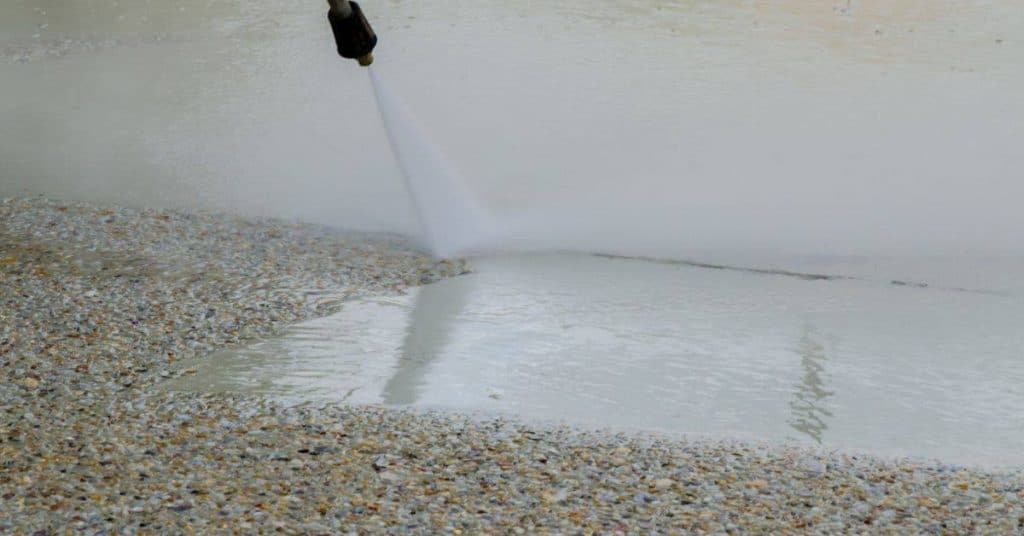
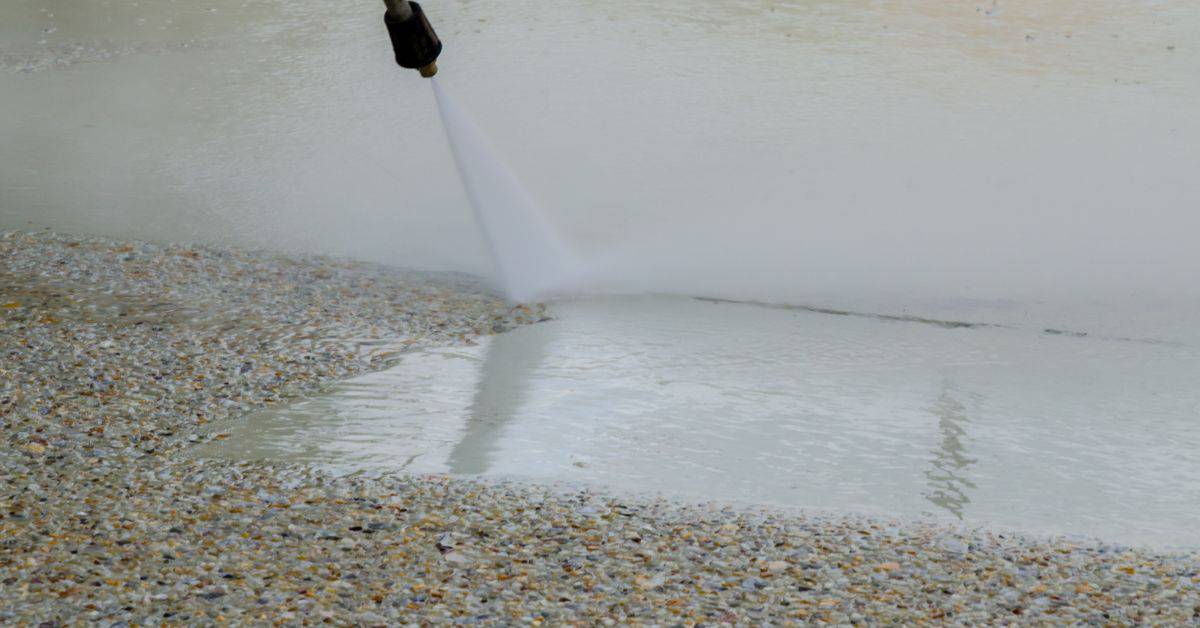
Applying the Repair and Creating the ‘Window’ Reveal
This patch is a small exposed-aggregate repair that blends into the surrounding finish and defines a clean window reveal. Prepare the area by removing loose material, dampening the surface, and feathering the edges to blend with texture. Use a precise formwork or tape to establish the window and maintain consistent depth.
Understanding the plan helps you get a seamless transition without crowding the reveal. Good prep, matching pigment and aggregate, and controlled exposure keep color and texture consistent as it cures. If in doubt, check product labels or manufacturer instructions and follow local practice to avoid a patch that stands out.
Forming the window frame or insert
To create a clean ‘window’ reveal, you’ll need to define its perimeter. Here’s how:
First, use a sharp utility knife or a concrete saw with a diamond blade to score and cut through any remaining finish at the edges of your repair area.
Protect surrounding concrete by applying painter’s tape along the cut lines. This will serve as a stop-edge for your formwork.
Now, create your temporary formwork using 1×4 or 2×4 lumber. Ensure it’s well-aligned and fits snugly against the taped edges. Secure it with screws driven into pilot holes to avoid cracking the concrete.
Layering, finishing, and exposing aggregate
Once your formwork is in place, you can start applying your repair mix. Here’s how to achieve a consistent exposed aggregate finish:
First, apply a base coat of your repair mortar, using a trowel or squeegee to spread it evenly within the formwork. Ensure it’s well-consolidated and fills any voids.
Next, add your dry aggregates, spreading them evenly over the wet base coat. Use a bullfloat or darby to press them firmly into the mortar, ensuring good contact.
Apply a surface retarder or wash-off agent immediately after exposing the aggregate. This will control the depth of exposure and help achieve a consistent finish. Follow manufacturer’s instructions for application and timing.
Once cured, use a stiff-bristled brush to gently scrub away any remaining mortar from the exposed aggregates. This will reveal their natural texture and color, matching your existing finish.
Cutting, Inserting, and Sealing the Window Frame
Plan the opening carefully, then cut true so the frame sits flush with the wall. Dry-fit the frame, shim as needed, and seal with flashing and sealant to block moisture. Ensure the finish matches the surrounding aggregate.
A precise cut and proper moisture barriers prevent leaks and misalignment that can loosen trim over time. Following templates, correct flashing, sill pan, and surface sealant keeps water away from interior finishes. Check labels and manufacturer instructions for flashing and sealant compatibility.
Accurate cutting and fit checks
First, measure the exact dimensions of your window frame. Mark these out on the concrete surface using a straight edge and a marker.
Use a dry-cut grinder with a diamond blade or carbide-tipped blades to cut through the concrete. Keep the blade perpendicular to the surface for clean cuts.
Before setting the frame, perform a dry-fit check. Place the frame in the opening and ensure it’s plumb and straight using a level. Adjust as needed until you achieve a consistent reveal around the entire window.
Flashing, anchoring, and sealant compatibility
Choose flashing material that’s compatible with your concrete patch. Galvanized steel or aluminum are good choices for their durability and resistance to corrosion.
For anchorage, use expansion bolts or chemical anchors. These won’t crack the patch like wedge anchors might. Drill pilot holes, insert the anchor, and tighten according to manufacturer’s instructions.
Select a sealant that’s compatible with both concrete and your window frame material. Silicone-based sealants work well for both. Apply sealant around the entire perimeter of the window frame before setting it in place.
Curing, Finishing, and Sealing to Match Sheen and Durability
Curing methods, timing for finishing, and sealer choices all hinge on keeping the repair moist and protected while it hardens. Use moisture-friendly approaches like moist curing or coverings, and only start texture matching, feathering, and sealing after the patch has reached a stable feel to the touch. Pick a sealer that fits your sheen goal and the surface you’re matching, and plan a pre-seal clean, neutralize, and dry-down step.
Context matters because improper curing or rushing finish work can show as blotchy color, rough edges, or micro-movement in the patch. The right balance keeps the repair durable, reduces wear around the edges, and helps the repair blend with the existing surface over time. Always test a small area for color and gloss, verify surface dryness and compatibility, and follow manufacturer instructions and labels for any sealer or curing product you choose.
Curing best practices and timelines
Proper curing is crucial for your repair’s strength and appearance. Here’s how to do it right:
Moist Curing: Keep the concrete damp, not wet. Use plastic sheeting or curing blankets to retain moisture. Spray occasionally if using plastic.
Temperature & Humidity: Ideal conditions are 50-80°F (10-27°C) and 70-90% humidity. Avoid freezing temperatures and direct sunlight.
Curing Duration: Minimum is 3 days, but 7 to 14 days is better for exposed aggregate. Wait until the surface is no longer tacky before finishing or sealing.
Sealers and finish options, including visual match
Choose a sealer that matches your existing finish’s sheen and durability:
Penetrating Sealers: Soak into the concrete, protecting from within. They don’t change sheen or color but may darken slightly. Easy to maintain.
Film-Forming Sealers: Coat the surface with a protective film. They can enhance sheen and color depth but require more maintenance. Some may yellow over time.
For exposed aggregate, use a sealer compatible with your existing finish. Test on a small area first to ensure color and gloss match.
Conclusion
Keeping the exposed aggregate window durable and looking right comes down to clean prep, careful matching, and steady, controlled work. Safety is non negotiable, and taking small, test patches keeps you from making irreparable mistakes.
First, confirm you can reproduce the finish and sheen in a discreet spot, then mix and adjust the repair in small batches, prepare the concrete surface thoroughly, insert the frame correctly, and seal and cure as advised. Work in calm, daylight conditions, follow the order you practiced in the project steps, and test frequently for adhesion and color match before moving on to the next stage.
Common mistakes to avoid include skipping a test area, rushing the cure, and using a repair mix that is too thin or too rough for the surrounding finish. Remember: mistakes bite you later in wear, water intrusion, or color drift. Safety first means wearing eye protection, gloves, and dust control, and never overwork the repair or force a frame in where it won’t sit true.
If the patch feels uncertain, or the existing finish is large, badly spalled, or you’re unsure about the match or framing, call a professional. Otherwise, finish with controlled steps, verify the result in different light, and you’ll have a window that lasts and blends with the rest of the surface. You’ve got this—steady hands, sharp eye, and a plan you can follow.
FAQ
How do I properly prepare the concrete surface before the repair?
Clean off any loose material, dust, and grease. Roughen the surface slightly so the new mix grabs, then dampen it without leaving standing water. Check for structural damage and fix any cracks or spalled edges before you start.
What’s the right way to mix exposed aggregate repair materials for the window reveal?
Follow the manufacturer’s directions on the bag or can for the binder and aggregate. Use the same or compatible aggregates to match the existing finish as closely as possible. Don’t guess—check labels or datasheets for compatibility and open-time guidance.
How can I create an even finish and blend colors between old and new concrete?
Trowel the repair in thin, even passes and feather the edges to blend with the surrounding surface. Keep the surface slightly smoother than the surrounding if the finish is glossy, or slightly rough if it’s matte. If color seems off, let it cure a bit and compare under good light before applying any touch-up.
How do I safely cut out a window in the existing concrete and insert a frame?
Score the outline with a masonry blade and use controlled, steady cuts. Support the edges so you don’t chip unwanted material, and wear eye and dust protection. Remove material gradually and clean the void before placing the frame.
What should I do to clean and seal the repaired area to match sheen and durability?
Clean the area after the repair cures to remove dust and haze. Apply a sealant or sealer compatible with your concrete and aggregate, following product instructions for application and cure time. Inspect for uniform sheen and reapply or touch up only as directed if the finish differs.