
Introduction
Water stains on wood can be removed with simple home remedies and careful finishing. This guide walks you through step-by-step techniques and common pitfalls, so you can restore the appearance of your wood without causing further damage. You’ll learn what to try for different finishes and what to avoid to protect the grain.
Key takeaways
- Identify stain type early to choose effective treatment and avoid damage.
- Test any chemical method on inconspicuous area before full application.
- Start with gentle methods to minimize wood surface alteration and damage.
- Heat and friction can lift light surface stains without chemicals.
- Apply polishes or oils after stain removal to even color.
- Prevent future stains by wiping spills promptly and using coasters.
Table of Contents
- Introduction
- Key takeaways
- Quick overview & when this guide applies
- Tools, materials, and cost comparison
- Assess the stain — a simple 3-step checklist
- Gentle, first-line treatments (try these first)
- Heat and friction methods for stubborn surface stains
- Stronger chemical treatments (when surface methods fail)
- Sanding, spot-refinishing, and when to strip and refinish
- What to avoid and final preventative tips
- Conclusion
- FAQ
Quick overview & when this guide applies
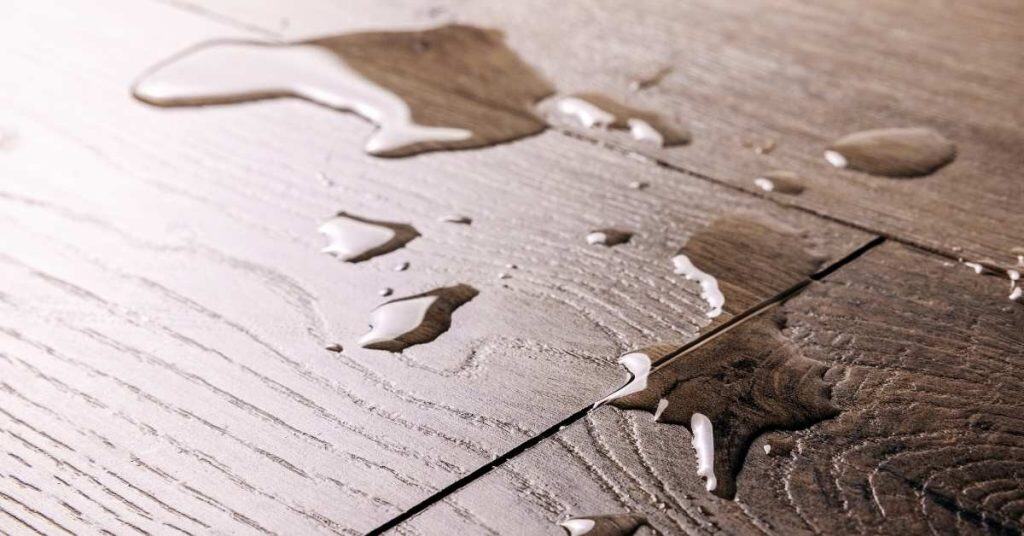
This section defines what stains are in scope: white rings, cloudy blushing, and dark/black stains, with fresh versus old stains treated differently. Expect lightening or removal of white rings on finishes, reduced blushing, and diminished dark tints, but outcomes vary by wood species, veneer, and finish condition. DIY methods fit superficial surface stains; deeper or layered stains, damaged finishes, or antique pieces may require a pro.
Test a small inconspicuous area and assess a hidden spot first to see what changes are realistic. Always wear protective gear, ensure ventilation, and avoid aggressive compounds on delicate finishes; stop if you risk sanding through. If you’re unsure about finish type or stain depth, check the product label/datasheet or local rules, and know when to call a pro.
Fresh vs. old stains — why timing matters
The age of a water stain can make all the difference when it comes to removal. For fresh surface stains, you’re in luck because they haven’t had time to penetrate deep into the wood or react with finishes, making them easier to tackle.
If you catch a white ring right after it appears, for instance, you can often lift it off using gentle methods like rubbing alcohol or mineral spirits. But if that same stain sits around for weeks or months, it will start to darken and set into the wood, requiring more aggressive techniques.
Older stains are trickier because they’ve had time to react with finishes like varnish or lacquer, turning them darker and harder to remove without damaging the surface. In such cases, you might need to strip back layers of finish before addressing the stain properly.
The key takeaway is that early intervention can save a lot of hassle later on. So if you spot water damage, act fast!
How wood type and finish change your approach
Different types of wood and finishes require different approaches to tackle water stains effectively without causing harm. For instance, varnished or lacquered surfaces need extra care because these finishes are more prone to damage from harsh chemicals.
If you’re dealing with a piece that has an oil finish like tung oil or Danish oil, you can often use solvents like mineral spirits to lift out water stains without much risk of damaging the wood. But be cautious—too aggressive and you might strip away too much oil along with the stain.
Veneer surfaces are particularly delicate since they’re thin layers over a substrate. Any method that’s too strong can easily tear or damage the veneer, leaving you worse off than before. In such cases, it’s often best to consult a professional who has experience in handling these materials carefully.
Lastly, solid wood pieces offer more flexibility but still need careful consideration based on their species. Some woods like oak are tougher and can withstand stronger solutions, while softer woods like pine might require gentler methods to avoid damage.

Tools, materials, and cost comparison
Tools, materials, and cost consideration come together to shape the right plan for water stains on wood. You’ll want a practical kit: soft cloths, a soft-bristle brush, fine sandpaper, and an iron or heat source for gentle lift; pantry helpers like baking soda, vinegar, olive oil, mayonnaise, and white toothpaste for mild cleaning, plus oxalic acid and commercial wood cleaners for tougher spots. Think in layers: identify the stain depth, pick an approach (absorption, paste lifts, heat/steam, or chemical cleaners), and anticipate how your finish type will respond. Expect a range of options, from quick, low-effort methods to more involved treatments, with costs tied to the tools and cleaners you choose.
This matters because the right combination protects the surface and avoids creating new problems like masking or veneer damage. A quick-use kit can handle light, fresh stains, while more intensive options require careful handling, ventilation, and PPE, especially with acids or strong cleaners. Keep in mind surface compatibility, disposal rules, and the most common missteps—abrasives on delicate finishes, over-wetting, or using harsh chemicals incompatible with veneers—so you can decide method and pace with confidence.
Safety gear and waste disposal
Before you start, make sure you have the right safety equipment to protect yourself from chemicals and dust.
- Gloves: Protect your hands from chemical burns. Use nitrile or rubber gloves for best protection.
Tip: Wear them anytime you handle oxalic acid or commercial wood cleaners. - Eyewear: Safety glasses shield your eyes from splashes and dust particles. Always wear them when sanding or applying chemicals.
Warning: Never use contact lenses around strong chemicals. - Ventilation: Open windows or run fans to keep the air fresh. Use a respirator if you’re working in an enclosed space.
Note: Proper ventilation is crucial, especially with volatile substances like vinegar and baking soda solutions. - Goggles: Full-face protection for extra safety when dealing with harsh chemicals. Essential for handling oxalic acid or commercial wood cleaners.
Tips: Wear goggles if you’re working in a dusty environment or using strong acids. - Hazmat disposal: Properly dispose of hazardous waste like used cloths and chemical containers. Check local regulations for safe disposal methods.
Note: Never pour chemicals down the drain; use sealed containers for disposal.
Quick cost/effort matrix
Choosing a method depends on how deep and old your water stains are. For fresh, light stains, you can start with simple household items like baking soda or vinegar.
If the stain is more stubborn, consider using commercial wood cleaners or oxalic acid. These methods cost a bit more but offer better results for set-in damage.
For very deep stains, professional-grade products and tools might be necessary. This approach will take longer and require more skill but can restore your wood to its original condition.
Assess the stain — a simple 3-step checklist
The key to choosing the right plan is to assess the stain first: surface stains usually show white, cloudy, or chalky color cues, while penetrating stains darken or bleed into the wood and won’t wipe away easily. If you see a color that sits on top, you’re likely dealing with a surface stain and a quick refresh may do the trick; if the color has sunk in or keeps coming back after wiping, you’re facing a deeper, penetrating issue that needs a more thorough approach. Use a hidden-spot test to gauge finish integrity—scrape or grooves and light abrasion in an out-of-sight area tell you how solid the finish is without ruining the visible surface.
Then probe depth with a damp cloth: wipe a controlled pass and watch whether the color lifts, beads, or bleeds into the cloth to classify surface vs. penetrated stain, and use what you learn to guide a quick surface refresh or deeper treatment such as polish/finish repair, filler, or stain removal as needed. The goal is a simple decision tree: if the color lifts cleanly and the finish stays intact, you can start with light restoration; if color is stubborn or the finish shows wear, plan for more involved work and safer products, while always wearing gloves and ensuring ventilation and testing on an inconspicuous spot first. Also check the product label or datasheet for any limits, and follow local rules for disposal of leftover materials.
Visual checkpoints to identify stain type
Use this checklist when you first spot a water mark on your wood.
- White ring: Look for clear, round marks. Confirm by wiping with damp cloth; should stay white if just surface damage.
- Cloudy blushing: Check for hazy spots. Confirm by pressing damp cloth; should lift slightly without bleeding into wood.
- Dark stain: Look for black or blue marks. Confirm by probing with damp cloth; should bleed if it’s deep in the wood.
- Finish integrity: Test a hidden spot with light scrape; confirm no damage to finish layer.
- Wood grain reaction: Check if stain follows grain lines; confirms deeper penetration.
- Surface texture: Feel for raised or sunken areas around the mark; indicates surface damage.
- Color contrast: Compare stained area to clean wood; darker marks suggest deep-set stains.
Quick rule: White rings are usually surface, dark stains often penetrate deeper.
When to call a pro
Use this checklist when you’re unsure about the extent of damage or your ability to fix it.
- Soft wood: Check if wood feels spongy; indicates rot, needs professional repair.
- Black stains: Look for dark marks through grain lines; suggests deep-set damage.
- Large areas: Assess size of stained area; bigger spots often need refinishing.
- Multiple layers: Check if stain goes beyond surface finish into wood itself.
- Complex finishes: Look for intricate patterns or varnished surfaces that require expertise to restore.
Quick rule: Call a pro if you see soft spots, large stains, or complex finishes.
Gentle, first-line treatments (try these first)
The core idea here is to start with gentle, first-line measures that are low risk and easy to control, and to clearly distinguish fresh water stains from white rings while assessing finish compatibility, age, and veneer involvement before any remedy. Begin with a quick check: is there surface moisture, is the stain dark or white, is the finish delicate, and can it tolerate mild remedies without signaling trouble down the road?
Blot to lift surface moisture, then try low-risk options in order of gentleness: a baking-soda and water paste, followed by a vinegar and olive oil rub, and finally mayonnaise or a light oil for white rings if the first steps show promise. Use a soft cloth or cotton swab, apply with light pressure, and wipe lightly to avoid abrading the finish; never heat or soak, and test an inconspicuous spot first. If you don’t see improvement after a couple of careful attempts, or if you notice finish lifting, color change, or elevated watermarking, skip ahead to stronger methods or professional help and check local disposal rules for products you used.
Baking soda paste method (safe for most finishes)
Start by mixing baking soda with just enough water to form a thick paste. The exact ratio isn’t crucial, but aim for something that sticks together without being too runny.
Apply the paste gently using a soft cloth or cotton swab in the direction of the wood grain. Don’t scrub hard; you want to avoid damaging the finish. Let it sit for about five minutes before wiping off with a damp cloth and drying thoroughly.
This method is great for fresh water stains but can also help lighten older marks without risking damage to your wood’s surface. Just remember, if no improvement after one or two applications, it might be time to try something stronger.
Vinegar + olive oil and mayonnaise for conditioning
The vinegar and olive oil mix is ideal when you need to both clean and condition the wood. Mix equal parts white vinegar and olive oil in a small bowl, then apply with a soft cloth.
Mayonnaise works well specifically on white rings caused by heat or water damage. It reintroduces oils that can help lighten these marks over time. Apply mayonnaise to the affected area and leave it overnight before wiping off gently in the morning.
Always test any new treatment on a small, inconspicuous spot first to ensure there’s no adverse reaction with your wood’s finish or type of stain. If you see improvement after using these remedies, continue as needed until the stain fades.

Heat and friction methods for stubborn surface stains
Heat (iron over a damp cloth) and light abrasive rubbing can lift light surface stains and moisture trapped under finish, but they carry risk to the finish, veneer, and wood. Use the iron over a damp clean cloth with low to medium heat and no steam, never placing the iron directly on wood, and keep the iron moving to avoid scorching. If the stain is dark or spreading, or you see blistering or changes to the finish, pause and choose a gentler approach or skip it.
Test in an inconspicuous spot first, work on a damp cloth only, and keep sessions brief. If progress stalls or the stain worsens, stop and consider alternatives like a mild abrasive or wood cleaner, and always ventilate and read product labels. Finish with a matching sealant or wax to restore sheen and help prevent moisture re-entry.
Iron technique step-by-step
This sequence uses heat to lift moisture trapped under the wood finish without damaging it.
- Set your iron on low to medium heat with no steam. Place a clean, damp cloth over the stain and apply light pressure for 10 seconds.
- Maintain distance between the iron and wood surface at least an inch apart to avoid direct contact. Move the iron in small circles or back-and-forth motions.
- Check the progress every minute by lifting the cloth slightly. If no improvement, repeat steps one and two for another minute but stop if you see any signs of scorching.
- If the stain lifts, wipe the area with a damp cloth to remove residue and let dry before reapplying finish or polish as needed.
Toothpaste and non-gel abrasives
Mix white, non-gel toothpaste with a small amount of baking soda to form a paste. Apply this mixture gently in circular motions using a soft cloth or light abrasive.
Focus on the stained area only and avoid rubbing too hard to prevent damaging the wood finish. Wipe clean after application and inspect for any improvements before proceeding further.
Note: If the stain persists, consider consulting a professional who can use stronger methods safely without risking damage to your wood surface.
Stronger chemical treatments (when surface methods fail)
When simple surface cleaners fail to lift dark or blue-tinged stains, stronger chemicals like oxalic acid or commercial wood restorers become appropriate. Wear ventilation and PPE, and always test on an inconspicuous area first. Outline the steps: prepare the dilution, apply to the stain, let it dwell and agitate as needed, then rinse thoroughly and neutralize if required, followed by careful re-finishing considerations.
This approach matters because it can salvage stained wood without full replacement, but it requires careful handling and timing. Follow practical post-treatment steps for re-finishing, color or sheen matching, and checking for any stain reappearance after coating. Always follow product labels for dilution guidance, note restrictions for unfinished or finished surfaces, and plan cleanup, disposal, and a cautious testing sequence to avoid dulling or damage.
Oxalic acid for black/blue stains
When surface treatments don’t cut it, oxalic acid is your next step. It’s great at removing iron-based stains that turn wood blue or black. Before you start, make sure the area is well-ventilated and wear gloves, goggles, and a mask to protect yourself.
Mix oxalic acid with water in a ratio of about 1 part acid to 8 parts water. This solution should be applied using a sponge or brush directly onto the stained area. Let it sit for around 15 minutes before scrubbing gently with a soft-bristled brush. Rinse thoroughly with clean water and let dry.
After rinsing, neutralize any leftover acid by applying baking soda paste to the treated area. Scrub lightly then rinse again. If you notice the stain persists or reappears after drying, consider another application but be careful not to overdo it as this can damage the wood.
Commercial cleaners and wood bleach alternatives
For those who prefer a ready-made solution, commercial wood restorers are available. These products often contain bleaching agents that work well on tough stains without the hassle of mixing chemicals yourself. Always check the label for specific instructions and safety precautions.
When choosing between oxalic acid and wood bleach, consider the type of finish on your wood. Oxalic acid is generally safe for sealed surfaces but can damage unfinished or oiled woods. Wood bleach is more versatile but requires careful application to avoid damaging the wood grain.
After treatment with either method, assess if the stain has been removed before proceeding to re-finish. If you’re unsure about color matching after cleaning, test a small area first and adjust your finishing technique accordingly.
Sanding, spot-refinishing, and when to strip and refinish
Sanding is a last-resort option for deep-set stains. Test gentler methods first, then use a careful grit progression to feather the edges into the surrounding finish, and block the stain before re-coating with a compatible finish.
Prep and safety matter: clean and dust well, test a hidden area, and mask any remaining stain with a stain-blocking primer or shellac as needed. If you’re unsure or the finish shows signs of trouble (uneven absorption, veneer damage, or adhesion issues), consider spot refinishing or full refinishing and match the sheen and product type to the rest of the piece. Always check the product label or datasheet for guidance on compatibility, and follow local disposal rules for any waste.
How to sand without creating noticeable repairs
Sanding is a last resort for deep-set stains, but it’s crucial to do it right. Start with 180-grit paper, feathering the edges into the surrounding finish. Move up to 220 grit and then 320 grit as needed.
Keep your passes light and even, focusing on blending the sanded area seamlessly with the rest of the wood. Avoid cross-grain scratches by sanding in the direction of the grain. Always check for evenness under good lighting to ensure a smooth transition.
After sanding, use a stain-blocking primer or shellac to mask any remaining discoloration before refinishing. This step is critical to prevent future staining and maintain the wood’s integrity.
Refinish Checklist After Stain Removal
This checklist helps you re-coat your wood after removing stains, ensuring a seamless finish. Use it when you’ve sanded or spot-refinished an area.
- Clean surface: Wipe down the wood with a damp cloth to remove dust and debris. Confirm by checking for residue under good lighting; skipping this can lead to poor adhesion.
- Select finish: Choose a polyurethane or oil-based finish that matches your existing one. Check compatibility on the label; mismatched finishes may peel over time.
- Apply primer: Use stain-blocking primer if needed, and let it dry completely before applying topcoat. Confirm by testing with a small patch; skipping this can result in re-staining.
- First coat: Apply thin, even coats of your chosen finish. Let each layer cure according to the label instructions. Skipping curing times can cause bubbling or uneven sheen.
- Second coat: Repeat with a second coat if needed for full coverage and protection. Confirm by checking for uniformity; too few coats may leave wood vulnerable.
Quick rule: Always test your finish in an inconspicuous area first to ensure it blends well with the existing surface.
What to avoid and final preventative tips
Avoid common mistakes that can worsen water stains or damage finishes on veneer, such as using harsh abrasives, applying undiluted vinegar or lemon juice, exposing the surface to high heat or steam, rubbing alcohol on finishes, or skipping a patch test. Pair those cautions with straightforward prevention: use coasters or heat-resistant mats, sealants or appropriate finishes, and blot spills immediately; focus on veneer finish compatibility and watch for color lift or edge lifting during any test patch.
This matters because veneer finishes are delicate and DIY fixes can backfire quickly if you don’t know the type of stain or finish you’re dealing with. A simple patch test informs you whether a method is safe before you proceed, and a calm, stepwise approach helps you avoid chasing a problem you can’t undo. If gentle methods fail, stop before you cause more damage and consider professional products or a professional assessment as a last resort; keep quick-drying, light-cleaning routines and moisture control as a baseline, and reinforce care with sealants, regular polishing, and proper drying times.
Safety and environmental cautions
When tackling water stains, always prioritize safety. Make sure the area is well-ventilated to avoid inhaling fumes from any chemicals you use. Wear gloves and protective eyewear to shield your skin and eyes from harsh substances.
Be mindful of the environment too. Avoid pouring leftover solutions down drains or on soil as they can harm local ecosystems. Check the label for proper disposal instructions, which often include taking residues to a hazardous waste facility.
Remember, prevention is key. Keep your workspace clean and dry to minimize the chances of water damage in the first place. By staying alert and prepared, you’ll keep both yourself and your wood surfaces safe and healthy.
Long-term prevention and maintenance
To prevent future water stains, establish a regular care routine for your wooden surfaces. Use coasters under glasses and cups to avoid direct contact with liquids. Place heat-resistant mats or pads beneath hot items like coffee mugs or pots.
Regularly apply a wood conditioner or sealer to protect the surface from moisture. This creates an additional barrier that can help prevent stains from setting in. Check the label for recommended application intervals and follow them closely.
Maintain your furniture by cleaning it gently but regularly with a soft cloth. Avoid abrasive cleaners or harsh chemicals, as these can strip away protective layers and damage finishes over time. By keeping up with simple maintenance tasks, you’ll extend the life of your wood pieces and keep them looking their best.
Conclusion
Protect the wood, your time, and your safety by following these steps with purpose and care. If you treat the problem like a small repair job, you limit damage and keep the finish looking good for years to come.
First, check your stain by testing a small area, gather the right tools and materials, and confirm your plan: start with gentle first-line treatments, move to heat or friction if needed, then only reach for stronger chemicals if surface methods fail. Move in a logical order, document what you tried, and keep area temps and ventilation steady. Always wear gloves and eye protection, work in a well-ventilated space, and test any product in a hidden spot before you commit.
Avoid these mistakes: rushing to chemical cleaners without testing, applying products over bleached or damaged wood, and sanding or stripping in a way that removes more material than intended. Keep safety first: protect surrounding finishes, work on small patches, and wipe spills immediately. Don’t skip cleaning, and never skip sanding or refinishing steps when you’re already in the project—that’s how you keep stains from creeping back.
If the stain won’t budge after these methods, or the wood is soaking up finish unevenly, it’s smart to call a pro. A skilled wood refinisher can judge whether to spot-refinish or strip and refinish without creating new problems. Stay practical, stay patient, and you’ll finish with a durable, good-looking result you can be proud of.
FAQ
What causes water stains on wood?
Water stains come from moisture soaking into the finish and the wood. The ring forms when water sits on the surface and is absorbed by the grain. If you ignore it, the stain can go deeper and harder to fix.
Can I try home remedies like toothpaste or vinegar?
Some gimmicks can make things worse. Toothpaste, vinegar, or bleach can damage the finish or stain the wood further. Always test in a hidden spot and stick to proven methods.
What is the best step-by-step for a light stain on finished wood?
Start with a mild cleaner and a nonabrasive cloth. If the stain fades, buff with a little furniture polish and reapply finish if needed. If it persists, light sanding with 320–400 grit may be required, then recoat the area.
What should I avoid doing to not ruin the wood?
Avoid soaking the wood or using harsh chemicals. Don’t rush to refinish the whole piece—fix small spots first and test methods. Never use harsh abrasives that gouge the surface.