

Introduction
Fixing loose but not falling plaster stops movement and prevents further damage.
The guide walks through practical steps, tips, and simple checks you can perform to stabilize plaster and plan safe skim repairs.
Key takeaways
- Tap plaster to distinguish hollow vs solid areas; note any creaking.
- Inspect cracks, bonding failures, and substrate movement before skim coat prep.
- Set up containment, wear PPE, seal dust, protect adjacent finishes, clean substrate.
- Only use screws and washers when movement is structural; avoid overdriving.
- Choose plaster bonding agents, apply backing with lath or mesh, then fill.
- Persistent movement warrants pro assessment; document movement patterns and revisit substrate.
Table of Contents
- Introduction
- Key takeaways
- How to diagnose “loose but not falling” plaster
- Causes of movement in otherwise intact plaster
- Tools and materials checklist
- Preparing the area: safety, containment, and substrate prep
- Mechanical stabilization techniques (when to use screws, washers, or splits)
- Bonding and filling: adhesives, bonding agents, and backing techniques
- Preparing for and applying the skim coat
- Finishing, sanding, and paint prep without reintroducing movement
- Troubleshooting persistent movement and when to call a pro
- Prevention and maintenance to avoid future “loose but not falling” issues
- Conclusion
- FAQ
How to diagnose “loose but not falling” plaster
Loose plaster that moves when you press it is active and needs repair. Differentiate it from hairline shrinkage or just loose paint by testing and watching for true movement. Use simple in-home checks to decide if it needs repair now.
Active plaster movement can lead to bigger cracks, popping, or falling chunks if you skip repair. Early checks save you from redoing work later and keep the wall strong for finishes. Keep an eye on hollow sounds, loose edges, or paint that flakes with a firm knock.
Step-by-Step Process
This sequence will help you diagnose loose but not falling plaster safely and effectively.
- Action: Use a soft-bristled brush to gently clean around the area. Reason: This removes dust that could interfere with your diagnosis. Check: The surface is free of debris, showing only the plaster. Stop and call pro if: You find extensive water damage or mold.
- Action: Tap around the loose area gently with a hammer handle. Reason: This helps you feel for hollow spots indicating separation from the wall. Check: Listen for a dull thud, not a solid tap sound. Stop and call pro if: The plaster flakes off easily.
- Action: Use a small screwdriver to probe around edges of loose areas lightly. Reason: This checks the depth and extent of separation without damaging the plaster further. Check: Feel for resistance, indicating still-attached plaster. Stop and call pro if: The screwdriver easily penetrates more than a quarter inch.
- Action: Apply a thin layer of water-based adhesive to any identified loose areas. Reason: This temporarily stabilizes the plaster while you decide on further action. Check: Ensure the surface is damp but not wet, allowing for proper adhesion. Stop and call pro if: The plaster remains extremely soft or disintegrates.
- Action: Leave the adhesive to set according to manufacturer’s instructions before proceeding with repairs. Reason: This allows time for the adhesive to bond properly, preventing further damage during repair work. Check: Wait at least 24 hours or as specified by the product label.
Pro tip: Always wear gloves and a mask when handling adhesives or probing plaster to protect yourself from dust and chemicals.
Tapping and sounding method
To find loose plaster, grab a mallet or screwdriver handle. Tap the wall gently but firmly in small sections. Listen for hollow sounds. If you hear it, mark that spot with chalk. Move to another area and repeat until the whole section is covered.
This method helps you map out where plaster needs attention before it falls off on its own. Don’t miss any spots or you’ll regret it later when chunks start dropping.
Visual and tactile inspection checklist
This checklist helps you quickly identify loose plaster without damaging your walls. Use it after tapping and sounding to confirm areas that need attention.
- Crack width: Check for cracks wider than 1/8 inch. Measure with a ruler or feel the gap with your fingernail.
- Bulging plaster: Look for any bulges larger than an inch in diameter. Gently press to see if it flexes.
- Gaps at joints: Inspect where plaster meets wood or metal edges. Check for gaps wider than 1/8 inch using a ruler.
- Finger test: Press lightly around the perimeter of any loose areas to see if it separates from the wall frame.
- Bead separation: Look at where plaster meets window or door frames. Check for gaps larger than 1/8 inch with a ruler.
- Crack patterns: Note any cracks that form an X, indicating deeper structural issues.
- Water stains: Inspect around windows and doors for signs of water damage or discoloration.
- Plaster texture: Feel the surface; loose plaster will feel soft or powdery compared to solid areas.
Quick rule: If you can fit your fingernail into a gap, it’s worth addressing before it gets worse.
When the problem is structural vs. localized
If your plaster feels loose but isn’t falling off, it might be a sign of bigger issues. First, run through tapping and sounding, then do a visual check for cracks or bulges. If you find widespread problems across multiple walls or floors, it’s likely structural.
Structural issues can come from poor base compaction under your foundation, shifting soil, or even tree roots pushing against the house. These need pro assessment because they’re not DIY fixes. Localized plaster issues, like small cracks around a window frame, are usually simpler to handle yourself.
If you see large cracks in walls that run diagonally from corner to corner, it’s almost always structural. Also, if your floor is sloping or cracking, check the base compaction. If it wasn’t done right when the house was built, you’re dealing with a major problem.
Causes of movement in otherwise intact plaster
Movement in otherwise intact plaster happens when the keying is poor or the wall lacks proper support. Moisture changes, thermal expansion, or past repairs can let the plaster move without it failing outright.
That matters on a DIY job because it tells you where to check first and what to fix before finishing. If you ignore these causes, small shifts grow into cracks or loose patches that can ruin a finish and cost more later.
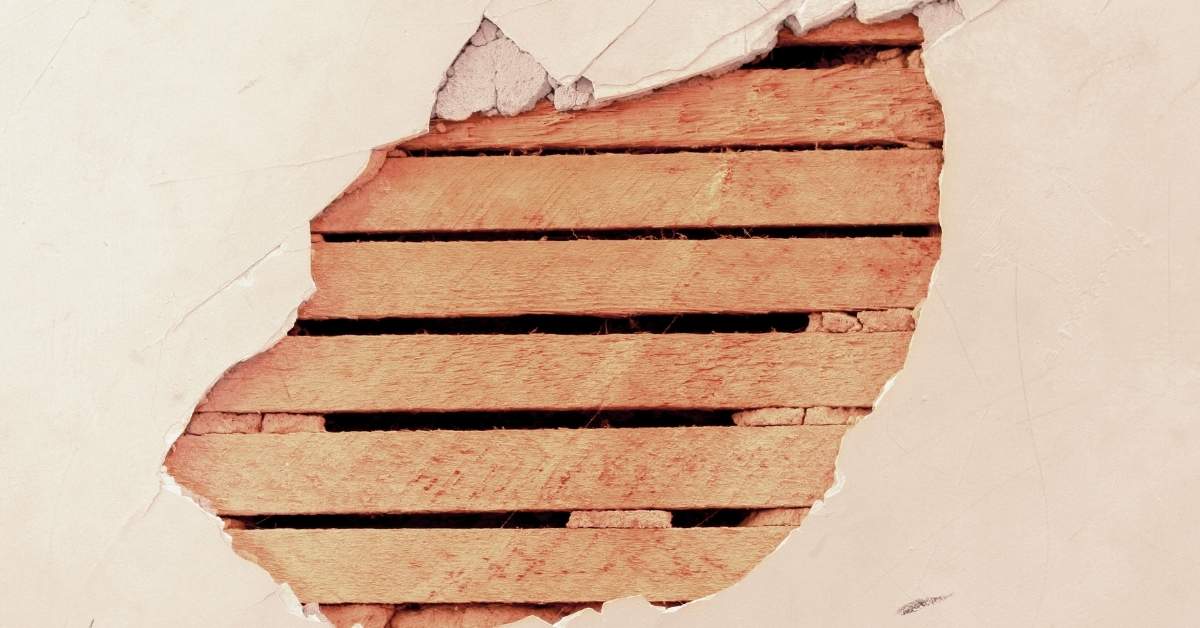
Substrate and lath problems
The foundation of your plaster job is the substrate, whether it’s wood laths, metal lathing, or drywall. If this base isn’t solid, you’ll see movement in your plaster down the line. Check for wet rot or dry rot, especially if you’re dealing with old wooden structures. This can cause the lath to weaken and shift over time.
If you’ve got loose laths, it’s a red flag. Lathing should be firmly attached to the studs; anything less means your plaster will crack and move as it dries. Another common issue is when modern drywall gets installed over old plaster without proper preparation. This mismatch can lead to uneven surfaces and movement in the new layer.
Before you start, make sure everything underneath is sound. Check base compaction if you’re working with concrete or masonry substrates too. Loose substrate means your plaster will settle over time, causing cracks and bulges.
Environmental and seasonal movement
The plaster on your walls can take a beating from the weather, especially if you live in areas with big swings between seasons. Humidity changes are a major culprit here. When it’s wet outside, moisture gets into tiny cracks or pores in the plaster, then when it dries out, that moisture leaves behind small gaps and weak spots.
Temperature shifts also play a role. In winter, heating systems dry out the air inside your home, causing plaster to shrink and crack. When summer rolls around with its higher humidity levels, the plaster expands again, leading to more micro-movement. This constant back-and-forth can eventually cause layers of plaster to peel off or delaminate.
While you can’t control the weather, you can manage indoor conditions better. Keep your home’s relative humidity between 30% and 50% year-round if possible. Use dehumidifiers in summer and humidifiers in winter to stabilize moisture levels. This won’t stop all plaster movement but it’ll slow down the damage.
Previous repair mistakes
Avoid these common errors to ensure your plaster repairs last.
- Over-relying on tape: Don’t just cover cracks with mesh or paper. Make sure the plaster bonds firmly to the substrate for real stability.
- Skim over unbonded areas: If the old plaster isn’t sticking, it won’t matter how smooth you make it. Fix the bond issue first.
- Neglecting moisture issues: Don’t ignore dampness or leaks. They’ll keep causing movement no matter how well you patch.
Double-check your work for these mistakes to prevent future plaster problems.
Tools and materials checklist
Get a practical list of tools, fasteners, repair compounds, adhesives, and safety gear ready before you start stopping movement. This checklist keeps you from scrambling on the job and speeds up the work. It covers hand tools, power tools, and the basics you’ll actually use.
Skimping on the right gear leads to failures and injuries. Use sturdy clamps, wedges, and proper fasteners, and choose the right adhesive or filler for the job. The right setup saves time, reduces risk, and keeps the jobsite moving without surprises.
Fasteners, adhesives, and mechanical options
This checklist helps you verify the right fasteners and adhesives for your concrete project before starting work.
- Screws: Use 1.5-inch concrete screws; check by measuring screw length against a ruler. Skip this step and risk weak joints.
- Plaster washers: Ensure washers are flat and undamaged; inspect visually for any cracks or deformities.
- Epoxy adhesive: Confirm it’s non-sagging type, suitable for vertical surfaces; test by applying a small amount to see if it stays put. Missing this can lead to sagging and wasted material.
- Mechanical anchors: Verify correct size for your application; measure anchor diameter against the hole in concrete. Incorrect sizing leads to weak connections.
- Screwdriver bits: Have a variety of sizes (Phillips #2, Torx T15); check by trying them out on sample screws. Not having these can slow down work significantly.
- Mortar mix: Ensure it’s ready-to-use and not expired; look for the expiration date on packaging. Using old mortar can cause poor adhesion.
- Bolts and nuts: Confirm they match your anchor sizes exactly; measure against a set of bolts to ensure compatibility. Mismatched hardware leads to loose connections.
- Adhesive cartridges: Check for proper seal integrity, no cracks or punctures; squeeze slightly to confirm cartridge is not empty. Using an empty cartridge wastes time and money.
Quick rule: Always double-check fastener compatibility with your concrete surface before installation.
Plaster repair compounds and skim materials
This checklist helps you select the right plaster and skim materials for re-boarding or patching walls. Use it when you’re ready to start your repairs.
- Bonding plaster: Choose a compound that adheres well to old surfaces. Confirm by applying a small test patch; if it sticks without cracking, you’re good. Skipping this can lead to loose patches and wasted time.
- Setting compound: Ensure it sets quickly but not too fast for your work pace. Check the manufacturer’s drying times and adjust accordingly. Rushing can cause weak spots or uneven surfaces.
- Finishing skim: Pick a smooth, fine texture for the final coat. Test by applying a thin layer; if it dries with no visible marks or imperfections, you’re on track. Poor quality can lead to an unsightly finish.
- Mixing water ratio: Follow manufacturer’s guidelines closely. Too much water will weaken your plaster, too little and it won’t mix well. Measure carefully for best results.
- Material consistency: Should be smooth and free of lumps. Stir thoroughly before use to ensure a uniform texture. Lumpy material can cause uneven patches or air pockets in the wall.
- Drying time allowance: Allow sufficient drying between coats. Check by touching the surface; if it feels dry but not hard, you’re ready for another coat. Rushing can lead to cracking and poor adhesion.
- Material coverage area: Estimate how much material you need based on manufacturer’s specs. Measure your wall area before starting to avoid running out mid-project. Running short means extra trips or wasted time waiting for delivery.
- Type of patching compound: Choose between lightweight and heavy-duty options depending on the repair size. For small cracks, use a light filler; for large areas, go with a stronger mix. Using too weak a material can lead to sagging and failure.
- Material shelf life: Check if your materials are still within their usable period. Look for expiration dates or freshness indicators on packaging. Old materials may not bond properly or set correctly.
- Mixing container cleanliness: Ensure mixing containers are clean before use to avoid contamination. A dirty container can introduce foreign particles that weaken the plaster mix.
Quick rule: Always test a small area first and follow manufacturer guidelines closely for best results.
Preparing the area: safety, containment, and substrate prep
Before you start, set up a clean, contained work zone. Control dust and debris, protect floors and furniture, and isolate any electrical fixtures. Prep edges and abutments so the repair can start true and stay secure.
Skipping dust control and edge prep invites mess, poor adhesion, and repeat work. A little setup now saves you time, money, and headaches later.
Dust control and PPE
Before you start pouring concrete, make sure you’ve got your dust masks on. A dust mask is not just a suggestion; it’s mandatory to avoid breathing in that plaster dust. If you’re dealing with a large area, consider using an air filtration system or wetting down the ground to keep the dust down.
Eyes are another critical concern. Wear safety glasses at all times—no exceptions. Dust and small particles can cause serious damage if they get into your eyes.
Containment is key for keeping dust in check. Set up barriers around your work area, like plastic sheeting or tarps, to prevent the dust from spreading everywhere. This also helps keep the substrate clean and ready for concrete.
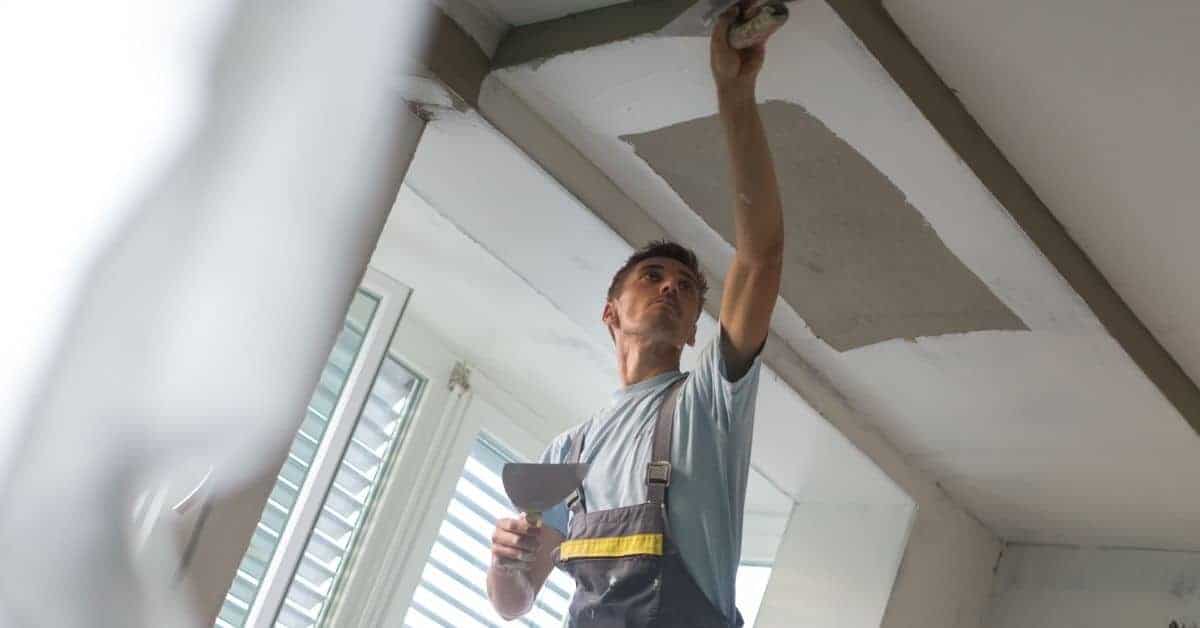
Exposing and cleaning the loose area
Before you start patching, cut back to sound plaster around damaged areas. Use a hammer drill on old work or a chisel for new construction. Make sure you expose solid substrate without leaving any weak spots behind.
Clean out all debris from lath and remove old adhesives completely. This is crucial for good bonding between the patch and existing surface. Don’t rush this step; it’s better to take your time and get it right than to have a failure later on.
Remember, you need clean, solid surfaces for new concrete or plaster to stick properly. If you’re unsure about any part of the substrate, check base compaction and ensure everything is stable before moving forward.
Mechanical stabilization techniques (when to use screws, washers, or splits)
When plaster is loose, secure it with the right hardware. Use screws with washers for solid backing, and use split anchors where the backer is weak. If the surface is crumbly, add a thin layer of adhesive to help hold before driving the screw.
Patterns matter: place fasteners in a staggered grid or parallel rows at about 8 to 12 inches apart, depending on plaster thickness. Space closer on edges and corners. This keeps plaster from cracking or moving and makes repairs last longer; it’s faster and safer on the job site.
Plasterboard screws and washers method
When securing plasterboard to studs, use self-tapping plasterboard screws with washers. The washers distribute the load, preventing screw heads from sinking into the board and causing cracks. Use 1¼-inch or 1½-inch screws depending on your wall thickness.
Check base compaction before starting to ensure studs are straight and secure. Screw in every stud at least once, placing screws about 8 inches apart along each edge of the board and spaced no more than 24 inches in the center. Use a torque screwdriver set to 50 inch-pounds for best results.
Remember, over-tightening can split the plasterboard. If you see cracks forming around the screw heads, back out the screw slightly and reinsert it with less force. This method keeps your walls strong and looking neat.
Stitching splits and re-anchoring lath
If you spot a split in your concrete, don’t panic. First, check base compaction. If it’s good, you can stitch the split with a metal plate and screws to hold things together. For loose or damaged lath, either re-tack it securely or replace it entirely.
To add support where needed, install blocking behind your wall studs. This gives extra backing for your lath and helps prevent future splits. Remember, weak spots need reinforcement; don’t skip this step just to save time.
Bonding and filling: adhesives, bonding agents, and backing techniques
Use a good construction adhesive or plaster bonding agent to reattach loose material and fill gaps before skim coats. Apply bonding agents to clean, dry surfaces and press the material into place. Use backing like expanding foam or mesh to support large voids.
This setup locks the wall in place and prevents cracks in the skim. It saves time and effort later by reducing pull-out and hollow spots. Skip on bad backing or cheap glue and you’ll pay later with more repairs.
- Surface preparation and testing: Remove dust, dirt, and loose particles with a stiff brush and vacuum. Do not apply over wet or damp surfaces. For concrete or masonry, verify substrate moisture with a suitable meter and keep moisture below 5% by weight or per product guidance.
- Adhesion testing: After cleaning, perform a simple adhesion check. Score a small area with a utility knife (cross-hatch) or apply a test patch of the bonding agent and let cure per product spec (usually 24–72 hours). If peeling or bond failure is observed, re-clean, allow proper drying, and re-test before proceeding.
- Priming: Use a bonding primer compatible with your chosen adhesive or bonding agent. Apply according to the manufacturer’s instructions and allow the primer to dry fully before setting backing material or skim coat.
- Backer prep: For voids, ensure backing materials are dry, well-fitted, and not oversized. Avoid overfilling; aim for a stable base that won’t bow under weight.
- Environmental conditions: Work at temperatures above 50°F (10°C) and avoid high humidity during application and curing to maximize adhesion and reduce cure times.
- Safety and cost notes: Wear eye protection and gloves when applying adhesives. Budget for a quality bonding agent and primer; cheaper products may require longer cure times and may fail under moisture or load.
Choosing the right adhesive and bond coat
Picking the right bonding agent is crucial for your concrete project. Start by considering polyurethane adhesives, which are great for damp or wet conditions but can be pricey. They stick to almost anything, even if it’s not perfectly clean.
Acrylic bonding agents are a good middle ground—economical and versatile. Use them when you need something that’s easy to apply and dries quickly. Acrylics work well for most indoor projects where moisture isn’t an issue.
If you’re dealing with heavy loads or outdoor applications, go for cementitious bonding agents. They offer strong adhesion and are durable against weather elements. Just make sure the base is well-compacted before applying to avoid future issues.
Filling hollows and voids for a stable skim base
To prep your concrete surface, start by filling in any hollow spots or voids. Use foam, backer rods, or setting plaster to create a solid backing that won’t shift under the weight of your skim coat. The key is to layer it up gradually and check each layer before moving on. Don’t rush this step; a weak base will lead to cracks down the line.
If you’re using foam or backer rods, cut them to fit snugly into the voids without overfilling. For deeper hollows, start with a setting plaster mixed to a thick consistency and build it up in thin layers until level. This method gives your skim coat something solid to bond with.
Remember, no matter what you use, make sure everything is dry before applying your final skim coat adhesive or bonding agent. Wet materials can cause issues later on, so take the time to let each layer set properly. And always check base compaction before starting any filling work.
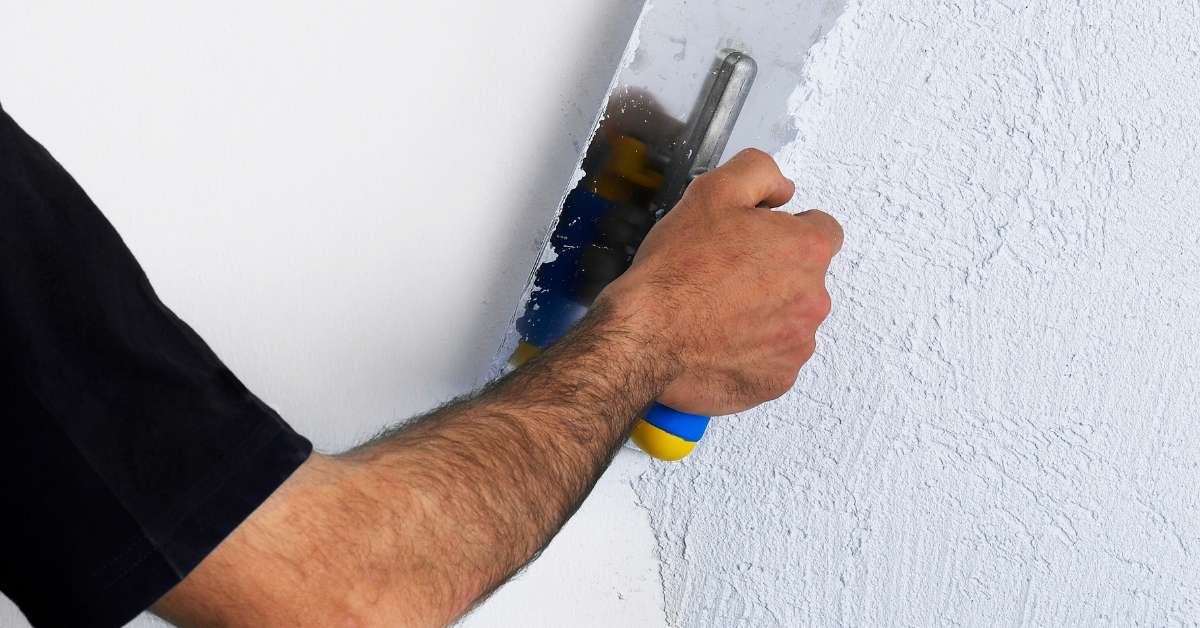
Preparing for and applying the skim coat
Let the skim coat dry fully before smoothing. Drying time depends on temperature and humidity, don’t rush it. Key the surface and mix the compound to the right consistency, then use a proper trowel technique to avoid bridging over moving areas.
If you skip keying or go too wet, you’ll trap dust and weaken adhesion. Move slowly with the trowel and work around any flex zones; skim coats crack when the surface moves. Take your time and test a small area first to avoid big headaches.
Timing and drying considerations
Before you start skim-coating, make sure the base layer is fully cured. If you’ve made mechanical repairs or used adhesives, wait at least 7 days. This ensures everything’s set and won’t shift under your new coat.
Check that the surface feels dry to the touch and isn’t damp from previous work. Damp concrete can weaken the bond of your skim coat, leading to cracks or peeling later on. If it’s still wet, wait until it dries out completely before proceeding.
A good test is to press a small area with your thumb; if there’s no moisture mark left behind, you’re ready to go. Rushing this step can lead to headaches down the line, so take your time and get it right from the start.
Skim application tips and layer control
When you’re laying down your skim coat, keep the thickness in check. Aim for a thin layer—about 1/8 to 1/4 inch per pass. This helps prevent cracking and keeps things manageable. Remember, it’s better to go light and come back with another coat than to pile on too much at once.
At the edges of your work area, feather out the skim coat so there are no sharp lines or ridges. This blending is crucial for a smooth finish that looks professional. Also, make sure you’re using the right type of compound; it should be designed not to move after application. If you see any shifting or cracking as the material dries, stop and check base compaction. A weak foundation will ruin your skim coat.
Lastly, timing is key. Don’t rush into applying another layer too soon. Wait until the previous coat has dried enough to be firm but not yet fully cured. This prevents new movement from affecting your work and keeps everything in line with your plan.
Finishing, sanding, and paint prep without reintroducing movement
Finishing without reintroducing movement means sand evenly, respect control joints, choose the right primer, and use flexible finishes. Sand lightly, avoid high spots near joints, and use compatible products. Pick primers and topcoats that tolerate some movement to prevent hairline cracks.
The goal is a smooth finish that hides small movements over time. Flexible coatings and proper primers bridge tiny shifts so you don’t see cracks. Skipping control joints or using rigid finishes invites re-cracking and endless touch-ups.
Sanding and feathering without damaging repairs
When sanding, start with a coarse grit of 80 for rough areas and switch to 120 for smoothing out. Avoid using power tools near repair edges; stick to hand sanders or fine-grit paper to avoid reintroducing movement. Check base compaction before you begin to ensure the area is stable.
Feathering should be done gently with a pole sander set at 120 grit for larger areas, but switch to a hand sander around repair edges. Feathering too aggressively can weaken the bond between old and new concrete. Keep an eye on your work from different angles to catch any uneven spots early.
After sanding, wipe down the surface with a damp cloth to remove dust and debris. This helps ensure better adhesion when you’re ready for paint prep. Remember, the goal is to smooth out without damaging repairs or causing cracks.
Priming and paint systems for repaired plaster
After you’ve finished sanding and feathering your repairs, the next step is priming. This equalizes porosity across old and new surfaces so they absorb paint evenly. Check base compaction before applying primer to ensure no movement will occur.
Choose a high-quality primer that’s compatible with your topcoat for best results. If you’re dealing with minor cracks or hairline movements, go with an elastomeric primer and finish coat. These paints stretch slightly without cracking, helping hide small shifts in the plaster.
When selecting paint systems, opt for ones that offer good coverage and durability. Avoid cheap options that might peel or crack over time due to movement. Remember, a quality job upfront saves you hassle down the road.
Troubleshooting persistent movement and when to call a pro
If movement returns after you’ve patched it, don’t pretend it’s fixed. Recheck for new cracks, doors sticking, or uneven floors. If it keeps moving, stop normal DIY fixes and call a pro.
Recurring movement can signal a real structural issue. A structural engineer or plaster conservator can diagnose the cause and plan proper repairs, saving you bigger problems later.
Quick fixes that mask versus solve the problem
When your concrete slab starts to move, it’s tempting to slap on a quick fix. But remember, these quick patches are just band-aids and won’t last long-term. They might look good for now but will come back to haunt you later.
Avoid using thinset mortar or epoxy coatings as permanent solutions. These materials can hide cracks and uneven surfaces temporarily, but they don’t address the underlying issue of poor base compaction or improper slope. You’re just delaying the inevitable repairs.
Instead, take a moment to check base compaction and ensure proper drainage around your slab. If you’re unsure about how deep your gravel layer is or if it’s properly compacted, don’t hesitate to call in an expert. A pro can assess whether the problem needs more than just surface treatment.
Decision threshold for DIY vs. pro: use a simple guidance-based check—if movement is less than about 1/16–1/8 inch (1.5–3 mm) and remains non-progressive over a full monitoring cycle (see below), careful DIY patching with appropriate backing, sealing, and monitoring may be considered. If movement exceeds 1/8 inch (3 mm) or shows progression (cracks widening or new cracks appearing) within a month, plan a pro assessment.
Cost/benefit of partial vs. full re-plaster
If you’ve got a small area with movement issues, it might seem tempting to just patch it up. But remember, a quick fix is often a false economy. If the base isn’t solid and compacted right, your plaster will keep cracking or shifting.
Before you dive into fixing only part of the wall, take a step back and assess if the whole area needs attention. Check for signs like cracks running across multiple panels or movement in the foundation around that spot. If it’s widespread, tackling just one section won’t solve the problem long-term.
A full re-plaster might sound daunting, but it’s often cheaper than constant repairs over time. Plus, you get a uniform look and peace of mind knowing your walls are stable. So if you’re unsure, don’t hesitate to call in an expert for advice—they can help decide the best course of action.
Monitoring plan to guide decisions: implement a simple crack and movement monitoring routine before and after repairs. Take dated photos weekly, measure crack widths with a plastic crack gauge or caliper, and note any changes in door alignment, floor flatness, or ceiling/around-window movement. If measurements widen or new movement appears, escalate to a professional evaluation promptly.
Safety and preparedness: during inspection and repair, turn off nearby utilities if you must access enclosure edges, wear eye protection and a dust mask, and avoid over-tipping or loading the patched area until cures are complete. If you encounter dampness, mold, or active efflorescence, address moisture first, as it often drives plaster movement.
Prevention and maintenance to avoid future “loose but not falling” issues
Prevention means regular checks and small fixes now to stop movement later. Do seasonal inspections, humidity control, and address any movement before it gets worse. Keep the substrate stable and tighten or repair components as needed.
If you catch movement early, you save time, money, and bigger repairs. Seasonal checks are simple habits you can do in a weekend, not a big project. Bad practice like ignoring humidity or skipping inspections leads to loosening and bigger failures.
Humidity and ventilation strategies
To prevent concrete from becoming loose but not falling, focus on managing humidity levels. Use dehumidifiers in areas where moisture is high to keep the air dry. This reduces swelling and shrinking that can cause cracks or looseness over time.
Ensure proper ventilation by opening windows or installing fans during drying periods after pouring concrete. Good airflow helps prevent excessive moisture buildup, which can weaken your slab’s integrity. Remember, controlling humidity is key to maintaining a strong foundation.
In colder climates, consider using heaters to dry out the area faster and reduce the time concrete spends in high-moisture conditions. However, avoid overheating as this can lead to uneven curing and cause other issues down the line. Balance is crucial here; too little or too much heat can both be harmful.
Visual checkpoints and simple annual maintenance
Use this checklist to inspect your concrete annually before winter or summer extremes. Catching issues early can save you from costly repairs later.
- Joint gaps: Check joints for cracks or widening gaps. Measure with a ruler; any gap over 1/4 inch needs attention.
- Expansion beads: Look at expansion beads to ensure they are flush and not clogged. Clean out debris if necessary.
- Cracks near edges: Inspect corners for hairline cracks or spalling. Use a magnifying glass if needed; small cracks can lead to bigger issues.
- Ponding water areas: Identify low spots where water pools after rain. Fill with concrete patch or slope away from the house.
- Drainage around slab: Ensure proper drainage directs water away from your foundation. Check for standing water within 24 hours of a rain event.
- Silicone sealant condition: Inspect silicone sealants at walls and windows; they should be flexible and not cracked or dried out.
- Concrete surface texture: Look for areas where the concrete is rough or pitted. Smooth surfaces are less likely to trap water.
- Rebar exposure: Check exposed rebar in older slabs; rusting can weaken the slab over time. Paint with a rust-inhibiting coating if needed.
- Tree root impact: Look for signs of tree roots lifting or cracking concrete near trees. Trim roots and fill cracks before they worsen.
- Parking areas: Inspect parking spaces for uneven surfaces that could damage vehicles. Level with a concrete patch if necessary.
- Foundation wall joints: Check where the foundation meets the slab; ensure no gaps or cracks are forming here.
- Sealant around doors and windows: Inspect seals around door frames and windows for any separation. Reapply sealant as needed.
Quick rule: If you notice anything out of the ordinary, address it before winter or summer sets in to prevent bigger problems later on.
Conclusion
Fixing plaster that’s loose but not falling is about stopping the movement safely now so your skim coat sticks, looks good, and lasts. The right steps protect people and structure while avoiding costly fixes later.
Take this as your working checklist: assess movement and substrate, set the area up with containment and clean surfaces, use mechanical stabilization if needed, apply bonding and backing as planned, then prepare and apply the skim coat in controlled passes, followed by careful finishing, sanding, and paint prep while rechecking for movement at key points. Do each task in small, deliberate steps and test after each stage to confirm it’s solid before moving on.
Common mistakes to avoid are rushing the assessment, skipping small-area tests, neglecting proper backing or cleaning, over-wetting the plaster, and overtightening screws or misplacing fasteners. Keep safety at the front: wear eye protection, protect floors, and work from a stable stance. If you see persistent movement, cracks widening, or dampness, don’t push through—rethink the approach and consider professional help.
Know when to call a pro: if the movement reappears after repair, if you’re unsure about the substrate, or you find signs of structural or moisture problems. Stay methodical, follow the checks, and you’ll finish with a durable surface and confidence in your work. You’ve got this—steady hands, smart steps, solid results.
FAQ
What causes plaster to feel loose but not fall out yet?
Usually there is a skim coat or backing that’s weathered. Loose plaster often means the adhesive bond is failing but the chunk is still held by a few fibers or by the surface. It’s a warning sign to act now before it breaks free.
Should I remove loose plaster or just damp it and re-anchor it?
Don’t just damp it and hope for the best. You need to clean out loose material, roughen the edge, and secure it with proper patching material. If the base is bad, fix the substrate first or you’ll waste time and money.
What tools and materials do I need before starting?
Grab a chisel, putty knife, hammer, utility knife, and a bucket of patching plaster or gypsum mix. You’ll also want a stiff brush, a damp sponge, bonding agent, and a screws-and-mash backer if needed. Have a dust mask and eye protection on too.
How do I test if the patch is solid after repair?
Let the patch cure fully, then press firmly at the edges. If it doesn’t flex or crack, it’s good. If you hear hollow sounds or see movement, you’ll need to redo the bond right away.