

Table of Contents
- Why Seal Stained Concrete? Benefits and Trade-offs
- Will Sealing Change the Color? How Sealers Affect Appearance
- Types of Sealers and Their Visual Impact
- Choosing the Right Finish: Matte, Satin, or Gloss
- Surface Prep and Testing Before Sealing
- Application Methods That Minimize Color Change
- Avoiding Slipperiness While Preserving Appearance
- Indoor vs. Outdoor Considerations
- Cost, Budgeting, and ROI of Sealing Stained Concrete
- Common Mistakes and How to Fix Them
- Product Recommendations, Trial Kits, and When to Consult Manufacturers
- Safety, VOCs, and Environmental Considerations
- Step-by-Step Sealing Workflow and Project Timeline
- Repair, Renovation, and Recoating Without Re-Staining
- Case Studies and Before/After Examples
- FAQs Homeowners Ask About Sealing Stained Concrete
- Appendix: Tools, Materials Checklist, and Quick Reference
Introduction
Seal stained concrete without muting its color by using the right sealer and careful, even application.
The guide walks you through selecting compatible sealers, preparing the surface, and applying with techniques that preserve vibrancy while adding protection.
You’ll learn practical tips, common pitfalls, and advice you can apply to real-world projects.
Why Seal Stained Concrete? Benefits and Trade-offs
Sealing stained concrete protects the surface from moisture, stains, and wear, while locking in color to prevent fading and making routine maintenance easier by reducing dirt penetration and simplifying cleaning schedules. The trade-offs aren’t hidden: you may pay more upfront, notice a slight change in appearance or depth of color, and need periodic reapplication to maintain performance and aesthetics.
Sealing is especially beneficial on new stained slabs or when repurposing existing pours, with indoor versus outdoor exposure, surface porosity, and traffic levels guiding the choice of sealer and the expected longevity of the color. Understand the options—water-based, solvent-based, or penetrating sealers—then focus on proper surface prep, compatibility with stains, slip resistance, and a practical maintenance plan to extend color life without sacrificing safety.
Protection from Wear, Stains, and UV
Sealers form the line of defense your stained concrete needs. For heavy foot or wheeled traffic, a film-forming sealer (acrylic, polyurethane) resists abrasion and scuffing better than a penetrating product. Outdoors, UV-resistant options slow color fading—if the slab gets full sun, plan for a UV-rated finish and expect more frequent recoats.
Chemical and oil spills matter most in garages, workshops, and commercial kitchens. If you park cars or use solvents, pick a sealer designed for chemical resistance and clean spills quickly. Penetrating silanes/siloxanes protect against water and mild stains but won’t stop oil soaking or strong acids.
Before you seal, check surface prep and match the sealer to the job: gloss level, indoor vs outdoor use, and traffic load. If you pick the wrong type, you’ll get peeling, cloudy finish, or poor protection. Plan routine inspections and recoat on schedule—it’s cheaper than repairing a ruined stain later.
Longevity and Maintenance Savings
Sealing stained concrete isn’t just cosmetic. A good sealer cuts the need for frequent deep cleaning, spot repairs, and costly refinishing. For interiors you’ll wipe and mop less often and avoid abrasive cleaning that eats finishes. For exteriors a proper sealer helps keep water and salt from driving freeze-thaw damage—refer back to the protection benefits above.
Practical checklist: inspect and recoat every 2–5 years depending on foot traffic and sun exposure, keep expansion joints clean and functional, and fix hairline cracks before they widen. If you skip these basics you’ll shorten the floor’s life and pay more later. Don’t trust looks alone—thin, worn finish can hide failing protection.
Choose the right sealer for the job and factor recoats into your budget. For outside slabs pick breathable, UV-resistant products; inside, pick a tougher film for high-traffic zones. Finally, avoid shortcuts like skipping surface prep or using deicers on sealed concrete—those bad habits erase savings fast. If you follow the simple checks above, sealed stained concrete will save you time and money over the long run.
Will Sealing Change the Color? How Sealers Affect Appearance
Sealants alter appearance mainly by forming a surface film that adds gloss, by creating a subtle wet-look that deepens color, and by penetrating the surface to enhance depth without a full gloss. These effects can slightly darken or intensify color, depending on the product, surface porosity, and ambient moisture at application. Understanding these mechanisms helps set realistic expectations for indoor vs outdoor use, machine-troweled vs broomed textures, and how sheen level affects perceived contrast.
To avoid surprises, do patch tests on representative samples, document sheen, color intensity, and any milky residues, then re-test after cure to confirm final appearance. Choose sealers based on scenario: gloss or satin for visibility and protection, wet-look for color depth on concrete, with attention to UV exposure, slip resistance, and compatibility with existing stains. Note that temporary color darkening can occur, some changes may be irreversible, and not every stain will read the same after sealing, so plan for adjustments in the final color expectation.
Gloss vs. Color Saturation: What to Expect
Gloss makes colors look richer because it reflects light and concentrates the pigment visually. That extra shine hides surface texture and gives the eye a deeper, more saturated read. Matte finishes scatter light, so colors look flatter and more muted; satin sits between the two.
Don’t guess—test a sample on the actual surface and view it at different times of day. A small patch will show how sheen changes hue and hides or highlights flaws. If you’re aiming for a “deep” wet look, go gloss; if you want even color with less glare, choose satin or matte.
Practical tip: glossy sealers can show brush marks and runs, so avoid over-applying and let each coat cure fully before deciding if you need another. For high-traffic areas, pick a sheen that balances appearance with durability rather than chasing the deepest color alone.
Color Shift Examples by Stain Type
Acid stains are chemical and give that variegated, mottled look. When you top them with a clear sealer they usually deepen and enrich the contrast — the highs get richer and the lows look darker. Don’t assume it will look the same as the bare stain; always test a patch and let the stain fully cure before sealing so you see the true interaction.
Water-based stains are pigment-driven and sit more on the surface. A clear sealer will typically add a little saturation and a touch of sheen, but they stay fairly predictable and uniform. If you hate extra shine, choose a low-sheen sealer or thin coats. Again, test a small area to confirm the look under your selected sheen level.
Dyes are the most volatile visually. A clear finish can make them jump in color and sometimes shift the hue slightly. If you must use a dye, test a patch, consider a barrier primer for bleed control, and apply light, even coats of sealer. Wait the full cure before judging the final color — quick touch-ups are a recipe for uneven tones.
Types of Sealers and Their Visual Impact
Sealant types shape how concrete looks after sealing: water-based, solvent-based, acrylics, epoxies, urethanes, and penetrating sealers each bring distinct visual outcomes such as gloss or matte, enhanced clarity, color warmth or coolness, and potential ambering over time. They interact with stained concrete to deepen color, shift hue, and alter saturation, so you can expect the shade to appear warmer or cooler and more vibrant under different sheens. Finishes range from matte to satin to gloss, and even small changes in moisture or humidity can cause a milky or cloudy appearance during application or curing.
Understanding these differences helps you predict how natural color will be preserved or changed, which sealers tend to deepen or mute tones, and how UV stability affects aging. This matters on the jobsite for selecting a finish that meets the project goals—whether you want a natural look, more color pop, higher gloss, or slip resistance—while keeping compatible with stains, prep steps, and interior versus exterior surfaces. A quick test swatch and careful surface prep are essential to avoid unexpected color shifts and to choose the right sheen for the desired texture and durability.
Water-Based Sealers (Advantages for Color Retention)
Water-based sealers sit on the surface and dry clear without the ambering you get from many solvent-based products. That means stamped concrete, pavers, and colored overlays keep their original tone longer. If maintaining the exact color is your top priority, choose a quality water-based product and plan for one more coat than you might with solvent types.
They also have lower VOCs and less odor, so you can finish small jobs without evacuating the house or renting heavy respirators. Still ventilate and wear a mask for dusty prep, but expect a friendlier job site smell and quicker re-entry time.
Do the simple checks: make sure the surface is dry, free of curing agents, and roughness is addressed so the sealer bonds. Test a small patch first to confirm sheen and color effect. If you see darkening after the first coat, apply another thin coat rather than a heavy one — heavy coats trap moisture and can change the look.
Solvent-Based and High-Gloss Sealers (When They Darken More)
Solvent-based and high-gloss sealers sit on top of the surface with a film of resin and oils. That film smooths and seals the pores, so light reflects differently and colors look deeper. Gloss levels amplify that effect — more shine equals a stronger “wet look.”
Solvents also carry the binder and any dissolved oils deeper into the material before they flash off. That temporarily boosts saturation and can leave a darker final tone than a water-based product. If you want to know exactly how much darker, do a test patch in an inconspicuous spot and let it cure fully before you decide.
Practical checks: pick the gloss level you actually want, not what looks good in the can; watch for strong fumes and allow longer cure time; don’t over-apply or you’ll trap solvent and get uneven darkening. If you need less darkening but like solvent durability, choose a semi-gloss or a film-former with a lower gloss rating and still test first.
Penetrating Sealers (Minimal Visual Change)
Penetrating sealers soak into the material instead of sitting on top. Products like silanes and siloxanes and other low-viscosity penetrants protect against water and salts while leaving the surface with little to no sheen or color shift. They’re the go-to when you want protection without the “wet” look or darkening you get with topical high-gloss products.
Before you roll or spray, do a small test patch on the exact slab or brick you’re treating. Check absorption, coverage rate, and whether the finish meets your expectations once cured. Lightly damp substrates absorb better; very dense materials may need a primer or a different chemistry to get penetration.
Apply on a calm, dry day and follow the label for coverage and recoat timing. Don’t over-apply—sitting pools won’t help and can leave streaks. Finally, consider what you’ll put on top later: penetrating sealers generally play well under clear topcoats, but test for paint adhesion or thin-film coatings before committing to the whole job.
Choosing the Right Finish: Matte, Satin, or Gloss
Choosing the right finish—matte, satin, or gloss—drives how depth, clarity, and mood are read on the stained surface, and it should align with indoor or outdoor use, traffic, and compatibility with common stains. Gloss yields more color pop but highlights scratches, matte hides scuffs but may need more maintenance, and satin sits in between for balanced performance. A simple decision flow helps: start with desired appearance, assess light exposure and slip resistance, and consider cleaning and longevity alongside sealer compatibility.
This matters on a jobsite because it translates into real-world results, not just aesthetics. Testing with sample boards over the same stain under varied light, plus abrasion and slip tests, gives actionable data you can document for clients or project records. Include guidance on maintenance, re-seal timing, and how outdoor UV exposure ages each finish to help a DIYer choose wisely and plan upkeep without surprises.
When to Choose Matte or Low-Sheen
Go matte when you want a natural, muted look or when the wall has flaws you don’t want drawing attention. Matte finishes hide imperfections better than anything else. If your walls are textured, old, or have lots of touch-ups, pick matte and stop stressing about every bump.
Check the room lighting and traffic. Low light and low-traffic areas—bedrooms, ceilings, formal rooms—are perfect for matte. High-traffic kitchens and kids’ rooms usually need something more washable, so only use matte there if you’re okay with occasional marks and careful cleaning.
Before you commit, do a small sample. Paint a 2×2-foot patch, let it dry, and look at it at different times of day. If color depth drops too much or cleaning becomes a nightmare, switch to a slightly higher sheen. A quick test will save you repainting later—do it.
When Satin or Gloss Works Best
Pick satin or gloss when you want deeper, richer color and surfaces that wipe clean. Good spots are kitchens, bathrooms, trim, doors, and cabinetry — anywhere fingerprints, grease, or scuffs are routine. If you need a crisp contrast against matte walls or want light to bounce around a small room, higher sheen does the job.
Do these quick checks before you buy: inspect the wall up close for bumps and repairs, check the room under the lighting you use, and decide how often you’ll need to clean the surface. If the wall has texture or flaws, sand and prime first or skip high sheen. Test a sample on the wall and view it at night and day to see how much the sheen grabs attention.
Prep more than you think. Sand, fill, and prime for a smooth base. Use satin for moderate traffic; use gloss for trim, doors, and areas that need tough, washable finishes. If you want shine but don’t want every flaw on display, push for satin over full gloss.
Surface Prep and Testing Before Sealing
Surface prep before sealing means thoroughly cleaning and degreasing the concrete to remove dust, oils, waxes, and other contaminants that could affect adhesion and color, then choosing whether to etch (acid or neutral) or use a neutral cleaner based on porosity, finish, and safety considerations.
Plan to test patches across varying textures and exposure conditions, apply the sealer with the stain on select samples, observe color shift, gloss, and slip, and document results with notes and photos so you can compare options before committing to the entire area.
Conduct moisture testing in situ using RH meters, pin or plastic-mill tests, and verify substrate dryness to avoid sealer failure such as blistering, peel, or poor adhesion that could undermine durability and aesthetics. Select representative test patches in high-traffic, shaded, and sun-exposed zones to assess how the sealer interacts with the stain color and surface texture, and schedule cure times, ventilation needs, and any surface reconditioning if results are unsatisfactory. Keep a detailed log of outcomes to guide decision making, reduce risk, and ensure the finished surface delivers predictable color, gloss, and slip resistance.
Cleaning, Efflorescence, and Contaminant Removal
Start by removing loose dirt and debris with a broom or leaf blower, then use a pressure washer for deep grime. For oil and grease, apply a commercial degreaser and scrub with a stiff brush; don’t just hose it off and assume it’s gone. Rinse thoroughly and let the surface dry completely—any cleaner residue left behind will stop a sealer from bonding and can cause blotchy or peeling results.
White powdery salts (efflorescence) need to be removed before sealing. Light deposits can be brushed out after wetting the area; heavier buildup usually needs an acid wash or a commercial efflorescence remover. Use PPE, follow dilution directions, neutralize and rinse well. After treatment, watch the area for a week—if salts keep reappearing, the moisture source must be fixed before sealing.
Always do a small test patch: clean a 2×2 foot area, let it dry, then apply sealer to confirm appearance and adhesion. If water beads instead of soaking in, or if the test patch peels, you likely have residual cleaner, salts, or trapped moisture. In short: clean thoroughly, rinse and neutralize, allow full dry time, and test—skipping any of that is where most DIY jobs go wrong.
Moisture and Vapor Tests; When Not to Seal
Do a quick plastic-sheet test before you spend money on sealer: tape a 2-foot square of clear plastic down with a tight seal, leave it 24 hours, then check for condensation or darkening of the slab. If you see moisture under the sheet or the slab looks darker where the plastic sat, that’s active moisture or vapor drive and you should not seal.
For in-slab relative humidity testing use ASTM F2170 (concrete in-situ RH test). As a practical DIY threshold, surfaces with in-slab RH ≥75% are considered at high risk for membrane failure; many manufacturers require <75% RH (often <70%) before installing non-breathable film-forming sealers. For pin-type or surface meters, treat readings as indicative only and confirm with an in-slab RH test for borderline results.
New concrete needs time to cure. If the slab is less than 28 days old, or if it was recently poured, pressure washed, or had a self-leveler applied, wait. Trapped moisture will push at the sealer film, causing peeling, blistering, or white haze (efflorescence) later on. That ruined finish is expensive to fix, so be conservative: wait for full cure or verify low moisture readings before coating.
If the plastic test flags moisture, fix the source first—drying, better drainage, moisture-mitigation products, or ventilation. Also double-check that contaminants were removed as covered earlier; dirt and oils hide moisture spots and wreck adhesion. If in doubt, get a relative-humidity (in-slab) test or a pro to verify—sealers fail more often from moisture mistakes than from wrong color choices.
Test Patch Protocol: Small-Area Trials
Pick a discreet but representative spot—corner, high-traffic edge, or near a downspout. Do the basic prep already covered earlier (clean, remove loose salts, confirm moisture tests). Treat the patch like the whole job: the way you prep, apply, and finish here is exactly how you’ll do the rest if it passes.
- Document: photograph the area (wide and close), note slab temp, air temp, RH, product batch, applicator and tools, coats, and times.
- Apply: use the same tool and technique planned for production and record wet-film thickness (WFT) target if available (typical WFTs: water-based acrylics 3–4 mils WFT per coat; solvent polyurethanes 4–6 mils WFT). If you lack a gauge, make thin, even passes to avoid pooling.
- Cure and Observe: let the patch cure 48–72 hours under the same conditions expected for site work; for cold/humid conditions extend to 7 days. Record final appearance, adhesion, slipperiness, and color shift.
- Decision Tree: if pass — proceed with same prep and application. If you see blushing/cloudiness — verify moisture, temperature, and ventilation; if adhesion failure — strip the patch, re-check contamination and moisture and retry with recommended primer or a penetrating sealer; if unacceptable color shift — try a lower-gloss or water-based alternative and retest until acceptable.
Let the patch sit and cure for at least 48–72 hours before judging. Check for adhesion, color change, sheen, slipperiness, blushing, bubbling, or any new efflorescence. If anything looks wrong, note exactly what you see, strip that small area, and try a different product or prep method. If it looks, feels, and performs like you want, you’ve saved yourself a lot of headaches—proceed to larger areas with the same method.
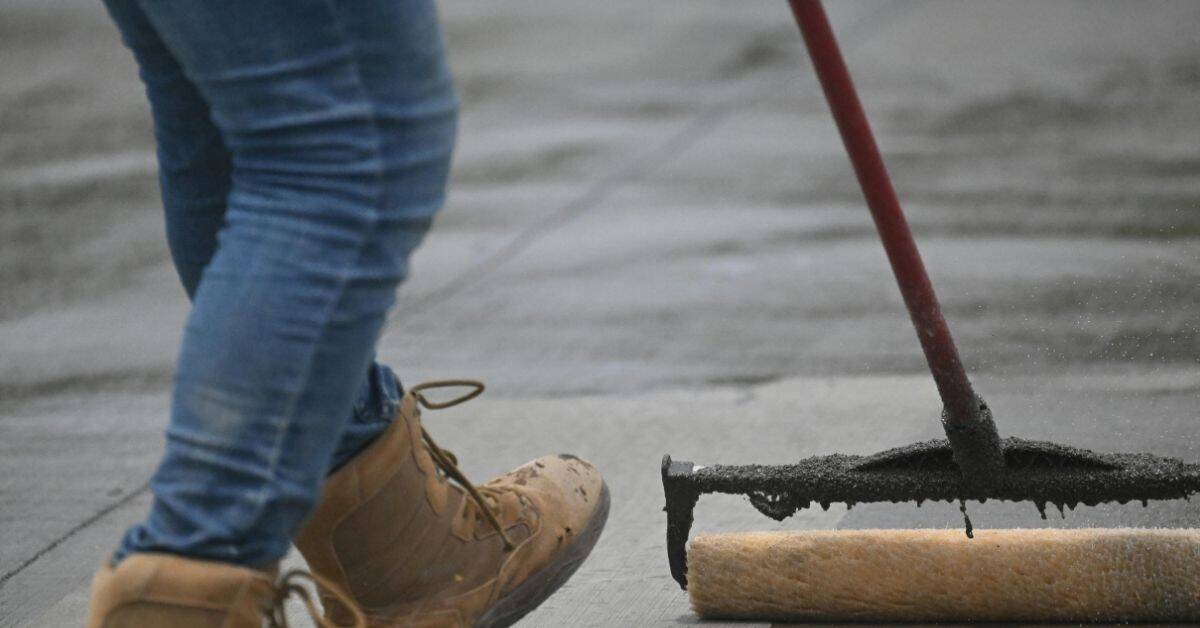
Application Methods That Minimize Color Change
Application methods—rolling, brushing, and spraying—each influence color retention, evenness, and the risk of pooling or gloss hotspots, so the aim is to build the finish with thin, uniform coats rather than a single thick pass. Rolling and brushing offer tactile control and slower deposition, which helps resist darkening or uneven patches on flat or broomed textures, while spraying can reach intricate surfaces but demands meticulous overlap, masking, and fan-pattern management. Across all methods, plan for thin coats, typically multiple passes, and adhere to recommended thickness limits to prevent sagging, color variability, or pooling that triggers hotspots.
Practical steps for minimizing color change include thorough surface prep (clean, dry, dust-free), working in even strokes with a consistent direction, maintaining a wet edge, and redistributing any excess sealer away from glossy spots while the coating is still workable. When choosing a method, weigh surface type, sealer formulation (clear vs tinted or low-VOC), and environmental factors such as temperature, humidity, and ventilation to balance coverage speed against color fidelity and risk of blotching. Finally, test patches, note wait times, and evaluate under typical lighting before committing to full sections, plus follow safety guidelines, proper PPE, and controlled cleanup and curing to reduce post-application color distortion.
How Many Coats and Film Thickness Matter
Don’t assume more is better. For common sealers: water‑based acrylics usually need two thin coats, solvent‑based topical sealers and most polyurethanes often do well with one full coat and a second light coat if you want extra durability, and penetrating silanes/siloxanes are typically a single application (sometimes a light second pass on very porous surfaces). Aim for even coverage, not a heavy puddle—that’s what makes darker spots and color change.
Recommended target values (typical ranges): water-based acrylics 10–15% solids, coverage ~200–400 ft²/gal per coat depending on porosity; solvent polyurethanes 25–45% solids, coverage ~250–350 ft²/gal; penetrating siloxanes/silanes coverage highly variable 100–400 ft²/gal depending on porosity (follow product label). For WFT guidance, follow the manufacturer’s wet-film thickness; overcoating too soon or too late also causes adhesion issues.
Keep coats thin and consistent. Thin, even coats dry uniformly and avoid the film pooling that deepens color. If you have a wet‑film gauge, target the manufacturer’s recommended wet‑film thickness; if not, apply with steady passes, backroll to remove puddles, and watch the edges for buildup. Heavy application traps more sealer in low spots and magnifies tonal shifts.
Timing matters as much as quantity. Let the first coat fully cure within the product’s recoat window before adding another—too soon and you’ll trap solvents, too late and adhesion suffers. When in doubt, follow the product instructions and do a small test patch on an inconspicuous area to confirm appearance before treating the whole surface.
Tools, Tip Sizes, and Spray Settings for Best Results
Pick the right tools and you control film build without changing the color. Below are the real tools you’ll use, when to rent or buy, and the settings that actually matter on the job.
- Standard roller (1/4–3/8″) Use on smooth to semi-smooth walls for the most even, low‑texture finish. Choose 1/4″–3/8″ nap for flat enamel or low‑sheen coatings to avoid trapping pigment. Cheap homeowner rollers are fine; using a too‑thick nap will add texture and can make color look darker or blotchy.
- Medium roller (3/8–1/2″) Use on lightly textured surfaces where you still want a smooth film. 3/8″–1/2″ balances load and leveling—don’t use thicker unless surface is rough. Optional to rent pro rollers; a thick nap will hide subtle color shifts but risks orange‑peel and uneven sheen.
- Thick roller (3/4″) Use only on rough masonry or stucco to fill valleys without extra coats. Thick naps hold more paint but can cause mottling on smooth finishes; buy if you have a lot of rough surface to cover. Wrong nap on smooth drywall will exaggerate texture and change perceived color.
- Synthetic angled brush For cutting in and trim work where spray or roller won’t reach. Use nylon/ polyester for waterborne paints and natural bristle for oil‑based; 2–3″ angled is the go‑to. Buy one good brush ($10–$30); cheap bristles shed and streak, which alters finish and color uniformity.
- Foam roller Use for ultra‑smooth surfaces and cabinet doors to get minimal texture. Foam gives a very even film but can cause lap marks if overloaded, so use light passes. Optional for walls; recommended for cabinetry—foam can tear on rough surfaces and leave voids that affect color.
- Airless sprayer (0.011″–0.017″ tip) Best for quick, even films on large jobs with minimal color shift when set up right. Start in the 0.011″–0.015″ range for fine finishes, up to 0.017″ for thicker primers; keep pressure as low as possible for atomization. Rent for big jobs ($50–$150/day); too large a tip or too high pressure creates orange‑peel and overspray that alters sheen and color.
- HVLP/turbine gun (1.0–1.4mm) Use for furniture, cabinets, and trim where control matters. Choose a 1.0–1.4mm nozzle for lacquers and thinner waterborne topcoats; keep air low to avoid dry spray. Good to rent for detail work; wrong tip or too much air causes dry particles and a dusty, pale finish.
- Mixing paddle & stick Use to get uniform pigment and correct viscosity before application. Mix slowly to avoid aeration; thin only to manufacturer recommendations. Cheap paddle is fine; unmixed or over‑thinned paint will lay down unevenly and shift color.
- Respirator & goggles Protect lungs and keep contaminants out of the wet film. Use an NIOSH‑rated respirator for solvent or fine spray work and goggles for eye protection. Essential to buy or borrow; working without protection risks health and overspray contamination that ruins finish durability and appearance.
Pro tip: Combine methods—spray the broad field at low pressure with the right tip, then backroll or cut in with a quality synthetic brush. That gives the fastest, most uniform film without overworking the coating or changing the color. Rent a sprayer if you don’t spray often; buy the brushes and rollers you’ll reuse.
Avoiding Slipperiness While Preserving Appearance
Slip risk from concrete sealers varies with sealer type, sheen, and how porous the surface. You can reduce slipperiness without noticeably changing color by using micro-additives (like fine silica or aluminum oxide), textured topcoats, or anti-slip waxes. For high-traffic areas, non-slip mats or coatings offer extra grip with minimal color change.
Practical application tips include choosing compatible binders, sticking to recommended dosages, and proper stirring, ventilation, and cure times to preserve color. Testing steps like small-area skid tests and dry/wet slip measurements help verify performance and color uniformity. This approach supports safer, durable floors that look as intended.
Traction Additives: Application and Visual Impact
For a subtle texture, broadcast very fine silica or polymer beads sparingly into a tacky base coat rather than dumping a lot on the finish coat. Apply when the primer or base is still wet but not puddling; that gives the grit something to bite into and locks it down without a chunky look. Before you start, check base compaction and surface cleanliness so the particles sit evenly.
Recommended broadcast rates: for minimal visual change and light traction, 0.5–1.0 oz/ft² (approx 15–30 g/m²). For commercial traction where texture is allowable, 1.5–3.0 oz/ft². Broadcast uniformly from 18–30 inches and backroll or sweep off excess once the base is set. Record the rate on your job sheet so future repairs match the texture.
Hold the bag or shaker about 18–30 inches above the surface and move steadily. Aim for a light, even mist — you want a whisper of texture, not an orange peel. Let the base cure enough to hold the particles, then back-roll or sweep off any loose fragments. If visibility is a concern, broadcast only on walking lines or high-traffic strips instead of the whole area.
To keep the appearance clean, seal the broadcast with a thin topcoat that matches the base color or is clear. That smooths the look while keeping grip. Don’t overdo it: too much grit looks industrial, traps dirt, and is harder to maintain. Do a small test patch so you can confirm the visual impact and traction before doing the whole job.
Matte Waxes and Topcoats That Reduce Slip
Matte wax-over-sealer and low-sheen topcoats give you a dull, natural look without turning the floor into a skating rink. Pick products labeled for floors and exterior use if applicable. The trick is to build protection in thin layers so you keep texture and traction, not a glossy film that hides grit and reduces friction.
Before you do the whole surface, test a small area. Apply the wax or matte topcoat over your current sealer, let it cure, then walk on it with wet shoes. If it feels too slick, either sand lightly to open the profile or switch to a product with more “tooth.” Remember the earlier section on traction additives — those are still the right fix if a matte coat alone doesn’t give you enough grab.
When you proceed, apply thin, even coats and follow the maker’s cure times. Heavy globs equal slippery spots and visible buildup. If you need to lower shine further without killing traction, a wax-over-sealer approach lets you tune appearance by adding or removing top layers, rather than stripping and redoing the whole system.
For objective recoat/maintenance triggers, measure static coefficient of friction (COF) under wet conditions—ADA target is ≥0.42 for accessible routes; 0.60+ is preferred for high-slip-risk areas. If COF drops below 0.42 when wet, plan restoration or recoat with traction treatment.
Indoor vs. Outdoor Considerations
Indoor environments expose sealers to household chemicals, foot traffic, abrasion, and strict low-VOC limits, so indoor options emphasize compatibility with existing finishes, slip resistance, indoor air quality, and resilience to cleaners and solvents commonly used inside homes and shops. Outdoor settings confront UV exposure, temperature cycles, freeze–thaw, and heavy weather, which require UV-stable, breathable, and robust sealers that resist fading, staining from environmental contaminants, and wear from rain, wind, pollen, and vehicles. Choosing a sealer therefore hinges on surface texture and how penetration or surface film will interact with stains or dyes previously applied, as well as planning for maintenance frequency and color retention expectations.
Indoor decisions favor low-VOC, water- or solvent-based formulas that seal without introducing strong odors or compromising air quality, while exterior selections lean toward durability and breathability to withstand sun, moisture, and abrasion. Consider surface prep for your concrete texture (smooth, broomed, stamped) and verify compatibility with stains, dyes, cleaners, and prior coatings to avoid adhesion failures or uneven finish. A practical quick checklist can guide you to the right setting so you balance slip resistance, maintenance intervals, and long-term appearance without overbuilding the project.
UV Stability and Yellowing Risk Outdoors
For outdoor jobs, pick a UV-resistant, water-based urethane. It won’t amber or yellow like many solvent/alkyd finishes when exposed to sun. If the wood gets direct sunlight, solvent-based clear coats will change color and ruin the look within months to a few years.
Before you buy a gallon, read the label for UV inhibitors and “non-yellowing” claims. Do a small test patch on a scrap piece or an unseen area and leave it outside for a week. If it darkens or turns amber, don’t use it where appearance matters.
Plan for touch-ups. Even good water-based urethanes slowly break down from UV, so expect to recoat every 2–5 years depending on exposure. If you want a truly long-lasting finish, consider pigmented stains or UV-blocking topcoats rather than relying on a clear solvent finish that will yellow.
Temperature, Humidity, and Cure Windows
Aim for a working temperature of about 50–85°F (10–29°C) for most sealers. Keep relative humidity under 70% when possible; high humidity slows cure and can leave a tacky finish. Always check surface temperature as well as air temp — a cold concrete or floor will hold moisture and ruin adhesion even if the air feels warm.
Minimum and conservative cure guidance: for acid and water-based stains allow at least 24–72 hours drying after neutralization/rinse; in cold (under 50°F) or high-humidity (>70% RH) conditions extend to 7 days. For solvent-based dyes and coatings allow 48–72 hours minimum. For film-forming topcoats follow the manufacturer’s stated recoat window; if in doubt wait the full maximum recoat time and abrade/scuff before recoating to ensure adhesion.
Thumb/tack test protocol: press a clean finger or cotton swab to the area; if there is visible transfer of color or tack, it’s not cured. A firm, non-tacky surface with no color lift is acceptable for light handling. For a stronger check, press a 1″ square of clear tape down and pull—if coating peels, allow more cure time or investigate moisture/contamination.
Know the cure windows for the product you bought: water‑based sealers often accept light foot traffic in 4–8 hours and full cure in 5–7 days; solvent or epoxy types can be touch‑dry in 2–6 hours but may need 72 hours or more for full strength. Follow the label recoat and open‑to‑traffic times exactly. If you’re working indoors, ventilation speeds drying; outdoors, the sun and wind speed things up but remember the earlier note about UV effects.
If conditions are outside those ranges, don’t guess — delay or control the environment. Use fans, dehumidifiers, or temporary heaters to lower humidity or raise temp, and tent or shield the surface from direct sun or rain. Before you start, do a simple moisture check: cold, damp surfaces or visible condensation mean wait. Better to wait a day than to have to strip and redo a bad seal.
Cost, Budgeting, and ROI of Sealing Stained Concrete
Cost, budgeting, and ROI of sealing stained concrete involve a clear breakdown of materials, labor, and the long-term value of protection. Expect per-square-foot pricing to vary by sealer type (water-based vs solvent-based), stains, and optional primers or fingerprint-resistant topcoats, with typical purchase quantities and ranges that hinge on porosity and surface texture. Labor estimates cover DIY time versus professional application, including surface prep, sealing, cure times, common hourly rates, and how size, broomed or stamped finishes, ventilation, and substrate conditions shift total cost.
The planning follows practical budgeting bands and practical timing: recoats and maintenance intervals depend on sealer type, wear signs, color retention, and ease of cleaning, while lifecycle value highlights reduced stain risk and potential color restoration costs if untreated. This matters for DIYers because it helps optimize ROI by balancing upfront material and labor with long-term protection, fewer cleaning costs, and the option to mix DIY with pro services to reach the best cost-per-year of service. Consider factors like porosity, moisture, temperature, humidity, and UV exposure to choose timing that minimizes waste, plus safety, VOC considerations, and warranty requirements that can influence total cost and value.
DIY vs. Professional Application Cost Comparison
For a homeowner doing the job, typical DIY material costs run: concrete stain kits $25–$100, clear sealer (1 gal) $25–$75, concrete cleaner/etcher $10–$30, strip/neutralizer $10–$40, and basic applicators/sprayer $30–$150. Add a diamond pad or hand grinder if you need light prep: $15–$40, or rent a floor grinder for about $100–$250 per day. For small jobs under 200 sq ft you can often finish for under $200–$400 in materials and rental fees.
Professional crews charge for labor and experience. Typical pro pricing runs about $1.50–$4 per sq ft for sealer-only jobs and about $3–$8 per sq ft for staining plus sealer and proper prep. Big factors are prep and repairs. If the slab needs grinding, patching, or moisture mitigation expect the price to rise. A pro brings faster turnaround, consistent coverage, and usually a short warranty.
If you have a small patio or want a simple refresh, DIY saves money and is fine if you follow prep steps and use decent products. Hire a pro when the area is large, the surface has damage or moisture issues, you want a high-gloss or commercial-grade finish, or you need the job done right and fast. Bottom line: DIY for small, straightforward jobs; hire a pro when repairs, liability, or guaranteed results matter. Check your earlier budgeting notes for ROI factors before deciding.
Expected Maintenance and Recoat Intervals
Sealers don’t last forever. Do a quick visual once a season and check for wear after winter or heavy use. Look for dull spots, water beading failure, or areas that darken when wet. Those signs tell you a recoat is coming sooner than later.
Typical timelines: for low-traffic patios or decorative floors expect solvent-based acrylic to need recoating about every 1–2 years, water-based acrylic every 2–3 years, penetrating silanes/siloxanes every 3–5 years, and epoxies or polyurethanes every 3–7 years. Under heavy traffic (driveways, commercial, garage with lots of tire use) cut those intervals roughly in half: solvent acrylic 6–12 months, water-based 1–2 years, penetrating 1–3 years, epoxy/polyurethane 2–3 years. These are field rules — climate, UV, and de-icing salts shorten life.
Objective inspection triggers: if water no longer beads (hydrophobicity lost), if COF (wet) drops below 0.42, or if visible abrasion or loss of film in >5% of area occurs, plan for maintenance or recoat. Prep before recoating: clean thoroughly, remove oil and efflorescence, and clean and scuff glossy areas so the new film bonds. Don’t wait until large areas peel — that forces a full strip-and-reseal, which costs a lot more (see cost section for details). If you doubt your surface prep or the sealer choice, hire a pro for the recoat. Saves money long term.
Common Mistakes and How to Fix Them
The section highlights common sealing mistakes that derail results, such as applying too much sealer, sealing damp or moist surfaces, skipping a test patch, choosing a sealer incompatible with the stain, and not allowing proper cure times, then pairs each error with practical fixes like adjusting coats, ensuring dryness, performing test patches, selecting the right penetration or film-forming option, and scheduling cure periods. It emphasizes diagnosing moisture and porosity, cleaning and dry-running profiling when needed, and re-testing after remediation to predict color and finish changes before committing to the whole project. By outlining a step-by-step remediation workflow—from patch test through surface prep, moisture mitigation, correct sealer application, and final inspection—it gives a clear path to correct the most frequent missteps.
This matters for DIY and job sites because it translates into reliable color fidelity, better protection, and safer surfaces with realistic expectations for slip resistance and longevity, rather than costly rework. Following safety and compatibility reminders—ventilation, PPE, manufacturer data sheets, avoiding wet substrates, and matching sealer to stain and surface—helps prevent health risks and compatibility issues that can compromise both results and materials. The preventive practices section reinforces a quick-reference checklist and documented product pairings so future projects proceed smoothly, with fewer surprises and more consistent outcomes.
Dealing with Blushing, Cloudiness, or Milky Finish
Blushing or a milky finish usually means moisture got trapped in the finish or you applied in too-cold conditions. You’ll see a white, cloudy look or tiny beads under the film. If you covered the cause earlier in the article, you already know the usual suspects — moisture and low temperature — so start there.
Recovery SOP (prioritized steps): 1) Verify moisture: plastic sheet, in-slab RH (ASTM F2170) or consult a pro; 2) If still tacky and moisture is present, ventilate, raise temperature and lower RH with heaters and dehumidifiers; 3) If cured but cloudy, scuff-sand with 320–400 grit and inspect—if clouding abrades away and appearance returns, clean and recoat; 4) If film floats or flakes, strip the area with a manufacturer-recommended stripper (use non-emulsifying solvent strippers for solvent-borne films or alkaline strippers for certain acrylics), rinse, neutralize, and retest substrate moisture before reapplying.
When you sand, work gently with fine grit and wipe clean before recoating. Reapply only when the wood and shop are dry and above the recommended temperature. Learn from it: don’t rush finishes in high humidity or cold. That’s the fast way to waste time and materials.
Fixing Uneven Gloss or Dark Spots
First, find the problem areas by wiping with a clean cloth and looking from different angles under good light. Run a fingernail over the spot. If the finish feels high or gummy, it’s a build or dust nib; if it’s soft or darker, it might be stain bleed or incomplete cure. Don’t assume same fix for everything.
For minor gloss differences or nibs, feather-sand the edges with very fine grit (320–400) until the shine blends. Sand lightly—you’re just knocking down the high edge, not removing all the finish. Clean thoroughly with a tack cloth or vacuum before anything else.
If sanding alone won’t match the sheen, buff with a non-abrasive pad and a finishing polish, or apply a thin, even recoat of the original topcoat product. Spot-seal any dark bleed-through first with dewaxed shellac or a compatible stain blocker for concrete where indicated, let it dry, scuff, then apply one thin coat across the whole panel to avoid lap marks. Dry and cure times matter—follow product directions and keep dust off while it sets.
Product Recommendations, Trial Kits, and When to Consult Manufacturers
Trial product categories—stains, tinted sealers, gel stains, dye-based solutions, and pigment concentrates—should be mapped to substrate types (machine-troweled, broomed, stamped, paver) to preserve color intensity and uniform appearance across zones. Trial kits offer versatility but have limitations on odor/VOC, coverage per kit, and predictability of color, so testing small samples or boards is essential, including porosity considerations and exposure scenarios. Use a structured testing protocol to assess sheen, color under lighting, slip resistance, and sealer compatibility after curing, documenting with photos and notes, and recording substrate type and weather conditions.
Leverage manufacturer tech notes and substrate-specific recommendations, compatibility with existing stains, recommended application tools, access to expert Q&A, and any warranty guidance to interpret results accurately on each substrate. After trials, use clear decision criteria—color match, UV stability, slip resistance, and foot-traffic performance—and decide whether to escalate to manufacturer consultation for tricky substrates or tool changes. Keep safety checks in mind: choose low-VOC options for indoor use, ensure proper ventilation, note curing times, disposal, and test for odor, indoor air quality, and environmental considerations, and record any safety alerts noted.
How to Read Tech Data Sheets for Visual Impact
Start by scanning the sheet for the short, sharp items that actually change how the finish looks: VOC, solids content, recommended coats, and UV resistance. High VOC formulas often amber or yellow over time, especially on light colors. Low-VOC waterborne products can stay truer to the tinted color but may require more coats to reach the same depth. If the TDS doesn’t list VOC clearly, call the manufacturer before you buy.
Solids content tells you how much pigment and film build you get per coat. Higher solids = richer, more opaque color and fewer coats; low solids = thinner, slightly washed-out look unless you do extra coats. The “recommended coats” number on the TDS isn’t a suggestion for speed — it’s what you need for coverage and gloss. If you skimp on coats you’ll get patchy sheen and lighter color than expected.
Check the UV/resistance line for color stability. A product rated for high UV resistance will keep the color and gloss longer outdoors; cheap, low-UV finishes fade fast and can yellow. Finally, do a small test patch or use a trial kit (or contact the manufacturer if the TDS is vague) — numbers tell you direction, but a real sample tells you the final look. Don’t gamble your siding or cabinets on assumptions.
When to Consult a Manufacturer or Rep
If the surface is a historic finish, a high-value floor, or you’re facing an unusual stain or substrate, stop and call the manufacturer or their rep before you buy a pallet. Don’t guess with rare or expensive work. Bring photos, a small sample of the material, and the job details so they can give specific guidance.
Ask about compatibility with the substrate, recommended prep, and any restrictions or warranty conditions. If you’re considering a custom tint or blend, ask for a manufacturer-mixed sample. Also ask for SDS, recommended application rates, and temperature or humidity limits — then get it in writing.
Before you roll out production, insist on a small on-site trial patch or accept a manufacturer-supplied bring samples kit so you can verify appearance and adhesion. If a rep shows up, have them sign off on the patch. If something goes sideways later, signed guidance is your best leverage. Refer back to the product recommendations and tech data sheets for baseline specs, but use the rep for anything outside normal conditions.
Safety, VOCs, and Environmental Considerations
This section outlines practical safety measures for staining and sealing projects, detailing when gloves, eye and face protection, and respirators are mandatory versus recommended, tailored to common staining products, plus ventilation strategies for both commercial crews and residential spaces, the role of local exhaust, and how low-VOC options, disposal rules, and regulatory notes fit into everyday workflow. It also emphasizes surface safety considerations such as slipperiness, residue, post-application curing times, and how to balance odor control, curing behavior, and environmental impact when selecting products and planning cleanup, storage, and waste handling.
Understanding PPE, ventilation, and VOC thresholds helps you choose appropriate products—clearly defined low-VOC versus zero-VOC distinctions, performance implications, odor, cure time, and color retention—along with quick pros and cons for stains, sealers, and primers in indoor versus outdoor scenarios. This matters for DIYers and job-site teams because it supports compliance with local, state, and federal rules, reduces exposure and slip hazards, improves disposal and spill response, and guides safer maintenance, water runoff considerations, and long-term environmental footprints while delivering reliable results.
PPE and Ventilation Best Practices
Wear the right gear before you open a can. For solvent-based products use a NIOSH-rated respirator with organic vapor cartridges (often labeled OV/GA or similar). For water-based paints or sealers a P100/particulate respirator is usually enough if odors are low. For extended spray work or when product TDS recommends, use a PAPRs or supplied-air systems. Always wear chemical-resistant gloves and eye protection — thin latex won’t cut it for solvents.
Ventilation beats brave lungs. When using solvents, create steady airflow with a forced exhaust fan that vents outdoors. For water-based products you can often rely on open windows and a box fan, but still aim for cross-ventilation until odors drop. If you’re working in a basement or small room, use mechanical ventilation no matter what the product is.
Containment and runoff: when pressure-washing or stripping, capture rinse water and dispose of it per local regulations—do not let solvent-laden or acidic rinse flow into storm drains. Use containment trays, absorbent pads, or rented filtration units for wash water. For solvent waste, follow SDS disposal instructions; many solvents must be managed as hazardous waste.
Check labels and act like the job matters. Follow the product’s respiratory and glove recommendations and the local VOC rules mentioned earlier. Don’t skip fresh air breaks, swap filters in respirators, or reuse contaminated gloves. If you smell strong solvent or feel dizzy, stop work and get fresh air — that’s your body’s warning light.
Choosing Low-VOC Options Without Sacrificing Performance
Pick water-based, low-odor products labeled for your surface and climate. Don’t be swayed by marketing—open the can and read the label and the product data sheet for cure time, recoat window, and adhesion ratings. If the product lists longer dry times or a tighter temperature/humidity range, plan for extra cure time and avoid heavy traffic until fully cured.
Expect a few trade-offs: some low-VOC formulas take longer to harden and may feel softer at first compared with solvent-based finishes. That’s normal. You can compensate by using the right primer or a low-VOC sealer for stain-blocking and better adhesion, and by allowing a longer cure before heavy use. For high-wear areas or raw wood with tannin bleed, a spot treatment with a compatible product may be necessary.
Do a test patch and push it—scrub, scratch, and rub—to confirm performance before finishing the whole job. Follow basic safety and ventilation practices already covered earlier, and don’t skimp on prep: surface cleanliness, proper temperature, and a good primer matter more than chasing the strongest solvent. If something looks off, stop and reassess rather than assuming more coats will fix it.
Step-by-Step Sealing Workflow and Project Timeline
A concise, practical timeline walks through stain cure to final topcoat, highlighting milestones such as stain initial set, surface prep, sealer selection, dry times between coats, and the final curing window. It pairs a day-by-day sequence with explicit wait times and temperature/humidity ranges that influence cure rates, plus a brief task checklist for a typical residential job. A quick, printable one-page checklist is referenced by task order to keep crews aligned from evaluation and patching to dust-free prep and final inspection.
The guidance helps DIYers and on-site teams prioritize safety, ventilation, masking, and furniture movement to minimize delays and abrasion damage. It clarifies decision points—single vs. multi-coat sealers, moisture concerns, porosity, weather delays—and how those choices shift the schedule. Quick duration notes for common surfaces (troweled concrete, broomed/stamped, interior vs exterior) empower realistic planning alongside a practical, task-focused sequence from surface evaluation to topcoat and final inspection.
Step-by-Step Process
This sequence gets your sealing job from prep to finish so the seal holds and looks right. Follow each step in order, check the short test, and respect the cure times before moving on.
- Do a final site safety and materials check: confirm ventilation, PPE, product expiry and ambient temperature. You do this so adhesives and coatings cure correctly and you stay safe. Check by comparing product label temps and expiry; if conditions are outside the label, stop and wait or reschedule. Call a pro if there’s structural damage or active leaks that you can’t isolate.
- Mask and protect adjacent surfaces: tape edges, cover floors and hardware to avoid overspray or drips. This keeps cleanup minimal and preserves finishes. Check by running a finger along taped edges—tape should be flush with no gaps. If masking won’t adhere or the area is oddly shaped, get a pro for complex masking and containment.
- Final surface sweep and solvent wipe: remove dust, oils, and loose particles just before you seal. Do this because contaminants kill adhesion at the moment of application. Check by a water bead test or by rubbing with a clean cloth—surface should feel consistently clean and dry. Stop and call a pro if contamination won’t come off or the substrate is flaking.
- Apply primer or adhesion promoter where required: lay it down thin and even per product instructions. Primer improves bonding and prevents premature failure. Check when tack-free and looks uniform; a missed strip shows different sheen or pull-test failure. If primer bubbles, softens, or you get solvent-sensitive substrates, call a pro for specialty primers.
- Apply the main sealant/coating in controlled passes: work a bead or roller lengthwise, tool or back-roll immediately for uniform spread. The reason is to avoid ridges, air pockets, and thin spots that cause leaks. Check by tooling until the bead is smooth and continuous and the roller leave consistent coverage; no pinholes or gaps. If you can’t achieve an even bead or the product runs uncontrollably, stop and get professional help.
- Allow initial set and do a tack and adhesion check: wait the manufacturer’s tack-free window and then press a small patch to test adhesion. This confirms proper cure and that solvent flash is gone. If it’s tacky where it shouldn’t be after the stated window, ventilate and wait; if it never firms, contact the manufacturer or a pro. Respect full cure time before traffic or reassembly—don’t rush it.
- Remove masking, tidy edges, and final inspection: carefully pull tape at a 45° angle and trim any excess with a sharp knife. This finishes edges and reveals any defects to touch up. Check by sight and a light rub—edges should be smooth and sealed with no gaps. If you find embedded moisture, poor adhesion, or wide failures, call a professional for repairs before use. Note and respect final cure time before full load—often 24–72 hours depending on product.
Pro tip: Always follow the product cure windows exactly and do a small trial patch in an inconspicuous spot first. Rushing cure or skipping the patch is the fastest way to need a redo.
Pre-Seal Timeline: Wait Times After Staining
Don’t rush the sealer. For acid stains let the reaction run and the slab dry for at least 24–72 hours after neutralizing and rinsing. If the slab still shows damp spots or color bleed when you wipe it, wait longer. Cold or humid weather pushes you to the high end of that range.
Dyes vary: water‑based dyes usually need about 12–24 hours to dry; solvent‑based dyes usually need 24 hours. For pigmented topical coatings (acrylics, epoxies, polyurethanes) expect 24–72 hours before applying a sealer over them. Note epoxies and some polyurethanes keep curing for days—they may be touch‑dry sooner but won’t reach full chemical cure for up to 7 days.
Quick jobsite checks beat guesses. Do a thumb/tack test and a white rag wipe to confirm no color transfer and no tackiness. Also check manufacturer labels and the weather. If in doubt, wait an extra day — sealing too soon is the fastest way to ruin the finish.
Post-Seal Care: First 24–72 Hours
Keep people and pets off the surface. Limit traffic to essential, soft-soled trips only. If you must step on it, wear clean socks or shoe covers. Any dragging or heavy impact in the first day will leave marks — do not drag furniture or rugs.
Avoid cleaning. No wet mopping, no scrub brushes, no cleaners with solvents until the sealer has set. If dust or dirt needs removal, gently sweep with a soft broom or use a low-suction vacuum with a floor brush attachment.
Decide where heavy items will go now and wait to place them. Light foot traffic is usually okay after 24–48 hours, normal household use after 48–72 hours, and heavy furniture or thick rugs only after the product reaches full cure (follow the label; many sealers need up to 7 days). Also check seams and edges for any soft spots before moving things back. For stain-specific wait guidance, refer to the Pre-Seal Timeline mentioned earlier.
Repair, Renovation, and Recoating Without Re-Staining
Refresh without re-staining is appropriate when the stained concrete shows minor wear, dulling, or topcoat breakdown but the color remains desirable. Start by assessing sealant and stain compatibility, identify the existing sealer, and plan thorough cleaning with dust and contaminants removed. Then perform light screening or sanding to key the surface and recoat with a compatible sealer that preserves color, testing a small area first.
Use low- or zero-VOC topcoats or clear/tinted sealers to maintain the original hue while providing renewed protection and slip resistance. Follow controlled recoating thickness and curing times, ensure proper ventilation, and implement a maintenance plan to prevent color change or blotching. Re-staining becomes necessary only when color fading, uneven tone, or dye migration occurs and a re-stain workflow can be planned after testing a small area.
Feathering and Spot Repairs
Start by cleaning the worn spot and surrounding area. Remove loose finish, dirt, and chalk with a stiff brush and solvent if needed. Lightly sand the edge of the existing finish so the new coat can feather over it — you want a gradual taper, not a hard line. If the wood is depressed or gouged, fill it with a compatible putty or thin epoxy and sand smooth before recoating.
Feather the edge with progressively finer sandpaper until the transition feels smooth to your hand. Apply the recoat in thin layers, extending each wet coat slightly past the feathered edge. Let each layer dry and sand very lightly between coats to remove any ridges. This approach helps the new film blend so you don’t see a patch when it dries.
Match the product and sheen to the existing finish. Test a small patch first and view it under the same light as the rest of the surface. If you rush with heavy coats or stop the feather too soon you’ll get a visible line. A neat feather and thin, patient coats are the difference between a repair that disappears and one that looks slapped-on.
When to Strip and Start Over
If the sealer is flaking across large areas, bubbling, or coming off in sheets, don’t bother with patching — that’s a job for full sealer removal. Small cracks and local delamination can often be fixed with feathering or spot repairs, but once the failure is widespread the new coat won’t bond and you’ll be chasing problems forever.
Heavy contamination is another hard stop. Oil, grease, paint overspray, efflorescence, or a previous incompatible product will ruin adhesion. If a simple water or mineral spirits wipe doesn’t change how the surface accepts a new coating, plan to strip down to clean substrate. Call it what it is: contamination means start over.
Do a few quick checks before committing. Scrape with a putty knife in multiple spots, do an adhesion test (tape or pull test), and wet a few areas to see absorption. If the surface fails any of those or shows deep substrate damage, strip, prep, and reapply. Half-measures here cost more time and money than doing it right once.
Case Studies and Before/After Examples
Three short case studies illustrate how different stains, sealers, and finishes perform in real-world conditions, with concrete surface types, indoor/outdoor settings, and initial problems clearly outlined. Each snapshot covers the chosen stain, the finishing kit or sealer, color retention versus subtle muting, and any compatibility notes about texture or previous coatings. You’ll see before-and-after color notes, measurable outcomes like sheen and gloss, plus practical lessons on surface prep, application, cure times, and maintenance to preserve color.
These examples matter on the job because they translate finish choices into tangible results and actionable tips for DIYers, installers, and homeowners planning similar projects. The notes highlight what worked, what didn’t, and why, including how to balance durability with appearance and how to tailor steps to different substrates. Expect concrete textures, texture-compatible finishes, and clear takeaways that help you choose finishes, avoid common pitfalls, and optimize long-term color retention and performance.
Interior Polished Floor — Matte Sealer Success
We had a homeowner with a polished concrete entry and wanted the natural color, not a shine. After grinding to a consistent finish, we applied a matte water-based sealer that kept the color true while cutting down daily upkeep. If you want the same result, test a patch in low-traffic light first so you can confirm color and sheen before committing.
Prep is where most people mess up. Clean thoroughly, remove any laitance or dust, and let the slab dry. Then apply thin, even coats and let each cure fully; too-thick layers trap moisture and look blotchy. Also check adhesion before full application by scuff-sanding a small area after the first coat.
For maintenance, stick to neutral pH cleaners and use microfiber mops. Skip abrasive pads and high-gloss topcoats — they defeat the matte look. If a high-traffic area dulls, refresh with a light recoat rather than aggressive sanding.
Exterior Patio — UV Challenge and Solution
Sun kills finish faster than anything else. Start by cleaning the patio thoroughly and let it dry fully. Choose a UV-resistant sealer made for exterior concrete or natural stone — don’t grab the cheapest indoor product. Do a small test strip so you can see how the sealer looks in direct sun before you coat the whole area.
Apply according to temperature and humidity recommendations. For most products that means thin, even coats and waiting the full cure time between coats. If the product calls for two coats, do two — skipping the second coat just speeds up fading and satin/gloss loss. Avoid oil-based sealers that yellow; pick non-yellowing, UV-stable formulas.
Plan on periodic recoats rather than a one-and-done job. For a south-facing, unshaded patio expect maintenance every 2–4 years; shaded spots last longer. Recoat prep is simple: clean, lightly abrade or scuff, then wipe before applying. I’ve seen the same patio look great for a decade with the right UV sealer and timely recoats — think of it like changing the oil on a car. If you want an indoor-polished look outside, remember that outdoor materials and maintenance are different from the interior polished floor example mentioned earlier.
FAQs Homeowners Ask About Sealing Stained Concrete
Sealing stained concrete is not a one-size-fits-all step; whether you need it depends on indoor vs outdoor use, high-traffic areas, moisture exposure, and whether the surface already has stain that could be altered, so sealing is beneficial in many cases but optional in others where breathability or a lighter finish is preferred. Choosing the right sealer—whether water-based, solvent-based, or penetrating—along with realistic coverage, cure times, and ventilation considerations helps you decide if you should seal now or plan for a future project.
Sealants can slightly alter appearance, sometimes darkening the color or enhancing the stain, so test a small patch to gauge the final look before applying to the whole surface and select a sheen (matte, satin, or gloss) that balances aesthetics with safety and maintenance. For safety and longevity, consider non-slip formulations or additives, and outline reseal intervals based on foot traffic, moisture, UV exposure, and cleaning practices, while paying attention to required surface prep, patch-testing steps, environmental conditions, and PPE requirements.
Quick Answers and Short Decision Guide
If the floor is indoors, low-traffic, and you want a clear shine, go with a water-based acrylic; if it’s a garage, driveway, or needs chemical and abrasion resistance, pick a solvent-based or a penetrating silane/siloxane. If you’re unsure, choose a penetrating sealer for outdoors and a water-based topcoat for interiors.
Before you buy anything, check base compaction, test for moisture, and clean the surface thoroughly. These quick checks tell you whether sealing will stick and last. If there’s residual moisture or loose material, fix that first — don’t seal over a problem and hope it holds.
Always test a small area with your chosen product and let it cure the full time listed on the label. Look for color change, gloss, and slip resistance. If the test patch passes, proceed; if not, switch products or address the issue you observed. Don’t skimp on prep or skip the patch — that’s how jobs fail.
When to Hire a Pro vs. DIY
If the job is small—think a patio under 200–300 sq ft and easy access—do it yourself. You can handle cleaning, etching, and one coat of sealer if the slab is flat and drains well. Save money and learn a skill on these straightforward jobs.
Hire a pro when the area is large, awkward to reach, or needs multiple coats and precise application. For anything over about 300 sq ft, steep slopes, heavy traffic zones, or interior areas where mistakes show, a contractor will save you time and headaches.
Also call a pro if the slab shows cracks, spalling, staining through the surface, or you need the base assessed—ask them to check base compaction and moisture levels. Specific hard triggers to stop DIY and call a professional: in-slab RH ≥75% (ASTM F2170), active hydrostatic pressure, structural movement/cracking, persistent adhesion failures on test patches, historic/heritage substrates, or when a job requires industrial equipment staged across large areas. If in doubt, get a pro assessment before spending on materials.
Appendix: Tools, Materials Checklist, and Quick Reference
This section presents a printable, reader-ready checklist that covers tools, materials, and quick test steps needed to plan and execute a staining-and-sealing project without color loss. It divides into clearly labeled Tools, Materials, and Quick Tests sections with space for date and batch numbers, plus checkboxes for easy on-site tracking. Designed for a compact, tape-friendly layout, it incorporates safety reminders, disposal guidelines, and minimalist design that remains readable at a workbench or on a bulletin board.
Having a concise, on-site reference streamlines preparation, reduces last-minute store runs, and helps verify compatibility before staining begins. The checklist guides readers through essential tests—surface moisture, pH/alkalinity, patch and adhesion tests, and curing timelines—so DIYers can prevent failures and rework. A sturdy, print-ready format keeps critical steps visible and promotes safer, more consistent results across indoor and outdoor projects.
Recommended Tools and Consumables
Here’s the short list of gear you actually need on the job. Nothing fancy — just what gets the job done, when you can rent instead of buy, and what will bite you if you skimp.
- Wool/nap Roller — Use for even coating on floors and walls; pick nap length to match texture (¼”–¾”). Cheap homeowner rollers are fine for small jobs; buy 2–3 so you can swap when clogged. Tip: a worn or wrong nap leaves streaks and trapped dust — that ruins adhesion.
- Trim Brush — For edges, corners, and touch-ups where a roller can’t reach. Get a 2–3″ angled synthetic brush for most coatings. Warning: a cheap floppy brush sheds bristles into wet coating — that’s permanent once cured.
- Airless Sprayer (optional) — Speeds large areas; look for ~2000–3000 psi and 0.017–0.023″ tip size for heavy coatings. Rent for big jobs; don’t buy unless you’ll use it often. Mis-tuned pressure or wrong tip overspray and creates poor film thickness and wasted material.
- Hand Pump Sprayer — For applying traction additives or primers in controlled amounts. Use a 1–2 gallon unit with a brass wand for chemical resistance. Tip: cheap plastic pumps can clog or blow apart with solvents — you’ll have a mess and uneven coverage.
- PPE: Respirator & Gloves — Half- or full-face respirator with proper cartridges and chemical-resistant gloves. Disposable masks won’t cut it for solvent fumes. Skimp here and you or your helper will pay with headaches or skin burns.
- Pressure Washer / Cleaner — Removes grease, laitance, and loose material before coating; 2000–3000 psi is typical. Rent a unit for one-off prep jobs. Under-cleaning leads to poor bond and early coating failure.
- Mixing Drill + Paddle — Ensures epoxy, primers, and additives blend uniformly; 500–800 RPM drill with a helical paddle works well. A cheap drill is fine for small batches; upgrade if you mix a lot. Mixing poorly leaves unmixed pockets that won’t cure or will weaken the layer.
- Traction Additive (silica grit) — Gives slip resistance when broadcast at the right rate; use aggregate sized for the finish you want (coarse for heavy traffic). Buy by the pound or bag; apply immediately to wet coating. Too much or too little ruins texture and may trap moisture, shortening coating life.
Pro tip: Rent the big ticket items (airless sprayer, pressure washer) and buy the consumables (rollers, brushes, grit). Pair a good mixer with a steady pump sprayer for fast, consistent work — and never skip the respirator when solvents are present.
Quick Troubleshooting Flowchart
Always start with a small test patch. Do the full prep, apply the product, and let it cure to the same conditions you expect for the rest of the surface. A quick patch tells you about color, sheen, and how the coating grips the substrate.
Observe two things: color/shade and traction/feel. If the color and sheen match and the surface isn’t slippery, proceed with your planned finish. If the surface is too glossy or slippery, either abrade and recoat with a matte topcoat or add a non-slip additive. If the color is off or blotchy, stop—clean or sand the substrate, prime if needed, and switch to thinner coats or a better stirring/mixing method.
If the patch peels or shows weak adhesion, do not cheat—remove the failed area, check base compaction and cleanliness, and fix any moisture or contamination problems before reapplying. Keep your recommended tools handy for proper prep and application; makes the fixes faster and less painful.

Conclusion
Sealing stained concrete a smart way to protect color and boost durability—done right, it preserves the look you want without turning your floors dull or slick. The core idea is simple: plan, test, and follow a clean, repeatable workflow so you can seal confidently without risking color shift or damage.
First, test in a small, inconspicuous area and note any color change, then pick a finish (matte, satin, or gloss) that matches your goals, make sure the surface is clean and dry, ventilate the area, and apply a thin, even coat in the recommended sequence. Ensure you wear the right PPE, follow cure times, and re-test after the sealer has set. If you see unexpected color changes or surface issues, back off and reassess before moving forward. Test first, thin, even coat, and proper ventilation should guide every step.
Common mistakes to avoid are skipping the test area, over- or under- applying sealers, and ignoring surface prep or curing times. Don’t rush the process or pile on product in one thick layer, and don’t ignore VOCs or indoor air quality. Always match the sealer to indoor/outdoor use, keep the surface clean and dry, and take precautions to prevent slipping during and after sealing.
If you’re working on a large area, dealing with moisture or stains you can’t fully control, or you’re unsure about the right product for your specific stain and environment, it makes sense to call a professional or consult the manufacturer for a trial kit and guidance. With careful prep, methodical testing, and steady application, you’ll finish with a protected, true-to-color surface—and the confidence to use it for years to come.
FAQ
What kind of sealer should I use to keep the color bright?
Choose a water- or solvent-based sealer that is specifically labeled for stained concrete. Look for low-sheen or matte options if you want to keep the color true. Avoid high-gloss sealers that will make the color pop too much and look fake.
Will sealing hide the stain or change its look?
If you apply the right sealer, the color will stay close to what you stamped or stained. Some sealers can slightly deepen the shade, but a good one won’t wash it out. Test a small area first to confirm you like the final look.
How do I prep the surface before sealing?
Let the stain cure fully according to the product instructions. Clean the surface thoroughly and remove dust, oil, and debris. A light etch isn’t usually needed unless the surface is very smooth or dusty.
What’s the easiest way to apply the sealer without streaks?
Apply thin, even coats with a high-quality roller or sprayer. Work in small sections and keep a wet edge to avoid lap marks. Don’t rush; multiple thin coats are better than one thick coat.