

Introduction
Overspray on exterior trim is when paint or coating lands beyond the intended edges, often causing runny lines and an uneven finish. Spraying can cover large areas quickly but risks drifting to adjacent surfaces, while brushing gives you more control at the edges. This article keeps it practical for DIY homeowners.
Smart masking is your best defense against overspray, using painter tape, plastic sheeting, and edge guards to shield nearby surfaces. Plan your masking before you start, test a small spot, and follow the tool and paint label directions for ventilation, drying, and cleanup. If you’re unsure about any rule or spec, check the manufacturer instructions or your local building guidance.
Key takeaways
- Spraying saves time but risks wider overspray on adjacent surfaces.
- Overspray on siding or bricks prevents proper film formation and adhesion.
- Prep steps include power washing, drying, and feathering edges before coating.
- Use edge seals, drop cloths, and containment to prevent airborne drift.
- Tools include brushes, rollers, sprayer with appropriate nozzles, masking tape and drop cloths.
- Wear respirator, maintain ventilation, and dispose of masking waste per local rules.
Table of Contents
- Introduction
- Key takeaways
- Quick Head-to-Head: Spraying Vs Brushing for Exterior Trim
- How Overspray Causes Paint Failures on Trim and Adjacent Surfaces
- Surface Preparation to Prevent Overspray-Related Failures
- Masking Smart: Containment and Edge Protection That Actually Prevents Failures
- Tools and Materials Checklist for DIY and Pro Trim Work
- Application Best Practices to Minimize Overspray Problems
- Common Failure Case Studies and Troubleshooting
- Safety, Cleanup, and Regulatory Considerations
- Conclusion
- FAQ
Quick Head-to-Head: Spraying Vs Brushing for Exterior Trim
Spraying offers speed and a smooth finish when the trim is large or detailed, but it can overspray onto adjacent surfaces. Brushing gives you precise control and edge definition for tight spots. Choose based on project size and the level of detail you can maintain without overcoating nearby areas.
Consider how comfortable you are with masking and the time it takes to prep and clean up. If you value rapid coverage for flat profiles, spraying may win. For complex trims or delicate edges, brushing can reduce the risk of overspray failures.
When spraying is the better choice
Spraying exterior trim paint can save you time and effort, especially when dealing with large runs of trim or full-house work. It gives a flatter, more consistent finish than brushing alone.
However, it comes with an increased risk of overspray. You’ll need to set up containment to keep paint off unwanted areas.
Spraying works best when you’ve got the right equipment and experience. It’s not recommended for small repairs or tight corners where control is crucial.
When brushing and rolling are preferable
Brushing and rolling exterior trim paint gives you more control over where the paint goes. It’s ideal for small repairs, tight corners, or delicate adjacent surfaces.
With hand application, you eliminate much of the overspray problem. Masking becomes simpler as well. You can take your time to ensure a neat, even finish.
Brushing and rolling is also a good option when you’re working on a small scale. It’s easier to set up and clean up than spraying equipment.
Hybrid workflows (spray + back-brush/roll)
Professionals often use a hybrid approach: spraying for speed, then back-brushing or back-rolling to ensure adhesion and cut in smooth edges. This minimizes visible spray texture.
Here’s how it works:
- Spray the trim with paint, focusing on covering the surface quickly.
- Before the paint dries, use a brush or roller to back-brush or back-roll, working the paint into the grain and ensuring even coverage.
This method combines the speed of spraying with the control of brushing. It’s particularly useful when you want a smooth finish but have large areas to cover.
How Overspray Causes Paint Failures on Trim and Adjacent Surfaces
Overspray can introduce contaminants and uneven film build on trim, which leads to adhesion issues later. Surface texture and finish can become mismatched if spray droplets settle where they shouldn’t. These problems are particularly risky on trim, where joints and profiles trap residual material.
Contaminants from overspray can interfere with the coating’s cure and performance. Improper film thickness on exposed edges can crack, peel, or fail to shed moisture. Understanding these failure modes helps you plan masking and prep more effectively.
Contamination and adhesion breakdown
Overspray can cause a world of trouble when it lands on unprepared surfaces. Those tiny droplets or fine mist can stick to tacky areas, interfering with your primer’s or topcoat’s ability to bond properly.
Here’s what happens: the overspray creates a weak layer that doesn’t adhere well. When you apply your paint, it struggles to stick to this contaminated surface. Over time, you’ll see peeling or delamination – fancy words for flaking and chipping.
Prevent this: Keep surfaces clean and free of contaminants before painting. Use painter’s tape and drop cloths to protect nearby areas during spraying.
Excess film thickness, runs, and sags
Overspray can build up on your trim, causing problems you don’t want. Too much paint in one spot leads to thick areas that sag or run down the surface.
Vertical edges are especially tricky. They’re like little paint magnets, attracting overspray and creating drips. When this happens, your once-smooth finish turns into a bumpy, uneven mess.
Avoid this: Keep your spray nozzle at a consistent distance from the surface. Use even, steady strokes. If you see runs or sags forming, stop and let it dry before sanding and recoating.
Cross-contamination between incompatible coatings
Overspray can transfer from one surface to another, causing issues you might not notice right away. The problem? Different paints have different chemistries.
Let’s say you spray some oil-based paint onto your trim. Overspray lands on nearby surfaces coated with latex paint. Now, those two incompatible coatings are mixed together. This can cause all sorts of problems – discoloration, peeling, or even a complete coating failure.
Check before spraying: Always ensure the paints you’re using are compatible. Read the labels and manufacturer guidelines. If you’re unsure, ask your local paint store for advice.
Surface Preparation to Prevent Overspray-Related Failures
Start with a thorough cleaning to remove dirt and oils that overspray might carry. Deglossing and light abrasion help create a receptive surface for primers and coatings. Confirm substrate compatibility and primer compatibility to avoid delamination later.
Feather edges where old paint ends and new work begins, so the new coat can blend without ridge lines. Check the manufacturer instructions for any special surface preparation requirements. If in doubt, verify through the label or data sheet before proceeding.
Cleaning, deglossing, and contaminant removal
Start by removing any dirt, oils, or chalk from your trim. A pressure rinse can help with this. For tougher spots, use a detergent wash.
If there’s still residue left behind, use solvent wipes to remove it. Be sure to follow safety guidelines when using solvents.
Allow surfaces to fully dry before applying any coatings. This could take anywhere from 24 to 48 hours depending on humidity levels.
Sanding, feathering, and creating a paintable profile
Feather the edges of your trim where it meets other surfaces. This helps to prevent overspray from getting trapped in rough edges.
Sand any sharp profiles on your trim to give your paint something to grip onto mechanically. A 120-grit sandpaper should do the trick.
Remove any loose material or dust from your trim with a tack cloth before painting.
Primer selection and compatibility checks
Before applying primer, check the manufacturer’s tech data sheets to ensure it’s compatible with your topcoat. This will help prevent any adhesion issues down the line.
If you’re unsure about a product or substrate, do a small adhesion test in an inconspicuous area. Apply the primer and let it dry according to the manufacturer’s instructions. Then, apply a small amount of your topcoat and see if it adheres properly.
Remember, prevention is better than cure. A little extra work upfront can save you a lot of trouble later on.
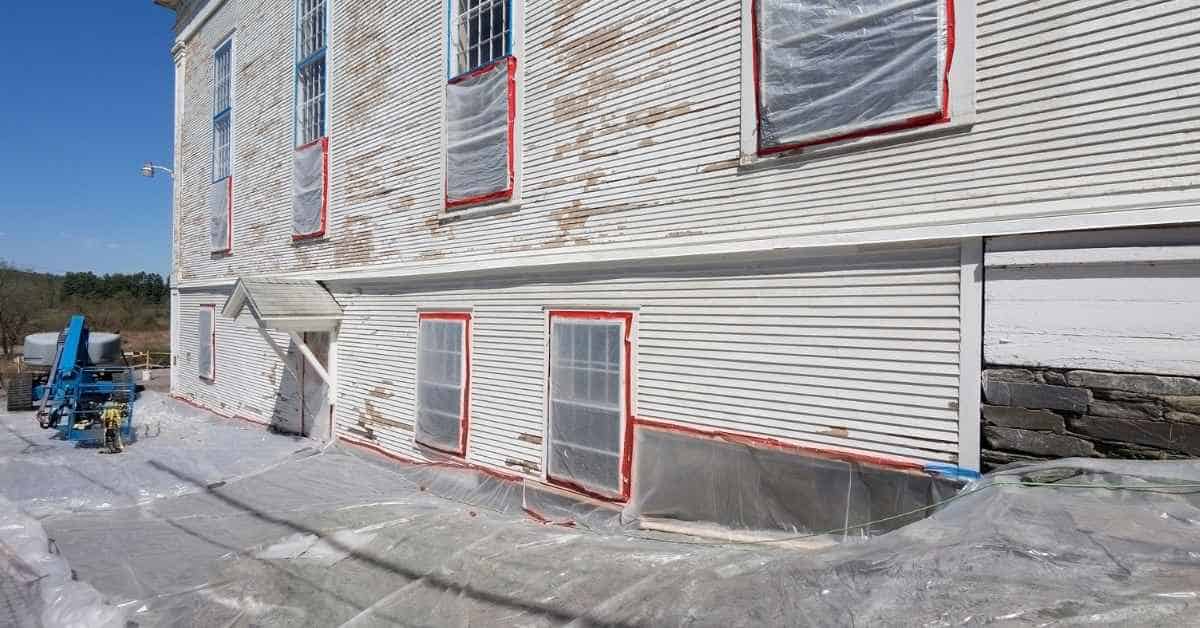
Masking Smart: Containment and Edge Protection That Actually Prevents Failures
Plan masking in logical sequence: protect windows, hardware, and landscaping first, then shield larger surface areas. Use barriers that match the shape of the trim and create clean edge lines. Focus on controlling edge bleed where spray can wrap onto adjacent surfaces.
Select masking materials that resist solvent attack and stay in place during cleanup. Tape, film, and edge guards should be used in combinations that suit the trim profile. Always verify product instructions for surface compatibility and removal guidance.
Masking windows, doors, and hardware
Start by cleaning all surfaces to remove any dirt or grease. This ensures your masking tape adheres properly.
Use low-tack tape for delicate glazed units. Apply it along the edges of the glass, pressing down firmly to create a good seal. For metalwork like door handles and hinges, use backing paper or film to protect them from overspray.
Avoid using regular masking tape on delicate finishes as it can leave adhesive residue behind.
Creating clean break lines and straight edges
For a crisp paint line, use tape-backed metal strips along the edge of your trim. Press down firmly to create a good seal.
Trim guards can be used on corners or where two surfaces meet at an angle. They prevent overspray from getting onto adjacent surfaces.
If you’re spraying a large area, consider using a pre-mask jig. This ensures your tape is applied straight and evenly, giving you a clean edge every time.
Containment for large areas and wind control
For large spraying jobs, set up temporary barriers using plastic sheeting or tarps. This contains the mist and prevents it from drifting onto other parts of your property.
Wind can cause overspray, so use wind screens to protect exposed areas. Position them downwind of your spraying area.
Work in sections, masking off one area at a time. Once you’ve finished spraying that section, move on to the next. This minimizes exposure and makes cleanup easier.
Tools and Materials Checklist for DIY and Pro Trim Work
List the core tools for spraying, brushing, and masking, plus extra blades or tips if you’re switching methods. Include protective gear and cleanup supplies so you can work safely and efficiently. Check each item against manufacturer guidance before use.
Keep a basic supply of primers, topcoats, and compatible sealants that match your substrate and climate. Have masking materials and surface cleaners on hand to quickly address any overspray during the job. Always confirm compatibility via the product label or data sheet.
Sprayer types and key setup considerations
Before you start spraying, ensure your sprayer is set up right. Here’s a quick checklist.
- Airless sprayer: Ideal for thick coatings. Check manual for tip size (0.015″ – 0.021″ for trim).
- HVLP sprayer: Good for thin coats, less overspray. Use 1.8mm – 2.4mm tips.
- Pressure: Follow manual. Too high = overspray, too low = poor coverage.
- Nozzle distance: Keep consistent (6″ – 10″) for even coat.
- Gun angle: Hold at 45° to the surface. Avoid spraying upwards.
- Tip condition: Inspect for wear or clogs. Replace if needed.
- Filter: Use appropriate filter (10 – 30 micron) to prevent clogging.
- Hose length: Longer hoses = more flexibility, but can cause pressure drop.
Quick rule: Always follow the manufacturer’s guidelines for your specific sprayer and coating.
Brushes, rollers, and applicators for trim
Choose the right tools for smooth trim work. Here’s what to consider.
- Trim brush: Angled sash brush (1″ – 2.5″) for tight spaces. Synthetic or natural?
- Roller nap: 3/8″ – 1/2″ nap for smooth surfaces. Avoid high-nap rollers on trim.
- Back-brushing: Use a smaller brush (1″ – 1.5″) to back-roll and remove excess paint.
- Synthetic bristles: Good for water-based paints. Won’t absorb water like natural bristles.
- Natural bristles: Better for oil-based paints. Holds point better but can dry out.
- Applicator pad: Use for corners and tight spots. Synthetic or foam.
- Tape handle: For comfort during long painting sessions.
- Brush condition: Inspect bristles for wear or splaying. Replace if needed.
Quick rule: Match brush/roller size to trim width for best results.
Masking materials and consumables
Proper masking prevents overspray and ensures clean lines. Here’s what you need.
- Painter’s tape: 1″ – 2″ width. Blue tape for outdoor use, less sensitive to temperature changes.
- Masking film: Use for large areas or windows. UV-resistant for outdoor work.
- Paper: For floor and drop cloths. Heavy-duty for better protection.
- Clamps: Hold masking in place, especially on windy days.
- Edge guards: Protect edges from overspray. Use with tape or film.
- Fasteners: Zip ties, staples, or tacks to secure masking materials.
- Masking liquid: For sealing edges of paper and preventing fraying.
- Scissors/utility knife: To cut tape and film to size.
Quick rule: Always test masking materials on a small area first. Some can damage surfaces if left too long.
Application Best Practices to Minimize Overspray Problems
Develop a simple workflow: prep, mask, apply, and inspect, then touch up as needed. Maintain consistent technique with steady hand motion or even spray patterns to avoid drips and sags. Pause to check for edge coverage and adjust settings if you’re brushing, to keep uniform coating.
Coordinate spraying and brushing with weather conditions, and plan for rapid cleanup to prevent coating curing on unintended surfaces. Use gradual passes and maintain proper distance to reduce drift. When in doubt, review the coating’s application guidance.
Spraying technique and sequencing
When spraying exterior trim, consistency is key. Maintain a steady overlap of about 50% to avoid runs and ensure even coverage.
Control your trigger pulls. Start with the nozzle off the surface, pull the trigger, and then bring it onto the work. Release the trigger when you lift it away.
Maintain a steady travel speed, typically around 8-10 inches per second. This helps keep the paint film even and prevents misting.
Always spray from top to bottom, starting at the highest point of your trim work. This allows gravity to help you achieve better coverage and reduces drips.
Brushing and back-rolling technique for trim
When brushing, use long, smooth strokes in the direction of the grain. Maintain a wet edge to avoid lap marks.
After applying paint with your brush, use a roller to back-roll. This helps to even out any brush marks and ensures an even film. Apply light pressure and work in small sections at a time.
For sprayed surfaces, back-rolling is especially important. It helps to ensure better adhesion and a more uniform finish.
Remember, less is more with brushing. Don’t overwork the paint or you’ll end up with brush marks and a uneven surface.
Dry times and layering strategy
Always follow the manufacturer’s recommended recoat window. Rushing your paint job can lead to poor adhesion, sagging, and other surface defects.
Instead of applying one heavy coat, opt for multiple thin coats. This allows each layer to dry properly and prevents excess material from pooling or running.
Before applying the next coat, lightly sand the surface with fine-grit sandpaper to remove any raised grain. Wipe off dust with a damp cloth and let it dry before proceeding.
By following these guidelines, you’ll achieve a smooth, even finish that lasts.
Common Failure Case Studies and Troubleshooting
Consider a scenario where overspray caused staining on a nearby sill or siding. Diagnose whether contamination or improper film build contributed to the failure and outline corrective steps. Use these cues to refine masking and prep for future projects.
Another case might involve edge-peeling where even coverage was achieved but adhesion failed at joints. Identify root causes such as substrate mismatch or incompatible primers, and document corrective actions. Use this knowledge to improve edge control and surface readiness.
Case: Overspray Adhesion Failure on Adjacent Siding
Ever seen your trim paint peeling off like wallpaper? That’s likely overspray contamination causing adhesion loss. Here’s how to fix it:
Diagnose: Check for any paint residue or dust on the siding before painting. If present, that’s your culprit.
Remediate: Strip off or scuff-sand the contaminated area. Re-prime with a good quality primer to seal and promote adhesion. Then, recoat with proper containment measures in place, like using low-tack masking tape and drop cloths.
Case: Mottled Sheen or Texture Mismatch After Spot Spraying
Spot spraying can leave a mottled sheen or texture mismatch. Here’s how to fix it:
Feathering: If the area is small, feather the edges with a brush to blend into the existing paint.
Blending/Re-coating: For larger areas, you might need to blend or re-coat the entire panel for a uniform appearance. Resist the temptation to keep spot spraying; it’ll only make it worse.
Full Re-spray: If visibility is an issue, bite the bullet and re-spray the entire section. It’s the only way to ensure a uniform appearance.
Post-Application Visual Inspection Checklist
Before you call it a day, inspect your work. Catching problems early saves time and money.
- Uniform Sheen: Check for consistent sheen across all surfaces. Inconsistencies could mean missed spots or over-sprayed areas.
- Consistent Edge Lines: Ensure edges are straight and clean. Any waviness might need touching up.
- Absence of Dust Nibs: Look for tiny paint bumps caused by dust. They’re hard to spot but easy to fix with a light sanding.
- No Runs or Drips: Check for any runs or drips, especially on vertical surfaces. They’ll need to be touched up.
- Masking Edges: Ensure masking edges are clean and paint hasn’t seeped underneath.
- Hardware Check: Make sure no paint has gotten onto hardware like hinges or knobs.
- Dry Time: Check that the paint is dry to the touch before removing tape or drop cloths.
- Overall Appearance: Step back and look at your work. Does it look uniform and professional?
Quick Rule: If you find any issues, fix them immediately. It’s much easier now than waiting for the paint to cure.
Safety, Cleanup, and Regulatory Considerations
Wear appropriate PPE and follow safe handling practices for coatings and solvents. Plan for proper disposal of overspray residues and used masking materials. Always consult the SDS and local regulations for environmental controls.
Keep cleanup steps clear: remove masking carefully, ventilate as required, and dispose of waste according to rules. Verify any local environmental requirements that may affect how you manage coatings and cleanup waste.
Personal protective equipment and respiratory protection
Safety first, buddy. You’re dealing with chemicals here.
- Eye Protection: Safety glasses or goggles to keep paint out of your eyes. Some sprays can cause irritation or even chemical burns.
- Skin Protection: Long sleeves and gloves to protect your skin from direct contact with the paint. Some paints can be absorbed through the skin.
- Respiratory Protection: A respirator matched to the coating chemistry. Check the product’s Safety Data Sheet (SDS) for recommendations. In high-dust or low-ventilation conditions, use a P100 filter or higher.
- Hearing Protection: Earplugs if you’re using power tools nearby. Paint sprayers can be loud.
- Optional: Tyvek Suit ($25-$40): For full-body protection, especially when spraying large areas or in windy conditions.
Environmental rules, VOCs, and permit considerations
Check local regulations before you start. You don’t want to be breaking any rules.
VOC Limits: Some areas have limits on the amount of volatile organic compounds (VOCs) in exterior coatings. Check with your local air quality district.
High-wind or populated areas might need permits for exterior spraying. Contact your city or county building department to find out.
Always follow manufacturer instructions and SDS guidelines for safe application, storage, and disposal of materials.
Cleanup, storage, and waste disposal
Proper cleanup keeps your tools in good shape and prevents waste. Follow these steps:
Clean Sprayers: Rinse with water immediately after use, then clean with the manufacturer’s recommended cleaner. For latex paints, soap and water usually do the trick.
Store Leftover Paint: Seal tightly and store in a cool, dry place away from heat sources. Most paints last up to a year when stored properly.
Dispose of Solvent Wastes and Contaminated Rags: Check local regulations for solvent waste disposal. Some areas require special handling or collection services. Never pour solvents down the drain. For rags, let them dry completely before disposing in regular trash. If they’re heavily contaminated, treat as hazardous waste.
Conclusion
Protecting trim, adjacent surfaces, and your surfaces starts with choosing the right method, testing on a hidden spot, and masking precisely so overspray can’t ruin the job or your curb appeal. This work pays off in a durable finish and a safer, cleaner site.
Now, move forward with a simple sequence: assess the area and choose brushing or spraying based on roughness and reach, prep and clean the surface, mask edges and nearby surfaces thoroughly, apply in controlled passes with steady speed, inspect as you go, and cleanup with a clear plan for disposal and harboring wash water. Test any new technique on a small area first, then scale up, and keep coverage even with consistent technique and a clean tool setup.
Avoid these pitfalls: don’t skip masking or edge protection, don’t rush through surface prep or cleanup, and don’t stay on one spot too long or overapply. Always wear eye and skin protection, keep an exit path clear, and verify you’re using materials and tools within the project’s safety and regulatory guidelines. If you’re unsure about edge protection, weather conditions, or the correct product for the surface, pause and double-check before proceeding.
If the project involves complex surroundings, untested substrates, or you’re near electrical or landscaping that can’t tolerate mist, consider bringing in a pro. With clear prep, steady technique, and careful masking, you’ll finish with durable trim that looks sharp and lasts. You’ve got this—start with a small test patch, then proceed with deliberate, safety‑first steps.
FAQ
When should I choose spraying versus brushing for exterior trim?
Spraying can cover fast, but it’s easy to overspray. Brushing gives you control on sharp edges and small details. Pick brushing for tight corners or delicate edges; spraying when you need speed and can properly mask and control overspray.
How does overspray cause failures on trim and nearby surfaces?
Overspray can leave thin film, miss spots, or cause adhesion problems on adjacent surfaces. It can also trap moisture under the finish if the spray isn’t cut in or cleaned off properly. Check the prior coating and edge areas for any signs of mist or ghosting after a pass.
What masking practices actually prevent overspray without slowing me down?
Mask large areas first, then tape edges tight along trim lines. Use drop cloths or plastic on the ground and vertical surfaces to catch drips. Remove masking as you finish each section to avoid peeling fresh paint later.
What common mistakes lead to paint failure on exterior trim after spraying?
Skipping surface prep or not sealing porosity can cause peeling. Not using a compatible primer or sealer under the paint can fail adhesion. If you notice dull spots, runs, or edge bleed, stop, assess edge protection, and recoat after proper cure and edge touch-up.