
Introduction
Concrete etching gone wrong means a surface that has been over-etched or uneven, requiring neutralizing and surface recovery.
This intro covers surface preparation before etching, how to apply the corrective solution, and what comes after. Always follow the product label and your local rules for handling chemicals.
After etching, neutralize the surface as directed by the manufacturer and rinse thoroughly before moving on. Then focus on cleanup and disposal, protecting nearby areas and choosing safe, compliant methods. If unsure about steps or requirements, check the label, instructions, or local codes and adjust accordingly.
Key takeaways
- Inspect surface for moisture, cracks, and loose particles before etching begins.
- Test small area after neutralizer to gauge reaction and avoid over-etching.
- Follow manufacturer instructions for neutralizers; never mix concentrates without guidance.
- Use proper personal protective equipment and ventilate work area during processing.
- Rinse and neutralize evenly; work in passes to prevent streaks.
- Dispose of residual liquids according to local rules and container labeling.
Table of Contents
- Introduction
- Key takeaways
- Immediate Steps and Safety When Etching Fails
- Assessing the Damage: Tests and Visual Checkpoints
- Neutralizers Explained and Effectiveness Comparison
- Surface Preparation Before Neutralization
- Neutralization Application Methods and Safe Mixing Guidance
- Post-Neutralization Recovery: Rinse, Clean Tools, and Prepare for Repairs
- Disposal, Storage, and Environmental Compliance
- Project Planning, Costs, and Common Mistakes to Avoid
- Conclusion
- FAQ
Immediate Steps and Safety When Etching Fails
Etching mishaps require fast hazard recognition and containment. Start with a quick hazards assessment to identify chemicals, fumes, and any skin or eye exposure risks. If risks are present, pause the project and notify nearby crew.
Have the right PPE ready—gloves, eye protection, and a respirator if fumes are possible—and locate an eyewash or shower and spill kit. Contain the area, shut down ventilation if it’s safe, and ensure fresh air exchange to limit exposure. Follow a simple triage: flush exposed skin/eyes with water, change contaminated clothing, and move the person to a safe area while monitoring symptoms. Document what happened and decide who coordinates cleanup and neutralization before resuming work.
Personal protective equipment and ventilation
Safety first. Gear up before tackling any etching mishap.
- Gloves: Chemical-resistant, not just work gloves. $10-$20 a pair.
- Eye protection: Goggles or face shield. Protect eyes from splashes and fumes. $5-$15.
- Respirator: If fumes are present, use a respirator with P100 filters. $20-$40 plus filters.
- Ventilation: Use fans to blow fumes away from work area. Portable job site fans, $30-$50 each.
- Optional – Air scrubber: Rental option for heavy fume situations. Around $100/day.
Containment and isolating the affected zone
Stop etching, halt work in the area. Contain the mess before it spreads.
Runoff: Use absorbents or containment booms to catch any runoff. $20-$50 per pack.
Tracking: Lay down plastic sheeting at zone entrances. Prevents tracking chemicals elsewhere. $10-$30 per roll.
Nearby surfaces/drains: Protect with more plastic sheeting or cardboard. Keep chemicals off nearby areas and drains until cleanup.
Assessing the Damage: Tests and Visual Checkpoints
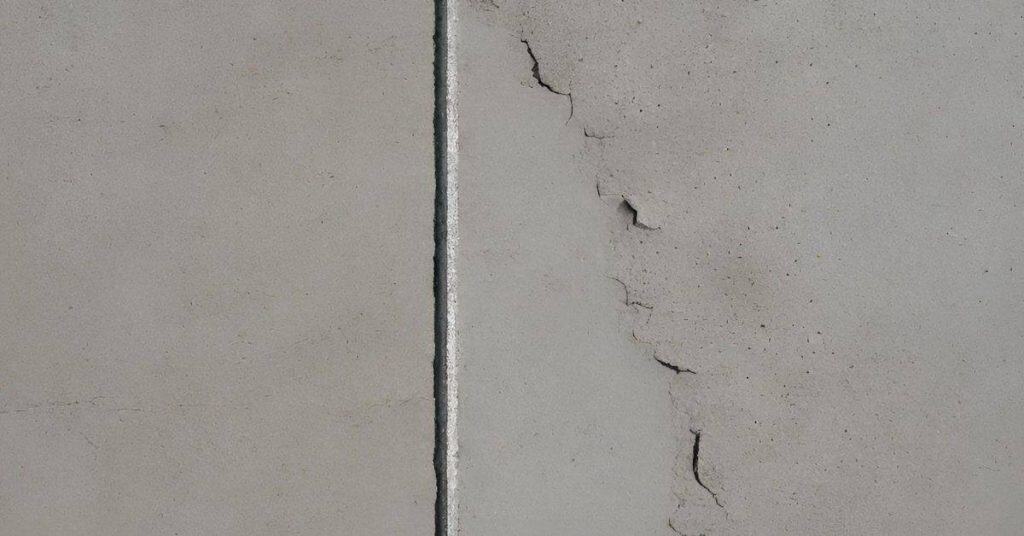
Start with visual checks for gloss loss, dull patches, pitting, or roughness to gauge etching severity. Look for uneven patterns or areas that stand out compared to the surrounding concrete. Note all trouble spots for later mapping.
Use quick tests to judge depth and residue: a simple water absorption check, a drag test with a gloved finger for smoothness, and a light brushing to see residue after cleaning. Check pH readiness before neutralization using a simple test patch or strips. Record results by area and flag zones that may require professional input.
Visual checkpoints and pH/residue spot checks
Before you start any treatment, use this checklist to assess your concrete’s condition.
- Gloss loss: Check for areas where the gloss is missing or reduced. This could indicate etching.
- Dull or frosted patches: Look for areas that appear dull or have a frosty texture. These are signs of etching.
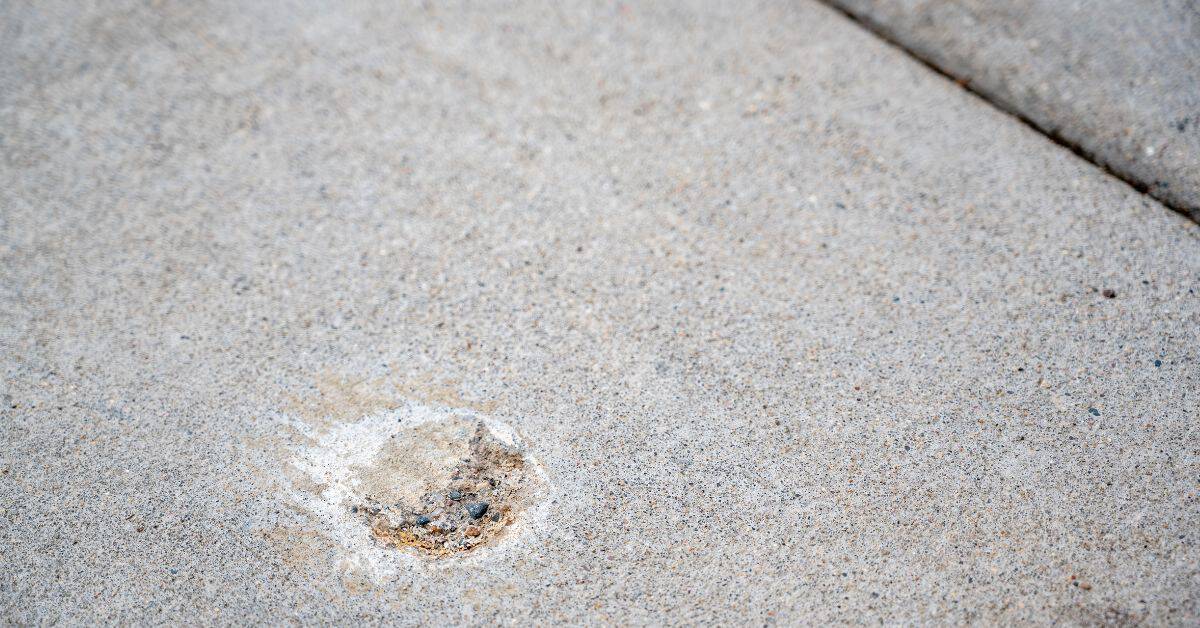
- Pitting: Inspect for small holes or pits in the surface. Deep pitting may require professional assessment.
- Roughness: Feel the surface with gloved hands to check for roughness, which could be due to etching.
- Uniformity of etching: Check if the etching is uniform across the floor or if there are isolated patches.
- pH test (acidic residue): Use pH test strips on a small, hidden area. If it reads below 7, acidic residue may be present.
- Wipe test (alkaline residue): Wipe the surface with a damp cloth. If it feels slimy or leaves a residue, alkaline residue might be present.
- Discoloration: Check for any discoloration, which could indicate laitance or old sealers.
- Flaky laitance: Gently brush the surface. If it flakes off easily, there’s likely laitance present.
Quick rule: Always perform these checks before starting any treatment to avoid making issues worse.
Salvage vs. replacement decision factors
Use this checklist to decide whether you can salvage your concrete or need to replace it.
- Etch depth: Measure the depth of etching. If it’s more than 1/8 inch, replacement might be necessary.
- Cracking: Check for cracks. Hairline cracks can often be repaired, but wider ones may require replacement.
- Efflorescence: Look for white, powdery deposits on the surface. This could indicate moisture-related issues that might need professional assessment.
- Moisture content: Perform a simple water absorption test. If the concrete absorbs too much water, it may be too damaged to salvage.
- Structural integrity: Check for any signs of structural damage, such as delamination or crumbling. If present, replacement is likely needed.
- Final finish goals: Consider what you want the final surface to look like. Some treatments may not be able to achieve your desired finish.
- Budget: Replacement can be costly. Consider if it’s more affordable to salvage and treat the concrete instead.
- Time constraints: Replacement takes time. If you need a quick solution, salvaging might be better.
Quick rule: Always consider both the condition of your concrete and your personal goals and resources when making this decision.
Neutralizers Explained and Effectiveness Comparison
Explain what each neutralizer does: acids or acid-neutralizing products stop ongoing etching, while baking soda approaches raise pH to halt acid activity. Separate the chemistry from everything left on the surface as residue. This helps decide if you need surface cleanup in addition to neutralization.
Residue profiles matter: laitance, calcium carbonate, and organic films affect bonding. Describe how different neutralizers interact with these residues and how rinsing or buffering steps influence readiness for the next coat. Include practical outcomes like pH shifts and appearance changes to set expectations.
How neutralizers chemically work
The job of a neutralizer is to balance the pH of your concrete surface, making it neither too acidic nor too alkaline. This is crucial before applying any sealers or coatings.
Acidic residues from etching lower the pH, while alkaline residues raise it. Neutralizers work by reacting with these residues and converting them into a neutral state (around 7 on the pH scale).
Citric/sour acids and acid-neutralizing products reduce surface acidity, stopping ongoing etching. Meanwhile, baking soda-based solutions raise the pH to halt acid activity.
Choosing between DIY and commercial neutralizers
When selecting a neutralizer, consider your concrete’s condition. For light etching, DIY solutions like baking soda or vinegar might suffice. But for heavy etching, opt for commercial products designed for the job.
Think about environmental impact too. DIY solutions are often eco-friendlier but may require proper disposal of acidic residues. Commercial products usually come with clear disposal instructions.
Ease of use is another factor. DIY solutions can be messy and time-consuming, while commercial products often have clear application guidelines and better penetration depths.
Always follow manufacturer guidance for the best results. If unsure, test a small area first to ensure compatibility with your concrete’s type and condition.
Surface Preparation Before Neutralization
Clear, clean baseline is essential so neutralizers work predictably. This reduces the chance of unexpected reactions after neutralization. A thorough clean is the foundation for a solid recovery.
Identify contaminants such as grease, cured films, laitance, dust, and old coatings. Assess the surface by sight and feel, and check porosity or moisture to gauge cleaning difficulty. Plan degreasing and mechanical cleaning, then rinse and verify cleanliness before moving on.
Degreasing and removing surface laitance
Before neutralizing, you must remove all oils, greases, and loose material from the concrete surface. These contaminants can interfere with neutralizers and cause unpredictable reactions.
Degreasers: Use a detergent-based degreaser or a low-tox solvent to break down grease and oil. Apply it liberally, let it soak for 10-15 minutes, then scrub.
For surface laitance – that loose, powdery layer on fresh concrete – use a stiff-bristled broom or a light wire brush to remove it mechanically. Be careful not to damage the surface.
Preliminary testing and coverage estimation
Before applying neutralizer across your entire surface, perform a small-area test. This helps confirm your chosen neutralizer works as expected and calculates how much product you need.
Choose an inconspicuous spot or a small section of the affected area. Apply the neutralizer according to its instructions, then observe for any adverse reactions. If it performs well, estimate your total area needing treatment.
Coverage: Calculate coverage based on the test area’s size and the time taken for the neutralizer to work. For example, if a 1 sq ft test area took 30 minutes to neutralize, a 20 sq ft area would take approximately 600 minutes (or about 10 hours). Adjust your estimate based on any variations in surface condition.
Neutralization Application Methods and Safe Mixing Guidance
Put safety first with PPE, ventilation, and careful handling of acids and neutralizers. Have a spill plan and know how to protect skin and eyes. This keeps the work area safer for everyone on site.
Always verify dilution instructions on the product label and look for any color or pH targets that confirm neutralization. Use a sequence that favors even coverage: apply, then rinse, then recheck before proceeding to the next area. Keep dwell times reasonable and avoid overly thick films that trap moisture or create slick spots.
Dilution checks and safe-range guidance
Always follow the manufacturer’s dilution ratio on the product label. If unsure, test a conservative lower concentration on a hidden area first.
Neutralizers are typically diluted with water at ratios like 1:4 or 1:8. But each product is different, so always check.
Consult the product’s Safety Data Sheet (SDS) for safety details and proper handling procedures.
Application techniques: spray, scrub, and dwell time
Apply neutralizer using a low-pressure sprayer, mop with agitation, or hand-scrub. Each method has its pros and cons:
Spraying is quick but may leave residue in hard-to-reach areas. It’s best for large surfaces.
Mopping ensures even coverage but can be labor-intensive. It’s good for medium to large areas with even surfaces.
Hand-scrubbing is ideal for small, intricate areas or where thorough agitation is needed. It’s time-consuming but effective.
Dwell time varies by method and surface condition. Generally, allow 15-30 minutes for spraying, 20-40 minutes for mopping, and 30-60 minutes for hand-scrubbing. Agitate the solution occasionally to ensure even contact.
Post-Neutralization Recovery: Rinse, Clean Tools, and Prepare for Repairs
Outline clear rinsing steps after neutralization, including how much water to use, expected dwell, and temperature considerations to avoid reactivating residues. Ensure all surfaces are free of active residues before patching or coating. Document the rinse process for traceability.
Explain how to verify a stable pH and what tool to use, then describe safe cleaning of sprayers, brushes, and trowels to prevent cross-contamination. Include surface prep steps like laitance assessment and possible profiling before repairs and coatings.
Rinsing, testing, and ensuring no residue remains
Thorough rinsing is crucial after neutralization to remove all residues and prevent contamination. Use clean water at a comfortable temperature (around 60-80°F or 15-27°C).
Apply water evenly across the surface using a hose with a spray nozzle, ensuring no puddles form that could lead to uneven rinsing. Let it dwell for about 5 minutes before rinsing again to ensure all residues are removed.
Retest the pH or residue levels after rinsing. Use colorimetric test strips or a pH meter to confirm the surface is neutral (pH 7). If readings are still high, rinse and retest until neutrality is achieved. Once the surface is clean and neutral, it’s ready for the next step.
Cleaning tools and equipment after use
Proper cleaning of your tools ensures they’re safe to use again and prevents cross-contamination. Here’s how:
- Brushes: Rinse thoroughly under running water, then scrub with a stiff brush in clean water to remove any remaining residue. Neutralizer solution can be reused for this step.
- Sprayers: Disassemble and rinse all parts (nozzles, filters, etc.) in clean water. Use a bottle brush or pipe cleaner to scrub the interior. Dispose of used neutralizer solution responsibly.
- Rinsing equipment (hoses, nozzles): Rinse thoroughly with clean water until no residue remains. If possible, use separate hoses for rinsing and neutralizer application to avoid cross-contamination.
- Trowels and floats: Scrape off excess material, then rinse under running water. Use a wire brush or scraper to remove any remaining residue. Neutralizer solution can be reused for this step.
- Optional: Pressure washer (rentable): A pressure washer can speed up the cleaning process. Rent one for around $50-$100 per day, depending on your location. Use it to blast clean water at high pressure onto tools and surfaces to remove residue.
Disposal, Storage, and Environmental Compliance
Describe disposal paths for unused neutralizer, spent rinse water, and contaminated absorbents, and point readers to the product SDS and local rules. Emphasize checking with local authorities to determine whether materials are hazardous waste. Document approvals before disposal.
Cover storage basics: labeled containers, secondary containment, and segregation from incompatible chemicals. Outline spill containment and cleanup steps, plus a simple compliance log to track disposals and updates from suppliers or regulators.
Handling and disposing of rinse water and residues
After neutralizing, you’ll be left with rinse water and residue. Here’s how to handle and dispose of these safely:
Containment: Collect rinse water in sealed containers or use a containment tray around the work area to prevent leaks into soil or storm drains.
Testing: Before disposal, test the pH of your rinse water. Neutralized concrete should have a pH between 6 and 9. If it’s outside this range, adjust with appropriate chemicals before disposing.
Disposal: Rinse water can often be disposed of in municipal sewers if diluted properly and tested within acceptable limits. However, residues may be hazardous waste. Contact your local waste authority for guidance on disposal pathways and regulations.
Shelf life and storage best practices
Proper storage extends the shelf life of your neutralizers. Here’s how to store them:
Temperature: Store in a cool, dry place away from direct sunlight. Extreme heat can degrade chemicals.
Sealed containers: Keep neutralizers sealed tightly when not in use to prevent contamination and moisture absorption.
Check shelf life: Always verify the product’s shelf life on its label or Safety Data Sheet (SDS). Don’t rely on assumed timeframes. If unsure, contact the manufacturer for guidance.
Project Planning, Costs, and Common Mistakes to Avoid
Offer a simple framework to weigh materials, labor, and downtime against the expected recovery outcome. Keep expectations realistic and document potential savings from DIY vs professional work. Use a straightforward cost view to guide decisions.
Lay out a practical workflow: assessment, testing, cleaning, neutralization, repairs, and finish. List common missteps to avoid, such as skipping tests, over- or under-neutralizing, and underestimating downtime. Provide criteria to decide when to DIY or hire a pro and what warranty considerations to discuss.
Cost considerations and decision checklist
Before you start, use this checklist to estimate costs and decide between DIY recovery or hiring a professional.
- Materials: Estimate quantities of neutralizer, repair materials, and test supplies. Don’t forget to add 10-15% for waste and spills.
- Equipment rental: Calculate costs for tools like sprayers, scrubbers, and safety gear. Some may be available from home improvement stores or local rental shops.
- Labor (DIY): Consider your time and effort. If you’re inexperienced, it might take longer than expected.
- Labor (Professional): Get quotes from contractors. Compare rates and services.
- Downtime: Estimate how long the surface will be out of use during recovery. This could impact your daily routine or business operations.
- Mitigation costs: Consider potential damages if not addressed promptly, like further etching or structural issues.
- ROI/Payoff (DIY): Compare DIY costs with professional quotes. If the difference is significant, consider doing it yourself.
- Warranty and documentation: Check if professionals offer warranties on their work. Also, document your project progress for future reference or to provide to contractors if needed.
Quick rule: If the cost difference between DIY and professional is minimal, consider hiring a pro for peace of mind and expertise.
Tools and materials checklist
Before you start neutralization and recovery, ensure you have all the necessary tools and materials at hand.
- Neutralizer: Choose a suitable neutralizer based on your surface type (concrete, brick, etc.) and etching severity. Follow dilution guidelines to avoid under- or over-neutralization.
- Test supplies: pH test strips or paper to monitor neutralization progress and ensure no residue remains after rinsing.
- PPE: Safety glasses, gloves, respirator (if using strong chemicals), and protective clothing to safeguard against chemical exposure and splashes.
- Surface repair materials: Concrete patch mix, sealant, or other surface-specific repair products. Ensure they match your existing surface for a seamless finish.
- Application tools: Sprayers, scrub brushes, or rollers for applying neutralizer and repairs. Consider using extension handles for hard-to-reach areas.
- Safety equipment: Ladders or scaffolding for high surfaces, drop cloths to protect surrounding areas from spills, and proper ventilation if working indoors.
- Cleaning supplies: Degreaser, scrub brushes, and a pressure washer (if available) to clean the surface before neutralization and repair.
- Testing equipment: Moisture meter or hygrometer to ensure the surface is dry enough for repairs. Concrete testing hammer to check for soundness.
Quick rule: Always prioritize safety first. Ensure you have proper PPE and follow manufacturer guidelines when handling chemicals.
Conclusion
Neutralizing the etch is where durability and appearance hinge. Do the steps with care, and you protect the surface from further damage while keeping you and the crew safe.
Test a small patch first, wear proper PPE, follow the neutralizer label, mix and apply as directed, watch the surface for the expected reaction, rinse thoroughly, let the floor dry, and then evaluate repairs and disposal. Do this in a steady sequence, one step at a time, and keep it simple.
Common mistakes are rushing, using the wrong neutralizer or mixing approach, or skipping the rinse and clean-up. Protect yourself by wearing eye protection and gloves, only work in good ventilation, and always dispose and store materials according to local rules and manufacturer guidance.
If you see wide cracking, heavy surface damage, uncertain chemical exposure, or you’re unsure about disposal rules, call a professional. Stay practical, stay safe, and you’ll keep the project on track and the surface ready for the next repair step. You’ve got this.
FAQ
How should I prep the surface before applying an etching solution?
Sweep and rinse to remove loose dirt and grit. Patch big craters or holes first, then dampen the surface so it’s not soaking wet before applying the etch. Always follow the product label for any pre-wet or dry-on requirements.
How do I apply the etching solution safely and effectively?
Apply in manageable sections with even strokes and keep the surface wet but not puddled. Work from one edge to the other and avoid skin contact; use gloves and eye protection. If you see heavy discoloration, check the manufacturer’s instructions for contact time and reapplication limits.
What happens during neutralization after etching, and how do I do it correctly?
Neutralization stops the etchant from continuing to act. Rinse or apply the neutralizer exactly as the label directs, then thoroughly rinse again until the water runs clear. Dispose of rinse water as instructed by the product label and local rules.
How should I clean up and dispose of leftover products and materials?
Contain and label any leftover etchant and neutralizer; store according to the manufacturer guidance. Clean tools promptly and rinse with plenty of water. Do not pour unused chemicals down the drain unless the label says it’s allowed; check local disposal options.