

Introduction
A long-lasting, vibrant exterior paint job starts with thorough prep, proper testing, and timely fixes. Start by inspecting the surface for peeling paint, dirt, and moisture, then scrub and repair as needed. Follow the manufacturer’s prep instructions and check local rules for surface prep requirements.
Before you commit to a full coat, run simple adhesion and compatibility tests on small patches. Address any issues you find—remove loose material, patch cracks, and let repairs dry fully. Keep an eye on weather and humidity, and choose a paint suitable for exterior exposure by checking the label.
Key takeaways
- Assess substrate, moisture, and peeling areas before selecting primers and paints.
- Test adhesion and softness with simple scratch or tape tests on small areas.
- Clean and repair surfaces thoroughly; prime visible repairs for uniform bonding.
- Use compatible primers and paints; follow manufacturer directions and local codes.
- Protect yourself and surroundings: wear PPE, cover nearby plants, and ventilate.
- Schedule inspections and maintenance: recheck for cracks, peeling, and moisture after seasons.
Table of Contents
- Introduction
- Key takeaways
- Planning the Project and Assessing Conditions
- Tools and Materials Checklist
- Surface Preparation: Cleaning, Repair, and Priming
- Pre-Paint Diagnostic Tests to Run
- Choosing Primers, Paints, and Color for Longevity
- Application Best Practices for a Durable Finish
- Common Failures and How to Fix Them
- Visual Checkpoints, Inspection Schedule, and Ongoing Maintenance
- Conclusion
- FAQ
Planning the Project and Assessing Conditions
Define the scope of the exterior paint project and outline what you want to achieve. Consider the timing, budget, and how long you can be off the area you’re working on. Think about environmental factors like sun exposure, moisture, and temperature ranges.
Check any local rules or HOA guidelines that could affect your plan. Map out a reasonable weather window and decide on a sequence of tasks. Make a quick plan for doorways, windows, and fixtures to minimize rework.
Choose the right season and weather window
Painting your home’s exterior is a weather-dependent task. Follow these steps to pick the best time:
Temperature matters. Most paints work best between 50°F and 90°F (10°C and 32°C). Check the manufacturer’s recommendations too.
Humidity is a foe. Aim for low humidity, ideally below 70%. High humidity can cause poor paint adhesion and mildew growth.
Monitor forecasts. Plan your project when stable weather is predicted. Avoid painting before rain or during high winds.
Inspect the building and prioritize surfaces
Before you start, give your home a thorough once-over:
Identify siding types. Different materials require different prep methods. Common ones include wood, vinyl, aluminum, and stucco.
Check previous coatings. Understand what’s currently on the walls to know how to prep. Old paint? Peeling wallpaper?
Look for problem areas – cracks, holes, or rot. Prioritize these for repair before painting. Also, note access needs and safety concerns like high spots or unstable structures.
Budget, timeline, and labor considerations
Planning your project involves more than just paint. Here’s how to estimate time and labor:
Prep vs. painting. Allocate about 40% of your time for prep work – washing, sanding, repairing. The rest is for painting.
Hire pros wisely. Consider hiring for complex tasks like high-access areas or specialized repairs. But you can save money by doing prep and lower-level painting yourself.
Build contingencies. Plan for unexpected repairs, dry times, and touch-ups. Allocate extra time (10-20%) and budget (5-10%) for these.
Tools and Materials Checklist
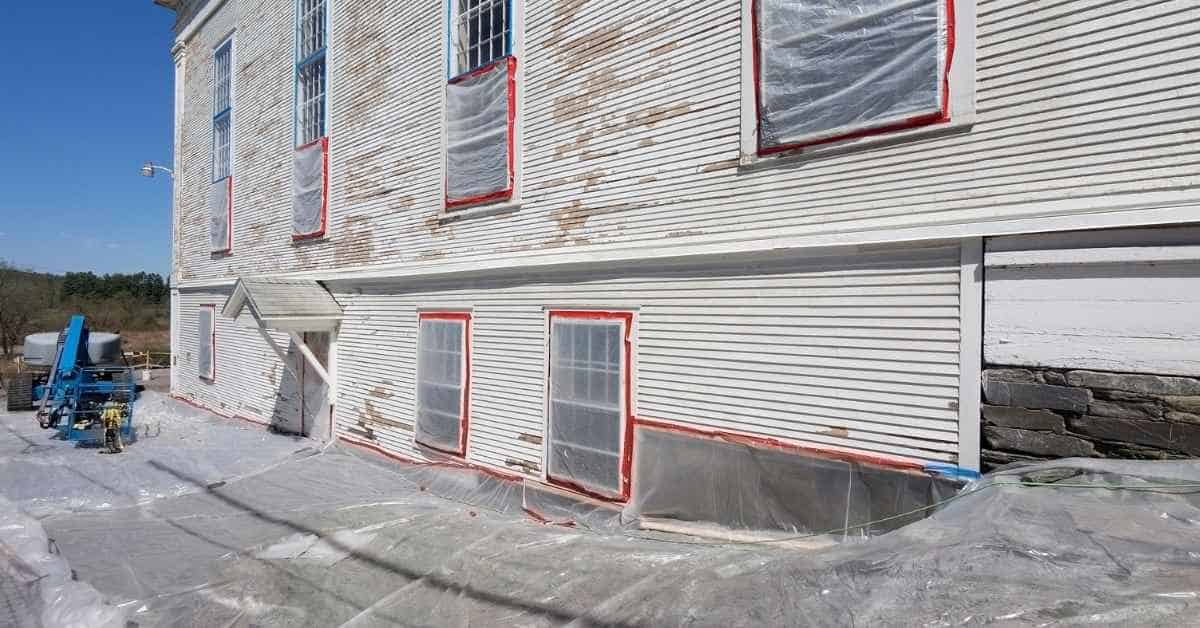
Gather a practical set of hand tools, scrapers, brushes, rollers, and a sturdy ladder. Include PPE such as gloves, eye protection, and a respirator or mask if you’ll be sanding or using chemicals. Have drop cloths, plastic sheeting, and clean rags on hand as well.
Choose quality levels appropriate for DIY versus pro work and read product labels for application details. Verify that primers, paints, and finishes are compatible with your substrate. Keep manufacturer instructions handy for any temperature, curing, or surface prep notes.
Essential tools and safety gear
Before you start, make sure you have the right tools and safety gear. This checklist helps you stay prepared and safe.
- Pressure washer: To clean surfaces. Check it works before use.
- Scraper: For removing old paint. Test its edge before starting.
- Sander: To smooth surfaces. Ensure it’s in good working order.
- Ladder: For high areas. Check stability and locks.
- Dust mask: Protects from dust and debris. Wear when sanding or scraping.
- Safety glasses: Shields eyes from debris. Wear at all times.
- Fall protection: For heights over 6ft. Use harnesses and secure anchor points.
- Drop cloths: Protects surfaces from paint. Tape them down securely.
Quick rule: Always check tools work before use. Safety gear should be worn at all times.
Paints, primers, and accessory materials
Choose the right products for your surfaces to ensure a long-lasting finish.
- Exterior primer: Bonds with paint and seals surfaces. Choose acrylic or oil-based for exterior use.
- Acrylic paint: Water-based, durable, and suitable for most exteriors. Check it’s 100% acrylic.
- Alkyd paint: Oil-based, good adhesion, ideal for metal or difficult surfaces. Ensure it’s exterior-grade.
- Caulks: Fills gaps and cracks. Choose paintable, exterior-grade silicone or acrylic.
- Sealants: Protects joints from water damage. Use silicone or polyurethane for exterior use.
Quick rule: Always match primer and paint types to your substrate for best results.
Consumables and maintenance items
Good quality consumables make painting easier, faster, and produce better results.
- Paint brushes: Natural or synthetic bristles. Choose good quality for smooth application.
- Rollers: Synthetic or natural covers. Ensure they’re suitable for your paint type.
- Painter’s tape: Protects edges. Test adhesion before use.
- Drop cloths: Covers surfaces. Use canvas or plastic for best protection.
- Cleaners: Removes dirt and grease. Choose a suitable cleaner for your surface type.
- Sponges: For touch-ups or cleaning. Ensure they’re non-abrasive and suitable for paint.
Quick rule: Invest in good quality consumables to save time, effort, and achieve a better finish.
Surface Preparation: Cleaning, Repair, and Priming
Begin with a thorough cleaning to remove dirt, mold, and chalky film. Rinse surfaces and let them dry completely before starting repairs. Sand rough spots lightly to create a smooth, keyable surface.
Repair any damaged areas with appropriate filler or patching material and allow full cure time. Prime bare wood, patched areas, and highly porous spots if required by the product line. Good prep is the deciding factor for color accuracy and adhesion later on.
Cleaning and mildew removal
Pressure washing is your first line of defense against dirt and grime. Use a wide-angle nozzle, keep the tip at least 12 inches from the surface, and work in small sections. For tough stains, use a solution of 1/4 cup bleach per gallon of water.
To remove mildew, mix one part bleach with three parts water. Apply it to the affected area, let it sit for 15-30 minutes, then scrub and rinse. Be sure to protect plants and grass nearby.
Avoid: Using harsh chemicals that can damage substrates or harm the environment.
Repairing damage and replacing rotten material
Material choices matter. They affect how well your paint job holds up over time.
- Wood replacement: Use pressure-treated lumber for areas exposed to moisture. Look for ACQ (Alkaline Copper Quaternary) or CBA (Chromated copper arsenate) treated wood.
- Stucco patching: Match the existing texture and color. Use a high-quality, exterior-grade stucco mix.
- Masonry repair: Use a concrete-based mortar that matches your existing surface. Avoid using sand-based mortars as they can crack over time.
- Structural repairs: If you find significant damage or rot, stop and consult a professional before painting.
Sanding, feathering, and priming techniques
Mechanical sanders can help feather edges for a smooth finish. Use a fine-grit sandpaper (120-220) to avoid damaging the surface.
Create a ‘surface profile’ with light sanding to improve paint adhesion. Wipe off dust with a damp cloth before priming.
Spot prime: Apply primer to areas that will be exposed to elements or moisture before painting, like around windows and doors.
Primer types: Use a stain-blocking primer for surfaces with tannin stains (like cedar) or a rust-preventive primer on metal surfaces.
Pre-Paint Diagnostic Tests to Run
Test the substrate for moisture issues before applying primer. Use simple indicators to confirm there’s no ongoing dampness that could affect adhesion. Check for efflorescence on masonry and address it first.
Confirm paint compatibility by performing a small test patch on a discreet area. Verify that the chosen primer and topcoat adhere well and cure without lifting or cracking. Reference product data sheets or label instructions for any specific test recommendations.
Moisture and vapor barrier checks
Before you start painting, check for trapped moisture. It can ruin your paint job.
Use a moisture meter. Press it against the surface. If it reads above 15-17%, there’s too much moisture. Wait until it dries out.
For vapor barriers, like in basements, use a vapor barrier paper test. Tape a piece to the wall. If it turns dark or wet after 24 hours, you’ve got a problem.
If moisture’s high, fix the source first. Then let it dry out before painting.
Adhesion and compatibility tests
Make sure your new paint will stick to what’s already there.
Do a tape test. Clean the surface. Let it dry. Apply painter’s tape. Pull it off after 24 hours. If paint comes off, adhesion’s poor.
For cross-cut tests, score the surface with a utility knife. Tape over it. Pull off the tape. If paint lifts, it won’t stick.
Test your new paint on a small, hidden area first. Make sure it bonds well and looks right before committing to the whole job.
Alkalinity and lead/pigment considerations
Masonry surfaces can be alkaline. This can ruin your paint. Test with pH paper. If it’s above 8.5, you need a primer designed for alkaline surfaces.
Older homes may have lead paint. Before testing or disturbing it, get a lead test kit. If positive, hire a certified professional to remove it safely.
Also, check for any other old pigments that might not play nice with your new paint. A quick internet search can help identify them.
Always wear proper safety gear when dealing with old paint. Ventilate the area well.
Choosing Primers, Paints, and Color for Longevity
Look for formulation features that resist chalking, UV fade, and peeling. Select primers that suit your substrate and environmental exposure, then pair with a compatible topcoat. Consider finishes that balance aesthetics with durable performance.
When picking color, check for UV stability and fade resistance notes on the product data sheet or label. Verify that the color system and sheen choice align with the climate and maintenance plan. If in doubt, compare options and follow the manufacturer’s guidance for compatibility.
Primer selection by substrate and problem
A primer’s job is to seal, protect, and prepare your surface for paint. Choose wisely based on the material you’re working with.
Wood: Use a wood primer to seal knots, prevent tannin bleed, and improve paint adhesion. Some have built-in mildew resistance.
Metal: Opt for a rust-inhibiting primer to stop corrosion and provide a stable base for paint. Zinc or phosphate-based primers work best.
Masonry/Stucco: Select a masonry primer that seals porous surfaces, prevents moisture intrusion, and enhances paint adhesion. Some are designed for specific types of masonry like brick or concrete.
Previously Painted Surfaces: If the old paint is in good condition, use a universal primer to seal and improve adhesion. If peeling, consider a stain-blocking primer first.
Paint formulation, durability features, and sheen choice
Understand your paint’s formulation to ensure long-lasting results. Acrylic and alkyd are the two main types.
Acrylic: Water-based, easy to clean up, and dries quickly. Good for most interior and exterior surfaces. Look for UV-resistant additives to prevent fading.
Alkyd: Oil-based, offers excellent durability and adhesion. Great for high-moisture areas like kitchens or bathrooms. Expect slower drying times.
Consider sheen levels based on your needs: Flat/low-sheen hides imperfections but shows dirt easily; semi-gloss/high-gloss resists stains and is easy to clean but reveals surface flaws.
Color selection for vibrancy and heat/UV performance
Choose colors that won’t fade quickly under sun exposure. Check manufacturer data on lightfastness.
Lighter colors reflect heat, keeping your home cooler in summer. Darker shades absorb more sunlight, making surfaces hotter. Consider this when choosing exterior colors.
High-quality pigments provide better color vibrancy and longevity. Look for paints with 100% acrylic or 100% solids content for superior performance.
Test your chosen color on a small area first to ensure it meets your expectations under different lighting conditions before committing to the entire project.
Application Best Practices for a Durable Finish
Follow a consistent technique for even coverage and proper wet edge control. Use the right tool for each surface and avoid overworking the coating. Monitor temperature and surface drying conditions to prevent field defects.
Apply in clean, dry conditions and respect recommended number of coats from the product guide. Align layer thickness with what the label allows and keep doors and windows closed during curing as directed. Maintain a steady workflow to minimize lap marks and color inconsistency.
Brush, roller, and spray techniques
Each application method has its pros and cons. Brushes give you control for detailed work, while rollers cover large areas quickly. Spraying offers even coverage but requires proper setup.
Brushing: Use a 2-3″ brush with synthetic bristles for most surfaces. Work in ‘W’ or ‘M’ patterns to avoid lap marks.
Rolling: Choose a roller cover based on surface texture and paint type. Maintain a ‘wet edge’ to prevent visible lines between strokes.
Spraying: Use low-pressure sprayers for even coverage. Overlap each pass by about 50% to avoid missed spots or overspray.
Proper coats, dry times, and film thickness guidance
Follow manufacturer guidelines for wet-film and dry-film times. This ensures each coat adheres properly and dries evenly.
First Coat: Apply a thin, even layer. Don’t over-apply; it won’t speed drying or improve coverage.
Subsequent Coats: Apply additional coats when the previous one is fully dry. Sand lightly between coats for a smooth finish.
Touch-ups: Spot touch-ups are easiest when paint is still wet. Allow to dry, then blend with surrounding area if needed.
Weather management and on-site quality checks
Protect your work from the elements for best results. Cover painted surfaces at night or during rain to prevent washing out.
Rain: Keep an eye on forecasts. Paint won’t adhere properly if it rains within 24 hours of application.
Wind: Minimize dust and debris pickup by painting when winds are light. Cover surfaces if wind picks up.
Quality Checks: Inspect your work visually for missed spots, drips, or visible lap marks. Use a flashlight at an angle to check for even coverage.
Common Failures and How to Fix Them
Identify common issues like peeling, cracking, or rapid chalking and trace them to root causes such as poor prep or improper substrate compatibility. Plan fixes that align with the original system and surface type. Decide whether a touch-up or a full recoat is appropriate.
When problems persist, know when to involve a professional—especially for structural concerns, extensive moisture, or stubborn coating failures. Document the work and follow safe, practical steps to restore appearance and performance.
Peeling, flaking, and adhesion loss
If your paint is peeling or flaking, it’s likely due to poor adhesion. First, diagnose the cause – it could be moisture damage or simply a bad initial application.
Moisture: If you find signs of moisture, like warping or soft spots, you’ll need to address that first. See our earlier section on moisture and vapor barrier checks.
Once you’ve fixed the moisture issue, remove all loose paint. Sand the surface lightly to improve adhesion for your new primer. Apply a suitable primer – we covered this in our primer selection guide. Let it dry, then repaint.
Blistering, chalking, and fading
Blisters, chalky residue, and faded color are common paint failures. Let’s tackle each one.
Blistering: This is usually caused by moisture or poor surface prep. If it’s moisture, fix that first (see our earlier section). Then, remove all blistered paint, sand, prime, and repaint.
Chalking: This happens when the paint’s binder breaks down, often due to UV exposure. Use a high-quality exterior paint with good UV protection – we discussed this in our color selection section. If it’s severe, you might need to sand and repaint.
Fading: This is mostly due to sun exposure. Choose a paint with good UV resistance next time. There’s no fix for faded paint except repainting.
Stains, mold recurrence, and efflorescence
Before you repaint, you need to treat these issues. Here’s how:
Stains: If they’re on masonry, use a stain-blocking primer before painting. For tough stains, consider a specialized stain remover.
Mold: If you find mold, safety first – wear gloves and a mask. Clean it off with a solution of bleach and water (1 part bleach to 3 parts water). Let it dry, then apply a mold-resistant primer before painting.
Efflorescence: This is when salt deposits appear on masonry. Remove them with a wire brush or scraper. If the problem persists, consider waterproofing your masonry before repainting.
Visual Checkpoints, Inspection Schedule, and Ongoing Maintenance
Set simple visual checkpoints to monitor surface condition after completion. Note any cracking, peeling, or discoloration at key seasons and after weather events. Keep a basic maintenance log to track touch-ups and cleanings.
Create a seasonal inspection routine and perform easy fixes as needed to extend life. Clean surfaces as needed, reseal edges, and address moisture or mildew promptly to protect the finish for years to come. Follow up with timely repainting when the color or sheen shows signs of wear.
Pre-winter and post-winter inspection checklist
Inspect your home’s exterior paint job before winter sets in to protect it from harsh weather, and again after winter to catch any early damage. This helps prevent larger problems down the line.
- Check for peeling or flaking: These are signs of adhesion loss, which can worsen with freeze-thaw cycles if not addressed.
- Inspect caulking around windows and doors: Cracked or missing caulk allows water intrusion, leading to rot and paint failure.
- Examine gutters: Clogged or damaged gutters can cause water to back up under the eaves, leading to peeling paint and wood rot.
- Look for mildew or mold: These can grow in damp conditions and cause discoloration and damage to your paint job.
- Check for efflorescence: This white, powdery substance indicates moisture is being drawn through the walls, which can lead to paint failure.
- Inspect siding and trim: Harsh weather can cause warping, cracking, or other damage that affects your paint job’s integrity.
- Check for nail pops: These can occur due to temperature changes and allow water intrusion, leading to paint failure.
- Examine any previous repairs: Ensure they’re still holding up; if not, redo them before winter.
Quick rule: Address any issues found during these inspections promptly to prevent further damage and maintain your paint job’s longevity.
Annual quick maintenance tasks
Perform these simple tasks annually to keep your exterior paint job looking fresh and lasting longer.
- Wash walls: Use a mild detergent and soft-bristle brush to remove dirt, mildew, and other contaminants. This helps maintain the paint’s sheen and prevents damage.
- Check caulking: Inspect all caulking around windows, doors, and trim. Replace any cracked or missing caulk.
- Touch up nicks and scratches: Small touch-ups prevent these areas from becoming bigger problems.
- Clean gutters: Clogged gutters can cause water damage to your paint job and siding.
- Trim landscaping: Overgrown plants can scratch or stain your exterior, so keep them trimmed back.
- Inspect paint on metal surfaces: Check for rust, which can cause paint to peel. Sand and repaint as needed.
- Check for insect damage: Insects can cause damage that affects your paint job’s integrity.
- Examine weatherstripping: Replace any worn or damaged weatherstripping to maintain a tight seal and prevent drafts.
Quick rule: Regular maintenance helps extend the life of your paint job and keeps your home looking well-maintained.
When to plan a full repaint vs. spot repairs
Knowing when to do spot repairs versus planning a full repaint can save you time and money in the long run.
- Age of paint: If your paint job is more than 10-15 years old, it might be time for a full repaint. Older paint may not adhere well to newer primers or topcoats.
- Extent of damage: If more than 20% of the surface area has damage, consider a full repaint. Spot repairs can look patchy and won’t last as long on an old surface.
- Substrate condition: If your siding or trim is damaged (e.g., warped, cracked), you’ll need to replace it before painting. This often makes a full repaint more cost-effective.
- Color fade: If your color has faded significantly, a full repaint may be necessary to achieve the desired look.
- Budget and timeframe: Consider how much time and money you’re willing to invest. A full repaint might be more expensive upfront but could save you money in the long run by extending the life of your paint job.
- Remaining substrate life: If your siding or trim has a limited lifespan left, it may be worth doing a full repaint to maximize its remaining useful life.
Quick rule: When in doubt, consult with a professional painter. They can assess your specific situation and provide tailored advice.
Conclusion
Finish strong by sticking to the plan: a careful prep job, the right primers and paints, and honest diagnostics give you a durable, vibrant exterior that stands up to weather and time. Safety and discipline at the start save you cost, headaches, and repaint cycles later.
To move from plan to finish, follow this flow: confirm the project scope and conditions, inspect and repair surfaces, apply the chosen primer and paint in the right order, run your pre-paint tests, and then proceed with application using proper technique, drying times, and clean-up. Start by securing your work area, PPE, and weather window, then clean and repair surfaces, prime where needed, test a small patch, mix and match paints as recommended, and check the finish against your color and gloss goals before you commit to the whole job.
Common mistakes to avoid are skipping cleaning and repairs before priming, using a mismatched primer or paint for the surface, and rushing the finish or skipping the diagnostic tests. Don’t neglect safety: protect plants, vehicles, and neighboring walls; never paint in high wind, extreme heat, or wet conditions; and never thin beyond recommended guidelines. A simple rule: test patches first, then scale up only after the test area looks and dries correctly.
If structural damage, extensive rot, or questionable framing shows up, or you’re unsure about the roofline, gutters, or ladders, call a professional rather than forcing it. Otherwise, stay with the plan, follow the steps, and keep the work site tidy. You’ve got this—steady prep now means a long-lasting, eye-catching finish that stays true year after year.
FAQ
What are the most common reasons exterior paint fails and how can I avoid them?
Poor surface prep, peeling old paint, and moisture behind the film are typical culprits. Resolve these by cleaning, repairing, and sealing any cracks before painting, and make sure the surface is dry and sound.
Follow manufacturer directions for primers and topcoats, and don’t skip the cure time for each step. If in doubt, check the product label and local weather windows for your area.
How should I handle painting if the surface is damp or recent rain occurred?
Do not apply paint on a damp surface. Wait for the surface to dry thoroughly and keep an eye on morning dew and shaded areas that stay wet longer.
Lightly test a small area after you think it’s dry to confirm it won’t trap moisture. If in doubt, defer the job until conditions are solid and dry.
What test should I run to ensure the coating will adhere well?
Perform a simple adhesion check after cleaning and priming by applying a small dab of paint to a inconspicuous spot and gently lifting a corner to see if it peels. If it lifts, investigate the substrate and primer compatibility before proceeding.
Always follow the tester’s results with the appropriate prep steps indicated by the product instructions or manufacturer. When unsure, consult the product label or manufacturer for compatibility guidance.
How do I maintain the finish after the job is done?
Inspect the painted surfaces periodically and touch up any small cracks or peeling edges promptly. Clean with mild cleaners and avoid harsh scrubbing that can lift the film.
Plan routine checks after seasonal weather changes or heavy storms. If you see new peeling or staining, reassess surface prep and repaint only where needed after proper cleaning and drying. If unsure, refer to maintenance guidance on the paint label.