
Introduction
Exterior painting season is the stretch of days that are good enough for painting outside, based on temperature, humidity, and moisture. This intro explains how to read the conditions, run simple checks, and avoid common mistakes. It keeps the talk practical and ready for a DIY weekend.
Look for dry days with no rain in the forecast and air that isn’t too humid. Test surfaces by touch and use a simple moisture check if you have one, and follow the manufacturer’s guidance for your paint. If conditions don’t line up, plan for a different window, fix any surface issues, or check local rules and instructions.
Key takeaways
- Check daily forecast: choose dry, moderate humidity days with no rain risk.
- Inspect surfaces for peeling, efflorescence, or mildew; fix before priming.
- Test for surface moisture, substrate saturation, and wood checks with care.
- Pre-clean, remove loose paint, repair cracks, and mask adjacent areas securely.
- Choose exterior paints suited to climate; match primers and coatings to substrate.
- Wear eye protection and respirator when sanding or cleaning surfaces.
Table of Contents
- Introduction
- Key takeaways
- When to Paint: Seasonal and Daily Weather Conditions
- Pre-Paint Inspection: What to Look for
- Tests to Diagnose Surface and Environmental Issues
- Common Surface Problems and Fixes Before Painting
- Surface Preparation Techniques for Lasting Coatings
- Selecting Paints, Primers and Materials for Exterior Conditions
- Application Techniques and Weather-Aware Painting Practices
- Curing, Inspection After Painting, and Maintenance Plan
- Conclusion
- FAQ
When to Paint: Seasonal and Daily Weather Conditions
Timing matters for how well paint sticks and how it cures. Seasonal and daily patterns influence adhesion, drying, and long-term performance. Check local climate patterns and follow the paint manufacturer’s guidance before you schedule a project.
Look for stretches of stable temperatures and dry conditions as a baseline, and beware rapid changes in humidity or temperature that can affect film formation. Use label recommendations to decide if a window of optimal weather exists. When in doubt, verify with the manufacturer instructions and your local rules or guidance.
Seasonal considerations and microclimates
Timing your exterior paint job right starts with understanding your region’s seasons. In general, the best times to paint are late spring or early fall when temperatures are mild and stable.
Microclimates like coastal areas or mountain regions can change these rules. Coastal homes need protection from salt spray, while mountains may require painting in summer due to cold winters.
Sun exposure also matters. South-facing walls get more heat, so paint them early or late in the day to avoid extreme temperatures.
Prevailing winds can affect drying times and paint adhesion. Check local climate patterns for wind trends and plan accordingly.
Daily timing and short-term forecast checks
Choose the right part of the day to paint. Mornings are usually best, after dew has evaporated but before heat builds up.
Avoid painting in direct sunlight as it can cause uneven drying and blistering. Also, steer clear of heavy dew, rain, or extreme wind.
Check forecasts for at least 24-48 hours ahead. If rain is predicted, postpone your job until conditions improve.
Use a moisture meter to test surfaces before painting. If it reads above 15%, wait for the surface to dry out.
When to postpone a job
Postpone your paint job if rain is imminent. Paint needs at least 24 hours of dry time to cure properly.
Persistent surface moisture or dew can cause poor adhesion and peeling. Wait for surfaces to dry out completely before painting.
Freezing nights can ruin a paint job. Temperatures below 50°F (10°C) at night can prevent paint from curing correctly, so avoid painting in cold weather unless using specialized cold-weather paint.
Always check with the paint manufacturer for specific product guidelines on temperature and humidity ranges for application and cure times.
Pre-Paint Inspection: What to Look for
Start with a systematic exterior inspection of all surfaces to be painted. Prioritize the condition of surfaces, trim, fasteners, flashings, and surrounding areas. Note any moisture signs, rot, or previous coatings that peels or cracks.
Document issues that could undermine adhesion or longevity, such as loose boards, rusted nails, or failed caulk. Consider how site conditions like shade, drainage, and nearby vegetation might impact the preparation or maintenance plan. If unsure about any finding, consult product labels, manufacturer instructions, or local building guidance for repair thresholds.
Visual checkpoints for siding, trim, and masonry
Before you grab your paintbrush, walk around your home with this checklist to spot any visual signs of trouble.
- Peeling or blistering: Check for these signs on all surfaces. They indicate moisture issues that need fixing before painting.
- Chalking: Rub your hand over the surface. If it feels chalky, it’s losing its protective layer and needs attention.
- Staining or discoloration: Dark spots could hide mold, mildew, or water damage that needs addressing.
- Efflorescence: A white, powdery substance on masonry indicates moisture moving through the wall. Fix any underlying leaks.
- Soft or crumbly surfaces: Gently press on surfaces. If it feels soft or crumbles, there’s damage that needs repair before painting.
- Cracking or caulk gaps: Inspect all corners and joints for cracks or missing caulk. These let in water and should be fixed.
- Moss or algae growth: Check for these on shady areas, especially on masonry. They can trap moisture and damage surfaces.
- Warped or damaged trim: Inspect all trim for warping, cracking, or other damage that needs repair before painting.
Quick rule: If you spot any of these issues, fix them before painting. Ignoring them will lead to paint failure and further damage.
Structural and hidden trouble spots
Before you start painting, check these often-overlooked areas for signs of water intrusion or other issues.
- Flashings: Inspect all flashings around roof penetrations. Missing or damaged flashings let in water and should be replaced.
- Gutters and downspouts: Ensure they’re securely attached, free of leaks, and directing water away from the house. Clogs can cause overflows that damage siding.
- Roofing tie-ins: Check where the roof meets walls for proper flashing and caulking. Improperly sealed areas let in water.
- Window and door seals: Inspect all seals around windows and doors. Cracked or missing caulk lets in water and air, leading to drafts and moisture damage.
- Water stains on ceilings or walls: Check for these signs of leaks, especially near roof penetrations, windows, or plumbing fixtures.
- Mold or mildew: Look for these in damp areas like basements, attics, or under eaves. They indicate moisture problems that need fixing.
- Sagging or damaged gutters: Gutters that sag or pull away from the house can’t direct water properly and should be repaired or replaced.
- Loose or missing siding: Check for any loose, warped, or missing siding. These areas need repair before painting to prevent further damage.
Quick rule: Fix any leaks or other issues you find before painting. Ignoring them will lead to paint failure and further damage.
Safety and accessibility review
Before you start your exterior painting project, assess the safety of your work area with this checklist.
- Ladder access: Ensure ladders are secure, in good condition, and extend at least 3 feet above the roof or surface you’re working on.
- Roof access: Check for any damaged or unstable areas before accessing your roof. Wear appropriate safety gear.
- Fall hazards: Inspect all work areas for tripping hazards, loose railings, or other fall risks. Secure or remove these hazards.
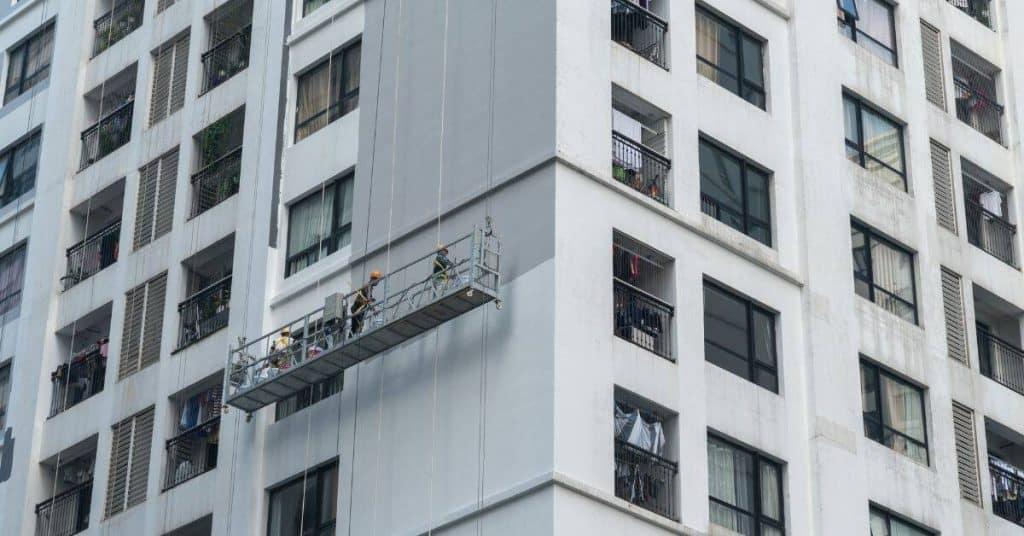
- Areas requiring scaffolding: Identify any areas where a ladder won’t reach or is unsafe to use. Consider renting or hiring professional scaffolding.
- Electrical hazards: Check for any exposed wires, damaged outlets, or other electrical hazards near your work area. Turn off power if necessary.
- Weather conditions: Assess the weather forecast and current conditions. Don’t paint in high winds, extreme heat, or during thunderstorms.
- Professional help needed: If you find any areas that are unsafe to access or repair yourself, hire a professional.
- Protective gear: Ensure you have appropriate safety gear like hard hats, gloves, and eye protection for your project.
Quick rule: Safety should always be your top priority. If an area is unsafe to access or repair, don’t attempt the work yourself.
Tests to Diagnose Surface and Environmental Issues
Use simple, DIY-friendly tests to confirm moisture, adhesion, and substrate soundness. A moisture meter can help identify hidden dampness behind coatings. Do a basic adhesion test by gently scraping a small area to see if the coating resists removal.
Check for salt or alkali contamination and signs of mildew or rot with appropriate spot tests. Simple visual checks and basic tools can reveal substrate softness or delamination. For any questionable result, refer to product data sheets, labeling, or manufacturer instructions before proceeding.
Moisture diagnostics (surface and substrate)
Before you start painting, check for moisture. It’s your home’s worst enemy.
Plastic Sheet Test: Tape a clear plastic sheet to the wall. Leave it for 24 hours. If condensation forms on the inside, there’s moisture.
Touch-and-Feel: Press your hand against the surface. If it feels cold or damp, moisture might be present. But remember, this isn’t foolproof.
For deeper moisture, consider renting a moisture meter. Or call in a pro. Don’t guess; check.
Adhesion and chalking tests
Check your paint’s bond with the surface. And see if it’s leaving behind a powdery residue – that’s chalk.
Tape/Pull Test: Stick painter’s tape to the surface, let it sit for 24 hours, then pull it off quickly. If paint comes off, adhesion is poor.
Scrape Test: Use a putty knife or scraper to check for loose paint. If it flakes off easily, you need to prep better.
Chalk Test: Wipe the surface with a damp cloth. If it turns gray, chalking is present. Clean and degloss before painting.
Alkali, efflorescence and salt exposure checks
Check for signs of soluble salts on masonry or coastal homes. They can ruin your paint job.
Visual Inspection: Look for white, powdery deposits (efflorescence) or discolored areas. These could be signs of salt exposure.
Spot Test: Moisten a cotton swab with distilled water and rub it on the affected area. If it turns yellowish or leaves a residue, salts are present.
If you find salts, expect recurring issues. Use special primers and treatments to protect your paint job.
Common Surface Problems and Fixes Before Painting
Map typical failures like rot, rust, mildew, cracked caulk, or bubbling to practical fixes. Determine whether repair or replacement is needed, and choose products accordingly. Plan for proper surface drying and stabilization before coating.
Recognize when specialized products or professional repairs are required, such as structural repairs for rot or corrosion-resistant coatings for metal. Use manufacturer guidelines and local codes to decide the scope of work and appropriate materials. If in doubt, verify with product labels or instructions before moving forward.
Wood repairs: rot, soft spots, and knot bleeding
Before you grab your paintbrush, check for wood rot. It’s often hidden under siding or trim. Use a screwdriver to probe suspect areas. If it goes in easily, you’ve got rot.
Repair options: For small spots, use a wood hardener and filler. For larger areas, replace the rotted piece with new wood. Make sure it’s treated lumber if it’s going outside.
Knots can bleed through paint. To prevent this, seal them with a knot sealer before priming. Sap bleeding is harder to stop but you can try sanding and applying a shellac-based primer.
Metal, fastener and rust remediation
Rust on metal surfaces needs to go. It’ll keep spreading if you don’t stop it. Use a wire brush or sandpaper to remove all the rust.
Replace corroded fasteners: If nails or screws are rusted, replace them. Rust can spread from these into the wood.
For metal flashing or trim, use a rust converter before painting. This turns the rust into a stable compound that won’t keep spreading.
Mold, mildew and staining treatments
Mold and mildew love damp areas. If you see it, clean it off before painting. Bleach can damage some surfaces, so use a detergent solution instead.
Rinse well: After cleaning, rinse thoroughly with clean water. Leftover cleaner can mess up your paint job.
For stubborn biological stains, try a mold and mildew remover from the hardware store. Always follow the manufacturer’s instructions for safe use.

Surface Preparation Techniques for Lasting Coatings
Outline step-by-step prep methods for common materials like wood, vinyl, fiber cement, and masonry. Clean surfaces thoroughly to remove dirt, oils, and contaminants. Lightly roughen glossy areas to improve adhesion.
Include sanding, stripping if needed, caulking, and priming as part of a coherent sequence. Tailor your technique to the substrate and climate, ensuring all materials are compatible. Always check product labels or manufacturer instructions for prep requirements and curing times.
Cleaning and degreasing strategies
Start by removing any loose dirt, paint, or contaminants from your surfaces. Pressure washing is a great tool for this, but be careful not to damage the surface.
Use a detergent designed for your specific surface material. For example, use a detergent with a higher alkaline content on vinyl siding and a lower one on wood. Always follow the manufacturer’s instructions.
Never use detergents containing ammonia or bleach on aluminum surfaces as they can damage the finish.
Mechanical prep: sanding, scraping and power tools
Before you start, ensure your safety by wearing appropriate protective gear including goggles, gloves, and a dust mask.
- Hand Sanding: Use 120-grit or finer sandpaper for most surfaces. It’s cheap and easy to use but can be time-consuming on large areas.
- Power Sanders: Rentable orbital sanders (around $50/day) speed up the process, but they can be too aggressive if not used carefully.
- Scraping Tools: Use a paint scraper for removing loose paint. A heat gun can soften old paint and make scraping easier.
- Power Scrapers: For large areas with failing paint, consider renting a power scraper (around $80/day).
- Edge Sanding: Use a sanding sponge or mouse sander to feather edges for a smooth transition between painted and unpainted surfaces.
Caulking, flashing and seam repair
Inspect all caulk lines around windows, doors, and trim. If it’s cracked, peeling, or missing, replace it.
Flashing is the material used to direct water away from vulnerable areas like window and door openings. Check its integrity and repair any damage with new flashing material.
When preparing joints for caulking, ensure they’re clean, dry, and slightly ‘V’-shaped. This allows the caulk to bond well and stay in place. Always use a paintable acrylic-latex caulk for best results.
Selecting Paints, Primers and Materials for Exterior Conditions
Guide readers to choose coatings and primers based on substrate, exposure, and common failure modes. Match product types to the surface and environment, and consider odor and safety factors. Use labels to confirm compatibility and coverage expectations.
Explain material specification concepts to check on product labels, such as binders, durability claims, and environmental resistance. Compare options for exterior substrates and select choices that align with climate and maintenance goals. For any uncertain specification, compare manufacturer data sheets and local guidance before purchase.
Matching Primer to Substrate and Problem
A good primer is your first line of defense against exterior paint failure. It promotes adhesion, seals the surface, and can tackle specific problems like tannin staining or rust.
For tannin staining, use a shellac-based primer. It blocks tannins from bleeding through and ruining your topcoat.
If you’re dealing with rust, opt for a zinc phosphate primer. It inhibits rust growth and provides a sound base for paint.
For masonry alkalinity, choose a pH-neutral or acrylic latex primer. These won’t react with alkaline surfaces, preventing peeling. If adhesion is an issue, consider a shellac or bonding primer to promote better paint grip.
Paint Chemistry and Finish Choices Explained
Exterior paints come in various chemistries, each with its pros and cons. Latex paints are water-based, easy to clean up, and offer good durability. They’re great for most exterior surfaces.
Alkyd-like formulations are oil-based, offering excellent adhesion and leveling. However, they take longer to dry and have stronger odors. Use them where extra durability is needed, like on metal or previously painted surfaces.
Finishes range from flat (matte) to gloss. Flatter finishes hide imperfections better but are harder to clean. Glossier paints are more durable and easier to clean but show every flaw. Choose based on your surface’s condition and desired maintenance level.
Always follow the data sheet for specific product recommendations and application guidelines.
Material Specs and Standards to Check
The right material choice ensures your paint job lasts. Here’s what to look for on product datasheets:
- Recommended Temperature/Humidity Ranges: Ensure the paint is suitable for your climate. Applying in extreme conditions can lead to cracking or poor adhesion.
- Minimum Surface Preparation: Follow these guidelines to ensure a sound base for your paint.
- Adhesion Claims: Check if the paint adheres well to your surface. Poor adhesion leads to peeling and failure.
- UV/Moisture Durability: Look for paints with good resistance to sun damage and moisture penetration, which can cause fading or mildew growth.
- Dry Time: Consider how long you’ll need to wait between coats. Long dry times can lead to improper application and failure.
Application Techniques and Weather-Aware Painting Practices
Provide practical tips for brushing, rolling, and spraying patterns to achieve even film formation. Plan coat sequencing so the base coat and finish coat cure without trapping moisture. Adjust technique for sun, wind, or shade to maintain consistent coverage.
Coordinate your work pace with drying times and protective schedules, and avoid painting in conditions that diminish adhesion. Use manufacturer instructions to tune spray pressures, nozzle sizes, and overlap patterns. If the guidance isn’t clear, verify with product labels or data sheets before proceeding.
Coating sequence and wet-edge techniques
Start by applying a coat of primer. This seals the surface, improves paint adhesion, and helps achieve even color.
First coat: Apply it in sections, maintaining a ‘wet edge’ to avoid lap marks. Work from top to bottom, overlapping each stroke about halfway.
Subsequent coats: Let the first coat dry according to the manufacturer’s instructions, then apply the second and third coats following the same wet-edge technique.
Adapting technique to wind, sun and humidity
Wind can cause paint to dry too quickly, leading to lap marks. On breezy days, work in shaded areas or use a windbreak to slow down drying.
Direct sunlight accelerates skinning. Paint early morning or late afternoon when the sun is less intense. In high humidity, allow more time between coats for proper drying.
Overspray: Wind can also cause overspray, so keep your distance from windows and other sensitive areas.
Working around detail areas and trim
Cutting in: Use a 1.5-2 inch angled brush to paint along edges, keeping your lines straight and even.
Back-rolling: After cutting in, use a roller to apply paint to the larger areas, working from top to bottom, maintaining that wet edge.
Gutters, eaves, and tight joints: Use a small brush or foam applicator for these areas. Work carefully to ensure full coverage and proper film thickness. Don’t forget to mask off any areas you don’t want painted.
Curing, Inspection After Painting, and Maintenance Plan
Describe what to expect during cure and how to conduct a post-paint inspection for flaws. Look for holidays, pinholes, sags, or inadequate film thickness in the initial weeks. Schedule a follow-up check to catch issues early.
Outline a maintenance plan to extend life, including periodic cleaning and reinspection intervals. Reference label guidance for wash methods and any cautions about environmental exposure. When in doubt, confirm maintenance requirements with product instructions and local guidelines before committing to a schedule.
Post-paint inspection checklist
Before you call the job done, walk through your freshly painted surfaces to ensure everything is up to snuff. Use this checklist within a few hours after painting.
-
- Adhesion: Gently pull on paint edges with your fingers or use painter’s tape. If it peels off easily, you’ve got a problem.
- Coverage: Check for any bare spots missed during application. A quick fix now saves major rework later.
- Runs and drips: Inspect surfaces for any heavy buildup that may have occurred due to overapplication or improper technique.
- Missed spots: Look for areas overlooked during painting, like behind downspouts or under eaves.
- Bubbles: Check for any bubbles forming under the paint. This indicates trapped moisture or poor adhesion.
- Cracking: Inspect for any cracks in the paint film, which could be due to inadequate surface preparation or incompatible materials.
- Alligatoring: Look for a cracked pattern resembling an alligator’s skin. This indicates improper paint choice or application technique.
- Blistering: Check for any blisters forming on the paint surface, which could be due to trapped moisture or poor adhesion.
Quick rule: If you find issues, address them immediately. Touch-ups are much easier now than major rework later.
Curing factors and how to verify readiness
Before exposing your freshly painted surfaces to normal wear, ensure the paint has fully cured. Use this checklist after 24 hours.
-
- Temperature: Check if the temperature is within the range recommended by the paint manufacturer (usually between 50°F and 90°F).
- Humidity: Ensure humidity levels are not too high, as this can slow down curing.
- Tackiness: Gently touch surfaces. If they feel sticky or tacky, they’re not ready yet.
- Smell: If you still smell paint fumes, the paint is not fully cured.
- Scratch test: Lightly scratch the surface with your fingernail. If the paint comes off easily, it’s not ready.
- Water test: Sprinkle a little water on the surface. If it beads up and rolls off, it’s cured. If it soaks in, wait longer.
Quick rule: Patience is key here. Don’t rush into exposing your surfaces to normal wear until they’re fully cured.
Long-term maintenance and when to call a pro
Regular upkeep ensures your exterior paint job lasts. Here’s what to do and when to seek professional help.
-
-
- Visual check: Inspect your painted surfaces annually for signs of wear, fading, or peeling.
- Cleaning: Wash surfaces every 2-3 years with a mild detergent to remove dirt and mildew. Too little cleaning can lead to premature failure.
- Widespread failure: If you notice large areas of paint failing at once, it’s time to call a pro. This could indicate an underlying issue.
- Structural leaks: Check for any water stains or leaks around windows and doors. These can lead to major structural issues if left unaddressed.
- Mold or mildew: Look for signs of mold or mildew growth, which can indicate trapped moisture and poor ventilation.
-
Quick rule: If you notice any major issues or are unsure about what you’re seeing, don’t hesitate to call a professional. Prevention is cheaper than repair in the long run.
Conclusion
Finish with confidence by sticking to tested conditions, proper prep, and steady, safety‑driven work. A durable paint job pays back in appearance and protection, but only if you respect the weather, the surface, and your limits.
Check the forecast and pick a window with dry, mild conditions; confirm the surface is clean, dry, and sound; verify test areas show acceptable adhesion and finish; follow the product directions for curing times; and complete each step before moving to the next. Keep patches small, work in manageable sections, and inspect your work as you go. If anything reads odd, pause and reassess rather than forcing a coat.
Common mistakes to avoid are rushing to coat on a sunny, hot day; skipping tests or skipping a proper surface prep; and underestimating drying and curing times. Safety rules to follow: use fall protection on ladders or scaffolds, wear eye and skin protection, and never mix or apply coatings beyond their stated limits or in unsuitable temperatures. If you encounter peeling lead paint, structural rot, or intricate details that feel beyond your reach, don’t push ahead—call a professional.
If the job grows beyond a DIY‑friendly scope, or you detect underlying rot, moisture intrusion, or incompatible coatings, seek pro help. Stay disciplined, finish on the right day, and you’ll protect the build and keep it looking sharp for years to come.
FAQ
How do I decide if it’s safe to start painting today?
Check the surface is dry to the touch and that the air won’t drop below a manufacturer’s minimum. Look at the forecast for consecutive dry days without heavy humidity or rain. If in doubt, read the product label or instructions for the recommended conditions and wait times.
What steps should I take if I find peeling paint on old siding before applying new coats?
Remove loose paint and clean the surface so the new coat can grab. Sand or scrape any edges smooth but don’t dig into sound material. For damaged areas, follow the product instructions for patching or replacing as needed and check local guidance on repairs.
Should I seal gaps or cracks before painting, and how to choose the right product?
Yes, seal obvious gaps and cracks to prevent water intrusion under the new coating. Use a sealant compatible with your siding material and the topcoat you plan to apply. Always verify with the label or manufacturer instructions for cure times and paint compatibility.
How do I protect doors, windows, and landscaping during exterior painting?
Mask or cover nearby surfaces and plants, and consider weatherproof drop cloths for ground areas. Remove or protect hardware and hinges as needed, and keep pets and kids away from the work zone. Rely on the product label and local guidance for safe masking and cleanup tips.