
Introduction
Stucco cracks are rarely cosmetic and can signal costly structural or moisture issues.
This guide explains why cracks matter, how to assess severity, and what steps you can take to prevent further damage.
You’ll learn practical tips for inspection, signs to watch for, and the kind of expert advice to seek before repairs.
Key takeaways
- Even hairline cracks can signal moisture intrusion needing professional assessment and repair.
- Different crack types require targeted fixes; improper sealing accelerates damage and costs.
- Inspect for staining, efflorescence, or mildew as hidden moisture indicators.
- Water entry often occurs at penetrations: windows, vents, pipes, and seams.
- EIFS and cement stucco differ in drainage, insulation, and moisture management.
- Visual checks, moisture meters, and infrared scans enhance DIY inspection accuracy.
Table of Contents
- Introduction
- Key takeaways
- Why “Just Cosmetic” Is Dangerous Thinking
- Types of Stucco Cracks and What Each Means
- Surface Clues That Signal Hidden Moisture
- How Water Gets Behind Stucco — Common Entry Points
- EIFS vs Traditional Portland Cement Stucco — Key Differences
- Modern EIFS (EIFS 2.0) — Why It’s Different
- Material Specs and Standards Explained
- Visual Checkpoints: DIY Inspection Walkthrough
- Tools and Techniques Contractors Use to “See” Behind Stucco
- Common Installation Errors That Lead to Cracking and Leaks
- When Cracks Are Cosmetic — and How to Confirm It
- Repair Options — From Patch to Full Remediation
- Typical Costs and Scope of Work
- Insurance: What Policies Cover (and What They Don’t)
- How Ignoring Stucco Cracks Affects Home Value and Resale
- Choosing the Right Contractor — Red Flags and Must-Haves
- Maintenance Planning for Long-Term Success
- Energy Efficiency Impacts of Stucco and EIFS
- Fire Performance and Safety Concerns
- Retrofit Options: When to Re-clad or Convert Systems
- Regional Considerations (Climate, Codes, and Local Practices)
- Case Studies: Preventive Action vs. Deferred Repair
- When to Call a Structural Engineer or Building Scientist
- DIY vs Professional Repairs: What You Can Do Safely
- Tools and Materials Checklist for Professionals and DIYers
- Permit and Inspection Process for Major Repairs
- Financing and ROI Options for Big Remediation Projects
- Common Myths Busted: Stucco & EIFS Facts vs Fear
- How Inspectors and Appraisers Evaluate Stucco Homes
- Preparing for a Contractor Assessment: What to Gather
- Maintenance Cost Comparison: Stucco, EIFS, and Alternatives
- Take Action: Immediate Steps If You Find Cracks
- Practical next steps and trusted sources
- Eifs 2.0: how modern systems fix the failures of the past
- Foam board insulation: key types, benefits, and best uses
- Stucco & eifs myths busted with clear, science-backed facts
- Indiana wall systems
- Conclusion
- FAQ
Why “Just Cosmetic” Is Dangerous Thinking
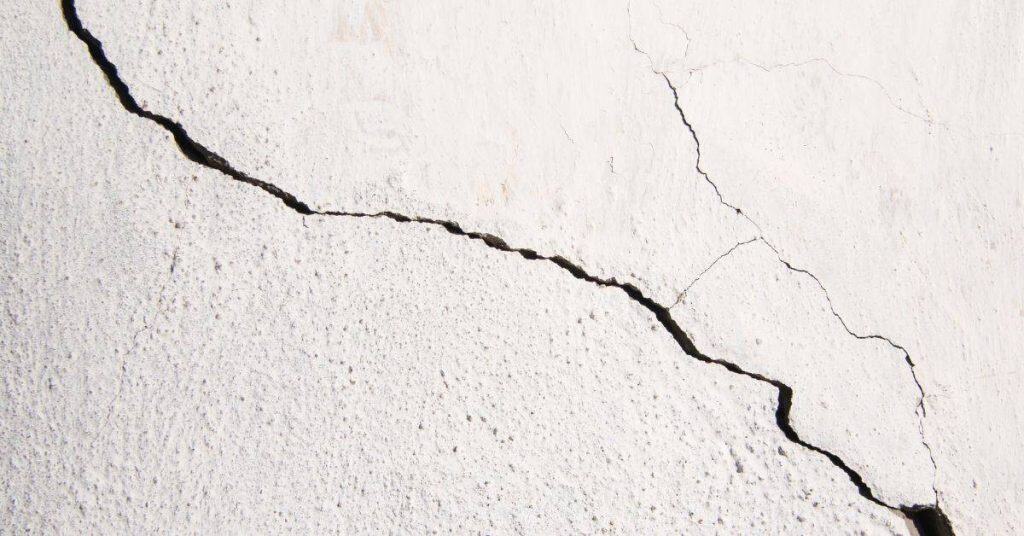
Even cracks that look cosmetic can let moisture seep behind stucco, inviting hidden rot, mold, and escalating repair bills over time. Small cracks may signal ongoing water intrusion and subtle structural vulnerability, so dismissing them risks concealing a larger problem until the damage becomes visible and costly. Early screening of hairline, pattern, and settlement cracks helps distinguish active leaks from harmless movement, providing a basis for timely professional assessment rather than reactive fixes.
Understanding these risks sharpens a practical DIY mindset, clarifying what to inspect, when to intervene, and the cost ranges you should expect as conditions evolve. Safety matters: do not remove protective coatings or tamper with hidden moisture barriers, and avoid unsupported DIY fixes while you plan moisture tests, repair options, maintenance steps, and ROI considerations in later sections.
Real-world cost examples
Homeowner A ignored a hairline stucco crack for two years. Water tracked behind the stucco, soaked the sheathing and rotted a section of wall framing. The repair? $12,000 to remove stucco, replace rotted studs, install new sheathing and flashings, then re-stucco the wall.
Homeowner B patched a cracked corner with paint. After a winter of freeze-thaw, the crack widened and mold started inside the wall cavity. Remediation plus HVAC cleaning and re-insulation ran about $7,500. The patch cost was pennies; the bill was not.
Takeaway: Small savings on a cosmetic fix can turn into large bills for structural and moisture repairs. A quick inspection and proper repair often costs far less than waiting.
How small cracks become big problems
A hairline crack looks harmless, but capillary action pulls water through tiny openings into the wall system. Once water gets in, it stays—especially behind impermeable finishes—so moisture builds up where you can’t see it.
Cold weather makes it worse. Water in a crack freezes, expands and widens the gap. That freeze-thaw cycle repeats and turns a small crack into a path for continuous water entry. Flashing or sealant failures at windows and doors accelerate the damage.
Result: What started as a surface flaw becomes hidden rot, failed flashings, insulation loss and mold. Fix the crack properly the first time to stop the chain reaction.
Types of Stucco Cracks and What Each Means
Crack taxonomy helps homeowners move beyond “cosmetic” labeling. Quick visual cues and typical widths let you triage damage and decide when to call a pro. Understanding each crack type unlocks the原因 behind moisture intrusion, install quality, or structural movement.
Use field tests and pattern clues to distinguish superficial from serious issues. Document progression with simple crack monitoring, moisture checks, and, when needed, advanced scans to guide repairs and prioritize safety and cost.
Hairline and shrinkage cracks
Hairline cracks are ultra-thin, generally under 1/16 inch, that appear as stucco cures and dries. Shrinkage cracks resemble hairlines but often run in tightening patterns across panels and at random points. Both are common and frequently cosmetic unless they widen or track into corners or openings.
Look for patterns: random, isolated lines vs. lines aligning with edges, corners, or windows. Monitor width over several months and note if they begin to widen, indicating movement or moisture problems. Quick tests include a tape measure check and simple moisture staining observations before deciding on repair steps.
Settlement and structural cracks
These cracks are larger and tend to run straight or stair-step along joints, block lines, or at corners, signaling framing or foundation movement rather than cure shrinkage. They may gradually widen or propagate through multiple layers.
If you notice doors sticking, brick offsets, or cracks that persist or enlarge, plan a structural assessment. Seek an engineer review if cracks exceed about 1/8 inch, show active movement, or contact load-bearing elements.
Impact and localized damage
Isolated chips, gouges, or radiating cracks from a hit (ladder strike, impact with equipment, hail) mostly affect the outer coat and can often be patched and textured to blend.
When impact reaches the lath, sheathing, or backer, the repair scope expands to substrate repairs or replacement. Probe the backer, remove loose material, and decide if it’s a surface patch or a larger rebuild before sealing.
Surface Clues That Signal Hidden Moisture
Hidden moisture often wears a quiet tell-tale path across the stucco before a visible flaw appears. Read the surface with a critical eye, then map where water could be pooling or seeping in. Document signs while the weather is favorable for accurate diagnosis.
Think like a investigator: combine surface cues with interior whispers to triangulate problem zones. High-res photos, weather notes, and simple moisture readings turn a vague suspicion into a concrete remediation plan you can share with a contractor.
Stains and biological growth
Dark streaks, rust-colored traces, or green/black patches signal more than dirt. They often indicate moisture has lingered behind the stucco long enough for soil particles, algae, or mold to take hold. Efflorescence—white, powdery deposits—can pop up when mineral-laden water migrates through the finish.
Look for recurring staining under eaves or beside windows, and test for musty odors that don’t dissipate. A probe or moisture meter helps confirm concealed dampness; treating the surface without addressing the source invites recurrence. If staining persists across seasons, plan a deeper inspection of the wall assembly.
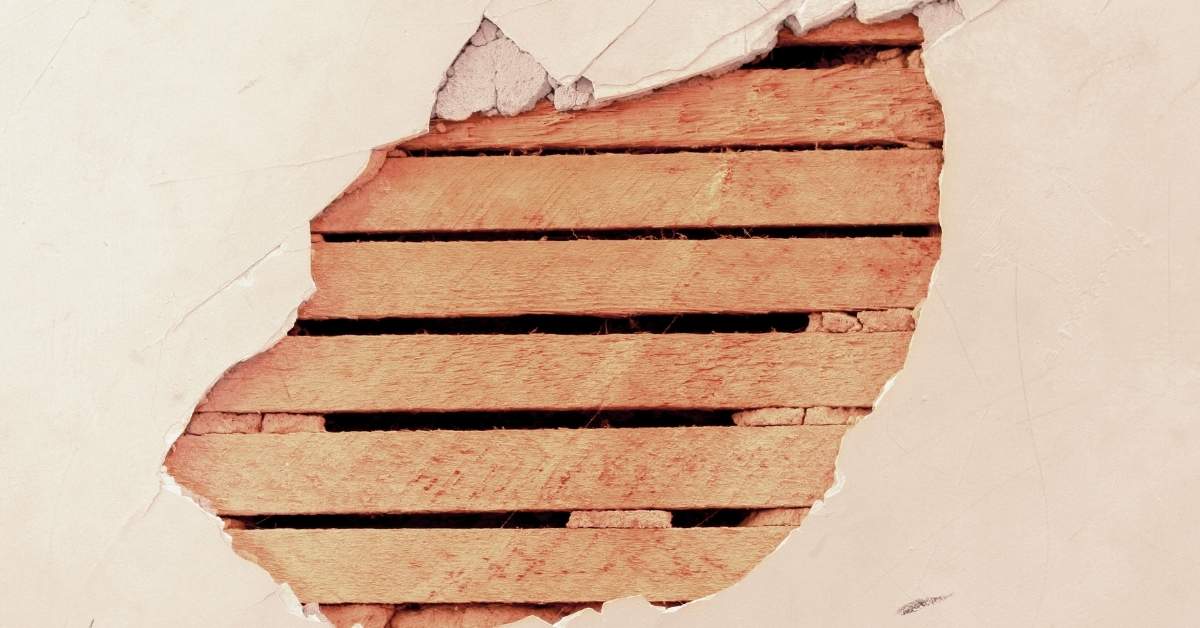
Bulges, blisters, and delamination
Raised areas, bubbles, or a soft, hollow shell indicate the bond to the substrate has failed—usually from water intrusion into the lath or sheathing. Behind a bulge you may find rotten wood or corroded metal lath awaiting repair.
If a bulge yields under pressure, pull a small edge to inspect rather than patch over it. The fix requires drying and rebuilding the substrate first; re-skinning the surface without curing the moisture will simply fail again and waste time and money. When substantial bulging or widespread staining exists, consult a pro and capture findings for remediation estimates.
How Water Gets Behind Stucco — Common Entry Points
Water finds entry points at windows, doors, joints, and other penetrations, and then travels behind stucco when flashing is misapplied or damaged, when weep screeds are missing or blocked, or when sealants fail under UV exposure, age, or incompatible materials. Together these flaws create capillary pathways that pull moisture into the wall cavity and push it toward concealed areas where it can stagnate, freeze, and promote mold, rot, and paint peeling. Understanding these common pathways helps you map a DIY inspection: look for misaligned or gapped interfaces, suspect joints, and substrates that draw water by capillarity from concrete, CMU, or foam boards into the stucco system.
Why this matters on a jobsite is practical: identifying the exact entry points lets you prioritize fixes that stop moisture at the source, such as resealing joints with compatible sealants, improving flashing layouts, and reinstating proper drainage through intact weep screeds and clean drainage paths. Flashing flaws, improper orientation, and metal-to-concrete gaps guide moisture behind the finish, so confirm lapped vs. butt joints, edge overlaps, and step flashing compatibility with the substrate and backer to prevent hidden leaks. Look for signs of surface dampness, frost, or efflorescence, perform quick checks at large penetrations, and weigh the cost and warranty implications of professional remediation, code requirements, and the potential for recurring damage if DIY repairs skim on substrate compatibility and UV resistance.
DIY inspection checklist (do these steps before any repair):
- Inspect window and door flashings: verify correct lap order, step-flashing where appropriate, and that flashings extend over the water-resistive barrier; identify any reverse-lapping or gaps and plan re-flashing if needed.
- Check weep screeds and drainage paths: ensure weep screeds are present, unobstructed, and angled to promote drainage away from the wall; remove obstructions (stucco debris, vegetation) and replace damaged screed components.
- Assess joints and sealants: look for gaps, cracks, or failed sealants at control joints, substrate joints, window/door openings, and terminations; plan to reseal with a compatible, UV-resistant sealant approved for stucco systems.
- Evaluate roof-wall intersections: examine counterflashing, kickout flashings, and trim details for proper integration with roofing flashing; address any missing or misaligned components.
- Test for moisture indicators: observe surface dampness, staining, efflorescence, or frost patterns after rain or irrigation cycles; use a moisture meter if available to identify elevated readings behind the stucco.
- Inspect substrate interfaces: check for gaps or capillary draw at concrete, CMU, or foam board backer into the stucco layer; plan compatible patching or backer material as needed.
- Document and prioritize fixes: rank issues by risk of active leaks, potential repair cost, and impact on warranty; include photos and notes for contractor reference if professional help is required.
Window and door flashings
Windows and doors are common weak spots. When flashings are installed backwards or lap in the wrong order, water rides the joint straight into the wall cavity instead of out. I see reverse-lapping all the time — it defeats the whole drainage idea.
Good practice is to step-flash or shingle the flashings so each layer sheds to the one below it. Sealant is a backup, not the primary defense; relying on caulk alone leads to leaks. Inspect the sill, jambs, and head flashings and fix any laps or gaps before reapplying stucco.
Roof-wall intersections and trim details
Where a roof meets a stucco wall is a tricky transition. If counterflashing, kickout flashings, or trim pieces are missing or tucked incorrectly, rain will follow the path of least resistance — into the wall. Those little trim pieces matter more than most homeowners think.
Make sure counterflashing ties into the stucco and the roofing flashing properly. Kickout flashings at gutters and properly lapped metal at roof edges direct water away. When these details are cut corners, you get staining, rot, and costly repairs down the line.
EIFS vs Traditional Portland Cement Stucco — Key Differences
Barrier EIFS vs drainable EIFS
Barrier EIFS was the original system: insulation board, adhesive, and a continuous outer coat that’s meant to keep water out. When that outer layer gets damaged or water gets behind it, there’s nowhere for the moisture to go. That’s why early problems showed up as hidden rot.
Drainable EIFS adds a built-in drainage plane or channels behind the insulation so incidental water can escape. It doesn’t make the system waterproof, but it greatly reduces the moisture dwell time and the risk of substrate damage. If you’ve read the earlier comparison, you already know the basics—this is the practical fix for the barrier system’s main weakness.
Bottom line: drainable systems need the same careful detailing at openings and terminations, but they’re more forgiving if the finish is nicked or flashings fail.
Cement stucco performance in freeze–thaw climates
Properly mixed and properly cured cement stucco is tough in cold weather. The key is good drainage, proper lath and scratch/brown/finish application, and control joints to handle movement. When those items are done right the stucco resists cracking and spalling through many freeze–thaw cycles.
Problems show up when water is allowed to sit in or behind the stucco—poor flashing, blocked weeps, or hairline cracks that aren’t addressed. Freeze–thaw blows out saturated areas first. You don’t need exotic materials; you need correct detail, prompt repairs, and routine inspections.
Tip: if you live where temperatures cycle around freezing, keep an eye on seals, flashings, and ground slopes. Fix small cracks fast and you’ll avoid big repairs later.
Modern EIFS (EIFS 2.0) — Why It’s Different
EIFS 2.0, or Modern EIFS, reimagines external insulation by adding an integrated drainage plane, a robust air/water barrier, and a reinforced mesh that together control moisture more effectively. This enhanced stack is designed to dry rapidly, shed bulk water before it reaches structural components, and slow deterioration across a range of climates and orientations. Stricter NFPA-compatible fire testing and clearer performance criteria also push for safer, more durable facades that meet modern code expectations.
For installers and property owners, understanding the layered stack—insulation board, drainage channel, water-resistive barrier, and polymer-modified finish—clarifies why each component matters for long-term performance and energy efficiency. Proper flashing details, certified installation practices, and thorough inspections around openings, joints, and penetrations prevent leaks, improve air tightness, and extend service life. Myth-busting: EIFS 2.0 is not just cosmetic; it delivers active moisture management, requires regular maintenance, and may justify upgrades or a full system replacement when retrofitting older buildings.
Drainage plane mechanics
Think of the drainage plane as a highway for water that gets behind the cladding. Grooved foam or drainage mats create a continuous channel so water can flow down and out instead of sitting against the sheathing.
The grooves and mats keep a small air gap so capillary suction is broken and gravity does the work. At the bottom you need a clear exit — weep screeds or flashing direct the water out of the wall.
Installation matters: laps must be tight, seams sealed where required, and penetrations kept clear. A clogged or pinched groove defeats the whole system.
Certification and tested assemblies
Don’t mix and match components willy-nilly. Use NFPA 285-tested assemblies or manufacturer-approved system details. Those tests prove the wall behaves under fire and weather loads when built as specified.
Manufacturers publish tested configurations. Follow their fastening patterns, air/water barrier continuity, and mesh/tape choices. If you change a component, you may be outside the tested assembly.
Ask for documentation on the job — test reports and installation instructions protect you and the building inspector. It’s the fastest way to avoid callbacks and costly rework.
Material Specs and Standards Explained
This section guides homeowners through the core standards that govern stucco and EIFS, outlining the relevant ASTM specifications for stucco, EIFS, lath, and flashing, how IBC and municipal codes apply, and key NFPA fire-safety considerations, plus how manufacturer data sheets translate into practical expectations for performance and durability. It also emphasizes how to read product data sheets and installation manuals to understand substrate prep, water-resistive barriers, drainage or air-gap details (where applicable), insulation, base coats, finishes, and flashing requirements that influence cracking, moisture migration, and long-term system resilience.
Knowing these specs helps you evaluate a contractor’s plan against proven performance criteria, including required fire ratings, moisture barrier performance, wind-load expectations, and regional climate considerations that affect stucco/EIFS behavior. Understanding manufacturer tolerances and warranty conditions also keeps DIYers from chasing cosmetic fixes that mask deeper failures or poor installation. A practical pre-purchase check, targeted questions for contractors, and awareness of third-party certifications and common field tests give you a clearer path to durable, code-compliant stucco or EIFS work.
Key ASTM tests for stucco and EIFS
When you’re checking specs, look for the ASTM tests that prove the material will hold up on the wall. The common ones are freeze–thaw cycling, adhesion strength, and water penetration resistance — they show durability in cold weather, bond quality, and how the system handles driving rain.
Freeze–thaw tests simulate repeated freezes and thaws to catch systems that will crack or delaminate. Adhesion tests measure pull-off strength so the finish won’t pop off the substrate. Water penetration tests demonstrate how well the assembly resists leaks under pressure.
Manufacturers usually list which ASTM standards their product meets. If a sub calls out ASTM numbers on their submittal, that tells you what lab performance to expect. Ask for test reports if you want proof beyond the cut sheet.
Building code and energy code (CI requirements)
Most codes now require continuous insulation (CI) on many exterior walls to meet energy targets. EIFS often satisfies those CI mandates because it provides a continuous foam layer over the sheathing, which reduces thermal bridging at studs and reduces heat loss.
Check your local IBC and energy code for the required R-value and where CI is mandatory. The EIFS system and its installation details must match the manufacturer’s CI R-value and flashing instructions to stay code-compliant.
For inspections, bring the product data showing the CI value and the installation details. If the project mixes cladding types, confirm the transition details so the continuous insulation remains uninterrupted and the inspector can sign off.
Visual Checkpoints: DIY Inspection Walkthrough
This section provides a room-by-room and exterior DIY walkthrough to help homeowners perform a preliminary assessment of stucco, EIFS, and related signs, with a defined scope, essential PPE reminders, and clear guidance on when to call a professional for issues like crack patterns, bulging stucco, or water intrusion. Exterior checkpoints cover cracking patterns, layering issues, hairline versus wide cracks, staining, efflorescence, and potential moisture ingress around windows, doors, and corners, while interior walkthroughs emphasize mapping interior cracks, nail pops, settlement indicators, loose finishes, and hidden moisture behind veneers to corresponding exterior zones, all paired with roof and drainage cues like flashing, gutters, downspouts, and roof-to-wall transitions.
The practical value lies in building a disciplined, photo-backed record: a room-by-room checklist with dates, severity notes, and explicit thresholds that trigger professional assessment—such as active leaks, complex EIFS/stucco systems, or persistent moisture indicators. This approach helps homeowners prioritize safety, plan timely repairs, and communicate clearly with pros, ensuring the building envelope is evaluated holistically rather than addressing isolated symptoms.
Exterior perimeter walk
Walk the full perimeter at eye level and at the foundation line. Look for cracked or missing sealant around windows, doors and where utilities penetrate the wall. Pay close attention to the base weep screed area — gaps, detached flashing or visible gaps can route water into the wall system.
Check for hairline to wide cracks in stucco, masonry or siding. Note cracks that run toward openings or under eaves; those are higher risk. Run a hand along trim and penetrations; loose or soft material usually means the seal has failed.
Take photos and mark locations so you can compare later or show a pro. If you see active staining, bulging, or pieces falling away, stop and get a licensed contractor to assess—don’t patch until you know the cause.
Interior signs to watch for
Smell is the first clue — a persistent musty odor often means moisture behind the wall or in the cavity. Look for water stains, tide lines or discoloration on ceilings and upper walls. Stains near corners, windows or light fixtures often mirror exterior penetration points.
Press gently on suspect drywall and trim. Soft, spongy drywall, swollen baseboards or peeling paint indicate prolonged exposure. Check closets and attic access for hidden staining; these spots can show leaks long before they appear on main walls.
Document all findings and correlate them with your exterior notes. Small stains can hide large problems, so any recurring interior signs should prompt a professional moisture scan before you start repairs.
Tools and Techniques Contractors Use to “See” Behind Stucco
Non-destructive testing (NDT) helps you understand what’s behind stucco without removing or damaging the outer finish, targeting moisture intrusion, hidden voids, and potential structural concerns that can silently undermine the wall system. Popular tools include moisture meters (covering capillary-rise probes and non-contact electric resistance types), infrared or thermal imaging to map heat and moisture patterns, and borescopes that let you peer through small access points, each with distinct strengths, limits, and accuracy profiles. Use invasive probes only when non-destructive results are inconclusive, when evidence suggests significant damage, when access constraints prevent imaging, or when safety and cost tradeoffs justify a deeper check.
Preparing the exterior—cleaning as needed, framing access points, and scheduling around favorable weather—helps you get reliable readings and minimizes false alarms. Readings guide a practical sequence: start with non-destructive methods, interpret moisture and temperature anomalies with context, and escalate to invasive inspection only when red flags persist or readings cross established thresholds. This approach matters for DIYers because it balances safety, time, and budget while keeping remediation planning and budgeting realistic.
Moisture meter interpretation
Moisture meters give you a snapshot, not a diagnosis. For wood sheathing a rule of thumb: under about 12% is dry, 13–18% is borderline and worth watching, and over 18% is a red flag that needs follow-up. On stucco surfaces readings will often be lower than what’s actually in the sheathing beneath, so treat numbers conservatively.
Pin meters read localized spots; pinless units read a shallow zone beneath the surface. Both can be skewed by salts in the stucco, surface dampness from recent rain, or metal lath and fasteners. Always take multiple readings in a pattern and compare to a dry reference area.
Use the meter to decide next steps: trending higher readings, consistent hot spots, or values over the red-flag threshold mean dig deeper. Don’t assume a single low or high number tells the whole story.
When to do destructive testing
Cutting a test opening is justified when non‑destructive checks show persistent elevated moisture, you have visible staining or efflorescence, soft spots, rot, or recurring leaks. If the siding flashing details or window perimeters look suspect, a probe can confirm whether the water is surface-only or has breached the weather‑resistive barrier.
Inspectors will look for wet or rotted sheathing, separation of stucco from substrate, failed flashings, compromised WRB, wet insulation, mold growth, and corroded fasteners. A small, well-placed hole gives definitive answers you can’t get from a meter or camera alone.
Make openings small and strategic. Repair and document each test cut. If you find serious decay, plan for larger removals and full repairs rather than patching around the problem.
Common Installation Errors That Lead to Cracking and Leaks
Common installation errors—such as inadequate substrate prep, skipped flashing, improper mesh embedment, and incorrect mixing—often trigger cracking and leaks in stucco and EIFS systems. Addressing these high-risk steps, especially moisture management, flashing, and substrate cleanliness, helps prevent water intrusion.
Understanding these pitfalls gives DIYers and inspectors practical pre-step checks and remediation tips, from joint placement and caulking to maintenance routines. By focusing on material mix ratios, proper embedment depth, and correct curing conditions, homeowners can ask the right questions and reduce future repairs.
Reverse flashing and lapped membranes
When laps point inward instead of shedding water out, the system routes moisture toward the wall. Water will find any gap and run along the back of the cladding — not where you want it.
Correct the problem by re-sequencing the membranes like roofing shingles: top layers overlap lower layers so water always runs out. Peel back the affected strips, set the laps in the proper direction, and reseal with compatible flashing tape or mastic. Use a kickout or diverter where the roof meets the wall to force water clear of the finish.
Simple rule: laps go downhill and out. If you follow that, you stop most inward leaks before they start.
Missing or improperly installed weep screed
No weep screed means trapped moisture at the base of the cladding. Water has nowhere to exit, so it soaks into the sheathing and framing. That leads to rot, mold, and stucco delamination.
Retrofitting a weep screed usually requires cutting back the finish, installing the screed and proper backer, then reinstalling the finish. It can be labor-intensive and costly compared with doing it right from the start. In the meantime, keep grade and trim clear, and add temporary drainage to reduce damage.
Bottom line: allow an exit for water at the base. Skipping it now saves nothing when you factor in repairs later.
When Cracks Are Cosmetic — and How to Confirm It
Cosmetic cracks are surface-only and meet criteria such as hairline width (less than 1/16 inch), no moisture intrusion signs, no delamination or bulging, and no active water staining. Use quick non-destructive tests—moisture meters, surface dye or flashlight checks for delamination, and gentle tapping—to confirm safety. If these conditions hold, routine patching and repainting can be appropriate instead of major remediation.
A practical diagnostic workflow helps DIYers avoid unnecessary work while catching hidden issues early. By mapping crack patterns, checking for moisture clues, and applying simple tests, you can decide between cosmetic patching and more extensive repair or remediation and monitor progression over time. Understanding when cosmetic findings become structural concerns—such as cracks aligning with framing, widening over time, or widespread peeling—tells you when to escalate to a professional.
Simple patch & monitor approach
When cracks are surface‑level and dry, do small repairs and watch them. Clean the crack, apply a flexible patching compound or caulk made for the material, then feather the edges so the repair lies flat with the surrounding surface.
After the patch, mark the area and check it on a schedule: 1 week, 1 month, 3 months, then every 6 months for a year. If the crack stays stable and no new gaps or moisture appear, you can treat it as cosmetic.
Record what you used and the dates. If the crack widens, reappears through the patch, or you find moisture underneath, stop cosmetic repairs and get a professional assessment. A simple patch is a stopgap, not a substitute for unseen damage.
Paint/finish-only failures vs. substrate issues
Surface flaking, chalking, or hairline cracking in the topcoat often sit on sound material beneath. Light sanding will remove loose finish; if the substrate stays intact and solid, the problem is likely the finish. Do a scratch test with a putty knife to see if the material underneath crumbles.
Substrate problems show different signs: soft spots, delamination, powdery residue, or moisture staining. Tap the area—solid sound means surface issue, hollow or spongy sound means deeper trouble. If in doubt, cut a small inspection patch to confirm what’s under the finish before spending on major repairs.
When the finish is at fault, a proper prep and recoat fixes it. When the substrate is failing, plan for replacement or structural repair rather than cosmetic fixes.
Repair Options — From Patch to Full Remediation
Repair Options — From Patch to Full Remediation organizes the work into four clear tiers: spot patching for hairline cracks and small gaps, a recoat or skim coat for mid-sized cracks and surface deterioration, localized substrate replacement where the issue is behind the finish, and a full cladding replacement for extensive damage or failed insulation. Each tier has its typical materials, compatible climates, and expected lifespan, along with clear pros and cons related to cost, time, energy impact, and durability. This framework shows when to choose one tier over another, and what risks to watch for, such as hidden moisture, improper adhesion, or mismatched finishes.
For DIYers and job sites, a practical decision framework guides moisture assessment, crack width and pattern, interior signs, and climate and movement indicators to determine feasibility and needed expertise. A quick workflow helps scope the job, gather materials, surface prep, primer and skim coat application, cure times, and finish bond, while noting required permits and safety and when to call a pro. Post-repair maintenance—crack monitoring, moisture control, and periodic inspections—helps keep repairs durable and reduces the chance of recurrence.
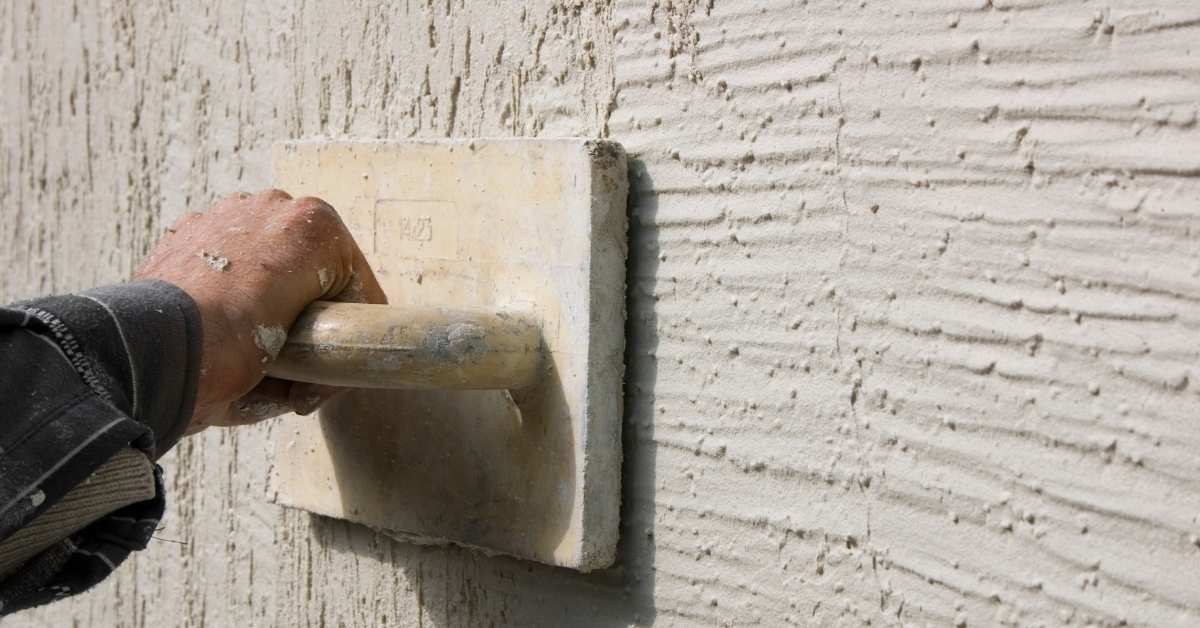
Cosmetic patching and texture/color match
Small holes, hairline cracks and surface stains can often be fixed without ripping the wall off. Clean the area, fill with a compatible patch compound, and sand to a feathered edge so the repair sits flat with the surrounding surface.
Getting the texture and color right takes time. Use test patches, match the paint sheen, and blend edges while the paint is wet. For textured finishes, extend the repair slightly beyond the visible damage to avoid a noticeable spot.
Expectations: Cosmetic work hides defects but won’t fix hidden moisture or rot. A well-blended patch can last years on a stable wall, but watch the area for return of staining or soft spots that mean a deeper repair is needed.
Full removal and rebuild process
When framing, sheathing or insulation is wet or rotten, plan to remove affected cladding and get down to the studs. Strip back until you see clean, dry wood; anything soft or moldy comes out. That step is non-negotiable—patching over bad structure only delays failure.
Replace damaged studs or blocked-fill insulation, install a new weather-resistive barrier, flash critical joints and reinstall sheathing or cladding. Allow drying and inspections at key stages. On an average exterior wall this sequence takes several days to a couple of weeks, depending on trades and drying time.
Timeline and checks: Frame repair and insulation first, then WRB and flashing, then cladding and finish. Inspect for square walls, continuous flashing and proper fasteners before closing up. Doing it right now prevents repeated repairs later.
Typical Costs and Scope of Work
Typical costs for wall remediation fall into several repair classifications and payment bands: cosmetic crack fill, targeted patching, partial remediation, and full remediation or re-skin, each with rough cost bands tied to the scope and the region’s labor rates. Price drivers commonly include crack size and density, hidden moisture or rot, insulation or EIFS considerations, accessibility, surface prep needs, permit requirements, and regional labor rates, which together create a wide range from small crack fills to full re-cladding.
Knowing these factors helps you gauge whether a project is minor maintenance or a larger remediation, and it clarifies when DIY is feasible versus when a licensed contractor is prudent. The practical takeaway is a simple decision framework: outline the scope of work (inspection, moisture assessment, substrate repair, crack prep, waterproofing, finish coat, and final inspection), compare against local permit rules, and use rough cost bands to estimate totals and timelines, while factoring in cure, coverage, and access considerations that influence both scheduling and long-term performance.
Small repairs (under 10 sq ft) cost range
For a patch under about 10 square feet you’re usually looking at a modest bill. Expect a range roughly between $150 and $800 depending on access, materials, and whether you need mold testing or just a simple cut-and-replace.
That price normally covers removal of damaged material, drying, treating the area if needed, and reinstalling the finish. If you need new drywall, insulation or a small section of siding the cost sits toward the higher end. Labor and travel time can push small jobs up faster than people think.
Large remediation and substrate replacement costs
When damage extends into framing, sheathing or insulation expect a much bigger job. Typical ranges run from $2,000 to $15,000 or more for full-area remediation and substrate replacement, depending on the square footage and structural repairs required.
Those jobs include demolition of affected framing, replacement of insulation and sheathing, drying, and often electrical or plumbing repairs if systems were involved. Permit work, disposal, and restoration of finishes add to the total, and costs vary widely by region and contractor availability.
Insurance: What Policies Cover (and What They Don’t)
Homeowners policies typically cover sudden, accidental water intrusion related to stucco defects, but gradual leaks or long-standing moisture problems are often excluded; the impact of pre-existing conditions and required disclosures can also determine eligibility and claims outcomes. In practice, many policies carve out maintenance, wear-and-tear, improper installation, and earth movement as exclusions, so knowing which endorsements—such as moisture-related riders or exterior cladding coverage—provide broader protection can be the difference between a claim being paid or denied. Clear disclosure of relevant conditions and timelines helps reduce surprises when a loss occurs and clarifies what the insurer expects during settlement.
For a DIY or jobsite reader, this matters because it highlights where gaps commonly arise and how to tighten coverage before damage happens. Understanding the disclosures you must make and documenting the defect timeline, moisture readings, photos, and contractor estimates can streamline a claim and support a faster, more accurate settlement. A practical approach is to assemble repairs and communications promptly, keep detailed records, and use those documents to guide conversations with the insurer, so you can address stucco/EIFS issues effectively without unnecessary delays.
Filing a claim for moisture damage
Take photos and video right away. Capture the affected stucco, interior stains, warped trim, and any tools or meters showing moisture. Time-stamped evidence makes the claim easier to prove.
Call your insurer and report the loss, then schedule a licensed inspector or contractor to document the problem. Get a written inspection and a repair estimate. Keep all receipts for emergency drying, temporary repairs, and living expenses if you had to vacate.
When the adjuster comes, walk them through what happened and hand over your photos, inspection report, and receipts. Be clear about when you first noticed the issue. If you disagree with their findings, get a second opinion from an independent contractor and submit that to the company.
When insurers deny coverage
Denials usually boil down to one of a few things: the damage is from a maintenance problem, it existed before you bought the house, or it’s from an excluded peril. If the insurer says the loss was gradual or from neglect, they expect the owner to have fixed the issue before it got worse.
Pre-existing conditions and failure to disclose known damage can also kill a claim. If you had prior repairs or visible issues and didn’t tell the company at binding, the insurer can deny coverage. Keep records of any prior work and disclosures to protect yourself.
If you get a denial you think is wrong, ask for the denial letter in writing, review the policy sections cited, and consider an independent appraisal or legal advice. Sometimes a clear inspection report or contractor estimate will get the company to reopen the file.
How Ignoring Stucco Cracks Affects Home Value and Resale
Even small stucco cracks can trigger appraisal adjustments when moisture intrusion or subtle structural movement is suspected, with appraisers differentiating cosmetic from functional defects and noting potential risk factors, including how the finding could affect moisture history and insulation performance. Inspectors frequently flag drainage issues, efflorescence, hairline cracks over windows, and distinct crack patterns that correlate with moisture paths, wall movement, or EIFS-related concerns that can lower perceived value, potentially prompting lenders to require a moisture assessment or remediation proof. Clear, well-organized documentation helps buyers and lenders see that the crack has been evaluated, repaired, and mitigated, reducing downward pressure on the price.
Build a practical, field-ready plan: comprehensive photos, moisture readings, remediation quotes, contractor warranties, and a narrative that connects the crack to its cause and the chosen fix, plus notes on monitoring progress during repairs and post-repair verification. Prioritize cost-effective actions such as sealing isolated hairline cracks first, then addressing leaks or drainage issues, and framing improvements to support insurance coverage and long-term durability, while including detailed cost estimates, timelines, and warranty terms. Disclosures, repair contingencies, and credits can influence offers, timelines, and buyer confidence, so documenting a credible path can preserve ROI and smoother negotiations, helping you negotiate from a position of clarity and preparedness in a competitive market.
What appraisers and inspectors look for
Appraisers want comparables and condition. Big, visible stucco cracks or areas of patching can drop your score because they scream deferred maintenance. If the crack shows staining, bulging, or separation at corners and window openings, the appraiser will note a potential cost to repair.
Inspectors hunt for moisture and structural trouble. They’ll probe soft spots, look for rusted fasteners or rotted sheathing behind the stucco, and test around flashings. Even hairline cracks near flashing or roof lines can trigger a moisture recommendation that scares buyers or requires work before sale.
Bottom line: visible damage or signs of water intrusion are red flags. A clean, documented condition lets an appraiser treat the home like other well-maintained comps instead of a fixer-upper.
Documentation that protects resale value
Keep the receipts and reports. Installation records, permits, contractor invoices and warranty papers show the work was done right. If you’ve fixed cracks, include the repair invoices and a short description of the methods used so buyers and appraisers know it wasn’t a quick slap-on.
Include any inspection or moisture tests. A recent moisture report or contractor inspection that shows no active leaks is worth a lot at the negotiating table. Photographs taken before and after repairs create a clear timeline that builds trust.
Hand these docs to your agent and have copies ready for showings. Sellers who present organized records cut down on surprises, reduce price concessions, and speed the sale.
Choosing the Right Contractor — Red Flags and Must-Haves
Choosing the right contractor means verifying essential qualifications and documenting clear expectations before work begins: confirm required licenses, current general liability and workers’ compensation insurance, and any bonding status along with verifiable trade certifications or affiliations relevant to stucco or EIFS installation, then insist on a written scope of work that details materials, performance standards, milestones, a defined change-order process, and a documented payment schedule with lien waivers; gather solid references and recent project outcomes, including warranty-related service evidence, and scrutinize whether local projects match your climate and architectural needs.
In addition, expect comprehensive warranties and post-installation commitments that spell out the length and terms of workmanship and materials coverage, maintenance responsibilities, moisture testing or inspection provisions, and clear claim resolution procedures, while avoiding red flags such as demands for upfront payment beyond agreed terms, vague or all-inclusive scopes, missing site safety plans, no on-site inspections, unclear warranty coverage, or pressure to hire non-local installers; this diligence helps avoid costly surprises and ensures your system performs as designed under local conditions.
Certification and manufacturer training
Certified installers have been through the hands-on training that matters. They know the brand-specific details that a checklist won’t catch. That reduces callbacks and saves you time and money.
Ask for proof of certification and any third-party inspection reports. A sticker on the job or a signed inspection form from the manufacturer or an independent inspector is worth more than a verbal promise.
If the contractor resists showing credentials, consider it a red flag. Proper training shows they stand behind their work and the product warranties.
Questions to ask and contract clauses to insist on
Get clear answers on warranty length and what it actually covers. Ask who does the warranty work, what parts and labor are included, and whether manufacturer and installer warranties run concurrently or consecutively.
Insist on written change order language, a payment schedule tied to milestones, and a clause requiring lien releases from subs and suppliers. Don’t sign until scope, materials, timelines, and cleanup are in writing.
Keep the contract simple but specific. Written terms are the tool you use if things go off schedule or someone tries to add costs later.
Maintenance Planning for Long-Term Success
Maintenance planning focuses on proactive inspections, yearly sealant resealing, and careful cleaning to extend the life of stucco and EIFS systems while preventing costly repairs and moisture-related damage. Establishing a multi-year calendar helps schedule sealants, coatings, inspections, and minor fixes in a predictable way, aligned with seasonal windows, warranty requirements, and available contractor availability. A moisture management approach—gutter and flashing checks, proper grading, ventilation, and drainage strategies—reduces water intrusion, minimizes mold risk, and preserves warranties while supporting long-term performance.
Think of a 3–5 year plan as your roadmap for ongoing protection, with estimated costs for sealants, coatings, inspections, minor repairs, and labor in clear line items to aid budgeting. It clarifies which tasks you can safely handle as a DIY project and when to bring in licensed pros to safeguard warranties, ensure proper repair methods, and document work for code compliance. This structured approach helps you catch issues early, manage costs, and keep the project on track, reducing downtime and surprise expenses while maintaining home value.
Annual inspection checklist
Walk the roof and around the house once a year. Look for cracked sealant, loose flashings, missing shingles, and clogged gutters. Check for soft spots on fascia and under-eaves that signal water intrusion.
Test windows and doors for drafts and inspect exterior caulk lines. Tighten loose screws on vents and replace any small broken pieces you can safely reach. For anything beyond a basic swap or re-caulk, note it for a pro.
Tip: Take photos and date them. That makes it easier to spot changes year-to-year and plan repairs before they get expensive.
Sealant lifecycle and replacement timing
Most exterior caulks last 5–10 years depending on UV exposure and movement in the joint. Silicone and polyurethane tend to outlast acrylics. Expect faster failure on south- or west-facing walls and around roof penetrations.
Replace sealant proactively when you see cracking, hardening, or gaps. Don’t wait for leaks. Remove old material, clean the joint, and use the right sealant for the application.
Plan: map critical sealant runs and rotate replacements every few years so you’re not doing the whole house at once. That spreads cost and keeps the building weather-tight.
Energy Efficiency Impacts of Stucco and EIFS
Energy efficiency for stucco and EIFS hinges on continuous insulation, whole-wall R-values, and air barriers that meaningfully reduce heat transfer, which directly shapes HVAC sizing, annual energy use, and occupant comfort across diverse climates. While modern EIFS 2.0 systems can deliver tighter envelopes and better moisture management than traditional stucco, achieving the energy benefits depends on meticulous detailing, appropriate insulation thickness, careful integration with the air barrier, and a design that avoids thermal bridges at openings, transitions, and edges.
From a planning and ROI perspective, upfront insulation costs must be weighed against long-term savings, with break-even timelines that vary by climate, local energy prices, and the chosen wall system, as well as codes and manufacturer warranties that affect performance guarantees and maintenance requirements. For DIY readers and busy job sites, practical steps include defining detailing standards, performing blower door tests and duct leakage assessments, checking for proper air sealing at penetrations, and setting up a simple monitoring plan after completion to confirm that reduced heat loss translates into lower energy bills, improved comfort, and preserved moisture control.
Real energy savings case study
I worked on a 2,000 sq ft ranch in a mixed-humid climate where the owner added a 1.5″ EIFS layer (about R‑6 continuous) over the existing sheathing. Before the upgrade the house had standard fiberglass in 2×6 walls and noticeable drafts at corners and windows.
After the EIFS went on we measured a steady drop in heating demand. Over the first winter the homeowner saw roughly 15–20% lower natural gas use for space heating compared with the previous year, with similar percentage drops in cooling energy the first summer.
Out-of-pocket the system paid back on energy savings in about 8–10 years when you include the reduced wear on the HVAC and lower monthly bills. Your local climate, fuel prices, and installation quality shift that window, but the continuous insulation and better air sealing were the main drivers of savings.
Whole-wall R-value vs nominal R-value
Nominal R-value is what the batts or boards are rated at inside the stud cavity. It doesn’t account for studs, headers, windows, or thermal bridges. On a typical framed wall that can shave a lot off performance.
Whole-wall R-value is the real number you care about. When you add continuous insulation like EIFS, you cut down thermal bridging and raise the whole-wall R much more than the board R alone suggests. A wall with R‑19 cavity batts can perform like R‑13 whole-wall without continuous insulation, and jump several R points with an exterior continuous layer.
In plain terms: don’t judge a wall by the batt. Look at whole-wall R and air tightness. Continuous insulation and a proper air barrier deliver the HVAC savings and ROI that nominal R-values often overpromise.
Fire Performance and Safety Concerns
Fire performance varies by system: traditional stucco is generally non-combustible and acts as a passive barrier, while EIFS materials carry different ignition risks and heat transfer characteristics, with modern EIFS 2.0 designed to improve performance but still requiring properly installed assemblies. NFPA 285 is the standard full-scale wall assembly test used to assess how a façade behaves under prolonged heat exposure from a vertical fire, and full-scale testing matters for code compliance because small lab tests can miss critical interactions between cladding, insulation, sheathing, and moisture. Many myths persist—such as cracking being purely cosmetic or hidden pathways to ignition—and the real story is that flashing details, drainage, air barriers, and moisture management directly influence fire spread and potential failures.
For homeowners, the practical implications start with proper ventilation, proactive moisture control, and meticulous flashing, drainage, and air-barrier details that maintain fire-resistance performance during routine weather cycles as well as during fires. A concise checklist helps you and inspectors verify code-ready assemblies: request product spec sheets, test reports, certification marks, and installation-quality indicators, plus targeted questions for contractors and local code officials. Regional factors like climate, building codes, and enforcement influence fire performance, so in Indiana or similar jurisdictions you should confirm use of code-approved assemblies and have inspectors verify that those assemblies were installed and maintained as tested.
Class A ratings and what they mean
Class ratings tell you how a roof or exterior assembly resists flame spread and burning. For walls and claddings, you want materials and assemblies that limit fire growth so a small fire doesn’t race up a building.
Class A is the top level for flame spread and is what insurers and inspectors like to see on combustible claddings in many neighborhoods. Remember: the rating applies to the whole assembly, not just the finish coat — tested assemblies like those meeting NFPA 285 are what counts on multi‑story work.
Lower ratings (Class B, C) mean more risk and more restrictions. If your setup uses combustible insulation or untested detailing, a Class A finish alone won’t save you — follow tested assemblies and local code requirements.
Materials and additives that improve fire resistance
What you put under and into the stucco/EIFS matters as much as the finish. Choose non‑combustible or fire‑retardant components and keep the details tight.
- Non‑combustible base Use cementitious base coats or mineral wool backer boards. Look for ASTM C1325 or similar specs. Avoid wood or OSB backer behind the system — it burns and weakens the bond.
- Mineral wool insulation Dense, non‑combustible insulation with an A rating. Check ASTM C612 or EN 13162 performance. If you use cheaper foam instead, expect higher fire load and possible delamination.
- Fire‑retardant foam When foam is required, choose foam with proven fire additives. Look for NFPA 285 compliance as part of the assembly. Untreated foam can melt, drip, and cause big failures in a fire.
- Cementitious base coat Use Portland cement base mixes for better fire resistance. Specify ASTM C926 or manufacturer fire‑rated mixes. Organic modified bases crack and can allow fire paths behind the finish.
- Reinforcing mesh Alkali‑resistant glass mesh helps keep the finish intact in heat. Follow manufacturer embedment depth. Wrong mesh or poor embedment leads to cracking and exposes combustible layers.
- Intumescent sealants Use at penetrations to swell and block heat in a fire. Check for tested temperature ratings and compatibility with stucco/EIFS. Regular sealants melt away and leave gaps for flame spread.
- Firestop backer Metal or mineral firestops at joints slow flame travel. Look for tested joint systems for your wall assembly. Skipping firestops lets fire bypass rated panels through joints.
Retrofit Options: When to Re-clad or Convert Systems
Converting barrier EIFS to drainable assemblies
You can often retrofit a barrier EIFS by adding a drainage plane behind the finish rather than ripping everything off. Typical methods are furring strips, a rainscreen gap, or a new drainage mat tied into the existing substrate and flashings.
These approaches reduce moisture risk but they have limits: they don’t fix a wet or decayed substrate, and they can be tricky around windows and openings. Expect additional flashing work and local re-detailing. Plan on invasive inspection first and budget for repairs to sheathing or framing if rot shows up.
For smaller jobs the retrofit can extend service life at lower cost than full re-clad. For extensive water damage or recurring failures, full removal and replacement with a proper drainable EIFS or other cladding is usually the smarter, longer-lasting move.
Switching to fiber cement, brick veneer, or siding
Choosing a new cladding is about durability, cost, and the work involved. Fiber cement is durable and fairly straightforward to install over a sound substrate. Brick veneer is long-lasting but heavier and pricier to install because of structural and foundation considerations. Traditional siding is cheapest up front but may need more maintenance over time.
Factor lifecycle costs: initial removal, substrate repairs, new weather barrier, flashing, and labor. Upfront cost can be higher for brick or full re-clad, but these options often lower long-term maintenance and moisture risk. If your substrate is compromised, the extra cost to replace it now saves headaches later.
Pick the cladding that matches your budget and long-term plans. If the envelope needs major repair, use the opportunity to upgrade the water-management details regardless of material choice.
Regional Considerations (Climate, Codes, and Local Practices)
Regional climate, codes, and local practices shape which stucco system performs best where you live, affecting both short-term results and long-term durability. Freeze-thaw cycles, humidity, rainfall, and wind-driven rain influence material choices and durability, often favoring traditional stucco in some climates and modern cladding in others, with maintenance needs that vary by locale. Municipal and regional variations in permits, water-resistive barriers, and EIFS 2.0 guidelines directly impact project scope, inspection expectations, and achievable performance, including Indiana- or Midwest-specific amendments to weather barriers and moisture management.
Understanding these regional factors helps homeowners decide when to prioritize EIFS 2.0 versus traditional stucco, and how climate aligns with system selection, installation sequencing, and total costs. The guidance also translates into practical steps: plan for local code compliance, ensure proper surface prep, flashings, sealants, and cure conditions, and schedule inspections at key milestones to avoid delays. By framing risks like freeze-thaw damage, moisture intrusion, and improper drainage against local practices, you gain a practical, phased approach for assessment, repair, and prevention that aligns with regional maintenance schedules and warranty expectations.
Freeze–thaw specific detailing
In cold climates the details matter more than the slab thickness. Place control joints where the slab will crack predictably and keep them at proper spacing and depth so the freeze–thaw cycles don’t open wide gaps.
Use reinforcement to limit crack width rather than try to stop cracking entirely. Fiber or rebar holds things together; joint layout lets the slab move without tearing up edges.
Air-entrained mix, good drainage, and proper curing are the trio that save concrete from repeated freeze damage. Make sure edges slope away and surfaces dry between freezes to reduce saturation and spalling.
Local code quirks and permit expectations
Every town has its own checklist. Before you dig or pour, check with the local building department for setbacks, frost-depth requirements, and whether an engineered design is needed. That avoids costly rework and failed inspections.
Inspections often focus on compaction, reinforcement placement, and drainage. Be ready to show stakes, forms, and rebar locations. Typical timelines and required documents vary, so ask about review times and inspection calls.
Also ask about common local contractor practices. Some areas accept stamped plans; others expect contractors to pull permits. Knowing the norm helps you choose a contractor who handles the paperwork and the work the town expects.
Case Studies: Preventive Action vs. Deferred Repair
Case studies show that identifying and addressing stucco and EIFS issues early—such as sealing small cracks, patching localized moisture pockets, and improving ventilation—produces noticeably better outcomes at a fraction of the cost of neglect. Two to three concise vignettes contrast early preventive action with long-term neglect, underscoring modest labor, material, and permit expenses for small fixes versus escalating remediation, structural reinforcement, or replacement over a 5–15 year horizon. Together they demonstrate the ROI of proactive maintenance, with initial investments typically remaining in the low hundreds to a few thousand dollars and the alternative path incurring higher, compounding costs.
For DIYers and job sites, clear diagnostic cues matter: crack width, moisture behind stucco, efflorescence, staining, and any sensing of movement should trigger escalation to inspection and moisture testing when thresholds are met. A practical decision framework considers age of the stucco or EIFS, climate exposure, building envelope condition, presence of EIFS 2.0 versus traditional stucco, and indoor moisture signals, plus a simple yes/no checklist to rapid-fire plan the timing. An actionable plan translates into documenting signs, obtaining multiple quotes, prioritizing fixes by urgency, scheduling preventive work next season, and establishing maintenance habits to prevent recurrence.
Early detection saved scenario
I found a small leak under the kitchen sink during a routine check. Timeline: noticed damp patch week 1, shut off supply and removed cabinet lining by week 2. No mold yet. Wood was soft but salvageable.
Interventions: replaced a failed flex line, dried the cavity with a fan and dehumidifier for 72 hours, treated and sealed the subfloor, and installed a drip tray. Took a handyman and a day of drying. Final cost: about $350–$600. Compare that to full floor replacement and mold remediation and you save big.
Deferred repair worst-case
Same leak ignored for months. Timeline: slow drip became steady over 6–12 months. Moisture spread into adjacent cabinets, subfloor, and wall cavity. Mold established behind drywall. Structural rot showed at joist ends.
Remediation: demo of cabinets, removal of drywall, mold remediation, replacement of subfloor and affected joists, new cabinets and finishes. Required licensed contractor and specialist testing. Final cost: about $8,000–$20,000 depending on extent. Time out of the kitchen: multiple weeks. Lessons are simple: early fix is cheap; deferred repair multiplies cost and hassle.
When to Call a Structural Engineer or Building Scientist
Escalation should be triggered by observable signs that suggest structural risk: large or widening cracks, sagging or bowing walls, and any suspicion of framing rot or significant delamination that could compromise load paths. Moisture intrusion behind stucco or EIFS, visible efflorescence, or ongoing water staining also count as red flags, especially when they coincide with changing crack patterns or increased interior dampness. Having clear thresholds helps you decide who to call—structural engineer, building scientist, or licensed general contractor—and when to escalate to formal assessments or insurance involvement.
Prepare documentation in advance: a simple checklist of cracks with approximate widths and locations, photos with scale, dates, weather conditions, and notes on any related sounds or odors to share with the inspector. Learn what to expect from the expert—visual inspection versus non-destructive testing, potential framing or sheathing checks, and how the report informs repair sequencing, cost estimates, and insurance claims. This context helps you budget, coordinate EIFS versus traditional stucco repairs, and plan temporary protections while work is queued, so escalation leads to safer outcomes rather than reactive fixes.
What an engineer evaluation includes
An engineer will start with a visual walk-through, noting cracks, deflections, rot, and any fastener or connector failures. They may open small sections of finishes to check hidden framing and moisture. Expect simple measurements and photos to document conditions.
Depending on what they find, they may order targeted testing — moisture meters, core samples, or load calculations. Tests are practical: they confirm if a member is unsafe or just cosmetic.
The final deliverable is a concise report with findings, severity ratings, and recommended repairs or monitoring. That report often includes drawings, repair sketches, and a clear statement on whether the structure is safe to occupy. Use the report as your decision document.
How to use engineering reports in negotiations
Give the report to contractors so bids are apples-to-apples. A good report defines scope and materials, which keeps contractors from underbidding then adding change orders. Highlight the engineer’s recommended methods and required materials when you compare quotes.
For insurance claims, attach the report to your claim and point to the specific findings and cost estimates. Insurers respond to factual, numbered items — not general worries. If you’re selling the house, include the report in disclosures to justify price adjustments or to show that documented repairs were completed.
Keep copies and refer to the exact language in the report during negotiations. Clear facts beat opinions when you’re asking for money or asking someone else to do the work.
DIY vs Professional Repairs: What You Can Do Safely
DIY can cover safe tasks like cleaning, minor cosmetic caulking, and surface sealing, provided you first evaluate cracks by width, pattern, and moisture signs to avoid misdiagnosis, and you follow a simple workflow: inspect exterior, document crack locations with photos, monitor changes, and decide if repairs are cosmetic or structural. Prepare the right tools and materials, do proper surface prep, choose matching caulk or sealant, and resist shortcuts that could worsen damage, while knowing when to pause for safety—scaffolding, ladders, PPE, and potential electrical or mold risks.
Red flags—active leaks, widening cracks, foundational settlement signs, interior staining, or suspect structural movement—mean professional help is needed, and when selecting a contractor, verify licenses, obtain solid references, insist on a written scope and warranties, and discuss cost timelines and insurance documentation. A clear maintenance plan after any repair reduces recurrence and keeps you prepared for future claims, making safety, accountability, and proper workmanship central to every decision.
Safe DIY patching steps
Start by cleaning the area. Remove loose material, dust and any old sealant. A stiff brush, vacuum and a damp rag do most of the work. Let surfaces dry fully before you touch the patching material.
Use the right product for the job: spackle or joint compound for small drywall dents, a paintable caulk for hairline gaps, and a concrete patch for shallow exterior cracks. Follow the maker’s instructions for mixing and application. Apply thin, even layers and let each layer cure before adding more.
Sand lightly, prime and paint to match. Think of these repairs as time-buying fixes, not permanent structural solutions. If you see wide cracks, spreading damage, or moisture coming through, stop and get a professional assessment.
When DIY makes problems worse
Using the wrong material is the biggest mistake. Flexible sealant on a structural crack, or paintable caulk where moisture control is needed, accelerates failure. Improper mixing of epoxy or mortar weakens the repair and hides the real problem.
Overfilling, skipping surface prep, or patching over active leaks masks damage and lets corrosion, rot and mold spread. That creates larger, costlier repairs later. If a repair requires cutting into structure, dealing with wiring, load-bearing parts or persistent water intrusion, stop and call a pro.
Tools and Materials Checklist for Professionals and DIYers
A practical checklist of core tools and materials for professionals and DIYers helps you diagnose moisture risk, monitor cure, and install reliably. It contrasts essential gear like a moisture meter, infrared camera, and field trowels with optional high-end equipment, and explains material specs for adhesives, lath, base coats, and stucco mixes to ensure compatibility and performance. The emphasis is on matching the right toolset and materials to the job and planning for surface prep, safety, and workflow from day one.
This section clarifies what to invest in upfront, what can be rented, and how to verify mix ratios, shear strength, curing times, and climate considerations to avoid failures. It highlights surface prep aids (hawks, floats, corner beads, mesh, fasteners) alongside professional vs. DIY options, plus PPE, calibration routines, and documentation like pre-job moisture readings and QA checklists. For a DIY or small contractor, the guidance helps you budget wisely, know when to upgrade gear for EIFS 2.0 vs traditional stucco, and stock the right essentials for quick turns while staying code-compliant and safe.
Recommended moisture meters and cameras
Pick tools built for building materials, not just wood. Look for meters with a separate pin and non‑invasive mode so you can check stucco, lath and sheathing without tearing things open.
A thermal camera that shows clear temperature differentials at 0.08°C sensitivity helps spot trapped moisture and delamination behind EIFS. Combine that with a capacitance or dielectric meter for quick scans and a pin meter for spot verification.
Pro tip: Calibrate meters on a known dry area before testing. Always document readings and photos so you can track changes over time.
Approved sealants and finish materials
Choosing the right sealant and finish keeps stucco and EIFS flexible, watertight and bonded. Wrong products lead to cracks, staining or failed adhesion.
- Silicone hybrid sealant Use at movement joints and around penetrations. Look for high UV resistance and 25%+ movement capability. Avoid basic acrylics—they dry rigid and split.
- Polyurethane caulk Good for flashing terminations and wet areas. Choose one rated for exterior masonry and high elongation. Poor adhesion causes water entry and staining.
- Lime-compatible mortar Match historic stucco repairs with breathable mixes. Specify vapor‑permeable blends with similar compressive strength. Using dense cement mortar traps moisture and cracks appear.
- Acrylic finish coat Use flexible, UV‑stable acrylics over basecoat. Pick products with good tensile strength and color-fast pigments. Low-quality finishes chalk, fade and crack fast.
- Elastomeric coating For large crack bridging and waterproofing on masonry. Look for 200%+ elongation and vapor permeability. Thick, non-breathable coatings can trap moisture and blister.
- Polymer-modified base coat Use as the bond and reinforcement layer over lath or insulation board. Specify cement mixes with polymer for adhesion and freeze/thaw resistance. Skipping polymer lowers bond strength and leads to delamination.
- Stainless-steel lath screws Corrosion‑resistant fasteners for long life. Choose appropriate length and corrosion class for coastal exposures. Using plain steel causes rust staining and fastener failure.
Permit and Inspection Process for Major Repairs
Major repairs and recladding projects typically trigger a local permit process and a defined inspection schedule, while routine maintenance tasks may fall under exemptions or simpler reviews based on thresholds such as square footage, load bearing changes, or EIFS/stucco remediation. Identify the permitting authorities—usually the city or county building department, with zoning, water/sewer, or environmental permits as relevant—and assemble typical application components like scope of work, structural drawings, material specs, and energy-code documentation. Document preparation should cover contractor licenses, project plans, weather or labeling for materials, drainage and moisture management details, and any EIFS/stucco integration specifications to avoid delays once submission occurs.
Understanding the inspection timeline helps prevent rework, with milestones such as pre-construction site review, framing or structural checks, exterior envelope and waterproofing inspections, and final occupancy clearance, while DIY work may require different sequencing or licensed oversight. Practical tips to streamline approvals include arranging pre-submittal meetings, using checklists, maintaining accurate cost estimates, and accounting for environmental considerations like lead paint when applicable, so you can avoid common delays and code violations. For DIY homeowners, prioritize safety and compliance by knowing when to hire a licensed professional for critical tasks, retaining documentation, and understanding the consequences of non-compliance, including rework costs, stop-work orders, and potential warranty issues.
Typical permit submittal requirements
You’ll normally need a clear set of plans showing the work scope, elevations and details of the reclad or remediation. Keep drawings simple and to the point so the reviewer can see what changes you’re making.
Expect to submit specifications for materials and flashing, plus a site safety plan if access or scaffolding is involved. The city will also want proof of contractor licensing and insurance—get those ready early.
Tip: bundle your paperwork in one package: plans, specs, contractor credentials and a short cover letter summarising the scope. It speeds up reviews and cuts down on RFI requests.
Third-party inspection roles
A third-party inspector gives you independent quality assurance. They check that work matches the drawings, that flashing and seals are installed correctly, and that remediation methods meet the intended performance.
Use the inspector to catch problems early. They write impartial reports you can show to the authority having jurisdiction or the client. That paperwork often smooths final sign-off.
Tip: schedule inspections at key milestones—substrate prep, mid-install, and final—so fixes are made when they’re still easy and cheap.
Financing and ROI Options for Big Remediation Projects
Financing and ROI for large remediation projects hinges on translating the true cost drivers—scoping stucco/EIFS damage, containment, removal, new cladding, and moisture barriers—into an itemized budgeting worksheet, then mapping a full range of financing pathways, from traditional loans and HELOCs to government programs and rehabilitation loans, while pairing them with credible timelines, eligibility criteria, and transparent rate expectations; the plan also highlights credible energy-efficiency incentives, including insulation upgrades, high-efficiency coatings, moisture-management improvements, and local/state rebates, tax credits, and utility incentives, with the necessary verifications documented to support lender confidence and project viability.
This approach culminates in lender-ready ROI modeling that covers payback period, net present value, and projected resale value uplift by integrating energy savings, maintenance reductions, and potential insurance premium shifts, all within a risk-aware framework that anticipates interest-rate volatility, delays, scope creep, and compliance costs; the resulting package—complete with standardized quotes, scope of work, phasing timelines, risk mitigation, warranties, and visual estimates—empowers DIY professionals and jobsite teams to justify upfront costs and choose financing versus cash with a clear, decision-driven process.
Home improvement loans and insurance recovery
Big remediation often needs cash up front. Home equity lines, personal loans, and contractor financing are the usual routes. Shop rates and terms like you would for tools—compare total cost, not just monthly payment.
For insurance recovery, document everything. Take dated photos, keep receipts, and get written estimates from contractors. File claims promptly and follow up in writing. If your insurer balks, an itemized contractor invoice and clear photos speed resolution.
Energy-efficient upgrade incentives
Adding continuous insulation and other efficiency upgrades can reduce operating costs and often qualify for rebates or tax credits. Check federal, state, and local programs; incentives change, so verify current offers before you buy materials.
Keep paperwork for applications and for your tax return. Receipts, product specs, and contractor invoices are usually required. Factor expected energy savings and available incentives into your ROI math to justify the upfront spend.
Common Myths Busted: Stucco & EIFS Facts vs Fear
Common myths about stucco and EIFS—that they always trap moisture, always hurt value, or are inherently dangerous—are not universal truths. Moisture risk depends on the system, the installation, drainage details, and ongoing maintenance, not on the material label alone, and in practice the biggest failures come from gaps in flashing or improper drainage. Traditional stucco and EIFS (including EIFS 2.0) handle moisture differently, and modern practices—such as improved flashing details, proper weep systems, and continuous insulation—shift risk profiles by reducing hidden moisture paths when installed by skilled crews, but only when installers follow regional code and manufacturer guidelines.
Understanding these differences helps homeowners avoid overreactions and makes DIY checks meaningful, especially in regions with freeze‑thaw cycles or high humidity. Look for signs that distinguish cosmetic cracking from moisture intrusion—patterned hairline cracks, staining, efflorescence, or softening of edges—and pair visual checks with simple tests when in doubt, such as moisture meters or infrared assessments as appropriate. A practical framework guides action: confirm the exact system type (traditional stucco vs EIFS or EIFS 2.0), document installation quality and warranty status, and decide when to bring in an expert for moisture meters, infrared imaging, or weep-system evaluation, to protect resale value, insurance considerations, and repair ROI; finish with a homeowner checklist on documentation, choosing qualified installers, regional considerations, and steps to take if moisture is detected.
Myth: “Stucco cracks = rot guaranteed”
Small hairline cracks in stucco are common. They often come from normal drying, minor settlement, or thermal movement. Those cracks alone don’t mean the wall is rotting.
That said, any crack that lets water get past the finish—wide gaps, open joints at windows, or cracking near flashing—needs attention. A quick inspection behind the crack or a targeted probe will tell you if the substrate is sound or if there’s trapped moisture.
Rule of thumb: treat minor surface cracks with sealant and monitor. For larger or recurring cracks, remove a section and check the sheathing and flashing before you assume rot.
Myth: “EIFS always causes moisture issues”
EIFS has a bad reputation because older barrier-type systems relied solely on the exterior finish to keep water out. Those installations, especially without proper flashing, did cause problems.
Modern drainable EIFS includes a clear drainage plane and proper flashing details. When installed and flashed correctly, it controls water like any other cladding and performs well long term.
Bottom line: EIFS isn’t inherently defective — installation and drainage detail determine performance. If you’re unsure, have the flashing and back-up detail checked rather than assuming the system is the enemy.
How Inspectors and Appraisers Evaluate Stucco Homes
Inspectors and appraisers use standard language to describe stucco and EIFS conditions, focusing on scope, severity, and recommended actions so buyers and lenders understand risk. They document crack patterns (hairline versus widening), signs of moisture intrusion (staining, efflorescence, mold), improper flashing, substrate failures, and past DIY repairs as red flags. This language cues whether remediation, partial remediation, or further testing is advised and whether the issue affects value or financing.
Diagnostic methods routinely documented include moisture meter readings, infrared thermography, core or scrape tests, water-resistance barrier checks, and a review of permits and history. Appraisers rely on moisture reports, remediation plans, contractor warranties, retrofit or EIFS 2.0 compliance, builder records, and third-party inspections to reassure buyers and lenders. For DIY readers, clear communication about findings, expected remediation costs, timelines, and the distinction between cosmetic and structural concerns helps protect value and secure financing, while noting regional or lender-specific expectations in Indiana.
Common inspector findings and how to address them
Inspectors often call out cracks, soft spots, and failed sealants around windows and penetrations. Point repairs usually fix these: cut out loose stucco, replace damaged lath or backing if needed, and patch with a compatible stucco mix. Keep the repair neat and flush to match the surrounding texture.
Water intrusion signs—stains, rot at trim, or damp insulation—get flagged fast. Dry rot and wood damage require removing wet materials and replacing them with treated lumber or proper sheathing. Replace flashing and add clear drainage paths so water can’t sit behind the finish.
Preventive steps matter: restore proper slope away from the foundation, maintain caulk joints, and keep landscaping away from the walls. Small fixes now stop big remediation later and make inspectors more comfortable with the condition of the cladding.
Providing documentation to appraisers
Appraisers look for proof that big issues were handled correctly. Provide invoices, permits, and photos showing repairs from start to finish. A clear before-and-after set of pictures plus contractor contact info removes doubt about the scope and quality of work.
If there was moisture damage, include moisture test results, scope-of-work reports, and any manufacturer warranties for materials used. Items tied to permits and licensed contractors carry extra weight and speed up valuation decisions.
Organize a one-page summary listing dates, contractors, permits, and follow-up maintenance recommendations. Hand that to the appraiser on site or attach it to the file—keeps things simple and shows you’re running a well-documented jobsite.
Preparing for a Contractor Assessment: What to Gather
Gather core documents and project scope, including any existing contractor estimates, blueprints or drawings, product specs (stucco vs EIFS), warranty and maintenance records, and prior remediation plans. Build a comprehensive photo log that documents exterior and interior crack patterns, moisture staining, delamination, roof line issues, downspouts, and drainage problems, with date stamps. Capture the property’s history and context by noting when cracks appeared, changes in use or climate exposure, past repairs, materials used, and the limitations of earlier attempts.
An organized approach speeds up the estimate and remediation process by providing a clear roadmap for inspectors and contractors. This routine also helps DIY homeowners anticipate what information is most critical, identify gaps early, and minimize back-and-forth delays. By mapping access points, marking moisture readings if available, and labeling a simple binder or digital folder with sections for Documents, Photos, Timeline, Materials, and Contacts, you create a practical system that keeps everyone aligned and focused on safe, accurate assessments.
Photos and timeline of visible changes
Take clear, close-up and wide shots of the problem areas. Include reference objects like a ruler or a common item so the scale is obvious.
Note the first date you saw each issue and any events that made it worse — storms, leaks, renovations. Write dates next to the photos or keep a simple dated log.
Label images by location and date before you hand them to the contractor. That quick context saves time on site and prevents guesswork.
Previous repair and installation records
Gather receipts, invoices and manufacturer sheets for any work or parts related to the area being inspected. Even old crew notes help point to prior fixes.
Warranties and installation instructions matter. They influence whether a contractor will repair, replace, or call the manufacturer; so bring the product model and warranty dates.
If you don’t have originals, take photos of labels, serial numbers and any visible tags. That information speeds up decisions and keeps costs down.
Maintenance Cost Comparison: Stucco, EIFS, and Alternatives
This section presents a multi-year cost comparison of stucco, EIFS, and alternative claddings, balancing upfront installation with ongoing maintenance, repairs, and expected lifespans in Indiana’s climate.
It breaks out cost drivers such as repair frequency and patching costs, material and labor rate changes, energy savings from insulation performance, and any warranty or code implications that affect total cost of ownership over 10–20 years.
A concise side-by-side snapshot will help DIY readers weigh performance metrics, failure modes, moisture risks, and maintenance needs against energy-efficiency gains.
Understanding these factors clarifies budgeting, scheduling, and risk management for Indiana homes and supports practical decision-making without overpromising tools.
10- and 30-year lifecycle cost snapshots
Think of this like a jobsheet. Over 10 years you’ll see repair patches and routine upkeep. Typical totals: stucco tends to have lower annual maintenance but occasional costly crack repairs; EIFS can save on energy but may have higher inspection and moisture-repair costs. Expect a 10-year range roughly between $2–6 per sq ft per year depending on damage and climate.
Stretch it to 30 years and the picture changes. Stucco’s lower frequency of major overhaul often keeps long-term costs modest. EIFS can pay off in energy savings on well-sealed jobs, but moisture-related repairs add up if not maintained. Over 30 years, plan on cumulative costs roughly in the ballpark of $40–150 per sq ft for most installations and climates.
Use these snapshots as ballpark figures. Your actual numbers will depend on local labor, climate, and how well the wall system was installed. Cross-check these ranges with the repair frequency, expected life, and energy savings we covered earlier to pick the right trade-off for your house.
Take Action: Immediate Steps If You Find Cracks
Take immediate action by documenting the crack and its context, drying the surface if possible, and using only temporary, non-structural sealing for small gaps when safe, while avoiding any permanent fixes until a professional assessment is done. Capture dated, high-resolution photos from multiple angles, note location (room or exterior wall), measure width and length, log recent weather and humidity, and record any prior crack history or activity. Avoid sealing active leaks or painting until a professional evaluates moisture, preserve access for inspectors, and maintain a simple log of dates, findings, and who has viewed the issue.
This approach helps you triage quickly, preserve evidence for professionals, identify access points such as weeps, flashing, and control joints, and ensure no temporary fixes block critical inspections when you schedule a moisture scan or infrared inspection. It also clarifies next steps, including thresholds for DIY triage versus contractor intervention and a practical checklist of questions to ask pros about moisture sources, EIFS or stucco concerns, remediation options, costs, timelines, and required permits.
Emergency temporary measures
Dry the area right away with towels or a wet/dry vacuum to stop ongoing water damage. Remove valuables and lift carpets or rugs so moisture can escape.
Seal obvious gaps with painter’s tape, a strip of plastic, or even duct tape as a short-term fix. These won’t replace proper repairs but will cut down on more water getting in until professionals arrive.
Keep the area accessible so inspectors can get straight to work when they arrive—don’t nail things shut or block access to the crack.
How to choose and schedule a trustworthy inspection
Call at least two licensed inspectors and ask about specific experience with foundation or concrete cracks. Request references and check reviews; a good inspector will explain what they look for and won’t pressure you into immediate repairs.
When booking, tell them you want a moisture scan and a written report with photos. Schedule the inspection during daylight so they can assess external drainage and take clear photos.
Be on site for the inspection if you can. Ask for a step-by-step explanation of findings and a written estimate before any work starts.
Practical next steps and trusted sources
This section points you toward authoritative standards and certifications homeowners can trust, establishing precise references for next-step actions. It also provides a clear EIFS 2.0 explainer—covering system layers, moisture management and drainage, proper installation practices—and outlines foam board insulation types and reputable industry sources to consult.
For a DIY or jobsite reader, the guidance matters because it supports safer, cost-conscious decisions and easier planning. A practical homeowner checklist, moisture indicators, cost ranges, and a phased plan (short-term fixes versus long-term remediation) with permit considerations helps you move from assessment to action with confidence.
EIFS 2.0: How Modern Systems Fix Past Failures
EIFS 2.0 tightened the weak spots. It adds continuous drainage planes, better flashing details, and stricter substrate checks so water that gets behind the cladding can escape. Those changes cut the rot and mold problems that gave older EIFS a bad name.
Manufacturers also improved materials and testing. Reinforcement meshes, adhesives, and coatings are rated to work together now. If you want the full deep-dive, look for a detailed EIFS 2.0 explainer from an industry body or manufacturer — it shows drawings, test standards, and installation checklists.
Bottom line: use certified systems, follow flashing and drainage rules, and inspect substrates before you start.
Foam board insulation: types and best uses
There are three common foam boards: EPS, XPS, and polyiso. EPS is economical with moderate R-value. XPS has higher R and moisture resistance. Polyiso gives the best R-per-inch but loses some performance in cold climates. Pick the board that matches your climate and budget.
R-values matter for wall assemblies and code compliance. Thicker foam raises R, but you also need to consider junctions, window heads, and rooflines. For stucco or EIFS, confirm compatibility — some boards need specific adhesives or fasteners and a drainage gap behind the stucco.
Quick tip: talk to the product rep about vapor behavior and approved finishing systems before you buy. That avoids costly rework on the jobsite.
Eifs 2.0: how modern systems fix the failures of the past
EIFS 2.0 represents a deliberate shift from older EIFS failures to a moisture-smart, substrate-protective system designed for long-term durability. The modern multi-layer assembly stacks insulation, a drainage/air/moisture management plane, and a reinforced exterior finish, with each layer tuned to prevent water entry and to divert moisture away from the wall assembly. Key improvements include enhanced drainage planes, robust air barriers, properly placed flashing, and airtight joints that work together across diverse climates and building orientations.
For DIYs and contractors, understanding the new standards helps you assess existing stucco or EIFS, choose products suited to Indiana’s temperate-humid seasons, and plan maintenance and inspections that reduce risk. The emphasis on certified installers, code-compliant detailing, and inspector checklists translates into real-life benefits: fewer failures, clearer troubleshooting, and a clearer path to durability and cost efficiency over time. Being aware of regional moisture risk, sun exposure, and correct installation decisions helps you separate myths from science-backed expectations about energy performance and retrofit longevity.
Assessing the EIFS 2.0 system: locating components, moisture risk, and failure indicators
Walk the wall and locate each layer first: the substrate (sheathing or masonry), the drainage plane or WRB behind it, the insulation board, base coat and mesh, and the finish coat. Point out flashings at sills, windows, and roof lines — those are the usual trouble spots. If you can, cut a small inspection opening at a discreet spot to confirm what layers you actually have before doing major work.
Look for moisture staining, efflorescence, peeling finish, soft or spongy sheathing, and obvious biological growth. Stains along flashings or at the sill line tell you where water is entering. Efflorescence usually signals water passing through masonry or mortar and leaving salts behind. Microbial growth is a sign of chronic dampness and poor drainage.
Document everything with photos and notes: take wide shots, detail shots of flashings, and close-ups of any damage. Measure moisture readings at several locations and record them next to each photo. That record saves time when you decide whether to repair in place, replace layers, or upgrade to a fully drained EIFS 2.0 assembly.
Safe removal and repair prep: moisture testing, containment, and temporary safeguards
Start by isolating the work area with plastic sheeting and barrier tape and set up negative air if you’re cutting into wet sheathing to control dust and spores. Wear appropriate PPE: N95 or P100 respirator, eye protection, gloves, and coveralls. Protect landscaping and adjacent finishes with drop cloths and plywood shields.
Do moisture testing before you remove more than the finish. Use a pin-type meter for sheathing and a non‑destructive surface meter for insulation. A borescope through small inspection ports helps you see delamination or hidden rot without large openings. Log all readings so you can identify wet pockets versus dry areas.
Remove damaged EIFS layers carefully to avoid tearing the WRB or damaging studs. Score the finish and base coat and peel back in manageable panels. If you find wet sheathing, remove only what is necessary and dry the structure with heaters and fans before installing new materials. Install temporary flashings and coverings to keep the wall dry between demolition and rebuild.
Correct installation steps for EIFS 2.0: flashing, insulation, base coat, and finish coat
Begin with a clean, dry substrate and a continuous WRB. Install robust metal flashings at all transitions and seal with compatible sealant. Flashings must extend over the WRB and direct water to the exterior; laps and termination points are where leaks start, so get them tight and supported.
Attach insulation board per manufacturer instructions — adhesive and mechanical fasteners are common. Stagger joints and seal them with compatible tape or sealant. Apply mesh embedded in the base coat while it is wet, feathering out the edges for a flat surface. Mix base coat to the recommended consistency and apply in even layers, allowing initial set time before sanding or additional layers.
Finish with the manufacturer-approved textured coat or acrylic finish. Cure times vary by temperature and humidity; protect the wall from rain and freezing during that period. Keep a short jobsite tool list handy: notched trowel, hawk, mixing paddle, drill, finishing trowel, mesh roller, moisture meter, and caulking gun. Test details at windows and penetrations — a watertight detail is the system’s best insurance.
Foam board insulation: key types, benefits, and best uses
Foam board insulation for stucco and EIFS comes in three main types—EPS, XPS, and polyiso—each with typical thicknesses from 1/2 inch up to 2 inches and corresponding R-values roughly from R2.5–R3 per inch for EPS, about R5 per inch for XPS, and around R6 per inch for polyiso, designed to resist different moisture and climate conditions. These boards improve thermal performance, reduce thermal bridging, help limit surface cracking by stabilizing the wall assembly, and manage air and vapor movement when paired with a proper drainage plane and compatible moisture barriers. They also benefit edge detailing and easier retrofit on existing facades.
Use cases vary: EPS is economical in EIFS or traditional stucco, while XPS or polyiso offer higher insulation with careful moisture management, edge detailing, and season-specific installation considerations. Attachments, drainage planes, sealants, flashing, and proper joint alignment must be detailed at edges and penetrations to prevent condensation, trapped moisture, or wind-driven leaks, and common mistakes include improper barrier compatibility, joints gaps, and flashing missteps. Compare foam board to mineral wool or reinforced coatings for different budgets and performance, considering upfront cost, long‑term energy savings, ease of installation, and potential impact on stucco longevity and maintenance.
Selecting foam board types for stucco homes: EPS vs XPS vs polyiso, their pros, cons, and code considerations
Pick the right foam for stucco and you avoid rot, thermal bridging, and failed finishes. EPS, XPS and polyiso each bring different R-values, moisture resistance and cost. Think performance on the wall, not just sticker R-value.
EPS is economical and breathable; it handles moisture cycling better but has lower R-value per inch. XPS offers better compressive strength and higher R-value than EPS and resists bulk water well, but it’s less vapor-permeable. Polyiso gives the highest R-value per inch but loses performance in cold, and most facing systems require careful detailing to avoid trapping moisture.
Code and moisture control should drive the choice: where local code demands specific continuous-insulation R-values or fire compliance, follow that first. In rain-prone climates choose boards and assemblies that provide a drainage plane and maintain a clear path for drying. Match the board to the wall system—if you plan a ventilated drainage stucco, EPS or polyiso can work; for direct-applied heavy rain exposure, XPS or a protected polyiso may be safer.
Proper installation steps for foam board under stucco: surface prep, fasteners, flashing, joint sealing, and detailing
Start with a clean, flat substrate. Remove loose material, repair sheathing, and ensure the WRB (water-resistive barrier) is continuous. If you’re adding furring for a rainscreen, attach it after the foam is set and sealed.
Adhere or mechanically fasten boards using a layout that staggers joints. For most jobs use a combination of construction adhesive beads plus corrosion-resistant screws with washers or approved foam anchors; follow the manufacturer’s fastener pattern. Flash all openings: sills, heads, and corners get integrated flashing that laps over the WRB and ties into the weep/drain system.
Seal joints with compatible tape or a low-modulus sealant and install a drainage gap or rainscreen where codes or exposure require it. Terminate foam properly at rooflines, foundations and windows—use backer rod where gaps exceed the sealant’s movement capability. Test continuity of the WRB and flashing before applying basecoat and lath.
Common installation mistakes and how to avoid them: gaps, improper joints, moisture paths, and tape/sealant failures
These are the recurring errors that create leaks and stucco failures. Fix them in the planning and layout stages to save hours of tear-out later.
- Large unsealed gaps — Gaps let water and air bypass the barrier. Ensure tight butted joints, use tapered filler where needed, and back up wide gaps with backer rod before sealing.
- Staggered joints ignored — Continuous straight joints create weak lines for cracks. Offset vertical joints by at least two board widths and fasten across joints to hold alignment.
- Wrong tape or sealant — Incompatible products fail under movement. Use manufacturer-approved tapes and high-movement sealants rated for foam and stucco, and verify adhesion on a test panel.
- Poor flashing integration — Flashing that doesn’t tie into the WRB causes hidden leaks. Lapse the flashing over the WRB and seal transitions; mechanically fasten only through flashed areas where required.
- No drainage plane — Trapped moisture leads to mold and delamination. Provide a rainscreen gap or drainage channel and install weeps at the base.
Catch these issues on your pre-lath inspection. A quick checklist for gaps, taped joints, flashing laps, and fastener pattern prevents most future repairs.
Stucco & eifs myths busted with clear, science-backed facts
This section debunks common myths about stucco and EIFS by separating cosmetic concerns from solid, science‑based explanations that reflect how moisture actually moves through assemblies. You’ll learn why claims that EIFS is inherently risky can mask serious moisture and structural issues, and how modern EIFS 2.0 differ from older systems in critical ways. We outline the most frequent failure points, clarify what is just aesthetics, and explain practical indicators homeowners can monitor before costly damage occurs.
For DIYers and job sites, expect a concise triage checklist, concrete steps to inspect flashing and drainage, and guidance on when to perform tests or call a licensed inspector. Indiana’s temperature swings, humidity, and moisture cycles influence crack patterns and drainage behavior, so recognizing local performance helps prioritize maintenance and timely repairs. A contractor vetting rubric and short inspection checklist empower you to verify certifications, warranties, and workmanship, reducing hidden leaks and guiding cost‑effective decisions on repair versus replacement for homeowners and buyers.
Conduct a moisture and crack assessment before repair
Start like you would on any job: confirm the wall is safe to work on and put on eye protection, gloves and a dust mask. Moisture and active movement are the killers of a good repair — find them first.
Use a moisture meter to scan from the surface back to the studs; note readings and map wet spots. Follow up with an infrared camera if available to spot hidden wet areas or voids behind the cladding. Mark suspect areas and avoid cutting or patching until you know what’s under the surface.
Inspect cracks with a crack gauge or a simple pencil-and-photo log to determine active vs dormant movement. Check for corrosion of fasteners, staining or efflorescence — signs of long-term water entry. If moisture is present above acceptable limits, stop and fix the source: flashing, slope, or penetrations must be addressed before cosmetic repairs.
Choose the right repair method and materials for stucco vs EIFS
Pick materials that match the system you have. Wrong products cause cracking, staining or poor bond — and you’ll be back fixing it again.
- Cement-based patch Use for traditional stucco repairs; choose a Portland-cement-based repair mix rated for exterior use. Tip: match the aggregate and workability to the existing texture to avoid stiff, weak patches that crack.
- Polymer-modified base Use for EIFS base coat repairs or where flexibility is needed; look for high bond-strength and alkali resistance. Tip: a rigid cement patch on EIFS will crack and delaminate.
- Reinforcement mesh Use alkali-resistant fiberglass mesh for both systems; pick mesh weight per manufacturer specs. Tip: lack of proper mesh or embedding causes tears and reflection cracking.
- Breathable primer Use on porous stucco before finish coats; check vapor-permeability (perm) rating. Tip: non-breathable primers trap moisture and cause staining or freeze damage.
- Elastomeric sealant Use at control joints and transitions; select a 12.5–25% movement capability and compatible adhesion. Tip: cheap sealants fail, letting water in at joints and undermining the repair.
- Finish coat match Use system-compatible acrylics for EIFS or cementitious finishes for stucco; verify UV and color-fast ratings. Tip: wrong finish leads to peeling, chalking or color mismatch.
- Water-resistive barrier Use behind stucco repairs if exposing the WRB; choose a rated housewrap or asphalt felt per code. Tip: skipping or damaging the WRB invites long-term moisture intrusion and rot.
Safe removal and repair workflow for cracked stucco
Set up containment and wear proper PPE: N95 or better respirator, safety glasses, gloves and hearing protection. Protect landscaping and windows with plastic sheeting and use a HEPA-rated vacuum for dust control while cutting or grinding.
Cut out damaged stucco back to sound material and a stable substrate. Remove rusted lath or deteriorated board and inspect the WRB and flashing. Replace or repair flashing and WRB before rebuilding the cladding; water control comes first.
Embed new mesh into a compatible base coat, feather edges to the existing plane, then apply the base and finish coats per manufacturer cure times. Keep repairs slightly undercut from the finish plane so the new finish keys in. Cure properly and avoid painting or sealing until moisture levels are low; rushing the cure is the most common pitfall.
Indiana wall systems
Indiana wall systems today encompass traditional stucco, EIFS, foam-board insulation assemblies, and the newer EIFS 2.0, each bringing distinct installation sequences and moisture control implications that demand climate-specific design to minimize cracks and water intrusion. By recognizing how climate—freeze–thaw cycling, humidity, wind-driven rain, and seasonal temperature swings—interacts with substrate, flashing, and sealants, homeowners can select materials and detailing that improve crack resistance and long-term performance. This section brings practical distinctions, explains failure drivers in Indiana, and frames a diagnostic and repair mindset suitable for do-it-yourselfers who want durable results without oversimplified guarantees or risky shortcuts.
Indiana-specific failure drivers include repeated freeze–thaw cycles, high humidity in basements and crawlspaces, improper roof edge drainage, and soil movement, all of which can push cracks and moisture deeper if surface prep and flashing are neglected. A hands-on diagnostic checklist helps readers identify crack type and location, notice moisture signs such as efflorescence or staining, assess substrate condition, verify flashing integrity, and spot control joints or expansion gaps that matter for performance. Finally, maintenance and preventive planning—seasonal inspections, timely crack addressing, targeted cleaning, sealant refreshes, and mindful cost considerations—supports reliable operation and reduces the risk of catastrophic damage on Indiana homes.
Identify Indiana wall system types and typical failure modes (EIFS vs stucco vs traditional plaster)
Walk the wall and look first at profile and thickness. EIFS is thin, uniform, often with a drainable gap or visible termination points near windows. Traditional stucco is thicker, rougher, and usually applied over metal lath or solid masonry; plaster is thinner, smoother, and found on older homes over wood lath.
Common failure modes in Indiana are moisture intrusion and detailing failures. EIFS typically fails at sealant joints, returns, or where flashing is missing and traps water behind the EIFS—look for soft spots and delamination. Stucco shows cracks, hairline or stair-step patterns at control joints, and failures at transition points where flashings are absent or bent.
Practical check: probe suspicious areas with a screwdriver and inspect flashings above windows and at rooflines. If you find rot, efflorescence, or ongoing staining, treat that as a moisture path rather than a surface problem; repairs that ignore the path will fail again.
Safe inspection, prep, and containment for exterior repairs in Indiana weather
Start with PPE: hard hat, eye protection, gloves, and a respirator when cutting or removing old material. Check the forecast—work during dry stretches and avoid freeze/thaw cycles for cement-based work. Set up ladders and scaffolding on firm, level ground and tie off when working above 6 feet.
Protect landscaping and HVAC intakes with drop cloths and plastic sheeting, and use containment to keep dust out of the house. Expose hidden areas by removing trim carefully and follow code-permitted access to get to underlying flashings and sheathing; don’t cover a problem you can’t see. Tip: keep a moisture meter on the job to confirm substrates are dry enough before you seal or finish.
Step-by-step repair workflows: selecting materials, patching, flashings, and curing
Material choice dictates durability. Use compatible systems: flexible sealants with EIFS, portland-based mixes with stucco, and corrosion-resistant flashings on all systems to avoid staining and bond failure.
- Assess substrate condition Remove loose material and test sheathing for rot. Replace rotten sections to a solid substrate; patching over rot causes ongoing failure.
- Select compatible material Match EIFS products to EIFS and portland cement to stucco. Using the wrong base causes poor adhesion, cracking, or staining.
- Prepare the joint Route cracks and clean out debris before repair. A clean, keyed edge gives mechanical grip; skip this and the patch will pop out.
- Use reinforcing mesh Embed mesh in base coat for larger repairs and control joints. Look for alkali-resistant mesh for cement systems; wrong mesh will deteriorate and lead to cracks.
- Install continuous flashing Add metal flashings at windows, sills, and roof intersections. Flashings must slip behind a weather-resistive barrier; improper flashing leads to hidden water damage.
- Choose proper sealant Use high-quality, paintable, compatible sealants with good UV and temperature range. Cheap sealants dry brittle or fail in freeze-thaw; they’re the weak link at joints.
- Mix and apply correctly Follow manufacturer ratios and apply in recommended temperatures. Overwatered mixes or too-thick coats cause weak bonds and cracking.
- Cure and dry times Allow full cure per product data—often 24–72 hours for final set, longer for full strength. Rushing painting or exposure to rain before curing will ruin the finish.
- Final inspection Re-check flashings, sealants, and transitions after curing. If you miss a loose flashing or gap now, the wall will show it on the first heavy rain.

Conclusion
Protecting your home means treating every crack as a warning signal, not a cosmetic blemish. By staying proactive, you guard against hidden moisture, structural damage, and costly remediation later, while keeping the home safe and efficient.
First, perform a calm, quick survey: walk the exterior with a flashlight, note crack patterns and moisture clues, check EIFS edges and sealant joints, confirm any interior signs such as staining or soft spots, and validate your findings against the common entry points and installation issues described earlier. Then, decide on a plan that starts with small, noninvasive tests in a safe area, progresses to targeted repairs if the issue is shallow, and escalates to full remediation only if moisture or structural concerns are confirmed. If you do pursue DIY steps, document every observation, work slowly, and test materials in a discrete spot before wider use.
Common mistakes to avoid are assuming all cracks are harmless, rushing repairs without confirming moisture behind the stucco, and skipping the permit or inspection steps when major work is needed. A few safety rules to follow: wear eye protection and gloves when probing or cutting, shut off exterior power near work zones, and never trap moisture by sealing a crack without addressing the water path behind it. If you’re unsure about the extent of moisture, or if you see expansive cracking, sagging, or multiple failure points, pause and bring in a professional.
Call in a contractor or building science expert when repairs exceed patching, when EIFS or water intrusion signs are clear, or when a structural assessment is warranted. The right expert will confirm findings with testing, propose a concise remediation plan, and help you prevent repeats. Stay focused, stay methodical, and take action now—the difference between a quick fix and a long-term safe, durable wall is this disciplined approach.
FAQ
Are all cracks in stucco just cosmetic?
No. Some cracks hide serious problems like water intrusion, structural settling, or frame damage. Treat any crack wider than a pencil or that changes shape over time as a red flag.