
Introduction
Mixing EIFS with incompatible paints can trap moisture and cause damage to the wall system.
You’ll learn how to spot common compatibility issues, why moisture becomes trapped, and practical steps to prevent failures.
The guide walks through simple rules of thumb and decision-making tips you can apply when choosing coatings and planning maintenance.
Key takeaways
- Use compatible paints designed for EIFS to prevent moisture entrapment.
- Avoid acrylic latex over elastomeric EIFS without a listed compatibility rating.
- Test stain or tint levels to ensure breathability and prevent film formation.
- Conduct moisture surveys before repainting to identify hidden moisture reservoirs.
- Document substrate condition and remove trapped coatings that block drying paths.
- Choose primer and finish systems rated for EIFS and climate exposure.
Table of Contents
- Introduction
- Key takeaways
- What is EIFS and why compatibility matters
- How paints and coatings interact with EIFS finishes
- Common incompatible paint types that cause problems
- How incompatible paints create moisture traps — the mechanisms
- Visual and interior signs of moisture traps caused by coatings
- Tools and diagnostic methods to detect moisture behind EIFS
- Pre-paint compatibility checklist for homeowners and contractors
- Step-by-step remediation when moisture is trapped by incompatible paint
- Approved paint and coating types for modern EIFS systems
- Tools and materials checklist for EIFS repaint or repair projects
- Preventive maintenance to avoid the compatibility trap
- Project planning and weather windows — scheduling to prevent trapping moisture
- DIY scope limits — what homeowners can safely do
- When to hire a certified EIFS contractor — professional services explained
- Costs and budgeting: repair vs. repaint vs. replace
- Safety, health, and liability — mold, demolition, and containment
- Code, permits, and warranty implications of using non‑approved paints
- Compatibility verification protocol for contractors
- Case studies: before/after diagnostics and successful remediations
- Regional considerations: freeze‑thaw climates, coastal, and humid regions
- EIFS 2.0: How modern systems fix the failures of the past
- Foam board insulation types: benefits and best uses with EIFS
- Stucco & EIFS myths busted with clear, science-backed facts
- Foam board insulation: key types, benefits, and best uses
- Conclusion
- FAQ
What is EIFS and why compatibility matters
EIFS, short for Exterior Insulation and Finish System, is a multi-layer exterior wall assembly designed to control heat flow and shed moisture. The common stack includes substrate, insulation, a base coat with reinforcement, and a finish coat. Each layer must align with the others to manage moisture and preserve the system’s warranty performance.
In practice, compatibility across layers means more than matching colors or textures. When paints, sealants, penetrations, or even fasteners clash with the EIFS components, moisture can become trapped, leading to staining, mold, and accelerated deterioration. A simple, methodical approach—following manufacturer specs, spot testing, and reviewing warranty terms—helps you prevent costly failures before repairs or coatings are applied.
EIFS system components explained
The EIFS stack starts with a suitable substrate and a continuous insulation layer, bonded by a base coat that embeds reinforcing mesh. The finish coat provides weather resistance and cosmetic texture. Each layer must be compatible with the next, especially around edges, penetrations, and terminations, where moisture pathways and thermal movement are most critical.
Flashing, sealants, and proper detailing at openings matter just as much as the core materials. If any component is mismatched or misinstalled, moisture control and warranty coverage can fail. Always use materials and details specified by the system manufacturer and confirm compatibility with coatings and penetrations.
Barrier vs. drainable EIFS — the critical difference
Barrier EIFS relies on the outer skin to keep water out; when a breach or misfit occurs, moisture can become trapped behind the insulation, driving rot and mold and triggering warranty disputes at penetrations or damaged finishes.
Drainable EIFS includes a drainage plane or gap that channels incidental moisture outward. This approach is more forgiving in real jobsite conditions and generally aligns better with broader warranty terms—provided flashing and weep paths are correctly installed and sealed. For lower risk, specify drainable systems and verify detailing during planning.

How paints and coatings interact with EIFS finishes
EIFS finishes are designed to breathe and shed water, so coatings must permit moisture movement without trapping it. The right paint system hinges on permeability, elasticity, and adhesion that suits textured EIFS surfaces and substrate moisture conditions.
In the field, you’ll verify compatibility with manufacturer recommendations, spot tests, and a controlled exposure plan before committing to the full coating. The goal is a breathable, flexible film that won’t trap moisture or delaminate under normal temperature swings and sun exposure.
Permeability (MVTR) and why it matters
MVTR measures how quickly water vapor moves through a film. EIFS needs enough breathability to prevent moisture from pinning behind the finish, which can soften adhesives and invite mold. Choose coatings whose permeability aligns with the EIFS system and climate.
Don’t guess. Read the product data: MVTR or real-world permeance ratings, and compare them to the substrate’s exposure and the manufacturer’s guidance. If in doubt, run a temporary, small-area test to confirm drying and evaporation behavior under dew and heat.
Elasticity and crack bridging properties
EIFS moves with temperature, wind, and settlement. A finish that’s too stiff will crack or delaminate as the substrate flexes. Look for coatings with measured elongation and true crack-bridging claims appropriate for exterior insulation systems.
Match flexibility to the EIFS. Prefer finishes specified for EIFS or consult the topcoat recommendations from the system maker. Plan a spot test with movement cycles (rapid heating/cooling) to ensure the film remains bonded and does not craze or peel.
Common incompatible paint types that cause problems
EIFS harmony matters because moisture pathways and vapor permeability determine how condensation vents through the wall. Impermeable finishes can trap moisture on the surface, in the foam, or within adhesive layers, undermining the system’s protective balance. When coatings seal too tightly, the wall becomes a moisture reservoir that weakens adhesion and shortens EIFS life.
Expect to see failures when coatings are non-breathable or incompatible with EIFS substrates. The planning brief below highlights the common culprits, practical checks, and safer alternatives that keep EIFS dry, flexible, and performing as intended.
Red flags when sourcing coatings
- Product labels and spec sheets omit foam/EIFS compatibility; they reference concrete or metal without mentioning synthetic stucco substrates.
- High perm-resistance or explicit “impermeable” claims; look for very low vapor permeability as a warning sign for EIFS use.
- Compatibility demands aggressive surface prep, solvent primers, or heat curing—signs the coating isn’t designed for flexible, breathable EIFS.
- Lack of EIFS-specific test data or absence of a clearly rated product for synthetic stucco interfaces.
Case examples of coating failures
A homeowner applied an oil-based enamel over EIFS. Within months the finish blistered and peeled in large sheets, as the oil film blocked vapor escape and moisture trapped in the foam pushed the coating off.
In another job, a high-build acrylic designed for abrasion resisted moisture initially but later showed dark stains and mold under the paint. The thick film trapped condensation at the EIFS/insulation interface, accelerating deterioration; the fix was removal and recoat with a breathable, EIFS-compatible system using proper primers and sealants.
How incompatible paints create moisture traps — the mechanisms
Impermeable or overly thick paints, especially elastomeric and oil-based coatings, block vapor diffusion through EIFS and trap a reservoir of moisture behind the finish, setting up conditions ripe for slow decay. Adhesion failures and micro-cracking at the paint-EIFS interface create continuous pathways for moisture to linger and hidden leaks to persist behind the coating, undermining the wall’s ability to dry. As these coatings seal surfaces that would normally vent moisture, stains, efflorescence, or rot are masked and the true condition remains hidden while moisture concentrates at interfaces or delaminations, accelerating deterioration beneath the surface.
Typical diagnostic clues include soft spots, bubbling, or delamination, and tests such as moisture meters, infrared thermography, and surface adhesion pull tests can reveal hidden traps, reduced breathability, and areas of poor substrate prep. Common incompatible paint scenarios—thick elastomeric or oil-based coats over non-porous primers, lack of breathability, improper surface prep, and finishing coats that are not EIFS-approved—prevent drying and channel moisture toward the substrate where it can remain unseen. Prevent and remediate by confirming substrate and coating compatibility with the manufacturer guidelines, using breathable EIFS-approved primers and finish coats, performing bond and moisture clearance before repainting, and choosing a finish that allows gradual drying to restore ventilation.
Blocking drying vs. allowing ingress
Some paints act like a one-way door for moisture: they stop water vapor from leaving the wall but don’t stop water coming in from a leak or driven rain. That trapped moisture has nowhere to go and stays in the substrate.
Other coatings are brittle or poorly sealed and let water in through cracks, joints, or pinholes. Those paints don’t trap vapor as much, but they let liquid water reach wood, plaster, and insulation where it causes rot and mold.
Know which problem you have. If the surface feels damp under an otherwise tight paint film, you’ve likely blocked drying. If you see staining or soft spots with gaps in the coating, you probably have ingress. The repair approach differs for each.
Accelerants: sealants, mismatched primers, and adhesives
Sealants, primers and adhesives are great when chosen right. Pick the wrong chemistry and they speed up moisture problems. A flexible silicone or solvent-based sealant over an incompatible primer can prevent adhesion and create pockets where water collects.
Mismatched primers (oil over latex, or vice versa) can fail to bond and hide wet spots under a sound-looking finish. That lets moisture migrate and pool behind the topcoat without obvious signs on the surface.
Think system, not single products. Use compatible primers, adhesives and sealants specified for the substrate. When in doubt, test a small area or follow manufacturer system recommendations to avoid creating hidden moisture traps.
Visual and interior signs of moisture traps caused by coatings
Exterior indicators to document include bubbling coatings, discoloration around EIFS seams or edges, soft or spongy spots under coatings, and any cracking that reveals moisture trapping zones; these signs often point to hidden moisture behind the exterior skin. Interior warning signs to monitor encompass visible stains on walls or ceilings near EIFS, musty or moldy odors, and elevated relative humidity readings in affected rooms, especially when odors align with ventilation patterns. A practical diagnostic approach combines moisture meters and infrared/thermal imaging to locate hidden pockets and to mark correlations between exterior abnormalities and interior symptoms, while noting coating-age and substrate-preparation issues that increase risk of moisture entrapment.
Understanding carrier/coating compatibility risk factors and improper installation helps explain why moisture can get trapped, alongside back-venting and failed drainage that create persistent problems. Documentation and next steps should focus on capturing photos, dates, and weather conditions, then preparing a preliminary severity assessment (stain intensity, odor strength, RH levels) to guide repairs or professional evaluation; this reduces guesswork and supports timely, targeted action. Avoid common mistakes by inspecting promptly, not ignoring odor cues, and refraining from superficial fixes without addressing the moisture source or ventilation, and know when to call a pro for a thorough assessment.
Exterior visual checkpoints
Walk the building with your eyes on transitions: window and door perimeters, the base of walls where they meet the foundation, and any roof or siding terminations. Those areas are where coatings most often trap moisture behind EIFS.
Look for changes in finish — areas that are dull, glossier, or have a different texture than surrounding surfaces. Soft spots, blistering or paint bubbling near seams and terminations are red flags that water is getting in and staying behind the coating.
Pay special attention to ground level and flashing details. Small cracks or a missed joint can let water in and then the coating keeps it from getting back out, so inspect those spots closely.
Interior clues to hidden EIFS moisture
Ceiling stains or dark patches on the top of walls often tell you moisture is migrating inward. If stains line up with exterior windows, doors or terminations, suspect trapped moisture behind the EIFS rather than a plumbing leak.
Peeling or blistering paint near the top of walls, a musty or moldy smell, and areas where wallpaper or trim pulls away are common interior signals. Use a moisture meter or check for elevated humidity in rooms that smell or look off.
Mold odors are a practical warning — don’t ignore them. If you detect a persistent musty smell, investigate the corresponding exterior areas noted above before repainting or resealing.
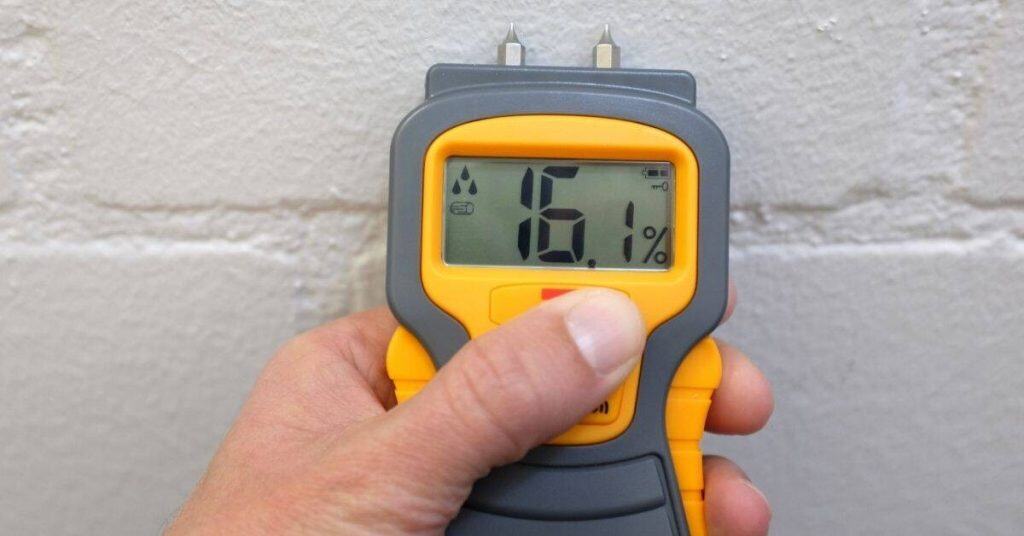
Tools and diagnostic methods to detect moisture behind EIFS
A clear diagnostic workflow for EIFS moisture starts with non-invasive screening to build a moisture map, identify hotspots, and then guide targeted invasive checks using pin meters, pinless meters, infrared thermography, borescopes, and invasive probe testing. Pin meters provide direct readings at contact points but can damage substrate and be affected by surface conditions, while pinless meters screen larger areas without penetration yet may lack depth specificity or accuracy on coated surfaces. Infrared thermography detects thermal anomalies linked to moisture, requires careful interpretation and favorable environmental conditions, borescopes enable visual access behind claddings, and invasive probes supply definitive substrate moisture data at specific depths with practical safety considerations.
Understanding what each tool measures, when to deploy it, and how to record readings with consistent thresholds helps DIYers distinguish surface moisture from genuine substrate intrusion and to document findings with photos and logs. This approach matters on a jobsite because proper safety planning, access coordination, weather awareness, and clear homeowner or insurer reports reduce uncertainty, avoid false positives or negatives, and inform repair sequencing and preventative measures. Documented results also support accountability and future maintenance, ensuring that the chosen remediation steps address the actual moisture drivers rather than symptoms.
How to use a pinless moisture meter on EIFS
Keep the meter flat and flush to the EIFS surface. Sweep slowly in overlapping passes so you don’t miss small wet spots. Mark any high readings as you go.
Think in terms of relative readings not absolute numbers. Compare a suspect area to nearby clean wall and to a known-dry control spot. A jump in readings tells you where to check further.
Remember the limits: pinless meters read a few inches deep and can be affected by insulation, metal, or multiple layers. Use them as a screening tool, not the final answer.
When to use infrared and invasive testing
Use an infrared camera when you need to spot thermal anomalies over large areas fast. Look for cool spots or patterns that match water paths. Run scans during a good temperature differential — morning or evening often works best.
If thermal or meter checks show suspicious areas, follow up with invasive checks. A small core, probe, or borescope lets you confirm moisture, inspect layers, and find entry points. Don’t skip this when stains, soft spots, or repeated leaks are present.
Rule of thumb: non‑invasive tools tell you where to dig; invasive testing tells you what’s actually behind the EIFS.
Pre-paint compatibility checklist for homeowners and contractors
This H2 guides homeowners and contractors through a stepwise checklist to verify EIFS and coating compatibility before painting. It covers reviewing manufacturer specs for the EIFS system and the chosen paint or coating—including primers, topcoats, sealants, and any substrate requirements—along with checking perm data and moisture management, conducting practical adhesion tests, and confirming suitable weather windows. It also calls for thorough substrate preparation, compatibility checks with sealants and penetrations, and documenting results to inform a clear pre-paint plan and approval process.
Following this checklist helps prevent moisture entrapment, edge failure, or premature coating failure by catching issues early and guiding remediation steps. It establishes a transparent workflow for product names, batch numbers, test results, and responsibilities, which protects homeowners and contractors and supports warranty considerations. It also clarifies when professional EIFS specialists are needed versus DIY work, highlighting red flags that warrant escalation and ensuring a durable, correctly executed paint system.
Adhesion and small-area test patch protocol
Pick a discreet spot and clean it down to sound substrate — no loose paint, dirt, or oils. Use the exact primer and topcoat system you plan to use and apply them in the same film build and sequence called for by the manufacturer.
Let the patch reach full cure time specified on the data sheets. Then perform a tape-and-peel adhesion check and mark the patch location. Monitor the area for 7–14 days for edge lift, blistering, or color change under service conditions.
If you see any failures, stop work and document the results. Repeat with a different prep or system only after confirming compatibility with the product tech data.
Documenting approvals and warranties
Get written approvals from the coating manufacturer or system supplier before you start. Ask for product data sheets, system approval letters, and any specific prep or temperature limits that affect the warranty.
Keep copies with the job file and give a set to the homeowner. Good paperwork preserves warranties and protects resale value. If conditions change, get an updated approval rather than guessing.
Step-by-step remediation when moisture is trapped by incompatible paint
Moisture trapped under incompatible paint requires a structured remediation: confirm the root cause, verify ongoing moisture sources such as condensation, penetration, or leaks, and clearly define the remediation scope before any re-coating. The approach progresses from removing the incompatible coating and performing a substrate assessment to plan targeted drying, substrate repair, and the selection of a compatible coating system, with measurable moisture targets set to guide every repair step.
Safety and containment are emphasized at the outset to protect surrounding EIFS, remove loose paint, and create a dry, ventilated work area that reduces new moisture ingress while you work. A thorough plan includes drying using dehumidification, low heat, and desiccants, substrate repair and re-leveling, resealing joints, and adhesion testing for the primer, sealer, and finish coats matched to EIFS compatibility. Post-remediation verification and preventive monitoring—re-testing moisture, inspecting for signs of residual dampness, and addressing drainage and flashing—help ensure readiness for re-coating and prevent recurrence.
Step-by-Step Process
Follow these steps to get paint off-dates fixed, the substrate sound, and the wall ready for a compatible finish. Each step keeps the job tidy and prevents the same problem from coming back.
- Clear the area and set up basic safety. Remove furniture and cover floors to protect belongings. Check ventilation and have eye and skin protection ready.
- Confirm moisture source and stop it. Fix leaks or poor drainage so repairs don’t fail. Dry readings should start dropping before you go further. Document initial readings as a baseline.
- Isolate the workspace and protect adjacent surfaces. Use plastic sheeting, taped seams, and negative air if available to keep dust and moisture contained.
- Remove failed paint and soft substrate. Scrape, score, and pull back loose coating until you hit firm material. The edge should feather to solid sound substrate.
- Assess substrate conditions and remove mold-contaminated material if present. Use an appropriate cleaner or remove affected gypsum/EIFS paper as needed. Surface should look clean and free of staining after treatment.
- Dry the substrate thoroughly and monitor levels. Use fans and dehumidifiers until moisture readings are in the acceptable range for the chosen coating. A consistent low reading over 24–48 hours is the sign it’s ready. Recheck readings at least daily during the drying phase.
- Repair or replace damaged substrate sections. Patch small areas with compatible filler or replace sections if structural or EIFS backing is compromised. The repair should be flush and well-bonded before priming. Address any voids or delamination with appropriate substrate repair materials per manufacturer specs.
- Prepare the surface. Lightly abrade to create a profile suitable for primer, clean dust, and ensure a sound, dry surface prior to priming.
- Prime with a compatible, high-adhesion primer. Primer ties the new finish to the repaired surface and seals any remaining porosity. Perform a simple adhesion pull or tape test to confirm bond. If adhesion tests fail, revisit substrate repair steps.
- Select and apply finish coats recommended for that substrate and exposure. Use the right drying conditions and film thickness. Apply in recommended sequences (primer → sealer → finish) when required. Check for uniform appearance and adhesion after the final coat. Maintain appropriate cure times between coats as specified by the product.
- Drying monitoring and first recoat timing. After final coat, verify cure per product data, then re-check moisture and adhesion before proceeding with any re-entry or usage allowances.
- Clean up, document, and schedule a follow-up check. Remove containment, dispose of waste properly, and note moisture readings for future reference. Recheck after a rain or seasonal change to confirm the fix. Archive the remediation plan and results for future maintenance and any warranty considerations.
Safe drying and mold remediation steps
Control the drying environment to prevent new damage and limit mold spread. Set up airflow and dehumidification so drying is even and predictable.
For visible mold or heavy contamination, use HEPA-filtered vacuums and contain the work area. Seal doors and vents, run negative air if possible, and keep dust to a minimum. Wear appropriate PPE and change filters or disposable gear between jobs.
If contamination is extensive, or occupants have health concerns, bring in an indoor air quality pro. They will test airborne spore counts and set containment levels. Small, isolated mold can be handled by a careful DIYer following HEPA and containment practices.
Replacing finish coats versus full system replacement
If the substrate is sound and moisture issues are fixed, a finish-only replacement often suffices. Clean, prime, and apply the correct topcoat system matched to the substrate and exposure. A good adhesion test and stable moisture reading tell you the surface-only route is safe.
Opt for full system replacement when the backing, insulation, or EIFS base is delaminated, waterlogged, or structurally damaged. Signs include widespread soft spots, continuous moisture, or persistent blistering after drying. When more than local patching is needed, a full removal and rebuild prevents repeat failures.
Use professional help for structural or extensive EIFS replacement. For simple cosmetic failures, a well-executed primer and finish can restore performance and appearance.
Approved paint and coating types for modern EIFS systems
Approved coating classes for modern EIFS systems are breathable acrylic paints and manufacturer-specified elastomeric finishes that are explicitly compatible with the EIFS substrate, including insulation boards, base coats, and primers, with breathability helping moisture escape and prevent trapped moisture behind the cladding. It’s essential to match coatings to the system’s approved lists and to follow the guidance on cure times, film thickness, temperature and humidity limits, and recoat windows to preserve warranty coverage. Distinguishing acrylic from elastomeric coatings helps you choose the right option based on elasticity, crack-bridging ability, and when thicker elastomeric films are appropriate within a given system warranty. To close the gap in guidance, consult the system manufacturer’s current approved coatings lists (often found in the system’s technical manuals or product bulletins) and cross-check each product’s compatibility with the exact EIFS composition you’re using (substrate type, base coat, primer, and insulation board).
Why this matters on a jobsite is that non-breathable paints, silicone-based or solvent-heavy coatings, and mismatched elastomeric formulations can compromise moisture management and aesthetics, especially over compromised membranes or damaged substrates. Practical application considerations include proper surface prep, cleaning, priming requirements, substrate temperature and dew point constraints, drying times, and the number of coats and inspection steps for adhesion and uniformity. Maintenance and lifecycle implications, like anticipated durability and re-coat intervals, help you plan inspections and budget for future performance while staying within the system’s guidelines to protect the warranty. In addition, request and retain written confirmation of compatibility from the coating manufacturer and the EIFS system maker for every product you intend to use, and document any close-but-not-listed products with the project file and the approved-by-manufacturer note.
How to read technical data sheets (TDS) for compatibility
Think of the TDS as the product’s scoreboard. Look first for moisture vapor transmission (MVTR or perms). EIFS needs breathable finishes, so higher perm values are usually better to avoid trapped moisture. When MVTR values are marginal, calculate the expected real-world performance by comparing local climate conditions (summer humidity, winter dew point) against the coating’s permeance at the anticipated dry film thickness, and verify with the manufacturer’s climate guidance.
Check elongation and tensile strength next. Flexibility tells you if the coating will move with the EIFS without cracking. Also verify adhesion values and the list of recommended substrates to make sure the finish was tested on EIFS or similar base coats. Look for explicit notes on compatibility with the exact base coat system and any primer or sealer required for your substrate. If the TDS lacks these details, contact the manufacturer for written clarification before purchase.
Finally, note application limits like temperature and recommended primers. If anything’s unclear, get clarification from the manufacturer in writing before you buy. A clear TDS saves headaches on the wall and in the warranty.
Manufacturer certification and approved product lists
Stick to what the EIFS maker approves. Their approved product list shows coatings tested with that specific system. Using listed products keeps the system performing as intended. Because product formulations change, verify that the list you rely on is the most current version and note the date of the approval in project records. If a product is close but not explicitly listed, obtain written approval from both the EIFS manufacturer and the coating manufacturer, including any required data sheets, and keep that correspondence with the project files. For each product, confirm if any additional primers, primers’ compatibility notes, or surface-prep steps are mandated.
Ask for written confirmation when a product is close but not explicitly listed. That simple step protects your warranty and avoids finger-pointing later. Keep a copy of any written approval with the project files.
Certified applicators also matter. If the finish or job requires a certified installer, use one. It’s an extra check that the coating and installation meet the manufacturer’s expectations.
Tools and materials checklist for EIFS repaint or repair projects
This section provides a concise, EIFS‑specific checklist of tools and materials you’ll need for repaint or repair, including cleaners, primers, approved finishes, and sealants that are rated for EIFS and the substrate. It emphasizes confirming compatibility across the system, surface prep steps, moisture assessment, and a simple adhesion test to ensure primers and topcoats will bond properly. You’ll also see guidance on selecting EIFS‑friendly cleaners, degreasers, etching options, and primers designed to work with your chosen finish.
Using this toolkit correctly helps prevent moisture entrapment, paints peeling, and warranty issues, while guiding you through a practical project sequence and safety considerations. It outlines the right combination of tools (putty knives, brushes, rollers, spray gear), PPE, containment measures, and a planned workflow that minimizes moisture exposure between cleaning, priming, and finishing. The notes on finishes, sealants, joint care, weather windows, disposal, and compatibility with existing coatings and flashings give DIYers a clear path to a durable, code‑compliant result.
Recommended personal protective equipment and safety gear
Keep yourself safe. EIFS work mixes dust, solvents, ladders and occasional mold. Use proper PPE for sanding, cleaning, and high-reach tasks.
- Respirator (P100) Use a P100 or NIOSH-rated particulate respirator for sanding and mold work. Replace cartridges per manufacturer; tight face seal is crucial. Tip: disposable N95s are cheap for light dust, but rent a cartridge respirator (~$40–$80) for solvent or mold jobs.
- Chemical gloves Nitrile or Viton gloves protect against cleaners and primers. Look for 0.4 mm minimum thickness and chemical resistance. Warning: latex can fail with solvents; change gloves often.
- Eye protection Safety glasses with side shields or full goggles for wiping and pressure washing. Choose ANSI Z87.1-rated eyewear. Tip: goggles prevent splash injuries during cleaning and are inexpensive (~$10–$25).
- Protective clothing Disposable coveralls or heavy-duty work clothes to keep cleaners off skin. Look for chemical-resistant seams for solvent jobs. Rentable option: disposable suits are cheap, reusable Tyvek styles last longer on full projects.
- Hard hat Use when working under scaffolds or with overhead hazards. Pick an ANSI-classified hard hat with chin strap for high-reach work. Jobsite tip: inexpensive hard hats (~$20) are mandatory on pro jobs.
- Non-slip footwear Sturdy boots with good grip and puncture resistance. Steel-toe optional for contractor crews. Clean soles before climbing ladders; wet EIFS and water make slips common.
- Hearing protection Ear muffs or plugs for power sanding and pressure washing. Look for NRR 25+ for loud tools. Tip: cheap plugs work but muffs are better during extended use.
- Fall protection Harness, lanyard and anchor when on scaffolds or roofs. Use OSHA-compliant gear rated for fall arrest. Rental: full kits available (~$50–$150/day) on longer jobs.
Materials to avoid and safer alternatives
Wrong materials ruin EIFS faster than bad weather. Use products designed for EIFS compatibility to prevent cracking, staining, or bond failure.
- Solvent-based paints Avoid oil or solvent-base topcoats; they trap moisture and break bond. Look for water-based acrylics formulated for EIFS with high vapor permeability. Wrong choice causes delamination and blistering.
- Non-breathable coatings Steer clear of heavy elastomeric or rubberized coatings with low perm ratings. Choose finishes with a perm rating suitable for EIFS (follow manufacturer). If you use non-breathable film, moisture pockets form and lead to staining and freeze damage.
- Generic sealants Do not use ordinary silicone or construction caulk that doesn’t match EIFS movement specs. Use EIFS-approved sealants or urethane sealants rated for exterior movement. Improper sealants crack or pull away under thermal cycling.
- Unapproved primers Skip universal primers that lack adhesion testing for foam substrates. Use primers specified by the EIFS finish manufacturer. Wrong primer leads to poor topcoat adhesion and patchy coverage.
- Abrasive cleaners Avoid harsh acid or abrasive cleaners that etch or dissolve finish coats. Use EIFS-safe cleaners and mold treatments with neutral pH and approved dilutions. Harsh cleaners can remove factory coatings and cause staining.
- Heavy-texture renders Don’t apply heavy cement-based renders over EIFS foam without engineering review. Use compatible lightweight basecoats and mesh-reinforced EIFS repair products. Incompatible renders add weight and crack off the substrate.
- Non-breathable backerboards Avoid cement board or dense sheathing over EIFS repairs that block vapor flow. Choose EIFS-compatible backer or foam products that match system permeability. Blocking vapor causes trapped moisture and long-term rot or decay.
Preventive maintenance to avoid the compatibility trap
A proactive preventive maintenance framework helps keep EIFS and paints compatible, reducing moisture risk where substrates and sealants meet. It emphasizes a seasonal plan with inspections, timely sealant replacement, gutter and drainage upkeep, and carefully timed repainting to prevent moisture intrusion and adhesion problems, with clear targets for moisture control, substrate compatibility, and color stability.
Contextualized for a DIY or jobsite audience, the plan translates into a practical seasonal checklist: inspect EIFS surfaces and flashing, verify sealant integrity, review paint compatibility, confirm joints and drainage outlets, and clean gutters to ensure water is directed away from transitions, while documenting sealant cycles, compatible materials, and safe resealing steps. It matters because timely maintenance minimizes moisture-driven failures, supports proper substrate interactions, and makes repainting safer by requiring moisture testing, appropriate surface prep, and primer guidance before applying coatings, so homeowners can keep the system performing while avoiding costly repairs or professional surprises through a simple year‑round calendar and clear warning signs that tell you when to call in an expert.
How often to inspect and what to prioritize
Walk the building at least twice a year — spring and fall are best. Do a quick check after any big storm or freeze-thaw event.
Focus first on openings and transitions: window and door seals, flashings at roofs and walls, and the outer finish for cracking or soft spots. Those are the weak points that let water in and start bigger problems.
Prioritize repairs that stop water entry. A small gap at a flashing or a failed seal is far cheaper to fix than replacing damaged sheathing or redoing finishes later.
Sealant life cycle and replacement guidance
Most exterior caulks and sealants will need replacement every 5–7 years under normal conditions. Harsh sun, movement, or chemical exposure can shorten that life, so use the shorter interval if anything looks hard or cracked.
Failing sealant leads to paint delamination and EIFS wetting long before you see big stains. Cut out degraded joints and reseal with a compatible product; proper surface prep and the right primer matter more than fancy application.
When in doubt, replace the sealant. It’s a small job that prevents costly repairs down the road and keeps finish systems working together instead of fighting each other.
Project planning and weather windows — scheduling to prevent trapping moisture
Plan precise weather windows for each phase—surface prep, primer/paint application, and final cure—favoring dry conditions, stable temperatures, and low humidity, with clear contingencies for rain, wind, or forecast changes that could interrupt work. Define substrate moisture criteria and verification steps, such as moisture tests, surface temperature ranges, dew point checks, and dew history logging, to prevent coating over damp EIFS and avoid trapped moisture. Choose primers, paints, and sealants that are breathable, moisture-tassing, and compatible with the EIFS system, and lay out explicit drying and cure timelines with recoat windows, tolerances for ambient conditions, and explicit actions if moisture appears during curing.
In practice, this planning reduces callbacks, extends coating life, improves adhesion, and ensures a reliable finish even when weather shifts, which matters on tight schedules and in variable climates. Using moisture meters, visual cues, dew point checks, and forewarned scheduling, crews can document decisions, communicate changes quickly, and adjust rapidly, minimizing waste, rework, and downtime while guarding against moisture damage. The approach helps DIYers select compatible products with manufacturer guidelines, stay on track with anticipated cure windows, and avoid guesswork by establishing clear contingencies and decision logs.
Recommended humidity and temperature ranges for work
Aim to work when ambient temperatures sit between about 50–70°F. That range keeps most coatings behaving predictably and curing within expected times. Below 50°F many products slow or stop curing and can trap moisture.
Keep relative humidity under about 70% during application and early cure. High humidity extends drying times and raises the risk of moisture getting locked under the coating. In cold or damp weather consider warming and dehumidifying the space before you start.
Tip: If you can’t hit those ranges, delay the work or use heaters and dehumidifiers until conditions are stable. It’s cheaper than redoing stuck-on moisture later.
Staging multi-step repairs to ensure dryness
Work in clear stages: first let the substrate dry fully, then make repairs, then allow any patch materials to cure before priming or finishing. Don’t rush from patch to topcoat — each layer needs its documented drying time.
After repairs, follow the manufacturer’s cure times and check moisture with a meter if unsure. Apply primer only when the surface is dry to the required depth, then wait the specified time before the finish coat.
On the job: write down each step and its drying window. That record keeps everyone honest and prevents coating over damp work.
DIY scope limits — what homeowners can safely do
Clear boundaries separate low‑risk DIY tasks from work that should stay in a contractor’s hands, such as invasive drying, mold remediation with containment, or EIFS removal. Homeowners can start with a visual inspection protocol, document findings with photos and dates, and perform safe, non‑invasive tasks like surface cleaning, gentle rinsing, debris removal, and small A/B paint compatibility tests in inconspicuous areas. A concise decision tree and checklist help decide what to do today, what to monitor, and when to escalate to a licensed contractor or EIFS specialist.
This approach reduces risk by outlining what is truly safe for a homeowner and what requires professional expertise, along with practical steps to stay organized and informed. Keeping notes and visuals creates a clear record of conditions and trends, supporting better decisions if issues worsen or regulations apply. By focusing on safety PPE basics, avoiding invasive work, and recognizing when readings exceed homeowner‑safe thresholds, you empower DIY readers to proceed confidently while protecting the home’s integrity.
Safe DIY tests and small repairs
Start with visual checks and simple cleaning. Wipe surfaces with mild detergent, clear loose debris, and let areas dry fully before you decide on next steps.
For adhesives and finishes, try a small test patch in an out-of-the-way spot to check adhesion and compatibility. If the patch holds and the substrate is firm, proceed carefully with similar small repairs.
Re-caulk narrow, non-structural gaps and replace a few damaged tiles or trim pieces if the surrounding material is solid. Keep tools basic and work in small sections so you can monitor results.
Monitor moisture levels and surface condition over several days after any repair. If the problem returns or spreads, stop and get a professional assessment.
When to stop DIY and call a pro
If you get high moisture readings, see active water entry, or find soft, crumbling substrate, shut down DIY efforts and call a contractor. Those are signs of deeper damage beyond basic patching.
Visible mold growth, especially on porous materials or over a wide area, requires professional evaluation and proper containment. Don’t try to handle extensive mold with household supplies.
Also stop if finishes are delaminating across a large surface or multiple rooms. Widespread failure often means structural drying, repairs, or specialized remediation are needed.
When in doubt, take photos, document moisture readings, and get an expert opinion before making bigger interventions.

When to hire a certified EIFS contractor — professional services explained
Certified EIFS contractors deliver a full diagnostic workflow that starts with an initial visual survey, moves through moisture measurements by approved methods, and culminates in targeted invasive testing when needed to pinpoint hidden moisture sources. They then outline a clear decision path for repair versus full system replacement, perform controlled drying and moisture management, and offer warranty-backed refinishing to ensure long-term protection of both the structure and interior finishes. Understanding these services helps homeowners assess value and avoid half-measures that can lead to repeated failures for years to come.
Key vetting criteria include valid licenses and insurance, EIFS-specific certifications, verifiable local references, a robust project portfolio, and transparent, itemized estimates that spell out materials, labor, and contingencies. Red flags to watch for include pressure to skip testing, vague scopes of work, weak or non-existent warranty terms, use of unproven products, and conflicting contractor claims without documented proof. Use a practical interview checklist focused on timelines, living-area protection, permit handling, drying protocols, post-repair maintenance, and a clear, written plan for how problems will be addressed should issues arise, along with a testing protocol you can trust.
Questions to ask contractors and verification points
Start by asking for their state license number, proof of insurance and any EIFS manufacturer certifications. A legit crew will have paperwork ready and will not hesitate to show training cards or factory letters.
Ask for references and photos of recent, similar jobs in your climate. Request one or two contacts you can call about workmanship and whether leak issues stayed fixed. Check that warranties are written and that the contractor is an approved applicator for the system you have or want.
Confirm they perform diagnostic testing and controlled drying when needed, and that invasive inspection is part of the quote if moisture is suspected. If you’re unsure about a document, ask for the issuing body and call to verify — that’s how you separate flash promises from real credentials.
Typical professional remediation timeline
Small repairs — like patching localized EIFS damage or replacing sealant — commonly take 1–3 days. That includes tear-out of damaged finish, replacement of the substrate patch, and re-coating. You might see a day of setup, a day of repairs, and a day to cure.
Moderate remediation that involves removing sections, remedial flashing, and targeted drying typically runs 1–2 weeks. Expect initial moisture testing, drying with fans/ventilation for several days, then repairs and finish coats. Drying time often drives the schedule.
Major replacement — full system removal and re-install — can take 2–6+ weeks depending on square footage, weather, and permit lead times. That schedule includes demolition, substrate replacement, multi-stage drying, EIFS reinstallation and final inspection or manufacturer sign-off. Contractors should give a phased timeline so you know when each step finishes and when the house is weather-tight again.
Costs and budgeting: repair vs. repaint vs. replace
Costs for EIFS moisture issues typically range from repair and repaint to full replacement, with rough per-square-foot estimates and overall project totals that shift based on how widespread the moisture is and how much substrate work is required. Key cost drivers include the extent of moisture damage, the total area affected, substrate repair needs, accessibility for crews, and whether re-insulation or flashing work is necessary to restore performance. Understanding these drivers helps you compare repair, repaint, and replacement options not just on upfront price but on long-term value and durability.
ROI considerations factor in potential energy savings, lower ongoing maintenance, curb appeal, and resale value, with break-even timelines varying by climate, system condition, and whether warranties come with replacement. For quotes and decision-making, document moisture testing results, take clear photos, record moisture readings, and ask contractors specific questions about warranties, expected lifespans, and what constitutes a satisfactory path from repair to replacement. Practical planning tips include noting access challenges, coordinating with any adjacent trades, and requesting line items that separate materials, labor, and any substrate or flashing work to better compare bids.
Sample cost scenarios with ballpark numbers
Small patch and repaint: for a localized soft spot or hairline delamination expect roughly $300–$800. That covers cutting out the bad spot, drying, patching the EIFS lath/mesh, and a local color coat if access is simple.
Moderate remediation: if moisture has tracked behind the system over a few square metres and you need substrate repairs and larger reinstatement, plan on about $1,500–$5,000. This includes more drying time, replacing impacted insulation board, and full-area finish to blend.
Full EIFS replacement: full removal and replacement varies a lot by house size, complexity, and scaffolding needs. Small façades can run several thousand; whole-house jobs commonly range from $8,000 to $30,000+ depending on materials, drainage upgrades and access. Use these ranges as starting points — get site-specific quotes for firm numbers.
How warranties and insurance affect cost decisions
Check your product and installer warranties before you start. If the system is still under warranty, some or all repair costs may be covered — but only if the original installation and approved materials were used. Using non-approved patches or aftermarket coatings can void those warranties.
Insurance can help when moisture damage is sudden and accidental, like plumbing failures or storm damage. Most policies won’t cover gradual wear or poor maintenance, so document damage dates and get professional assessments to support claims.
When weighing repair vs replace, factor in warranty transferability and insurance likelihood. A higher upfront cost for a warranty-backed replacement can save money later if it restores coverage and reduces future claim risk.
Safety, health, and liability — mold, demolition, and containment
Mold growth from moisture intrusion can compromise indoor air quality during demolition, so identify and address moisture sources before and throughout the work to prevent a health crisis and to avoid urgent remediation later. Rigorous safety protocols require appropriate PPE, including respirators when necessary, eye and skin protection, hearing protection, and meticulous tool hygiene, plus a buddy system and immediate stop-work triggers to empower workers to halt unsafe conditions. Containment and waste management are critical for preventing cross-contamination: sealed work zones, plastic sheeting, negative air pressure, HEPA vacuums, and clearly marked waste containers that keep dust and debris contained within the work area.
From a planning perspective, mold prevention, testing, and remediation decisions hinge on thorough moisture assessment, HVAC considerations, temporary climate controls, and clear thresholds for escalation to professionals when conditions exceed DIY capabilities. Documentation matters legally and financially, with permits or notifications, insurance implications, and meticulous record-keeping of procedures, disposal, and post-demo inspections to defend against indoor contamination claims and to simplify any future audits. For DIY and job sites, adopting these practices reduces health risks, protects occupants, and helps ensure compliance if something goes wrong by providing a clear, auditable trail of actions and decisions.
Mold remediation best practices
Start by stopping the moisture source. Fix leaks, dry wet materials, and keep humidity under control before you touch moldy surfaces. If the area is small and you’re healthy, you can clean non-porous surfaces with detergent and water, then dry thoroughly.
For larger infestations, visible growth in HVAC systems, or if occupants have health issues, hire a certified mold professional. They have containment plans, negative air machines, and HEPA filtration to prevent cross-contamination. Use a HEPA vacuum and HEPA air scrubbers during and after work to remove airborne spores.
Document the cleanup. Take before-and-after photos and keep contractor reports. That protects you and any future occupants if questions about indoor air quality come up.
Handling lead, asbestos, or older substrates
Older homes can hide hazardous materials. Paint, insulation, floor tile, and pipe wrap are common culprits. Don’t assume a material is safe. Test suspicious materials before you start demo.
If tests show lead or asbestos, stop work and call a licensed abatement contractor. DIY disturbance of these materials can create airborne hazards and legal liability. Licensed firms use proper containment, negative pressure, and disposal methods to keep the rest of the house clean and compliant.
Record the results of any testing and keep receipts from abatement work. Proper documentation protects you from liability and helps future owners or contractors know what was done.
Code, permits, and warranty implications of using non‑approved paints
Many EIFS coatings require explicit approval from the system manufacturer and local code officials before application, and using non-approved paints or coatings can void warranties, trigger code violations, and undermine the system’s intended moisture management and insulation performance. Non-approved products may fail to bond correctly, react with the EIFS substrate, or mislead inspectors, leading to moisture intrusion, accelerated deterioration, and costly resealing or repainting down the line.
Local codes, permitting processes, and building inspections often demand documented compatibility data, official approval lists, and proof of continued compatibility, with the possibility of re-inspection or permit denial if coatings prove incompatible with the EIFS system. Warranty coverage from manufacturers and installers typically depends on strict adherence to approved materials, and applying unapproved paints can void moisture-related coverage, shift blame to improper installation, and complicate claims. For DIYers and contractors, align paint choices with HOA/CC&R rules, document conversations with manufacturers and code officials, and follow a practical checklist that verifies approvals, collects compatibility data sheets, and outlines steps to remediate any non-compliant application.
How to check local code and permit requirements
Call your city or county building department. Ask specifically about exterior repainting, EIFS work, and whether a permit is needed for coating changes. Keep the name and date of the person you spoke with.
Check the building department website for permit trigger lists and downloadable forms. Search for EIFS or synthetic stucco in their code documents. If online info is unclear, take photos of the wall and email them for written guidance.
If you work with a contractor, get them to confirm permit needs in writing. A short note from the inspector or a permit card will save headaches later. Don’t assume—verify before you buy materials or start work.
Documenting compliance to protect warranties
Collect the product Technical Data Sheets, manufacturer approvals, and any EIFS-specific application instructions before you start. Save PDFs or printed copies with the date and product batch if available.
Get written confirmation from the paint manufacturer or EIFS maker if you plan to use a non-standard product. Ask for an email or signed letter that states the product is approved for your system.
When hiring a contractor, request a signed scope of work that references the approved products and application methods. Keep receipts, photos, and permit documents together. These records are the quickest way to defend a warranty claim if a problem shows up later. Paper trail matters.
Compatibility verification protocol for contractors
A compatibility verification protocol defines the scope and purpose for EIFS moisture control, outlining why primer, paint, sealant, and topcoat choices must be matched to the specific system and setting. It requires gathering the EIFS specifications and an approved product list, recording batch or SKU numbers, and establishing clear acceptance criteria before any coating work begins. When needed, it includes performance screening such as adhesion and permeability tests on representative samples and a formal process to document results and decision points.
This approach matters on the jobsite because it reduces risk, prevents costly rework, and provides a traceable record that supports warranty terms and moisture management goals. For DIY or small crews, it translates into a practical workflow: compile data, perform selective testing, and maintain a simple, consistent log of methods, ambient conditions, and surface prep. A well-defined plan also establishes post-application monitoring, inspection intervals, and client communication so everyone understands limits and responsibilities.
Fast field tests vs. lab tests
Start with a simple peel or probe adhesion check on the job. Cut a small area, apply tape or a pull test tool, and see if the EIFS basecoat and finish stay put. These quick checks give you a real-world take in minutes.
If results are borderline, the substrate is unfamiliar, or the client disputes workmanship, escalate to lab testing. Lab adhesion and permeability (perm) tests measure bond strength and moisture movement under controlled conditions and are the tie-breaker for claims or warranty issues.
Document field test steps and photos before sending samples to the lab. That paper trail speeds the lab review and keeps everyone honest.
Sample specification language to include in contracts
Include a clause requiring only manufacturer-approved EIFS components: “All EIFS materials and accessories shall be products approved by the EIFS manufacturer and listed on the manufacturer’s approved product list at time of installation.”
Add a testing and documentation clause: “Contractor shall perform field adhesion checks and provide photos. For any questionable adhesion or substrate compatibility, contractor will obtain laboratory adhesion and permeability testing. Written test reports shall be submitted to the owner prior to final acceptance.”
Finish with a responsibility line: “Where lab results conflict with field observations, the laboratory report will govern remediation scope and costs, unless otherwise agreed in writing.” Use short, clear clauses so there’s no finger-pointing later.
Case studies: before/after diagnostics and successful remediations
Case studies present anonymized, real-world examples that pair diagnostic readings with practical remediation outcomes, focusing on before/after moisture readings and paint-system compatibility. Each entry follows a consistent structure: entry context, diagnostic metrics, remediation actions, and final outcomes. The emphasis is on how moisture data—CM/EC values, surface temperature, dew-point calculations, and infrared or moisture-mapping results—influenced decisions, with clear notes on what changed after remediation. Common failure modes revealed include moisture entrapment from incompatible paints with EIFS, UV degradation, and hidden flashing or weep hole blockages, all traced back to diagnostic evidence.
The second paragraph explains why this matters to a DIY or jobsite reader: it shows concrete steps and outcomes, including selecting compatible primers and topcoats, removing or sealing moisture sources, improving drainage, detailing joints properly, and allowing appropriate cure times. Readers can see how the measured improvements—reduced moisture readings, smoother finishes, absence of reappearance of staining or delamination, and even IAQ or thermal gains when relevant—translate into real-time project consequences such as time and cost implications. These anonymized cases also highlight best practices for documentation, when to escalate to professionals, and how to apply lessons learned to prevent future failures and inform proactive maintenance.
Case A — Paint-over trapping moisture: discovery to cure
Owner called about blistering paint and a faint musty smell in a first-floor hallway. Moisture meter showed 18–22% in the plasterboard and IR scan flagged a cool band along the external wall. Surface felt dry but readings told a different story.
We opened a 2×2 section, confirmed damp gypsum, and found old wallpaper and oil-based paint sealing the wall. The plan was simple: remove trapped finishes, dry the cavity with low-heat fans and a dehumidifier for ten days, then treat for salt contamination before rebuilding the finish. During rebuild we used a vapor-permeable primer and breathable topcoat.
Final verification with the meter read 6–8% and IR showed uniform temperature. The homeowner got normal paint adhesion and no return of blisters. Lesson: trust meters over surface feel and use breathable systems after drying.
Case B — Preventive repaint that avoided a moisture crisis
These are the common mistakes that lead to trouble. We stepped in early, tested, and chose materials to stop a problem before it started.
- Test before painting — simple moisture readings told us levels were borderline; we delayed work until readings dropped to safe range.
- Pick breathable finishes — used a vapor-permeable primer and paint so any residual moisture could escape instead of getting trapped.
- Address external issues first — fixed a leaking gutter and pointing before repainting to remove the source of water.
- Monitor after work — took follow-up meter and IR checks at 1 and 4 weeks to confirm drying continued.
- Keep records — photos and readings saved the homeowner from warranty disputes and guided future maintenance.
Bottom line: quick testing and the right materials kept a small problem from turning into a full teardown. Preventive steps save time and money.
Regional considerations: freeze‑thaw climates, coastal, and humid regions
Regional climate drives EIFS choices, drying times, and detailing strategies, with particular attention to Indiana-style freeze‑thaw cycles and how coastal salt exposure and high humidity alter material compatibility and moisture management. Climate shapes substrate conditioning, coating temperature thresholds, and the selection between rapid‑dry or slow‑dry finishes to control cracking and paint adhesion. Detailing and flashing must be customized for each zone to manage moisture ingress, using appropriate weeps, joints, and sealants that suit the local weather patterns.
For DIY projects, understanding these regional factors helps plan installation windows, anticipate curing behavior, and select products that resist harsh cycles without failure. Expect humidity, wind, and seasonal temperatures to shorten or extend drying times and influence paint adhesion, requiring region‑specific timing and application practices. A practical approach includes regionally approved products, correctly conditioned substrates, and moisture‑control details that mitigate leaks, while staying mindful of warranty requirements and the need for installers experienced with local climate nuances. Regular, simple inspections and early‑warning checks tailored to coastal, humid, or freeze‑thaw regions keep EIFS performing reliably over time.
Freeze‑thaw specific detailing and coatings
In places that cycle above and below freezing—think Indiana winters—you want details that allow movement and drain moisture. Use continuous expansion joints at floor lines, around windows, and at large panels. Keep joints full of a compatible, flexible sealant over a closed‑cell backer rod so water can’t collect and freeze.
Choose finishes that breathe a bit so trapped moisture can escape, and use elastomeric or silicone‑modified coatings where movement is expected. Keep flashing and drip edges prominent; any place water can sit will turn into ice and damage the EIFS face over time.
Check and maintain those seals every spring. Reseal gaps before the next freeze cycle and repair any hairline cracks early—small fixes now prevent big repairs after a few winters.
Humid and coastal environments: salt, mold, and corrosion concerns
Near the coast or in humid climates you need materials that tolerate salt and constant moisture. Specify corrosion‑resistant fasteners and anchors (stainless or hot‑dip galvanized) and use corrosion‑resistant mesh and accessories. Avoid standard carbon steel where salt spray can reach it.
Pick higher‑perm base coats and breathable finishes so moisture won’t get trapped behind the system. Use mold‑resistant additives or coatings on the substrate and plan for regular rinse‑down of coastal salt deposits. Keep drainage and flashing clear to move water away quickly.
Inspect more often—at least twice a year and after major storms. Look for staining, rust streaks, soft substrate, and deteriorated sealant. Early attention keeps small corrosion or mold issues from becoming big structural problems.
EIFS 2.0: How modern systems fix the failures of the past
EIFS 2.0 represents the clear shift from traditional, moisture-trapping assemblies to drainable systems that manage water at the surface and behind the finish, reducing the risk of costly failures, improving long-term performance, and enabling more predictable detailing on varied substrates. Modern systems integrate a drainage cavity, a weather-resistant barrier, drainage mats, proper flashing, and careful edge detailing, forming a continuous path for water to escape while maintaining air and vapor control and accommodating movement.
Standards and testing, especially ASTM E2273, guide the design and installation so that detailing, substrate preparation, and material compatibility minimize moisture risk when executed correctly and with proper sequencing. On the job, you’ll inspect for a continuous drainage plane, flashing at penetrations, an intact barrier, visible drainage mats or perforated sheathing, and accurate substrate prep to ensure the cavity drains and dries as intended. A practical checklist for contractors and homeowners helps verify EIFS 2.0 compliance before and after installation, covering drainage continuity, sealant and flashing details, air/water barrier integrity, and the absence of moisture staining or trapped moisture during ongoing inspections.
Standards and testing that matter
Modern EIFS are backed by real standards that separate good systems from risky ones. The big one is ASTM E2273, which tests wall systems for moisture drainage and how they handle water over time. It’s a lab check that proves a wall can get rid of water instead of trapping it.
Along with that, EIMA and other industry guidance spell out jobsite details: proper flashings, through-wall seams, sealants, and drainage plane setups. Those rules are what protect your sheathing, framing, and insulation from rot and mold when the system is installed right.
Bottom line: look for EIFS components and installation methods that reference these standards. They don’t guarantee perfection, but they cut the risk if the crew follows the tests and the manufacturers’ directions.
Foam board insulation types: benefits and best uses with EIFS
Foam board insulation comes in EPS, XPS, and polyiso, each with distinct thermal performance, moisture behavior, and typical costs, and all must be evaluated for EIFS assemblies to avoid moisture traps or weak interfaces. EPS offers affordable, moderate R-values with higher porosity that promotes drainage but is more vulnerable to moisture ingress if joints aren’t well detailed, XPS delivers stronger moisture resistance and dimensional stability with better vapor control, and polyiso provides higher R-values for cold climates but requires meticulous compatibility checks at joints, edges, and around penetrations to prevent moisture entrapment.
Understanding foam porosity and vapor characteristics helps you plan dew point management, drainage plane compatibility, and appropriate adhesive and finish pairings for EIFS; use EPS where budget and drainage are priorities, XPS where damp or high-moisture zones exist, and polyiso where higher insulation is needed, provided system manufacturers approve the combination. This matters on DIY jobs because proper surface prep, edge detailing around penetrations, sealant compatibility, UV exposure considerations, and proactive moisture management prevent moisture ingress and ensure the EIFS assembly performs as intended.
How insulation choice affects moisture behavior
Different foam boards handle vapor and liquid differently. If you read earlier on EPS, XPS and polyiso you know their basic traits. Here I’ll stick to how that affects moisture in an EIFS wall.
EPS is the most vapor‑permeable of the three and can absorb some water if it sits against a wet substrate. XPS is more resistant to bulk water and has lower vapor permeance. Polyiso has high R‑value but can be fairly vapor‑resistive, especially with foil facers, and its thermal performance can drop in cold, wet conditions.
Thermal bridging and detailing matter as much as the foam type. Continuous board reduces studs acting as cold paths. Tight joints, taped seams, proper drainage plane and compatible adhesives keep moisture from getting trapped behind the EIFS. In short: pick the board to match your climate and detail the installation to manage vapor and drainage.
Stucco & EIFS myths busted with clear, science-backed facts
Myths about EIFS and stucco are debunked by science: the real culprits are improper installation and incompatible coatings, not EIFS itself, and the key is to separate myths from proven facts by pairing each misconception with testing standards and evidence about moisture transfer, drainage planes, vapor permeability, substrate prep, and breathable, compatible coatings rather than generic paints. Common misbeliefs—EIFS inherently traps moisture, paints doom the system, or stucco and EIFS can’t be repaired—are addressed with explanations of how correct installation practices and system design manage moisture and how compatible coatings and primers support long-term performance.
For DIY and jobsite readers, this matters because it translates into practical steps: verify substrate readiness, select primers and coatings for compatibility, conduct patch tests for elasticity and UV resistance, and understand when field testing or pro consultation is warranted. A simple decision framework helps: answer yes/no to questions about proper installation, coating compatibility, and ongoing moisture monitoring, and watch for signs such as unexpected moisture intrusion, coating delamination, or performance gaps that warrant professional evaluation and possibly targeted repairs rather than wholesale replacement.
Myth vs. reality quick checks
Myth: EIFS always traps water and causes rot. Reality: When installed with proper flashing, drainage plane details, and compatible coatings, modern EIFS performs like any other cladding. Building science and field studies show failures are tied to poor details, not the system itself.
Myth: Stucco is maintenance-free and immune to cracking. Reality: All rigid coatings can crack if substrates move or if installers skip control joints. Regular inspection and timely repairs keep small cracks from becoming big problems.
Quick rule: If you see issues, look for installation or detail problems first — not the material. For the common failure modes we covered earlier, proper flashing, breathable membranes, and correct coatings are your best defense.
Foam board insulation: key types, benefits, and best uses
Foam board insulation comes in EPS, XPS, and polyiso, each with different strengths and limits for EIFS applications. EPS is affordable with decent moisture resistance but lower R-values, XPS offers higher R-values and better moisture stability in damp climates, and polyiso delivers the best thermal performance when moisture is managed with proper drainage and coatings. These differences determine vapor diffusion behavior, moisture migration risk, and how well the board accepts surface coatings and fasteners on an EIFS substrate.
Practical installation requires thorough substrate prep, clean dry surfaces, wind and temperature cautions, and thoughtful panel layout with tight seams, proper edge detailing, and finished joints to prevent moisture traps. Aligning fasteners, drainage planes, and coatings with the foam and EIFS system reduces failures at penetrations, corners, and along edges, and helps maintain continuous drainage and vapor control through the wall assembly. Use this guidance to choose best-use scenarios such as foundations, parapets, and damp or freeze–thaw exterior walls, while avoiding conditions that need extra drainage or ventilation, and watching for common pitfalls like incompatible adhesives, missing sealants, or neglecting code-required fire-safety measures.
Selecting the right foam board type for EIFS compatibility
Pick the foam based on moisture risk and the R-value you need. EPS breathes more and tolerates moisture cycling; use it where drainage is good and budgets are tight. XPS gives better moisture resistance and is stiffer — good for below-grade or hard-driven wind loads. Polyiso delivers the highest R-value per inch but can lose performance in cold, wet climates.
Check adhesive and primer specs for compatibility. Some EIFS adhesives bond better to smooth, closed-cell surfaces (XPS/polyiso) while others are formulated for EPS. When in doubt, call the EIFS manufacturer and confirm tested pairings — that avoids delamination or trapped-moisture issues.
Choose EPS when ventilation/drainage is present and cost matters; choose XPS where constant moisture or impact resistance is likely; choose polyiso for tight envelopes in milder climates where space for thickness is limited. Keep the system tested together, not just the foam alone.
Preparing surfaces and safe handling of foam board before EIFS application
Start with a clean, dry substrate. Remove dust, loose paint, oil, and anything that will stop adhesive from bonding. Use a moisture meter to confirm substrate moisture content is within the EIFS manufacturer’s limits — never install over damp sheathing or wet framing.
Handle boards with clean gloves and keep them off the ground on pallets. Cut outside when possible to avoid dust in the workspace. Avoid power-washing foam or using solvents that can leave residue; those trap moisture under the EIFS later.
Wear eye protection, dust mask, and gloves during cutting and sanding. Store boards flat in a dry, shaded area and cover them to prevent UV degradation and water absorption before installation.
Installing foam board with weather barriers and sealants to prevent moisture traps
Lay the weather barrier or WRB first and integrate it with flashings. Butt foam edges tight but avoid gaps; where joints occur, use compatible tape or sealed mesh per system instructions. Run fasteners to the structural backing, not just the foam, and avoid overdriving which compresses the board and creates voids.
Detail penetrations and openings before finishing the EIFS. Flash around windows, doors, and mechanical penetrations with compatible sealant and backer where needed. Use sealants that the EIFS maker approves so the exterior coat bonds properly and the sealant flexes with movement.
Tape or fill joints with compatible adhesive or joint sealant, then check the plane for flatness before base coat. A continuous, well-sealed WRB plus correct fasteners and approved sealants is what keeps moisture out and stops trapped pockets behind the EIFS.

Conclusion
What you put on EIFS matters as much as what’s behind it. Using incompatible paints traps moisture, speeds deterioration, and can ruin your finish. The right move now is to confirm compatibility, test it, and follow a plan that protects safety and long‑term durability.
Start by inspecting the project area: verify you’re using an approved coating for modern EIFS, choose the smallest test patch, and document any moisture signs before and after applying a test coat. Then proceed in a clear sequence: prep and clean the surface, apply a compatible primer if required, test at a controlled area, monitor for a full season, and only scale up if the test proves stable. Always use weather windows with low risk of rain and adequate drying time, and keep moisture controls in mind during every step.
Common mistakes to avoid include rushing the test phase, skipping the compatibility check, and overwriting with high‑solids coatings on porous EIFS textures. Don’t skip safety: wear appropriate PPE, contain any debris, and seal off painted areas to prevent mold growth or dust migration. Test in a small area first, follow the manufacturer’s cure times, and never rely on color alone to gauge compatibility.
If in doubt, or if you discover moisture behind the finish, call a certified EIFS contractor rather than pushing ahead. A pro can verify adhesion, perform proper moisture remediation, and ensure a warranty‑friendly result. With careful testing, the right products, and disciplined execution, you’ll protect your investment and finish with a durable, visually solid exterior.
FAQ
Why do mixing EIFS with incompatible paints cause moisture traps?
Different paints and coatings breathe differently. When they don’t match with the EIFS, moisture gets stuck behind the layers. That trapped water can lead to mold, rot, and failed coatings.
How can I tell if my paint is compatible with EIFS?
Check the paint’s data sheet for breathable properties and exterior compatibility with EIFS. If in doubt, ask your supplier or a pro for a compatibility test. Don’t assume it will work—the wrong combo can bite you later.
What are the warning signs of moisture traps on EIFS surfaces?
Look for peeling, blistering, or staining on the coating. You may also notice musty smells or soft, spongy spots behind the surface. Catching these early saves you from bigger repairs.
What steps should I take to fix an ongoing moisture problem on EIFS?
First remove the offending paint and reseal with a compatible system. Re-apply only coatings proven to work with EIFS. If moisture is deep, call a pro to assess structural damage before finishing the job.