
Introduction
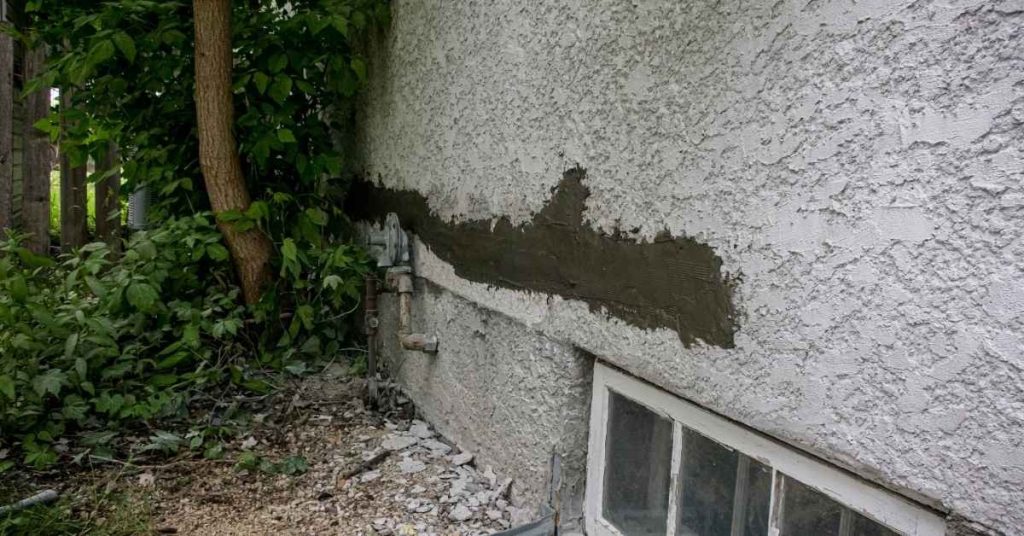
Dark rings around stucco repairs are staining caused by moisture during the curing process.
This article calls out a practical, hands-on approach to reduce those stains while you patch. What you do and when you do it matters for a cleaner, longer-lasting repair.
Plan ahead for weather, especially in Eugene, and keep the surface ready before you patch. Keep a consistent moisture path during cure and follow the product label or manufacturer instructions to avoid extra staining. Check local rules and safety notes, and focus on simple steps like cleaning edges, applying a thin patch, and letting it cure with minimal disturbance.
Key takeaways
- Work patching climates with proper curing conditions; avoid rain during sealant cure.
- Assess true curing stains vs dirt, adjusting cleanup methods accordingly to prevent rings.
- Prepare surfaces by masking nearby textures and controlling dust to reduce staining.
- Seasonal maintenance rhythm for roofs in Eugene should balance moisture and dryness.
- Keep gutters clean; control moss and algae to prevent water flows on patches.
- Wear eye protection and gloves when patching; follow manufacturer instructions.
Table of Contents
- Introduction
- Key takeaways
- Why Stucco Patch Curing Causes Dark Rings
- Assessing the Problem: Identify True Curing Stains Vs Other Causes
- Best Practices Before and During Stucco Patching to Minimize Rings
- Post-Patch Treatments to Prevent or Reduce Dark Rings
- Quick Fixes and Homeowner-Level Remedies
- Prevention-Focused Maintenance and Seasonal Considerations
- Long-Term Solutions and Upgrades to Avoid Recurring Rings
- Visual Checkpoints, Tools, and Specs for Contractors and Inspectors
- Conclusion
- FAQ
Why Stucco Patch Curing Causes Dark Rings
During curing, moisture remains in the patch longer than the surrounding stucco. This trapped water can slow cement hydration and darken the new patch relative to adjacent material. You’ll often notice a halo where the patch meets the older surface.
Efflorescence and pigment washout are common culprits as salts migrate to the surface with moisture. The contrast with weathered, aged stucco makes the ring appear darker and more pronounced. Practical curing steps, like maintaining consistent patch thickness and keeping the area damp with approved methods, help reduce rings and even out color over time.
Cement hydration and moisture gradients
The curing process involves water moving through the patch. This water carries salts and other minerals with it. As it dries, especially at the edges of the patch, these materials concentrate. That’s why you might see darker halos there.
Slower drying also means more time for cement hydration to happen. This can make the new patch look darker compared to the surrounding stucco that’s already cured and dried.
Tip: Keep the patch consistently moist during curing to minimize these gradients.
Efflorescence and mineral leaching
During curing, soluble salts in the stucco migrate towards the surface. This can leave pale or dark deposits, creating visible rings around your patch.
Efflorescence happens when these salts reach the surface and evaporate, leaving a white, powdery residue. If they don’t fully evaporate, they can darken the surface instead.
Tip: Use a moisture meter to check for excess water that might be driving efflorescence.
Surface texture and absorption differences
The way your patch was finished, the type of aggregate used, or even the primer can all affect how it takes stains or reflects light compared to the surrounding stucco.
For instance, a smooth finish might reflect light differently than the textured surface around it. Or, if the new patch absorbs water at a different rate than the old stucco, it could stain more easily.
Tip: Match the texture and absorption of the surrounding stucco as closely as possible when repairing.

Assessing the Problem: Identify True Curing Stains Vs Other Causes
This section helps you tell curing stains from mold, paint mismatch, water intrusion, or substrate contamination by sight and touch. Look for uniform ring shapes and a consistent edge sharpness that follow the patch boundaries. A rough, powdery surface can also hint at curing-related issues.
Use a simple test sequence to verify, including moisture behavior after drying and a quick surface temperature feel. Document leads that point away from curing, such as mold signs or persistent damp spots, to decide whether to re-patch, re-seal, or call a pro. Keeping photos and notes helps prevent misdiagnosis.
Visual checkpoints to inspect
Before you start poking and prodding, grab a flashlight and give your patch a good once-over. This checklist helps you spot curing stains.
- Ring shape: Curing stains form rings around the patch. If it’s irregular or broken up, it might not be curing.
- Timing since repair: Check when the stain appeared. Curing stains take time – if it’s too soon, wait a bit longer.
- Rain-dependent staining: If the stain only shows up after rain, it’s likely curing-related.
- Edge sharpness: Sharp edges around the stain indicate curing. Blurred or fuzzy edges might mean something else is going on.
- Uniformity: Curing stains should be even. If it’s patchy, rethink your diagnosis.
- Gloss level: Check if the stained area is glossier than the rest. This could indicate moisture trapped under the surface.
- Powdering: Gently touch the stain. If it feels powdery or crumbles, that’s a sign of curing.
- Moisture feeling: Press your finger onto the stain. If it feels wet, something else might be going on.
Quick rule: If anything seems off from this checklist, dig deeper before assuming it’s curing.
Simple moisture and weather tests
Now let’s get hands-on. These quick tests help confirm if moisture is moving through your patch.
First, mark the date on a piece of painter’s tape and stick it to the stain. Check back in a week. If the stain has grown, you’ve got active moisture movement.
Next, after a rainstorm, place a dry towel over the stain and shine a blacklight on it. If the stain glows, that means moisture is moving through.
Pro tip: Keep an eye on weather patterns. Heavy rains or sudden temperature drops can cause old stains to reappear temporarily.
When to suspect structural moisture or leaks instead
Sometimes, what looks like a curing stain is actually something more serious. Here’s when to sound the alarm.
Stain growth during dry weather: If your stain is getting bigger when it hasn’t rained, you might have a leak elsewhere in your system that’s seeping into your patch.
Interior stains: If you’re seeing stains on the inside of your walls, that’s a sign of serious water intrusion. Get a pro out ASAP.
Persistent dampness: If your patch feels consistently wet or damp, even after it’s had time to cure, there’s likely a leak or moisture issue behind your wall that needs immediate attention.
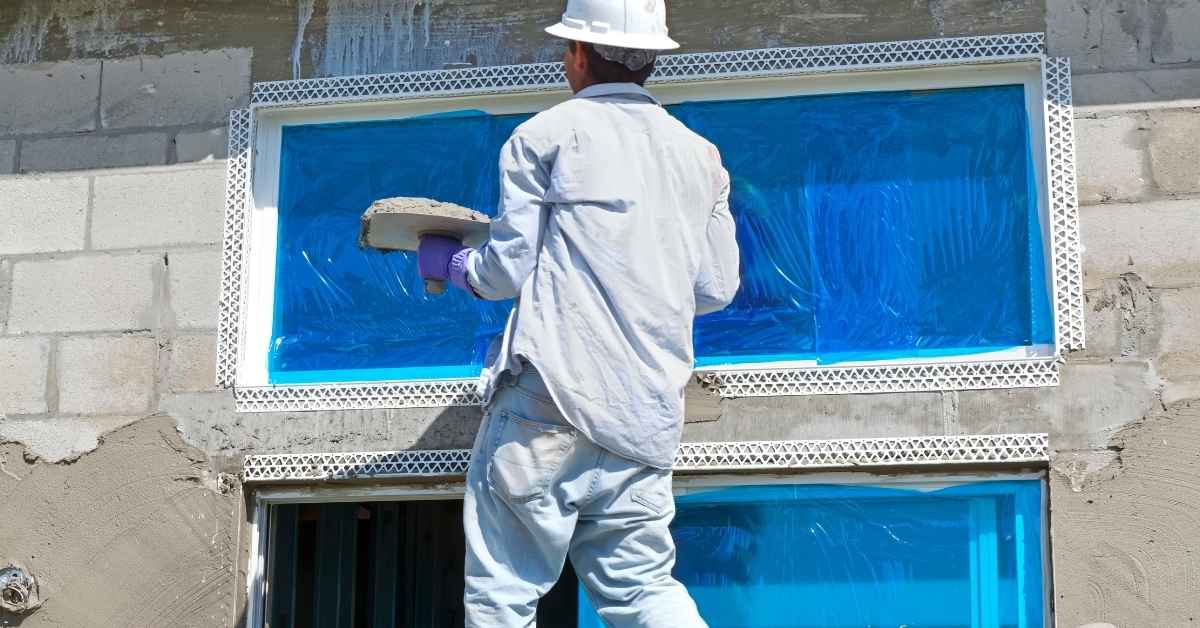
Best Practices Before and During Stucco Patching to Minimize Rings
The goal is to minimize differential curing and staining by controlling prep, materials, mix, and patching order. Start with a clean, feathered edge and a sound base to reduce edge contrast. Check substrate health as part of your prep before any patch goes in.
Choose compatible mixes and finishes, and manage batching to avoid over-wetting or under-mixing. Use proper curing methods and a steady thickness to keep the pigment from washing out differently. Finish with a plan for sealing and inspection to catch uneven absorption early.
Substrate Prep and Cleaning
Before you start patching, ensure your substrate is clean and sound. Remove any dirt, grease, or loose material.
Pre-wet or prime the area to improve adhesion and reduce suction that can cause rings. If there are underlying cracks, repair them first.
Use a bonding agent if the old stucco is non-cement-based or has a weak bond. This helps create a strong link between the new and existing material.
Matching Materials and Pigmented Mixes
The right materials can minimize rings. Incompatible or poorly matched materials cause contrast, leading to differential curing.
- Cement Type: Use the same type of cement (Portland, lime-putty) as your existing stucco to ensure compatibility.
- Pigments: Match colors closely. A slight mismatch can cause visible rings.
- Sand Gradation: Use similar sand size and type to maintain texture consistency.
- Avoid: Using new, incompatible materials or different sand gradations that can cause cracking and staining.
- Spec/Rating: Look for ASTM C926/C926M standards for cement, and ensure your pigments are lightfast and weather-resistant.
Controlled Curing Techniques on the Job
Proper curing minimizes rings by controlling moisture loss. Here’s how:
Fogging: Mist the patched area lightly to keep it damp, mimicking natural rain.
Damp Curing: Cover the patch with a breathable membrane or wet burlap to retain moisture.
Avoid: Rapid sun/wind exposure that can cause quick drying and rings. Use shading or windbreaks if necessary. Apply curing compounds as directed for added protection.
Post-Patch Treatments to Prevent or Reduce Dark Rings
First, confirm the patch is fully dry and monitor any remaining damp spots in the area. Avoid trapping moisture with aggressive cleaners or sealers that reduce breathability. Use gentle tests to identify lingering salts before moving ahead with treatments.
Choose breathable sealers and compatible finishes that won’t trap moisture. Plan coating and painting steps so primers and colors align, and allow proper time between stages. Ongoing checks help catch recurring staining early and guide maintenance decisions.
Safe cleaning and salt removal
Before you start cleaning, make sure the patch is completely dry. Check for any damp spots that might trap moisture later.
Use a low-pressure rinse to avoid damaging the surface. A mild detergent or manufacturer-approved efflorescence cleaner can help remove salts. Always test on a small area first to ensure it doesn’t degrade your stucco or patch.
Never use high-pressure washing or harsh solvents, as they can abrade the surface and re-wet surrounding stucco.
Breathable sealers and coatings (when to use)
Breathable sealers like silane/siloxane allow moisture to escape while preventing water ingress. They’re great for reducing dark rings without trapping moisture.
Apply them once the patch is dry and any efflorescence has been removed. Follow manufacturer instructions for best results.
Avoid non-breathable films that can trap moisture, leading to further staining or damage.
Timing and methods for repainting or color-matching
Wait at least 28 days after patching before painting to ensure the stucco is fully cured. Use a masonry primer to seal the surface and improve paint adhesion.
To blend the patch with the original stucco, use a feathering technique when applying the primer and paint. This helps create a smooth transition between the two surfaces.
Remember, patience is key here. Rushing the process can lead to uneven color or trapped moisture.
Quick Fixes and Homeowner-Level Remedies
Develop a quick diagnostic to distinguish dark rings from other stains, then pursue safe DIY steps. Focus on non-destructive cleaning and moisture management around the repaired area. Avoid aggressive methods that could affect texture or patch integrity.
Light sanding and feathering can help blend the edge, while temporary shading or misting during cure slows ring formation. Know your limits: persistent staining, cracks, or signs of ongoing moisture mean it’s time to hire a licensed professional for a thorough remedy.
Gentle washing and efflorescence removal at home
First, mix a mild cleaning solution: one part white vinegar to four parts water. Dip a soft-bristled brush into the mixture and gently scrub the affected area.
Safety first: Wear gloves and test the solution on a small, hidden patch before applying it to the entire area. Vinegar is acidic, so avoid using it on sensitive surfaces or if you’re unsure about your stucco’s composition.
Rinse thoroughly with clean water after scrubbing. For efflorescence (white powdery deposits), use a stiff-bristled brush and a solution of one part muriatic acid to ten parts water. Be cautious, as muriatic acid is highly corrosive. Always wear protective gear and follow safety guidelines.
Temporary visual blending tricks
While waiting for the patch to cure completely, you can try some temporary cosmetic fixes to reduce the appearance of dark rings:
1. Masonry wash: Apply a diluted mixture of acrylic paint and water (about 20% paint) over the entire patched area. This will help blend the colors.
2. Tinted water-based stains: Use a stain that matches your stucco’s color as closely as possible. Apply it to the patch and surrounding area for better blending.
3. Matched touch-up coatings: If you have leftover paint from when the patch was applied, use it to touch up the edges of the patch. This can help reduce the contrast between the patched area and the rest of the wall.
Remember: These methods are temporary and may not fully eliminate dark rings. They’re best used while waiting for the patch to cure or as a quick fix before hiring a professional.
When to stop DIY and contact a contractor
While these DIY methods can help reduce the appearance of dark rings, there are times when you should stop and call in a professional:
– If staining persists or worsens after cleaning and temporary fixes. This could indicate an ongoing moisture issue that needs expert attention.
– If you notice soft edges or crumbling around the patch, it might be a sign of improper curing or underlying structural issues.
– If there are cracks in the stucco or interior walls, these could indicate structural problems that require professional assessment and repair.
– If you notice interior moisture or dampness, this could be a sign of leaks or other moisture issues that need to be addressed by a pro. Don’t wait – contact a licensed contractor for help.
Prevention-Focused Maintenance and Seasonal Considerations
The aim is to cut repeat moisture cycles by addressing moisture sources and drainage around the patch. Clear goals and a simple routine make seasonal tasks like gutter checks and debris removal part of your standard practice. Stay on top of environmental factors that drive staining.
Regular checks of drainage paths, flashing integrity, and surrounding landscaping help keep moisture away from patches. A repeatable seasonal plan with reminders and basic logs makes spotting early signs easier and keeps repairs looking even longer.
Water management: gutters, downspouts, and flashing
Proper water management around your stucco patch is crucial to prevent moisture buildup. Start by checking your gutters. They should be clear of debris and have a proper slope away from the wall to direct water away.
Securely connect all downspout extensions or use splash blocks at their ends. This ensures water doesn’t pool near your repair, which can lead to staining.
Inspect your flashing at transitions like roof-to-wall, windows, and doors. It should be intact with no gaps. Re-caulk or seal any problem areas to stop moisture intrusion.
Regularly maintain these components to keep water away from your stucco patch and reduce the risk of curing stains.
Vegetation and microclimate control
Plants near your stucco wall can trap moisture, creating a humid microclimate that encourages staining. Prune back any vegetation growing too close to the patch.
Maintain a clear space around the base of the wall to prevent water from being wicked up by plant material or soil. Use gravel or other permeable materials for landscaping in this area.
Consider introducing some shading or spacing plants to reduce radiant heat and condensation on warm, damp days. This can help prevent moisture buildup around your stucco patch.
Regularly monitor and maintain your landscaping to keep it from contributing to moisture problems.
Timing repairs for favorable weather
Weather plays a significant role in how well your stucco patch cures and its susceptibility to staining. Aim to schedule your repairs during mild, low-humidity conditions. This allows the patch to cure evenly without excessive evaporation.
Avoid hot, windy days as they can cause rapid drying and create a strong temperature gradient that draws moisture back into the patch, leading to staining. Also, steer clear of wet periods to prevent excess water from being drawn into the wall.
If you’re unsure about the weather outlook, consult local forecasts or ask your local hardware store for advice tailored to your area.
Timing your repairs wisely can help minimize the risk of curing stains and ensure a better-looking finish.
Long-Term Solutions and Upgrades to Avoid Recurring Rings
Substrate waterproofing and proper drainage are foundational. A continuous moisture barrier and correct slope away from repairs help manage water movement. Consider upgrades that integrate with the existing stucco system for lasting performance.
Improve the drainage plane, add through-wall flashing where needed, and choose durable finishes that resist color shift and UV exposure. Establish a maintenance plan with clear intervals to prevent recurrence and protect warranty coverage when applicable.
Improve the wall drainage plane and flashing
Moisture buildup behind your stucco can cause dark rings around repairs. To fix this, you need to improve your wall’s drainage plane and install proper flashing.
Weep screeds: These are horizontal grooves at the bottom of your stucco that let water escape. If yours are clogged or missing, install new ones.
Step flashing: This is L-shaped metal flashing installed along with siding or stucco at corners, windows, and doors. It helps channel water outwards. Retrofit step flashing where needed.
If your existing flashing is damaged, replace it. Use a sturdy, corrosion-resistant material like galvanized steel or aluminum.
Use of factory-tinted or colored stucco finishes
Color consistency is key to preventing noticeable rings around repairs. Factory-tinted or colored stucco mixes can help.
These pre-mixed, color-integral systems ensure your patch blends seamlessly with the existing wall. They’re more consistent than adding color on-site.
UV stability: Colored finishes are often UV-stable, resisting fading and discoloration from sunlight. This keeps your repairs looking fresh longer.
When repairing, use a finish coat that matches your existing stucco as closely as possible. If you’re unsure, consider a full recoat for consistent appearance.
Cost vs. benefit: targeted rework vs full recoat
Deciding between spot repairs and a full recoat depends on your budget, the extent of damage, and longevity.
Targeted rework: Spot repairs are cheaper but may not last as long. They can look patchy if not done well. Consider this option for minor issues or when you’re on a tight budget.
Full recoat: A full stucco system upgrade is more expensive but provides consistent appearance and longevity. It’s ideal when your existing stucco is damaged, faded, or inconsistent in color.
If you find yourself repeatedly repairing the same area, it might be time for a full recoat. Weigh the costs and benefits based on your specific situation. Consulting with a professional can help make an informed decision.
Visual Checkpoints, Tools, and Specs for Contractors and Inspectors
Provide visual checkpoints to identify curing stain patterns and typical ring progression, with scale references for photos. Emphasize a consistent documentation routine so homeowners and inspectors can compare conditions over time. Use clear cues to distinguish curing rings from other issues.
List essential tools and specs for field work, like moisture meters and color-matched sealants, and include a concise homeowner checklist for pre-patch, during-application, and post-cure steps. Add a pro tip section to help verify staining is from curing rather than ongoing moisture intrusion and to tell lighter rings from true stains.
Tools and materials checklist
Before you start, gather these tools and materials to assess and remediate curing stains.
- Moisture meter: Check for excess moisture in the stucco before and after repairs. Skipping this can lead to recurring rings.
- pH test strips: Test substrate pH to ensure it’s within acceptable range (6-8) for proper adhesion and curing.
- Soft-wash kit: Gently clean the area before patching to remove dirt, mold, or mildew that could interfere with curing.
- Breathable sealer samples: Have options ready to seal the patched area and prevent future staining.
- Color swatches: Match the existing stucco color for touch-ups after repairs.
- Tape measure: Accurately measure stain sizes and patch dimensions.
- High-contrast non-staining pencil: Mark boundaries and measurements clearly without leaving residue.
- Color-matched sealants: Have touch-up sealant ready to blend patched areas with the surrounding stucco.
- Concrete curing compounds: Apply these after patching to control evaporation and prevent dark rings.
- Water-absorption tests: Check substrate absorption rate before applying any materials.
Quick rule: Always test materials on a small, hidden area first to ensure compatibility with your existing stucco.
Photo documentation and marking protocol
Documenting stains helps track progress and support warranty claims. Follow this protocol:
- Photograph stains: Take clear, well-lit photos of stain patterns from various angles.
- Date-stamp photos: Include date stamps to track changes over time.
- Measure stains: Use a tape measure in the photo for scale reference.
- Mark boundaries: Tape off stain boundaries with high-contrast, non-staining tape.
- Record notes: Jot down observations about stain progression and weather conditions.
- Re-photograph regularly: Take new photos every 2-4 weeks to monitor changes.
Quick rule: Consistency is key. Use the same camera, lighting, and angle for each photo set.
What to ask a contractor: questions and warranty points
Vetting contractors with these questions ensures quality workmanship and lasting results.
- Materials used: Inquire about the specific materials they’ll use for patching, sealing, and curing.
- Curing methods: Ask how they plan to control evaporation during the curing process.
- Sealer breathability: Ensure the sealer they choose allows moisture vapor to escape (breathable).
- Remediation warranty: Ask about their warranty policy for stain remediation and prevention.
- Experience with curing stains: Inquire about their experience dealing with curing stains specifically.
- Before/after photos: Request examples of their past work, including before-and-after photos.
- References: Ask for references from satisfied customers who had similar issues.
- Timeline and follow-up: Discuss the expected timeline for repairs and any follow-up inspections.
Quick rule: Trust, but verify. Always check credentials, licenses, and insurance before hiring.
Conclusion
Keep the focus on safe, durable repairs. Stop dark rings from returning by respecting curing times, protecting patches from moisture, and checking the patch against the surrounding texture before you call it done.
To proceed, treat the task like a small, controlled project: verify weather and moisture conditions, prep the surface properly, patch with the right mix, cure in a protected area, test for even color after cure, and finish with a light protective treatment if appropriate. Do this in a clear sequence: assess, patch, protect, observe, and then maintain. If you see unexpected staining or if the patch seems to pull away, pause and reassess before adding more product.
Common mistakes to avoid include rushing the cure or exposing fresh patches to rain, skipping a test area, using the wrong mix or application thickness, and ignoring seasonal humidity swings. Use basic safety rules: wear eye and skin protection, work only when you can keep the patch dry for the recommended cure period, and never force a patch to dry faster with heat or fans. If the problem looks large, deeply cracked, or repeatedly returns after patches, call in a professional for assessment and longer-term fixes. Stay deliberate, stay safe, and you’ll keep the color and durability solid. You’ve got this; just follow the plan and finish strong.
FAQ
Why is wet weather hard on shingles and how does that relate to stucco patches and curing stains?
Rain and high humidity can slow drying and push moisture into wall joints, which can worsen curing stains around patches. Wet weather also makes it harder to spot true staining versus temporary damp spots. Check the patch label and local weather guidance before proceeding.
What is the right seasonal maintenance rhythm for roofs in Eugene to prevent patch-related stains and other moisture issues?
In Eugene, keep a simple rhythm: inspect after heavy rains and before the wet season, clear gutters, and look for any signs of water intrusion. Do small touch-ups on dry days and keep a log of when you patched and weather conditions. Use this to guide future patching timing and precautions.
How should I handle moss and algae to protect stucco and roofing joints around patches?
Keep roofs and walls free of moss and algae to reduce moisture retention. Trim nearby vegetation so they don’t shade the surface, and treat with the product directions when necessary. Always follow the product label and local guidelines for safe use near patches and flashing.
What maintenance steps around gutters, downspouts, flashing, and sealant help prevent dark rings after patching?
Keep gutters clear and downspouts directed away from patched areas. Check flashing and sealants for gaps and re-seal as needed, following manufacturer instructions. If you’re unsure, inspect the label or manufacturer guidance and fix the obvious leaks first.
Why is attic ventilation mentioned with stucco patches, and what practical checks should I do?
Proper attic ventilation reduces interior moisture that can condense and affect exterior patches. Check that vents are clear and systems aren’t blocked by insulation. If in doubt, consult a venting or insulation guide and verify against what your attic setup requires.