
Introduction
Ice and water shield and felt serve different roofing roles, and the shield is typically used where water intrusion is most likely.
You’ll learn how to identify when each is appropriate, compare their performance and cost, and understand practical installation tips and common pitfalls.
The guide walks through quick rules of thumb to help you choose the right option for your climate and roof design.
Key takeaways
- Choose ice and water shield for valleys, eaves, and high-risk roof sections.
- Felt provides basic moisture barrier under shingles where climates are dry.
- Install cold weather shingles and proper nailing before applying underlayment.
- Ice and water shield resists ice damming; felt requires additional flashing.
- Codes may require continuous underlayment in northern regions or new builds.
- Total cost varies by area size; factor material, labor, and roof pitch.
Table of Contents
- Introduction
- Key takeaways
- Quick Answer — Which One to Use and When
- What Is Ice & Water Shield?
- What Is Felt (Roofing Felt / Underlayment)?
- Head-to-Head Comparison: Performance, Lifespan, and Limitations
- Installation: Areas, Techniques, and Common Mistakes
- Codes, Warranty, and Insurance Considerations
- Cost Breakdown and Long-Term Value
- Safety, Environmental Impact, and DIY vs Professional Installation
- Conclusion
- FAQ
Quick Answer — Which One to Use and When
For a quick rule of thumb, use ice and water shield where cold, wet conditions and lots of roof penetrations raise the risk of leaks—think valleys, eaves, and long edges. In contrast, in many common setups with milder weather and tight budgets, traditional felt or a synthetic underlayment can do the job. One-line: shield the critical areas, but felt or synthetic can cover broad, noncritical sections.
The decision matters because snow load, wind-driven rain, and roof geometry change how much protection you actually need, and budget and install practicality push you toward limiting shield to eaves and valleys. Before you buy, check the product label or datasheet for the exact guidance and use a simple checklist: cold climate? steep slope? exposed ridge? budget tight? risk tolerance for leaks?
Short scenario-based guidance
If you live in a cold climate with heavy snow loads, like the northern states, go for ice and water shield to prevent ice dams and leaks. It’s worth the extra cost if your roof has valleys or edges where wind-driven rain can sneak in.
Budget-conscious homeowners might opt for traditional felt or synthetic underlayment on a re-roof project to save money, but only if you’re okay with slightly less protection against ice dams and leaks. For metal roofs, use ice and water shield around all penetrations and edges since they are more prone to wind-driven rain.
For full-coverage protection, especially in areas with frequent freeze-thaw cycles, stick with ice and water shield across the entire roof deck. It’s a bit pricier but offers peace of mind against leaks and damage from harsh weather conditions.
Bottom-line recommendation for homeowners
The better choice is ice and water shield, especially if you’re in a cold climate with steep roof slopes or lots of valleys. It’s more expensive but offers superior protection against leaks.
If budget constraints are tight, use traditional felt or synthetic underlayment for most areas, but apply ice and water shield around critical spots like eaves, valleys, and any roof penetrations to minimize risk.
Consult a professional if you’re unsure about your specific situation. They can help assess the best materials based on your climate, roof geometry, and budget.

What Is Ice & Water Shield?
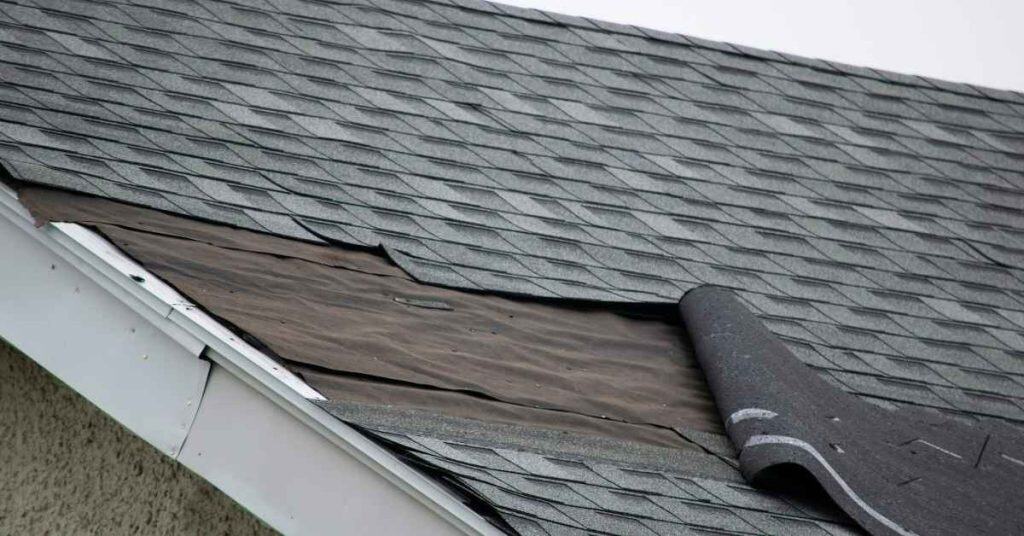
Ice and water shield is a rubberized asphalt or self-adhering membrane installed at roof edges, valleys, and penetrations to block water intrusion and help with ice dam issues in cold weather. Typical forms include rubberized asphalt sheets and self-adhesive peel-and-stick membranes, with variants that are reinforced or non-reinforced for grip, durability, and temperature tolerance. Builders place it over or under traditional underlayment depending on the job, and emphasize proper overlap, sealant at seams, and location at eaves, rakes, chimneys, vents, and valleys.
Why it matters for you is you get a second line of defense where water is most likely to intrude, which means fewer leaks and less membrane failure when snow slides and melts. Watch for adhesion issues, UV exposure limits, and pitch or substrate problems, and always check the product label or datasheet for exact installation guidance and warranty implications.
Material composition and how it works
The materials used for ice & water shield are critical to its performance. Rubberized asphalt with a self-adhering backing is the standard, providing flexibility and durability.
- Rubberized asphalt: Provides waterproofing; look for high elongation ratings to ensure it stretches without breaking. Tip: Avoid using in direct sunlight before installation as UV exposure can damage the membrane.
- Adhesive backing: Ensures a strong seal against roof sheathing; check for high temperature tolerance to prevent melting or cracking. Common mistake is improper adhesion due to cold temperatures during application.
- Sealing fasteners: Use sealant around all nails and screws to prevent water intrusion; avoid overdriving fasteners which can puncture the membrane, leading to leaks.
Typical use areas on a roof
The ice & water shield is crucial at eaves and rakes where melting snow often drips. It’s also essential in valleys, around chimneys, and under skylights to prevent water from seeping into the building.
Eaves and Rakes: Install a minimum of 24 inches up the roof edge to catch runoff and direct it away from walls. Improper installation here can lead to significant water damage during heavy rain or snowmelt.
Valleys, Chimneys, and Penetrations: Use ice & water shield in valleys to prevent pooling and around chimneys and vents for a watertight seal against wind-driven rain. Ensure proper overlap and sealing at all seams to maintain integrity.
What Is Felt (Roofing Felt / Underlayment)?
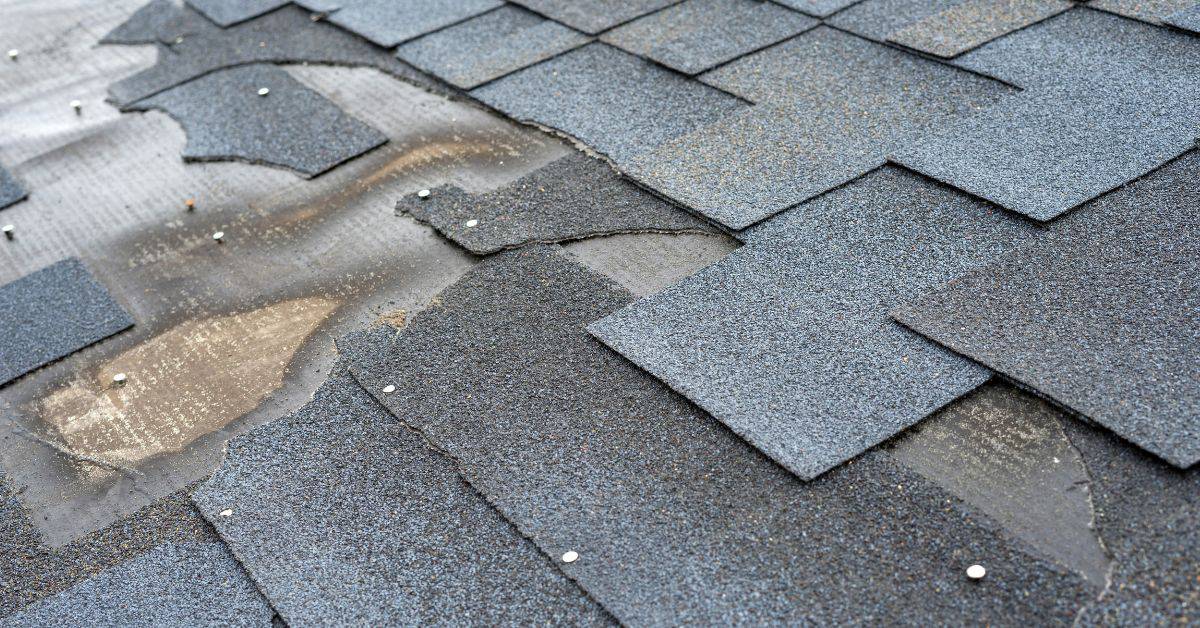
Roofing felt, or underlayment, sits between the roof deck and the shingles to shed moisture and give you a stable nailing surface. There are several felt families: organic felt, fiberglass/asphalt-saturated felt, and a separate category called synthetic underlayment. When you hear “felt,” understand the traditional fibers or the modern synthetics that serve as a moisture barrier and base for shingles.
Organic and fiberglass/asphalt-saturated felts act as moisture barriers and help protect the deck, but synthetic underlayment often offers different strengths like tear resistance and lighter weight. Use cases vary: organic or saturated felts are common in traditional installations, while synthetics may be favored in wet climates or when a faster install is desired; check the label or datasheet for installation notes and compatibility with ice and water shield. This matters because climate, roof pitch, and warranty considerations influence which type you choose and how you install it.
Types of Felt and Synthetic Alternatives
Felt underlayment comes in two main types: organic and fiberglass/asphalt-saturated. Organic felt is made from recycled paper or wood pulp, while fiberglass/asphalt-saturated felt uses a woven glass fiber mat saturated with asphalt for added durability.
Organic felt typically comes in 15 lb and 30 lb weights, where the weight refers to its moisture content after saturation. The heavier 30 lb felt offers better tear resistance and moisture protection compared to the lighter 15 lb option. However, it’s also more expensive and heavier to handle.
Fiberglass/asphalt-saturated felt is a popular choice due to its superior strength and longevity. It’s less prone to tearing during installation and can withstand harsh weather conditions better than organic felt. Common trade names include Atlas and GAF Dura-Kote.
Synthetic underlayment, such as polypropylene or polyester-based products, is another option gaining popularity. These materials are lighter, more tear-resistant, and offer excellent moisture protection. They’re often used in areas with high wind loads or where rapid installation is necessary.
Role of Underlayment in the Roofing System
The primary role of underlayment, whether felt or synthetic, is to serve as a moisture barrier between the roof deck and shingles. It prevents water from seeping into your home during heavy rain or snow melt.
Underlayment also provides temporary protection for the roof deck while new shingles are being installed. This is crucial because exposed wood can quickly absorb moisture, leading to costly damage if left unprotected.
In areas prone to ice dams and wind-driven rain, underlayment acts as an additional layer of defense. It helps prevent water from entering through small gaps or nail holes in the roof deck.
Choosing the right type of underlayment is essential for maintaining a long-lasting, watertight roof. While felt has been the traditional choice, synthetic options are becoming more popular due to their superior performance and ease of use.
Head-to-Head Comparison: Performance, Lifespan, and Limitations
The head-to-head look pulls back the curtain on waterproofing ability, durability, UV and temperature performance, and how long each option tends to last in real roof conditions. You’ll see where seams, overlaps, and edge detailing can leak, and how each product handles punctures or tearing over time. Expect a clear read on what wears out first and why a given choice might matter on your specific roof setup.
This matters because DIY roofing hinges on understanding what happens when the sun bakes, the cold bites, or a wind uplift hits. It translates into installation choices, handling, and long-term maintenance, plus whether ice and water shield or felt underlayment fits your climate and roof type. A quick read here helps you pick the safer, more practical path for your project while avoiding common missteps and costly misfires.
Waterproofing and Leak Resistance
The ice & water shield is fully waterproof, sealing around fasteners to prevent leaks. It’s designed to stop water from penetrating even in the harshest conditions.
Felt underlayment, on the other hand, is more like a barrier that resists water but isn’t completely watertight. In heavy rain or snowmelt, it can let moisture through if not installed perfectly.
Ice & water shield also has better sealing properties around nails and screws, reducing the risk of leaks at fastener points where felt often fails.
This means that for critical areas like valleys and eaves, ice & water shield is a safer bet to prevent water intrusion during storms or heavy snowmelt.
Durability and Lifespan
The typical lifespan of felt underlayment ranges from 15 to 30 years, depending on quality and environmental factors. Synthetic alternatives can last longer but still face similar challenges.
Ice & water shield often matches the life expectancy of your roof shingles, typically around 20–30 years. It’s more resistant to UV rays and temperature fluctuations, which helps it maintain its integrity over time.
Felt is prone to tearing or puncturing during installation and can degrade faster in direct sunlight. Ice & water shield is tougher and less likely to tear, making it a better choice for high-wind areas.
Both products have their limits—ice & water shield can crack if exposed to extreme cold or heat over time, while felt can deteriorate from prolonged exposure to moisture. Choose based on your climate conditions and roof type.
Installation: Areas, Techniques, and Common Mistakes
Install in this order: deck prep, ice & water shield at eaves, valleys, and around penetrations, then felt or synthetic underlayment as required, and finally the roof coverings. Know where shield is mandatory versus where you can use felt or synthetic on slopes outside shield zones, and follow any climate or product notes. Lap 3–4 inches for shield laps and 4–6 inches for felt overlaps, and stagger seams to reduce leaks.
This matters because proper coverage prevents leaks, wind uplift, and issues around penetrations and roof-to-wall transitions. Always check the product label and any local rules, rely on self-adhesive bonds where appropriate or mechanical fasteners as directed, and avoid skipping eave/valley coverage or underlapping around penetrations by keeping the membrane intact and protected.
Step-by-step installation checklist
Use this checklist when you’re ready to install ice & water shield and felt or synthetic underlayment.
- Deck prep: Clean, dry deck; check for protrusions. Ensure proper ventilation.
- Ice & water shield at eaves: Start here first; ensure full coverage of overhangs. Check for any gaps or wrinkles.
- Valleys and penetrations: Wrap around all valleys, chimneys, vents thoroughly. Confirm no exposed edges.
- Felt/synthetic underlayment: Lay on slopes outside ice & water shield zones; ensure proper overlap. Check for consistent adhesion.
- Lap widths: 3-4 inches for ice & water shield, 4-6 inches for felt or synthetic. Confirm no gaps between sheets.
- Seam staggering: Avoid direct seams overlapping; stagger by at least one sheet width. Check for consistent coverage.
- Mechanical fasteners: Use only where required; avoid puncturing ice & water shield. Ensure proper spacing and depth.
- Roof-to-wall transitions: Extend underlayment to walls, ensuring no gaps or wrinkles. Confirm secure attachment.
Quick rule: Always install ice & water shield first in critical areas before applying felt or synthetic underlayment.
Common installation mistakes to avoid
Avoid these common errors during the installation process to ensure a watertight roof system.
- Inadequate overlap: Ensure proper lap widths; underlapping can cause leaks. Check for consistent coverage.
- Nailing through seams: Avoid puncturing ice & water shield or felt; use self-adhesive bonds where possible. Confirm no fasteners in critical areas.
- Skip eave/valley coverage: Full coverage is mandatory here; missing these spots can lead to leaks. Check for complete wrap around penetrations.
- Poor adhesion in cold weather: Ice & water shield may not adhere properly if too cold; ensure proper temperature before installing. Confirm no gaps or wrinkles.
Maintaining a keen eye on these details will help prevent costly roof leaks and prolong the life of your roofing system.
Codes, Warranty, and Insurance Considerations
Typical code requirements and best practices
In cold climates, building codes often mandate the use of ice & water shield along roof edges, eaves, valleys, and soffits to prevent ice dams and leaks. The International Residential Code (IRC) specifies a minimum coverage of 24 inches up the roof edge from the lower edge of exterior walls or grade plane.
Homeowners should check with their local authorities having jurisdiction (AHJ) for specific requirements since regional variations exist, especially in areas prone to heavy snowfall. For instance, some regions may require additional coverage at valleys and soffits beyond what is mandated by the IRC.
Best practices include adhering strictly to manufacturer installation instructions and ensuring that all seams are properly sealed with tape or flashing. This not only complies with codes but also maximizes warranty protection and reduces insurance risks.
Warranty and insurance implications
The choice of ice & water shield over traditional felt can significantly impact your roof’s shingle warranties. Manufacturers often specify the use of their recommended underlayment to maintain warranty validity, so it’s crucial to follow these guidelines.
Insurance companies also have preferences for certain materials and installation methods. Proper documentation is key—keep receipts, photos, and notes on contractor certifications to prove compliance with both manufacturer requirements and building codes.
If you mix brands or use inferior products, warranties can be voided, leaving your roof unprotected during claims. Similarly, insurance companies may deny coverage if they find that the installation did not meet their standards for quality and safety.
Cost Breakdown and Long-Term Value
Cost breakdown shows how the material price per square, plus fasteners, tapes, and installation supplies, stack up for ice and water shield versus felt. It also calls out labor differences, readiness for surface prep, and sequencing (whether shield or felt goes first) with typical time per square in qualitative terms. The goal is to compare value over the life of the roof, not just the first invoice.
It explains long-term repair and maintenance costs, expected lifespan, and common failure modes in plain language so you can plan for 15–30 year horizons. It ties climate and roof type to value, noting when shield helps on high-snow or low-slope roofs, and when felt may be enough, with a simple framework to weigh warranties and moisture protection against upfront price. Look for notes on caveats and installation quirks that affect price and longevity when you estimate your project.
Upfront materials and labor costs
The choice between felt, synthetic underlayment, and ice & water shield can significantly impact your project’s budget. Here’s a breakdown of the key factors:
- Felt cost: Felt ranges from $0.25 to $1 per square foot. Look for high-quality 30-pound or 45-pound felt. Avoid cheap options that tear easily.
- Synthetic underlayment cost: Synthetic materials range from $1 to $2 per square foot. They offer better durability and resistance to UV rays, but they’re more expensive upfront.
- Ice & water shield cost: Ice & water shield ranges from $3 to $5 per square foot. It’s the most durable option for high-risk areas like valleys and eaves. Avoid applying it incorrectly; it needs proper overlap and sealing at seams.
- Labor differences: Felt is quicker to install but requires more surface prep. Synthetic underlayment takes longer due to its thickness, but it’s easier to work with in cold weather. Ice & water shield installation is the most time-consuming due to its complexity and need for precise application.
- Roof pitch: Steeper roofs require more material and labor due to safety concerns and increased surface area. Ensure proper fall protection and secure footing.
Lifecycle cost and ROI
Picking the right underlayment can save you money over time by reducing repair costs and insurance premiums. Longer-lasting materials like synthetic underlayment or ice & water shield offer better value in the long run.
For example, while felt might be cheaper upfront, it’s more prone to damage from UV rays and moisture, leading to frequent repairs and replacements. Synthetic underlayment and ice & water shield, on the other hand, can last up to 20 years with minimal maintenance, reducing your overall costs.
Additionally, proper waterproofing in high-risk areas like valleys and eaves can prevent costly damage from ice dams and roof leaks. This targeted approach not only saves money but also enhances your home’s value by maintaining its structural integrity over the long term.
Safety, Environmental Impact, and DIY vs Professional Installation
Safety comes first when working on roofs. This section covers fall protection, ladder setup, weather windows, PPE, and on-roof handling to keep you from getting hurt, plus how to minimize risk during installation or inspection. It also weighs the environmental impact of materials and the tradeoffs between DIY and professional installation.
Understanding these factors helps you plan safely, minimize waste, and avoid costly mistakes. It explains when a complex roof, attic access, or edge detailing should push you to hire a pro, plus what tools and permits you might need.
Safety precautions and required PPE
Working on a roof is dangerous, so always wear the right gear. Start with a hard hat to protect your head from falling debris or tools. Non-slip boots are crucial for traction on slippery surfaces.
Inspect your ladder before use—make sure it’s sturdy and set up at a safe angle (about 4:1 ratio). Use fall protection equipment like harnesses and safety lines, especially if you’re working above the second story or over steep areas. Never work alone; have someone nearby to help in case of an emergency.
When handling materials like ice & water shield or felt, be cautious around sharp edges that can cut your hands or feet. Wear gloves and eye protection to avoid injuries from dust or debris. If you feel uncomfortable with any part of the job, stop and call a professional—it’s not worth risking injury for a DIY project.
Environmental and disposal considerations
Felt underlayment is made from paper and asphalt, which can release volatile organic compounds (VOCs) during installation. Synthetic underlayments like ice & water shield are more durable but may have higher embodied carbon due to manufacturing processes.
When disposing of old materials or waste, check local regulations for recycling options. Some communities offer drop-off centers specifically for roofing materials. Proper disposal ensures you’re not contributing to landfill issues and helps maintain environmental compliance.
Recycling programs vary by region, so look into what’s available in your area. For instance, some manufacturers have take-back initiatives or partnerships with recycling facilities that accept certain types of underlayment waste. By choosing materials wisely and disposing responsibly, you can minimize your project’s impact on the environment.
DIY vs professional: risks and benefits
Doing it yourself is a great way to save money if you’re dealing with small patches or minor repairs. However, full reroofing projects are best left to professionals who have the experience and equipment needed for complex installations.
If your roof has intricate details like valleys or dormers, hiring a pro ensures these areas are properly sealed against leaks. Professionals also understand local building codes and can secure necessary permits, avoiding costly mistakes down the line.
DIY projects require specific tools such as roofing hammers, chalk lines, and safety gear. If you don’t have access to these or feel uncomfortable handling them, it’s safer to hire a pro. Additionally, professional installation often comes with warranties that protect your investment against defects or workmanship issues.
Conclusion
Choosing between ice and water shield and felt comes down to where you have real risk of water intrusion and how long you expect to stay in the home. Do it right, and you protect the deck, the attic, and the interior—safety, durability, and appearance all rely on clean installation and following the rules.
Do this: inspect the roof deck and identify vulnerable edges and penetrations, verify local code and warranty requirements, decide where ice and water shield is necessary and where felt will do, install with proper overlaps and fasteners, seal around vents and chimneys, and test a small area first before committing to the full roof.
Common mistakes to avoid include skipping underlayment on critical sections, ignoring manufacturer instructions, and pushing on in bad weather or when the roof is slick. Always use fall protection, keep your ladder secure, and avoid walking on damaged or frozen surfaces. If in doubt, don’t hesitate to call a professional—fall protection, correct products, and precise flashing matter more than rushing the job. When you follow the steps and respect the limits, you’ll finish with a roof that sheds water, lasts longer, and looks solid for years.
FAQ
What is the difference between an ice and water shield and felt?
An ice and water shield is a thick, adhesive layer that sticks to the roof deck. Felt is a lighter underlayment laid over the roof deck with nails. The shield seals against leaks, while felt mainly provides a barrier and a surface to nail shingles to.
When should I use an ice and water shield?
Use it where leaks are likely or on project edges like rakes and eaves, plus around chimneys or skylights. It helps in ice dam zones and snowy areas. If you’re building a simple, dry roof in a dry climate, you can skip it in some spots.
When is felt enough?
Felt is often fine in mild climates with good roof ventilation. It protects the deck during shingle installation and provides a secondary barrier. If you get heavy rain or ice, felt alone isn’t enough in many areas.