
Introduction
Painting cabinets and built-ins can be done smartly with a practical, step-by-step approach that focuses on prep, test swatches, and controlled finishes. This intro walks you through a simple process you can follow at home, with hands-on tips from a jobsite perspective. You’ll learn how to plan, test finishes on scraps, and spot common trouble before it sticks.
We break down how to test compatibility on sample panels, apply coats evenly, and fix drips or uneven sheen. If something doesn’t look right, you’ll learn safe, practical fixes and when to check product labels, manufacturer instructions, or local rules.
Key takeaways
- Create a detailed planning map with labeling, timing, and storage for components.
- Test small surface areas for adhesion and finish before full cabinet coating.
- Protect floors and surrounding fixtures; wear masks and eye protection during prep.
- Use manufacturer-approved primers and paints; follow label instructions for prep.
- Apply thin, even coats and allow proper drying; avoid rushed applications.
- Inspect joints, edges, and corners after each coat for touch-ups.
Table of Contents
- Introduction
- Key takeaways
- Project Planning and Decision Guide
- Tools and Materials Checklist
- Prep and Teardown: Removal, Labelling, and Protection
- Surface Prep, Common Tests, and Small Repairs
- Priming, Paint Types, and Smart Product Choices
- Application Process: Best Practices for Consistent Results
- Tests, Inspection Checkpoints, and Quality Assurance
- Common Problems, Diagnostics, and Fixes
- Conclusion
- FAQ
Project Planning and Decision Guide
Start by weighing visual impact, budget, and durability. Compare painting, refinishing, or replacing to find the most practical path. Look at the overall condition and the desired lifespan of the project before deciding.
Know when to DIY or call a pro by evaluating access, complexity, and safety considerations. Scope the work clearly to avoid surprises by listing tasks and milestones. Check labels, data sheets, and local rules for guidance on what’s feasible.
Assessing Substrate and Condition
The first step in any cabinet or built-in project is to assess the condition of your existing surfaces. This will help you determine if painting, refinishing, or replacement is the best option.
Start by examining the material:
- Wood: Check for cracks, warping, or water damage. If the structure is sound, painting can be a viable option.
- Plywood and MDF: These materials are great for painting but may need repairs if they’re damaged.
- Laminate: Painting laminate can be tricky due to its smooth surface. It might require specialized primers or techniques.
- Previously painted surfaces: Check for peeling paint, which indicates poor adhesion and needs addressing before painting.
Adhesion risk: If the surface is glossy, greasy, or has a wax finish, it may not adhere well to paint. Sanding lightly can help improve adhesion.
Timeline, Workspace, and Disruption Planning
Planning your project timeline is crucial to ensure you have enough time for each phase of the work. This includes prep, painting, drying, and reassembly.
Realistic phases: Allow at least 2-3 days for prep work (sanding, cleaning, priming), 1-2 days for painting, and 24-48 hours for drying between coats and after the final coat. Some products may require longer curing times.
Protect living spaces: Lay down drop cloths to protect floors from paint drips or spills. If possible, remove cabinet doors and drawers to work on them in a separate area like a garage or basement.
Drying/curing needs: Always check the product instructions for recommended drying times between coats and after the final coat. Some products may require specific conditions (like temperature or humidity) for optimal curing.
Cost and Material Budgeting
The cost of your project will largely depend on the materials you choose. Higher quality materials often result in better, longer-lasting results but come at a higher price.
- Paint: High-quality paint with good coverage and durability can save you time and money in the long run. Look for paints with built-in primers or those that offer excellent adhesion to various surfaces.
- Primer: A quality primer can help your paint adhere better, cover stains, and reduce the number of paint coats needed.
- Sanding supplies: Invest in good-quality sandpaper (120-grit for prep work, 220-grit for smoothing) to ensure a smooth finish. Don’t skimp on sanding blocks or orbital sanders if you’ll be doing extensive work.
- Hardware: If you’re replacing hardware, consider the style and quality of the new pieces. Cheap hardware can look out of place on otherwise high-quality cabinets.
- Tools: While you don’t need expensive tools for this project, having a good paintbrush or roller set, sanding supplies, and painter’s tape can make the job easier.
- Specialty materials: If your surfaces require specialized primers or techniques (like painting laminate), factor these additional costs into your budget.
Using low-quality materials can lead to cracking, staining, weak bonds, or poor coverage. Always consider the value of investing in better coatings and tools for a professional-looking result that will last.
Tools and Materials Checklist
Build a practical list of abrasives, primers, paints, and applicators tailored for cabinets and built-ins. Include safety gear and disposal items for a clean, compliant job. Consider budget options and when rental tools save time or money.
Note alternatives for different budgets and space constraints. Verify tool compatibility with the chosen coatings by checking product instructions. Keep a copy of the manufacturer’s guidelines handy at the jobsite.
Essential hand tools and prep supplies
Before you start mixing concrete, ensure you have all the necessary hand tools and prep supplies. This checklist will help you verify that you’re ready to go.
- Scraper/Strike-off Guide: Check length matches your pour width. It should be straight and undamaged for a smooth finish.
- Putty Knife (1″ & 3″): Verify both sizes are present for edging and smoothing. Blades should be clean and unbent.
- Sandpaper (80, 120, 220 grit): Ensure all three grades are available for surface preparation and finishing. Check for intact sheets.
- Wire Brush: Confirm it’s stiff enough to remove rust or old paint. Test bristles by running them over a rough surface.
- Cleaning Agent (Acetone, Denatured Alcohol): Check product label for compatibility with your concrete mix. Ensure it’s not expired or diluted.
- Masking Tape: Verify it’s wide enough to cover joints and edges cleanly. Test adhesion by sticking a piece on a surface and trying to remove it.
- Drop Cloth/Tarps: Confirm they’re large enough to protect the area from spills. Check for tears or holes that could cause leaks.
- Gloves, Safety Glasses, Ear Protection: Ensure all safety gear is present and in good condition before starting any work.
Quick rule: Always inspect your tools and supplies before starting. Damaged or missing items can lead to costly rework and delays.
Application equipment: brush, roller, and sprayer options
Before you start applying your cabinetry finish, use this checklist to ensure you have the right application equipment. This will help you achieve a professional-looking result and avoid costly mistakes.
- Brush: For small areas and intricate details. Check bristle stiffness; soft bristles are best for lacquers and varnishes, while stiff bristles work well with oil-based paints. What goes wrong if you skip this: Incorrect bristle type can lead to poor coverage or damage the finish.
- Roller cover: For large, flat surfaces. Ensure roller cover nap length matches your paint/finish; short naps (1/4″ – 3/8″) for smooth surfaces, longer naps (3/8″ – 1/2″) for textured or damaged areas. What goes wrong if you skip this: Wrong nap length can result in poor coverage, visible roller marks, or an uneven finish.
- Sprayer: For large projects and a smooth, even finish. Check spray pattern; it should be adjustable for different paint/finish types. What goes wrong if you skip this: An unsuitable spray pattern can cause drips, runs, or poor coverage.
- Brush size: Choose appropriately based on the area to be painted; 1″ – 2″ for small areas, 3″ – 4″ for larger surfaces. What goes wrong if you skip this: Using an incorrectly sized brush can lead to poor coverage, drips, or a slow application process.
- Roller frame: Ensure it’s sturdy and compatible with your roller cover size. Check handle length; longer handles are better for tall cabinets or hard-to-reach areas.
- Paint/finish viscosity: Test a small amount on a scrap piece of wood to ensure it’s the right consistency for your chosen application method. Thickeners may be needed if it’s too thin. What goes wrong if you skip this: Incorrect viscosity can cause drips, poor coverage, or an uneven finish.
- Cleaning supplies: Have appropriate cleaners for your chosen application method; mineral spirits for oil-based paints, soap and water for latex paints. What goes wrong if you skip this: Using the wrong cleaner can damage brushes, rollers, or the finish itself.
- Safety equipment: Ensure you have gloves, goggles, and a respirator to protect against paint/finish fumes. What goes wrong if you skip this: Exposure to harmful chemicals can cause health issues.
Quick rule: Always test your application equipment on a small, hidden area before starting the project to ensure compatibility with your chosen finish and surface type.
Paint and primer selection guide
Use this checklist before you start painting to ensure you’ve got the right products for your job. This will help you avoid common mistakes and achieve a lasting, professional finish.
- Check substrate type: Inspect surface for wood, metal, drywall, or other materials. Each has specific primer needs.
- Identify stains or odors: If present, use a stain-blocking primer to prevent bleed-through and unpleasant smells.
- Consider moisture levels: For high-moisture areas (like bathrooms), opt for mold-resistant primers.
- Match topcoat type: Choose between waterborne alkyds, conversion coatings, or lacquers based on desired finish and manufacturer recommendations.
- Verify paint sheen: Check if you need flat, satin, semi-gloss, or high-gloss. Different sheens have varying durability and cleanability.
- Check label for ‘self-priming’: Some paints claim to prime themselves; skip primer if specified.
- Read manufacturer guidelines: Always follow product instructions for best results and safety.
- Test patch first: Apply a small test patch to ensure color, coverage, and adhesion meet your expectations. This helps avoid costly reworks.
Quick rule: Always prime new or bare surfaces before painting. Primer improves paint adhesion, enhances coverage, and seals the surface against moisture and stains.
Prep and Teardown: Removal, Labelling, and Protection
Plan a clean teardown by removing doors, drawers, and hardware in a systematic order. Label each part clearly to simplify reassembly later. Protect countertops, floors, and surrounding surfaces with appropriate coverings.
Organize parts as you work to prevent loss or mix-ups. Take photos for reference if needed. Follow safe handling practices to minimize damage during removal and transport.
Hardware removal and labeling systems
Start by removing all hardware – knobs, pulls, hinges. Keep them organized.
Use a simple labeling system: number each door/drawer, then bag its hardware with the same number. Screw bags are handy here.
For hinges, use a hinge template to mark their positions on the doors. This ensures accurate reinstallation.
Masking, dust control, and containment
Minimize dust by masking off areas you don’t want painted. Use painter’s tape and drop cloths.
Control overspray with temporary barriers like plastic sheets or reusable paint shields. Seal gaps with more tape.
Ventilation is key. Open windows, use fans, or consider a HEPA air cleaner to keep dust at bay.
When to keep parts attached
Sometimes it’s best to paint in place. This is true for large, heavy pieces or when you’re updating the look but not changing hardware.
Protect adjacent finishes with frog tape and plastic sheets. Apply painter’s tape first, then press down hard to seal any gaps.
Use a small brush to ‘cut in’ around edges, keeping paint off unwanted areas. Work carefully, using steady hands or a guide for straight lines.
Surface Prep, Common Tests, and Small Repairs
Start with a thorough cleaning to remove grease and grime, then degloss and lightly scuff the surface. Sanding should create a sound, receptive base without creating deep gouges. Use safe filler for minor repairs and seams as needed.
Run essential adhesion and contamination tests per product instructions. Address dents, gouges, and gaps with appropriate methods before priming. Keep test areas small to verify compatibility before full application.
Cleaning and deglossing protocols
Start by removing dust with a soft brush. For grease and grime, use a degreasing cleaner like TSP or a mild dish soap solution. Apply it with a sponge, let it sit for 10-15 minutes, then scrub gently and rinse clean.
To remove wax buildup, use a wax remover or mineral spirits. Apply, let it soak for a few minutes, then wipe off with a clean cloth. Never mix cleaning products.
For mechanical deglossing, use fine-grit sandpaper (120-150 grit) to lightly scuff the surface. Wipe off dust with a damp cloth. Choose between chemical and mechanical methods based on your cabinet’s condition and finish type.
Adhesion and compatibility tests
Before painting, perform quick tape and solvent tests to ensure adhesion. For the tape test, apply painter’s tape, let it sit for 24 hours, then pull it off quickly at a 90-degree angle. If paint comes off with it, your surface isn’t ready.
For the solvent test, dab a small amount of denatured alcohol or rubbing alcohol onto the surface with a cotton swab. If the finish softens or dissolves, it’s not compatible with water-based paints. Always test in an inconspicuous area first.
If both tests pass, your surface is ready for primer. If not, troubleshoot and retest until you’re confident in your results.
Fillers, bonders, and edge repairs
For small chips or gouges, use a wood filler. Apply with a putty knife, let it dry, then sand smooth with fine-grit sandpaper. For routed edges or veneer lift, use an epoxy filler. Follow product instructions for mixing and application.
To enhance bonding, apply a bond-enhancing primer after filling and sanding. This creates a better surface for paint adhesion. Always consult product data sheets for specific application guidelines.
For large gaps or seams, consider using a gap-filling caulk instead of wood filler. Choose one that matches your cabinet’s finish type (water-based or oil-based). After applying and letting it dry, sand smooth before priming.

Priming, Paint Types, and Smart Product Choices
Compare primer strategies with topcoat chemistries in the context of cabinets. Consider durability, touch-up ease, VOC concerns, and application behavior. Always check the technical data sheets for specifics before purchasing.
Choose product lines based on the substrate and expected wear patterns, not just price. Match sheen and finish to use and environment. Keep notes on recommended cure times from the label or datasheet.
Primer selection and application tips
Primers are the foundation of a good paint job. They prepare your cabinets’ surface, improving adhesion and helping to seal out moisture.
Stain-blocking primers tackle tough stains like water rings or tannin bleed. Use them when you’ve got stubborn stains that won’t budge with cleaning alone.
Bonding primers are great for new, raw wood or surfaces where adhesion might be an issue. They create a strong bond between the surface and your topcoat.
Shellac-based primers seal in tannins and provide a good base for waterborne topcoats. Apply them with a brush or sprayer, following the manufacturer’s instructions. Remember, using the right primer can save you time and money in the long run by preventing issues down the line.
Topcoat chemistry pros and cons
Different topcoats have their own strengths and weaknesses. Here’s a quick rundown to help you make an informed decision.
Pros
- Waterborne alkyds: Durable, easy to clean up, and offer good hide.
- Conversion varnish: Excellent durability, resists heat and chemicals, but can be harder to apply.
- Lacquer: Fast drying, great for detailed work, but has strong solvents and isn’t as durable as other options.
- Acrylic enamel: Good durability, easy to clean up, and offers a tough, long-lasting finish.
Cons
- Waterborne alkyds: Can raise grain on wood surfaces and may not be suitable for high-traffic areas.
- Conversion varnish: Slower drying time can lead to dust nibs if not careful. Also, it’s not the best choice for dark colors due to poor color retention.
- Lacquer: Strong solvents mean proper ventilation is a must. It also has poor resistance to water and heat.
- Acrylic enamel: Can be more expensive than other options and may not offer the same depth of color as oil-based paints.
Choose your topcoat based on your cabinets’ needs, your budget, and the look you’re going for. Always check the technical data sheet for specifics.
Finish level and sheen considerations
The sheen of your finish can make a big difference in how your cabinets look and perform.
Higher sheens (semi-gloss, gloss) are easier to clean but show every imperfection. They’re great for kitchens where grease and grime build up. Lower sheens (flat, satin) hide surface imperfections better but aren’t as easy to clean. They work well in less-trafficked areas like bedrooms or home offices.
Consider the level of durability you need too. Higher sheens are more resistant to wear and tear than lower sheens. But remember, they also show every scratch and dent. It’s all about balancing appearance with practicality.
Don’t forget, sheen can also affect the overall look of your cabinets. A higher sheen can make them appear brighter, while a lower sheen gives a more subtle, understated look. Choose what works best for your space.
Application Process: Best Practices for Consistent Results
Outline a practical sequence for priming and topcoating, including brush, roller, or spray methods. Control coat thickness to avoid runs and sags. Follow typical drying and handling steps as outlined by the manufacturer.
Use clean, well-maintained equipment and work in a dust-free area when possible. Verify environmental conditions and times per the product directions. Document steps to stay consistent across all pieces.
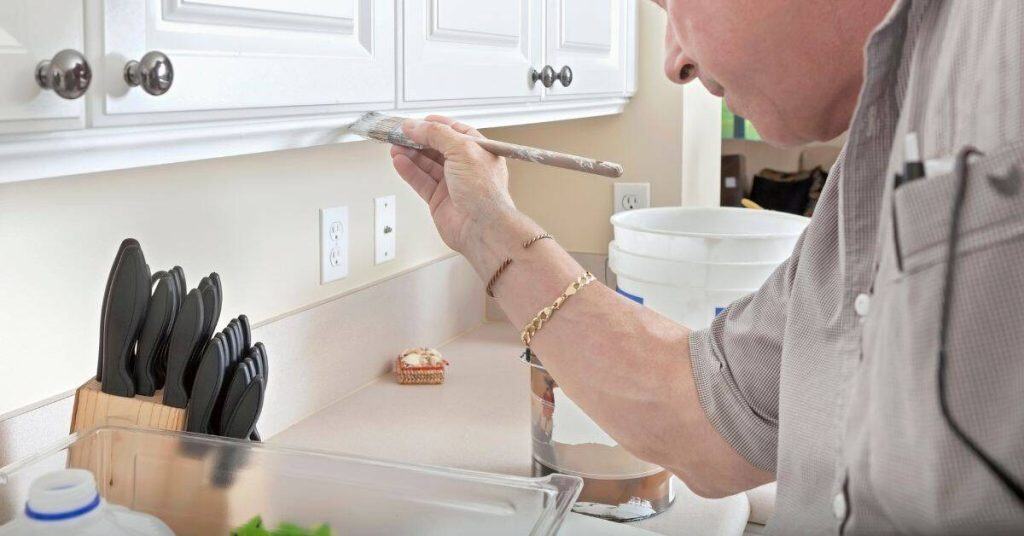
Brushing and rolling technique for cabinet faces
Start with a good quality, angled sash brush. It’s your best tool for getting into corners and around hardware holes.
Rolling: Use a 9-inch roller cover with 3/8-inch nap for smooth surfaces. For textured or heavily grained doors, opt for a 6-inch cover with 1/2-inch nap. Work in small sections, about 2×2 feet, to avoid lap marks.
Follow the grain of the wood when brushing and rolling. This helps paint lay down evenly and reduces visible brush strokes. For panel detailing, use a smaller, flat-headed brush to cut in around edges and details.
Spraying cabinets: setup and workflow
Choose an HVLP (High Volume, Low Pressure) spray gun for better control and less overspray. A 1.8mm or 2.0mm tip works well with most cabinet paints.
Setup: Set up your spray station in a well-ventilated area, preferably outdoors or in a dedicated spray booth. Hang doors on a spray rack or lay them flat on a table for spraying.
Use a fan pattern at the nozzle to create even coverage. Start and stop spraying outside the surface to avoid drips. Stage parts so you can spray one side, let it flash (dry slightly), then flip and spray the other side before moving on to the next piece.
Between-coat sanding and scuffing
After each coat dries, use a tack cloth or damp sponge to remove dust nibs. Then, lightly sand the surface with 220-grit sandpaper to smooth out any raised grain or imperfections.
Scuff-sanding: Between coats two and three, and again before the final coat, perform a ‘scuff sand’. This involves lightly sanding the surface with 320-grit or finer paper to create a slight ‘tooth’ for better paint adhesion. Be careful not to sand through previous coats.
Your goal is a smooth, dust-free surface with no visible lap marks or imperfections before applying the next coat. Always wipe off any sanding dust before proceeding.
Tests, Inspection Checkpoints, and Quality Assurance
Establish a visual and tactile checklist to confirm adhesion, uniformity, and surface feel. Look for gaps, pinholes, and texture variations as you progress. Check cure progress before reinstalling hardware.
Perform simple hardness and solvent-resistance tests as recommended by the product instructions. Record results and address any deficiencies before reassembly. Use a methodical approach to ensure lasting results.
Visual quality checkpoints
Before you reinstall hardware and call the job done, use this checklist to ensure your painted cabinets and built-ins look as good as they are durable.
- Check for lap lines: Look at all edges. Lap marks indicate uneven paint application or inadequate drying time between coats.
- Inspect for orange peel: Run your hand over surfaces. Orange peel texture indicates incorrect spray technique, low-quality paint, or insufficient drying time.
- Scan for brush marks: Check all visible areas. Brush strokes can be minimized with proper brushing technique and adequate drying time between coats.
- Examine edge coverage: Inspect all edges and corners. Inadequate edge coverage may indicate missed spots or insufficient paint application.
- Check for sags or drips: Look at all surfaces, especially vertical ones. Sags or drips suggest overapplication of paint or inadequate drying time between coats.
- Inspect for dust nibs: Examine all surfaces. Dust nibs are small bumps caused by dust settling on wet paint and can be prevented with proper surface preparation and cleanliness.
- Check for milky or cloudy areas: Inspect all painted surfaces. Milky or cloudy spots indicate inadequate deglossing or improper cleaning before painting.
- Look for any missed spots: Examine all visible areas. Missed spots can be touched up with a small brush or sponge applicator after the paint has fully cured.
Quick rule: If you find issues, address them immediately to avoid costly rework later on.
Functional tests before reassembly
Before reinstalling hardware and putting your cabinets back together, perform these simple tests to ensure your paint job is durable and won’t mar or rub off.
- Check hinge movement: Open and close cabinet doors. Ensure hinges move smoothly without any resistance or binding that could cause the paint to chip or peel.
- Test door alignment: Close cabinet doors. Make sure they align properly with the frame, as misalignment can cause excessive wear on the painted surface.
- Check drawer slides: Open and close drawers. Ensure slides move smoothly without any binding or resistance that could damage the paint.
- Test handle and knob hardware: Gently pull on handles and turn knobs. Make sure they’re secure and won’t wiggle or wobble, which could cause the paint to wear off over time.
- Inspect for any tackiness: Run your hand over all painted surfaces. If it feels sticky or tacky, allow more drying time before reassembly.
- Check for any soft spots: Gently press on all painted surfaces. Soft spots indicate inadequate curing and may need additional drying time before reassembly.
- Test for solvent resistance: Lightly rub a cotton swab soaked in rubbing alcohol or lacquer thinner over a small, hidden area. If the paint doesn’t smear or come off, it’s ready for hardware reinstallation.
- Check for any nicks or scratches: Examine all painted surfaces. Nicks and scratches can be touched up with a small brush or sponge applicator after the paint has fully cured.
Quick rule: If you find issues, address them immediately to avoid costly rework later on.
Sample and mock-up testing
Before committing to whole-room finishes, perform these tests on sample boards and cabinet interiors to evaluate performance under everyday use conditions.
- Spray or paint sample boards: Apply your chosen paint color and finish to a few 2’x2′ boards. This will give you a better idea of how the color will look in your space.
- Test different sheens: Paint samples with varying levels of gloss or matte finish to determine which works best for your needs.
- Subject samples to sunlight: Place painted samples near windows to observe how they react to direct sunlight. Some colors may fade or change shade over time.
- Test samples for durability: Gently rub, scratch, and clean the samples to see how well they hold up to everyday wear and tear.
- Paint cabinet interiors: Apply paint to a few cabinet interiors to ensure it adheres properly and performs well in high-traffic areas.
- Test for off-gassing: Allow painted samples to dry in an enclosed space, like a closet or cabinet. Check for any unpleasant odors that may indicate poor ventilation or inadequate drying time.
- Examine samples under different lighting: View painted samples under various types of lighting (incandescent, fluorescent, LED) to ensure the color looks consistent and appealing in all conditions.
- Test samples for moisture resistance: Apply water or a damp cloth to painted samples to see how well they resist moisture and prevent warping or peeling.
Quick rule: The more tests you perform, the better informed your final decision will be.
Common Problems, Diagnostics, and Fixes
Identify frequent failures like runs, fisheyes, tannin bleed, and adhesion issues. Prioritize corrective steps that prevent rework and protect the finished look. Plan preventive measures for future projects during fixes.
Follow safe, step-by-step repair procedures and document changes made. When in doubt, verify product compatibility and re-check environmental conditions. Aim for durable, repairable outcomes rather than quick fixes.
Fixing runs, sags, and texture issues
If you notice excessive build-up or runs while painting your cabinets, don’t panic. Here’s how to fix it:
Leveling: Use a paint leveler additive to prevent runs. Add it to your paint before application.
Drying: Be patient and let each coat dry completely before sanding or applying the next one. Rushing can lead to more problems.
Sanding: Gently sand any raised grain with fine-grit sandpaper after the paint has dried, then wipe off dust with a damp cloth.
Recoat: Apply a second coat at a 45-degree angle to even out any imperfections and ensure an even finish.
Addressing adhesion failures and peeling
If your paint is peeling, you’ll need to troubleshoot the problem area:
Test: Check if the entire surface or just parts are affected. Use a scraper to gently lift a corner of the paint.
Strip/Degloss: If it lifts easily, strip the paint off and degloss the surface using a deglosser or light sanding with fine-grit paper.
Prime: Choose the right primer for your situation. For best results, use a primer that matches your topcoat’s chemistry (oil-based on oil-based, water-based on water-based).
Prep: Ensure the surface is clean, dry, and free of any contaminants before recoating.
Tackling stain and tannin bleed
Stains from tannins can bleed through your paint, ruining the finish. Here’s how to deal with it:
Identify: Look for discoloration or dark spots on your cabinets. These are signs of tannin bleed.
Block: Use a stain-blocking primer designed to seal tannins. Apply it evenly, let it dry, then lightly sand and wipe off dust before painting.
Re-prime: If you still see bleeding after priming, you may need to re-prime the area or use a stronger stain-blocking product.
Test: Always test your stain-blocker on a small, hidden area first to ensure it works effectively.
Conclusion
Finish with confidence by sticking to the tested process, protecting surfaces, and validating results through careful checks. The goal is durable, good-looking cabinets and built-ins that stand up to daily use without surprises.
Proceed by confirming your plan, gathering the right tools and materials, removing and protecting what you must, preparing surfaces properly, performing the essential tests and small repairs, choosing primers and paints wisely, and following the application steps with steady, even motion. Check that everything is clean, dry, and mechanically sound before you start; work in a well-ventilated area; and always test a small area or sample first to verify adhesion, finish, and color in real lighting.
Common mistakes to avoid are skipping surface prep, applying paint over residue or moisture, and rushing coats or cleanup. Safety rules to follow are wear eye and skin protection, handle ladders and solvents with care, ventilate the space, and never force a job that doesn’t feel right—pause, reassess, or call a pro if you’re unsure about moisture, higher-risk paints, or structural issues.
If you hit stubborn problems or the project scales beyond a simple refresh, it makes sense to bring in a professional for repairs, complex refinishing, or finish failures. Stay focused, stay safe, and push forward with a plan you can defend—your redesigned space will look good and last long if you keep the process solid from start to finish.
FAQ
How do I know if my cabinet surfaces are ready for paint after the prep work?
Check that the surface is clean, dry, and free of dust or grease. Look for a uniform feel with a light scuffing that stays even when you wipe with a finger. If anything peels or dust falls off, do another round of cleaning and sanding where needed.
What should I test before choosing a paint or primer?
Test adhesion on a small area with the primer you plan to use. If the primer or paint lifts or doesn’t stick after a light rub, switch products or follow the manufacturer’s instructions. Always verify compatibility with existing finishes by checking the product label or datasheet.
How can I fix surface problems without ripping everything apart?
For light defects, fill with a compatible putty and sand smooth. For peeling or loose coatings, remove the loose material and re-prime the bare spots. If you’re unsure, consult the product instructions and local rules before proceeding.
What’s the right way to test your finished coat for durability?
Perform a simple scratch test in an inconspicuous spot to ensure good adhesion and film formation. Check for even coverage and no visible pinholes or runs after the finish cures. If issues appear, address the specific defect per the product guidance.