
Introduction
Concrete countertops are durable, customizable surfaces cast from concrete for kitchens and baths. They start with planning, choosing forms, finishes, and how you’ll cure and seal them. This article speaks in plain terms for DIYers, with practical steps and caution about common missteps.
Expect hairline cracks, chips, or staining if surfaces aren’t protected or poured evenly. Fixes involve proper sealing, patching with matching material, and re-sealing as needed, but always check product instructions. If in doubt, verify with manufacturer guidelines and local rules before proceeding.
Key takeaways
- Plan a realistic budget buffer for materials, tooling, and potential professional help.
- Design properly with edge details, reinforcement layout, and formwork plan before pouring.
- Verify sealer compatibility with cement colorants and your finish choices.
- Use PPE and proper lifting techniques; never work alone with heavy molds.
- Cure conditions and humidity affect final strength; follow manufacturer guidelines.
- Inspect corners and surfaces during cure; address cracks promptly to avoid propagation.
Table of Contents
Planning & Budgeting
Before you commit to concrete countertops, map out your goals and constraints. Consider how the slab, edge profiles, and thickness impact cost and workflow. Review whether DIY or professional installation fits your schedule and skill level.
Identify the major cost drivers and any tradeoffs you’re willing to make, such as fabricator lead times or delivery restrictions. Check your local requirements for underslab prep, cabinets, and support. When in doubt, read the product label, manufacturer instructions, or local rules to verify expectations.
Cost breakdown: DIY vs professional
The cost of concrete countertops varies greatly depending on whether you DIY or hire a pro. Here’s what drives the costs:
DIY: Materials (concrete mix, aggregates, sealers) are your main expenses. Expect to spend around $60 – $120 per square foot.
Professional: Labor and overhead increase the cost significantly. Pro installers charge $85 – $175 per square foot installed.
The biggest budget consumers? Labor (pro), materials (DIY), and overhead (pro, e.g., insurance, equipment).
Project timeline & permitting
A concrete countertop project takes time. Here’s a typical breakdown:
Design & Planning (2-4 weeks): Measure, choose mix design, order materials.
Installation (1-3 days): Formwork, pour, finish, and cure concrete.
Curing & Sealing (2-4 weeks): Let concrete cure, then seal for protection.
Permitting: Check local codes before starting. You may need permits for structural changes or plumbing/electrical work.
Structural considerations and cabinet support
Concrete’s heavy weight (around 150 lbs per cubic foot) requires reinforcement:
Cabinet Reinforcement: Ensure cabinets can handle the load. Consider reinforcing or using heavier-duty boxes.
Substrate Choice: Use a rigid, flat substrate (e.g., plywood, OSB) under concrete to distribute weight evenly.
Load Distribution: Verify countertop design doesn’t concentrate too much weight on cabinet corners or supports. Distribute load evenly for stability.
Design & Materials
Choose materials and finishes that fit your look and use. Think about color, pattern, and texture, as these affect fabrication complexity. Heavier designs may require additional cabinet support and handling planning.
Understand how design decisions influence delivery timelines and costs. Verify compatibility with edge styles, back splashes, and sink integrations by consulting manufacturer instructions or supplier data sheets. If unsure, ask for samples or a design sketch for accuracy.
Mix types, aggregates, and additives
Concrete’s strength and workability depend on mix type. Here’s what you need to know:
Mix Types: Common mixes are:
– C60/75: General-purpose, good balance of strength and workability.
– C20/25: Weaker but easier to handle, for non-structural parts like driveways.
– C40/50: Stronger, for foundations and structural elements.
Aggregates: These give concrete its bulk. Check the label:
– Coarse (10-20mm): For thick slabs and structural work.
– Fine (0-4mm): For thin toppings and repairs.
Additives: These tweak concrete’s properties. Check manufacturer instructions:
– Admixtures: Improve workability, set time, or strength.
– Fibers: Reinforce concrete, reducing cracking.
– Accelerators: Speed up setting time (check local rules before using).
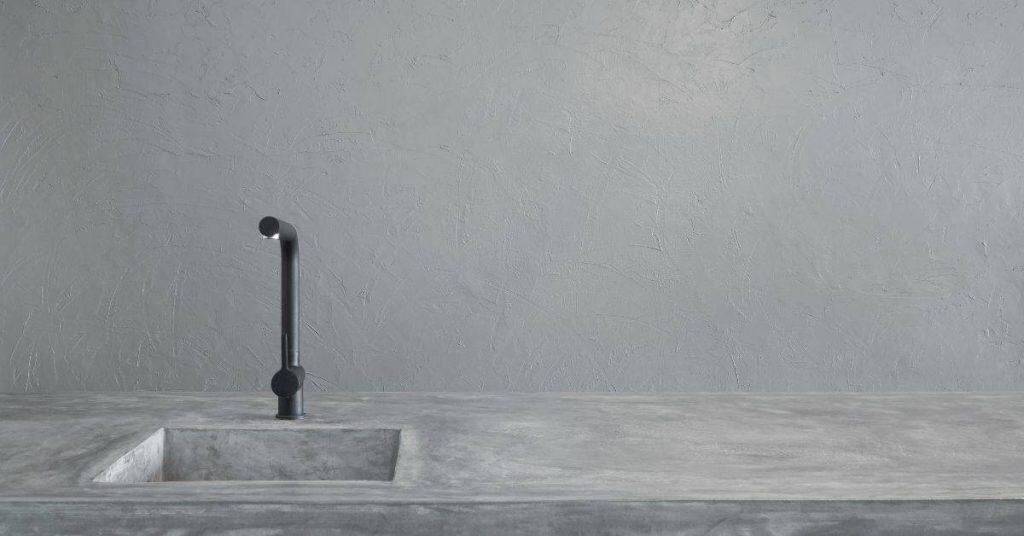
Edge profiles, thickness, and integrated sinks
When it comes to your concrete countertops, the edge profile can make a big difference. Here are some common styles:
- Eased edge: A simple, rounded-off edge that’s easy on the hands.
- Beveled edge: A slanted edge that gives a modern look.
- Waterfall edge: A continuous edge that flows down to the floor, great for islands.
Thickness matters too. For support, aim for 1.5″ to 2″. Thinner can crack under heavy loads. Check your base compaction before pouring.
For sinks, you’ve got two main options:
- Integral sink: Poured with the countertop. Smooth, seamless look. Make sure to use a sink liner for easy removal.
- Undermount sink: Installed after pouring. Gives a clean, modern look. You’ll need to waterproof the underside before installation.
Color, pigments, and finishing textures
When it comes to color, you’ve got two main options: integral pigments or surface-applied stains. Integral pigments are mixed into the concrete before pouring, giving a consistent color throughout. Check your pigment’s label for recommended dosages.
Surface-applied stains, on the other hand, are applied after the concrete has cured. They can give a more varied, natural look but may require touch-ups over time. Always follow manufacturer instructions for application and safety precautions.
Finishing textures range from matte to polished. For a matte finish, use a broom or texture mat during the final curing stage. This adds grip and hides minor imperfections, making it great for high-traffic areas like driveways.
A polished finish is achieved with grinding and polishing equipment after the concrete has cured. It’s smooth, reflective, and low-maintenance but can show every scratch or stain. Consider your space’s function and traffic before deciding on a finish.
Tools and Materials Checklist
Build a practical list of essential tools and safety gear for both DIY and contractor workflows. Include basic grinders, trowels, sanding pads, and moisture meters as needed. Plan for proper containment and clean-up supplies on site.
Include consumables like sealers, bonding agents, primers, and any specialty coatings. Always verify product labels, data sheets, and local code guidance before purchasing or mixing. If you’re missing something, pause and confirm the requirement with the supplier or a pro.
Essential fabrication and finishing tools
Before you start, ensure you have all the necessary tools for forming, casting, vibrating, and finishing your concrete countertops.
- Mixing tubs: Essential for combining ingredients. Skip this, and mixing becomes a mess.
- Concrete mixer: Optional but recommended for large batches to ensure even mixing.
- Measuring tools (buckets, scales): Crucial for accurate ingredient measurement. Inaccurate amounts lead to weak countertops.
- Formwork materials (plywood, screws, clamps): Necessary for shaping your counters. Poor formwork results in misshapen or leaking concrete.
- Vibrating screed: Vital for removing air bubbles and ensuring a smooth surface. Air pockets can cause cracking over time.
- Trowels (hand, margin): Essential for smoothing and finishing the surface. Skipping this step leaves an uneven finish.
- Power float: Optional but recommended for a smooth, polished look. Without it, you’ll have a rough, unfinished appearance.
- Safety gear (gloves, goggles, ear protection): Protect yourself from concrete dust and noise during mixing and finishing.
Quick rule: Always double-check your tools before starting. Missing a crucial item can halt progress or ruin the final product.
Materials, sealers, and reinforcement options
Selecting the right materials, reinforcements, and sealers ensures durable, long-lasting concrete countertops.
- Cement type: Choose between Portland cement or blended cements for strength and durability. The wrong choice can lead to weak counters.
- Aggregates (sand, gravel): Select aggregates based on desired color and strength. Incorrect aggregates result in poor aesthetics or weak countertops.
- Water reducer admixtures: Add these to reduce water content, improving strength and durability. Skipping this can cause cracking over time.
- Reinforcement (fibers, mesh, rebar): Include reinforcement to prevent cracking under stress. Omitting this can lead to countertop failure.
- Sealer type: Choose between topical or penetrating sealers based on desired maintenance and aesthetics. The wrong sealer can affect durability or appearance.
- Integral color pigments: Add these for consistent, long-lasting color throughout the countertop. Skipping this results in a plain gray surface.
- Release agents (form oil, wax): Apply these to prevent counters from sticking to formwork. Without it, removal becomes difficult or damages the countertops.
- Curing compounds: Apply these to maintain moisture and promote proper curing. Skipping this can cause weak spots or cracking.
Quick rule: Always test materials and sealers on a small sample before committing to the entire project to ensure desired results.
Fabrication & Installation Process
Walk through core fabrication choices such as mix design, curing, and finishing options. Note how each decision can affect strength, texture, and appearance. Plan for accurate templating and surface prep to avoid surprises on install day.
Outline installation steps from support checks to final sealing. Identify critical control points like leveling, edge alignment, and seam treatment. Always verify installation instructions from the manufacturer or fabricator and follow local codes where required.
Casting methods: in-place versus precast
When it comes to concrete countertops, you’ve got two main casting methods: in-place and precast. Let’s dive into each.
In-place means you pour the concrete directly onto your cabinets. It’s simpler but limits design options. You’re stuck with a single, continuous slab. Transporting heavy slabs isn’t an issue though.
Precast, on the other hand, involves casting in a shop then transporting to your home. This lets you create complex designs and integrate sinks, but moving heavy slabs can be tricky. Both methods need careful curing control.
Reinforcement, inserts, and embedded fixtures
Strengthening your countertops is crucial. Use rebar or fiber reinforcement for added strength. Place it evenly throughout the mix.
For inserts like faucets or soap dispensers, mark their positions before pouring. Once cured, drill holes to fit your inserts. For plumbing/electrical embeds, consult a pro first. They’ll guide you on safe placement.
For sinks, use a template to mark the cutout shape. After curing, carefully cut out the sink hole using a diamond blade. Be sure to wear safety gear!
Curing best practices and environmental controls
Proper curing is vital for strong, durable countertops. Keep your slabs moist and at a consistent temperature (around 70°F/21°C) for at least seven days.
Use plastic sheeting to cover the slabs, keeping moisture in but allowing air circulation. Avoid direct sunlight as it can cause uneven curing and discoloration.
Common mistakes include letting the concrete dry out too quickly or exposing it to extreme temperatures. Be patient; rushing the curing process weakens your countertops.

Common Problems and Their Causes
List frequent issues homeowners see, such as cracking, staining, or edge chipping. Link each problem to a likely root cause like improper curing, poor underlayment, or sealing gaps. Emphasize how early indicators relate to the underlying cause.
Explain how site conditions, handling, and finishing choices contribute to performance problems. Encourage checking substrate integrity, moisture management, and sealer compatibility by consulting labels or manufacturer guidance. When in doubt, safekeep notes and verify with a pro.
Cracking and structural failure
Concrete countertops can crack for various reasons. Understanding the type of crack helps pinpoint its cause.
Shrinkage cracks are thin, hairline cracks that appear as the concrete dries. They’re usually cosmetic but can indicate improper mixing or curing.
Movement cracks occur when the countertop shifts due to changes in temperature or humidity. These can be structural concerns if they’re wide or grow over time.
Load cracks form when the countertop bears too much weight. They often run diagonally and may indicate insufficient reinforcement or support.
Surface defects: pinholes, pitting, and discoloration
Imperfections on the surface of your concrete countertop can be due to issues during mixing or finishing.
Pinholes are tiny voids caused by air bubbles trapped in the mix. Using a proper mixing technique and adding admixtures can prevent this.
Pitting occurs when small aggregates fall out of the surface during finishing. This can happen if the concrete is too wet or not properly consolidated.
Discoloration may result from improper pigment dispersion, inconsistent curing, or contamination during mixing. Ensuring a clean workspace and proper pigment addition can help avoid this.
Delamination, staining, and etching
Problems with your countertop’s surface protection can lead to several issues.
Delamination happens when the sealer fails, causing the concrete to lose its protective layer. This can occur due to improper sealing or exposure to harsh chemicals.
Staining occurs when liquids penetrate and discolor the concrete. Using a suitable sealer and promptly wiping up spills can prevent this.
Etching is caused by acidic substances eating away at the concrete’s surface. Common culprits include lemon juice, vinegar, and wine. Regular sealing and prompt cleaning can help prevent etching.
Repair and Fixes (Troubleshooting)
Offer actionable repair steps for common issues that DIYers can safely tackle, such as superficial scratches or minor surface flaws. Distinguish repairs that require professional equipment or expertise. Document the expected outcomes and limitations of each fix.
Highlight when to escalate to a pro for structural concerns, deep stains, or compromised slabs. Advise checking warranty terms and following approved repair protocols from the manufacturer or fabricator. If any repair seems beyond scope, stop and seek guidance.
Small chips and surface repairs
For minor chips, mix up some concrete patching compound to match your countertop’s color. Apply it with a putty knife, pressing firmly into the chip.
Let it set for about 15 minutes, then use a damp sponge to smooth and blend the edges. Wipe off any excess compound.
If the chip is large or deep, you might need to replace the entire slab. Patching won’t give you a perfect match in texture or color.
Filling hairline cracks and structural remediation
For hairline cracks, use an injectable sealant. Drill small holes at both ends of the crack, insert the nozzle, and squeeze in the sealer.
For larger cracks or structural issues, you might need to reinforce or replace slabs. Stitching can help – drill overlapping holes along the crack, insert stainless steel rods, and grout them in place.
Note: If there’s significant movement or crumbling, it’s best to call a pro. They have specialized equipment for structural repairs.
Resealing, stain removal, and etch repair
To remove stains, use a poultice – mix a powdered cleaner with water to form a paste, apply it to the stain, cover with plastic wrap, and let it sit.
For etches (shallow pits), you can use a concrete polishing kit. Start with the coarsest pad, work your way up to finer grits, and follow with a sealer.
Reseal your countertops every 2-3 years for best protection. Choose a sealer that matches your countertop’s finish – matte, satin, or gloss.
Maintenance and Long-Term Care
Suggest a practical maintenance routine focused on cleaning, resealing intervals, and protection from heat and impact. Include simple daily or weekly habits to keep the surface looking consistent. Mention how different finishes respond to cleaners and abrasives.
Explain how to monitor sealers and plan re-application according to the product data sheet or label instructions. Reinforce the need to verify compatibility with cleaners and abrasives before use. When in doubt, consult the sealer manufacturer or your installer for recommended intervals.
Daily cleaning and routine schedule
Concrete countertops are tough, but they need regular care to stay that way. Here’s a simple daily cleaning and inspection routine:
Daily: Wipe down your counters with warm water and a mild dish soap. Avoid harsh chemicals like bleach or ammonia.
Weekly: Check for any signs of damage, like small chips or cracks. Address these promptly to prevent them from growing bigger.
Monthly: Inspect the countertops for any stains or etches. If you find any, tackle them right away with our stain removal and etch repair tips from earlier in this guide.
Sealer types, lifespan, and resealing indicators
Concrete countertops need a good sealer to protect them from moisture and stains. Here’s what you need to know about sealers:
There are two main types: film-forming (like acrylic or polyurethane) and penetrating (like silane or siloxane). Film-forming sealers create a barrier on top of the concrete, while penetrating sealers soak into the surface.
The lifespan of a sealer varies depending on use and care. On average, expect to reseal every 3-5 years. Here’s how to tell if it’s time:
1. Water no longer beads up on the surface. If water soaks in instead of beading, your sealer is worn out.
2. Stains start showing through. If spills leave stains that won’t come off with regular cleaning, it’s time to reseal.
Preventive measures: heat, acids, and impact protection
Concrete countertops are durable, but they’re not indestructible. Here’s how to protect them from everyday hazards:
Heat: Use trivets or hot pads under hot pots and pans. Concrete can withstand high temperatures, but sudden extreme heat can cause stress cracks.
Acids: Wipe up spills promptly, especially from acidic substances like lemon juice, vinegar, or wine. Acids can eat away at the sealer over time, leaving your countertops vulnerable to stains and moisture damage.
Impact: Be careful with heavy objects. While concrete is strong, a hard enough blow in just the right spot can cause a chip or crack. If you drop something heavy, check for damage immediately.
Safety, Sustainability & Codes
Cover safety precautions during fabrication and installation, including PPE and handling practices. Highlight ventilation needs and dust control for grinding and cutting. Remind yourself to follow manufacturer instructions for safe use.
Discuss environmental considerations, warranty requirements, and how to verify applicable building codes. Check with local authorities or the product label for code compliance. If any rule is unclear, contact a licensed pro or the supplier for clarification.
Workshop Safety and PPE
Safety comes first when working with concrete. Ensure your workspace is well-ventilated to avoid inhaling dust.
Personal Protective Equipment (PPE) is a must: wear gloves, safety glasses, and a respirator or dust mask.
When grinding or polishing, use ear protection too. Keep the area clean and organized to prevent accidents.
Environmental Impacts and Recycled Material Options
Your choices in materials impact both your countertop’s quality and its environmental footprint.
- Low-VOC Sealers: Choose sealers with low volatile organic compounds to reduce air pollution. Look for products rated ‘low VOC’ or ‘zero VOC’. Avoid high VOC sealers to prevent long-term indoor air quality issues.
- Recycled Aggregates: Incorporating recycled aggregates like glass or crushed concrete reduces waste and lowers embodied carbon. Specify a mix with at least 30% recycled content for significant environmental benefits. Be aware that using too much recycled aggregate can weaken the countertop’s structure, so strike a balance.
- Fly Ash: Fly ash is a byproduct of coal combustion used as a partial replacement for cement. It reduces embodied carbon and improves durability. Look for fly ash with a minimum 50% replacement rate. Avoid using too much to prevent cracking due to excessive shrinkage.
- Recycled Glass Countertop Surfaces: These add color and interest while reducing waste. Specify recycled glass content, e.g., ‘70% post-consumer recycled glass’. Be aware that high glass content can make the countertop more susceptible to chipping.
Codes, Load Limits, and Warranty Considerations
Check local building codes to ensure your countertops comply with structural requirements. Verify weight limits for your substrate – too much weight can cause failure.
Warranties typically cover manufacturing defects but may not cover installation issues or normal wear and tear. Read the fine print: some warranties require professional installation, while others are void if the countertop is not properly sealed.
To protect your investment, maintain proper care and maintenance as outlined in the warranty guidelines. Keep records of all maintenance performed to validate any warranty claims.
Conclusion
Concrete countertops pay off when you plan well, test thoroughly, and keep safety at the front. Do it right and you’ll get a durable, good-looking surface that lasts and stays repairable if you catch issues early.
Plan your design and budget, lock in materials and finishes, confirm the tools and workspace setup, run a small test panel, and cure and seal in stages before you install. Move in logical steps: verify dimensions, mix and pour in controlled batches, monitor cure, fit edges and hardware, then seal and maintain. Leave yourself time for inspections and repairs, and keep the work area clean and ventilated at every stage.
Common mistakes to avoid include rushing cure times, skipping test panels, skimping on surface prep, using the wrong sealers or cleaners, and neglecting proper joints or supports. Safety rules are simple: wear eye and respiratory protection, use PPE and proper ventilation, never mix incompatible chemicals, test each change on a small area first, and verify code requirements and drainage before proceeding.
If the project feels over your head—especially with structural support, complex finishes, or local codes—call a professional rather than pushing on. When in doubt, get a quick check on substrate stability, curing conditions, and sealing compatibility. Stay deliberate, stay safe, and you’ll finish with a countertop you can trust for years to come.
FAQ
What should I watch for during curing and sealing that signals a problem?
Look for premature darkening, cracking, or a sticky surface that stays tacky. If you see a strong chemical smell or unusual haze, stop and verify with the product label as curing depends on the mix and environmental conditions. Always follow manufacturer instructions for curing times and sealant compatibility.
How can I tell if my countertop is too porous before sealing?
Test by placing a few drops of water on the surface and watching how it behaves. If the water soaks in quickly or darkens the area, it’s porous and may need a penetrating sealer or additional prep. Check the product datasheet for recommended curing and surface prep steps before sealing.
Can I install concrete countertops over existing surfaces or without removing cabinets?
Yes, but you must verify weight bearing and edge support with the existing structure. Check that the substrate is solid and prepared, and confirm mounting methods with the installation guide. If in doubt, consult the manufacturer instructions or a local pro for safety.
What DIY fixes are appropriate for minor cracks or etching, and when should I stop?
Small surface cracks and shallow etching can sometimes be patched or touched up per the product label. If cracks widen, if the surface crumbles, or if color integrity is lost, stop and evaluate with the sealant or concrete countertop supplier’s troubleshooting guide. For major issues, plan a professional repair.