
Introduction
A smooth concrete slab starts with a proper paste-to-aggregate balance and clean finishing technique.
Too much paste or too little can cause a rough touch or surface tearing; using the right balance alongside the standard finishing steps helps the surface stay uniform.
Always verify with the product label or local guidelines if you’re unsure about mixes, tools, or methods.
Finishing in the right sequence—screeding, floating, edging, then troweling—helps you lock in a smooth finish.
Keep an eye on the texture, edges, and bleed water, and adjust your approach if the surface looks pinched or uneven.
If something feels off, consult the concrete mix instructions and local rules before proceeding.
Key takeaways
- Understand paste-to-aggregate balance drives surface finish and crack resistance in slabs.
- Check batch consistency, slump, and aggregate size before pouring to avoid surface tearing.
- Follow a finish sequence: screed, float, edger, and trowel within timing window.
- Use the right tools for each step, wear eye protection, and keep blades clean.
- Environmental factors warn that wind, sun, and temperature change setting times.
- Inspect the surface early for pits, dusting, and plan repairs or rework.
Table of Contents
- Introduction
- Key takeaways
- Why Paste-to-Aggregate Balance Controls Surface Behavior
- Mix Design and What to Check Before You Pour
- Step-by-Step Finishing Sequence and the Timing Window
- Tools, Equipment, and a Materials Checklist
- Environmental and on-Site Factors That Change Paste–Aggregate Interaction
- Common Finish Failures: Causes, Prevention, and Repair Options
- Choosing the Right Finish for Function, Durability, and Safety
- DIY Troubleshooting Checklist, Cost and Liability Implications
- Conclusion
- FAQ
Why Paste-to-Aggregate Balance Controls Surface Behavior
The balance between cement paste and the rock-and-sand mix at the top surface controls how a slab behaves as you finish it. Cement paste forms the film that bonds and smooths, fine aggregate fills between particles, and coarse aggregate provides stiffness and structure. When paste coverage is right, the surface glides smoothly; too much paste can create laitance or tear-prone zones, while too little paste leaves a flaky, craggy finish.
On site, this balance shows up in how the surface looks and feels as you work: gloss versus matte sheen, and whether capillary bridges stay visible or disappear under a uniform film. It matters because it governs when you trowel, bull float, or burnish without tearing, and it hints at whether you should aim for a smoother or more textured result. Watch moisture, bleed timing, and the cure regime, and adjust finish passes accordingly to preserve cohesive top layers and avoid delamination.
What paste does at the surface
The cement paste in concrete plays a crucial role at the surface. It’s like the glue that binds everything together.
Paste binds aggregate: It coats and adheres to both fine and coarse aggregates, creating a strong bond between them.
Paste lubricates the mix for finishing: A well-proportioned paste allows the concrete to flow smoothly, making it easier to trowel and finish. Too little paste makes the concrete harsh and difficult to work with.
Paste forms the matrix for a smooth finish: When there’s enough paste at the surface, it fills in the gaps between aggregates, creating a smooth, level surface that’s easy to trowel and burnish.
How aggregate content causes tearing or roughness
The amount and type of aggregate in your concrete mix can significantly impact the surface finish. Too much or the wrong kind of aggregate can lead to problems.
Excessive coarse aggregate: If there’s too much coarse aggregate, it won’t be properly coated with paste. This leads to weak spots where the surface is prone to tearing and flaking during finishing.
Poorly graded sand: Insufficient fine aggregate (sand) or a poorly graded mix can result in inadequate paste coverage at the surface. This shows up as rough, craggy surfaces that are difficult to finish smoothly.
Weak paste-aggregate contact: When aggregates aren’t properly coated with paste, they can protrude from the surface. This makes it hard to achieve a smooth finish and increases the risk of tearing during finishing.
Role of fines, admixtures, and supplementary cementitious materials
The choice of fine particles, admixtures, and supplementary cementitious materials can greatly influence the surface behavior of your concrete.
- Fine particles (fines): Too many fines can cause bleeding issues and lead to a weak, laitance-rich surface. Look for mixes with less than 10% passing the No. 200 sieve. To avoid this, use well-graded aggregates.
- Plasticizers (superplasticizers): These admixtures improve workability and make it easier to finish the concrete. They also help reduce water demand, which can lead to a stronger surface. Look for ASTM C494 Type A or F plasticizers.
- Retarders: Retarders slow down the setting time, giving you more time to finish the concrete. They’re useful in hot weather or when using low-paste mixes. Look for ASTM C494 Type D retarders.
- Fly ash (Class F): Fly ash can improve surface durability and reduce the risk of cracking. It also makes concrete more resistant to sulfate attack. Use ASTM C618 Class F fly ash.
- Slag cement: Slag cement improves long-term strength and reduces the risk of corrosion in reinforced concrete. It can also improve surface finish by increasing paste cohesion. Look for ASTM C989 Type I or II slag cement.
Mix Design and What to Check Before You Pour
Mix design and proportioning determine paste thickness and aggregate exposure at the face, which matters for the final look and how the slab handles tension. That’s why you shouldn’t guess—check the target slump, aggregate grading, and the intended max aggregate size. Confirm these against project needs and supplier or engineer guidance.
This matters because it guides finish choices and what to expect from field adjustments. Use a practical batch-site checklist: confirm water-cement guidance, admixture compatibility, and that field adjustments stay within spec. If something doesn’t align, ask the supplier or engineer and follow the label instructions, and document any deviations against the project requirements.
Common mix guidelines and practical signals on site
Before you pour, use this checklist to ensure your concrete mix is right for the job. It’s crucial to check these points when the mix is being batched.
- Uniform appearance: The mix should look consistent throughout. Segregation (separation of aggregates and paste) can cause issues later on.
- Lack of segregation: Stir the mix gently to check for separation. If it’s well-mixed, it won’t separate easily.
- Acceptable slump per project specs: Slump is a measure of workability. Too little (dry) or too much (wet) can cause problems. Check with your project specs.
- Cohesive paste: The cement paste should hold the aggregates together without being overly sticky or dry.
- Appropriate aggregate exposure: For exposed aggregate finishes, ensure the mix has enough large aggregates and not too much paste.
- Water-cement ratio within spec: Too much water weakens concrete. Check the ratio to ensure it’s within project specs.
- Admixtures compatible with cement type: Some admixtures don’t play nice with certain cements. Check compatibility to avoid surprises.
- Field adjustments minimal and within spec: If adjustments are needed, keep them small and ensure they stay within project specs.
Quick rule: Trust your eyes and experience. If something looks or feels off, it probably is.
Material specs and standards to verify
Before you pour, ensure your concrete mix meets project requirements and local standards. Here’s a checklist to help you confirm.
- Aggregate gradation: Check the grading curve against project specs. Too much or too little of any size can cause problems at the surface.
- Max aggregate size: Ensure it’s within project limits to avoid issues with placing and finishing.
- Air content: Check it’s within spec for your desired finish. Too much air can cause honeycombing, too little can lead to bleeding.
- Paste coverage considerations: Ensure there’s enough paste to coat all aggregates and provide a smooth finish.
- Supplier specifications: Confirm the mix design with your concrete supplier. They should have this info on hand.
- Engineer notes: If you’re working from plans, check any notes or recommendations from the engineer.
- Applicable codes and standards: Check local building codes and ASTM standards for concrete mix design. Your supplier should know these too.
Quick rule: Don’t guess. Verify everything with your supplier, engineer, or local codes to avoid costly mistakes.
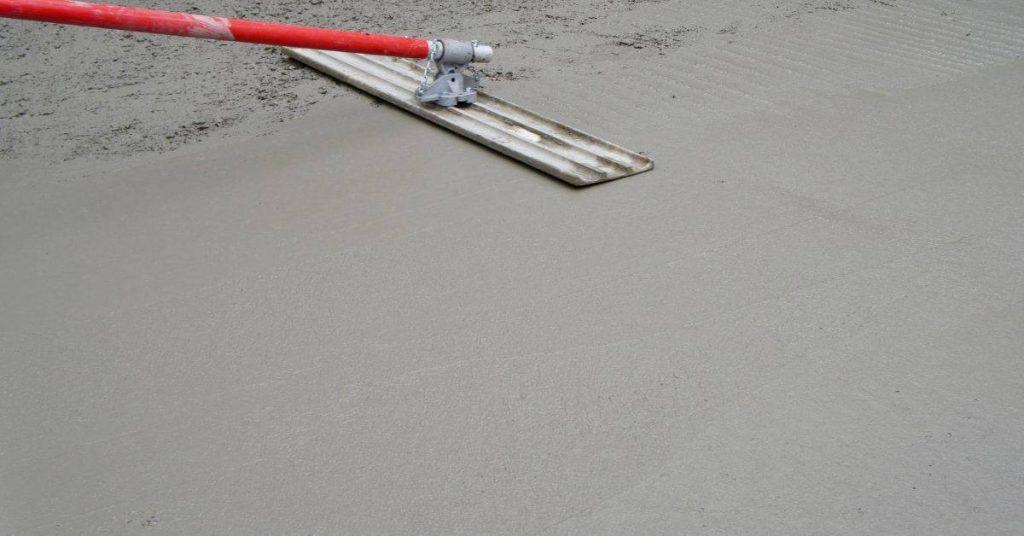
Step-by-Step Finishing Sequence and the Timing Window
The finishing sequence runs in a tight order: screed to establish the slab height, then bullfloat or hand float to bring paste up and start smoothing, followed by edging and jointing for clean lines, and finally a light trowel pass. At each step you’ll see paste behavior shift and the surface texture change as underlying aggregate becomes more or less exposed. Use visual clues like sheen, color uniformity, and the feel of the surface to decide when to move on rather than chasing a fixed time.
This matters because the window between steps changes how the paste and aggregate balance, what shows on the surface, and how hard the deck will feel when you’re done. If you go too early or too late you risk tearing paste, creating drag marks, or closing the surface too soon, which you can often fix with a brief re-buckling or a light rework of the top layer. Keep an eye on temperature-friendly cues, bleed water behavior, and the surface texture as your quick guide to progress.
Step-by-Step Process
The following is a practical step-by-step sequence to achieve a smooth concrete finish, focusing on the timing window for each operation.
- Prepare and check safety: Wear appropriate PPE, ensure tools are clean and ready, and check weather conditions. Why: Safety first, and clean tools prevent contamination.
- Screed: Level the concrete surface using a straight edge to remove excess material and create a flat plane. Check: Surface is level with no high or low spots.
- Bullfloat/Hand Float: Work the float in wide, overlapping strokes to consolidate the surface, embed fines, and bring paste to the top. Sign it’s right: Concrete has a uniform sheen and no visible aggregate.
- Edging/Jointing: Use an edger tool to create control joints at specified intervals to control cracking. Timing: Do this when the surface is firm but not hard, usually 1-2 hours after screeding.
- Final Trowel Pass: Make a final pass with a steel trowel to densify and smooth the surface. Feel: The concrete should feel firm but not draggy.
- Cleanup/Final Checks: Clean tools, remove forms, and check for any imperfections or areas that need touch-up. Why: Proper cleanup maintains tool life and ensures a quality finish.
Screeding and initial consolidation
Proper screeding is crucial to distribute the paste evenly, bring bleed water and fines to the surface, and prevent overworking the mix.
Technique: Hold the screed level with both hands, using a steady, smooth motion to remove excess concrete. Keep the leading edge in constant contact with the forms.
After screeding, allow bleed water to rise to the surface. Sign it’s ready: When the surface is covered with a sheen of water, proceed to the next step.
Floating and initial surface closure
Floating compacts the surface, embeds fines, and readies the slab for texture or troweling. It also helps to remove any entrapped bleed water.
Technique: Use a bullfloat or hand float in wide, overlapping strokes. Work from one end of the slab to the other, applying even pressure.
After floating, check for any low spots or voids. Sign it’s right: The surface should be flat and uniform with no visible aggregate or voids.
Troweling and final texture control
Successive trowel passes densify the surface, but they also risk trapping moisture or exposing aggregate if mistimed or overworked.
Technique: Use a steel trowel in smooth, overlapping strokes. Start with wider strokes and gradually use narrower strokes for a smoother finish.
Monitor the concrete’s texture and feel during troweling. Stop when: The surface feels firm but not draggy, and no paste is being pulled up from below.
Tools, Equipment, and a Materials Checklist
This section covers a practical checklist of hand and power tools, finishing aids, and consumables that shape paste-aggregate outcomes. It shows how to match tool choices to slab size and finish goals to control density and texture. It highlights how tool selection affects surface density and feel so you can plan the right approach for your project.
Use it to choose the right riding or walk-behind trowels, finishes, and curing options for the look you want. Align your tool and finish with slab thickness and timing so you get a smooth, dense surface or a textured/non-slip result.
Hand tools vs power trowels
Use this checklist to determine when and how to use hand floats, trowels, or power trowels for optimal paste smoothing and aggregate exposure.
- Slab size: Small pads (less than 10ft²) – Hand tools. Large slabs (over 25ft²) – Power trowels.
- Finish goal: Smooth, dense surfaces – Trowels. Textured or non-slip finishes – Brooms or brushes.
- Concrete age: Young concrete (within first hour) – Hand floats for initial closure. Older concrete (2-6 hours) – Power trowels for final texture control.
- Tool size: Match tool width to slab length for efficient coverage and minimal overlap.
- Blade type (power trowels): Smooth blades – Glossy, smooth surfaces. Coarse blades – Textured or non-slip finishes.
- Speed (power trowels): Slow speed (60-80 RPM) – Initial passes for consolidation. High speed (120-160 RPM) – Final passes for texture control.
- Avoid: Overworking concrete with power trowels, which can cause excessive bleeding and surface discoloration.
- Check blades/shoes: Inspect for wear or damage before each use to maintain performance.
Quick rule: Use hand tools for small jobs and young concrete. Power trowels are best for large slabs and final texture control on older concrete.
Finishing aids and texture tools
Use this checklist to select the right finishing aids and texture tools to achieve your desired surface grip, look, and durability.
- Brooms/brushes: Use for non-slip surfaces. Select broom type based on desired texture depth and pattern.
- Salt or other textures: Apply within 15-30 minutes of pouring for unique, slip-resistant finishes.
- Edging/jointing tools: Use to create clean, uniform joints and edges. Size tool based on slab thickness.
- Curing membranes: Apply within 24 hours of pouring to protect against moisture loss and improve durability.
- Avoid: Overworking concrete with texturing tools, which can cause excessive aggregate exposure and surface damage.
- Release agents: Apply before finishing to prevent adhesion of tools to the slab’s surface.
- Curing compounds: Select based on desired finish (glossy or matte) and application method (spray, roll, or brush).
- Etching/grooving tools: Use to create decorative patterns or improve traction in wet conditions.
Quick rule: Choose finishing aids and texture tools based on desired surface grip, look, and durability. Always follow manufacturer guidelines for application and safety.
Materials checklist for a pour
Use this checklist to ensure you have all essential materials ready before starting your concrete pour.
- Mix ticket: Verify mix design, slump, and aggregate size to match project requirements.
- Clean tools: Inspect and clean all hand and power tools before use to prevent contamination and maintain performance.
- Curing materials: Have curing compounds, membranes, or other protective measures ready for immediate application after finishing.
- Backup help: Ensure you have enough labor to complete timing-critical steps (e.g., placing, screeding, and finishing) efficiently.
- Avoid: Starting a pour without proper materials or tools. This can lead to delays, poor finish quality, and wasted concrete.
- Formwork: Inspect forms for leaks, damage, or improper alignment before pouring.
- Reinforcement: Verify proper placement, size, and coverage of rebar or other reinforcement materials.
- Weather protection: Have tarps or other protective measures ready to shield the pour from rain or extreme temperatures.
Quick rule: Always verify you have the correct materials and tools before starting a concrete pour. Proper preparation ensures a successful, efficient project.

Environmental and on-Site Factors That Change Paste–Aggregate Interaction
Temperature, humidity, wind, sun, and how moist or dry the substrate is all push how the paste behaves. They change bleed water, set time, and paste mobility, which raises the risk of tearing or over-finishing. Watch these factors and adjust timing and curing accordingly.
Use simple checks like thermometer readings, humidity estimates, surface tackiness tests, and bleed water observation to guide when to finish. Control the site with shade, windbreaks, and mild curing methods, and be ready to slow finishing or delay passes if conditions shift. If in doubt, check the label/datasheet for any retarders or sequence options and choose the safer path.
Bleed water, evaporation rate, and wind effects
Too-rapid evaporation of bleed water can lead to a dry surface layer that’s weak and prone to tearing. Wind speeds up this process, making it worse.
High winds and dry conditions increase the risk of dusting and surface cracking. Keep an eye on your slab – if it starts looking dry or dusty too soon, you might need to adjust your finishing schedule or use windbreaks.
On the other hand, too much bleed water can cause segregation, leaving less paste at the surface. This makes the slab vulnerable to tearing and over-finishing. Monitor your slab – if it’s too wet or has excessive bleeding, consider delaying finishing passes.
Cold, heat, and humidity impacts
Cold temperatures slow down the setting process. This allows more time for bleed water to rise to the surface, but it also increases the risk of segregation and cold joints. Keep your slab warm – use insulated forms or heating blankets if necessary.
Heat, on the other hand, speeds up setting. In hot, dry conditions, the surface can set too quickly, forming a skin that traps moisture underneath. This can lead to crazing or delamination. Monitor your slab with a thermometer and adjust your finishing schedule accordingly – you might need to start earlier in the day.
High humidity slows down evaporation but doesn’t affect setting time as much as temperature. It’s still important to monitor your slab for signs of excessive bleeding or surface dryness.
Substrate and form conditions
A damp, contaminated subgrade can lead to poor paste distribution at the slab surface. Ensure your substrate is clean, dry, and well-compacted before pouring.
Poorly constructed or maintained formwork can also cause issues. Check your forms for gaps, leaks, or warping that could allow concrete to escape or vibrate excessively, leading to a weak surface layer.
Uncontrolled vibration from nearby equipment or traffic can also cause problems. Keep heavy machinery away from the pour area and consider using vibration isolation mats under your forms if necessary.
Common Finish Failures: Causes, Prevention, and Repair Options
Common finish failures show up as tearing, scaling, dusting, aggregate popping, or crazing, and each points to paste/aggregate balance issues or finishing errors. You can spot the problem by feeling for roughness, checking for color gaps, and noting when the surface peels or powders off with light touch. Tearing and paste pull-out usually come from over-troweling or too aggressive finishing before the mix set, while dusting and crazing signal drying or curing problems. Quick fixes exist, but prevention is the real money saver: control slump, avoid adding water after finishing begins, and treat the green stage with careful timing and proper tools.
Why this matters: DIYers gain stronger, longer-lasting floors by tying the symptoms to a cause and choosing simple, practical steps. Weaker surfaces crack or dust because the paste-aggregate balance wasn’t right or moisture and curing were mishandled; the cure is consistent work flow, restrained troweling, and timely protection. Store-bought patching compounds or skim coats can fix holes or rough spots, re-screed or re-float for levelness, and surface sealers can reduce dusting—so use them with proper adhesion and cure in mind. If unsure, check product labels, manufacturer instructions, and local rules before proceeding.
Tearing and Aggregate Pop-Out
Tearing occurs when the paste layer is too thin, leaving aggregates exposed. Early finishing can also cause this issue by not allowing enough time for proper consolidation.
High aggregate content in your mix design can contribute to tearing as well. To fix, rescreen or re-float the affected area while the concrete is still green. For larger tears, use a trowelable skim coat patch.
Remember, these fixes are temporary and mainly cosmetic. They won’t address underlying structural issues caused by improper paste-aggregate balance.
Scaling, Dusting, and Weak Surface Paste
Overworking the concrete surface can draw out too much water, leaving a weak near-surface layer. Poor curing or high water-cement ratio can exacerbate this issue, leading to scaling (flaking) and dusting.
To prevent, control water content during placement and avoid excessive troweling. For existing problems, apply a resin-based or cement patching compound. If the surface is too weak, consider an overlay to strengthen it.
Regularly check for moisture before applying any patch or overlay to ensure proper adhesion and cure.
When Repair Requires Professional Intervention
If you notice widespread structural concerns, like deep cracks or delamination, it’s time to call a pro. These issues could indicate serious underlying problems that require expert assessment.
Repeatedly failing surface repairs can also signal a need for professional help. This might mean the original problem wasn’t properly addressed or there are hidden issues at play.
Don’t hesitate to consult with a concrete specialist if you’re unsure about any repairs. It’s better to address problems early before they become bigger, more expensive issues.
Choosing the Right Finish for Function, Durability, and Safety
Choosing the right finish comes down to balance: the paste and the aggregate in your mix strongly limit what you can safely and practically apply. For example, smooth trowel, broom, exposed aggregate, stamped, salt, and swirl finishes each have distinct feel and performance under different paste/aggregate conditions. In short, the finish has to be feasible with what you poured and how it cured, not just what you wish it looked like.
That matters because you’re balancing function, traffic, slip resistance, and maintenance from day one. Indoor or outdoor use, high-traffic areas, or residential slabs all demand different priorities, and the finish should support those needs without sacrificing durability. Check the label or datasheet for guidance, and plan prep, sealing, and timing around the chosen finish so you don’t fight the surface after it hardens.
High-traffic, industrial, and vehicle areas
For heavy-duty surfaces like driveways, garage floors, or commercial spaces, durability and low maintenance are key. Here’s what you need to consider:
Paste-Aggregate Balance: A leaner mix with less paste (more aggregate) can handle heavier loads better. But be careful – too lean can lead to weak spots.
Recommended Finishes:
– Smooth Trowel Finish: For vehicle traffic, it’s easy to clean and maintain.
– Broom Finish: Provides some texture for traction but still low-maintenance.
Residential and decorative surfaces
Aesthetics matter here. You’ve got options, but there are trade-offs:
Paste Coverage: Decorative finishes often need more paste for a smooth, even look. But too much can lead to scaling or dusting.
Exposure Techniques:
– Exposed Aggregate: Shows off the aggregate, but needs good paste coverage and may require sealing.
– Stamped Concrete: Can mimic stone or brick, but needs a rich paste for detail and may need periodic re-stamping.
Slip-resistance and safety-focused textures
For areas where traction is crucial – like pool decks or walkways – consider these options:
Texture Tools & Timing: Use tools like brooms, salt shakers, or exposure techniques. But remember, timing matters. Too early, and the paste won’t set right.
Recommended Finishes:
– Broom Finish: Creates a textured surface for better grip.
– Exposed Aggregate: Offers natural traction, but needs good paste coverage.
– Salt Finish: Provides texture and can be used on sloped surfaces.
DIY Troubleshooting Checklist, Cost and Liability Implications
This section highlights a short, practical pre-pour and post-finish checklist to help DIY homeowners and small contractors spot problems early and to guide conservative choices. It covers surface prep quality, moisture content, cure conditions, formwork integrity, and slope or drainage to prevent finishing issues, plus a post-finish check for surface consistency, edges, joints, and early cure monitoring. If any red flags appear, lean toward safer, slower methods or hire a pro when in doubt.
That choice matters because poor finishing can boost long‑term costs and raise liability risk if cracks, delamination, or rough textures prove hard to fix later. Understanding when to hire a licensed contractor or concrete specialist, and how to document issues for future fixes, helps you negotiate safer, cost‑effective outcomes and protect your investment. Use conservative options like proper mix guidance, appropriate sealers, and lightweight patch materials, and always know when to pull the trigger for professional help.
Visual and tactile checkpoints after finishing
Once you’ve finished your concrete slab, it’s crucial to inspect it thoroughly before moving on. Here’s a quick checklist to ensure everything looks and feels right.
- Uniform color and texture: Check for any discoloration or inconsistent textures that could indicate problems with the mix or finishing process.
- Absence of bleeding or excessive dust: Bleeding indicates too much water in the mix, while excessive dust suggests a weak surface paste. Both need immediate attention.
- Cure protection: If any issues are found, apply cure protection immediately to prevent further damage from weathering.
- Trowel marks: Ensure trowel marks are even and consistent. Irregular marks may indicate improper finishing techniques.
- Edges and control joints: Check edges for any rough spots or inconsistencies, and ensure control joints are clean and well-defined.
- Mist vs. sealers: If using a sealer, apply it within the first 24 hours after finishing to maximize its effectiveness.
Quick rule: Inspect your slab as soon as possible after finishing. Early detection of issues can save you time and money in the long run.
Cost consequences and liability risks
Poorly finished concrete slabs can lead to costly repairs, downtime, and even legal issues. Here’s what you need to know about the potential consequences.
- Repair costs: Fixing surface failures can be expensive. Preventive measures are always cheaper than repairs.
- Downtime: A damaged slab may need to be replaced, leading to downtime and lost productivity.
- Safety claims: Rough or uneven surfaces can cause trips and falls, leading to potential liability issues and insurance claims.
- Reduced property value: Poorly finished concrete can lower the value of your property. Investing in correct finishing methods can increase its value.
- Warranty claims: Many contractors offer warranties on their work. Documenting any issues can help you make a claim if needed.
Quick rule: Investing in proper finishing techniques upfront can save you money and prevent potential liability issues down the road.
When to consult a pro and what to document
Sometimes, even with the best intentions, DIY concrete finishing can go wrong. Here’s when to call in a professional and what to document along the way.
- Delamination or curling: If your slab is peeling or curling up at the edges, it’s time to consult a pro. These issues could indicate serious problems with the subgrade or mix design.
- Rough or feathered textures: While some texture is normal, excessive roughness or feathery patterns can indicate finishing issues that may require professional intervention.
- Inconsistent sheen: A consistent sheen indicates a uniform finish. Inconsistencies could suggest problems with the mix or finishing techniques.
- Mix tickets and weather records: Keep detailed records of your concrete mix, including the ticket number and any adjustments made. Also, document daily weather conditions.
- Photos and finish timing: Take photos of your slab at various stages of the finishing process. Note the time each stage was completed for future reference.
Quick rule: If you suspect a problem with your concrete slab, don’t wait. Consult a professional immediately to prevent further damage and potential liability issues.
Conclusion
The paste-to-aggregate balance is the core of a smooth finish that lasts. Get it right and you avoid tinged surfaces, crumbling edges, and costly rework; get it wrong and the slab fights you every step of the way.
Make this a small, deliberate routine: verify mix design and check before you pour, track the timing window for finishing, follow the finish sequence, confirm tools and materials are ready, and test a trial section first. Work in a controlled area, clean as you go, and stop if you see unexpected set or color changes. If in doubt, slow down, re-check the mix, and don’t pour on soil, frost, or rain risk. If you’re unsure about finish choice, choose the safer, easier option and document your checks so you know what to adjust next time.
Two common mistakes to avoid are rushing the pour and skipping the timing window, which leads to tearing or binding. Never skip safety gear, and never pour when the 환경 or site conditions are extreme or changing rapidly. If you see surface curl, chatter, or bond failures that you can’t fix with basic adjustments, pause and call in a pro rather than forcing a repair that could fail later.
If the project scope feels uncertain, small and controlled trials are wise, and when you’re not sure about paste–aggregate balance, finish timing, or environmental limits, it makes sense to bring in a qualified contractor. Stay disciplined, measure what matters, and push forward with confidence rather than guesswork. You can do this—steady steps, clear checks, solid results.
FAQ
Why is understanding the finishing sequence important for a good slab?
A proper finish starts with how the paste and aggregate set up. If you rush steps or skip timing cues, you’ll get a rough surface, tearing, or edge ravel. Knowing the flow helps you hold the look and avoid common flaws.
What are the key steps in the finishing process, and what does each one do?
Screeding levels the surface. Floating broadens the paste and pushes fines up for a smoother look. Edging and joint tooling help keep the edges neat and prevent scale cracking. Troweling finally seals the surface for slickness or a textured finish, depending on need.
What tools are used for different finishes, and how do I choose?
For a smooth finish, you’ll use a darby or bull float first, then edging tools, and a finishing trowel. For a broom or textured finish, you’ll stop finishing earlier and brush the surface with a broom while it’s still workable. Check tool widths and blade hardness on the label or manufacturer instructions before you buy.
How do weather and timing affect finishing, and what should I watch for on site?
Heat, wind, and humidity change how fast the surface sets. If the surface stiffens too quickly, it tears or shows blemishes. If it stays too soft, you’ll get sagging or a permissive surface; adjust work pace and plan your sequence accordingly by watching the surface texture and firming up cues.