
Introduction
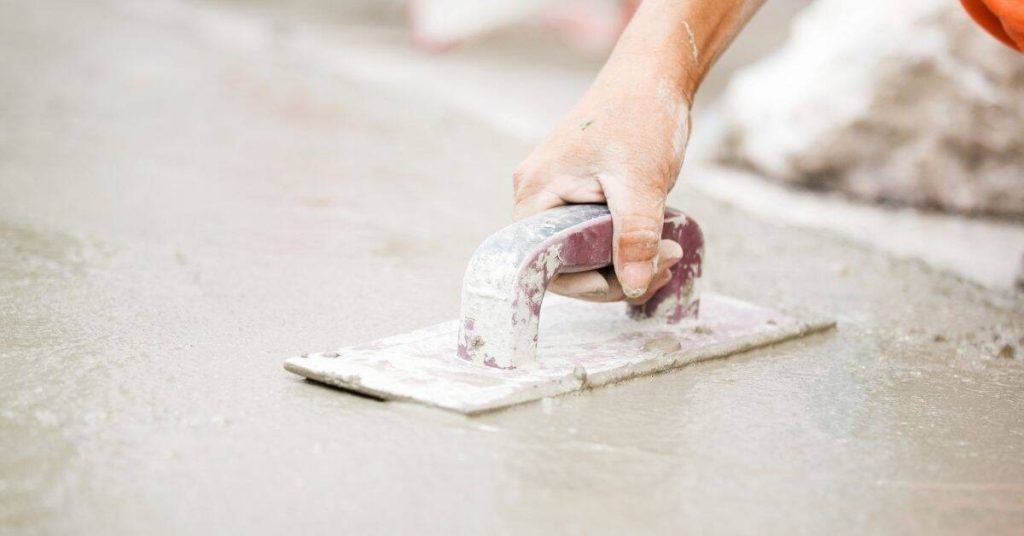
Steel trowel burn is when the surface of fresh concrete darkens after smoothing with a steel trowel. The dark patch comes from heat and friction that affect the surface paste as you work it. That burn can also create a slightly different texture or sheen if the trowel is held too long in one spot.
Choosing the right steel trowel and using proper technique helps prevent burn and swirl marks. Look for a blade that suits your slab size, keep the blade flat, and move in steady, overlapping passes to avoid overworking any area. If you notice dark patches forming, back off and follow the manufacturer’s guidance for finish timing and blade pressure to minimize swirl.
Key takeaways
- Choose a steel trowel sized for your slab and finish stage.
- Keep trowel edges clean to prevent edge-rubbing causing swirl marks.
- Work with fresh concrete during cooler periods to reduce burn risk.
- Inspect surface for darkening and texture changes before final finishing.
- Use proper tooling rotation and gentle passes to avoid overworking.
- Wear dust mask and protect surrounding areas during corrections and cleanup.
Table of Contents
- Introduction
- Key takeaways
- What Steel Trowel Burn Is and How to Identify It
- Primary Causes of Trowel Burn and Swirl Marks
- How Concrete Chemistry and Surface Mechanics Matter
- Tools, Tooling Selection, and Material Specs Checklist
- Inspecting the Floor Before Starting Work
- Techniques to Prevent Swirl Marks During Finishing
- Correcting and Repairing Trowel Burn and Swirl Marks
- Safety, Regulations, and Dust Control When Correcting Surfaces
- Conclusion
- FAQ
What Steel Trowel Burn Is and How to Identify It
Steel trowel burn is a surface condition that shows up as a darkened, high gloss area or blotchy patches on freshly finished concrete. It comes from heat buildup, overworking the surface, moisture mismanagement, and the pressure of steel blades during finishing. You can tell burn from other issues by looking for concentrated shine and uneven sheen that follows trowel passes.
On site, confirm burn by comparing the affected area with adjacent sections and under different lighting. Note whether the marks align with tool passes or appear as isolated spots. If you suspect burn, document the patterns with photos for remediation planning and future prevention steps.
Visual characteristics to look for
Steel trowel burn leaves distinct marks on concrete surfaces. Here’s what to look out for:
Darkened patches: Burnt areas appear darker than the rest of the surface due to heat-induced changes in the cement paste.
High-gloss or blotchy sheen: These areas reflect light differently, creating shiny spots or uneven sheen that doesn’t match the surrounding finish.
Swirl-like reflections: Over-troweling can cause streaks or swirls aligned with trowel passes, which are visible under certain lighting angles.
How it differs from other surface defects
Before attempting repairs, ensure you’ve correctly identified the issue. Here’s how steel trowel burn differs from similar problems:
Stains and discoloration: Unlike burn, these are usually caused by external agents (e.g., dirt, chemicals) and often have irregular edges or patterns.
Efflorescence: This white, powdery substance forms when water-soluble salts rise to the surface. It’s not dark like burn and can be easily wiped off.
Aggregate exposure: Exposed aggregates appear rough and textured, unlike the smooth, glossy feel of trowel burn. They also don’t have the same dark discoloration.
Primary Causes of Trowel Burn and Swirl Marks
Trowel burn and swirl marks are related but distinct finish concerns. Burn typically appears as dark, glossy patches, while swirl marks look like deliberate or irregular streaks from tool motion. Both stem from technique and slab condition interacting during finishing.
Mechanical causes include over-troweling, excessive pressure, and finishing before the concrete has set properly. Tool and material factors cover metal contamination, dirty edges, or inappropriate mix design. Timing and slab condition also play a role when finishing too early, too late, or on bleed water.
Over-troweling and finish timing errors
Avoid these common mistakes to prevent trowel burn and swirl marks.
- Finishing too late: Waiting until the concrete is hard enough for a steel trowel to skid can cause it to darken. It’s too late then.
- Over-troweling: Too many passes with the trowel compact paste and concentrate cement at the surface, leading to burn.
- Excessive pressure: Pressing down hard on the trowel can also cause darkening by forcing too much paste to the surface.
- Finishing before proper set: Working the concrete too early can create swirl marks and make it susceptible to burn.
Find that sweet spot: finish when the slab is firm enough to hold your footprint but still soft enough to leave an imprint. Use light, even pressure with the trowel.
Metal contamination and embedded particles
Steel shavings, rebar dust, or contaminated tools can cause localized dark streaks and accelerated burn when worked into the surface.
Steel trowels: Keep them clean and free of rust. Rust can leave dark marks on the concrete.
Rebar: Ensure it’s properly covered with a protective layer to prevent dust from getting onto the surface.
Inspect your tools and slab before finishing. Remove any contaminants to avoid trowel burn.
Curing and moisture-related contributors
Inadequate or uneven curing can change paste concentration and increase susceptibility to burn.
Uneven curing: If some areas cure faster than others, they may be more susceptible to trowel burn. Keep the slab evenly moist during the initial curing period.
Moisture variations: Too much or too little moisture can affect the surface set and glaze formation, leading to burn. Ensure consistent moisture content throughout the slab.
Monitor your slab’s moisture levels and cure it properly to minimize trowel burn risks.
How Concrete Chemistry and Surface Mechanics Matter
The surface paste layer and fines content influence how light reflects off the concrete after troweling. A paste-rich surface can look darker or moister under finish lighting. This is a key factor in whether the surface reads as uniform or spotty with glaze.
Think of the paste-to-aggregate ratio as a behavior guide for the surface. It helps explain why mechanical action changes sheen, swirl patterns, and perceived darkness. Controlled trowel mechanics shape the final texture and color depth without relying on exact numbers.
Paste concentration and surface densification
The top layer of concrete, known as the paste, plays a big role in how your finish turns out. Too much paste or overworking it can darken your surface.
When you trowel too much, you’re reducing the surface’s porosity. This means there are fewer tiny holes for light to bounce off. Instead, it gets absorbed, making the concrete look darker.
Overworking also traps more moisture in the surface. This can make it look moister and again, absorb more light, deepening that dark color.
Effect of tool pressure, speed, and heat generation
How you use your trowel can leave marks or even burn the surface. Let’s break down what each factor does:
- High Pressure: Too much force can shear off the top layer of paste, exposing aggregate and leaving a dark patch.
- Aggressive Speed: Moving too fast doesn’t give the concrete time to level out. It can leave swirl marks or even burn the surface if you’re going over the same spot repeatedly.
- Repeated Passes: Too many passes can generate heat, which dries out the surface too quickly and leaves it dark and patchy.
- Tool Type: Using a bullfloat or magnesium float instead of a steel trowel for final finishing can help prevent burn. Rentals start around $50 per day.
- Temperature Control: Working in hot weather or on unshaded slabs can increase heat generation and lead to burn. Consider working early in the morning or late in the evening when temperatures are cooler.
Tools, Tooling Selection, and Material Specs Checklist
Start with the core finishing tools and when each is appropriate to minimize burn and swirl marks. Magnesium, wood, polymer, and steel each have a role based on the mix, moisture, and setting stage. Your choice should align with the project needs rather than a single rule.
Read manufacturer specs and the material design guidelines rather than assuming a universal rule. Use a stage-by-stage approach for tool selection tied to the current set progress and desired finish texture. Keep a simple matrix of compatible sealers, curing compounds, and bonding agents to guide options.
Choosing Metal Bond Diamond Tooling and Grinding Tools
Before you start, ensure your diamond tooling is fit for purpose. The right bond selection can prevent burn and swirl marks.
- Bond type: Choose between resin (soft), metal (medium), or electroplated (hard) bonds based on slab condition.
- Segment size: Larger segments are better for rougher surfaces, smaller ones for finishing.
- Grit size: Coarser grits (e.g., 30/60) for initial grinding, finer grits (e.g., 120/240) for polishing.
- Tool shape: Select the right tool profile for your job – cup wheels, turbo cups, or core bits.
- Machine compatibility: Ensure tools fit your grinding machine.
- Manufacturer specs: Check datasheets for recommended speeds and pressures to avoid damaging tools or slab.
- Tool condition: Inspect tools for damage, missing segments, or dull edges before use.
- Safety gear: Always wear appropriate PPE when using grinding tools.
Quick rule: Consult tooling manufacturers about bond softness/hardness for your specific slab condition to prevent excessive heat generation and burn.
Steel Trowel Types and Maintenance
Selecting the right steel trowel and maintaining it properly can minimize burn and swirl marks.
- Trowel size: Choose based on slab size – larger slabs need bigger trowels (e.g., 48″ for large slabs).
- Edge condition: Sharp edges create better finishes but can increase burn risk. Blunt edges reduce burn risk but may leave swirl marks.
- Trowel profile: Flat trowels are best for initial passes, convex trowels for final finishing.
- Polished or damaged trowels: These can increase burn and swirl mark risks. Inspect before use.
- Edge wear: Regularly check edge condition – dull edges leave marks.
- Rust: Rust on trowels can transfer to slab, causing discoloration and burn.
- Blade integrity: Check for cracks or warping that could affect finish quality.
- Cleanliness: Keep trowels clean to prevent metal contamination and embedded particles.
Quick rule: Regularly inspect and maintain steel trowels to minimize burn and swirl mark risks.
Site Checklist: Consumables and Control Equipment
Before starting work, ensure you have the right tools and materials to prevent burn risk.
- Clean tools: Use clean tools to avoid introducing contaminants into the slab.
- HEPA-capable vacuum: Essential for cleaning up laitance and maintaining a dust-free environment.
- Moisture meters: Check substrate moisture levels before starting work. Ideal concrete moisture is 4-6%.
- Approved curing compounds: Use manufacturer-recommended curing compounds to prevent moisture loss and maintain slab integrity.
- Sealers: Choose compatible sealers based on tool material – some sealers can react with certain tools, causing discoloration or damage.
- Bonding agents: Use bonding agents as recommended by the manufacturer to ensure proper adhesion of toppings or overlays.
- Edge wear and rust check: Inspect all tools for edge wear, rust, or other damage before use.
- Tool calibration: Ensure all tools are calibrated correctly to maintain consistent finish quality.
Quick rule: Always check datasheets for product-specific requirements and follow manufacturer guidelines to minimize burn risk.

Inspecting the Floor Before Starting Work
Set objective cleanliness criteria for the surface before you begin. Identify contaminants like release agents, coatings, or curing compounds and plan their removal. Document the plan so the crew stays consistent.
Carry out a practical moisture and surface integrity assessment with hands-on checks and simple tests. Note roughness, porosity, and any irregularities that could affect finishing. Use photos to record conditions and guide your workflow.
Visual and Tactile Inspections
Before you start troweling, walk the floor to spot any issues that could lead to steel trowel burn or swirl marks.
- Embedded metal: Look for shiny particles. If present, they can cause discoloration and should be removed.
- Laitance: Check for a thin, weak layer on the surface. It appears as a whitish film and must be removed to prevent burn.
- Uneven paste: Feel for variations in smoothness. Inconsistencies can lead to uneven densification and burn.
- Cracks or chips: Inspect for any damage that could worsen during finishing.
- Moisture sheen: Check for a glossy surface, indicating excess moisture which can cause burn.
- Texture inconsistencies: Feel for areas that are rougher or smoother than others. These may require additional grinding.
- Oil/grease slicks: Look for dark spots or slick areas. If present, they can cause discoloration and should be cleaned.
- Pop-outs: Inspect for small pieces of aggregate breaking through the surface. They need to be ground down.
Quick rule: If you find any of these issues, address them before starting to trowel. It’s easier and cheaper to fix now than after burn has occurred.
Simple Tests and When to Escalate
Perform these quick checks before deciding if you need deeper testing or professional help.
Light-angle inspection: Check the floor at different angles with a bright light. This can reveal contaminants, laitance, or other issues not visible to the naked eye.
Probing soft spots: Use a screwdriver or similar tool to gently probe the surface. Soft spots indicate weak areas that could cause problems during finishing.
If these tests reveal significant issues or you’re unsure about what you’re seeing, it’s time to escalate. Consult a concrete specialist or perform deeper testing like moisture vapor emission rate (MVER) or relative humidity (RH) tests. Don’t risk ruining your floor with guesswork.
Techniques to Prevent Swirl Marks During Finishing
Time the finish stages to the concrete’s readiness, considering ambient conditions and bleed water. Avoid rushing through float, steel trowel, and burnish steps if the surface isn’t ready. Structured timing helps minimize swirl formation.
Adopt a clear pass sequence and pattern to keep texture even. Use consistent pressure and controlled movement, and be prepared to pause if the surface shows signs of distress. Maintain safety and monitor temperature and moisture for best results.
Recommended finishing sequence and timing cues
The key to a swirl-free finish is knowing when to start each stage of the process. Here’s your guide:
Screeding and Bullfloating (Initial Set): Start these as soon as the concrete reaches an initial set, usually 1-2 hours after placement. This helps prevent large-scale segregation.
Edging and Steel Troweling (Early Stiffening): Begin edging and steel troweling when the surface is no longer sticky but still has some give, around 3-5 hours after placement. This timing may vary based on temperature and humidity.
Burnishing (Late Stiffening to Early Hardening): For a high-gloss finish, burnish once the concrete has stiffened but is not yet fully hardened, typically 6-12 hours after placement. Follow manufacturer guidelines for your specific project.
Trowel handling: pressure, stroke, and overlap
The way you handle the steel trowel can make or break your finish. Here’s how to avoid swirls:
Pressure: Apply light, consistent pressure. Think ‘tickling’ not ‘stomping’. Too much pressure causes localized heat and swirl marks.
Stroke: Use long, smooth strokes. Short, jerky movements create swirl lines. Keep your trowel flat on the surface for even contact.
Overlap: Overlap each pass by about half the width of your trowel. This ensures full coverage without leaving visible tracks. Alternate directions with each pass to avoid concentric swirls.
Alternative finishes to reduce risk
If a high-gloss, steel-troweled finish isn’t necessary, consider these alternatives to minimize the risk of swirl marks:
Broom Finish: Use a broom to create texture and hide any minor imperfections. Work the broom in one direction for a consistent look.
Stamped Concrete: Stamping tools imprint patterns into the concrete before it sets, hiding any finishing marks. Use light pressure and ensure stamps are well-lubricated.
Exposed Aggregate Finish: This finish exposes the aggregate within the concrete, eliminating the need for a smooth, steel-troweled surface. Use a washout technique to reveal the aggregate.
Non-Steel Floats: Consider using wood or magnesium floats instead of steel. These can help reduce the risk of trowel burn and swirl marks but may not achieve as high a gloss.
Correcting and Repairing Trowel Burn and Swirl Marks
First, differentiate localized burn spots from broader swirl and decide between spot repair or full-surface correction. The choice depends on severity and aesthetics goals. Testing a small, inconspicuous area helps guide the plan.
Choose repair methods aligned with the substrate condition and finish goals. Options range from localized grinding and polishing to regrinding or resurfacing, with attention to the impact on color and texture. Plan to recheck evenly and protect the corrected area afterward.
Immediate on-site fixes
If you notice trowel burn or swirl marks right after finishing, don’t panic. Here are some quick actions to limit damage:
Light feathering: Use a soft-bristle broom to lightly ‘feather’ the edges of the affected area. This helps blend it with the surrounding concrete.
Re-troweling: If the burn is minor, you might be able to re-trowel the area using a steel trowel with appropriate tool pressure and speed (refer to your earlier article on finishing techniques).
Clean off contaminants: If there are any visible contaminants causing discoloration, gently remove them with a damp cloth or soft brush.
Grinding, polishing, and coating workflows
For more severe cases, follow this progressive workflow to correct trowel burn and swirl marks:
Grinding: Start with coarse diamond pads (e.g., 30/40 or 50 grit) to remove the darkened paste. Follow your tooling manufacturer’s guidelines for equipment settings and pressure.
Polishing: Progressively use finer grits (e.g., 80, 120, 200, 400) to blend out swirl marks and achieve the desired sheen. Remember to keep your tools lubricated with water or a suitable densifier.
Densifying/Sealing: After grinding and polishing, apply a concrete densifier or sealer to protect the surface and enhance its appearance. Always test in an inconspicuous area first to ensure compatibility with your substrate.
When to consider overlays or replacement
Sometimes, corrective grinding and polishing might not be enough to restore the intended appearance. In such cases, consider these options:
Thin overlay: If the substrate is structurally sound but the finish is beyond repair, applying a thin overlay can give you a fresh surface to work with. This involves applying a new layer of concrete over the existing one.
Full replacement: In severe cases where the structural integrity or appearance cannot be salvaged, it might be best to remove and replace the affected area entirely. This should always be a last resort due to the labor and material costs involved.
Always consult with a professional if you’re unsure about which repair method to choose. They can provide expert advice tailored to your specific situation.
Safety, Regulations, and Dust Control When Correcting Surfaces
Understand the health risks of silica dust from grinding and polishing concrete and why dust control matters for DIY and professional work. Implement practical controls to limit exposure and protect workers. Dust control is non-negotiable for safety.
Check regulatory expectations at all levels and follow typical standards and permits. Use HEPA vacuums, wet methods, and proper PPE, and keep records of equipment certifications and maintenance. Align work practices with local requirements to stay compliant.
Silica exposure controls and HEPA systems
Grinding concrete kicks up silica dust, which is harmful to your lungs. To control this, you need a HEPA-level vacuum. These capture 99.97% of particles as small as 0.3 microns.
Check your vacuum’s HEPA rating and ensure it matches the tool you’re using. Manufacturers provide guidance on compatible tools and vacuums. Using incompatible ones can lead to poor dust control.
Regularly clean or replace filters to maintain efficiency. Clogged or dirty filters reduce suction, letting dust escape into the air.
PPE, wet cutting, and ventilation
Wear a respirator with P100 filters or higher to protect against silica dust. Ensure it fits properly – a poor fit lets in dust.
Use safety glasses and consider face shields for added protection. Earplugs or earmuffs protect your hearing from grinding noise.
For large-scale grinding, use wet methods to suppress dust. Spray water onto the surface before grinding. Increase ventilation in work areas to help disperse any remaining dust particles.
Recordkeeping and compliance best practices
Keep records of your dust control measures. Note when, where, and how you used them. This shows compliance with local safety standards.
Document training on dust control methods and PPE use. Train all workers involved in grinding or polishing operations.
Maintain equipment maintenance records. Note when filters were replaced, vacuums cleaned, and tools serviced. Regular maintenance ensures your equipment works as intended.
Conclusion
Keep it simple, safe, and deliberate. A good finish sticks with you for years, so protect the surface, control dust, and work within the concrete’s window to avoid dark patches and swirl marks.
Check in this order: inspect the floor and cure status, confirm tool condition and surface moisture, set up dust control and PPE, verify mixes and slump, test a small patch, practice light passes on a sacrificial area, then finish with steady, even strokes and timely cleaning of trowels. If anything looks off, pause and fix it before proceeding.
Avoid common mistakes like rushing past curing signs, overworking a live surface, or skipping a test patch. Wear proper safety gear, keep dust down, and never work alone without a plan for cleanup and containment. If the surface shows severe burn, unpredictable color, or you’re unsure about the cure or seal, call a professional rather than guessing.
When in doubt, schedule a quick expert opinion and proceed with confidence. Stay conservative, document your tests, and you’ll get durable, smooth results with fewer touch‑ups and less rework. You’ve got this—finish strong and keep the job safe and sound.
FAQ
How do I choose the right steel trowel for my concrete project?
Match the trowel size to the area you’re finishing and your height. Start with a mid-sized blade you can control easily, and pick a handle that feels solid in your hand. Check the manufacturer’s label for blade material and mounting style, and avoid cheap, won’t-hold-up options.
What’s the proper technique when using a steel trowel to avoid burn and swirl marks?
Use a light touch and steady strokes; don’t press hard or drag aggressively. Work in uniform passes with consistent rotation and angle, keeping the blade fairly flat to the surface. Clean the trowel often and don’t rush the finishing stage.
What causes concrete darkening and swirl marks when troweling?
Darkening happens when the surface pulls moisture and fines to the top, or when the cement paste bleeds and sits under the glaze. Swirl marks come from uneven passes, inconsistent pressure, or a blade that’s too dry or too damp. Check that the surface is ready for burnishing and that you’re using the right technique for the mix and slump.
What maintenance and care does a steel trowel need?
Keep blades clean and dry after use to prevent rust. Sharpen or replace blades as the edge wears, and check blade-to-handle connections for looseness. Store in a dry place and lightly oil the blade if you’ll be idle for a while to slow rust.