
Introduction
Crack isolation membranes are thin sheets or coatings that separate a flooring layer from the concrete to limit crack transfer. They’re installed between the slab and the finish, acting as a buffer rather than a full repair. On older slabs, you’ll need to verify compatibility and follow product instructions for best results.
What they can do: they help reduce the effect of some cracks and improve movement tolerance under tile or other floors. What they can’t do: they don’t fix severe damage, and installation may be limited by slab condition, moisture, or adhesive compatibility. Check the label and local rules, and test a small area if unsure about adhesion or movement compatibility.
Key takeaways
- Older slabs may flex and crack; membranes help but don’t fix structural movement.
- Verify substrate moisture and voids; perform tests per manufacturer instructions.
- Choose membranes compatible with tile adhesive and grout systems; read labels.
- Prep involves cleaning, removing loose materials, and patching dimples for adhesion.
- Follow installation order: primer, membrane, optional second coat, then tile setting.
- Safety: keep area dry, wear PPE, guard against trips and electrical hazards.
- Inspect for lippage, edge debonding, and exposed pores after cure.
Table of Contents
- Introduction
- Key takeaways
- Quick Overview: Purpose and Types of Crack Isolation Membranes
- What Crack Isolation Membranes Can Reliably Do on Older Concrete Slabs
- What Crack Isolation Membranes Cannot Do on Older Slabs
- Inspecting Older Slabs Before Choosing a Membrane
- Prep Work and Substrate Remediation for Successful Membrane Performance
- Choosing the Right Membrane and Materials for Older Slabs
- Installation Best Practices and Common Failure Modes to Avoid
- Testing and Verification After Installation
- Conclusion
- FAQ
Quick Overview: Purpose and Types of Crack Isolation Membranes
Crack isolation membranes are a layer placed between a substrate and finish to absorb movement and keep cracks from transferring to the tile. They come in several forms that suit different jobs. The main types are sheet membranes, liquid-applied systems, and fabric reinforced options.
The primary goal is to decouple the tile or finish from substrate movement, which helps reduce crack transfer and protect the surface finish. Common materials fall into these categories, each with its own method of installation and suitable applications.
How Crack Isolation Differs From Waterproofing And Crack Suppression
Crack isolation membranes, waterproofing membranes, and crack suppression membranes each serve different purposes. Let’s break it down:
Crack Isolation Membranes decouple your tile or finish from the substrate below. They allow movement in the slab without transferring cracks to your finish. This is crucial for older slabs with existing cracks.
Waterproofing Membranes, on the other hand, prevent water from passing through. They’re used in wet areas like showers and basements. While they can sometimes help with minor hairline cracks, their primary function is to keep water out.
Crack Suppression Membranes are designed to bridge small cracks and prevent them from growing wider. They don’t decouple the finish from the substrate like crack isolation membranes do. Use these when you want to control minor cracking but still need some flexibility in the slab.
Common Membrane Systems And Typical Warranties
Crack isolation membranes come in various types, each with its own warranty. Here are some common ones:
Sheet Membranes, like those made of polyethylene or polyolefin, typically come with warranties ranging from 10 to 25 years against visible crack transmission. They’re usually easy to install and can be walked on immediately.
Liquid-Applied Membranes, such as urethanes or acrylics, often carry similar warranties but may require a longer cure time before foot traffic. They provide excellent flexibility and adhesion.
Fabric-Reinforced Membranes, combining the benefits of sheet membranes with added strength from embedded fabric, usually come with warranties ranging from 15 to 30 years. They’re great for areas with heavy foot traffic or loads.
What Crack Isolation Membranes Can Reliably Do on Older Concrete Slabs
On older slabs, these membranes can help reduce the spread of small, non-structural shrinkage cracks. They can also allow thin-set tile installations over substrates that have minor movement. When installed correctly, they can contribute to a longer lasting finish by tolerating some substrate changes.
Be sure to verify the membrane’s limitations and recommended use with the manufacturer or local guidelines. Different products have different performance envelopes that matter for aging concrete.
Size and type of cracks membranes can bridge
Crack isolation membranes are designed to handle different types and sizes of cracks. Here’s what you need to know:
First, check the product label or manufacturer instructions to find out the approximate crack widths a membrane is designed to handle. This usually ranges from 1/8″ (3mm) to 1/4″ (6mm). Anything wider might require additional repair steps.
Now, let’s talk about the types of cracks:
- Hairline cracks: These are tiny, barely visible. Most membranes can handle these.
- Shrinkage cracks: These happen as concrete dries and shrinks. Membranes designed for older slabs should be able to bridge these.
- Structural cracks: These are wide, often caused by settling or structural issues. If you’ve got these, the slab needs proper repair before applying a membrane.
Remember, membranes aren’t magic. They won’t fix serious structural problems. So, always check your slab’s condition before starting any work.
Improving tile and finish performance vs. direct adhesion
Old concrete slabs can be tricky to tile due to their age and potential movement. Directly adhering thin-set mortar to these surfaces might seem like the easiest way, but it’s not always the smartest.
That’s where crack isolation membranes come in. These flexible sheets bridge minor cracks (check membrane specs for size) and absorb some of the slab’s movement. Here’s how they improve your tile job:
First off, they create a stable base for your thin-set mortar. Unlike old concrete, these membranes don’t shift or crack under thermal/humidity changes. That means better adhesion and less chance of tiles popping off.
Secondly, they help prevent moisture from wicking up into your new tile installation. This is crucial to stop mold growth and delamination (check local building codes for moisture barrier requirements).
Lastly, membranes add an extra layer of protection against future cracks. If the old slab moves again, the membrane will take some of that stress, keeping your tiles in place.
What Crack Isolation Membranes Cannot Do on Older Slabs
These membranes will not permanently fix structural movement or active cracks. They do not stop major deflection or severe substrate movement. They also cannot replace the need for slab repair where movement or damage is significant.
They do not substitute for proper waterproofing where it is required, and they rely on correct substrate conditions and installation. Always check the product label and installation instructions for limits before planning a project.
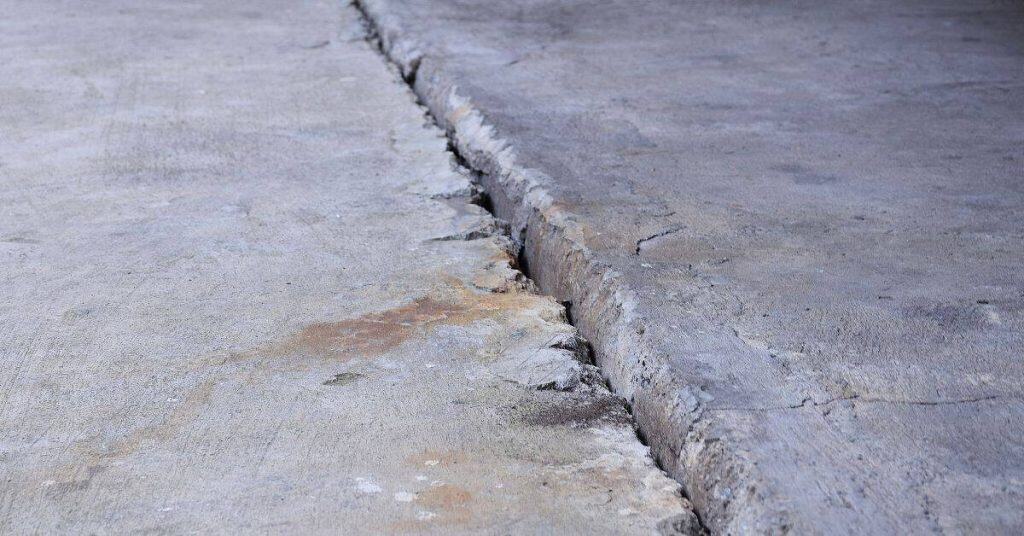
Active movement and structural cracks
Crack isolation membranes aren’t magic. They can’t fix ongoing structural issues on your slab.
Signs of active movement? Cracks that keep widening, joints misaligned, or even noises from the slab itself. These are signs of serious problems beneath the surface – maybe settlement, maybe something worse.
Membranes won’t stop these issues. They can’t bear loads or fix structural problems. They’ll just cover up the symptoms, not cure the disease.
Substrate deterioration, delamination, and moisture-related failures
Membranes can’t fix everything. They won’t stick to a bad substrate.
Spalling concrete? Lose laitance? Severe moisture vapor drive? Non-load-bearing failures? These are serious issues that need fixing before you apply any membrane.
Moisture’s the enemy here. It weakens the slab, makes membranes peel off. You’ve got to fix these problems first, or your membrane job will be a waste of time and money.
Inspecting Older Slabs Before Choosing a Membrane
Start with crack mapping to understand pattern and extent. Check for moisture symptoms and test accordingly with accepted methods. Run a simple flatness check and tap the surface to listen for voids or delamination.
Note any existing coatings or finishes and review load history or traffic patterns. Red flags like widespread cracking, moisture, or damag e may require professional evaluation before choosing a membrane.
Moisture and vapor assessment
Before you pick a membrane, you gotta know what you’re up against. Here’s how to test for moisture and vapor in your old slab:
Relative Humidity Probes: Stick ’em into the slab at different spots, follow the manufacturer’s instructions. Acceptable range? Below 75% RH.
Calcium Chloride Test: Place a dish of CaCl2 on the slab, cover it, and check back after 60-72 hours. If there’s no condensation, you’re good. If not, recheck or consider an alternative test.
Always check product labels for recommended tests and acceptable ranges. Don’t guess, don’t wing it. You wanna avoid moisture-related issues later on.
Flatness, deflection, and load considerations
Before you slap on any membrane, check your slab’s flatness. It’s crucial for a successful tile job.
Tile installation flatness tolerances vary, but generally, aim for no more than 1/8″ in 10′ for ceramic and 3/16″ for vinyl. If you’re over these, consider leveling or consult a structural engineer if deflections are severe.
Check for deflection, too. Gently press on the slab; it should spring back. If it’s soft or stays down, there might be issues. Check base compaction and consider reinforcing if needed. Always follow local building codes and manufacturer recommendations.
Prep Work and Substrate Remediation for Successful Membrane Performance
Begin with thorough cleaning to remove oil, dust, and contaminants. Repair spalls and delamination, and fill large or open cracks as recommended. Ensure the surface is ready for bonding according to the membrane instructions.
Prime the substrate per the manufacturer’s directions and confirm compatibility with any primers used. Proper prep is essential for adhesion and performance over time.
Repair techniques for cracks and delaminated areas
Before applying a crack isolation membrane, fix any visible damage. Here’s how:
Structural cracks: These need attention from an engineer first. Once approved, use epoxy injection to fill them.
Delamination: Remove loose concrete using a chisel or grinder. Patch with a suitable repair mortar.
Spalls: Clean the area, apply a bonding agent, then patch with repair mortar.
Surface profile, cleaning, and priming best practices
Prepare your slab’s surface for membrane adhesion:
Profile the surface: You can mechanically abrade or chemically etch it. Both create a better bond.
Remove coatings/adhesives: Use a suitable stripper and scraper to clear the surface.
Prime the slab: Apply a membrane-specific primer, following manufacturer’s instructions. This ensures maximum adhesion.
Choosing the Right Membrane and Materials for Older Slabs
Match the membrane type to the slab condition, expected movement, traffic, and finish plan. Consider how the substrate might move and what that means for long-term performance. Refer to the finish requirements when selecting a product.
Always cross-check the product technical data sheets and installation guides. Compare limits, curing, and installation steps to ensure compatibility with your project.
Matching membrane performance to crack severity and movement expectations
First off, you gotta inspect your slab. Check for cracks – their width matters. If they’re less than 1/8″ (3mm), you can get away with a liquid membrane. It’ll seep into those tiny gaps and seal ’em up nice.
Now, if your cracks are wider than that, say 1/4″ (6mm) or more, you need something tougher. That’s where sheet membranes come in. They can bridge over those bigger cracks and keep water out. But remember, they need a flat surface to stick to.
Speaking of flatness, if your slab’s got some wiggles or dips, you might want to consider self-leveling compounds before applying any membrane. This way, you’ll get a good, even surface for your membrane to adhere to.
Lastly, when it comes to details around penetrations – pipes, drains, that sort of thing – liquid membranes can be a bit trickier. You might need some extra sealants or tape to make sure water doesn’t sneak in. Sheet membranes are easier here, as you can just cut them to fit and stick ’em down.
Compatibility with tile, adhesives, and floor finishes
When working with older slabs, you’ve already picked a membrane that handles the cracks and movement. Now, let’s make sure your tiles, adhesives, and floor finishes play nice together.
First off, check each product’s compatibility list. Manufacturers tell you what works best with their stuff. Ignore this at your peril – I’ve seen too many DIYers waste time and money on incompatible products.
Here’s a quick checklist:
- Check if your chosen membrane is compatible with the tile adhesive you’re using.
- Ensure your tiles are suitable for the substrate (that’s slab talk for ‘surface’).
- Make sure your floor finish (sealer, varnish, etc.) won’t react badly with the tile or adhesive.
If you’re unsure about any of this, contact the manufacturers. They’ll set you straight. And remember, it’s always better to spend a bit more time checking now than fixing problems later.
Installation Best Practices and Common Failure Modes to Avoid
Plan the sequence of steps to avoid trapping debris or creating voids. Aim for consistent coverage and proper overlap where needed. Treat seams or movement joints according to the membrane’s guidelines.
Be mindful of common errors such as improper curing, insufficient bonding, or misalignment with joints. Understanding these pitfalls helps prevent failures down the line.
Detailing around penetrations, drains, and edges
Crack isolation membranes (CIMs) need careful detailing at transitions to prevent stress concentrations and leaks. Here’s how:
Penetrations: Seal around pipes, wires, or other protrusions with the membrane manufacturer’s recommended sealant before applying the CIM.
Drains: Install drain inserts that are compatible with your chosen CIM. Ensure they’re properly sealed and bedded to prevent water from getting underneath the membrane.
Edges: At slab edges, use a flexible edge strip or metal flashing to protect the membrane’s edge and allow for movement without tearing.
Integrating movement joints and perimeter isolation
Existing movement joints in your slab must be honored to prevent cracking. Here’s how to integrate them with your CIM:
Movement Joints: Clean and prime existing joints before applying the CIM. Use a flexible joint sealer or membrane-specific joint tape to seal the joint while allowing for movement.
For new joints, use a sawcut tool to create control joints at regular intervals (usually 10-20 feet apart) before applying the CIM.
Perimeter Isolation: At walls and other perimeter edges, install a flexible edge strip or membrane-specific perimeter isolation system. This allows for slab movement without stressing the membrane or tile.
Testing and Verification After Installation
After installation, perform adhesion checks if included or recommended by the manufacturer. Visually inspect for voids, unbonded areas, or uneven surfaces. Conduct a small-area test or mock-up before proceeding with full tiling.
Document the conditions and any test results to establish a baseline for future maintenance or repairs. This helps verify performance before committing to a full finish.
When and How to Perform Adhesion or Bond Tests
After installing your crack isolation membrane, it’s crucial to ensure it’s properly bonded to the substrate. Here’s when and how to test:
On-site adhesion tests: Some manufacturers recommend simple on-site tests like pull-off tests using a small, hand-held device. This can be done in inconspicuous areas or mock-ups.
When to engage lab testing: If the on-site test results are questionable, or if you’re dealing with critical areas (like heavy traffic zones), consider engaging a lab for more detailed adhesion testing. This might involve sending samples of the membrane and substrate for analysis.
Third-party inspection: For high-stakes projects, hire a third-party inspector to perform adhesion tests. They provide an independent assessment, giving you peace of mind.
Warranties, Documentation, and Manufacturer Sign-Off
Proper documentation is key to maintaining warranties and ensuring future reference. Here’s what you need:
Product data sheets: Keep these for record-keeping and future reference. They contain vital information about the membrane’s performance, maintenance, and compatibility with other materials.
Installation records: Document every step of the installation process. This includes dates, temperatures, humidity levels, and any issues encountered during installation.
Photos: Take before-and-after photos to document the condition of the slab and the membrane’s application. These can be useful for troubleshooting future issues.
Manufacturer or system warranty confirmation: If a warranty is offered, obtain written confirmation from the manufacturer. This might require submitting documentation of the installation process and test results.

Conclusion
The bottom line is simple: a crack isolation membrane can protect and improve an older slab if you approach the work with solid prep, careful selection, and conservative testing. Do the right prep, verify the slab is suitable, and follow the membrane’s instructions to avoid costly failures and keep surfaces safe and durable.
Begin with a practical checklist your hands can follow: assess the slab for moisture and movement, inspect for loose or delaminated concrete, and confirm flatness before choosing a membrane; pick a product that matches the slab condition and your substrate remediation plan; test a small area to confirm adhesion and performance; perform required prep and repair steps, including addressing any cracks or uneven patches; install the membrane following the manufacturer’s guidelines with proper bedding, seams, and protection during curing; and complete verification tests after installation to confirm performance before finishing floors or coverings. Safety first and test small areas before committing to full-scale work, and document conditions so you can adjust if anything looks off.
Avoid these common mistakes: skipping moisture and crack assessment, choosing a membrane that isn’t rated for older concrete, or rushing through substrate remediation and cure times. Never skip the basic safety steps, including proper ventilation, personal protective equipment, and shutting down adjacent work areas to prevent damage or injury. If you’re unsure about slab condition, membrane compatibility, or you see signs of severe settlement, pause and re-check before moving forward.
When in doubt, stop and call a professional if the slab shows unclear movement, widespread existing damage, or your tests don’t meet acceptable results. With careful planning, small-scale testing, and disciplined execution, you can protect your investment and keep the project moving toward a solid, durable finish. Stay focused, follow the steps, and you’ll finish confidently.
FAQ
Is this crack isolation membrane suitable for very old slabs with stubborn cracks?
Crack isolation membranes can help control some movement, but they don’t fix deep settlement or wide cracks. Check the membrane label for max crack width and substrate requirements, and follow the manufacturer’s instructions for old concrete.
For safety, confirm with the product data and your local rules before installing. If in doubt, test a small area first and watch for edge lifting or poor adhesion.
What should I look for on the slab before choosing a membrane?
Ensure the slab is clean, dry, and structurally sound. Look for high moisture, efflorescence, or delamination, and fix those issues per prep guidelines described by the product maker.
If moisture is a concern, check the label or datasheet for any required barriers or primers. When in doubt, consult the installation instructions for your exact scenario.
How do I know if the membrane is failing after install?
Watch for joint edge lifting, bubble formation, or bond failure between the membrane and concrete. Poor prep or over-wetting during application are common culprits.
If you see issues, stop and review the manufacturer’s troubleshooting steps. Rework may be needed if the surface isn’t ready or the product wasn’t applied per spec.
Can I install over old slabs that have minor surface contamination or laitance?
Light surface contaminants can sometimes be addressed with the proper bonding primer and good mechanical profiling. Follow the product’s guidance on acceptable surface conditions and the required profile depth.
If laitance is heavy or you’re unsure, don’t guess. Check the label, and consider additional surface preparation or a compatible primer before proceeding.