
Introduction
A tile leveling system helps you keep tiles flat and evenly spaced while you set them. Use it to hold grout lines steady as you tile, but don’t rely on it alone. Follow manufacturer instructions for setup and removal, and check your local rules.
Decide if you need it based on tile size, surface, and your tolerance for wobble. If you skip it, keep tiles pressed and checked with a level as you go. Always verify alignment before the adhesive sets.
Key takeaways
- Always read manufacturer instructions before starting any wedge/clamp system.
- Align adjacent tiles first; leveling system helps maintain even joints.
- Use system only where flat substrate and proper substrate support exists.
- Check for tightness without over-clamping to avoid tile breakout.
- Remove or consolidate spacers before grout to prevent seams misalignment.
- Keep a clean work area and store components away from concrete dust.
Table of Contents
- Introduction
- Key takeaways
- What a Tile Leveling System Is and Why It Matters
- When to Use a Tile Leveling System — Best Scenarios
- When to Skip a Tile Leveling System — When It’s Unnecessary or Harmful
- Step-by-Step Guide to Using a Wedge/Clamp-Style System Correctly
- Step-by-Step Guide to Using a Screw/Cap-Style System Correctly
- Tools, Materials, and Supplies Checklist
- Troubleshooting Common Problems and Visual Checkpoints
- Finishing: Grout, Seam Alignment, and Quality Inspection
- Conclusion
- FAQ
What a Tile Leveling System Is and Why It Matters
Tile leveling systems are tools that help you hold tiles in place as they set. They work by stabilizing edges and controlling grout lines. You’ll see benefits on certain tile types and layouts, especially when accuracy matters more than speed.
Understanding how they solve common problems like lippage and uneven edges helps you decide when to use them. Check the product label or manufacturer instructions for compatibility with your tile and substrate. Set realistic expectations for your skill level and the tile you’re installing.
Basic components and how they work
A tile leveling system is made up of a few simple parts. Let’s go over them.
The main players are:
- Wedges or Clips: These create the space between your tiles, ensuring even grout lines.
- Caps: They hold the wedges in place and distribute pressure evenly across the tile surface.
- Screws (in some systems): Some systems use screws to adjust spacing. Others rely on wedge-style mechanics, where you tap the wedge with a hammer to create space.
The goal is to create a uniform plane and consistent spacing between your tiles. This results in straight grout lines and no lippage – that’s when one tile sticks out higher than its neighbor.
Common myths and misconceptions
Tile leveling systems are fantastic tools, but they’re not magic wands. Let’s clear up some common misunderstandings.
Myth 1: You must use them for all tiles. Not true! If your substrate is perfectly flat and you’ve got a steady hand, you might not need one. But remember, even the slightest slope or variation can lead to lippage.
Myth 2: They’ll fix a poorly prepared surface. Nope! A leveling system won’t correct major substrate issues. You still need a solid, flat base for your tiles.
Myth 3: They’re only for beginners. Actually, pros use them too. A good tile setter knows when to rely on tools like these to ensure a top-notch finish.
When to Use a Tile Leveling System — Best Scenarios
Use leveling systems for large-format or rectified edge tiles where precision makes a difference. They are also helpful in diagonal layouts and on substrates with any irregularities. In these cases, leveling reduces the risk of grout line misalignment and visible unevenness.
If you’re unsure, review the tile type and substrate conditions on the product data sheet or instructions. Consider the system’s ease of removal and reusability as part of your plan. This helps you decide whether the added step is worth it for your project.
Tile sizes, materials, and edge profiles that benefit most
The size, material, and edge profile of your tiles can greatly affect the outcome. Larger format porcelain, rectified tiles, and thin tiles are more sensitive to lippage.
- Large-format porcelain: These tiles show every imperfection in the substrate. Use a leveling system for best results. Look for tiles rated for large formats. Avoid using on uneven surfaces without leveling.
- Rectified tiles: Their precise edges make lippage more noticeable. A leveling system ensures a consistent, professional look. Specify rectified tiles with matching edge profiles. Avoid mixing different edge profiles.
- Thin tiles: Thinner tiles are more prone to cracking if not installed on a perfectly flat surface. Use a leveling system for better support and adhesion. Look for thin tiles rated for their thickness. Avoid installing on uneven surfaces without leveling.
Substrate and layout indicators that suggest using a system
The condition of your substrate and the layout pattern you choose can dictate whether you need a tile leveling system. Here are some indicators:
Uneven substrate: If your floor or wall has visible dips, high spots, or is out of level, use a leveling system to ensure consistent tile installation.
Floor vs. Wall: Floors require a leveling system more often due to their size and the weight they bear. Walls, especially those with minor imperfections, might not need one.
Layout patterns: Staggered or diagonal layouts can accentuate substrate imperfections. A leveling system helps maintain a consistent grout joint and prevents tiles from leaning.
When to Skip a Tile Leveling System — When It’s Unnecessary or Harmful
Skip leveling for small mosaic tiles or sheets where individual tiles are already consistent. For random-pattern natural stone, leveling can interfere with natural variation and aesthetic. On a perfectly flat substrate, the system may offer little or no added benefit.
If you’re uncertain, compare the substrate tolerance and tile tolerances in the manufacturer guidance. Consider whether the extra work may cause delays or damage to delicate tiles. Use your judgment to avoid overengineering the installation.
Situations with acceptable tolerance for lippage
Not every wall needs a perfect tile leveling system. Some areas can handle a bit of variation without causing issues.
Backsplashes are one such example. Since they’re usually not walked on, slight variations won’t cause tripping hazards. Just ensure tiles are securely attached to prevent them from popping off over time.
Similarly, non-visible walls like those behind appliances or in utility closets can have some lippage. However, always check that the variation isn’t excessive and won’t cause problems when installing fixtures or appliances.
Remember, even in these situations, it’s crucial to check base compaction before tiling. A solid foundation is key to preventing excessive lippage later on.
Risks of overusing or misusing a leveling system
Overusing or misusing a tile leveling system can cause more harm than good. Here’s what you need to watch out for:
Grout Joint Widening: Too much leveler can make grout joints wider, letting in water and dirt. This ruins the look of your tiles and can lead to maintenance issues down the line.
Tile Chipping: If you’re not careful, using too much leveler can cause tiles to chip or crack when they’re installed. Always check base compaction before adding leveler to avoid this.
Misusing a leveling system can also add time and cost to simple jobs. You’ll spend more time mixing, applying, and waiting for the leveler to cure. Plus, if you mess up, you might have to start over, wasting materials.
Step-by-Step Guide to Using a Wedge/Clamp-Style System Correctly
Plan the layout with a dry run and mark reference lines. Place tiles and insert wedges or clamps according to the kit instructions. Apply steady pressure to seat tiles without forcing them out of true.
Keep a consistent bed thickness and check alignment frequently. Remove wedges or clamps at the right time per the guide and clean excess adhesive before it cures. Note any corners or edges that require additional adjustment during grouting.
Step-by-Step Process
The following is a clear, numbered sequence of practical steps to guide you through using a wedge/clamp-style tile leveling system correctly. This process starts with preparation and safety checks, then moves on to the main work, and finishes with cleanup or final checks.
- Preparation: Ensure your substrate is clean, dry, and structurally sound. Check for any high or low spots that could affect your tile layout.
- Layout: Plan your rows carefully, using spacers to maintain consistent grout lines. Start from the center of the wall or floor and work outwards to minimize waste.
- Dry-Fit: Perform a dry run by placing tiles on the substrate without adhesive. This helps you spot any uneven tiles or issues with your layout.
- Main Work: Apply thin-set mortar, following manufacturer’s instructions for consistency and coverage. Place your tiles, then insert wedges or clamps at the desired spacing, ensuring they’re level and even.
- Tighten: Gently tighten the wedges or clamps, applying consistent pressure across all tiles. Be careful not to over-tighten and damage the tiles.
- Check: Inspect your work for any lippage or unevenness. Make adjustments as needed before the thin-set sets.
- Cure: Allow the thin-set to cure according to manufacturer’s instructions, keeping the wedges or clamps in place until it’s fully set.
- Remove: Once cured, carefully remove the wedges or clamps and clean up any excess mortar. Inspect your work one last time for any issues.
Preparation: Layout, Spacers, and Dry-Fitting
Before you start installing tiles with a leveling system, it’s crucial to plan your layout carefully. This ensures consistent grout lines and helps minimize waste.
Start by planning your rows. For walls, begin at the center and work outwards. For floors, start from one corner and work across to the opposite corner.
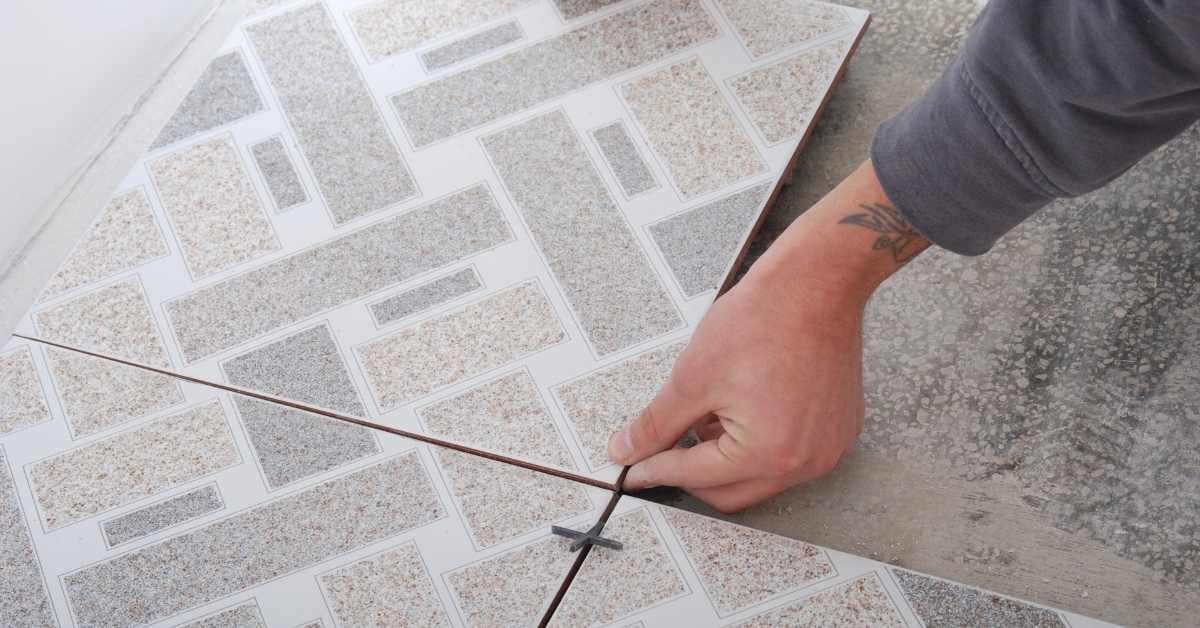
Use spacers in conjunction with your clips or wedges. Spacers ensure consistent grout lines, while the leveling system helps maintain even tile height. Dry-fit your tiles before applying adhesive to check for any unevenness or issues with your layout.
Pro Tip: Use a laser level to ensure your rows are straight and plumb.
Setting, Adjusting, and Curing Considerations
When setting your wedges or clamps, follow a specific tightening sequence to ensure even pressure across all tiles. Start from the center and work outwards, applying consistent pressure.
The acceptable pressure depends on the tile material and thin-set consistency. Too much pressure can damage tiles, while too little may not provide sufficient leveling. Always check manufacturer’s recommendations for your specific materials.
Leave the wedges or clamps in place until the thin-set has fully cured according to the manufacturer’s instructions. This ensures consistent leveling across all tiles. The curing time also depends on thin-set consistency and environmental conditions, so be patient and follow the guidelines.
Pro Tip: If you’re unsure about any aspect of the process, don’t hesitate to consult a professional or contact the manufacturer for advice.
Step-by-Step Guide to Using a Screw/Cap-Style System Correctly
Set up the layout and attach caps or screws as directed by the system. Start with level checks and adjust to maintain flatness across rows. Tighten to the recommended torque range and avoid over-tightening.
Monitor tile squareness during setting and remove caps after the adhesive cures if the kit allows. Document any fixes needed for misalignment and plan grout timing around removal. Be mindful of removal impact on tile edges and substrate integrity.
Step-by-Step Process
The following steps guide you through using a screw/cap-style tile leveling system correctly, from start to finish.
- Preparation: Check your layout, spacers, and dry-fit tiles. Ensure safety glasses are worn.
- Mark the substrate where each cap will go. Use the system’s template or marks on the back of the tiles.
- Attach caps to the marked spots using screws. Hand-tighten only; don’t use a drill yet.
- Begin setting tiles, starting from a corner. Place them on the caps and press down gently.
- Using a drill with a torque-limiting screwdriver bit, gradually tighten each cap in a consistent direction (e.g., clockwise).
- Check levelness using a straight edge or laser level. Adjust as needed by turning caps slightly.
- Once leveled, apply thin-set mortar around the tiles and let it cure according to manufacturer’s instructions.
- After curing, remove spacers and clean any excess mortar.
- Perform final checks for lippage and levelness. If issues arise, consult a professional.
Proper Torque and Leveling Sequence
Gradually tightening caps in a consistent direction helps avoid over-torquing and maintains tile levelness.
Start by hand-tightening all caps to ensure they’re snug but not overly tight. This gives you a starting point for your torque sequence.
Using a drill with a torque-limiting bit, begin tightening each cap in the same direction (e.g., clockwise). Go around the room in a spiral pattern, starting from the center and working outwards. This helps distribute pressure evenly across all tiles.
Be cautious not to over-tighten. If you feel significant resistance or hear grinding, stop immediately. Over-torquing can move tiles and cause lippage.
Removal Technique Without Damaging Tiles
Remove caps and screws before attempting to lift the tile. This prevents pulling adhesive off the back of the tile or scratching edges.
If you used a kick/break-off method during installation, wait until the adhesive has fully cured (usually 28 days) before removal. Then, use a flathead screwdriver to gently pry up one corner of the tile and lift it off.
For unscrewing methods, simply reverse the installation process: loosen caps with a drill in reverse (counterclockwise), then remove screws by hand. Lift the tile carefully.
Avoid pulling upwards on the tile. This can damage the adhesive and leave residue on the back of the tile, making it difficult to reuse or resell.
Tools, Materials, and Supplies Checklist
Keep a sharp tile cutter, appropriate trowels, a rubber mallet, and a spirit level on hand. Have a straightedge for verifying flatness and a basic punch or plier for clip removal. Stock several sets of leveling clips to match tile sizes you’ll be using.
Select the right leveling kit for your tiles, and keep extra adhesive and spacers available. Verify bed thickness guidelines in the instructions and ensure you have a clean work area for accurate results. Check label guidance for any limitations or cautions.
Choosing the right leveling kit and accessories
Use this checklist before you start preparing your concrete mixture to ensure you have the correct leveling kit and accessories for a smooth, even finish.
- Check joint width: Measure the width of your joints. This will determine the size of clips/caps needed in your leveling system.
- Compare systems: disposable vs. reusable: Consider whether you want a disposable or reusable leveling system. Disposable is cheaper but not eco-friendly, while reusable can be more expensive upfront but saves money in the long run.
- Material compatibility: Ensure your chosen leveling kit is compatible with the concrete mix you’re using. Check product labels for compatibility information.
- Clip/cap size: Match the clip/cap size to your joint width. Most common sizes are 1/8″, 3/16″, and 1/4″.
- Leveling system type: Choose between surface leveling (for small imperfections) or self-leveling (for larger, uneven areas).
- Check manufacturer instructions: Always follow the manufacturer’s guidelines for installation and usage to avoid voiding warranties.
- Accessories: edging tools: Ensure you have the right edging tools (like a trowel or float) for your chosen leveling system.
- Avoid common mistakes: Don’t skip checking joint width and clip/cap size. Using incorrect sizes can lead to cracking, uneven surfaces, and expensive rework.
Quick rule: Always match your leveling kit and accessories to your specific project’s needs – wrong choices can lead to costly mistakes.
Thin-set and substrate prep requirements
Use this checklist before mixing thin-set mortar and applying it to your substrate. This ensures a strong bond and prevents common issues.
- Check thin-set bag for open time: Ensure you have enough time to complete the job once mixed. Open time varies by product, so check the label.
- Select trowel notches: Choose the right trowel notches based on tile size and manufacturer recommendations. Common sizes are 1/8″, 3/16″, and 1/4″.
- Inspect substrate for cleanliness: Remove all dirt, grease, and old materials using a wire brush or scraper. A clean surface ensures good adhesion.
- Check substrate moisture level: Use a moisture meter to ensure the substrate is within acceptable limits (usually 12-15% for concrete). Excessive moisture can cause tiles to lift.
- Prime the substrate: Apply a primer specifically designed for your substrate type. This improves thin-set adhesion and prevents moisture from wicking up into the mortar.
- Back-butter thin-set: When applying thin-set, spread some onto the back of each tile using a notched trowel. This ensures full coverage and helps prevent voids.
- Check thin-set consistency: Mix thin-set according to manufacturer instructions. Consistency should be like peanut butter – not too thick or thin. If it’s wrong, remix or add water/sand as needed.
- Inspect substrate for levelness: Use a straight edge and level to check for high or low spots. Fill low spots with thin-set before tiling to ensure a flat surface.
Quick rule: Always follow manufacturer instructions for mixing, application, and open time. Skipping these steps can lead to poor adhesion, tile lifting, and other costly issues.
Troubleshooting Common Problems and Visual Checkpoints
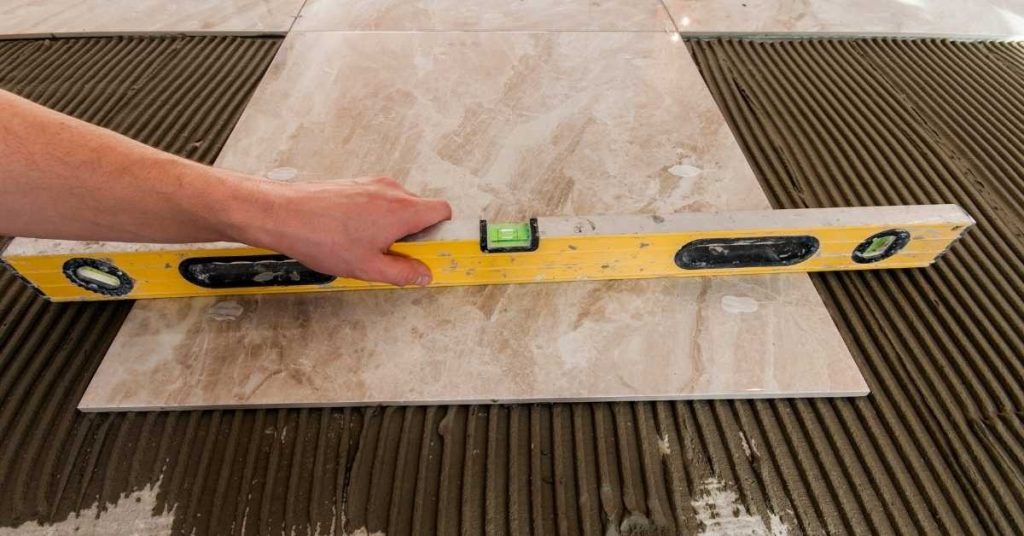
Look for bowing or bowing across a row and address it before grout goes in. If there’s uneven pressure, pause to recheck substrate flatness and clip positioning. Cracked tiles usually indicate excessive weight or improper bed height that must be corrected.
During installation, verify that clips and wedges are seated properly and that thin-set isn’t trapped under tiles. Use a straightedge to confirm flatness and watch for lippage at tile edges as you progress. Plan corrective steps early rather than after setting the grout.
How to fix minor lippage after the adhesive cures
After your tile leveling system has been removed and the thin-set has cured, you may notice some minor lippage. Here’s a checklist to help you address these issues.
- Check for low spots: Look for any areas where tiles are lower than their neighbors. These can be caused by not enough thin-set or improper leveling.
- Grind down high spots: If tiles are higher, use a wet diamond blade on an angle grinder to carefully grind them down. Be sure to wear safety gear and keep the area wet to minimize dust.
- Re-level small areas: For isolated low spots, you can mix up some thin-set and re-level the tile using a trowel. Make sure the tile is level with its neighbors.
- Check grout lines: Ensure that grout lines are even. If they’re not, it could indicate lippage or improper spacing.
- Use grout profiles: For minor lippage, you can use grout profiles to minimize the appearance of uneven tiles. These can be applied after the thin-set has cured but before grouting.
- Avoid over-sanding: Be careful not to sand too much and create a hollow spot or damage the tile surface.
- Inspect edges: Check for lippage along walls, floors, and other edges. These areas can be prone to issues due to their location.
- Recheck after grouting: Once you’ve grouted, recheck your work. Grout can sometimes highlight areas where there’s still lippage.
Quick rule: Always address minor lippage issues before grouting to avoid trapping problems under the grout.
Preventing and addressing tile movement or hollow spots
Tile movement or hollow spots can occur if tiles aren’t properly bedded in thin-set or if there’s an issue with the substrate. Here’s a checklist to help you prevent and address these problems.
- Perform tap test: Before grouting, perform a tap test on each tile using a wooden dowel or similar object. A hollow sound indicates a problem.
- Remove and re-bed tiles: If you find a hollow spot, remove the tile, clean out the thin-set underneath, and re-bed it with fresh thin-set, ensuring full coverage.
- Check substrate: Ensure your substrate is sound and can support the weight of the tiles. If not, you may need to reinforce it before tiling.
- Properly butter tiles: When installing, make sure each tile is fully coated with thin-set. This helps prevent hollow spots and ensures a strong bond.
- Check for voids: Look for any voids or air pockets in the thin-set as you install. These can cause hollow spots and weak bonds.
- Avoid over-compacting: Be careful not to over-compact the thin-set, which can force out the air but also push out the thin-set, leaving a void.
- Use appropriate thin-set: Make sure you’re using the right type and mix of thin-set for your tiles and substrate. This will help ensure a strong bond and prevent movement.
- Allow proper curing time: Let the thin-set cure according to the manufacturer’s instructions before walking on or grouting the tiles to avoid disturbing the bond.
Quick rule: If you find a hollow spot, address it immediately. Ignoring it can lead to further movement and even tile failure.
Finishing: Grout, Seam Alignment, and Quality Inspection
After removing leveling parts, inspect grout joints for consistent width and clean remaining marks off tile edges. Recheck alignment against reference lines and adjust if needed. Clean any residual adhesive or clip remnants before final grouting.
Perform a final flatness check across the installed area and confirm seam alignment with adjacent surfaces. Look for uniform grout depth and even color, and address any high spots or gaps before sealing or curing. Document any issue for future projects or repairs.
Grouting considerations after using leveling systems
Before you start grouting, use this checklist to ensure a smooth and successful process. This is especially important when you’ve used leveling systems to keep your tiles even.
- Check grout type: Ensure the grout is compatible with your tile type and leveling system. Check the product label for recommendations.
- Inspect joint width: Make sure joints are within the recommended range (usually 1/8″ to 3/16″) for your chosen grout. Too wide can cause grout sinking, too narrow may not allow proper adhesion.
- Clean joints: Thoroughly clean joint surfaces using a suitable cleaner or compressed air to remove any debris that could hinder grout adhesion.
- Check clip removal: Ensure all clips from the leveling system have been removed. Any remaining clips can cause voids in your grout lines.
- Timing – wait for initial set: Allow the leveling compound to reach its initial set (usually 15-30 minutes) before applying grout to prevent sinking into unset joints.
- Check humidity levels: Ensure your room’s humidity is within the recommended range (usually 40-60%) for optimal grout curing. Check with a hygrometer if unsure.
- Test grout consistency: Mix grout to a smooth, peanut butter-like consistency. Too thin can cause sinking, too thick may not fill joints properly.
- Check temperature: Apply grout within the recommended temperature range (usually 50-80°F or 10-27°C) for best results and to avoid curing issues.
Quick rule: Always follow manufacturer instructions for your specific tile, leveling system, and grout. This ensures you’re using the right products and techniques for your project.
Final acceptance checklist for homeowners and pros
Use this checklist once the concrete has been poured, leveled, and allowed to cure according to manufacturer’s instructions. It will help you ensure a high-quality finish before signing off on the job.
- Check flatness: Use a straightedge or level to confirm the surface is within acceptable tolerance (FNF 1-4 for residential).
- Inspect seams: Ensure all control joints and expansion joints are clean, uniform, and free of debris. Check they align with each other.
- Verify grout width: Measure grout lines to ensure they’re within the specified range (usually 1/8″ – 3/16″).
- Check for chips or cracks: Inspect the entire surface for any damage. Even small chips can lead to bigger problems over time.
- Uniform plane: Ensure there are no low spots or high points that could indicate improper leveling or settlement.
- Grout color match: Confirm the grout color matches the concrete. Check in different lighting conditions to ensure consistency.
- Check for efflorescence: Look for white powdery deposits, which could indicate moisture issues. If present, consult a professional.
- Test for proper cure: Perform a simple water test by sprinkling water on the surface. It should be absorbed quickly; if it beads up, the concrete may not be fully cured.
Quick rule: Always double-check that all tools and equipment have been removed from the site before signing off. Missing items can cause damage or lead to rework.
Conclusion
Finish with confidence by remembering that proper leveling keeps tiles flat, joints even, and leaks or cracks from tile movement at bay. Safety and a careful approach protect your floors and your time, so take small, deliberate steps and test as you go.
To wrap it up, keep moving in this order: verify the area is clean and dry, set the first row true, place wedges or clamps or caps as directed, tighten gradually and check for warp or lippage, wipe away excess material, and grout after the system seats. If you’re unsure, start in a small area to confirm you’re getting a true surface, then scale up to the rest of the layout.
Common mistakes to avoid are rushing the setup, over-tightening and distorting tiles, and skipping the final inspection. Use steady, incremental tightening, check for even gaps and level after every few tiles, wear eye protection and gloves, and keep a known-good straightedge handy to verify straight lines. If anything feels off, stop, re-check your layout, and don’t force it; safety and quality come first.
If the job involves awkward angles, large spans, or unstable substrates, consider calling a pro rather than pushing through and risking damage or costly fixes. When you’re ready, keep your plan simple, test first, and focus on a solid base—your finished surface should be safe, durable, and ready for grout and sealing. You’ve got this; one careful step at a time leads to a flawless install.
FAQ
How do I decide whether to use a tile leveling system for my project?
Consider the size of the area and the tile thickness. If you’re laying large format tiles or want flat seams across a wide area, a leveling system helps. For small or simple runs, you may get by without it, but check the tile manufacturer’s instructions and local practice first.
What should I double-check before tightening wedges or caps?
Make sure the tiles are fully seated with one edge against the previous tile. Check that the leveling clip sits flat against the tile surface and that there’s no rock or gaps at the joints. If you feel any wobble, stop and re-seat before proceeding.
What are common mistakes that ruin level alignment and how can I avoid them?
Avoid overtightening, which can pinch the thinset and cause lippage. Don’t rely on the system alone; pull a straight edge or use a visible spacer to confirm even joints. Follow the manufacturer’s instructions for system use and remove clamps promptly after the mortar sets if required.
How do I handle a misalignment after setting initial tiles?
Don’t force tiles after they’re set. If you notice high or low spots, remove the offending tile and relevel the area before the mortar cures. Check the surrounding tiles again and re-check with a straight edge to confirm a consistent plane.