
Introduction
Tile spacers, wedges, and leveling systems are tools to keep tiles aligned and at a consistent height while you set them. They each serve different roles in the job, and using the right one helps prevent lippage and misalignment. Trust the product label and manufacturer instructions for how to install and use them on your project.
Spacers keep even gaps, wedges help tighten and pull tiles into line, and leveling systems can lock the height across rows. In practice, pick what fits your tile size and layout, and test on a small section before committing. Always check the kit instructions and any local rules or code requirements to stay compliant.
Key takeaways
- Choose tile spacers, wedges, or leveling systems based on tile size and layout.
- Spacers maintain consistent grout joints, while wedges and systems help flatness.
- Leveling systems reduce lippage but require careful removal after set.
- Always follow manufacturer instructions and local codes for spacing methods.
- Practice on a scrap or small area to avoid costly mistakes.
- Safety: wear eye protection and keep edges guarded during cutting and tiling.
Table of Contents
- Introduction
- Key takeaways
- Quick Overview: Why Spacing and Leveling Matter
- What Tile Spacers Are and How They Work
- What Wedges Are and How They Work
- What Modern Leveling Systems Do Differently
- Direct Comparison: Spacers Vs Wedges Vs Leveling Systems
- Tools and Materials Checklist for Each Method
- Step-by-Step Installation Workflows (Short Guides)
- Common Mistakes and Troubleshooting
- Conclusion
- FAQ
Quick Overview: Why Spacing and Leveling Matter
A consistent grout joint and a flat tile surface are the straightest path to a professional look. Spacers, wedges, and leveling systems all target one outcome: keeping adjacent tiles properly spaced and flush as they set. You’ll use each tool at different stages depending on tile size, adhesive, and your budget.
In practice, spacers support joint width during set, wedges help align edges with some give, and leveling systems actively prevent lippage on large or heavy tiles. Plan to pick one approach based on the tile size, surface, and the speed you want to achieve, while still following the manufacturer instructions for your chosen method.
Common tile installation problems addressed
When tiling, you’ll face common issues like uneven tiles, lippage (where some edges are higher than others), and inconsistent grout lines. These problems can make your finished surface look unprofessional and may even cause long-term durability issues.
Tile spacers help tackle these problems by ensuring consistent grout joint widths. They come in various sizes to suit different grout line requirements, keeping your tiles evenly spaced throughout the installation.
Wedges are useful for larger format tiles or when you need extra support to maintain leveling and spacing. They’re particularly helpful on walls where gravity can cause tiles to shift.
Leveling systems address lippage by ensuring all tiles are flat and even. They sit underneath the tile, supporting it from below to create a smooth, uniform surface.
How choice affects finished look and durability
Consistent grout lines give your tiled area a clean, professional appearance. Tile spacers ensure this uniformity by keeping grout joints even throughout the installation.
Uneven grout lines can draw attention to minor imperfections in the substrate or tiles, making the whole area look less polished. They also make cleaning more difficult as dirt and grime can accumulate in wider or narrower areas.
Flat tile surfaces are crucial for both aesthetics and durability. Leveling systems ensure all tiles are flush with each other, creating a smooth, even surface that’s easy to clean and maintain. Lippage can trap dirt and moisture, leading to grout discoloration or even tile damage over time.
In summary, using the right combination of spacers, wedges, and leveling systems ensures your tiled area looks great and stands up to daily wear and tear.
What Tile Spacers Are and How They Work
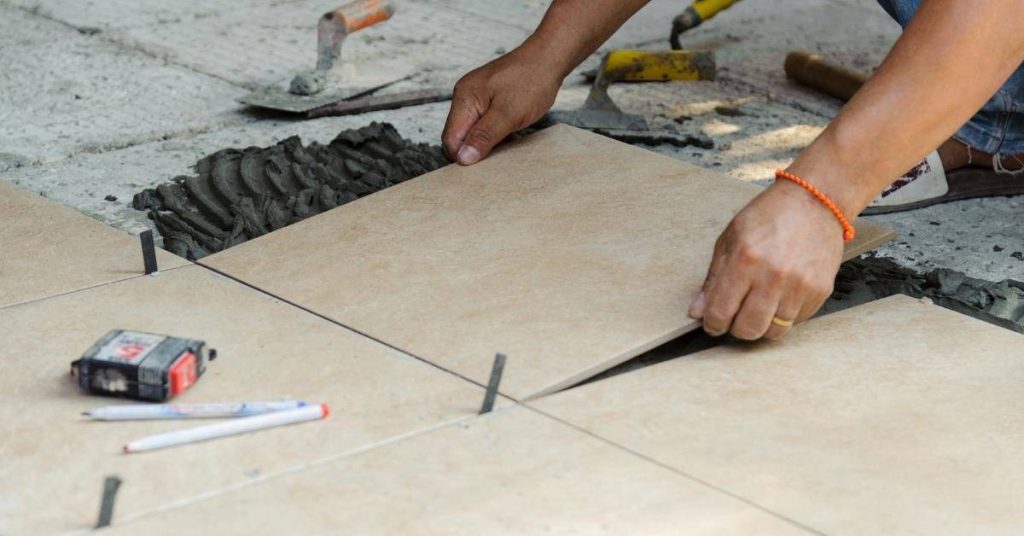
Tile spacers are simple guides that sit between tiles to lock in grout joint width. They come in common shapes like cross and T, and are typically plastic in a range of thicknesses. Sizes and shapes should be chosen to match your expected grout joint dimension and tile layout.
To use them, place spacers at corners where tiles meet, press the next tile into them, and maintain alignment as you set more tiles. After the adhesive cures, you either leave the spacers in place for grouting or remove them as you prefer, following the label guidance. Always verify the spacer type and recommended joint width on the product packaging or data sheet before starting.
When to use spacers (best-case scenarios)
Spacers are your go-to for small format tiles and thinset installations. Here’s why:
Small tiles need consistent grout lines. Spacers ensure that, even if you’re not a pro.
Thinset has some give. So, spacers can handle minor subfloor imperfections without popping out like wedges might.
But remember, spacers aren’t magic. They won’t fix major subfloor issues or prevent lippage on large format tiles.
Pros and cons of spacers
Spacers are simple, cheap, and easy to use. Let’s weigh the pros and cons.
Pros
- Inexpensive
- Easy to use – even for beginners
- Consistent grout lines for small format tiles
- Can handle minor subfloor imperfections with thinset
Cons
- No lippage control – won’t fix out-of-level tiles
- Possible displacement during setting, especially on large format tiles
- Not reusable – wasteful for larger projects
- Limited size options – may not fit all tile sizes
Spacers make sense when you’re on a tight budget, using small format tiles, and your subfloor is in decent shape. But they might not cut it for larger tiles or high-end jobs.
What Wedges Are and How They Work
Wedges are part of a system where a wedge is inserted between tiles and then tightened to tighten the row. This creates stable pressure points that help tiles stay even as the adhesive sets. They are often used with a flange or base piece that guides the tile edge into plane alignment.
Typical workflow: place the wedges as you set each tile, tighten with the included tool or pliers, and monitor the grout line against neighboring tiles. Some wedges are designed to stay under the grout or be removed after curing, depending on the system—check the instructions for removal and reuse guidelines before you start.
Situations where wedges are most effective
Wedges shine in situations where you need fine-tuned control over tile leveling. They’re particularly useful with:
Large format tiles. Wedges help keep these heavy tiles level and prevent lippage.
Uneven substrates. If your floor or wall isn’t perfectly flat, wedges allow you to adjust each tile individually.
DIY installers. Wedges give homeowners more control over the installation process, helping them achieve professional-looking results.
Pros and cons of wedges
Wedge systems offer several advantages but also have some limitations:
Pros
- Reusable: Once you’re done, you can remove the wedges and reuse them on your next project.
- Adjustable: You can fine-tune the level of each tile for a perfect finish.
- Versatile: They work with most clip systems and tile types.
- Easy to use: Even DIYers can achieve professional results with wedges.
Cons
- Time-consuming: Adjusting each wedge takes time, especially on large projects.
- Learning curve: It might take a few tries to get the hang of using them effectively.
- Not universal: They may not work with all clip systems or tile thicknesses.
- Additional cost: Wedges add an extra expense to your installation costs.
Wedges make sense when you want precise control over your tile leveling, and you’re willing to invest a bit more time and money for the perfect finish.
What Modern Leveling Systems Do Differently
Two-part clip-and-cap leveling systems use a clip that sits under the joint and a cap that tightens the tile edge. Snap-off designs let you remove the excess cap after the adhesive cures, leaving a flush surface with minimal lippage. These systems are popular for large-format tiles because they maintain even pressure across the tile face.
With leveling systems, you typically place the clip under the edge of each tile, insert the cap, and snug it to bring the neighboring tile edges to plane. After setting, you snap off the cap or remove the cap and clip according to the system’s guidance, allowing easy cleanup and a consistent joint profile.
Clip-and-cap vs snap-off systems
The two main modern leveling systems are clip-and-cap and snap-off. Let’s compare.
Clip-and-cap: These have a base clip that goes under the tile, holding it up. Then you cap it with another piece on top. They’re reusable, reducing waste. But they take more time to install and remove.
Snap-off: These are one-piece designs that snap onto the tile’s edge. They’re quicker to use but not reusable. You’ll have plastic debris after removal.
Pros and cons of leveling systems
Leveling systems bring benefits and challenges. Here’s what to consider.
Pros
- Precise leveling, reducing lippage.
- Faster installation for large-format tiles.
- Easier to achieve a professional finish.
- Can be reused (clip-and-cap systems).
Cons
- Higher upfront cost compared to spacers or wedges.
- Not always compatible with thin tiles or certain substrates.
- Extra steps and time for installation and removal.
- Plastic debris left behind (snap-off systems).
Leveling systems make sense when you’re working with large-format tiles, want a precise level, and don’t mind the extra cost and effort.

Direct Comparison: Spacers Vs Wedges Vs Leveling Systems
Cost and reuse are common trade-offs: spacers are usually cheaper per joint and often reusable, while wedges or leveling caps add up if used on every joint. Expect that leveling systems require more upfront investment but can save time on large-format runs.
Ease of use and precision depend on the tile size and adhesive. Spacers are simple but less dynamic for alignment; wedges offer mid-range control; leveling systems provide the strongest control for flatness but require following specific workflow and tool use. Always consult the manufacturer instructions for compatibility with your tile size and thickness.
Decision matrix for common scenarios
When choosing between spacers, wedges, and leveling systems, consider these common scenarios:
Small bathroom floors (12″ x 12″ tiles): Spacers are your best bet. They’re quick to use and precise for small areas.
Large-format porcelain (24″ x 48″ tiles): Wedges or leveling systems work well here. They help maintain consistent grout lines across large surfaces.
Walls: Spacers are fine, but consider wedges for vertical installations to ensure stability during installation.
Heated floors: Leveling systems shine here. They allow for precise leveling of tiles over heating elements.
Cost and time tradeoffs
The choice between spacers, wedges, and leveling systems depends on your budget and available time:
Material costs: Spacers are the cheapest. Wedges are mid-range, while leveling systems are the most expensive.
Labor time: Spacers are quick to install but require more precision. Wedges take longer due to their placement and removal. Leveling systems save time by allowing for faster, precise installation.
Spending more saves time or improves quality: If you’re tiling a large area or want a professional finish, investing in leveling systems can save time and improve the final result. For small areas or tight budgets, spacers are sufficient.
Tools and Materials Checklist for Each Method
For spacers, gather a supply of spacers in the typical joint width you’ll use, a level, and a tile-ready adhesive compatible with the spacers. Kneepads and a grout bag can speed up the process after setup. Keep spare spacers handy in case you need to adjust joints mid-run.
For wedges, have the wedge pieces, the tightening tool, and a way to monitor tile alignment as you go. With leveling systems, collect the clips, caps, a rubber mallet or knock-off tool, plus a timer or watch to track cure times. Always verify that the chosen accessories are rated for your tile thickness and size on the packaging or data sheet.
Tile spacer checklist
Use this checklist before you start laying tiles to ensure you have the right spacers and adhesives for a professional finish.
- Spacer sizes: Check you have spacers in the correct sizes. Common sizes are 1/8″, 3/16″, 1/4″, and 3/8″. The size depends on your tile’s width and desired grout line.
- Adhesive type: Ensure you’re using the right adhesive for your tiles. Check the product label or manufacturer instructions to confirm it’s suitable for your tile type (ceramic, porcelain, natural stone, etc.).
- Spacer material: Verify that spacers are made of plastic or rubber. Metal spacers can cause displacement and damage tiles.
- Spacer condition: Inspect spacers for any cracks or damage. Discard any damaged ones to prevent issues during installation.
- Spacer quantity: Calculate the number of spacers needed based on your tile layout and spacer size. Having enough spacers prevents running out mid-installation.
- Adhesive consistency: Check that the adhesive has the correct consistency before use. It should be smooth, creamy, and spreadable. If it’s too thick or lumpy, mix it again or discard if it’s too old.
- Tile thickness variation: Measure a few tiles to ensure they’re within acceptable thickness variations (usually 1/32″ – 1/16″). Significant variations may require additional spacers or adjustments in installation technique.
- Wall/floor preparation: Before applying adhesive, check that the surface is clean, dry, and free of any contaminants. Poor surface preparation can cause tiles to lift or fall off over time.
Quick rule: Always use spacers that are at least half the width of your tile to maintain consistent grout lines and prevent displacement.
Wedge and leveling system checklist
Use this checklist when installing large format tiles or on uneven surfaces to ensure a level and secure installation.
- Clip types: Verify you have the correct clips for your wedge and leveling system. Check the product label or manufacturer instructions to confirm.
- Wedge/cap sizes: Ensure wedges and caps match the size of your tiles. Measure a tile and compare it with the wedge/cap dimensions.
- Cutting/removal tools: Have a suitable wet saw or nippers for cutting clips if needed. Check that your tools are in good working condition.
- Personal protective equipment (PPE): Ensure you have safety glasses, gloves, and ear protection. Quickly check each item before starting work.
- Level: Inspect your level to ensure it’s functioning correctly. Check the bubble at eye level in a well-lit area.
- Trowel: Ensure you have a suitable notched trowel for applying thin-set mortar. Check the trowel size against manufacturer recommendations.
- Thinset mortar: Verify that your thinset is within its usable lifespan and mixed correctly. Check the product label or manufacturer instructions.
- Grout: Ensure you have the correct grout for your tiles. Check the product label to confirm it’s suitable for your tile type and size.
Quick rule: Always double-check that your wedges, caps, and clips are compatible with your chosen leveling system and tile size to avoid installation issues.
Step-by-Step Installation Workflows (Short Guides)
Spacers workflow: start with a level surface and fresh adhesive. Set the first tile, insert spacers at the corners and edges, and place neighboring tiles in line with the spacers. Check alignment frequently and remove or adjust spacers as you go, then grout when cure is reached.
Wedges workflow: place the first tile, insert wedges at the joints, and tighten to bring tiles to plane. Continue building the row, checking for lippage and adjusting as needed, then grout after the adhesive sets. For leveling systems, position the clips under the edges, nest the cap, tighten to the same plane, and repeat across the run; once cured, remove any caps per the system, finish with grout.
Step-by-Step Installation Process
This section guides you through a clear, numbered sequence of practical steps for installing tiles, from preparation to final checks.
- Preparation: Check your tools and materials. Ensure the surface is clean, dry, and free of debris. Safety first – wear gloves and eye protection.
- Layout: Dry-fit tiles on the floor to plan your layout. Start from the center point and work outwards for a balanced look.
- Apply Adhesive: Spread thin-set mortar or adhesive evenly using a notched trowel. Ensure full coverage, checking for any missed spots.
- Install Tiles: Press tiles firmly into the adhesive, following your layout. Use spacers, wedges, or a leveling system as needed. Check flatness and joints regularly.
- Clean Up: Wipe off any excess adhesive with a damp sponge while it’s still wet. Allow the tiles to cure according to the manufacturer’s instructions before grouting.
Fast workflow for spacers
This section outlines a quick, efficient process for installing tiles using spacers.
Start by preparing your bed. Ensure it’s clean, level, and primed if necessary. Lay out your tiles to plan your pattern.
Place spacers between tiles as you install them. This ensures even grout lines. Adjust tiles as needed to maintain a consistent joint width. Once installed, allow the adhesive to cure according to the manufacturer’s instructions before removing spacers and grouting.
Tip: Use spacers of varying sizes for different grout line widths. Check flatness regularly to avoid lippage.
Fast workflow for leveling systems
This section provides a quick guide to installing tiles using modern leveling systems like clip-and-cap or snap-off systems.
Begin by placing clips along the edges and at regular intervals across the floor. Cap or wedge these clips tightly, ensuring they’re secure but not over-tightened.
Install your tiles as usual, following your layout plan. The leveling system will help maintain flatness and even joints. Allow the adhesive to cure according to the manufacturer’s instructions before removing the caps/wedges and clips. Clean up any debris left behind.
Note: Some systems may require additional tools for clip removal. Always follow the manufacturer’s guidelines for best results.
Common Mistakes and Troubleshooting
Avoid over-torquing caps or wedges, which can distort tile edges or crack tiles. If a spacer is left in place, it can cause an uneven joint after grouting. Inspect adhesive coverage; thin or uneven coverage can lead to hollow spots and early failure.
Prevent recurrence by double-checking tile and joint tolerance, cleaning excess adhesive promptly, and following the labeling for remove-ability and reusability. If you encounter lippage, reassess the method and verify that you are within the recommended tile size range for your chosen system.
Fixing lippage and uneven joints after setting
Lippage, where tiles aren’t level, can happen. Don’t panic. First, assess the damage.
For minor issues, use a tile leveling system. Remove excess adhesive, apply the system, and re-level.
For major lippage, you might need to grind down high spots. Be careful not to damage tiles. If grinding isn’t enough, remove and reset those tiles.
Compatibility and measurement pitfalls
Before you start, avoid these common mistakes in selecting spacers or clips.
- Tile rectification: Check if your tiles need rectifying. Spacers won’t work right on rectangular tiles that aren’t square.
- Thickness variation: Tiles can vary in thickness. Measure a few to ensure consistent spacing.
- Spacer size: Select spacers that match your tile size and grout width. Too small, joints will be too narrow. Too large, tiles won’t fit right.
- Clip size: For snap-off systems, clips must fit your tile thickness exactly.
Take these measurements before you start tiling to avoid do-overs.
Conclusion
One core idea to hold onto: choosing the right spacing and leveling approach protects safety, durability, and the finished look, so pick the method that fits your substrate, tile, and room conditions and then stick to it. The goal is a flat, level surface with even grout joints that lasts.
Start by confirming your tile type and substrate, then decide on spacers, wedges, or a leveling system, gather the matching tools, dry-fit the layout and ensure the full workflow is clear, plan the layout and mix the thinset and grout in the correct order, set the tiles with steady pressure, check with a level or straightedge as you go, and allow proper cure time before grouting and sealing. Follow the step-by-step workflows you read, but tailor them to a small section first to verify your method before scaling up.
Common mistakes to avoid include using the wrong spacer size or leaving spacers in place under the tile, skipping a true level check, and rushing the cure or grout work. Safety rules are simple: wear eye protection and gloves, keep your workspace dry to avoid slips, and test a small area before committing to the whole floor or wall to catch issues early.
If you’re unsure about substrate compatibility, a wobble in the plan, or uneven substrate that could trap moisture, call a professional instead of forcing a DIY fix. When you stay focused on proper spacing, leveling, and curing, you’ll finish with a durable surface that looks right and lasts. You’ve got this—start now, verify the basics, and proceed with confidence.
FAQ
When should I switch from spacers to leveling systems for large tiles?
Use spacers for small to medium tiles and plain leveling systems when you need precise height control and faster lippage prevention on large-format tiles. For very large tiles or areas with a lot of movement, a leveling system helps keep edges even as you work. Check manufacturer guidance for your tile size and substrate compatibility.
Can I mix spacer types in the same job?
Avoid mixing spacer types across the same surface. Inconsistent spacing can lead to uneven gaps and unpredictable grout lines. If you start with one method, stay with it for that area unless you have a clear, controlled plan and all related product instructions.
How do I know which spacer or leveling system to buy for my tile size and substrate?
Read the tile size, thickness, and substrate recommendations on the product label or datasheet. Look for sets that specify compatible tile thickness ranges and bonding methods. If you’re unsure, check with the manufacturer or the retailer for guidance specific to your tile and substrate.
How can I spot and fix lippage or uneven edges after setting tiles but before grouting?
Check the surface with a straight edge or a small level across multiple tiles. If you see high spots or gaps under edges, adjust while the adhesive is still tacky or re-temper the area per product instructions. Don’t grout until the surface is flat and a test pass shows no noticeable lippage.