
Introduction
You can pour a concrete slab that aligns with an existing doorway height without creating a trip lip.
The guide walks you through measuring the opening, planning form setup, and making edge and level adjustments so the slab transitions smoothly into the door.
You’ll learn practical steps, common pitfalls, and quick rules of thumb to aim for a clean, safe threshold without added bump hazards.
Key takeaways
- Determine target slab elevation by measuring doorway threshold plus desired slope and thickness.
- Plan graded transitions: maintain one-half inch per foot slope away from doorway.
- Ensure edge treatment uses chamfer or bevel to minimize trip hazard.
- Verify ADA/local codes for thresholds and flush transitions before pour.
- Have all tools ready: screed, bull float, trowels, and compactor.
Table of Contents
- Introduction
- Key takeaways
- Overview: goals, standards, and when to avoid a trip lip
- Planning and measurements: how to calculate target slab elevation
- ADA and local code requirements for thresholds and flush transitions
- Material selection: concrete mixes, additives, and edge treatments
- Tools and materials checklist for a DIY slab pour around an existing door
- Step-by-step pouring method to achieve a flush slab at the doorway
- Techniques to control drainage without a trip lip
- Retrofitting existing thresholds: repair, grind, or level-up options
- Common mistakes and how to avoid them
- Safety, inspection, and acceptance checklist for contractors and DIYers
- Cost comparison: flush slab solutions vs traditional threshold fixes
- Case studies and before/after measurements
- Maintenance, long-term inspection, and when to call a pro
- Practical next steps and trusted sources
- Conclusion
- FAQ
Overview: goals, standards, and when to avoid a trip lip
The goal is to put a flush concrete slab at the doorway so the threshold sits level with the interior floor and there is no trip lip, while still allowing the door to swing and the finish to match the frame. A trip lip is any edge or abrupt plane change that can trip a foot or wheel, and the plan is to eliminate it where possible. ADA/accessible-route intent guides when a seamless threshold is required, using the 2010/2004 framework as the guiding idea without diving into citations.
That means in public or accessible routes, weather-sensitive entrances, and other high traffic areas you push for a seamless threshold, while in some low-traffic or interior situations a small, compliant lip might be allowed. The payoff is safety, improved accessibility, and better weather control, since a flat slab keeps rain and snow from bridging the doorway and reduces tripping risk. Before pouring, do practical checks: confirm door clearance and swing, verify slope and level, ensure drainage, and confirm compatibility with existing door hardware and frames.
What is a trip lip and why it matters
A trip lip happens when the edge of your concrete slab sticks out, creating a small step that can catch someone’s foot. It’s not just an eyesore; it’s a safety hazard that leads to falls and injuries. If you spot one forming during or after pouring, fix it right away.
Common issues from trip lips include tripping accidents in walkways and doorways where people frequently pass. They can also cause damage to wheelchairs, strollers, and even furniture when dragged across the lip.
To avoid a trip lip, make sure your formwork is tight and level before pouring concrete. After the pour, check base compaction around edges to ensure no settlement causes an uneven edge later on. If you’re doing any cutting or finishing work near slab edges, be extra careful not to undercut the concrete.
When you must meet ADA/accessibility standards
If your project is public or commercial, you must follow the Americans with Disabilities Act (ADA) guidelines for accessible thresholds. This means no trip lips higher than 1/2 inch and ramps that aren’t too steep. For private homes, it’s less strict but still a good idea to keep things safe and easy to use.
In public areas like sidewalks or entryways open to the general public, inspectors will check your work against ADA standards. If you’re unsure about compliance, consult local building codes and talk to an inspector before pouring concrete. Don’t risk fines or safety issues by ignoring these rules.

Planning and measurements: how to calculate target slab elevation
Plan for a precise target slab elevation by locking in the doorway threshold, door jamb, and any adjacent finished floors, then measure every thickness that affects the transition. Measure the existing floor finish, underlayment, subfloor, and door sill height, and record tolerances or potential shifts. Decide the final finished floor elevation and pour thickness first, including any beveled edge or ramp needs, so there’s a flush, gap-free transition.
Use a reliable datum and method—laser level, water level, or straightforward line-of-sight leveling—and document reference points across the doorway so you can reproduce the elevation accurately. Work through the height calculation step by step: subtract all finish-thickness components from the desired door clearance, and verify with multiple trial elevations before you commit to a pour. Validate the plan by simulating the pour with a temporary mock-up, checking clearance with a straightedge and feeler gauges, and rechecking any changes to finishes or door components to avoid a costly rework.
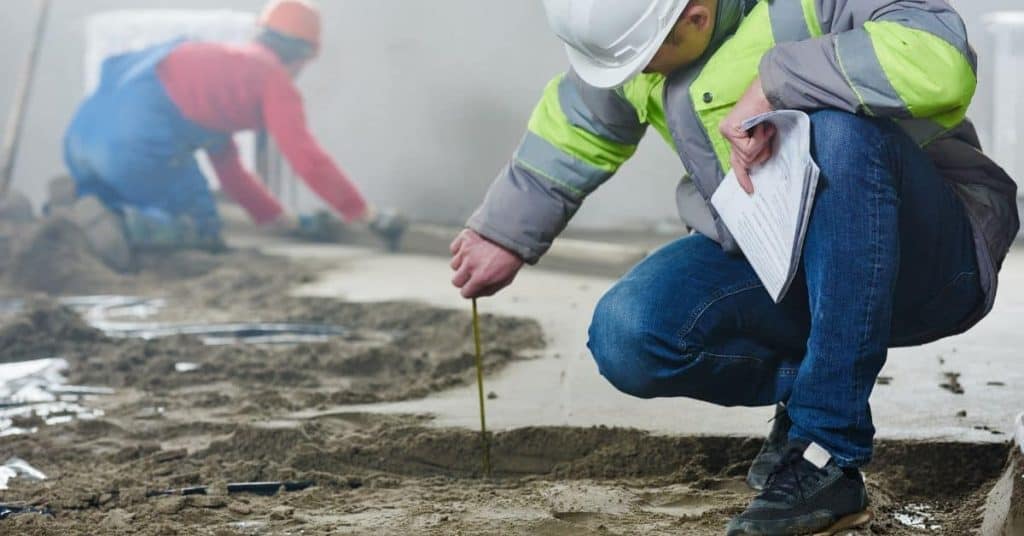
Measuring the door frame and sill height accurately
To get your slab elevation right, start by measuring the existing door frame and sill. Use a level, transit, or laser to find the exact height of the sill. Mark this point clearly with chalk or spray paint so you don’t miss it later.
Once you have your reference points, double-check them against any existing concrete work around the house. This helps ensure everything lines up correctly when pouring new slabs. If there’s a chance the ground isn’t level where you’re working, check base compaction before finalizing measurements.
Record these heights in your notes and keep them handy during construction. Accurate measurements save time and headaches down the road, so take your time getting it right from the start.
Accounting for floor finishes and slope requirements
Before pouring concrete, measure the height of your door frame sill and add in the thickness of any planned flooring materials. For example, if you’re putting down tile or hardwood, factor in their total thickness to set your slab elevation correctly.
Next, consider slope requirements for drainage. A 1/4-inch per foot grade is usually enough to keep water moving without pooling. Check base compaction and ensure it’s level before setting forms to avoid uneven settling later on.
Finally, plan your transitions between different flooring types or rooms with slightly higher elevations. Use threshold plates if needed to maintain a smooth transition while keeping the slope for drainage intact. This prevents water from backing up at doorways.
ADA and local code requirements for thresholds and flush transitions
ADA 2010 standards set clear rules for thresholds and level changes at doorways: a level change becomes a new accessible route if it creates an abrupt rise or drop that disrupts a smooth, continuous floor surface. Distinguish thresholds, flush thresholds, and ramped transitions, and watch for trip lips that must be eliminated or replaced with a compliant flush transition; there are maximum height allowances and tolerance ranges you must stay within. Doors’ maneuvering clearances, width, turning space, and how the door swings impact slab pour height and doorway compatibility are all pieces that influence how you frame and finish the doorway edge.
What this means on the job: if you don’t verify the exact local rules, you risk rework and inspection failures before you pour concrete or install finishes. The practical payoff is a doorway that stays accessible for everyone and avoids trips, jams, or noncompliant heights that slow the project. Use a simple verification plan: consult ADA Standards, your state accessibility code, and your local building department; check inspector checklists; and verify local amendments or overlays that might tighten requirements. Steps: measure and document threshold and floor surfaces, confirm permissible height ranges, confirm door openings and clearances, and confirm that local rules align with or exceed federal requirements before pouring or finishing the slab.
To make this actionable on site, use this concise verification checklist and keep it with your project notes. Record the date of the assessment, the jurisdiction, and the exact measurements.
- Threshold height limit: ensure changes in level are no more than 1/2 inch without a ramp. If a step exists, install a ramp or replace with a flush transition that complies with ADA ramp specifications adjacent to the doorway (include ramp length, slope, and landings in your plan).
- Cross-slope: verify cross-slope across the threshold is less than 1:48 (rise per 48 inches of run). If you see higher slopes, adjust the base or add a proper flush transition with a documented slope that meets ADA guidance.
- Transition edge quality: the doorway edge must be flush or smoothly beveled with no sharp or abrupt drop; radii or bevels should prevent tripping or catching wheels.
- Door swing and clearances: confirm hinge side clearance, door width, and swing direction won’t be compromised by the slab height. Recalculate clearances if the slab pour height changes the threshold envelope.
- Base material and compaction: verify the base course and compaction meet local code requirements before pouring the transition to ensure long-term performance and prevent settling that could violate thresholds.
- Documentation: photograph and timestamp each measurement, include door width, threshold height, cross-slope, and ramp specs if applicable. Attach the measurements to the permit drawings or project binder.
- Verification plan cadence: perform these checks before pouring, upon final grading of the site, and again after the slab is cured but before finishes are installed.
What this means on the job, updated: in addition to keeping you compliant, this practical plan helps you avoid costly rework and facilitates smoother inspections. The emphasis is on documented, site-specific measurements and adherence to a local interpretation of ADA standards. The result is a doorway that remains accessible for everyone and minimizes trips, jams, or noncompliant heights that slow the project. Use a simple verification plan: consult ADA Standards, your state accessibility code, and your local building department; check inspector checklists; and verify local amendments or overlays that might tighten requirements. Steps: measure and document threshold and floor surfaces, confirm permissible height ranges, confirm door openings and clearances, and confirm that local rules align with or exceed federal requirements before pouring or finishing the slab.
To help confirm compliance, contact the local inspector with a stamped plan showing thresholds, flush transitions, and ramp details. If anything is unclear, ask for written guidance or a quick on-site clarification before proceeding. This reduces back-and-forth and keeps your project on track.
Material selection: concrete mixes, additives, and edge treatments
Choose concrete mixes that balance strength, workability, and a clean flush edge for a doorway slab. Use standard residential pours in the 3,000–4,000 psi range and add shrinkage controls and edge reinforcement to keep cracks away and edge finishes true. Expect to use fibers or mesh and compatible admixtures to minimize edge lip and ensure a durable, level edge.
This matters on the job because the wrong mix or reinforcement here means cracks, uneven edges, or a trip lip at the doorway. Target proper water-cement ratio, slump, and workability, and check with field tests for flow and leveling to avoid edge defects. Place around the doorway with careful jointing, timing, and form setup to keep the transition true and the edge flush against the threshold.
Best concrete mixes for thin finishes and ramps
For thin finishes and ramps, you want a high-strength mix that can handle the load without cracking. Look for fiber-reinforced concrete, which adds durability by reducing cracks from shrinkage or impact. If you’re dealing with slopes or need extra wear resistance, consider polymer-modified toppings. They stick better to existing surfaces and are great for slippery areas.
When mixing your own concrete, make sure the base is well compacted. A solid base means less chance of cracks in your finish later on. Also, remember that thin finishes need a finer aggregate mix to avoid any bumps or unevenness once it sets.
If you’re unsure about which additives to use, refer back to earlier sections on material selection. They cover the basics of what each additive does and when to use them. Don’t skimp on quality—cheap concrete may save money upfront but will cost more in repairs down the line.
Edge protection and reinforcing details
When it comes to protecting edges, especially around door frames, you need to get the dowels and rebar placement right. Dowels help tie new concrete pours to existing structures, ensuring a strong bond. Make sure your dowels are long enough to reach into both old and new concrete.
For reinforcing, use wire mesh or rebar at the edges where stress is high. Place it just below the surface of the concrete but above the slab thickness. This helps prevent cracking and keeps the edge strong. Don’t forget to check base compaction before laying any reinforcement; a solid foundation means less chance of cracks later.
Formed edge angles are another way to protect flush edges next to door frames. Use forms that fit tightly against the frame, ensuring no concrete leaks out during pouring. This neat finish not only looks good but also provides a clean line for expansion joints if needed.
Practical edge finishing for high-traffic doorway transitions is essential to prevent trips and damage. Implement the following during setup and finish work:
– Use a chamfer or bevel around the threshold edge to reduce a sharp glaze and create a safer, more durable transition. A 1/4″ to 3/8″ bevel (45-degree) is common for interior doorways; a smooth 1/2″ chamfer may be appropriate for exterior, high-traffic doors, depending on threshold height.
– Install edge forms that are tightly aligned to the door jamb or frame, and seal joints with a compatible sealant or backer rod to prevent water infiltration and edge spalling.
– Plan for a control joint directly at or immediately adjacent to the doorway to accommodate movement and prevent random cracking; spacing should follow standard practice (typically every 8–12 feet along the slab, with the doorway edge treated as a joint line).
– Ensure a consistent, flush reveal by finishing the edge with a straightedge or trowel, then wipe the edge to remove backfill cement and create a crisp line that aligns with the threshold.
– If heavy traffic is anticipated, consider applying a surface treatment or epoxy or polymer-modified overlay within the doorway zone to improve wear resistance and reduce abrasion of the edge over time.
– Schedule curing and protection to avoid edge drying cracks; cover the doorway slab and keep it moist for the recommended curing period, especially along the edge where finish work occurs.
Tools and materials checklist for a DIY slab pour around an existing door
This H2 introduces a practical, door-friendly tools and materials checklist for a slab pour around an existing doorway, covering PPE, site prep, form work, concrete mix specifics, and the gear you need for mixing, placement, and finishing without creating a trip lip. It lists safety gear, measuring devices, form boards, shims, and a plan for temporary bracing to keep forms true to height, plus moisture barrier considerations and bonding agents if you pour onto an existing slab. You’ll see a compact set of concrete materials guidance, from mix type and slump targets to water/cement ratio and any admixtures you might use for workability or set time.
Why this matters: a door-friendly, well-planned checklist prevents common mistakes that ruin door clearances, heights, and the finish, and it keeps your workflow efficient on a busy jobsite. Following it helps you verify doorway height, confirm final slab height matches the existing floor, and perform on-site checks during pour and finish while keeping waste disposal and cleanup simple. It’s blunt, practical guidance you can follow without hunting down tools mid-work, so you stay safe, organized, and on schedule.
Essential hand and power tools
Before you start pouring concrete around an existing door, use this checklist to ensure all your tools are ready for the job.
- Concrete float: Check it’s clean and free of debris. Confirm by running a finger over its surface; should feel smooth.
What goes wrong: A dirty float can mix dirt into the concrete, ruining the finish. - Screed board: Ensure it’s straight and level. Test with a spirit level or laser level.
What goes wrong: An uneven screed will result in an inconsistent slab thickness. - Bull float: Inspect for any cracks or splits. Confirm by flexing the handle; should bend without breaking.
What goes wrong: A cracked bull float won’t smooth out the concrete properly, leading to a rough surface. - Trowel: Check it’s sharp and free of rust. Test by running your finger over its edge; should feel sharp but not dangerously so.
What goes wrong: Dull or rusty trowels leave marks on the concrete that can’t be fixed later. - Jointer tool: Ensure it’s clean and straight. Confirm by laying it flat against a surface; should sit level without wobbling.
What goes wrong: A bent jointer will create uneven joints, causing cracking over time. - Circular saw: Check blade is sharp and properly aligned. Test with a piece of wood; cut should be clean and straight.
What goes wrong: Dull or misaligned blades can cause ragged cuts that weaken the slab’s integrity. - Laser level: Ensure it’s calibrated correctly. Confirm by setting up on a flat surface; laser line should remain steady without drifting.
What goes wrong: An inaccurate laser level will result in uneven concrete, causing structural issues later. - Plate compactor: Check the plate is clean and free of debris. Test by running it briefly to ensure smooth operation.
What goes wrong: A dirty or jammed compactor won’t properly compact the concrete, leading to weak spots in the slab.
Quick rule: Always have your tools ready and tested before you start pouring; a few minutes of prep can save hours of rework.
Materials and consumables
This checklist helps you verify all materials are ready before pouring concrete around an existing door.
- Concrete mix: Confirm quantity matches your pour volume. Check for proper slump (should be 4-5 inches). Skip this: Risk of poor workability and weak slab.
- Admixtures: Ensure correct type and amount for weather conditions. Mix according to manufacturer’s instructions. Skip this: Can lead to improper curing or cracking.
- Bond break/adhesives: Apply evenly around door frame edges. Check no gaps where concrete will meet existing slab. Skip this: Concrete may bond improperly, causing cracks.
- Expansion joint material: Place correctly at specified intervals to prevent cracking. Confirm proper depth and width. Skip this: Can lead to large cracks or uneven settling.
- Curing compound: Apply evenly immediately after concrete placement. Check for uniform coverage without pooling. Skip this: Concrete can dry too quickly, leading to poor strength.
- Sealers: Choose appropriate type based on slab use and climate. Test small area first for compatibility. Skip this: Can result in premature wear or discoloration.
- Concrete bags or ready-mix truck: Ensure delivery time matches your pour schedule. Check for correct mix design. Skip this: Delays can cause concrete to set too quickly, leading to wasted material.
Quick rule: Always double-check materials before starting the pour to avoid costly mistakes.
Step-by-step pouring method to achieve a flush slab at the doorway
Set a precise target height at the doorway by tying the slab to the door jamb or threshold and deciding if the threshold must be modified to stay flush. Plan the forms, shoreline marks, shims, and adjustable screed rails so the pour height lands exactly at the doorway edge and slopes away for drainage. Pour in a controlled sequence, place concrete up to the edge, and use a two-direction screed if needed, then feather the edge with a bull float and finish with a light trowel to avoid a raised lip at the threshold.
Edge protection matters: cover the doorway frame, prevent overfilling under casings, and install a thin wedge or beveled edge to reduce trip hazards. Curing is the other half of the job—keep moisture in with plastic sheeting or a curing compound and protect the edge until set. This method saves trips, creates a seamless transition, and keeps the doorway flush with adjacent floors for a safer, more durable entry.
Step-by-Step Pouring Process
This sequence will guide you through pouring concrete to achieve a flush slab at your doorway, ensuring a seamless transition and proper alignment.
- Action: Start by pouring the concrete around the edges of the doorway first. Reason: This sets the level for the rest of the pour. Check: The edge should be straight and even with no gaps or high spots. Stop & Call Pro: If you notice significant unevenness, it’s a sign to seek professional help before proceeding.
- Action: Use a screed board to level the concrete across the doorway area. Reason: This ensures uniform thickness and smooth surface. Check: The surface should be flat with no dips or bumps, matching your edge pour height. Stop & Call Pro: If you can’t achieve a straight line after several attempts.
- Action: Trowel the concrete to finish it smoothly and remove any small imperfections. Reason: This gives the slab its final look and feel, making it safe for use. Check: The surface should be free of cracks or holes, feeling smooth underfoot. Stop & Call Pro: If you notice large cracks forming during this step.
- Action: Install expansion joints around the edges to prevent cracking due to thermal changes. Reason: This is crucial for long-term durability and maintenance of your slab. Check: The joints should be properly cut, clean, and aligned with the doorway edge. Stop & Call Pro: If you’re unsure about proper joint placement or depth.
- Action: Allow the concrete to cure for at least 24 hours before walking on it. Reason: Proper curing ensures strength and longevity of your slab. Check: The surface should be firm but not hard enough to leave marks from light pressure. Stop & Call Pro: If the concrete appears soft or spongy after 24 hours.
Pro tip: Always keep a wet sponge handy during troweling to smooth out any minor imperfections without overworking the surface and causing cracks.
Site prep and forming against the existing threshold
Before you start pouring, make sure to remove or protect your existing door threshold. If it’s wood, take it out and set aside; if metal or concrete, cover it with plastic sheeting to keep it clean during the pour.
Next, form up against the jambs using 2x4s nailed securely into place. Make sure these forms are level and square to ensure your new slab will fit flush. Don’t forget to check base compaction before you start pouring; a weak foundation means a wobbly slab later on.
Once everything is set up, clean the area thoroughly where the concrete will meet the existing structure. This helps with bonding and prevents any air pockets or contamination that could weaken your new slab.
Pouring, screeding, and finishing near the door opening
Once you’ve got your forms set up against the existing threshold, it’s time to pour concrete around the doorway. Pour in small batches, keeping an eye on how the concrete fills the space without overloading the area. Use a straight edge or screed board to level the surface to your target elevation right next to the door frame.
When you reach the door opening, tool the edge of the slab with a float or trowel for a clean line that matches up nicely with the existing concrete. This helps prevent water from pooling and keeps things looking neat. Be careful not to create any ridges at the edge; instead, feather your finish into the frame so it blends seamlessly.
Finishing near doors is tricky because you want a smooth transition without damaging the door frame or leaving excess concrete around the edges. Take your time here, and if you’re unsure, step back and look from different angles to ensure everything lines up right before moving on.
Curing and protecting the new flush edge
After pouring your concrete slab, curing is crucial to prevent cracking and ensure durability. Start by applying a moist cure, which means keeping the surface damp for at least seven days. You can use plastic sheeting or burlap soaked in water.
Avoid using de-icing salts near the new concrete as they can damage it. Instead, opt for sand or calcium chloride if you need traction on icy surfaces. Once the slab is cured and set, protect the flush edge with a temporary barrier to prevent any settlement from foot traffic or materialsHTMLHTML
html
Curing and protecting the new flush edge
After pouring your concrete slab, curing is crucial. Use moist cure, keeping it damp for at least seven days with plastic sheeting or burlap.
Avoid de-icing salts near the new concrete; they can damage it. Opt for sand or calcium chloride instead if needed. Protect the flush edge once set to prevent settlement from traffic or materials.
Techniques to control drainage without a trip lip
Keep surface water moving away from the doorway with a subtle cross-slope toward the exterior and a gentle longitudinal fall that directs runoff out, not toward the sill. Use concealed channels or trench drains where needed, and place grates and subgrade work so the drain stays hidden yet effective, with no raised lip to trap water. Add controlled weep gaps at joints or threshold areas and install compatible threshold flashing to seal the interface and prevent edge settling that creates puddles.
This approach avoids a flood-prone edge and makes a flush slab practical for daily use, especially at doorways that see rain and foot traffic. Plan the details in advance, verify slopes on site, and finish with proper flashing and sealant to reduce maintenance and water damage. If you skip the concealed drain or gaps, you’ll fight moisture, edge settling, and a progressive trip lip that makes entry awkward.
Designing a gentle slope that remains ADA-friendly
When setting up your concrete slab, aim for a slope of 1/4 inch to 1/2 inch per foot. This keeps water moving without creating tripping hazards. For doorways and thresholds, the cross-slope must not exceed 1:48, meaning no more than 1 inch drop over 48 inches.
To transition slopes smoothly around doorways, start your slope at least three feet from either side of the doorway. Use a straightedge to ensure you maintain this gentle angle as you approach the threshold. If your design needs a steeper slope near the door, create a small ramp with a minimum length of 6 inches and no more than a 1-inch rise.
Check base compaction before pouring concrete to ensure your slopes stay in place over time. Loose soil can cause settling that ruins your carefully planned slope angles, leading to water pooling or uneven surfaces.
Drain and waterproofing options at flush thresholds
When dealing with flush thresholds, you need to ensure water doesn’t sneak in. Linear drains are a good choice as they sit right on the surface without causing tripping hazards. Make sure your base compaction is solid, or else the drain won’t work properly.
Channel drains can also be used but require careful installation to avoid leaks. You’ll need to use membrane turn-ups around the edges to direct water away from the building. Don’t forget door sill flashing; it’s a must-have for preventing water infiltration under doors.
Making sure your waterproofing is top-notch at these points can save you big headaches later on. Remember, proper installation and maintenance are key—no shortcuts here!

Retrofitting existing thresholds: repair, grind, or level-up options
This section covers retrofit options for existing thresholds, including removing and replacing the threshold, grinding down lips, pouring a leveling screed, or raising the interior floor, and it weighs each approach against door swing, moisture, substrate, and weather sealing. You’ll see clear pros and cons for cost, time, durability, maintenance, and accessibility, so you can pick the safest, most reliable path without creating new hazards. The goal is to keep the transition smooth and compliant, with a plan that prevents trips and drafts while preserving operation.
Plan to identify the threshold type, height, and material, and measure clearances around the jamb to judge feasible options. Evaluate each retrofit pathway for compatibility with the door, substrate condition, moisture, and load zones, and note structural or moisture risks like slab thickness, vapor barriers, or crack potential. The right sequence matters: prep and removal, surface prep, method-specific work, edge finishes, and curing or settling timelines, all while watching for ADA/IBC implications and ensuring a seamless, ramp-friendly, lip-free transition. This matters because a poorly chosen method can cost more, loosen seals, invite moisture, or create a new trip hazard that defeats the upgrade.
Grinding and smoothing existing lips safely
When dealing with old thresholds, grinding can be a quick fix for metal or masonry lips that are uneven. But before you start, check base compaction. If the concrete is weak or has cracks, grinding won’t help; it’ll just expose more problems.
Use a wet grinder to avoid dust and keep things safe. Wear protective gear like goggles and a mask. Don’t forget to cover nearby surfaces with plastic sheeting to protect them from flying debris.
Grinding is not a magic wand. If the lip is too thick or uneven, you might need to level up instead of grinding down. Grinding should be your last resort if there’s no other way to get that smooth transition for your door.
Leveling up versus lowering—tradeoffs and when each is best
Raising your interior floors to fix a threshold issue can be easier than digging out the exterior slab, but it comes with its own set of challenges. When you level up, you’re essentially adding more material on top of your existing floor, which means dealing with things like adjusting door frames and ensuring that new flooring materials match or integrate well with what’s already there.
If you opt to lower the exterior slab, it’s a bigger job. You’ll need to break up concrete, dig out soil, and pour new concrete at a lower level. This approach can be more costly due to labor and materials but might be necessary if your existing slab is too low or has drainage issues.
When deciding between the two, check base compaction for any new work you do. If you’re leveling up inside, make sure the floor joists can support the added weight. For lowering outside, ensure proper grading to prevent water from pooling around your foundation.
Common mistakes and how to avoid them
Common mistakes kill slabs and create trip risks. Verify doorway head clearance and edge height, and plan pour depth so no raised lip forms. Use straight forms, compact thoroughly, cure properly, and slope away from the doorway to prevent cracking and pooling.
This matters because uneven elevations, poor compaction, and bad drainage lead to cracking, settling, and water damage. Planning subgrade, forms, joints, and finish early keeps you from rushing edge work at the end. Follow a simple check plan on every pour so you stay ahead of cold joints, wind drying, and debris near the threshold.
Mistakes in elevation calculations
Avoid these common errors to ensure your concrete pour is level and true.
- Incorrect grade slope: This can lead to water pooling or improper drainage. Always double-check the site’s natural slope before starting.
- Miscalculating form height: If forms are too high, you risk over-pouring; if they’re too low, concrete may spill out. Use a level and verify your measurements against existing structures.
- Ignoring elevation changes: Small rises or drops in the ground can cause uneven pours. Walk the site with a laser level to spot these changes early.
- Failing to account for settlement: Concrete settles over time, so plan for it by pouring slightly higher than your final grade needs.
Take the time to verify your elevation calculations before you start mixing concrete. It’s a small step that can save big headaches later on.
Mistakes in edge finishing that create a hidden trip hazard
Edge finishing is crucial for safety and aesthetics. Avoid these common mistakes to keep your concrete job site safe.
- Over-troweling Edges: This creates subtle lips along the edges, which can be tripped over. Stick to a
- Incorrect Jointing Placement: Placing joints too far from corners or edges leads to uneven curing and potential trip hazards. Follow proper joint spacing guidelines.
- Uneven Curing: Inconsistent curing can cause the concrete edge to rise slightly, creating a hidden lip. Ensure even moisture and temperature control during curing.
Double-check your edges for smoothness and consistency to prevent trip hazards. A little extra care goes a long way in safety.
Safety, inspection, and acceptance checklist for contractors and DIYers
Safety during the pour is non‑negotiable, and your final walkthrough should cover PPE and lockout/tagout for nearby utilities, eye/ear/respiratory protection, fall protection if you’re working near drops, and a live‑load safe work zone around the pour; verify doorway clearance, formwork height, proper shimming and support, and temporary barriers to keep bystanders away. You must document measurements with a pre‑pour log that records slab thickness, door threshold height, edge distances, and cross‑checks level and plumb against specs, all while keeping a clear, visible record for inspectors and future reference. Plan the pour sequence to avoid trip lips, ensure proper vibration and compaction, and finish the edges or beads to ADA‑like accessibility standards if required, so nothing catches a toe or trips a wheel during use.
This matters because a thorough checklist reduces surprises for inspectors and DIYers alike, clarifies expectations, and helps you spot issues before they become costly repairs or safety incidents; a well‑documented process also speeds sign‑offs, photos, and any needed adjustments after the pour. Post‑pour steps matter too: allow surface set time, apply proper curing methods, verify door clearance after set, and conduct a final walkthrough for trip hazards and doorway interoperability to ensure the space remains safe and functional. By following these checks, you protect people, protect the work, and avoid laments about weak edges, cracks, or misalignment that can derail a project later.
On-site safety items during pour near an entryway
Use this checklist when pouring concrete close to a building’s entrance. It helps keep the site safe and prevents damage.
- Set up barriers: Place cones or tape around the work area. Check that they are clearly visible from all directions. Skip this, and you risk visitors tripping over the wet concrete.
- Fall protection: Ensure scaffolding is stable and railings are in place if working at heights. Test by walking on it to confirm stability. No rails mean a fall hazard for workers.
- Concrete splash shields: Install plastic or cardboard barriers around doors and windows. Confirm they extend 2 feet above the pour height. Splash can ruin finishes if not protected.
- Entryway access: Keep entryways clear of equipment and materials. Walk through to ensure no obstructions block passage. Blocked paths lead to accidents.
- Wear PPE: Ensure everyone wears hard hats, gloves, and safety boots. Check by visually inspecting each person entering the work area. No PPE means unprotected workers.
- Concrete truck route: Plan a clear path for concrete trucks to avoid entryways. Walk through the planned route to confirm it’s safe and wide enough. Trucks blocking paths can cause delays and damage.
- No smoking area: Post no-smoking signs near the pour site. Place them at least 20 feet away from concrete trucks. Smokers near wet concrete are a fire risk.
- Water supply: Have water hoses ready for emergency cleanup and cooling of hot concrete. Test by turning on a hose to ensure it works properly. No water means no way to cool down or clean up spills.
Quick rule: Keep entryways clear, protected, and safe at all times during the pour.
Inspector-ready documentation and measurement checklist
This checklist helps you gather all necessary documents and measurements before your concrete work is inspected.
- Photos of site: Take clear photos showing the entire pour area, including any adjacent structures. Confirm by reviewing them for clarity and completeness.
- As-built elevations: Measure and record the final height of poured sections compared to your original plans. Check with a level or laser tool.
- Slope measurements: Use a slope gauge or string line to measure slopes in drainage areas. Confirm by ensuring water flows away from structures.
- Material data sheets: Collect and review material certificates for concrete, rebar, etc., showing compliance with building codes. Verify that all required documents are present.
- Reinforcement layout: Document the placement of reinforcement bars (rebar) as per your plans. Confirm by comparing to your drawings.
- Concrete cover measurements: Measure concrete cover over reinforcing steel and confirm it meets code requirements for durability and corrosion resistance.
- Formwork inspection: Check that formwork is properly braced, aligned, and watertight. Confirm by walking around the perimeter to ensure stability.
- Expansion joint locations: Mark and measure where expansion joints should be placed according to your design. Verify with a tape measure against your plans.
- Drainage system installation: Ensure all drainage pipes are correctly installed and connected to the storm sewer or other outlet. Confirm by tracing water flow paths.
Quick rule: Always document everything as if you were leaving for a week—nothing should be left to guesswork when the inspector arrives.
Cost comparison: flush slab solutions vs traditional threshold fixes
Cost-wise, a flush slab pour uses more upfront material and labor than a traditional threshold fix, including concrete, rebar or welded mesh, forms, a vapor barrier, and surface finishing, but it can pay off later with lower maintenance and smoother accessibility. You must account for site specifics like doorway width, slab thickness, subgrade prep, drainage, and how well the new slab integrates with existing flooring or thresholds, because these details drive both cost and the chance of cracking or settlement. Your plan should also include time estimates, potential permit or inspection steps, and the risk of hidden costs from moisture issues or trial pours that can derail a DIY schedule or force contractor delays.
Why it matters to you on the jobsite is simple: long-term costs come from sealing, patching, joint care, and any future changes for accessibility, plus periodic maintenance that a flush pour might reduce compared with retrofitting a threshold. A clear view of the timeline, contractor availability, and DIY pace helps you decide when to pour now or schedule a more involved install, and it flags high-risk moves like inadequate subgrade or poor moisture control that lead to bigger fixes later. Expect a practical price range and a break-even sense for when flush slabs become cheaper than threshold fixes, with scenario tips for new door heights, retrofit constraints, and ADA considerations to guide your planning.
Typical material and labor cost ranges
The materials you choose for your flush slab solution can significantly impact both the durability and appearance of your doorway. Opting for quality over cheap alternatives will save you time, money, and headaches in the long run.
- Type N mortar: Used to set bricks or stones around doorways. Look for a high-strength class like ASTM C270 Type N. Good for setting up your flush slab edges without compromising structural integrity. Avoid using cheaper mortars that lack durability, as they can crack and stain over time.
- Concrete mix: For filling gaps or leveling the floor around doorways. Choose a high-strength concrete with a minimum compressive strength of 3000 psi for longevity. Mixing it on-site is cheaper but requires precise water ratios to avoid weak spots. A ready-mix truck might be necessary for larger jobs.
- Rebar: Reinforces the slab and prevents cracking. Use #4 or #5 rebar spaced 12 inches apart in a grid pattern. Cheaper alternatives like wire mesh won’t provide the same level of reinforcement, leading to cracks over time.
- Epoxy grout: Fills small gaps between concrete slabs for a seamless look. Ensure it’s acid-resistant and non-yellowing. Use this only in areas where aesthetics are crucial; otherwise, regular mortar is fine.
- Concrete sealant: Protects the slab from water damage. Look for one that dries clear and has UV protection to prevent fading or discoloration. A cheaper option might save money upfront but will need frequent reapplication due to poor durability.
- Grinding machine: For smoothing out rough edges after pouring concrete. Renting a professional-grade grinder is more efficient than using hand tools, especially for larger projects. Ensure it’s powerful enough to handle the job without overheating or wearing down too quickly.
- Sand and gravel: Used as aggregate in homemade concrete mixes. Choose clean, angular sand and crushed stone for better bonding and strength. Mixing your own can be cheaper but requires precise ratios and quality control.
- Concrete sealer spray: Quick-drying option for sealing large areas quickly. Look for one that’s breathable to prevent moisture buildup underneath the slab. Avoid using cheap sealers as they may peel off or yellow over time, ruining your work.
- Screed board: For leveling concrete during pouring. Use a straight and sturdy 2×4 or aluminum screed board. Cheaper alternatives might bend or warp under pressure, leading to uneven surfaces.
Pro tip: Always store materials like mortar and concrete in dry conditions to prevent moisture damage before use. Mixing too much at once can lead to waste; mix smaller batches as needed for the job.
Long-term cost and liability considerations
When you go with a flush slab solution, you’re not just saving on materials and labor upfront. You’re also cutting down on future maintenance costs by reducing trip hazards. A smooth transition between slabs means fewer chances of someone tripping and getting hurt. That’s less money spent on repairs and legal fees if something goes wrong.
Plus, making sure your property meets accessibility standards is not just a good idea—it’s the law in many places. If you have steps or high thresholds that don’t comply with local building codes, you could face hefty fines or lawsuits from people who say they were injured because of it. A flush slab setup helps keep you out of legal trouble and shows your neighbors and visitors that safety is a top priority.
Remember to check base compaction when setting up your new slab. If the ground isn’t solid enough, even a well-designed flush slab can sink or crack over time. This weak foundation will cost you more in repairs down the line and could lead to liability issues if someone gets hurt because of it.
Case studies and before/after measurements
Two brief real world cases illustrate how to close the door height gap and remove the trip lip, using clear targets for door operation, slab elevation, and weather exposure while noting space for formwork and any constraints. Each case follows a simple workflow: establish the exact problem (target door height, existing sill and slab edge, trip lip presence), pick a practical solution (pour height, grinding, or ramped transition), and record exact measurements with a laser level and measuring rod to build a reliable before/after baseline.
These examples emphasize repeatable steps, from site conditions to installation and curing time, with clear numeric results showing initial elevations and the new elevations that eliminate the lip. The approach helps DIY readers judge material choices, formwork methods, and the tradeoffs between speed, cost, and long term durability, while giving practical checks and simple validation tips to verify clearance after settling and to spot early signs of movement or failure. It matters because a precise, documentable workflow reduces guesswork, speeds up approvals on small jobs, and gives confidence that the finished transition will stay functional for years.
Residential retrofit example
We tackled a tricky residential project where the front walkway was uneven, causing tripping hazards. The original concrete had settled over time due to poor base compaction and soil erosion under the slab. To fix this, we removed the old concrete, checked base compaction, and poured new concrete with rebar for added strength.
The elevation changes were modest but crucial—about 2 inches across a span of 10 feet to level out the walkway. We used a high-quality concrete mix designed for residential use and ensured proper curing time before allowing foot traffic again. The result was a smooth, safe path that improved curb appeal.
Before the retrofit, we measured tripping hazards with a slope gauge; after completion, the flushness was within acceptable limits per building codes. This project shows how small adjustments can make a big difference in safety and aesthetics for your home’s exterior.
Commercial ADA compliance example
We tackled a commercial doorway project where we had to bring an existing entrance up to ADA standards. The first step was getting the permit interaction right with the city, which included submitting detailed drawings and measurements of our proposed changes.
During construction, we focused on making sure the ramp slope didn’t exceed 1:12, and that the handrails were at the correct height. We also paid close attention to the surface texture for slip resistance. After completing the work, the inspector gave us some feedback on minor adjustments needed before final approval.
Once everything was squared away, we took final compliance measurements, which included checking door width and clearance space inside the building. This project taught us that attention to detail is crucial for passing inspections and ensuring safety for everyone using the entrance.
Maintenance, long-term inspection, and when to call a pro
Keep the doorway tight and level by focusing maintenance on flush thresholds and the doorway jamb. Inspect for loose or raised concrete, micro-voids under the sill, debris, moisture intrusion, and any wear that could create a trip lip or hinder door operation. Document cosmetic and structural concerns separately, and set a simple routine for sealant or overlay checks and seasonal visits.
Run a steady check for settlement and cracks using a straightedge and level to confirm the slab stays level with the threshold, and track horizontal displacement or widening of cracks over time. Verify drainage around the doorway so the slab slopes away and water does not pool, and watch for surface scaling or joint separation that worsens moisture or ice problems. If you see significant vertical movement, misalignment that breaks the seal, large cracks, or drainage needs beyond routine care, call a pro, and keep a clear restoration plan with photos and measurements.
Routine checks and quick DIY fixes
This checklist helps you catch small issues before they become big problems. Use it every six months or after heavy weather.
- Check cracks: Look for hairline cracks, especially around corners. Confirm by running your finger over the surface to feel any breaks. Skipping this can lead to water seeping into the concrete and causing more damage.
- Inspect joints: Check expansion joints are clean and free of debris. Run a straightedge across them to ensure they’re level with the surrounding area. Overgrown joints let in moisture, leading to spalling.
- Test for water leakage: Pour water into any visible cracks or joints. Confirm if it soaks in slowly or runs off the surface. Water soaking in can weaken concrete over time.
- Seal joints: Re-seal all expansion joints with a good quality sealant, especially after cleaning out debris. Confirm by checking for clean edges and no gaps around the joint. Unsealed joints allow water to enter and cause structural damage.
- Check surface levelness: Use a straightedge across your driveway or patio. Look for dips or bumps that indicate uneven settling. Uneven surfaces can lead to tripping hazards.
- Evaluate concrete edges: Check the edges of sidewalks and driveways for cracks or spalling. Confirm by looking at the corners where water tends to collect. Damaged edges weaken structural integrity over time.
- Look for efflorescence: Inspect surfaces for white, powdery residue that indicates salt deposits. Clean it off with a stiff brush and mild acid solution if necessary. Leaving efflorescence can cause surface deterioration.
- Check drainage systems: Ensure water flows away from the house or building. Confirm by observing rainwater runoff patterns. Poor drainage leads to pooling, which damages concrete over time.
- Maintain cleanliness: Keep your concrete surfaces free of dirt and debris. Sweep regularly with a stiff broom. Dirt buildup can trap moisture and cause damage.
- Inspect for spalling: Look for small pieces breaking off the surface, especially around corners or edges. Confirm by touching the area to see if it’s soft or crumbling. Spalling weakens concrete over time.
- Evaluate walkway slopes: Ensure walkways slope away from buildings at least 1/4 inch per foot. Use a level to check. Improper slopes lead to water pooling and damaging surfaces.
- Check for cracks near doors: Look around door thresholds for any signs of cracking or lifting concrete. Confirm by checking if the threshold is level with the surrounding area. Cracks here can cause tripping hazards.
Quick rule: If you see it, fix it—don’t wait for problems to grow.
When to hire a structural engineer or contractor
This checklist helps you spot serious issues that need professional attention. Use it when your routine checks reveal something out of the ordinary.
- Excessive settlement: Check if concrete surfaces are uneven, with noticeable dips or cracks at corners. Measure changes over time; significant shifts mean structural problems.
- Repeated cracking: Look for new cracks forming in the same spots as old ones. If they appear after heavy rain or freeze-thaw cycles, it’s a sign of underlying weakness.
- Drainage failures: Water pooling around concrete structures is bad news. Check if water drains away from your foundation within 24 hours; standing water can cause major damage.
- Cracking near load-bearing walls: Any cracks wider than a credit card or those that run vertically through walls should be checked by an expert.
- Buckling or warping of concrete slabs: If your slab is bowing in the middle, this could indicate soil issues under the foundation. Measure any changes over time to confirm.
- Cracks wider than 1/8 inch: Large cracks can be a sign of structural instability. Use a ruler or tape measure to check their width and length.
- Foundation movement: Notice if doors and windows are sticking, indicating the building is shifting out of square. This could mean serious foundation issues.
- Cracking around door frames: If you see cracks forming around your door frames, especially near corners or thresholds, this can indicate structural stress.
- Water stains on interior walls: Persistent water marks inside your home often point to a leaking foundation. Check for dampness and mold growth as well.
- Sagging floors: Floors that feel soft underfoot or have visible dips are signs of structural issues. Measure floor height at different points to see if there’s significant change.
- Cracks in brickwork: Vertical cracks through bricks can indicate shifting foundations. Horizontal cracks often mean the mortar is failing, a sign of deeper problems.
- Uneven concrete surfaces: If your driveway or walkway has dips and bumps that weren’t there before, it could be settling soil under the slab.
- Cracking near corners: Corners are weak points. Any cracks here should raise red flags about structural integrity.
- Water pooling around concrete edges: If water is collecting at the base of your walls or foundation, it’s not just a drainage issue but could be causing unseen damage.
Quick rule: When you see significant changes in your concrete structures that affect safety and stability, call in the pros to avoid costly repairs later on.
Practical next steps and trusted sources
Plan your approach with permit-ready sketches and a concise inspector checklist. Start by pinning the slab height to the doorway floor line, verify the doorway height on site, and note any slope or transition to prevent a trip hazard. Draw a simple, printable diagram showing key dimensions from the door jamb to the slab edge, hinge side clearance, and finished floor level, labeling crowns, bevels, and necessary transitions. Include a short list of required measurements so a reviewer can see you’ve done your homework. Keep references to code and authority links factual and direct, and remind readers to contact the local building department for permit requirements and acceptance criteria.
This matters because a clean, documented plan speeds approvals and reduces back-and-forth on site. A clear workflow—measure, sketch, form, pour, cure, trim, verify height—keeps the job moving and avoids costly rework. It also helps you avoid a lip at the doorway and maintain level backing, which are frequent trip hazards and code concerns. You’ll have solid footing to defend decisions with official code references and the authority’s guidance, not guessing or gut instinct.
Sample sketch elements to include on permit drawings
Your permit drawing should clearly show elevations and slope callouts. Elevations help the inspector understand how high your concrete will be at different points, so make sure you have accurate measurements. Slope is crucial for drainage; mark where water needs to flow.
Include material specifications in your sketch. This means noting what type of concrete mix and reinforcement bars (rebar) you plan to use. Don’t forget waterproofing details, especially if the slab will be exposed to moisture or below grade. Show how you’ll seal around edges and penetrations like pipes.
Before submitting, double-check your base compaction is shown. Loose soil can lead to settlement issues down the line. Also, mark any existing utilities that could affect your pour. This helps prevent costly mistakes during construction.
Printable inspector checklist for doorway flush-slab acceptance
Use this checklist right before the concrete is poured to ensure your doorway slab meets all necessary standards.
- Elevation check: Measure finished elevation. Ensure it matches permit drawings. Skip and doors may not fit properly.
- Slope verification: Check for proper slope away from door. Use a level to confirm water drains correctly. No slope can cause flooding issues.
- Joint inspection: Confirm joints are clean, straight, and properly sealed. Look for any cracks or debris. Inadequate sealing leads to future cracking.
- Drainage test: Pour water near the door slab edge. Ensure it drains away from the house within 10 seconds. Poor drainage can lead to foundation issues.
- Slip resistance: Test surface with a slip meter or by walking barefoot. Surface should not be overly slippery. Safety hazard if too slick.
Quick rule: Always double-check elevation and slope before sealing any joints to avoid costly rework.

Conclusion
Getting a flush, durable slab by the doorway isn’t optional—it protects the opening, keeps the doorway usable, and prevents costly repairs down the line. Stay strict about plan, elevation, and drainage so the edge around the threshold stays solid and safe.
Now run the short check as you move: confirm target height with a quick riser test, verify that you meet ADA or local sill and threshold rules, choose a compatible concrete mix and edge treatment, assemble the tools and safety gear, set forms or guides, test a small patch first, and then pour in controlled lifts until you are flush with the door. Work in small, planful steps and keep drainage away from the threshold as you go.
Two common mistakes will bite you: rushing the pour and skimping on cure, or ignoring drainage and overfilling the lip so water pools at the doorway. Don’t ignore safety PPE, keep the work area clear, and test a dry run or small test patch before committing to the full pour. Always control water, vibrations, and load during curing, and never pour over wet or frost-affected concrete.
If the doorway has unusual height limits, extensive grading, or you’re unsure about local codes and thresholds, call in a pro sooner rather than later. With careful planning and steady work, you’ll end up with a clean, level entry that lasts for years and avoids the cost of rework. Stay disciplined, test as you go, and you’ll have a solid, professional result.
FAQ
How do I match the doorway height when pouring the slab?
Measure the doorway height carefully. Set a temporary screed or form to the exact height and keep your slab level with it. Check multiple spots to avoid any tall spots or low spots near the doorway.
What about removing the lip after the slab cures?
Don’t wait too long to remove any temporary forms. Do it when the concrete is stiff enough to hold its shape. If you leave a lip, clean it right away or you’ll fight it later with patches and patches don’t look good.
How do I prevent the slab from cracking at the doorway?
Control joints should be placed close to the doorway to steer cracks away. Use proper expansion gaps and keep the slab hydrated during curing. Don’t skip control joints or you’ll pay for it later with random cracks.
Is it okay to pour a slab in sections to meet the doorway height?
Yes, but you must wrap and level the joint between pours. Make sure the height is consistent and the finish is smooth. Otherwise you’ll end up with a trip lip and weak edge where the pours meet.