

Introduction
Pouring a concrete ramp correctly is essential for safety, accessibility, and long-term durability. The guide explains practical steps, key tips, and stop rules you can apply in real-world projects. You’ll learn how to prepare the site, set forms, pour and finish the concrete, and ensure proper curing to avoid common errors.
Key takeaways
- Verify local permits and slope requirements before beginning any ramp pour.
- Inspect site for drainage, level, and access to avoid settlement issues.
- Build proper formwork with correct height, alignment, and expansion gaps.
- Install reinforcement and wire mesh above grade to prevent cracking.
- Pour in lifts with vibration, screed, and broom finish for safety.
- Cure under protection, maintain moisture, avoid rapid drying, and inspect for cracks.
Table of Contents
- Introduction
- Key takeaways
- Quick overview and legal requirements
- Tools, materials, and specs
- Site assessment and preparation
- Formwork, reinforcement, and expansion planning
- Step-by-step pouring and finishing process
- Curing, protection, and inspection
- Common mistakes, troubleshooting, and maintenance
- Conclusion
- FAQ
Quick overview and legal requirements
A properly poured ramp matters for safety, drainage, load transfer, and long-term durability. Common failures show up as cracking, settling, or icy slick surfaces, and local rules exist to prevent these issues. This section helps you decide when a permit or ADA considerations come into play.
Start by distinguishing residential from commercial ramps, and surface choices like concrete, pavers, or compacted aggregate. Grade and accessibility objectives influence design choices and what you can build without triggering extra steps. You’ll also want a clear idea of where permits usually fit in, and when ADA compliance may apply in your area.
When a permit is required
A building permit is usually needed when constructing new ramps, altering existing ones, or changing their use. Here’s what to check:
Public Access: If your ramp will be used by the public, you’ll likely need a permit.
Slope, Size, and Grading: Local codes may require permits for ramps with steep slopes (exceeding 1:12), large sizes (over a certain square footage), or significant grading changes. Check with your local building department to be sure.
ADA and accessibility basics
The Americans with Disabilities Act (ADA) sets standards for ramp construction. Here’s what you need to know:
Maximum Slope: Ramps should not exceed a slope of 1:12, except for temporary ramps which can be 1:8.
Landing Requirements: Provide level landings at the top and bottom of your ramp. They should be at least 60 inches long and have handrails if the ramp is longer than 7 feet.
Width, Handrails: Ramps must be at least 36 inches wide and have handrails on both sides if they’re over 8 feet long. Always follow local codes as well.
Who can legally do the work
As a homeowner, you can pour your own concrete ramp if it’s for personal use and within your property lines. Here are some considerations:
Licensed Contractors: If your ramp is public-facing or requires special permits, consider hiring a licensed contractor to ensure compliance with building codes and safety standards.
Insurance and Bonding: If you hire someone, make sure they’re insured and bonded to protect yourself from liability in case of accidents or damages.
Pro Consultation: Even if you plan to do the work yourself, consulting with a professional can help ensure your ramp meets all necessary standards.
Tools, materials, and specs
Make a complete tools and equipment checklist so you can prep the site, mix, pour, and finish efficiently. Include safety gear and measurement devices, plus a plan for mixing and placement timing. Note safe operating ranges for tools without relying on proprietary specs.
Choose concrete types and strength options appropriate for ramps, and consider air-entrained versus non-air-entrained mixes. Keep slump guidance in mind to balance workability with crack resistance, and plan reinforcement, joints, and finish textures to suit the ramp’s use and slope.
Tools and safety gear checklist
Before you start your ramp project, ensure you have all the necessary tools and safety gear at hand. This will save you time and prevent potential injuries.
- Tape measure: To accurately measure and mark out dimensions.
- Level: For checking and maintaining a consistent slope and surface.
- String line: To create straight edges for forms.
- Wheelbarrow or mixer: For transporting and mixing concrete. A 3-cubic-foot wheelbarrow is sufficient for most DIY projects, while a portable cement mixer can handle larger volumes.
- Shovel: To load and unload concrete into the wheelbarrow or mixer.
- Tamper: To compact and level fresh concrete. A 24-inch tamper is standard for most jobs.
- Screed boards: To strike off and level the concrete surface. Use a straight, rigid board around 8 feet long.
- Gloves: To protect your hands from cuts, abrasions, and cement burns.
- Goggles: To shield your eyes from debris and splashes.
- Hard hat: For head protection in case of falls or falling objects. Wear it when working on elevated surfaces.
- Respirator: To protect against concrete dust, which can cause respiratory issues over time.
Quick rule: Always prioritize safety gear before starting any task to minimize risks.
Material choices and concrete mix guidance
The right materials ensure a strong, durable ramp that lasts. Here’s what you need to know about concrete mixes and reinforcement options.
- Concrete strength: Choose a mix with a compressive strength between 3000–5000 psi for residential ramps. This range provides adequate durability without excessive cost.
- Air-entrained concrete: Opt for air-entrained mixes to improve freeze-thaw resistance and enhance workability. This is crucial in regions with cold winters.
- Slump: Aim for a slump of 3–5 inches to balance workability and prevent cracking. Too much water can lead to weak concrete, while too little may result in an uneven surface.
- Reinforcement options: For most ramps, welded wire fabric (WWF) is sufficient. Use a 6×6 or 6×8 pattern with #4 or #5 rebar for added strength at critical points like the base and edges.
- Fiber additives: Consider using fiber reinforcement for increased crack resistance and improved tensile strength. This can be an alternative to traditional steel reinforcement, especially in thin slabs.
Material specs and standards explained
Understanding material specifications helps you select the right products for your ramp project. Here are key aspects to consider:
- Compressive strength: This measures a concrete mix’s resistance to compression. For residential ramps, look for mixes with a 28-day compressive strength of 3000–5000 psi.
- Slump: Slump is a measure of concrete workability. A slump of 3–5 inches indicates good workability and ease of placement without excessive segregation or bleeding.
- Aggregate size: Choose an aggregate size suitable for your ramp thickness. For most residential ramps, a maximum aggregate size of 1/2 inch is sufficient.
- Admixtures: Admixtures enhance concrete properties like workability, set time, and freeze-thaw resistance. Ensure the mix you choose contains appropriate admixtures for your climate and application.
- Welded wire fabric (WWF) standards: Select WWF with a standard spacing pattern (e.g., 6×6 or 6×8) and an appropriate wire size (#4 or #5). Follow manufacturer guidelines for installation and support.
Site assessment and preparation
Confirm the overall site grade and the intended ramp slope to avoid over-excavation or a step in the wrong direction. A clear plan helps you stay code-compliant while keeping the rise gradual. You’ll also map drainage paths to ensure positive drainage away from foundations.
Assess soil bearing capacity and compaction needs, then decide on sub-base materials and thickness. Plan ramp alignment, width, length, and transitions, and identify underground risks and utilities before you dig. Prepare forms, rebar placement, and safety barriers so work can start smoothly.
Measuring slope and setting grade
Before you pour concrete, you need to know the slope of your site and set it to the right grade. Here’s how:
First, measure the rise (vertical change) and run (horizontal distance) over a 10-foot span. Divide rise by run for your slope ratio. For example, if rise is 2 feet and run is 8 feet, your slope is 2/8 or 0.25.
Check local codes or ADA guidelines for required slopes (usually 1:16 to 1:48). Set stringlines at the top and bottom of your pour area, using levels to ensure they’re level. Use a laser level or transit to set intermediate stringlines between them.
Confirm your grade by measuring from one stringline to another along the run. Adjust as needed until you hit your desired slope ratio. Don’t guess; measure and check.
Excavation, Compacting Base, and Sub-base Prep
First off, you need to dig out the area for your concrete. Aim for a depth of about 6-8 inches. This gives room for the base material and the concrete itself.
Now, fill in with a good quality crushed stone. It should be clean, angular, and free from fines (dust). Check the label or ask your supplier if you’re unsure. Spread it out evenly to a depth of about 4-6 inches. This provides a stable base for your concrete.
Next, compact that base material. You can rent a plate compactor for this job. Work in layers, adding more stone as needed and compacting each time. Aim for at least 95% compaction. To check, try walking on it – if it feels solid, you’re good to go.
Before you pour, make sure your base is level and slopes slightly away from any structures. If not, water could pool and cause issues later. Also, check local building codes for specific requirements in your area.
Drainage and frost considerations
Before you pour that concrete ramp, you gotta make sure water doesn’t pool and cause trouble. Here’s how:
Direct surface water away from the ramp site. You don’t want rainwater hanging around, so slope the ground around your ramp to send it on its way. Check your grade measurements from earlier to get this right.
If you’ve got a low spot that won’t drain naturally, you might need to install drainage pipes or tiles. Dig a trench, lay the pipe, and cover it with gravel. Make sure it’s sloped towards an outlet where water can escape.
Now, if you’re in a cold climate, frost heave’s gonna be your enemy. So, design for frost prevention. That means:
- Check base compaction – it should be at least 90% of maximum density.
- Use a frost-protected shallow foundation, if needed. This involves insulating the concrete from the ground, so frost can’t cause it to lift.
Always check local building codes and manufacturer instructions for specific requirements in your area. Now you’re ready to pour that ramp!
Formwork, reinforcement, and expansion planning
Formwork should create stable, true edges with proper slope and supports. Bracing and edge alignment matter, and having a removal plan helps keep surrounding surfaces undamaged. Plan how the forms will interface with existing surfaces to minimize cracking at transitions.
Place reinforcement thoughtfully, using chairs or spacers and following cover depth guidelines. Determine jointing strategy, including where control and expansion joints go and how they’ll be protected. Align forms to maintain consistent rise/run and ensure drainage paths are not blocked.
Building and bracing forms
Start by selecting sturdy, straight form materials. Use dimensional lumber for the base and plywood or OSB for sides.
Set up your forms with a consistent slope, using a template to ensure accuracy. The ramp should rise 1 inch for every 12 inches of length (8% grade).
Brace forms every 4 feet vertically and horizontally using 2x4s or 2x6s. This keeps them square and prevents bulging during the pour.
Check your forms visually before pouring. Ensure they’re level, plumb, and aligned properly. Tack on any loose spots with nails or staples.
Reinforcement layout and cover
Lay your rebar mesh or individual bars at the midpoint of the ramp’s thickness. This distributes loads evenly.
Use #4 or #5 rebar, spaced 6 to 12 inches apart. For wider ramps, stagger joints and use additional bars.
Maintain a concrete cover of at least 2 inches over your reinforcement. This protects the rebar from corrosion and ensures proper strength.
Use rebar chairs or spacers to maintain this cover consistently throughout the pour.
Joints and finish transitions
Cut control joints every 5 to 6 feet along the ramp’s length. These help control cracking by allowing concrete to shrink naturally.
At abutting structures, install expansion joints. Use preformed joint fillers or saw-cut grooves filled with compressible material like backer rod and caulk.
For transitions to walkways or driveways, create a smooth finish. Taper your forms gradually over 12 inches to match the existing surface’s height and slope.
Before pouring, ensure all joints are clean, dry, and well-lubricated with form release agent to prevent adhesion.
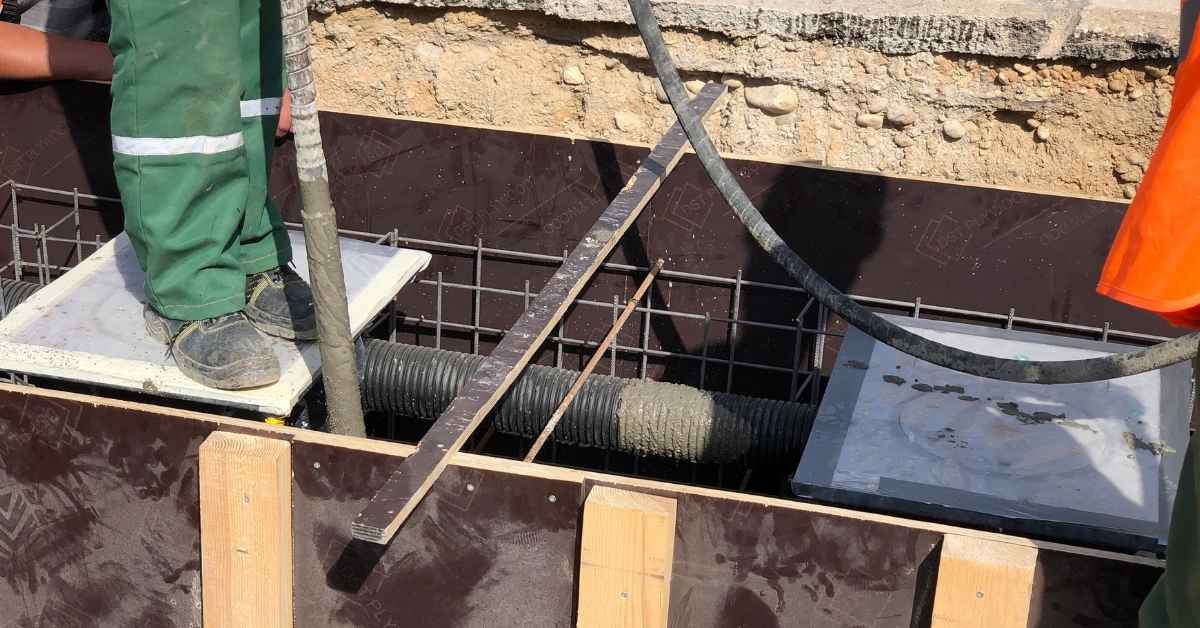
Step-by-step pouring and finishing process
Before pour, double-check form tightness, reinforcement, substrate moisture, and the weather window. Verify delivery timing and batch consistency, and have finishing tools ready for a smooth workflow. Keep the pour sequence orderly to avoid cold joints and misalignment.
During pour, monitor slump and air content, and consolidate effectively with vibration and tamping. After screeding, proceed with bull float and initial trowel to establish a consistent surface, then place control joints and apply the chosen texture. Follow curing methods and keep an eye on conditions that could affect set or joint integrity.
Step-by-Step Pouring Process
Follow this clear, numbered sequence to ensure a smooth and successful concrete ramp pour.
- Confirm all preparations are complete: slope, forms, reinforcement, substrate moisture, weather, tools, and delivery timing.
- Mix concrete according to your chosen mix design. Ensure the correct water-cement ratio and check slump and air content.
- Start pouring from the highest point, maintaining a continuous flow to prevent cold joints. Keep the pour moving steadily to avoid delays.
- Use vibrators and tamping to consolidate the concrete, eliminating air pockets and ensuring proper compaction. Work from the bottom up.
- Finish by screeding to grade, bull floating, initial troweling, and placing control joints. If you notice any issues like inconsistent slump or form leakage, pause and consult a pro.
Pouring technique and team coordination
Staging the pour is crucial for maintaining slope and preventing cold joints. Coordinate with your helpers to ensure a safe, continuous pour.
Start at the highest point and work downhill to maintain the desired slope. Use vibrators and tamping irons to consolidate the concrete as you go.
For most DIY projects, two to four helpers are typically needed. Assign tasks clearly: one person pours, another consolidates, a third screeds, and the last finishes. Rotate tasks as needed to maintain energy levels.
Monitor the weather closely. If rain or extreme temperatures threaten, pause the pour and cover the ramp with plastic sheeting until conditions improve.
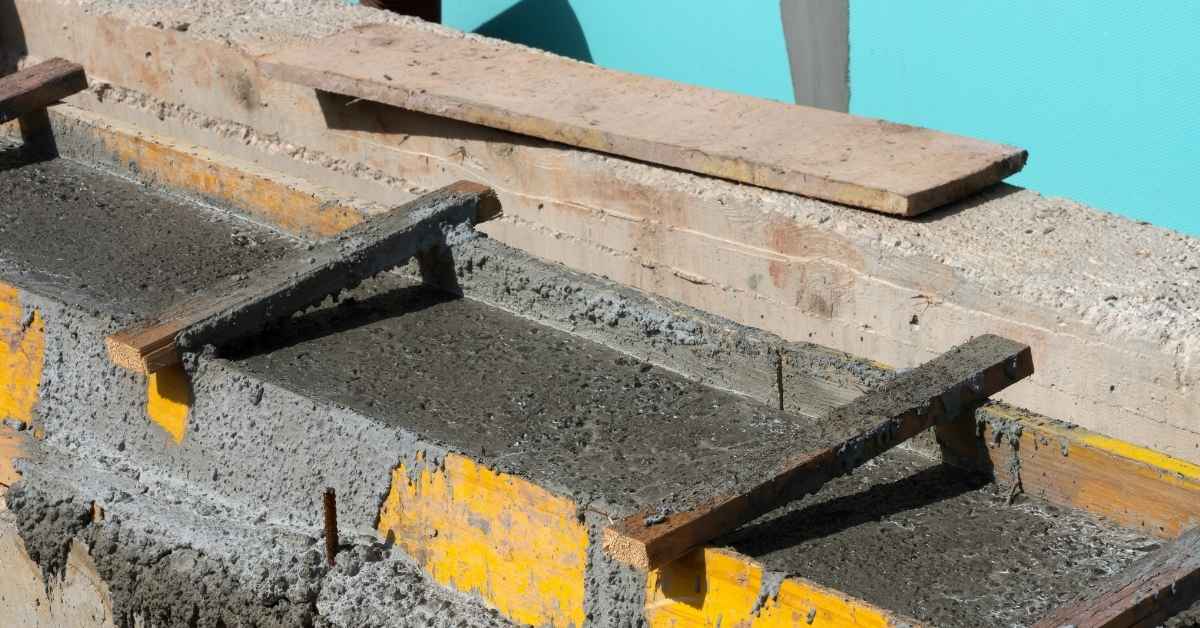
Screeding, leveling, and surface finishing
Proper screeding, bullfloating, and edging create a smooth, even surface. Choose the right finish for slip resistance.
After pouring, use a straightedge to screed off excess concrete and establish the final grade. Work from side to side, maintaining a consistent elevation.
Bull float the surface immediately after screeding to remove any remaining air pockets and level out minor imperfections. Follow up with initial troweling for a smooth finish.
For slip resistance, consider using a broom finish or embedding texture into the surface during the final trowel pass. Always follow local building codes regarding required textures and finishes.
Stop rules during the pour
Certain conditions require immediate attention or may necessitate pausing the pour entirely. Know these critical red flags to ensure a successful outcome.
Cold joints forming: If you notice cold joints starting to form due to delays, pause the pour and consult a pro. Cold joints can weaken the ramp’s structure.
If forms start failing or leaking, stop the pour immediately. Leaky forms can cause weak spots in your ramp, while failed forms may result in an uneven surface.
Sudden weather changes, especially rain or extreme temperatures, can affect concrete curing and strength development. If such changes occur during the pour, pause and cover the ramp with plastic sheeting until conditions improve.
Inadequate consolidation can lead to air pockets and weak spots. If you notice any signs of insufficient compaction, stop the pour and use vibrators or tamping irons to consolidate the affected areas before resuming.
Curing, protection, and inspection
Outline curing methods such as moisture or film curing and plan the timing to reach strength before loading. Protect the ramp from sun, wind, rain, and temperature swings with temporary enclosures or shading as needed. Schedule protection to prevent early damage during the cure period.
Set up clear inspection points for both DIYers and inspectors, focusing on form integrity, slump consistency, reinforcement positioning, and cure completion. Document curing details and any protection measures, and know when to involve a licensed professional if issues arise or local rules require review.
Curing methods and timelines
Once your concrete ramp has been poured, it’s crucial to maintain proper curing for the first few weeks. This ensures your ramp gains sufficient strength before load exposure.
- Moisture retention: Keep the concrete damp using a curing compound or water misting. Avoid letting it dry out.
- Film-forming compounds: Apply these within 24 hours of pouring to seal in moisture and protect from rain.
- Temperature control: Maintain temperatures between 50-70°F (10-21°C) for optimal curing. Use temporary heat if needed.
- Curing duration: For a concrete ramp, cure for at least 7 days before light traffic and 28 days before full load exposure.
- Avoid heavy loads: Keep vehicles, equipment, and pedestrians off the ramp until it’s fully cured to prevent damage.
- Handrail installation: Wait at least 7-14 days after pouring before installing handrails to allow for proper curing.
Quick rule: Always follow recommended curing durations and moisture-retention techniques to ensure your ramp’s long-term strength and durability.
Protecting the new ramp
After pouring, protect your concrete ramp from environmental factors and traffic until it’s fully cured.
- Rain protection: Use temporary enclosures or tarps to shield the ramp from rain. Avoid water exposure for at least 7 days post-pour.
- Sun protection: Keep the ramp shaded during hot weather to prevent rapid drying and cracking.
- Wind protection: Shield the ramp from strong winds using temporary barriers or screens to prevent dust accumulation.
- Freeze-thaw cycles: Protect the ramp from freezing temperatures until it’s fully cured. Use heat if necessary.
- Traffic control: Install temporary barriers and signage to restrict vehicle, pedestrian, and equipment access until the ramp is fully cured.
- Schedule around forecasts: Plan your pour and protection measures around weather forecasts to minimize risks.
Quick rule: Shielding your concrete ramp from harsh environmental conditions and traffic ensures it gains full strength and prevents damage.
Inspection checklist and documentation
Regular inspections help ensure your concrete ramp meets standards and will last for years. Use this checklist to track progress and maintain compliance with local codes.
- Formwork integrity: Inspect formwork before pouring to ensure it’s secure, level, and free of defects. Any issues can lead to a weak or misshapen ramp.
- Slump consistency: Check concrete slump at the pour site to ensure consistent mix design and strength.
- Reinforcement placement: Verify that reinforcement is properly placed, aligned, and covered according to plans. Inadequate reinforcement can cause cracking or structural failure.
- Cure completion: Inspect the ramp after the recommended curing period to ensure it’s fully cured before load exposure.
- Surface finish: Check for proper finishing, including screeding and leveling. A smooth surface prevents tripping hazards and improves longevity.
- Dimensions and slope: Measure the ramp’s dimensions and slope to ensure they meet building codes and accessibility standards.
- Joint placement: Verify that contraction joints are properly placed and tooled to control cracking and maintain a neat appearance.
Quick rule: Document all inspections, curing timelines, protection measures, and any issues that arise. Consult a licensed professional if problems occur or local code requires review.
Common mistakes, troubleshooting, and maintenance
Watch for common errors like wrong slope or thickness, poor formwork, and missing joints or reinforcement. Inadequate drainage and edge protection are frequent causes of premature problems. Address these early to keep the ramp performing well.
When defects appear, distinguish hairline cracks, settlement, and spalling, and decide whether patching or a professional evaluation is needed. Establish a maintenance plan with routine cleaning, periodic sealing, and periodic inspections after freeze-thaw cycles to extend life and performance.
Common construction mistakes and fixes
To ensure your concrete ramp performs well over time, avoid these common DIY mistakes during construction.
- Inadequate drainage: Water pooling can cause erosion and structural damage. Ensure proper grading away from the ramp.
- Incorrect slope: A slope of 1:12 is typically needed for accessibility. Check local codes and measure carefully.
- Thin concrete layer: Too thin, and your ramp may crack or settle. Aim for at least 4 inches thick.
- Poor reinforcement layout: Reinforcement should be evenly spaced and properly covered with concrete to prevent corrosion.
If you spot any of these issues, address them promptly. For major problems, consult a professional.
Long-term maintenance and durability tips
Maintaining your concrete ramp involves regular care to prevent deterioration and extend its lifespan.
Seal the surface: Apply a sealant every 2-5 years, depending on climate and wear. This protects against moisture and chemicals.
Care for joints: Keep joints clean and free of debris. Fill them with a flexible joint sealer to prevent water intrusion.
Inspect your ramp annually, especially after freeze-thaw cycles. Address any new cracks or signs of settlement promptly.
Cost estimate factors and budgeting tips
The cost of pouring a concrete ramp depends on several factors. Understanding these can help you create an accurate budget.
Labor: This is often the largest expense. Larger ramps or complex forms will increase labor costs.
Concrete volume: The size and thickness of your ramp will determine how much concrete is needed, affecting material costs.
Formwork complexity, permits, and any necessary repairs should also be factored into your budget. Obtain quotes from multiple contractors to compare prices. Consider setting aside a 10-15% contingency for unexpected expenses.

Conclusion
Pouring a ramp correctly is about getting the slope, joints, and curing right the first time. Do it safely and you’ll protect the investment, avoid costly fixes, and keep the ramp looking and working well for years.
Check the site and formwork, confirm the mix and pour plan, verify reinforcement and expansion spacing, then proceed step by step: calm site, confirm forms are true and supported, set the ramp height and slope to spec, mix and pour in sections, screed and finish cleanly, and cover or protect as soon as you’re done. Leave curing to cure and protect with proper barriers or covering, then inspect for cracks or settlement and address small flaws early.
Common mistakes to avoid include rushing the pour, skipping proper grading or drainage, and neglecting proper curing or protection. Safety rules are simple: wear eye and hand protection, keep the work area clear of obstructions, never work on a wet, windy, or overly hot day, and test a small area first before committing the whole ramp. If you’re unsure about the slope, form integrity, or load requirements, pause and review the plan or call in a pro—it saves time and money in the long run.
When in doubt about local codes, loading, or complex site conditions, seek professional help rather than pushing on alone. Stay focused, follow the plan, and you’ll finish strong with a strong, durable ramp you can rely on.
FAQ
How thick should the ramp be?
Check your local codes for thickness and load requirements. Plan for a solid forms setup and proper base. Don’t guess when a mistake costs you later.
How should I prepare the subgrade?
Clear, compact, and level the ground before you pour. Add a stable base material and compact it well. Moisture control helps the concrete set evenly.
How do I ensure the right slope and finish?
Set the form to the correct slope and keep it consistent along the run. Use a screed to level, then a darby or float for a smooth surface. Don’t leave high spots or loose edges.
What are red flags that mean I should stop and redo something?
If the base shows shifting, water pools, or the form leaks, pause and fix it. If the concrete starts to set before you finish troweling, stop and restart cleanly. Bad timing or a weak base will ruin the ramp.