

Introduction
A trench drain in a concrete driveway is a channel that collects surface water and carries it away from the surface.
It’s installed by cutting a slot in the slab and setting a grating or lip that directs flow to a drainage line. Plan for slope, embedment depth, and a clean connection to any existing drainage, and check local requirements before you start.
If you’re adding to existing concrete, be prepared for extra steps like cutting and patching to blend the new trench with the old slab. You’ll need the right tools for cutting concrete and staying safe, plus preparation like screening off the work area. Always verify installation details with the product label and manufacturer instructions, and follow any safety or site rules in your area.
Key takeaways
- Confirm existing driveway suitability and slope to drain toward yard or street.
- Map trench route early and coordinate with utilities, permits, and setbacks.
- Gather saws, blades, and cutting tools; verify blade depth and suitability.
- Wear proper safety gear and establish containment to minimize dust and disruption.
- Set channels with level bedding, precise slope toward drainage, and secure anchors.
- Seal joints properly and monitor transitions for water-proofing and performance.
Table of Contents
- Introduction
- Key takeaways
- Can You Add a Trench Drain to an Existing Concrete Driveway?
- Planning, Layout, and Permits
- Tools, Materials, and Material Specs Explained
- Cutting the Concrete: Saw Cuts and Demolition Best Practices
- Slope, Bedding, and Alignment (Getting the Grade Right)
- Installation Steps: Setting Channels, Anchoring, and Backfill
- Sealant, Joints, and Waterproofing Transitions
- Safety, Containment, and Minimizing Disruption
- Conclusion
- FAQ
Can You Add a Trench Drain to an Existing Concrete Driveway?
Retrofit trench drains in poured concrete driveways is feasible under specific conditions. Assess the slab for thickness, rebar layout, cracks, and existing joints to decide if a retrofit cut-in is practical or if full slab removal is required. When the concrete is sound and the driveway alignment supports a drain toward a curb or storm line, a retrofit can be straightforward.
Plan the location and slope to match the driveway’s drainage path, avoiding low spots and ensuring a clean alignment with the trench drain body and any connections. Compare cut-in techniques with the realities of breaking and removing a larger section when performance, warranty, or structural concerns demand it. Outline practical steps such as cut depth, trench width, bedding, sealant choices, and how to integrate with the drain body, while keeping safety, permits, and local codes in view.
Site assessment and identifying problem areas
Before you start, inspect your driveway thoroughly. Look for low spots where water pools. These are your problem areas – they’ll dictate where to place your trench drain.
Check the surface for cracks or unevenness. Subsurface issues like soft spots or voids can cause drainage problems too. You might need a concrete scanner to find these.
Water’s path is key. Observe how it flows after rain. Your trench drain should align with this path, not fight against it.
Cut-in vs. full slab removal: decision criteria
Deciding between a cut-in and full removal depends on several factors:
Slab Thickness: If your slab’s less than 4 inches thick, you might need to replace it. Cutting into thin slabs can compromise their strength.
Reinforcement: Check for rebar layout. If it’s dense or runs through the planned cut area, full removal may be safer. Sawing through rebar is tough and risky.
Underground Utilities: Before you dig, locate any utility lines. If they’re close to your planned work area, full removal might be wiser. Cutting into them could cause damage or hazards.
Drainage Path: Consider the existing drainage path. If it’s complex or requires a deep cut, full removal could be more efficient.
Planning, Layout, and Permits
Define the project scope and drainage goals before you start any work, including preferred slope direction and how the new trench drain will interface with the existing grade. Establish a pre-install grading plan that guides flow away from structures and toward the outlet. Verify the driveway’s overall drainage path to ensure compatibility with the retrofit or new installation.
Map utilities and site constraints early to avoid damaging lines or rebar during trenching, and document permit and inspection requirements with the local authority. Check code language on trench drain slope, discharge points, and any traps or connections that may affect permits. Plan safe sequencing, access, and material staging to minimize disruption during the project.
Locate utilities and mark trench path
Before you start digging, get your underground lines located. Call your local utility companies to have them mark their lines.
Use paint or flags to mark the path of your trench. Start at the low point where water will drain out, and work backwards towards the high points where water will collect. Make sure your path is straight and unobstructed.
Check for any rebar in your existing driveway that might interfere with your trench. Mark these areas as well.
Permits, codes, and slope requirements
Before you start, check local codes for trench drain installations. Most places require a permit, especially if you’re connecting to a public stormwater system.
Slope is crucial. Water needs to flow away from your structure. A common requirement is a 1-2% slope. Check with your local building department to be sure.
Your trench should also meet certain depth and width requirements, depending on the size of your driveway and the volume of water it needs to handle. Again, check with your local codes for specifics.
Tools, Materials, and Material Specs Explained
Choose channel types and loads based on how the driveway is used, weighing options like surface versus recessed profiles and material choices such as HDPE, steel, or concrete. Match grate styles and materials to the channel, considering anti-slip features and corrosion resistance. Ensure the selection aligns with the driveway traffic and any local load requirements you need to verify on product labels or manufacturer data sheets.
Plan bedding and backfill carefully to support the trench, and confirm slope continuity for drainage efficiency. Use the right saw blades and cutting methods to produce clean edges and accurate depths, and select sealants that tolerate movement and exposure while fitting with existing concrete. Cross-check certifications and compatibility notes on product literature and local code references before purchase.
Sawing, drilling, and demolition tools
For concrete work, you’ll need a basic set of tools. Start with a handheld circular saw fitted with a diamond blade for cutting. It’s versatile and can handle most jobs.
For larger projects or deeper cuts, consider renting a walk-behind wet saw. They’re more powerful and produce cleaner cuts. Always check the blade’s recommended depth of cut to avoid damaging your tool.
Drilling into concrete requires a heavy-duty drill and appropriate masonry bits. For larger holes, you might need a core drill. Always wear safety glasses and secure your work piece to prevent it from spinning.
For demolition, a breaker (also known as a jackhammer) is essential. They come in electric or pneumatic models. Safety first: always wear hearing protection, gloves, and sturdy boots. Check local rules for noise restrictions before starting.
Drain channel, grate, bedding, and concrete repair materials
The right materials ensure your drainage system works well and lasts. They affect durability, appearance, and how easy it is to fix later.
- Polymer Concrete Drain Channel: Durable, long-lasting. Look for high-density polyethylene (HDPE) or polypropylene (PP). Avoid cheap plastic channels that crack easily.
- Steel Drain Channel: Strong, heavy-duty. Ideal for heavy traffic areas. Check galvanized coating for rust resistance. More expensive than polymer.
- Plastic Grate: Inexpensive, lightweight. Choose UV-stabilized for outdoor use. Avoid cheap ones that discolor or break easily.
- 3/8″ to 1/2″ Clean Aggregate (Bedding): Supports channel, allows water flow. Check particle size and shape for proper compaction. Too fine can cause clogging.
- Type N Mortar: Bonds channel to slab. Look for ASTM C476 strength class. Avoid using concrete mix as mortar; it’s too strong, causing stress on channel.
- Concrete Repair Mix (Fast-Setting): Fixes cracks, holes. Check setting time and compressive strength. Some are too weak or set too fast for practical use.
Pro tip: Buy materials from reputable suppliers to ensure quality. Store aggregates in a dry place to prevent clumping. Always follow manufacturer’s mixing instructions for best results.
Sealants and joint materials
Choosing the right sealant or joint material is crucial for a durable, long-lasting concrete job. They keep water out, prevent cracking, and maintain appearance.
- Polyurethane Sealants: Used for filling control joints and preventing water intrusion. Look for high UV resistance (UV rating) to prevent discoloration. Avoid in areas with extreme temperatures as they can become brittle or soften.
- Polysulfide Sealants: Ideal for expansion joints due to their flexibility and ability to withstand movement. Check for good chemical resistance, especially against acids. Not recommended for areas exposed to direct sunlight as they degrade over time.
- Epoxy Sealants: Used where high strength and durability are needed, like anchoring bolts or repairing cracks. Look for a high tensile strength rating. Avoid in areas with heavy foot traffic as they can be slippery when wet.
- Silicone Sealants: Great for sealing around fixtures and edges due to their excellent adhesion and flexibility. Check for good UV resistance (UV rating) if exposed to sunlight. Not recommended for filling wide joints or areas with heavy traffic.
- Concrete Caulk: Used for small gaps and cracks, providing a flexible seal. Look for a low modulus of elasticity for better movement accommodation. Avoid in areas with extreme temperatures as they can become brittle.
Pro tip: Always check the product label for compatibility with concrete before buying. Store materials properly to maintain their shelf life and follow manufacturer’s mixing instructions for best results.
Cutting the Concrete: Saw Cuts and Demolition Best Practices
Prepare the site with the right PPE, barriers, and dust control measures, then verify utilities and rebar locations before any cutting begins. Map obstacles and joints to avoid compromising structural performance while planning the trench path for efficient drainage. Decide on the saw-cut pattern and depth based on the trench design, whether you use continuous or segmented cuts to maintain edge quality and stability.
Describe how to create neat trench edges and stage removal without spalling or uncontrolled breakage, then address thermal and dust concerns with wet cutting or vacuum strategies. After cutting, clean edges are checked and rebar exposure is noted to plan for formwork or sealant installation. Follow disposal guidelines and local regulations for concrete waste and runoff control.
Saw-cut technique and controlling dust
Start your saw cut at a steady speed, not too fast or slow. The key is consistency.
Pass depth: Set your blade to cut about 1/4″ deep per pass. This helps maintain control and reduces stress on the blade.
Wet cutting: Use water for dust suppression and cooling. It’s a must when working indoors or near sensitive areas. Connect your saw to a water supply, and keep the blade wet throughout the cut. This extends blade life and keeps dust to a minimum.
Removing slab sections and dealing with rebar
Once you’ve saw-cut your lines, it’s time to break out the concrete. Use a sledgehammer or a breaker attachment on your jackhammer.
Safety first: Wear safety glasses, gloves, and sturdy boots. Tie back long hair and secure loose clothing.
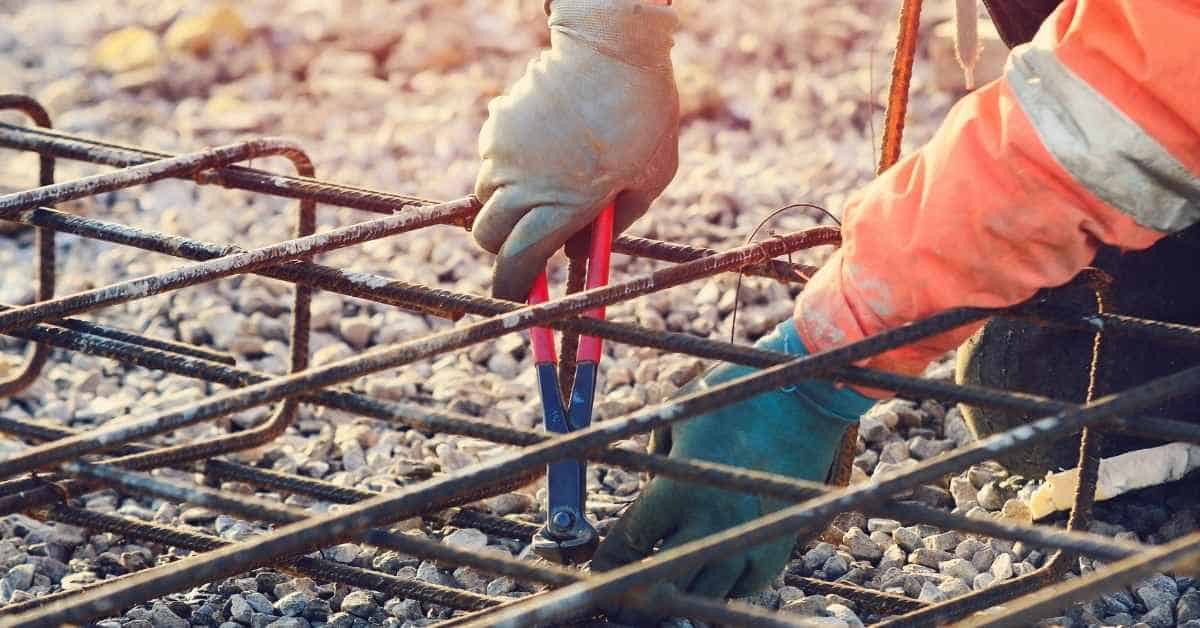
If you hit rebar, stop immediately. Rebar can whip around unpredictably when struck. If it’s in your way, use a reciprocating saw with a metal-cutting blade to cut or bend it as needed. Inspect the surrounding concrete for any undermining or damage.
Visual checkpoints during cutting
Before you place your drain channel, take a moment to inspect your cuts. This ensures a neat, functional installation.
- Straight edges: Check that your saw cuts are straight and align with each other. Misaligned cuts can lead to an uneven trench.
- Consistent depth: Ensure all cuts are the same depth. Inconsistencies can cause drainage issues or require additional concrete removal.
- No unseen voids: Tap along your cut lines with a hammer and listen for any hollow spots. These could indicate undermining, which needs to be addressed before proceeding.
- … (continue listing 8-14 items)
Quick rule: If something doesn’t look right, it’s better to pause and fix it now than to have problems later on.
Slope, Bedding, and Alignment (Getting the Grade Right)
Establish the required slope by comparing the trench line to the driveway grade, aiming for a consistent gradient toward the outlet without creating new low spots. Define bedding depth and material type (such as sand, gravel, or lean concrete) to provide stable support and accommodate the drain body height. Use alignment methods such as string lines or laser checks to verify the trench location relative to driveway edges and the discharge point.
Describe step-by-step methods to verify flow direction and outlet clearance, ensuring proper elevation at the discharge and eliminating air pockets. Include practical tips for measuring and rechecking after bedding and forming, plus adjustments to maintain the proper grade during install. Emphasize safety, tool choices, and compatibility with sealants and end connections as you proceed.
Determining and measuring slope
To ensure proper water flow, your trench drain needs a consistent slope towards the outlet. Here’s how to measure it:
First, decide on the required slope. For most driveways, 1-2% is sufficient – that’s 1 or 2 inches of fall for every 10 feet.
Use a string line and level, or a laser level, to establish this gradient along your trench path. Mark the required fall at regular intervals using chalk lines.
Pro tip: Always double-check your measurements and ensure a consistent slope throughout the trench run.
Sub-base compaction and bedding preparation
A solid sub-base is crucial for your trench drain’s longevity. Here’s how to prepare it:
Excavate the trench to a depth that accommodates the drain body, plus an additional 2-4 inches for bedding material.
Fill this space with either clean gravel or aggregate base. Spread it evenly and compact it using a plate compactor. The goal is a uniform, stable base for your channel body.
Pro tip: Account for the height of the drain body and any surface finish when determining bedding depth.
Connecting to outlet and maintaining continuous fall
Tying your trench drain to an outlet requires careful planning to maintain the required slope:
1. Check outlet elevation: Ensure the outlet is at a lower level than the highest point of your trench run.
2. Maintain fall: When connecting to the outlet, make sure there are no sags or high points that could cause water to pool. Use string lines and levels to maintain the required slope all the way to the outlet.
Pro tip: If you’re connecting to a pipe, ensure it’s properly sloped and clear of any obstructions that might block water flow.
Installation Steps: Setting Channels, Anchoring, and Backfill
Start with a dry-fit to confirm trench location, slope, and alignment with the driveway grade, then adjust before cutting or anchoring. Place channel sections end-to-end with the correct slope toward the outlet, temporarily securing them and verifying outlet alignment with the planned drainage path. Plan an anchoring strategy using appropriate concrete anchors, epoxy, or corrosion-resistant fasteners and schedule cure times to prevent movement during backfill.
Backfill around the channels with clean material, then encase with concrete if required, keeping uniform height and avoiding air pockets. Restore the surrounding surface with matching patching methods, address joints, and plan sealant or grout at interfaces after curing. Use step-by-step checks after each stage to prevent drift and confirm final surface flushness and drainage before opening to use.
Dry-fit, spacers, and anchoring methods
Before cutting into your driveway, perform a dry-fit of the drain channels. This helps catch any misalignments or issues before you start sawing.
Lay out the channel sections end-to-end with precise slope towards the outlet. Use temporary supports to keep them in place. Verify that outlet points line up with the planned drainage path.
Spacers are crucial for maintaining even gaps between channels. Use them consistently throughout the layout.
Once satisfied, mark the outline of the channels onto the concrete. This is your guide for sawing.
Grouting, backfilling, and finishing concrete
After anchoring, prepare a suitable grout or mortar for encasement. It should match the surrounding concrete in strength and texture.
Backfill around channels with clean material, compacting it uniformly to avoid air pockets and voids. Use a vibrator if necessary.
If installing a concrete encasement, ensure it’s level with the surrounding slab and maintains a uniform height. Vibrate the concrete to eliminate voids.
Once set, finish the surface to match the adjacent slab texture. This ensures a seamless look and prevents water from pooling.
Visual checkpoints before finishing
Before pouring any concrete or applying sealant, perform these checks to ensure everything is aligned correctly.
- Level across channels: Check that the top of each channel is level with the surrounding slab. Use a long straight edge and a level.
- Slope verification: Confirm that water will drain towards the outlet. Pour some water into the trench to check.
- Grate fit: Ensure the grate fits snugly in the channel. Check for any gaps or misalignment.
- Gap sizes: Measure the gaps between channels and at the edges of the trench. They should be consistent throughout.
- Rebar alignment: If you’ve had to cut through rebar, ensure it’s still securely anchored and won’t interfere with drainage.
- Outlet alignment: Confirm that the outlet is clear and aligned with the planned drainage path.
- Bedding condition: Check that the bedding material remains compacted and hasn’t shifted.
- Concrete edges: Ensure the cut edges of the concrete are clean and won’t interfere with the trench’s function.
Quick rule: If any issues are found, correct them before proceeding. It’s easier to fix now than after pouring concrete or applying sealant.
Sealant, Joints, and Waterproofing Transitions
Identify all joint types involved, including channel-to-slab joints and transitions to other drainage elements, and evaluate how they accommodate movement and shear forces. Select sealants and backing materials based on exposure, movement range, and chemical resistance, and verify cure times and substrate compatibility on product labels or spec sheets. Prepare joints properly by removing old material, cleaning substrates, and installing backer rods to control depth.
Detail the application process for a smooth finish and correct bead size, then take protective measures during curing to avoid bubbles or contamination. Address waterproofing transitions so the trench-to-slab interface remains continuous and protected, using edge membranes or wake detailing as needed. Plan a maintenance schedule to monitor cracking or debonding and determine when resealing or joint replacement is required.
Selecting a sealant and prepping joints
Choosing the right sealant is crucial for a durable, long-lasting joint. Consider expected movement, exposure to elements, and chemical resistance.
Polyurethane, silicone, or hybrid seals are common choices. Check compatibility with concrete and cure times before application.
Prep joints by removing old sealant, cleaning substrates with a wire brush, and drying surfaces thoroughly. Apply a primer for better adhesion if needed.
Expansion joints and transition treatments
Install expansion joints where the trench meets existing concrete to accommodate thermal or structural movement. Use saw cuts at regular intervals, typically every 6-10 feet.
For transitions, ensure proper detailing to prevent water ingress. Use edge membranes and apply sealant in a ‘wake’ pattern for continuous protection. Maintain slope continuity across the transition.
Consider using foam sleepers or backer rods to control sealant depth and provide a compliant base at expansion joints.
Safety, Containment, and Minimizing Disruption
Outline the required PPE and safe work practices, including eye and face protection, respirators or dust masks, hearing protection, gloves, and hard hats when needed. Implement dust suppression, noise control, and vibration management strategies to reduce the impact on occupants and neighboring areas. Establish site containment, warning signage, and dedicated access routes to organize the workflow with minimal disruption.
Carefully sequence saw cuts, trench formation, and concrete removal to limit downtime and disruption, while coordinating power, water, and utility considerations. Address disposal responsibly, sorting and recycling material where possible, and obtaining any necessary disposal permits. Communicate schedule details to occupants to keep them informed about expected interruptions and access changes.
PPE and dust-control measures
Safety’s our top priority. Here’s what you’ll need:
Personal Protective Equipment (PPE): Respirator or dust mask, safety glasses, hearing protection, gloves, and hard hat.
Dust Control: Wet cutting reduces dust. Use a vacuum system to capture dust at the source. Temporary barriers help contain it within the work area.
Closing off the work area and scheduling to limit impact
Minimize disruption with these strategies:
Site Containment: Fence off the work area. Post warning signs to keep others away from hazards.
Scheduling: Plan noisy work, like cutting, for times when it’s least disruptive – early morning or late afternoon, not during peak hours or quiet periods.
Conclusion
Get this right and the trench drain becomes a durable, low-maintenance part of your driveway that channels water away cleanly and looks finished. Safety stays on the job every step, and precision now saves cost and trouble later.
Begin with a simple, practical check: confirm permits if required, measure the run, mark the slope and slowest grade changes, plan channel placement, read the material specs, cut only where you must, set the channels true to grade, anchor firmly, backfill solidly, seal all joints and transitions, and test the flow with a small, careful trial before final backfill. Do each step in order, keep tools sharp, and keep the work area contained and dry enough to control debris and dust.
Common mistakes to avoid include trying to overfill or undercut the bed, skipping the slope test or misreading the grade, and using sealant or joints outside recommended temperatures or cure windows. Don’t rush the cuts or the setting; test a small area first, and verify water sheds away from the driveway edge. If the project looks beyond your scope—especially when structural cracking, permits, or heavy equipment are involved—call a pro rather than pushing on. When you stay disciplined—plan, measure, and verify—you’ll finish confident, with a clean, functional drain that lasts.
FAQ
Can you add a trench drain to an existing concrete driveway?
Yes, you can, but it’s a job for small, controlled sections. You’ll need to cut a trench, remove concrete, and install the channel with proper slope toward the outlet. Check manufacturer guidance for the drain system you choose and local rules before starting.
Tools needed for cutting concrete (saws, blades)
Use a cold-cut saw or a diamond blade designed for concrete. Have a measuring tool, chalk line, and a vacuum or chute to control dust. Check blade width, depth limits, and any moisture restrictions on the blade label or manufacturer instructions.
Safety gear and precautions
Wear eye protection, hearing protection, sturdy gloves, and a dust mask or respirator. Keep a clear work zone and have a plan for breaking and lifting debris safely. If you’re unsure about a tool or procedure, pause and verify with the label, manufacturer instructions, or local rules.
Preparation of the work area (screening off area)
Screen off the driveway from the house and street with temporary barriers. Use plastic sheeting or fencing to limit dust and debris. Confirm you won’t be cutting near utilities and follow local guidelines for containment and cleanup.
Correct placement of the trench drain
Place the drain where water naturally collects and where it can exit safely without creating a trip hazard. Align with the driveway slope so water moves toward the outlet. Double-check with levels and the manufacturer’s layout recommendations before cutting. If in doubt, consult the installation guide or local building authority.