
Introduction
Repairing a broken concrete curb corner can seem like a daunting task, but with the right approach and understanding of the timeline involved, it’s a manageable DIY project. This step-by-step guide walks you through the process from start to finish, breaking down each stage so you know exactly how long it takes and what to expect at every phase.
Whether you’re a seasoned DIYer or tackling your first curb repair, this timeline-focused approach ensures you stay on track and complete the job efficiently. Let’s dive into the step-by-step process of repairing that broken concrete curb corner.
For the full guide, see How to Repair a Broken Concrete Curb Corner: Forms, Dowels, and Texture Matching.
The Concrete Curb Corner Repair Timeline: Step by Step
Repairing a broken concrete curb corner involves several stages, each with its own duration and importance. Here’s a detailed timeline to help you understand the process:
- Inspection and Planning (15-30 minutes): Begin by assessing the damage thoroughly. Remove any loose material and plan your repair strategy.
- Gathering Tools and Materials (30-45 minutes): Based on your assessment, gather all necessary tools and materials. This includes safety gear, cleaning supplies, forms, dowels, concrete mix, and finishing tools.
- Preparing the Existing Curb (15-30 minutes): Clean the repair area, undercut any damaged edges, and roughen the surface to ensure proper bonding with the new concrete.
- Building Forms and Installing Dowels/Reinforcement (45-60 minutes): Construct sturdy wooden forms that align with the curb profile and grade. Install dowels or reinforcement following alignment and overlap guidance.
- Mixing Concrete (10-15 minutes per batch): Follow manufacturer’s instructions to mix a compatible repair material that matches the original curb’s texture. Mix only what you can place within 30 minutes to maintain workability.
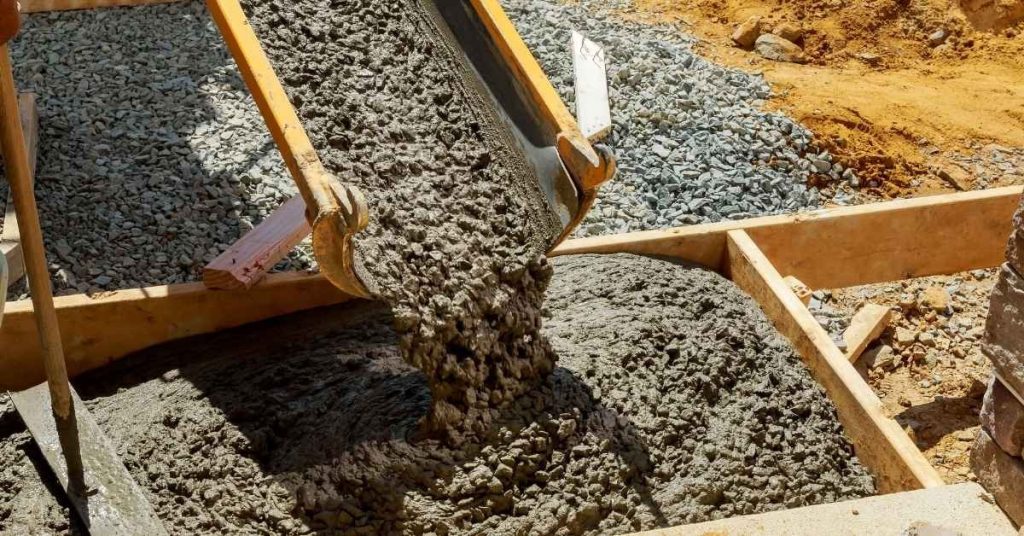
- Placing, Consolidating, and Finishing the Repair (30-45 minutes): Place the mixed concrete into the forms, consolidate it using a trowel or screed, and finish the face to match the local texture. Ensure proper alignment and heights throughout the process.
- Curing, Protection, and Cleanup (24 hours – 7 days): Protect the patch while it cures according to manufacturer’s instructions. Keep traffic limited during this time. Once cured, remove forms and clean up any remaining debris.
By following this timeline, you can complete your concrete curb corner repair efficiently and effectively. Keep in mind that these timeframes are approximate and may vary depending on the size of the repair, weather conditions, and other factors.
Key takeaways
The planning stage is crucial as it sets the foundation for the entire repair process and affects the overall schedule. Taking the time to assess damage thoroughly and gather necessary tools and materials ensures a smoother workflow and helps you stay on track with the timeline.
- Assess damage and plan before mixing, matching texture to curb edge.
- Choose repair materials compatible with existing concrete and traffic load.
- Build sturdy wooden forms that align with curb profile and grade.
- Install proper dowels or reinforcement to anchor new concrete.
- Wear PPE when mixing and applying; protect eyes, skin, and lungs.
- Cure under protection and monitor for cracking; keep traffic limited.
Table of Contents
- Introduction
- Key takeaways
- Assessing Damage and Planning the Repair
- Tools and Materials Checklist
- Preparing the Existing Curb for Repair
- Choosing and Mixing Appropriate Repair Materials
- Building Forms and Installing Dowels/Reinforcement
- Placing, Consolidating, and Finishing the Repair
- Curing, Protection, and Cleanup
- Common Mistakes, Troubleshooting, and Long-Term Durability
- Conclusion
- FAQ
Assessing Damage and Planning the Repair
Start by deciding whether the damage is a surface chip, a repairable structural break, or if the curb section needs partial or full replacement; inspect the crack pattern, depth, and any exposed reinforcement to guide that choice. If a number or spec matters—like dowel size or allowable movement—check the product data sheet, structural guidance, or a local code official before committing.
Next, check load-bearing and anchor points: look for movement at joints, separation between curb segments, soft or washed-out base material, and signs of moisture that could undermine a repair. Make a repair plan that lists the sequence of work, materials (patch mortar versus full-form concrete), dowel placement needs, texture-matching approach, required permits, weather window, access and bracing, and safety measures so you don’t discover missing items once demolition starts.
Inspect structural vs. cosmetic damage
First, look at the curb corner. Is it just a small chip on the surface? Or is there a deep crack or break?
Use a screwdriver to probe the damaged area. If it’s only surface deep, you’re likely looking at a cosmetic issue that can be patched.
But if the screwdriver goes in deep and hits something hard (like rebar), or if there’s movement when you push on the curb, it’s probably a structural problem. You might need to replace part or all of the corner.
Permits, traffic control, and site safety planning
Before you start, check if you need a permit. Some areas require them for curb repairs.
Next, plan how to keep people safe during the work. If it’s a busy area, you might need to redirect traffic or put up barriers.
Wear a hard hat, safety glasses, and gloves while working. Keep your workspace clean and clear of debris. And if you’re using power tools, make sure they’re in good condition and follow safety guidelines.
Project scope, time, and cost considerations
Decide on the scope of your repair. Can you patch it? Or do you need to rebuild the whole corner?
Patching is quicker but might not last as long. Rebuilding takes more time but should be stronger in the long run.
Estimate how much time and materials you’ll need. Remember, costs can vary depending on where you live and who supplies your materials.
Always get quotes from suppliers or contractors to make sure you’re getting a fair price.
Tools and Materials Checklist
Gather tools and materials rated for exterior concrete work and compatible with the repair product you’ll use; read labels and technical data to confirm ratings like ASTM or manufacturer-recommended uses. If a product requires a polymer-modified mix, fast-setting formulation, or specific freeze-thaw rating, verify that on the product data sheet before purchase.
Include hand tools (trowels, margin trowel, hammer, chisel, pry bar), cutting gear (reciprocating saw or jigsaw), mixing equipment (paddle mixer or mortar mixer), measuring tools (tape, level, chalk line), and cleanup items (broom, shop vac, hoses). For forms and reinforcement bring plywood or foam forms, stakes, form release, dowel sleeves or rebar chairs, and select exterior-rated patching mortars, bonding agents, polymer-modified repair compounds, texture-release or retarder, and PPE (safety glasses, respirator, gloves, knee pads, sturdy boots).
Essential tools and form materials
Before you start, make sure you have all the right tools and materials to build your corner forms and place concrete.
- Trowel: For smoothing and finishing concrete surfaces. Skip this, and you’ll struggle with a rough finish.
- Margin trowel: For edging and creating sharp corners. Without it, your curb may look sloppy.
- Hammer & chisel/pry bar: To remove damaged concrete sections. Don’t skip this step; it’s crucial for a solid repair.
- Reciprocating saw or jigsaw: For cutting out damaged curb sections cleanly. A hack job here can lead to poor results later.
- Mortar mixer or paddle mixer: To mix concrete and repair mortars evenly. Inconsistent mixing leads to weak, crumbly repairs.
- Chalk line & tape measure: For marking out cuts and form dimensions accurately. Mess this up, and your forms won’t fit right.
- Level: To ensure your curb is even and square. A crooked curb looks unprofessional.
- Plywood or foam curb forms: To recreate the exact curb footprint and corner radius. Cheap or warped forms can ruin your repair.
- Stakes & string: For securing forms in place and maintaining their shape. Sagging forms result in a poorly shaped curb.
- Form release agent: To prevent concrete from sticking to forms. Skipping this makes removing forms difficult, risking damage to your repair.
Quick rule: Always check your tools and materials before starting. Missing something crucial can set you back hours or even days.
Repair materials, bonding agents, and reinforcement
Choose the right repair products to ensure a strong, lasting fix for your curb corner.
- Exterior-rated concrete patch: For filling large voids or replacing missing sections. Using interior-grade patch can lead to cracking and crumbling in harsh weather conditions.
- Bonding agent/primer: To create a strong bond between old and new concrete. Skipping this can result in delamination, where the repair pops off over time.
- Polymer-modified repair mortar: For small repairs and resurfacing. Non-polymer mortars may not hold up to freeze-thaw cycles or heavy traffic.
- Surface retarder (optional): To match the texture of existing concrete. Without it, your repair might look different from the surrounding curb.
- Concrete dye or texture-release: For color and textural matching. Ignoring this can leave a visible patch that detracts from your curb’s appearance.
- Dowel sleeves or rebar placement aids (if using dowels): To ensure proper load transfer between old and new concrete. Without them, your repair may not hold up under pressure.
Quick rule: Always match repair products to the job at hand. Using the wrong product can lead to a poor, short-lived repair.
Safety equipment and consumables
Protect yourself and your work area with the right safety gear and cleaning supplies.
- Safety glasses: To protect your eyes from debris. Without them, you risk serious eye injuries.
- Dust mask/respirator: For breathing protection during cutting, chipping, and mixing. Inhaling concrete dust can cause lung issues over time.
- Gloves: To protect your hands from cuts, scrapes, and chemical exposure. Working without gloves can lead to injuries and skin irritation.
- Knee pads: For comfort and protection when working on the ground. Without them, you may struggle or injure your knees.
- Sturdy footwear: To protect your feet from falling objects and provide traction. Slipping or tripping can cause serious injuries.
- Broom & shop vac: For cleaning up debris before and after work. Leaving debris can lead to accidents or poor repair results.
- Hoses (water & air): For wetting out surfaces, cleaning tools, and removing dust. Without hoses, you may struggle with a dry, dusty work environment.
- First-aid kit: For treating minor injuries on-site. Always have one nearby in case of emergencies.
Quick rule: Never compromise on safety gear. It’s there to protect you and ensure a smooth, accident-free job.
Preparing the Existing Curb for Repair
Define how deep and extensive the damage is by checking crack depth, spalling, and whether rebar or dowels are exposed; that assessment tells you if a repair or a partial replacement is appropriate. When uncertain about structural adequacy or moisture conditions, consult product instructions or a professional to avoid undercutting a failed substrate.
Remove loose material with chisels, small demolition tools, or a grinder with containment to prevent debris spread and to expose sound concrete; keep surrounding landscape protected. After removal, clean dust and contaminants, profile the surface for a mechanical key (grit blasting, acid etch, or shot blasting per product guidance), check for no imminent rain and acceptable substrate moisture, then apply bonding agent per manufacturer instructions before placing repair material.
Cleaning and removing damaged concrete
Start by protecting adjacent surfaces with plastic sheets. Use a chisel and hammer to remove loose, delaminated concrete. For tougher spots, use a grinder with a diamond blade or pressure wash. Be careful not to damage the sound concrete.
Remove all contaminants like dirt, grease, or paint using a wire brush or pressure washer. Ensure the surface is clean and free of any debris that could hinder bonding.
Safety first: Wear appropriate Personal Protective Equipment (PPE), including safety glasses, gloves, and ear protection when operating power tools.
Making square, true edges and exposing reinforcement
Use a saw with a diamond blade to cut the break at an angle, creating stable edges. This helps prevent new cracks from forming at the repair site.
Exposed reinforcement? Inspect it for signs of corrosion or damage. If found, clean it using a wire brush and apply a rust inhibitor before proceeding.
If dowels are exposed, ensure they’re still securely anchored. If not, consider replacing them to maintain structural integrity.
Surface preparation and bonding readiness
Profile the surface using a grinder with a diamond blade or an acid etcher to create a mechanical key. This increases the surface area, promoting better adhesion of the repair material.
Check manufacturer recommendations for applying bonding agents or primers. Generally, apply them when the concrete’s moisture content is acceptable and no rain is imminent.
Protect surrounding areas: Apply sealant to any exposed edges or surfaces not being repaired to prevent damage from the repair process.
Choosing and Mixing Appropriate Repair Materials
Choose the material based on damage depth, exposure conditions, and loading: shallow chips can use a patching mortar while deep, load-bearing sections may need preblended repair mixes or full concrete replacement. Always follow the product datasheet for permitted uses, cure expectations, and substrate compatibility rather than guessing mix behavior in the field.
Compare options such as cementitious patch material, polymer-modified mortars, and fast-setting blends and match the choice to freeze–thaw exposure and service loads; remove rust and profile the substrate before applying. Mix following manufacturer directions for water content and working time, choose appropriate aggregate size for the repair depth, and consider whether dowels or reinforcement are required for load transfer and to maintain texture continuity with the existing curb.
Selecting the right product for depth and exposure
The first step in choosing your repair material is to assess the damage’s depth and exposure. Here’s how:
Shallow repairs (up to 1/2 inch): Use surface patch or trowelable mortar. These are quick, easy-to-apply solutions for minor cracks or chips.
Moderate repairs (1/2 inch to 3 inches): Opt for polymer-modified repair mortars or preblended mixes. They provide better bonding and durability than surface patches but aren’t as strong as full concrete replacement.
Deep repairs (over 3 inches): Consider full concrete replacement. This ensures the strongest, most durable repair but requires more time and effort.
Mixing techniques and additives
Proper mixing is crucial for a strong, lasting repair. Here’s how to do it:
Follow the manufacturer’s recommended water-to-mix ratio. Too much water weakens the mix; too little makes it unworkable.
Use a clean, durable mixing tool, like a drill with a paddle attachment or a sturdy shovel. Mix until the consistency is even and smooth.
Additives can enhance your mix’s performance. Consider these:
– Bonding agents: Improve adhesion to existing concrete.
– Plasticizers: Increase workability without adding water.
– Fibers: Reinforce the mix and control cracking.
Building Forms and Installing Dowels/Reinforcement
Measure the existing curb profile—radius, face angles, and height—so your temporary forms reproduce the curb geometry precisely and allow for a seamless joint. If you need exact specs for dowel diameter, embedment length, or spacing, check manufacturer instructions or structural guidance before drilling or installing anchors.
Build sturdy forms from plywood, melamine, or foam curb forms with bracing and stakes to resist pressure during placement, and use release agent on form faces. Lay out dowels or reinforcement to tie new concrete into old—set sleeves or chairs to hold dowels at the correct elevation and alignment, prepare mating surfaces by cleaning and priming if required, and use shims or string lines to align grade and edge before placing material.
Designing and securing corner forms
The first step in repairing a broken concrete curb corner is to create temporary forms that reproduce the exact profile of your existing curb. Here’s how:
1. Measure accurately: Take precise measurements of the radius, edge details, and overall geometry of your curb. This ensures your new piece matches perfectly.
2. Choose form materials: Select lightweight, reusable or disposable materials like plywood, melamine, or foam for your forms. Secure them with bracing to hold their shape during the pour.
3. Avoid blowout: To prevent concrete from blowing out during placement, ensure your forms are well-braced and fit tightly against the existing curb. Use wedges or shims if needed.
Dowel and reinforcement placement and anchoring
To tie your new concrete into the old, you’ll need to install dowels and reinforcement. Here’s how:
1. Choose dowel type: Select steel or fiberglass dowels based on your needs. Steel provides more strength but can corrode if not protected.
2. Drill and anchor: Drill holes in the existing curb for your dowels, ensuring they’re perpendicular to the surface. Use a hammer drill with a masonry bit for best results. Anchor dowels using epoxy or other suitable adhesive.
3. Space and protect reinforcement: Space reinforcement (rebar) according to local building codes, usually 6-12 inches on center. Protect it from corrosion by using plastic covers or coating with anti-corrosion agents.
Visual checkpoints for form fit and reinforcement
Before placing your concrete, perform these quick checks to ensure everything is in order:
- Form dimensions: Check that forms are the correct size and shape. Any discrepancies could lead to a poorly fitting repair.
- Slump clearance: Ensure there’s enough space between the form top and existing curb for concrete slump without overflowing.
- Reinforcement cover: Verify that reinforcement is properly placed and covered by at least 2 inches of concrete to protect against corrosion.
- Dowel alignment: Check dowels are straight, secure, and aligned with the existing curb’s reinforcement.
- Form bracing: Ensure forms are well-braced and won’t shift during pouring.
- Joint spacing: Confirm dowels and reinforcement are spaced correctly from joints to prevent cracking.
- Edge distance: Verify reinforcement extends far enough into the existing curb for proper bonding.
- Level and alignment: Use string lines or levels to ensure your new piece will match the grade, slope, and edge alignment of the existing curb.
Quick rule: If any checks fail, address them immediately. Skipping these steps could lead to a weak, poorly fitting repair.
Placing, Consolidating, and Finishing the Repair
Place the repair material into the form in controlled lifts if required, keeping the joint with the existing curb clean and aligned; mask adjacent surfaces to protect texture and color. Follow the repair product’s placement and working-time limits—consult the label or technical bulletin if uncertain about pot life or rework windows.
Consolidate the material to remove voids around dowels and in corners using tamping, poking with a rod, or light vibration without overworking the surface to avoid segregation. Finish to match the existing texture using edged tooling, broom, stamp, or hand-tossed technique as appropriate, and begin curing per product instructions—protect the repair from traffic, rapid drying, or freezing until it has reached adequate strength.
Placement and consolidation techniques
Start by placing your repair material into the form. You can do this in lifts, layering the concrete, or all at once if you’re experienced enough.
Vibration: Use an internal vibrator to eliminate voids. Work from the bottom up, ensuring no air pockets remain. Be careful not to overwork it though; too much vibration can cause segregation.
Tamping: For smaller repairs or where vibration isn’t feasible, tamping works well. Use a tamper tool to compact the concrete around corners and dowels. Again, avoid overworking.
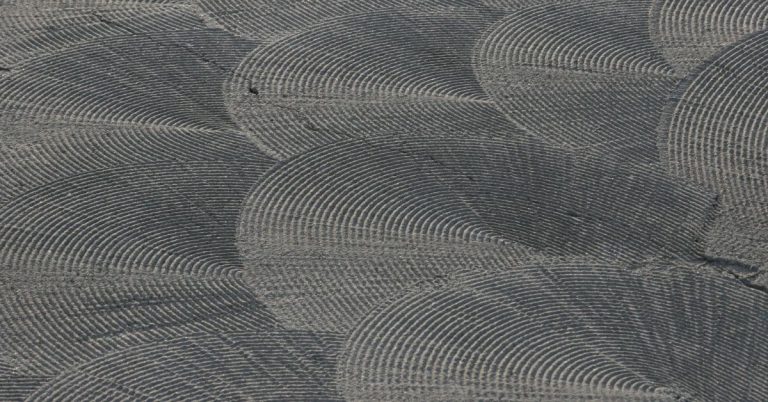
Texture matching and recreating tool marks
Matching texture is crucial for a seamless repair. Start as soon as the concrete has set enough to hold its shape.
- Broom finish: Use a stiff-bristled broom to create a textured surface. Work in one direction, applying even pressure.
- Stipple finish: For a more refined texture, use a stipple tool. Apply light, consistent pressure, working in small sections.
- Edge tooling: Use an edging tool to mimic the original curb’s edge profile. Work carefully, following the existing shape.
- Color matching: If your repair is visible, match the color by adjusting cement and aggregate ratios during mixing. Be patient; it takes practice.
- Sheen matching: The sheen can vary based on curing conditions. Shield the repair from direct sunlight during initial curing to maintain a consistent sheen.
Form removal, edge detailing, and touch-ups
Remove forms once the concrete has gained enough strength—usually after 24-48 hours. Be gentle to avoid damaging the repair.
Edge detailing: Use a trowel or edging tool to dress up the edges, ensuring they match the existing curb’s profile and shape. Work carefully; any mistakes will be visible once the forms are off.
Touch-ups: If you notice any minor imperfections post-form removal, address them immediately. Use a small trowel or putty knife to apply a thin layer of repair material, smoothing it out carefully.
Curing, Protection, and Cleanup
Start curing per the product recommendations as soon as the repair can hold curing protection without damage; check the datasheet for suggested curing methods and minimum protection windows. Choose a curing method—moist curing, curing compound, or plastic sheeting—based on local weather and the product’s guidance, and don’t guess timing if the label is specific.
Shield the repair from sun, wind, rapid temperature swings, and traffic until the specified cure is met, and manage washout water and spills to prevent environmental contamination. After form removal and final cure, clean tools and dispose of leftover materials and washout water according to local regulations and product disposal instructions.
Curing strategies and moisture control
Start curing your concrete curb corner repair as soon as it’s placed. For curb corners, a typical curing window is 7 days minimum, but longer is better for strength gain.
Moisture curing – like fogging or misting – helps keep the concrete hydrated and prevents shrinkage cracking. Use water blankets if needed. Chemical curing compounds can also be applied to protect from moisture loss. Plastic/sheathing barriers can help maintain a consistent temperature but may trap heat, causing rapid strength gain which isn’t ideal.
Temperature control is crucial. Ideal curing temperatures are between 50-80°F (10-27°C). If it’s colder or hotter, adjust your curing methods accordingly. In cold weather, use insulated blankets or heating systems. In hot weather, provide shade and keep the concrete cool.
Protecting the repair from traffic and weather
While your curb corner repair cures, protect it from heavy traffic. Place barriers to redirect foot or vehicle traffic away from the repair area.
Be mindful of weather conditions too. In freezing temperatures, use freeze-thaw protection like insulated blankets or heating systems. In hot weather, keep the concrete shaded and cool with wet burlap or other moisture-retaining materials.
Do not allow water to pool on the repair surface during curing. This can cause surface defects and weaken the concrete.
Also, protect adjacent surfaces from bonding or staining by applying a release agent before placing any protective coverings.
Site cleanup and maintenance tips
Once the repair is fully cured (usually after 28 days), remove all formwork carefully to avoid damaging the new concrete. Clean tools thoroughly with water, not chemicals, to prevent corrosion.
Recycle or dispose of curing blankets or plastic according to local guidelines. Do not dump them in landfills if your area has recycling programs for construction waste.
Schedule routine inspections and minor maintenance to extend the life of your repair. Check for signs of cracking, chipping, or other damage. Address any issues promptly to prevent further deterioration.
Common Mistakes, Troubleshooting, and Long-Term Durability
Watch for common errors like misaligned forms, improper dowel spacing, and inadequate substrate profiling that cause joint failures or cracking; inspect alignment and bond prior to placing material to avoid rework. If you need parameters for dowels, embedment, or spacing, verify those in manufacturer literature or structural guidance rather than assuming a one-size-fits-all solution.
For issues such as delamination, scaling, or early cracking, troubleshoot by checking surface profile, bond line cleanliness, mix consistency, and curing history—repair small failures by patching after proper preparation or remove and redo sections when structural integrity is compromised. Plan routine maintenance—inspect joints, keep drainage clear, and re-seal edges as needed—to extend life, and choose repair methods with durability appropriate to the expected loads and climate for longer-term performance.
Common errors and how to avoid them
To ensure a successful repair, steer clear of these common mistakes:
- Inadequate surface prep: Skipping proper cleaning, etching, or priming leads to poor bonding. Always clean and prepare the surface before applying new material.
- Wrong material choice: Using the wrong type or mix of repair mortar can result in weak repairs. Match the existing concrete’s composition for best results.
- Insufficient curing: Skimping on curing time allows moisture to escape too quickly, weakening the repair. Follow recommended curing times and methods.
- Poor joint handling: Neglecting expansion joints can cause cracking due to temperature changes. Ensure proper placement and maintenance of expansion joints.
By avoiding these common pitfalls, you’ll increase your chances of a long-lasting repair.
Troubleshooting early and late failures
If issues arise post-repair, follow this troubleshooting flow:
Early cracking or delamination: Inspect the repair site for any signs of moisture, improper curing, or inadequate bonding. If found, chip out the affected area and restart the repair process.
Late failures (cracking, scaling): Check for excessive loading, freeze-thaw damage, or poor joint maintenance. Address these issues by reinforcing, sealing joints, or performing localized repairs as needed.
Regular inspections help catch potential problems early, preventing costly rework and extending the life of your repair.
Durability comparison and maintenance schedule
Understand the expected longevity of different repair methods:
Patching mortars: Quick and easy, but may not last as long as full replacement. Expect 5-10 years with proper maintenance.
Full replacement: More labor-intensive, but provides a longer-lasting solution. Expect 20+ years with routine care.
To preserve your repair, follow this simple maintenance schedule:
– Inspect annually for signs of cracking or damage.
– Seal joints every 3-5 years to prevent water intrusion.
– Clean and touch up any minor defects promptly.
– Reapply protective edging as needed.
Conclusion
Fixing a broken curb corner is doable, but the job hinges on proper planning, solid form work, and a durable repair that blends with the texture. When you do it right, you get a curb that looks good, lasts longer, and keeps your edge safe for pedestrians and vehicles.
First, lock in a practical plan: inspect damage, prepare the curb area, mix the right repair material, build a clean form, install any needed dowels, place and consolidate the repair, then cure and protect. Move step by step in that order, check alignment and heights often, and test a small area first to verify adhesion and texture before full exposure. Keep safety gear on, work with dry materials when possible, and clean up as you go to avoid costly mistakes.
Common mistakes to avoid include rushing the form setup or skipping dowels, which weakens the repair at load points; using the wrong mix or not properly curing, which leads to cracking or surface mismatch; and neglecting texture matching, which stands out and invites future repairs. Always verify the substrate is sound, follow the material guidance, and protect the work zone from rain or traffic during curing.
If the damage is excessive, the curb sits on a slope, or you’re unsure about the dowel layout or load paths, call a professional. When in doubt, don’t push past your limits—get a quick estimate and a second pair of eyes on the form and joints. Stay patient, stay deliberate, and you’ll finish with a curb that’s strong, safe, and hard to tell from new.
FAQ
What repair material should I choose for a broken curb corner, and what should I look for on the label or instructions?
Look for a repair material labeled for exterior concrete repair and curb use. Check the manufacturer instructions for patch depth, surface prep, and curing guidance. If in doubt, compare options by how well they bond to old concrete and how they handle freeze-thaw cycles.
How do I prep the damaged area before applying the repair material?
Clean out loose concrete and dust with a stiff brush. Rinse and let it dry as directed by the product instructions. Roughen the surface to give the new material something to grab onto, then dampen it if the product requires moisture for bonding.
What’s the right way to build wooden forms for a curb corner repair?
Build a tight, square form that matches the existing curb and corner profile. Use straight boards and layer them with release agent so the new concrete can be removed cleanly. Secure corners with clamps or bracing so the form doesn’t spread or leak during pouring.
How should I mix and apply the repair material, and how do I avoid texture mismatches?
Follow the product label for mixing steps and consistency. Mix only what you can place per the instructions to avoid cold joints. When finishing, skim the surface with the texture you want and, if needed, use a roller or brush to mimic the curb’s texture while the material is workable.
What should I do if the damage is deep or in a tight corner, and texture matching is tricky?
For deep damage, fill in layers as the product allows and cure between pours if required. For corners, build up gradually and shape with a tool while it’s plastic. If texture is off, practice on a scrap piece first or use a consistent finishing technique across the repaired area.