
Introduction
Cracks in a home can indicate serious foundation problems or simply surface issues, and this guide helps you tell the difference.
You’ll learn practical ways to assess crack type and progression, so you can decide what actions are necessary.
The guide walks through common crack patterns, simple observations you can make, and when it’s wise to seek professional evaluation.
Key takeaways
- Differentiate hairline surface cracks from wider foundation cracks for safety.
- Measure crack width monthly with a precision ruler to spot growth.
- Record locations and patterns to distinguish settling vs. moisture-induced issues.
- Use room-by-room checks: doors, windows, slabs, and basement walls for signs.
- Non-structural fixes include hairline fillers and drainage improvements only.
- When in doubt, stop DIY and consult a licensed structural professional promptly.
Table of Contents
- Introduction
- Key takeaways
- Quick primer: why distinguishing crack types matters
- Identifying the main crack types and what they usually mean
- How to assess crack severity: measurements, patterns, and timing
- Common causes behind foundation and surface cracks
- Visual checkpoints: what to inspect room-by-room
- DIY tools and materials checklist
- Step-by-step DIY fixes for non-structural cracks
- DIY limitations and safety — when not to proceed
- When to call a professional: red flags and triage rules
- Professional repair options explained (what to expect)
- Cost guide and decision matrix: DIY kits vs professional scope
- Preventive measures to avoid future cracks
- Project planning, timing and follow-up monitoring for DIY repairs
- Common DIY mistakes and how to avoid them
- Region-specific considerations: soil, climate and local codes
- Visual checkpoints and printable quick reference (for field use)
- Conclusion
- FAQ
Quick primer: why distinguishing crack types matters
Goal: help homeowners tell cosmetic cracks from structural issues, reduce panic, and establish clear thresholds for when DIY is appropriate versus when a licensed professional is needed. By framing a safe, stepwise approach, the guide sets expectations, avoids unnecessary alarm from normal settling, and outlines what limits DIY can reasonably have before formal assessment and remediation are required. It emphasizes practical limits, the importance of basing judgments on consistent observations rather than a single crack, and the need to pause DIY when potential signs of a larger problem appear.
You’ll learn to recognize crack typologies worth noting—hairline versus wide, vertical versus horizontal versus stair-step patterns—and ND indicators like settlement or shrinkage that help separate cosmetic issues from structural risk. Telltale signs pushing toward a professional evaluation include cracks that widen or move over seasons, doors and windows sticking, uneven settlement, an apparent slope, or cracks that traverse foundations or slabs, with width measured by a simple gauge. For safe DIY steps, perform a visual check, record location (interior or exterior), photograph changes, avoid probing or lifting, address drainage and moisture, and organize a basic monitoring plan that you can share with a pro along with photos, measurements, and time-lapse notes.
What this guide will (and won’t) do for you
I focus on practical, visual checks you can do safely from the ground or inside your home. Expect clear signs to look for, a simple way to measure crack width, and basic DIY fixes for cosmetic, non-moving cracks. I’ll also show the red flags that mean it’s time to call a pro.
This is not a substitute for a structural inspection. I won’t provide engineering calculations or step-by-step structural repairs. If you see continuous movement, wide horizontal cracks, or cracks through footings, stop DIY and get a licensed professional.
Use this guide to reduce panic, gather the right photos and notes, and decide whether to monitor, patch, or hire help.
Key terms homeowners should know
Hairline: very thin surface cracks under 1/16″ often from paint or plaster shrinkage. Width: the gap size—measure with a simple gauge or a coin. Movement: any change in width or length over weeks or seasons.
Diagonal/Diagonal settlement: slanted cracks often linked to uneven settling. Stair-step: stepped cracks following masonry joints — more likely structural. Hydrostatic pressure: water pushing against foundations, can cause bowing or leaks.
Injection: a professional repair method for sealing and stabilizing cracks. Underpinning: a structural solution to lift and stabilize a sinking foundation. Knowing these terms speeds communication with a contractor.

Identifying the main crack types and what they usually mean
You’ll encounter several main crack patterns, each with different implications for safety and repair. Stair-step cracks that zigzag across blocks, horizontal and vertical cracks, and diagonals toward corners trace how the structure moves, while hairline separations versus widened gaps signal different severities and causes such as settlement, soil movement, shrinkage, freeze–thaw, or water intrusion. Knowing which foundation style you’re looking at (slab, basement, crawlspace) helps you interpret whether a crack is mainly cosmetic or a sign of underlying structural movement.
Use simple diagnostic cues: measure width, watch for growth, note if cracks align with doors or windows or cross joints, and track changes after rain or seismic events. If cracks widen over time, appear after moisture events, or doors won’t shut, that’s a sign to bring in a professional rather than attempt DIY fixes. Keep a practical, safety‑minded checklist by documenting with photos, taking ruler measurements, and noting environmental factors, while acknowledging regional foundation differences to avoid over-generalization and to interpret patterns in the context of your home.
Vertical and near-vertical cracks
Vertical hairline to 1/4-inch cracks commonly show up in slabs, poured walls, and block foundations. They often come from normal settlement, concrete curing shrinkage, or thermal movement and are frequently low-risk if stable in width and length.
Watch for signs that raise concern: a crack that widens beyond 1/4 inch, grows over months, or lines up with sticking doors or sagging floors. If a vertical crack runs continuously through masonry units or across multiple walls, it may signal more than simple shrinkage and merits closer inspection.
Diagonal and stair-step cracks (masonry/block)
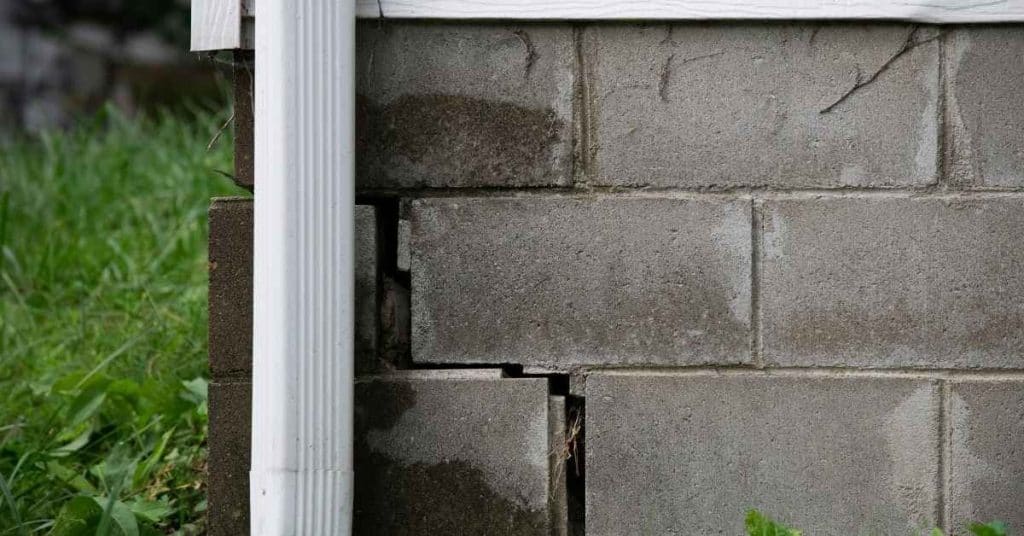
Diagonal or stair-step cracks through mortar joints and blocks usually point to differential settlement — one side of the foundation is moving more than the other. These are common in crawlspaces and basement block walls where soil conditions vary.
These cracks can be cosmetic at first but often indicate ongoing movement. Measure width, note whether cracks follow mortar joints versus cutting through units, and monitor for change. New, widening, or paired diagonal cracks near corners or openings should prompt a professional evaluation.
Horizontal cracks and bowing walls
Horizontal cracks, especially in basement block or poured walls, are the most concerning. They usually result from lateral soil pressure, frost heave, or hydrostatic forces and can precede wall bowing or collapse.
If a crack runs parallel to the floor, is wider than 1/4 inch, or is accompanied by a bulge or inward movement, treat it as serious. These patterns often require structural repair or engineering input rather than DIY patching.
Hairline, crazing, and shrinkage cracks
Fine surface cracks — hairline, crazing, or shrinkage — are common in cured concrete and plaster. They usually reflect normal drying or thermal shifts and are largely cosmetic on slabs and above-grade walls.
Even small cracks can let in water or pests, so document them with photos and a ruler. Repair options range from simple sealants to repainting, but if they widen or coincide with other movement, step up to monitoring or professional assessment.
How to assess crack severity: measurements, patterns, and timing
A repeatable crack assessment uses simple measurements and pattern notes to gauge severity and reliably track changes in width, length, depth, and direction over time for a given structure. Measure width with a crack gauge or coin test, length with a tape, and record depth, orientation, location, and any movement you observe, noting whether they occur at joints, corners, or along a single plane. Create a small chart or diagram to keep results consistent across inspections, show baseline versus progressive readings, and make it easy to compare readings at future visits.
This approach helps homeowners distinguish movement from surface shrinkage by cataloging patterns (horizontal, vertical, stair-step, diagonal, or random) and noting exact locations, such as walls, joints, doors, and windows, so you can infer likely causes. Take baseline readings now, then recheck at set intervals (for example 30 and 90 days, or after significant weather events), documenting widening, new cracks, or faster movement to decide when a professional inspection is warranted. Keep photos and measurements organized to support a homeowner action plan, including clear thresholds (like cracks wider than 1/4 inch), temporary stabilization steps, and a step-by-step guide for contacting a structural professional if needed.
Step-by-Step Process
A simple, repeatable sequence to evaluate cracks safely and reliably.
- Prepare the area and safety gear. Clear loose debris and wear gloves and eye protection so you can work clean and avoid injury; a tidy workspace means better measurements.
- Document baseline condition. Photograph the crack, note wall/floor location, and sketch a quick diagram so you have a reference; a clear baseline prevents guesswork later.
- Measure width, length and depth. Use calipers, a coin test, and a tape; record numbers on your chart so you can compare future checks.
- Note pattern and orientation. Identify stair-step, horizontal, diagonal or hairline and mark exact start/end points; pattern points toward likely causes.
- Mark and date ends for tracking. Scratch small pencil ticks or use removable tape at fixed points so later checks are exact; inconsistent marks give useless data.
- Set recheck schedule and triggers. Reinspect at 30 and 90 days, plus after heavy weather or excavation nearby; set alarms to keep discipline.
- Finalize notes and store records. Save photos, measurements and a short severity note