
Introduction
Tape can fix small, stable plaster cracks, but larger or shifting cracks require stabilization.
The guide helps you assess crack movement and decide when to use tape versus structural repair, then walks you through practical steps and tips to perform each method.
You’ll learn how to prep the ceiling, apply repairs cleanly, and avoid common mistakes to keep a plaster ceiling durable.
Key takeaways
- Differentiate hairline cracks from wide settlement cracks to prioritize repair.
- Assess severity: movement, moisture, and sounds indicate instability or water damage.
- Taping is appropriate for stable, clean cracks with minimal movement.
- Stabilization needed when plaster detaches, bows, or shows continuous movement.
- Stabilization methods include mechanical anchors, lath repair, or mesh reinforcement.
- Follow a step-by-step workflow: diagnose, prep, stabilize, tape, finish, cure.
Table of Contents
- Introduction
- Key takeaways
- Quick overview: types of plaster ceiling cracks
- How to assess severity and risk
- When drywall tape (or paper/fiberglass tape) is appropriate
- When you need stabilization instead of (or before) taping
- Stabilization methods for plaster ceilings
- Step-by-step DIY stabilization + repair workflow
- Tools, materials checklist and material specs
- Cost, time estimates, and decision guide: DIY vs professional
- Maintenance, prevention, and common pitfalls to avoid
- Conclusion
- FAQ
Quick overview: types of plaster ceiling cracks
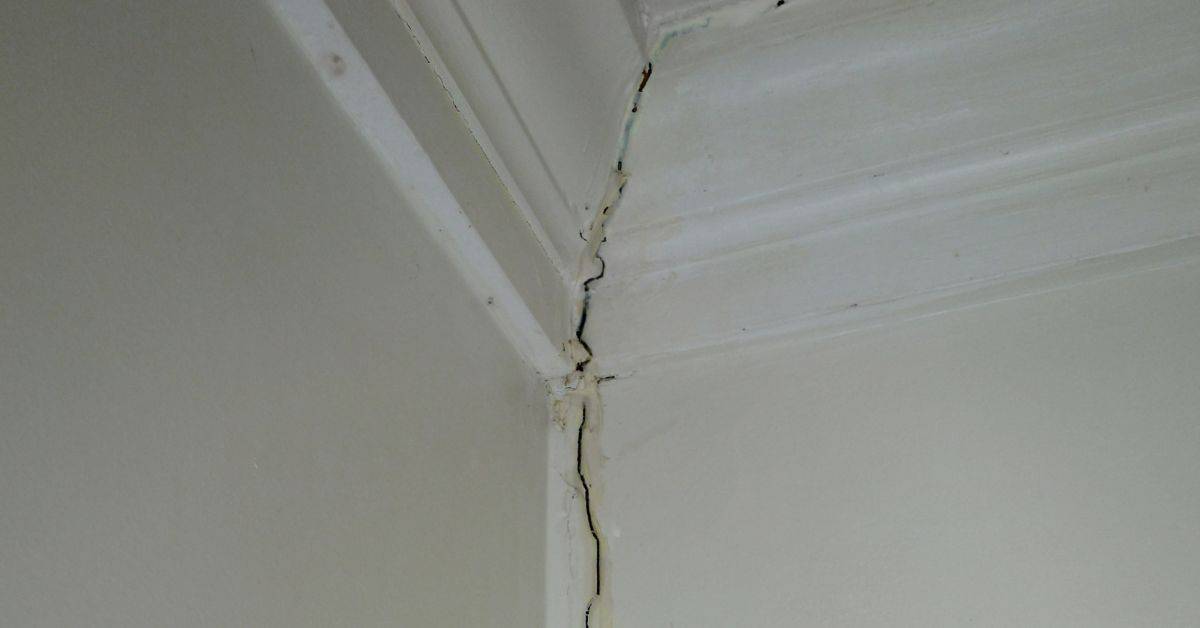
Ceiling cracks fall into a few main types. Hairline, shrinkage, settlement, and structural cracks each have distinct looks and spots, so you can preliminarily classify damage.
Hairline cracks stay thin and run along joints or corners. Shrinkage cracks are small, irregular lines near the ceiling edge as plaster dries. Structural cracks are wider and can run through the board or across the room; if you notice step-like patterns, doors sticking, or widening cracks, stop and assess with care.
Hairline and shrinkage cracks
Hairline cracks are the kind that look like thin lines, barely noticeable but hard to miss once you spot them. They’re usually cosmetic issues, not structural problems. Shrinkage cracks come from drying out or thermal movement, which means they happen when your plaster dries up too fast or changes with temperature shifts.
If you see these cracks, don’t panic. They often appear in new plaster as it settles and dries. The main thing is to check the base compaction before starting any work; if that’s solid, then chances are good your ceiling just needs a little TLC. Use a hairline crack filler for cosmetic touch-ups.
Avoid overreacting by trying to fix these cracks with heavy-duty methods like re-plastering or adding supports unless you see signs of real structural weakness. That’s just overkill and can cost you more than it’s worth.
- Action steps if you suspect cosmetic cracks exist: clean the area; lightly sand or abrade the crack edges; apply a matching filler or caulk suitable for plaster ceilings; smooth, prime, and repaint. Reassess after 24–48 hours for any widening.
- Safety tip: wear eye protection and a dust mask when sanding or abrading plaster, and keep the work area ventilated.
Settlement and foundation-related cracks
Wider, stepped, or diagonal plaster ceiling cracks often signal serious issues with your home’s structure. These aren’t just surface-level problems; they can indicate that the house is settling unevenly due to poor base compaction. This kind of crack needs immediate attention from a professional.
If you see these types of cracks, don’t ignore them. They might mean your foundation isn’t stable enough to support your home’s weight properly. Hairline and shrinkage cracks are one thing, but settlement cracks can lead to major structural problems if left unchecked.
When dealing with settlement-related cracks, it’s crucial to address the underlying cause rather than just patching up the surface damage. Look for signs of water leakage or soil instability around your home’s foundation as well. These issues could be contributing to the movement and cracking in your ceiling plaster.
- Action steps: document crack length, width, and location with photos; monitor for progression over 2–4 weeks; consult a structural engineer or foundation specialist if cracks widen more than 1/8 inch or show increasing step-patterns; check for plumbing leaks or irrigation issues that could aggravate movement.
- Do not attempt to re-tie or re-plate the ceiling during active movement; stabilization must precede any cosmetic repairs.
- Cost awareness: early professional assessment can prevent larger structural repairs; budget a preliminary inspection plus any foundation or drainage work that may be recommended.
When dealing with settlement-related cracks, it’s crucial to address the underlying cause rather than just patching up the surface damage. Look for signs of water leakage or soil instability around your home’s foundation as well. These issues could be contributing to the movement and cracking in your ceiling plaster.
Lath failure and plaster delamination
When you see bulges or areas where the plaster is pulling away from the lath, it’s a sign of serious structural issues. This type of crack means the base isn’t stable enough to support the plaster anymore. Check base compaction and look for signs that the lath might be failing.
If you find plaster delamination, don’t just patch it up with filler; it’s like putting a bandaid on a broken bone. You need to stabilize the area first or the problem will come back worse than before. This often means replacing damaged laths and reinforcing the base structure.
Ignoring this type of crack can lead to bigger headaches down the road, including more extensive damage and higher repair costs. Take action as soon as you spot it to prevent further issues.
- Stabilization steps: assess whether the existing lath is sound; if rust or deterioration is evident, plan for lath replacement or retrofitting with a modern mesh; ensure the substrate is solid before any plaster repair; re-adhere with appropriate bonding agents.
- Repair sequence: remove loose plaster, clean the lath, apply bonding agent, install new lath or reinforcing mesh, re-plaster using recommended mix, then tape joints and finish as needed.
- Cost considerations: lath replacement can be labor-intensive; factor in material costs for lath, plaster, bonding agents, and potential professional labor if multiple areas are affected.
How to assess severity and risk
This is about quickly judging how bad a ceiling issue is. Do simple checks you can trust, like tapping for hollow spots, probing soft edges, and measuring crack width to gauge urgency. If you see wide cracks, sag, or new movement, treat it as serious and act fast. Before you start stabilization or repairs, run a quick safety and stability check: confirm you understand load paths, and plan temporary support to keep the ceiling from shifting or collapsing while you work.
Use these checks to decide if you can safely shore and monitor, or if you need a pro. Never work under a sagging ceiling or near cracking walls; clear the area and support only with proper temporary methods. Small signs can hide big failures, so err on the side of caution and call for help if in doubt.
Step-by-Step Process
This sequence will guide you through assessing the severity and risk of a concrete project, ensuring safety and accuracy.
- Action: Conduct a rapid structural risk assessment before touching anything: identify load-bearing members (joists, beams), check for signs of active movement (gaps opening or closing, new cracks), and note any electrical or plumbing hazards.
Reason: Knowing the load path helps you plan safe stabilization and reduces the risk of a sudden failure.
Check: Look for sag in the ceiling, leaning walls, or cracking that escalates with seasonal changes.
Call pro if: You detect active movement, significant sag, or you’re unsure how to safely shore the area. - Action: Establish a temporary shoring plan and scaffold setup if needed, using rated materials and following manufacturer guidelines.
Reason: Proper temporary support prevents collapse during repairs and protects both you and bystanders.
Check: Verify load ratings on lumber, ensure supports transfer load to solid framing, and place supports on stable ground.
Call pro if: You’re unsure how to design or install shoring or scaffold systems. - Action: Review project plans and safety guidelines briefly.
Reason: Ensure you understand the scope and requirements before proceeding.
Check: Confirm all necessary tools and materials are on-site.
Call pro if: You find critical details missing or unclear. - Action: Set up safety barriers around work areas.
Reason: Protect yourself and others from falling debris or tripping hazards.
Check: Ensure all barriers are visible and secure.
Call pro if: You need help setting up complex scaffolding. - Action: Perform a quick surface test to check for moisture or cracks.
Reason: Moisture can weaken concrete, while cracks indicate structural issues.
Check: Use a hygrometer and look closely at the surface.
Call pro if: You find extensive cracking or high moisture levels. - Action: Take measurements of critical areas for accuracy.
Reason: Accurate dimensions ensure proper fit and function of new concrete elements.
Check: Double-check all measurements with a tape measure.
Call pro if: You find discrepancies that could affect structural integrity. - Action: Wait for curing time as per manufacturer’s guidelines before final checks.
Reason: Fresh concrete needs time to set properly and reach full strength.
Check: Use a curing meter or wait the recommended days.
Call pro if: The surface shows signs of cracking or uneven setting. - Action: Conduct final inspections for quality control.
Reason: Ensure all work meets safety and performance standards.
Check: Look for any defects, such as cracks, air pockets, or improper slopes.
Call pro if: You find significant issues that compromise the project’s integrity.
Pro tip: Always wear protective gear and keep a first aid kit handy. Safety is non-negotiable on any site.
Measuring and recording cracks
To assess the severity of cracks in your concrete, start by measuring their width and length. Use a ruler or calipers to get precise measurements. Don’t just look at them once; document changes over time. This helps you track if the crack is growing, which can indicate bigger issues like poor base compaction.
Record your findings in a notebook with dates and descriptions. Include photos for visual reference. If cracks are widening or showing up frequently, it’s a sign that something isn’t right under the surface. Address these early to prevent more costly repairs later on.
When deciding on repair methods, refer back to your measurements and notes from earlier in this process. This data will guide you towards the best approach without guesswork. Remember, ignoring cracks can lead to major structural problems down the line.
Signs that indicate structural concern
If you spot cracks wider than 1/8 inch, especially if they’re growing rapidly or appearing in multiple converging lines, it’s time to act. These aren’t just cosmetic issues; they signal serious structural instability. Don’t wait—call a pro.
Sagging floors or walls are another major red flag. If you notice any drooping, it means the foundation isn’t supporting the weight as designed. This can lead to further damage if not addressed right away. Check base compaction and soil conditions too; they might be contributing factors.
When moisture is involved
Water can be a real headache in concrete work. If you spot water stains, active leaks, or mold, it means there’s serious moisture intrusion. This changes everything because now you’re dealing with more than just surface damage; you’ve got to address the source of the leak and ensure proper drainage.
Mold is your enemy here. It not only ruins concrete but also poses health risks. If you see any signs of mold, act fast—clean it up thoroughly and find out where the water’s coming from. This might mean checking for cracks in walls or floors that allow moisture to seep through.
Don’t just patch up the surface; fix the problem at its root. Look into waterproofing options if necessary. And remember, proper drainage is key—make sure water isn’t pooling around your concrete and causing more damage.
When drywall tape (or paper/fiberglass tape) is appropriate
Drywall tape is a durable fix for stable cracks in drywall seams and plaster where the substrate is solid and the crack is relatively small. Use joint tape when the crack runs along a seam or is hairline to a few millimeters wide. If the crack is wide, stepping, or keeps opening, tape alone won’t hold; you need to address the cause first.
- Assessment to guide your approach: Confirm the crack is stable (not widening over time) and the surrounding material feels solid to the touch. If you see movement, widening at the edges, or signs of moisture, stabilization or addressing the underlying cause comes first.
- Moisture and cause check: Look for water stains, mold, or a history of leaks. Do not tape over active water intrusion without stopping the flow and repairing the source.
- Sizing and scope: If the crack is hairline to a few millimeters, drywall tape is usually appropriate. For cracks wider than about 1/4 inch (6 mm) or with visible stepping, plan for stabilization or reinforcement before taping.
- Cost and time expectations: Tape repairs are typically faster and cheaper than full stabilization repairs, but if the substrate is moving or the area is soft, you’ll likely spend more time and materials fixing the root cause.
- Safety and prep: Wear eye protection and a dust mask when cleaning and sanding. Clear the area and protect floors and furnishings before starting.
Paper, fiberglass, or fiberglass-reinforced tape helps strengthen the joint and keep paint from cracking again, but it won’t fix a moving wall or a water problem. Taping over small, stable cracks is faster, cheaper, and usually looks good if you mud and sand cleanly. If you skip prep, use the right tape, and use proper mudding technique, you’ll save time and avoid repeating repairs.
Preparing cracks for tape repair
Clean the crack thoroughly. Use a wire brush and vacuum to remove all dirt, dust, and debris. If you see any loose material, scrape it off with a putty knife or similar tool.
Slightly widen or recess the crack to ensure good coverage of your tape and compound. This step is crucial for preventing future cracks from reappearing in the same spot. Check base compaction before widening; if the area feels soft, address that first.
Apply a primer or bonding agent to the cleaned surface. This helps create a strong bond between the drywall tape and the wall material. A good coat will prevent air bubbles under the tape and ensure your repair lasts longer.
Choosing tape type: paper vs fiberglass vs mesh
When it comes to drywall tape, you’ve got three main options: paper, fiberglass, and mesh. Each has its pros and cons.
Fiberglass tape is the strongest option, with minimal shrinkage once it dries. It’s great for large cracks or areas that need extra reinforcement. But it can be a bit trickier to work with because you have to feather out the compound more carefully to avoid bumps.
Paper tape is cheaper and easier to apply but tends to shrink slightly. This means you might see some wrinkles if not applied correctly, which could lead to cracks later on. It’s best for small repairs where precision isn’t as critical.
Mesh tape, meanwhile, offers a good balance between strength and ease of use. It doesn’t shrink like paper tape but is easier to work with than fiberglass. Mesh tape also allows the compound to spread more easily around it, making your finish smoother without much effort.
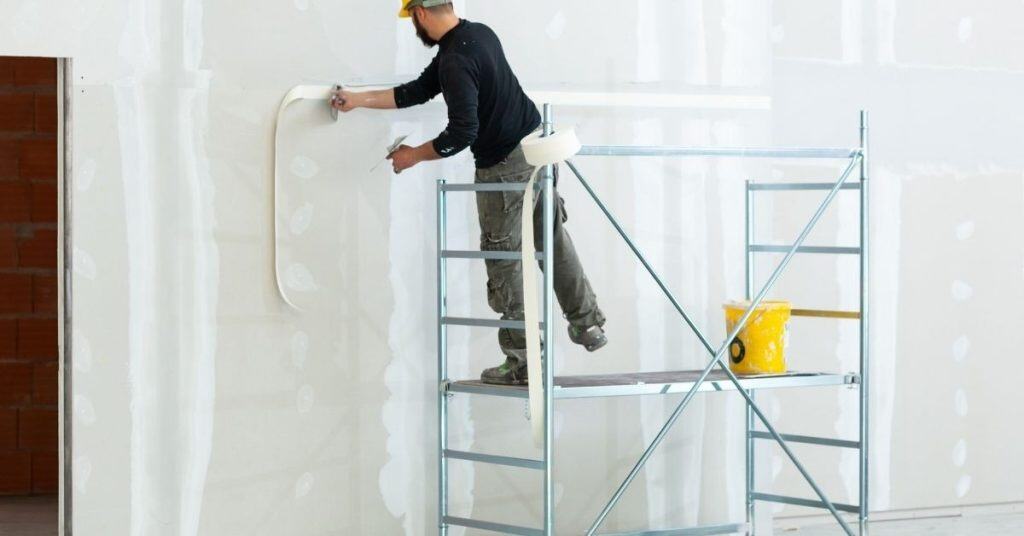
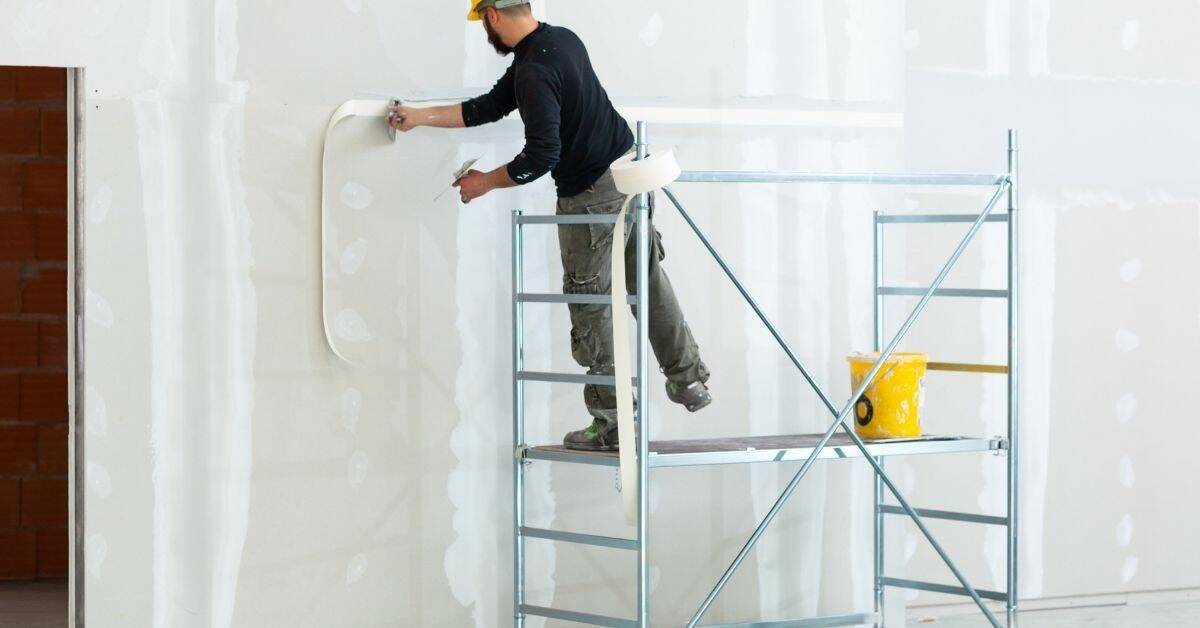
Step-by-step taping technique for plaster ceilings
This sequence will guide you through embedding drywall tape into a plaster ceiling to ensure smooth, long-lasting repairs.
- Action: Apply a thin layer of joint compound over the crack or seam using a 6-inch knife.
Reason: This seals the area and provides a base for the tape.
Check: The surface should be smooth, without ridges or gaps. If you can see the crack through the compound, reapply more compound.
Call pro if: The plaster is crumbling; it’s time to patch with new material. - Action: Lay the drywall tape over the joint compound and press firmly into place using a 6-inch knife.
Reason: Embedding the tape ensures it adheres well, preventing future cracks.
Check: The tape should be flat with no bubbles or wrinkles. If you see any imperfections, smooth them out immediately.
Call pro if: You notice significant plaster damage that needs professional repair. - Action: Apply a second thin layer of joint compound over the embedded tape using a 10-inch knife.
Reason: This covers the tape and begins to feather out the edges for a smooth finish.
Check: The surface should be even with no visible tape or compound ridges. If you can still see the tape, add another thin layer.
Cure time: Allow this coat to dry completely before applying additional coats. - Action: Apply a third and final thin layer of joint compound over the previous coat using a 12-inch knife.
Reason: This further feathers out the edges, blending them into the surrounding plaster for an invisible repair.
Check: The surface should be smooth with no visible seams or tape. If you can still see any imperfections, feather it out more.
Cure time: Let this coat dry completely before sanding. - Action: Sand the dried compound lightly to remove ridges and ensure a smooth surface.
Reason: Proper sanding ensures that the repair blends seamlessly with the surrounding plaster.
Check: The surface should feel smooth when you run your hand over it. If there are any rough spots, sand them down further.
Cure time: Allow the compound to cure fully before painting or applying a final coat.
Pro tip: Always use a damp sponge to clean off excess dust after each sanding session. This keeps your work area neat and ensures better adhesion for subsequent coats.
When you need stabilization instead of (or before) taping
Sometimes you need stabilization before you tape. If the plaster is loose or delaminated, the lath is failing, there is active structural movement, or cracks are wide, tape won’t hold. Stabilization stops movement so tape can do its job.
Stabilization sets a solid base so repairs last. This matters on a DIY jobsite because skipping it means crack reopening, patch failure, and wasted time. Understanding when to stabilize saves you time and money.
Identifying bonded vs unbonded (hollow) plaster
To spot hollow spots in your walls, start by tapping the surface. A solid thud means it’s bonded well to the wallboard or lath behind it. If you hear a dull echo, that area is likely unbonded and needs attention.
Use a small probe or screwdriver to poke around areas where plaster feels loose. You’re looking for spots that don’t resist pressure, indicating they’ve pulled away from the backing material. These hollows need stabilization before you can move on with taping.
Hollow plaster isn’t just unsightly; it’s also a weak spot that can lead to cracks and further damage down the line. Don’t skip this step—fixing these issues now saves headaches later.
Temporary stabilization vs permanent repair
When dealing with plaster damage, you’ve got two main options: quick fixes for now and full repairs later. If the plaster is just loose but still in one piece, use temporary measures like shims or screws. This buys you time to plan a proper fix without letting things get worse.
But if there’s serious damage—like big cracks or chunks missing—you can’t just slap on some tape and call it done. You need to think about whether the plaster needs replacing entirely or if you can reattach it properly with new anchors or adhesive. Don’t rush into a half-baked solution; take your time to assess the extent of the damage.
Remember, shims and screws are just band-aids. They keep things from falling apart but won’t make them look good or last long-term. So while you’re stabilizing, also plan out how you’ll do a proper repair soon after. Don’t let temporary fixes become permanent problems because of laziness.
Risks of skipping stabilization
If you skip the stabilization step, you’re setting yourself up for trouble. Cracks that were just starting to show can reopen and spread wider than before. This isn’t just a cosmetic issue; it’s structural. Plaster that’s not stabilized properly might fall off walls or ceilings, causing damage and posing safety risks.
Ignoring the need for stabilization means you’re likely overlooking underlying issues like unstable foundations. These problems won’t go away on their own—they’ll only get worse over time, leading to more extensive repairs down the line. This can be a costly mistake since fixing major structural flaws is far pricier than addressing them early.
To avoid these headaches, make sure you check base compaction and address any hollow spots in your plaster before moving on to taping or other cosmetic fixes. It’s like laying a solid foundation for a house—skip it at your peril.
Stabilization methods for plaster ceilings
Stabilizing plaster ceilings means picking the right repair for the looseness you see. Use plaster washers for light delamination, backing strips for larger gaps, resin injections for hollow spots, and selective re-lathing for stubborn sag. When matched to the problem, expect durable results that last years.
These techniques give you a clear plan and avoid guesswork on a DIY job. Choosing the right method reduces future squeaks, cracks, and call-backs, and helps you finish with a solid, long-lasting ceiling.
Plaster washers and screw-and-clip methods
If your plaster ceiling is sagging, using wide-head screws with washers can be a quick fix. Screw into the lath behind the plaster to pull it tight. This method works best when you’ve already checked that the base compaction is solid.
For a more secure hold, use screw-and-clip methods where you drive in a screw through a metal clip attached to the lath. The clip spreads out against the back of the plaster, providing extra grip and stability. This approach is especially useful if your ceiling has large gaps or loose sections.
Avoid hammering screws directly into the plaster as it can crack and weaken the surface further. Always go through the lath to ensure a strong hold without damaging the plaster face.
Installing backing strips and nibs
If your plaster ceiling is sagging at the edges, you might need to install backing strips behind it. Use plywood or wood strips, not metal, because wood flexes a bit with temperature changes and won’t crack the plaster.
To secure loose edges, place the backing strip along the perimeter where the ceiling meets the wall. Screw it in firmly but don’t over-tighten—too much pressure can damage the plaster. If you need to stabilize specific spots within the ceiling, use adhesive backing nibs instead of strips for a more targeted fix.
Remember, before installing any backing, check base compaction. Loose framing can cause your fixes to fail over time. And always refer back to earlier sections on plaster washers and screw-and-clip methods if you need alternative solutions.
Full re-lathing and plaster replacement
If your ceiling is severely damaged, sagging, or has extensive cracks, you might need to remove the old lath and plaster entirely. This is a last-resort option when other methods won’t work. Before starting, check base compaction and ensure the joists are sound.
To re-lathe, install new wood strips across the ceiling joists at regular intervals. Use 1×2 or 1×3 boards spaced about every 6 inches apart for a solid base. Once lath is in place, apply plaster in thin layers, starting with a scratch coat and finishing with a brown coat.
Consider replacing old plaster with drywall if you’re dealing with major structural issues. Drywall is quicker to install and more forgiving for DIYers. However, it’s not always the best aesthetic choice or cost-effective for historic homes.
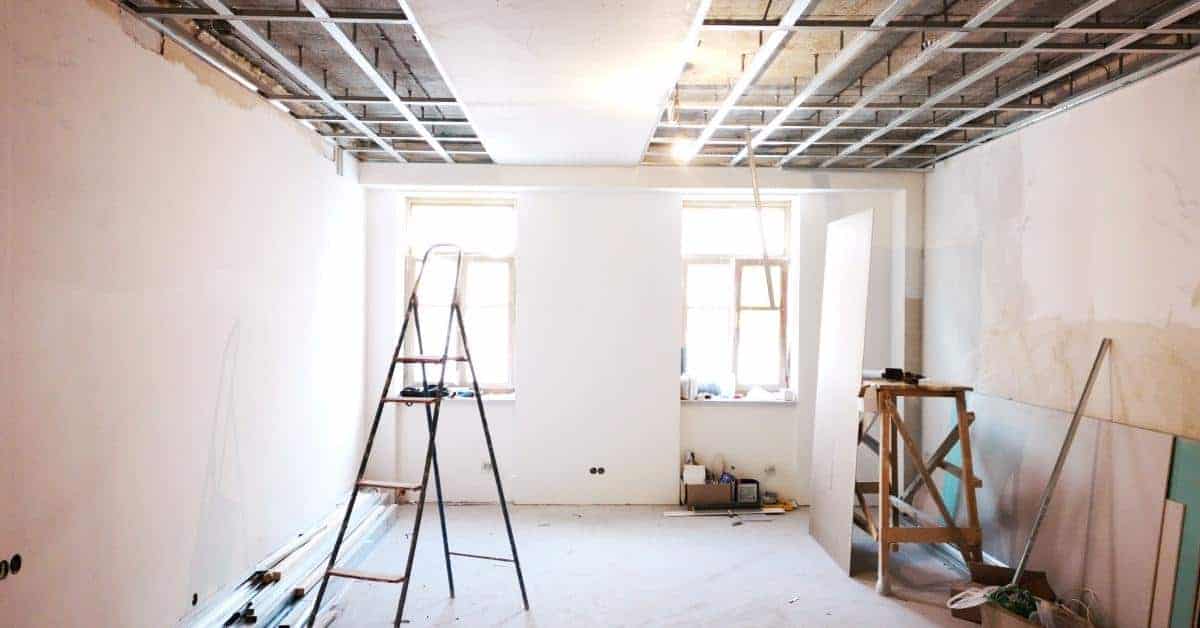
Step-by-step DIY stabilization + repair workflow
We start with a quick assessment, then install temporary supports. Next we stabilize the structure and control the load. Then we tape, finish, and paint as you plan the repair, stopping if conditions worsen and calling a pro when needed.
This sequence keeps the repair safe, predictable, and within reach for most homeowners. It helps you stage work in logical steps, so you see progress and avoid costly missteps. If you feel a condition is beyond your scope, pause and call a pro.
Step-by-Step Repair Process
This sequence will guide you through repairing your concrete surface, ensuring a durable and long-lasting fix.
- Action: Clean the area thoroughly with water and detergent. Reason: Removes dirt and debris for better adhesion of repair materials. Check: Surface is free from loose particles and clean to touch. Warning: If surface is too damaged or contaminated, call a professional. Cure Time: Let dry completely before proceeding.
- Action: Apply concrete bonding agent according to the manufacturer’s instructions. Reason: Ensures new repair material adheres properly to existing concrete. Check: Surface is evenly coated and slightly tacky but not wet. Cure Time: Follow product guidelines for drying time.
- Action: Mix the repair compound in a clean bucket, following package instructions. Reason: Ensures proper consistency for application. Check: Compound is smooth and free of lumps. Cure Time: Use immediately after mixing.
- Action: Apply the repair compound to damaged areas using a trowel or float. Reason: Fills in cracks, holes, and other defects for structural integrity. Check: Surface is level with surrounding concrete and free of air bubbles. Cure Time: Allow compound to set according to product instructions.
- Action: Smooth the repair area using a float or trowel. Reason: Ensures a seamless finish that matches existing surfaces. Check: Surface is smooth and even, with no visible seams. Cure Time: Follow product guidelines for final curing.
- Action: Apply a concrete sealer to the repaired area once fully cured. Reason: Protects the repair from moisture damage and extends its lifespan. Check: Surface is uniformly coated with no missed spots. Cure Time: Allow sealant to dry as per manufacturer’s instructions.
Pro tip: Always work in small sections, allowing each repair layer to cure properly before moving on to the next step for best results.
Prep and safety measures
Lay down drop cloths to protect floors from concrete dust. Cover furniture with plastic sheets if you’re working indoors. Wear a respirator mask, gloves, and safety glasses to avoid inhaling dust or getting debris in your eyes.
If dealing with large areas that might be unstable, support the ceiling first. Use scaffolding or temporary supports to prevent any accidents. Check base compaction before starting work; loose ground can cause major issues later on.
Reattaching plaster and treating hollows
Before you start reattaching plaster, make sure your base is solid. Check base compaction and fix any loose spots with adhesive or backing strips. For hollow areas, inject a strong adhesive like epoxy into the wall every 6 inches to fill gaps.
To reattach plaster, use washers and screws spaced about 12 inches apart for stability. Screw in slowly to avoid cracking the plaster. If you’re using backing strips, place them along the edges of hollow areas or where the plaster is loose.
Remember, a little extra work now saves big headaches later. Don’t rush through this step; take your time and do it right.
Finishing: joint compound, tape, and texture match
After you’ve got your plaster reattached and hollows filled, it’s time to finish up. Start with a thin coat of joint compound. This is where the magic happens—make sure it’s smooth and level before moving on.
Sand down any bumps or ridges after drying. Use fine-grit sandpaper for a smoother surface. Don’t forget to clean off dust thoroughly afterward, so your next coat sticks properly.
For texture matching, you’ll need to mimic the existing ceiling’s look closely. This might mean applying another thin layer and then using a spray bottle with water to soften it slightly before texturing. Practice on a small area first if unsure how it will turn out.
Once everything is textured to your liking, give it one final light sanding and prime the whole repaired section. This ensures paint adheres evenly across both old and new surfaces.
Tools, materials checklist and material specs
This section lists the essential tools and materials you need, plus the key specs like drying times and screw lengths. You’ll see budget options and premium choices so you can plan within your budget. Keep it simple and choose the right tape, joint compound, washers, screws, adhesives, and backing materials.
Getting the right specs matters for a solid finish and fewer callbacks. Knowing dry times and correct screw length saves time on the job and keeps the project moving.
Recommended tools for novices
This checklist is designed to help DIY homeowners ensure they have the right tools before starting their concrete project. Use it as a quick reference when setting up your workspace.
- Concrete mixer: Choose a manual or electric model that fits your mixing volume needs. Confirm by checking its capacity against your mix requirements. Skip at your own risk; hand-mixing is labor-intensive and can lead to inconsistent mixes.
- Trowel set: Include a float, edger, and finish trowel. Check each tool’s condition for nicks or damage that could affect the surface quality. Damaged tools can leave marks on your concrete.
- Screed board: A straight 2×4 works well; measure its length to ensure it matches your slab width. Confirm by laying it across the form edges and checking for levelness. Inaccurate screeding leads to uneven surfaces.
- Laser level: Ensure accuracy with a quick test shot against a known reference point. Misalignment can cause costly mistakes in leveling concrete forms or pouring areas.
- Mason’s line: Use it for marking straight lines and checking formwork alignment. Stretch the line between stakes to check its tension and straightness. Inaccurate lines lead to misaligned pours.
- Wheelbarrow: Ensure it has a sturdy frame and good tires; test by filling with concrete mix to see if it holds up under weight. A failing wheelbarrow can delay your project significantly.
- Concrete vibrator: Test its operation before use; ensure it’s powerful enough for your pour depth. Skipping this step can result in honeycombing and voids in the concrete.
- Safety gear: Include gloves, safety glasses, and dust masks. Check each item fits properly to protect against injuries or irritations from debris and dust.
Quick rule: Always double-check your tools before starting a pour; it’s better to spend 10 minutes now than face issues later.
Material specs and compatibility
This checklist helps you ensure that new materials will work well with existing ones on your project. Use it before mixing any compounds or applying finishes.
- Check plaster type: Confirm if old walls are lime-based or modern gypsum. Look for a smooth, chalky finish for lime; hard and uniform for gypsum.
- Verify mortar mix: Ensure new mortar matches existing by checking color and texture. Mix small sample to compare.
- Test adhesion: Apply thin layer of new material over old surface; check if it sticks without cracking or peeling after 24 hours.
- Measure porosity: Check how much water is absorbed by the wall within a minute. More than half an inch indicates high porosity, requiring a bonding agent.
- Inspect old plaster: Look for cracks and crumbling to determine if surface needs repair before applying new material.
- Evaluate ambient conditions: Ensure temperature is between 50°F-90°F (10°C-32°C) and humidity below 70% for proper curing of materials.
- Select additives: Choose appropriate bonding agents or waterproofing based on material type and environmental factors.
- Confirm aggregate size: For concrete mixes, ensure aggregates are no larger than one-third the thickness of the slab to avoid weak spots.
- Test setting time: Measure how long it takes for a small batch of mixed compound to set. Should be within manufacturer’s specs.
- Check consistency: Ensure new plaster or mortar is not too wet or dry; should hold shape when squeezed but not drip water.
- Inspect surface preparation: Clean and roughen old surfaces for better adhesion of new materials. Smooth, glossy finishes can cause failure.
- Choose primer type: Use a penetrating primer on porous surfaces and an adhesive primer on smooth ones to ensure proper bonding.
Quick rule: Always test compatibility by applying small samples before full-scale application to avoid costly mistakes.
Cost, time estimates, and decision guide: DIY vs professional
This section helps you decide if you should DIY or hire a pro based on cost, time, and job scope. For simple tape repairs, expect a few hours and a few hundred dollars; stabilization work runs higher, and full replastering can reach the low thousands.
A quick decision flow: small fixes = DIY, bigger repairs or uncertain walls = hire a pro. Mistakes cost more later, damp or cracks can signal bigger problems, and poor plaster work sticks out and fails. Know what you can handle, set a budget, and plan for cleanup and downtime.
Typical costs for common scenarios
Tape-only repairs are the cheapest option, running around $1 to $2 per square foot in materials. Labor is minimal if you’re doing it yourself, but hiring a pro can cost an extra $5 to $8 per square foot.
Washer stabilization projects usually cost more due to additional material needs like washers and possibly rebar anchors. Expect around $3 to $4 for materials alone plus labor costs of $6 to $10 per square foot if you hire out the job.
Replastering is the most expensive fix, with material costs ranging from $5 to $7 per square foot depending on quality and brand. Professional labor can add another $8 to $12 per square foot, making it a pricey but necessary option for severe damage.
How to choose a qualified contractor
Picking the right concrete contractor is crucial. Start by asking for references and checking past work. Look at their certifications, especially if they’re dealing with structural elements. Don’t just go for the cheapest quote; compare estimates from at least three contractors.
During your meetings, ask about their experience with similar projects and how they handle issues like base compaction and formwork setup. A good contractor will be upfront about challenges and have a clear plan to address them.
Lastly, don’t hesitate to check reviews online or talk to previous clients. A reputable contractor should welcome these checks and provide solid references that back up their claims.
Maintenance, prevention, and common pitfalls to avoid
Cracks form from moisture, movement, and neglect. Keep humidity in check, maintain the roof and gutters, and address foundation issues to stop future cracks.
Avoid common DIY mistakes: patching cracks without fixing the root cause, using the wrong sealant, or skipping drainage checks. When you do it right, repairs last longer, your home stays safer, and you’ll save time and money.
Seasonal movement and humidity control
Moisture and temperature changes can make your concrete slab move, leading to cracks. To prevent this, keep an eye on the humidity levels. Use a dehumidifier in wet seasons or add fans for better air circulation.
Avoid letting water sit around the edges of your slab; it weakens the base and causes movement. Make sure the ground is well-drained and slope away from the foundation to keep moisture at bay.
Simple HVAC systems can help manage temperature swings inside buildings, but don’t forget about the outside too. Regularly check for any gaps or openings where air might be leaking in or out around your slab edges.
Visual checkpoints after repair
Use this checklist to inspect your concrete repairs every three months for the first year. This helps catch issues early and ensures longevity.
- Check cracks: Look for any new or widened cracks. Use a straight edge to confirm they are not reappearing in repaired areas. Skipping this can lead to water damage and structural weakening.
- Inspect joints: Ensure all control and expansion joints remain intact and properly filled with sealant. Missing or damaged seals allow moisture intrusion, leading to spalling.
- Test levelness: Use a spirit level to check if the repaired surface is flat. Uneven surfaces can cause tripping hazards and uneven wear.
- Evaluate drainage: Confirm water drains away from the repair area without pooling. Standing water weakens concrete over time, causing further damage.
- Look for stains: Check for any signs of moisture or chemical staining on repaired surfaces. This indicates potential leaks or improper sealing materials.
- Check corners
- Inspect edges: Ensure all edges are smooth and properly finished, especially where repairs meet existing concrete. Rough or uneven edges can lead to water pooling and structural issues.
- Test for spalling: Look for any signs of flaking or chipping around the repair area. This indicates that moisture has penetrated and weakened the concrete.
- Evaluate sealant integrity: Check all seals and caulking for cracks, gaps, or deterioration. Proper sealing prevents water damage and prolongs the life of your repairs.
- Look for efflorescence: Inspect repaired areas for white powder residue on the surface. This is a sign that salts are moving through the concrete, indicating potential moisture issues.
- Check for proper curing: Ensure the repair area has fully cured and hardened according to manufacturer guidelines. Premature use can cause damage and weaken the structure.
Quick rule: If it looks different or feels wrong, check it out before it becomes a bigger problem.
Conclusion
Safety matters most: stabilizing a plaster ceiling crack now protects the ceiling from spreading and keeps people in the space safe and looking up at it without fear. Use the right path—tape for minor, still or stable cracks, or stabilization first where the plaster isn’t solid—so you don’t waste time or create bigger trouble.
Safety first in every step. Start by testing a small area, turn off nearby electrical if needed, and wear eye protection and a dust mask. Check the crack for movement, set up a stable working area, gather the proper tools and materials, then follow a clear workflow from securing the surface to applying tape or stabilization and finishing with a proper cure and finish. Don’t rush; measure, recheck, and let each step cure before moving on.
Common mistakes to avoid: trying to tape over actively moving cracks or loose plaster, skipping stabilization when the plaster isn’t solid, and ignoring moisture or hidden damage behind the obvious crack. Don’t skip safety steps or overwork the plaster—test as you go, respect curing times, and protect adjacent finishes. If you’re unsure, pause and reassess rather than forcing a quick fix that could fail later.
If cracks keep moving after your stabilization work, or you see sagging, new water staining, or you lack access to solid working height, it’s time to call a professional. When in doubt, choose proper stabilization and a thorough repair plan and you’ll restore durability and appearance with confidence. You’ve got this—steady progress beats heroic odds any day.
FAQ
Can tape fix a small crack in plaster ceiling?
Yes for tiny, non-structural cracks. Clean it, apply joint tape, then skim with patch compound. Don’t expect a real fix if the crack is moving or wider than a hair.
When should I stop taping and start stabilizing the ceiling?
If cracks keep opening after repairs, or you see deflection, sag, or new cracks piling up, stop taping. Stabilization with proper supports or sistering is needed to stop movement. Tape won’t hold a moving structure.
What does stabilization involve for a plaster ceiling?
Stabilization means loading the ceiling to stop it from moving. This can mean adding blocking, fasteners, or reinforcing joists. It’s best done by a pro or someone who knows structural basics.
Is there a risk in ignoring a cracking ceiling?
Yes. Cracks can signal framing or load problems. Ignoring them can lead to bigger damage or collapse. If in doubt, treat it like a warning and assess the structure first.