
Introduction
Furring strips create a new, flat surface for hanging drywall over plaster.
This method helps prevent hollow spots by giving you solid backing and a frame to fasten into. Check your local rules and manufacturer guidelines for spacing and fastener choices.
Plan your layout, level the strips, and avoid compressing the plaster when you attach them. Use appropriate fasteners per label instructions, and verify solid anchoring before proceeding. If in doubt, double-check with the product label or local code requirements.
Key takeaways
- Assess plaster for hairline cracks, moisture, and sound hollow while tapping gently.
- Use furring strips where plaster is uneven or brittle to prevent hollow spots.
- Prepare plaster with appropriate scoring or skim coat to create drywall-ready surface.
- Secure furring strips level with a straightedge; wear eye protection to prevent debris.
- Adhesive limits and risk: test adhesion on small area before full drywall application.
- Conduct visual checks and tap tests after install; address hollow spots immediately.
Table of Contents
- Introduction
- Key takeaways
- Assessing the Existing Plaster Wall
- Materials, Specs and Tools Checklist
- Preparing Plaster for Drywall Installation
- Installing Furring Strips: Step-by-Step Best Practices
- Adhesive Installation: Techniques, Limits and Risk Management
- How Hollow Spots Form and How to Prevent Them
- Visual Checkpoints and Testing for Solid Attachment
- Finishing, Troubleshooting and Code/Cost Considerations
- Conclusion
- FAQ
Assessing the Existing Plaster Wall
Start by examining the plaster for cracks, cracks that expand with movement, or loose sections that rattle when tapped. Look at the underlying substrate to identify lath, masonry, or gypsum board behind the plaster. Check for hollow areas or signs of moisture damage that could affect fastening options.
Decide between furring strips and heavy adhesive based on what the wall can support and how sound the structure is. Verify the wall’s condition by reading labels, manufacturer instructions, or local building notes before choosing a method. If in doubt, consult the product data sheets and applicable codes for recommended practices.
Signs plaster is suitable for adhesives
The first step in deciding whether to use adhesives for hanging drywall over existing plaster is to assess the condition of your walls. Adhesives work best on solid, stable surfaces with good adhesion.
Look for these signs that your plaster might be suitable for adhesives:
Smooth surface: If the plaster has a smooth, even surface without deep cracks or holes, it’s likely to provide good adhesion.
No loose areas: Tap the wall with a knuckle or use a taping knife to check for hollow spots. If the sound is solid and there are no loose pieces, adhesives could work.
Limited patching needed: If you only need to do minor patching, adhesives can be a good option. However, if extensive repairs are required, consider using furring strips instead.
Signs you should use furring strips instead
While adhesives can work well in some cases, there are situations where using furring strips is a safer and more effective option. Here’s what to look for:
Loose plaster: If the plaster feels loose or crumbles easily when touched, it’s not suitable for adhesives. Furring strips will provide a solid base for your drywall.
Uneven surfaces: Deep cracks, holes, or other uneven areas can prevent adhesives from bonding properly. In these cases, furring strips can create a smooth surface for hanging drywall.
Deep profiles or hidden cavities: If the plaster has deep profiles (like textured or patterned walls) or you suspect there are hidden cavities behind the plaster, use furring strips to provide a stable surface and prevent hollow spots.
Materials, Specs and Tools Checklist
Create a builder-friendly list of required materials, including fasteners, spacers, and any furring strips, plus the drywall type and thickness you’ll install. Gather hand tools and a few power tools you’ll need for layout, leveling, and anchoring. Have a measuring tape, square, level, and marking tools ready for accurate placement.
Check material specs and standards on labels or data sheets before you buy. Look for compatibility with plaster walls, including weight limits, moisture tolerance, andEdge/face finish requirements. If instructions vary by product, follow the manufacturer guidance and local code rules for installation parameters.
Furring strips, fasteners and backing materials
Use this checklist before you start installing furring strips to ensure you have the right materials and that they’re compatible with your substrate.
- Check furring strip material: Verify strips are made of pressure-treated lumber (for exterior use) or CDX plywood (for interior use).
- Verify strip width: Ensure they’re at least 1″ wide to provide adequate support for your cladding.
- Confirm strip length: Measure and cut strips to match the height of your wall, plus an extra 2-3″ for overhang at the top.
- Check fasteners: Use corrosion-resistant screws or nails (for exterior) or drywall screws (for interior).
- Verify fastener length: Screws/nails should be long enough to penetrate the furring strip and at least 1″ into the substrate. Check manufacturer recommendations.
- Check substrate compatibility: Ensure your fasteners are suitable for the substrate (e.g., concrete, wood, metal).
- Verify backing material (if needed): If using a backing material like foam board or rigid insulation, ensure it’s compatible with your cladding and substrate.
- Check local codes: Confirm all materials comply with local building codes and manufacturer recommendations.
Quick rule: Always double-check that your fasteners are long enough to penetrate both the furring strip and the substrate. Skipping this can lead to inadequate support, cladding failure, and costly rework.
Adhesives, tapes and drywall materials
Use this checklist before starting your drywall installation to ensure you have the right materials for a smooth and durable finish.
- Drywall Screws: Check length (usually 1-1/4″ or 2″) and head type (countersunk) to match stud spacing. Wrong size can cause drywall sagging or popping.
- Drywall Joint Tape: Verify paper width (3/4″, 1-1/4″, or 2″) matches joint width for a seamless finish. Too narrow can lead to cracking, too wide wastes material.
- Joint Compound: Check consistency and type (lightweight, all-purpose, or setting-type) based on job requirements. Wrong compound can result in weak joints or difficult sanding.
- Setting-Type Compound: If using, ensure it’s the correct type for your climate to prevent premature drying or excessive shrinkage.
- Drywall Primer: Confirm it’s suitable for your paint and drywall type. Skipping primer can cause paint absorption issues and uneven finish.
- Corner Bead: Check length, width, and material (metal or vinyl) to match your job needs. Incorrect corner bead can result in damaged corners during painting.
- Drywall Boards: Inspect for damage, correct size (4′ x 8′, 4′ x 10′, or 4′ x 12′), and appropriate drywall type (regular, moisture-resistant, or fire-resistant). Damaged boards can cause costly rework.
- Adhesive for Backing Materials: If using, ensure it’s compatible with your backing material and job conditions. Wrong adhesive can lead to poor adhesion and backing failure.
Quick rule: Always check product labels and manufacturer instructions before starting any drywall task to avoid costly mistakes and rework.
Preparing Plaster for Drywall Installation
Secure any loose plaster with proper backing or removal if needed, so the surface won’t move under fasteners. Level high spots and fill obvious gaps to create a consistent plane for drywall. Address moisture or mold by treating affected areas and ensuring surfaces are dry before proceeding.
Mark any hidden services or studs behind the plaster so you don’t damage them during fastening. Clear debris and dust from the wall to improve adhesion and screw purchase. Consider a moisture check if the room has a history of dampness and follow through with remediation if needed.
Repairing loose or damaged plaster and lath
Before you start hanging drywall, it’s crucial to ensure your existing plaster wall is in good shape. Here’s how:
Loose Plaster: Use a utility knife to score around the loose area, then carefully cut out the damaged section. Apply joint compound to the back of a new piece of drywall or plaster patch, press it into place, and let it dry.
Damaged Lath: Inspect your lath (the wooden strips behind the plaster). If they’re rotten or missing, you’ll need to replace them. Cut out damaged sections with a sawzall, then install new lath using screws or nails.
Surface cleaning, priming and moisture checks
Preparing the plaster surface is key for a successful drywall installation. Here’s how:
First, clean the surface with a damp cloth to remove any dirt or dust. Let it dry completely.
Next, check for moisture issues. Use a moisture meter to test the wall. If you find high moisture levels, address the source (like leaks) before proceeding.
Finally, apply a coat of primer to seal the surface and improve adhesion. Let it dry according to the manufacturer’s instructions.
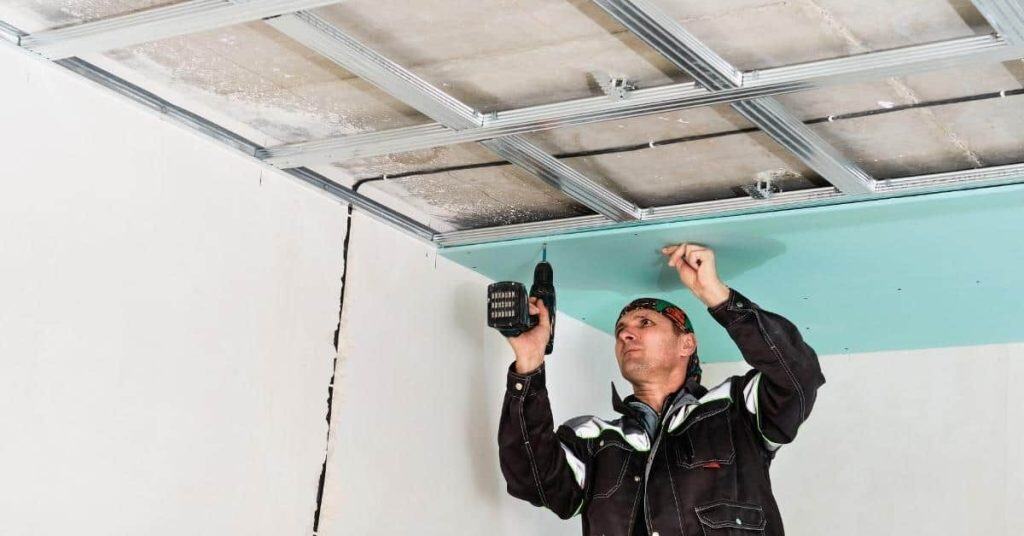
Installing Furring Strips: Step-by-Step Best Practices
Plan the layout of the furring strips to run plumb and level, prioritizing straight lines that give you a true plane. Establish a leveling strategy that accounts for wall irregularities and ensures consistent screw lines. Follow a logical fastening sequence so each strip is secure before the next is attached.
Attach strips in a methodical order to minimize gaps and unevenness, and use appropriate fasteners for the substrate you’re anchoring into. Maintain proper spacing and confirm the surface remains square as you proceed. Always verify that the strips are supported and free from movement before hanging drywall.
Step-by-Step Installation Process
The following steps guide you through installing furring strips, ensuring a solid base for your drywall.
- Preparation: Ensure the area is clear and safe. Gather tools – tape measure, pencil, level, saw, hammer or drill, and furring strips.
- Measure and mark: Determine strip spacing (usually 16″ or 24″) and mark the wall accordingly.
- Cut strips to size: Measure and cut strips to fit your wall’s height. Leave some overlap at the top for ceiling attachment.
- Attach the first strip: Start from a corner, level the bottom of the strip, and secure it with screws or nails every 12″-16″.
- Install subsequent strips: Continue along the marks, ensuring each strip is level and properly spaced. Use shims if needed to maintain consistency.
- Check for level: After each strip, double-check it’s level before moving on. Adjust as necessary.
- Attach ceiling strips: Once all wall strips are up, attach strips to the ceiling, overlapping the wall strips.
- Final check and cleanup: Inspect your work, ensure all strips are secure and level. Clean up any debris.
Layout, Level and Shim Strategies
Establishing a consistent plane for your drywall starts with proper layout and leveling of furring strips. Here’s how:
Start by finding the highest point on your wall. This will be your reference point for leveling.
Use a 4-foot or longer level to ensure accuracy. Place it on the strip, and if necessary, use shims behind the strip at the low end to bring it level with the high point you found earlier.
Shim as needed to maintain a consistent plane across all strips. This ensures your drywall sheets will lie flat and create even joints.
Fastening to Different Substrates (Masonry, Lath, Solid Plaster)
Furring strips need to be securely fastened to the substrate. Here’s how to do it right:
Masonry: Use masonry screws or anchors. Drill pilot holes and secure strips every 12″-16″.
Lath: Screw through the lath into the studs behind, if possible. If not, use drywall screws directly into the lath.
Solid Plaster: Use plasterboard screws or drywall screws. Ensure they’re long enough to penetrate at least 1″ into the substrate. Always check for hidden obstacles before drilling or screwing.
Adhesive Installation: Techniques, Limits and Risk Management
Describe the adhesive application methods suitable for drywall over plaster, including where traditionally adhesive-only options may be used. Understand the key limitations compared to furring strips, such as load-bearing behavior and long-term stability. Follow product instructions to ensure proper cure times and surface preparation.
Mitigate common adhesive failures by following manufacturer guidance on substrate compatibility, application patterns, and environmental conditions. Verify the approved substrates, thickness, and any surface priming requirements in the data sheets. If uncertain, check with the manufacturer or your local building authority for acceptable practices.
Proper surface prep and adhesive application
Before applying adhesive, clean the plaster surface thoroughly. Remove any loose material, dirt, or grease.
Prime the surface to improve adhesion and seal it against moisture. Use a primer suitable for your chosen adhesive.
Select an adhesive designed for drywall-over-plaster applications. Follow the manufacturer’s instructions regarding mixing, open time, and application temperature.
Apply adhesive in a crisscross or herringbone pattern, ensuring even coverage. This helps distribute the drywall’s weight evenly and promotes better adhesion.
Situations where adhesives are high-risk
Adhesives may not be suitable if your plaster is delaminated or has large irregularities. In these cases, consider using furring strips for added support.
If you plan to hang heavy fixtures like cabinets or mirrors, use furring strips for extra strength. Adhesives alone might not provide sufficient hold.
Moisture issues can also compromise adhesive performance. Ensure your plaster is dry and free from moisture before applying adhesive.
Always consider the condition of your plaster and the weight of your drywall and fixtures when deciding between adhesives and furring strips.
How Hollow Spots Form and How to Prevent Them
Explain how cavities form when fasteners miss the backing or when a poor substrate doesn’t hold the drywall flush. Identify factors that can worsen hollow spots, such as inadequate seating, sagging supports, or unsupported edges. Understand how the transfer of vibrations or movement creates visible pockets behind the drywall.
Design and installation choices that reduce hollow spots include solid backing, proper screw alignment, and a stable plane for the sheet. Implement checks during mounting to catch waviness or gaps early. Consult product instructions or building guidelines for any recommended mitigation steps.
Common causes of hollow spots with adhesives and fasteners
Hollow spots under your flooring or cladding can be a real pain. Here’s what you need to watch out for when using adhesives and fasteners:
Uneven substrate: If your base isn’t flat, you’re asking for trouble. Check base compaction, ensure it’s level, and fill any low spots before applying adhesive.
Not enough contact: Adhesive needs a good surface to stick to. Make sure your substrate is clean, dry, and free of contaminants. And don’t be stingy with the adhesive – apply it evenly across the whole area.
Incorrect fasteners: Using the wrong type or size of fastener can lead to hollow spots. Always use the right one for your job, and follow manufacturer instructions. Also, ensure you’re driving them in straight and not over-tightening.
Thermal/structural movement: Even if you’ve done everything right, your building might still move a bit with temperature changes or settling. To minimize this, use flexible adhesives where possible, and consider expansion joints in large areas.
Construction techniques to avoid hollows when using furring strips
Here are some common mistakes to steer clear of when using furring strips to prevent hollow spots under your drywall.
- Skipping leveling: Furring strips won’t give a solid base if they’re not level. Check and adjust as you go.
- Inadequate bearing: Strips need to bear on the studs continuously. Space them correctly (usually 16″ or 24″ OC) for even support.
- Neglecting back-blocking: At ends and where there are no studs, use back-blocking to provide solid backing for your strips.
- Rushing inspection: Don’t assume everything’s fine. Inspect each strip before hanging drywall to catch any issues early.
Double-check these points to ensure you’re not inviting hollow spots into your walls.
Visual Checkpoints and Testing for Solid Attachment
Establish a practical inspection protocol to spot loose edges, nails, or screws that don’t seat properly. Look for uniformity in the drywall surface and listen for drum-like sounds when tapping suspicious areas. Record any irregularities to address before finishing.
Use simple tests to verify attachment, like gentle pressure checks along seams and edges. If you detect movement, re-secure the area following proper fastening patterns. Confirm that the test methods align with manufacturer instructions or local rules for securing plaster-over-structure assemblies.
Tapping, sounding and small-cut inspection techniques
Before you start finishing your walls, use this non-destructive checklist to ensure full contact between drywall and plaster.
- Tap with knuckle: Listen for a solid ‘thud’ sound. A hollow ‘echo’ indicates an air gap.
- Use a rubber mallet: Gently tap the wall. A dull thud means good contact; a ringing sound signals hollowness.
- Sounding with a flathead screwdriver: Gently scrape along seams and joints to listen for hollow spots.
- Probe with a small awl or ice pick: Carefully poke through drywall at suspected hollows. If it goes in easily, there’s an air gap.
- Selective cutting: For persistent hollowness, cut a small access hole to inspect and fill if necessary.
- Avoid excessive probing: Too much poking can damage the drywall or create new hollows.
- Check edges and corners: These areas are prone to hollowness due to uneven plaster or lath.
- Inspect around obstacles: Hollowness can hide behind switch boxes, outlets, or other obstructions.
Quick rule: If you find a hollow spot, address it immediately to prevent future issues.
When to remove and reinstall vs. repair localized hollows
Use this checklist to decide whether to fix in place or remove and reinstall drywall for localized hollowness.
- Size of hollow: If it’s small (less than 1 sq ft), repair in place. Larger areas may need removal.
- Number of hollows: Multiple hollows or widespread issues suggest removal and reinstallation.
- Hollow depth: Shallow hollowness can often be repaired in place. Deep gaps may require removal.
- Plaster condition: If plaster is crumbling or damaged, remove drywall to assess and repair before reinstalling.
- Drywall damage: Tears or cracks at hollow spots suggest removal for proper repair.
- Accessibility: Hard-to-reach hollowness may be better repaired in place to avoid excessive drywall removal and reinstallation.
- Avoid patching over larger issues: Patching over extensive hollowness can lead to future problems and aesthetic concerns.
Quick rule: If in doubt, remove the affected area for thorough inspection and repair. It’s easier to fix now than deal with recurring issues later.
Finishing, Troubleshooting and Code/Cost Considerations
Outline joint finishing techniques tailored to furring-strip installations, including taping and mudding strategies that suit the supported plane. Address common post-install issues such as edge cracking, fastener pops, or joint telegraphing with practical fixes. Keep a plan for sanding and texture that matches the room’s look.
Check code requirements and budget considerations that affect materials, labor, and long-term performance. Verify any local amendments or material approvals that influence finishing and inspection. If unsure, reference the product labels, manufacturer instructions, or building department guidance for compliance.
Taping, mudding and skim-coat tips for a flat finish
You’ve got your concrete base ready. Now, let’s get that smooth, seamless finish you’re after. Here’s how:
First, check your joint compound. It should be creamy, not too thick or thin. If it’s too thick, add water; if too thin, let it sit a bit to thicken.
For taping, use a 6-inch wide tape. Wider is better for hiding those furring-induced seams. Press it firmly into the joint with a taping knife, then apply compound right away. Don’t wait around.
Mudding’s next. Use a 12-inch or wider knife for a smooth, flat finish. Apply compound in thin layers, letting each one dry before sanding lightly. Patience is key here, buddy.
Common problems, remedies and permit/code checks
Every job’s got its hitches. Here’s how to tackle ’em:
Movement cracks? Blame poor base prep or too-thin slab. Check base compaction, ensure proper reinforcement, and consider thicker slab.
Fastener pops? That’s drywall talkin’ to ya. Too much moisture or not enough screws. Check humidity levels, add more fasteners, and use longer screws next time.
Insulation gaps? Gaps happen when you rush through install. Take your time, ensure proper fit, and check local codes for insulation requirements. Don’t forget to get permits before startin’.
Conclusion
Relying on proper furring strips gives you a solid, straight drywall finish and prevents sagging or hollow spots, which protects the work and your investment. Think safety first: verify the wall is sound, use the right materials, and install with precision so you don’t chase flaws later.
To move forward, start by inspecting the plaster for delamination, test a few spots for firmness, mark where studs or framing behind the wall sit, choose the correct furring strip layout and fasteners, clean and prepare the plaster surface, install the strips level and plumb with proper spacing, apply adhesive only where specified and not as a sole attachment, and then recheck for solid attachment with a simple tapping test and visual checks before you finish. Do the work in small sections, follow the approved method, and keep your eye on the finish line.
Two common mistakes to avoid are overusing adhesive as the main attachment, which can hide hollow spots and cause future failures, and installing strips or fasteners too shallow or too deep, which can leave uneven surfaces and screws that barely hold. Safety rules are simple: wear eye protection and a dust mask, shut off nearby utilities if you’re near outlets or pipes, keep the work area dry, and test a small area first before committing the whole wall.
If you’re not confident about the wall condition, measurements, or the framing behind plaster, call a professional before you start cutting, drilling, or punching into the surface. When in doubt, err on the side of conservative fasteners and proper spacing rather than forcing a DIY shortcut. Stay deliberate, finish cleanly, and you’ll have a durable, professional result you can trust.
FAQ
When should I choose furring strips over adhesives for drywall over plaster?
If the plaster is loose, cracked, or uneven, furring strips often give you a solid frame. Adhesives alone can fail on a brittle plaster surface. Check manufacturer instructions and local rules to confirm what works best for your wall condition.
How do I spot hollow spots after pulling the drywall tight against plaster, and what should I do about them?
Tap the wall and listen for a dull or hollow sound. If you hear it, pull back and reattach with proper fasteners or add furring strips in that area. Always follow product labels for fastener size and spacing.
What signs tell me adhesive alone won’t hold on plaster, and I should use furring or mechanical fasteners?
Visible gaps, crumbling plaster, or poor bite on adhesive suggest adhesive-only isn’t reliable. In those cases, switch to a method that creates a solid structural backer, and verify with the adhesive and drywall product instructions.
What finishing steps help ensure a solid attachment and prevent cracking or flexing after drywall is installed?
Secure joints with proper tape and compound, then check for movement or cracking after curing. If motion is detected, reassess attachment method in that area and recheck fastener placement per instructions.