

Introduction
Cement plaster is typically safer in shower areas because it resists moisture better than gypsum.
It dries hard and handles moisture and humidity in wet zones better. Choose cement plaster for areas that get a lot of splash, and always follow the product label and local building guidance. Check that the substrate is sound, the area is properly waterproofed, and you use the right mix and curing steps as recommended. If in doubt, ask for the specific instructions from the manufacturer or a local pro and verify with your local code requirements.
Key takeaways
- Cement plaster generally offers greater moisture resistance than gypsum in shower areas.
- Verify product labels and manufacturer guidelines before installation in wet zones.
- Prepare surfaces thoroughly, use waterproofing, and wear PPE to prevent skin irritation.
- Cement plaster choices require compatible waterproofing membranes and appropriate curing practices.
- Gypsum may be acceptable in controlled, non-wet areas or with protective detailing.
- Follow code standards and consult local inspectors for shower plaster installations.
Table of Contents
- Introduction
- Key takeaways
- Quick Comparison: Cement Plaster Vs Gypsum for Showers
- How Moisture and Wet-Use Conditions Affect Plaster Performance
- Common Shower Scenarios Where Cement Plaster Is the Safer Choice
- Situations Where Gypsum May Still Be Acceptable
- Installation Best Practices for Using Cement Plaster in Showers
- Surface Preparation and Waterproofing Strategies
- Material Specs, Standards and Code Considerations
- Tools, Materials and PPE Checklist for Diyers and Professionals
- Conclusion
- FAQ
Quick Comparison: Cement Plaster Vs Gypsum for Showers
Cement plaster is typically more durable in wet areas and can tolerate higher moisture levels with the right backing and waterproofing. Gypsum systems are often lighter and easier to install, but depend more on complete enclosure and moisture control. The practical choice comes down to exposure, maintenance willingness, and the accuracy of the substrate preparation.
Use this quick checklist to decide: check the shower’s ventilation, confirm waterproofing details, evaluate anticipated water contact, and review system compatibility with tile and drains. If moisture and wear are ongoing concerns, cement plaster with proper membranes is usually safer. If the space is well sealed and you can maintain it, gypsum may be acceptable under approved assemblies.
Key material differences
The choice between cement and gypsum plasters affects your shower’s performance, durability, and appearance.
- Moisture Resistance: Cement plaster is more water-resistant. Gypsum absorbs moisture, leading to staining and mildew growth.
- Adhesion: Both adhere well but cement has better grip on concrete and masonry substrates. Gypsum sticks best to drywall.
- Durability: Cement plaster lasts longer due to its higher compressive strength. Gypsum can crack or crumble over time.
- Cracking: Gypsum is more prone to cracking during drying or settling. Cement is less likely to crack but may show hairline cracks.
- Finish: Cement plaster offers a rougher, more textured finish suitable for industrial or rustic styles. Gypsum provides a smoother, more refined look.
Quick decision checklist
Use this checklist to decide between cement and gypsum plasters for your shower.
- Environment: Check if the area is prone to high humidity or water exposure. Cement is better in damp conditions.
- Ventilation: Assess natural and mechanical ventilation. Gypsum needs good airflow to prevent mold growth.
- Finish Type: Consider your desired aesthetic. Cement offers a rougher finish, gypsum is smoother.
- Waterproofing Strategy: Plan for waterproofing and tiling. Cement plaster can be used with most systems but may require additional preparation.
- Substrate: Identify the base material. Cement adheres better to concrete, gypsum to drywall.
- Budget: Compare costs. Cement is generally more expensive but lasts longer.
- Timeframe: Consider project timeline. Gypsum dries faster but cement may require additional curing time.
- Maintenance: Think about long-term care. Cement requires less maintenance but may show signs of aging over time.
Quick rule: If you’re unsure, lean towards cement plaster for its superior moisture resistance and durability.
How Moisture and Wet-Use Conditions Affect Plaster Performance
Water exposure and high humidity attack plaster assemblies by softening binders and encouraging failures at joints. Repeated wetting and drying cycles push moisture deeper, which can lead to delamination and cracking. The speed of those failures depends on the system, venting, and drainage quality.
Practical outcomes to watch for include mold growth in damp niches and efflorescence on surfaces where minerals migrate through the substrate. A well-sealed, continuous membrane and proper drain detail dramatically reduce these risks, but they must be part of the design from the start. Always verify that the chosen materials and details align with the expected wet conditions.
Gypsum susceptibility in wet environments
Gypsum plaster, often used in dry areas, isn’t cut out for shower spaces. Here’s why:
When water hits gypsum, it absorbs it like a sponge. This makes the plaster soft and weak over time.
Worse yet, this moisture creates an ideal environment for mold to grow. Even if you seal the surface, water can still get in through cracks or porous areas.
Cement plaster behavior under moisture exposure
Cement plaster is a different story. It’s designed to handle wet conditions:
When water hits cement plaster, it doesn’t absorb as much as gypsum. This means it stays stronger and more stable.
However, prolonged exposure can lead to issues like cracking or efflorescence – a white, powdery deposit on the surface. But these are minor compared to gypsum’s problems in wet areas.
Common Shower Scenarios Where Cement Plaster Is the Safer Choice
Showers with ongoing moisture exposure and limited airflow benefit from cement-based systems that tolerate wetter environments. Barrierless wet rooms and showers without reliable water management require robust moisture resistance. In tiled curbless configurations, cement plaster helps maintain edge durability and reduces cracking risk.
Continuous wetting and poor ventilation are clear indicators to favor cement plasters. Confirm that the chosen assembly includes appropriate waterproof membranes and proper detailing at drains and transitions. Make sure the installation plan addresses expected water exposure and maintenance needs.
Continuously wet or high-traffic showers
In showers that see constant water exposure, like those in busy hotels or homes with large families, cement plaster is the better choice. Why?
Cement plaster doesn’t absorb water as much as gypsum. This means it’s less likely to swell and crack over time.
Plus, cement plaster can handle more traffic without showing wear and tear as quickly. So, it’s a safer bet for high-traffic areas.
Poorly ventilated bathrooms and commercial showers
In spaces with poor ventilation, like small bathrooms or commercial shower areas, moisture lingers. This can cause problems for gypsum plaster.
Gypsum doesn’t like to stay wet. It can lose its structural integrity over time in poorly ventilated conditions.
Cement plaster, on the other hand, is more tolerant of damp conditions. It won’t crumble or delaminate as easily when it’s not drying out quickly.
Wet rooms and barrier-free (curbless) showers
In wet rooms or curbless showers, waterproofing is crucial. Here’s why cement plaster is often recommended:
Cement plaster can be applied directly to waterproof membranes, creating a seamless, integrated system. This reduces the risk of leaks and makes maintenance easier.
Plus, cement plaster can handle some water exposure on its surface without issue. So, it’s well-suited for these types of shower designs where water may splash onto the walls.
Situations Where Gypsum May Still Be Acceptable
Gypsum can be viable in controlled, fully waterproofed tile assemblies or when using prefabricated wet panels with proven moisture barriers. The key is that the system is designed to isolate gypsum from direct water contact and condensation. Isolation details and manufacturer guidance must be followed closely.
Correct detailing, substrate prep, and compatibility with sealants and membranes are essential. Always check the product data sheet and local code requirements to ensure gypsum is permitted in your specific shower design and climate. If in doubt, consult the membrane supplier for approved configurations.
Tile assemblies with full waterproofing
Gypsum can be used behind tile in shower areas if the assembly is fully waterproofed. This means installing a proper membrane system that isolates the gypsum from moisture.
Here’s how to do it:
Step 1: Apply a waterproof membrane directly onto the concrete or existing wall surface.
Step 2: Ensure the membrane overlaps all seams and extends at least 6 inches up the walls and around any fixtures.
Step 3: Install cement board over the membrane, securing it with screws designed for waterproofing applications.
Prefabricated or manufacturer-specified assemblies
Some shower units or systems are prefabricated and specify the use of gypsum-compatible materials. In these cases, using gypsum as directed by the manufacturer’s instructions may be acceptable.
Here’s why:
The manufacturers have tested their systems under controlled conditions and warrant that their products will perform as expected when installed correctly. This includes using specific materials like gypsum in certain parts of the assembly.
Note: Always check the manufacturer’s instructions and warranty information before proceeding with any installation. If you’re unsure, consult a professional installer or contact the manufacturer directly.
Installation Best Practices for Using Cement Plaster in Showers
Plan the sequence to keep water away from unfinished areas and ensure proper curing conditions. Use a continuous waterproofing membrane beneath the plaster and at all joints. Pay close attention to drain liners, curb details, and transitions to tile or panels.
Avoid common mistakes like skipping substrate prep, improper bonding, or inadequate waterproofing coverage. Follow manufacturer instructions for mixing, application thickness, and cure time, and verify local requirements before proceeding. Regularly inspect for cracks and fix promptly to prevent water ingress.
Substrate assessment and preparation
Before you start slapping on that cement plaster, you gotta make sure your shower’s ready for it. Here’s what you need to do:
Check base compaction. Make sure the concrete or plywood base is solid and doesn’t give when you walk on it. If it’s soft or bouncy, get it fixed before proceeding.
Give your substrate a good clean. Remove any dust, dirt, or old paint with a wire brush or scraper. A clean surface ensures better bonding.
Inspect for damage. Look out for cracks, holes, or other defects. Fill them up using a suitable patching compound before applying the plaster.
Now, grab that bonding primer. Apply it evenly over the prepared substrate to improve adhesion and prevent delamination. Follow the manufacturer’s instructions on how much and how often to apply.
Layering, Application Technique and Curing Control
Now that your substrate is prepped (check here if unsure), let’s get the cement plaster on. Here’s how to layer it right:
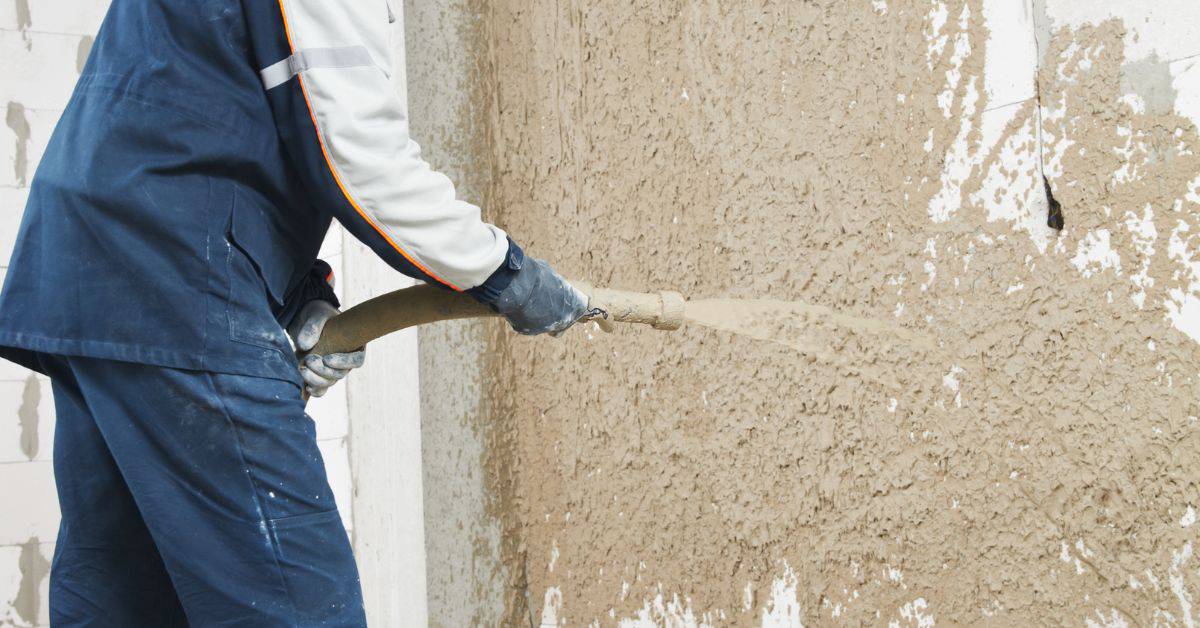
Layering: Apply in thin layers, around 3/8″ thick each time. Thicker layers can crack as they dry. Use a straight edge trowel for even application.
Application Technique: Work from the top down to avoid stepping on wet plaster. Start at the shower ceiling, then work your way down the walls. Scrape off excess with a hawk and trowel. Check base compaction before applying each new layer.
Curing Control: Keep the plaster damp for about a week to cure it properly. Spray it lightly with water 3-4 times a day, or cover it with plastic sheeting. But don’t overdo it – too much water can cause cracking. Follow manufacturer’s instructions (check here if unsure) for specific curing times.
Sealing Seams, Corners and Penetrations
Alright, listen up. You’ve prepped your substrate and slapped on that cement plaster like a pro. Now, let’s make sure water doesn’t find its way in through those pesky seams, corners, and pipe penetrations.
First things first, check your membrane. It needs to be compatible with your plaster. Read the label, check the manufacturer’s instructions, and if you’re unsure, give them a call. You want something that’ll stick around as long as your plaster does.
Now, let’s tackle those seams and corners. Apply your membrane generously, but not so much it drips down onto your freshly laid plaster. Use a trowel or a brush, whatever you’re comfortable with. Make sure to overlap the edges by at least an inch or two for good measure.
Pipe penetrations are a bit trickier. You’ll want to use a membrane specifically designed for them. Follow the manufacturer’s instructions to the letter here. Cut it to size, apply it, and make sure there are no gaps. Remember, water finds the path of least resistance, so don’t give it any options.
Surface Preparation and Waterproofing Strategies
Compare pre- and post-plaster membranes, along with liquid-applied and sheet systems, to find the option that integrates best with your layout. Prioritize continuity across walls, floors, and fixtures to prevent pinholes and gaps. Ensure membranes extend into corners, around drains, and behind any niches.
Detail work matters: ensure proper bonding, slope toward the drain, and seamless transitions to tile substrates. Always verify compatibility between the plaster, membrane, and tile adhesive by checking the manufacturer guidance and local rules. Confirm that the selected system is suitable for the expected moisture regimen.
Choosing and integrating membranes
When it comes to waterproofing with cement plaster, you’ve got two main membrane options: liquid-applied and sheet systems. Each has its pros and cons.
Liquid-applied membranes are flexible, can be applied over existing surfaces, and provide a seamless barrier. They’re great for complex shapes and changes in plane. But they need proper surface preparation and may require additional primers.
Sheet membranes, on the other hand, are quicker to install but can be more susceptible to damage during installation. They’re typically used over plywood or OSB substrates.
Regardless of your choice, ensure the membrane is compatible with cement plaster and follow the manufacturer’s guidelines for integration at changes in plane – like corners, walls, and floors.
Drainage, slopes and transitions
Proper drainage is key to keeping your shower area dry. Start by ensuring your substrate has a slight slope towards the drain – around 1/4 inch per foot.
The drain itself should be integrated into your waterproofing strategy. Install a membrane that extends up and over the drain, creating a watertight seal. Use a drain that allows for this – some have integral membranes or flashing kits.
At changes in plane, like where the shower floor meets the walls, ensure your membrane transitions smoothly without any gaps or overlaps. This prevents water from finding a weak point and seeping through.
Remember, water will always find the path of least resistance. A well-planned drainage strategy, along with proper slopes and transitions, ensures it finds its way out of the shower area, not into it.
Material Specs, Standards and Code Considerations
Review product data, certifications, and installation instructions before specifying cement or gypsum for showers. Look for approved substrates, bonding agents, and cure times within the label or data sheet. Local code references should guide minimum requirements for wet areas.
Always confirm the recommendations of the membrane or tile system manufacturer and check with local building authorities or standards organizations. If anything is unclear, ask for the official documentation or a code reference to verify compliance. Do not rely on memory alone for critical moisture and interface details.
What to Read on Product Datasheets
Before you buy, check the product datasheet. It’s your key to understanding what you’re getting into.
Recommended Use Conditions: Make sure it’s suitable for shower areas. Some plasters aren’t.
Bond Instructions: See how well it sticks to your substrate. You don’t want it peeling off.
Compatible Finishes: Check if it plays nice with the tile or other finish you’re planning.
Standards, Testing, and Compliance to Check
Plaster might be tough, but it’s not tough enough to ignore standards.
Moisture Resistance: Look for tests like ASTM D1037 or EN ISO 62. They measure how well it handles water.
Fire Resistance: Check if it meets fire safety codes, like ASTM E84 or EN 13501-1.
Building Codes: Confirm with your local authority that you’re following their rules. They vary by location.
Tools, Materials and PPE Checklist for Diyers and Professionals
Prepare a practical list of essential tools, primers, bonding agents, membranes, and appropriate PPE for cement-plaster showers. Include items for substrate prep, mixing, application, and finish work. Consider when to engage a specialist for membranes or structural concerns.
Always verify that each item is compatible with your chosen plaster system and meets local safety requirements. Check product labels and manufacturer instructions for use, storage, and disposal. When in doubt about a critical step, pause and consult a pro or the supplier’s technical support.
Cement-plaster specific supplies
Before you start mixing, make sure you have all the right materials. This checklist helps ensure you’ve got everything covered.
- Cement-based mix: Choose a mix designed for shower areas to ensure durability and water resistance.
- Bonding agent: Use a cement-based bonding agent to improve adhesion to the substrate.
- Reinforcement products: Consider using fiber mesh or other reinforcement products for added strength.
- Primer: Apply a primer to seal the substrate and improve bond strength.
- Waterproofing membrane: Ensure you have a compatible membrane to prevent water ingress.
- Tape: Use tape for seams, corners, and penetrations to create a watertight barrier.
- Mixing tools: Have a sturdy mixing paddle and drill, plus a bucket or mixing tub ready.
- Measuring tools: Use a trowel or notched trowel for accurate application.
Quick rule: Always follow manufacturer guidance to ensure compatibility and performance of your chosen products.
Finishes and accessory materials
Once the plaster is applied, you’ll need the right finishes and accessories to complete the job. Here’s what to check.
- Tile adhesive: Choose an adhesive suitable for cement-based plasters and compatible with your chosen tiles.
- Grout type: Select a grout that matches your tile color and is suitable for shower areas (epoxy or cement-based).
- Sealant: Use a flexible, waterproof sealant for joints and edges to prevent water damage.
- Trim components: Ensure you have trims for corners, edges, and other areas where tiles meet.
- Cleaning tools: Have sponges, cloths, and a bucket ready for cleaning up excess adhesive or grout.
- Safety glasses: Protect your eyes from debris during cutting and installation.
- Gloves: Wear gloves to protect your hands from chemicals in adhesives, grouts, and sealants.
Quick rule: Always test a small area first to ensure compatibility of finishes with your chosen plaster and tiles.
Conclusion
When you’re working in a shower, cement plaster is the safer, tougher choice for long-lasting performance and easier maintenance. Get the moisture handling right now, and your walls will stay flat, crack-free, and visually solid for years.
Proceed with a simple, practical check: verify moisture-resistant surfaces and proper waterproofing first, confirm cement plaster is appropriate for the area you’re finishing, inspect surface prep, set up the correct mix and mixing method, follow best practices for plaster application and curing, and double-check local codes and material specs before you start each step. Do a small test patch, then scale up only after it passes your water exposure tests and your visual checks fit the plan.
Two common mistakes to avoid are skimping on surface preparation and skipping the waterproofing steps, which invites mold, cracking, and costly repairs. Never mix or apply cement plaster in a way that leaves thin spots or runny patches, and always wear the right PPE and follow the manufacturer’s safety guidance to protect yourself and others. If the project Box starts to look beyond your comfort level—unexpected plumbing, structural issues, or ambiguous code requirements—call a professional and get a plan documented before moving forward.
FAQ
Can cement plaster be used over existing gypsum plaster in showers?
It can be, but you must prepare the surface properly. Scrape away loose material, roughen the surface, and apply a bonding primer if the manufacturer recommends it. If in doubt, follow the product instructions or check with the supplier.
What should I check on product labels before starting?
Look for clear guidance on moisture resistance and suitable substrates. Check cure times, required primers, and any waterproofing steps the product needs. Follow local rules and manufacturer directions for best results.
How should I test waterproofing after installing cement plaster?
Verify you have a proper waterproofing layer or membrane as specified. Look for visible seams and perform a simple check per the system you used. If you’re unsure, consult the membrane or plaster supplier for the recommended test method.
What common mistakes lead to plaster failure in showers?
Skipping surface prep, skipping or misapplying waterproofing, and assuming plaster alone stops water. Avoid overly thick plaster and poor curing conditions. If you see moisture behind tiles, stop and reassess the system before continuing.