

Introduction
Outside corners should be rebuilt straight when the corner bead fails.
The article explains the practical steps to assess damage, remove the damaged bead, reestablish a true corner, and reapply mud and new bead so you end up with a clean, durable edge.
Key takeaways
- Inspect for hairline cracks and rust, replace damaged corner bead before patching.
- Clean fastener holes, remove old mud, and dry corner for proper adhesion.
- Use a corner bead with proper profile and 90-degree corner for flat joints.
- Embed first coat fully behind bead and feather edges for smooth transition.
- Tap and set fasteners flush; avoid overdriving which cracks mud coat.
- Check edge straightness with a speed square and visual shadow lines.
Table of Contents
- Introduction
- Key takeaways
- Quick overview: why outside corners fail
- Tools and materials checklist
- Assessing the failed corner and preparation
- Choosing and cutting the right corner bead
- Fastening the corner bead correctly
- First coat technique: embedding and feathering
- Second and finishing coats: shaping a crisp edge
- Visual checkpoints and quality control
- Troubleshooting common problems and mistakes
- When to call a pro and cost/time estimates
- Long-Term Maintenance to Prevent Future Problems
- Conclusion
- FAQ
Quick overview: why outside corners fail
Outside corners fail when the bead dents, pulls away from the wall, bulges, rusts, or the tape cracks. A straight, true corner helps the finish stay durable and look right. If you see any of these signs, address it before drywall damage spreads.
Most small dings are cosmetic and can be repaired with proper taping and mud. But rust, tape failure, or a loose corner is structural and must be fixed correctly to keep moisture out and the corner true.
Typical symptoms to look for
When outside corners start failing, you’ll see uneven shadow lines where the corner meets walls. This means your corner isn’t straight and needs attention. Also, cracked joint compound is a clear sign that something’s wrong. It might be due to poor compaction or too much moisture in the concrete mix.
Another telltale symptom is when the bead around the corner starts to come loose. This means your seal isn’t holding and water can get in, causing bigger problems down the road. Don’t wait for it to get worse; fix these issues early before they turn into major headaches.
How much damage requires rebuilding
If you’ve got outside corners that are failing, it’s time to assess the extent of the damage. If there’s separation at multiple points, or if rust is visible and widespread, full replacement might be your only option. Don’t waste time on patch jobs when the base isn’t solid—check base compaction first.
Avoid the temptation to slap on another coat of concrete over old repairs. If you’ve already had to fix the same corner more than twice, it’s likely a structural issue that won’t be fixed with surface treatments. Take a step back and look at the bigger picture—rebuilding might save you from future headaches.
Tools and materials checklist
This section gives you a concise, project-ready checklist: the tools you’ll need, the fasteners, the types of corner bead, and the joint compounds for a professional rebuild. Include metal, vinyl, paper-faced, and foam corner beads, plus the right screws or nails and setting materials. It also flag optional power tools that speed the job.
Knowing what to gather before you start keeps the project moving and cuts guesswork at the jobsite. The right corner bead choice and joint compound setup save time, reduce waste, and prevent fragile corners from failing later. Don’t skip solid fasteners or proper mixing and trowel technique—bad choices here show up as cracks and callbacks fast.
Recommended corner bead types and when to use them
This checklist helps you pick the right corner bead for your job. Use it before buying materials or starting work.
- Metal Bead (Galvanized): For exterior corners in wet areas like bathrooms, kitchens. Check if galvanized coating is intact to prevent rust. What goes wrong: Rusting leads to replacement.
- Stainless Steel: Best for coastal or highly corrosive environments. Confirm it’s 304 grade stainless steel by checking the label; cheaper grades won’t last. What goes wrong: Corrosion weakens corners over time.
- Vinyl Bead: Ideal for interior drywall projects, easy to install and cut. Ensure it’s flexible enough to bend around corners without cracking. What goes wrong: Cracking leads to unsightly repairs.
- Paper-faced Metal Bead: Great for interior walls where aesthetics matter less. Check the paper face is intact; damaged faces can cause issues during painting. What goes wrong: Paint peeling due to exposed metal edges.
- Heavy Duty Metal Bead: For high-traffic areas like hallways or commercial spaces. Verify thickness by measuring with calipers, at least 0.045 inches thick for durability. What goes wrong: Thin beads wear out quickly under pressure.
- Vinyl J-channel: Useful for finishing edges and corners where a cleaner look is needed. Confirm it fits snugly against the wall without gaps or overlaps. What goes wrong: Loose fit leads to uneven paint lines.
- Stainless Steel J-channel: For high-end interior projects needing extra durability. Check for proper fitting around door frames, ensuring no gaps. What goes wrong: Inadequate fit causes visible imperfections.
- Metal Bead with Foam Backing: Ideal for soundproofing and insulation needs. Verify foam backing is securely attached to the metal bead. What goes wrong: Loose foam can cause noise issues and poor insulation.
- Vinyl L-Channel: For interior corners where a clean, professional look is desired. Ensure it’s straight and fits snugly against walls. What goes wrong: Misalignment causes uneven paint lines and visual imperfections.
Quick rule: Pick metal for durability in wet areas, vinyl for easy installation indoors, and stainless steel where corrosion resistance is key.
Materials specs and quantities
This checklist helps you verify the right amounts of joint compound, screws/nails, and corner bead before starting your project.
- Joint Compound: For 8–10 ft corners, buy at least 2 gallons. Check by pouring out a small amount to ensure it’s smooth and workable; avoid overly thick or lumpy compound.
- Screws/Nails: Have around 50 pieces per corner for securing the bead. Confirm quantity by laying them out in rows of 10, ensuring you have enough without overbuying.
- Corner Bead Length: Measure your corners and cut beads to fit; typically, one piece covers about 4 ft. Check by measuring a few pieces against your walls to ensure they match the length needed.
- Beading Type: Refer back to recommended types for your project needs. Confirm type matches the corner’s requirements to avoid rework later.
- Safety Gear: Have gloves and safety glasses on site. Check by ensuring each person has their gear before starting work.
- Paint Primer: Buy enough primer for a thin coat over all bead areas; typically, one can covers 100 sq ft. Confirm coverage by testing the primer on scrap material.
- Caulking Tube: One tube per corner is usually sufficient. Check by squeezing out a small amount to ensure it’s not dried up or too thick.
- Sandpaper: Have 100-grit and 220-grit sandpapers on hand. Confirm grits match the recommended grades for smoothing compound.
- Drywall Knife: Ensure you have a knife that fits your bead size; typically, an 8-inch knife is good for most corners. Check by holding it against your corner to see if it’s comfortable and effective.
Quick rule: Always measure twice, cut once, and double-check all materials before starting work to avoid costly mistakes.
Assessing the failed corner and preparation
Assess how the corner is attached and the condition of the substrate. Look for loose fasteners, cracks, and old compound, and note any moisture or rot. If the surrounding compound is deteriorated, remove it; if it’s sound, feather into it and clean the edge for a smooth transition.
This matters because a solid base prevents future cracks and makes the repair last longer. You’ll cut dust and mess with proper containment and a vacuum, and you’ll protect yourself with goggles and a mask. Skipping this prep invites failure and more work later.
Removing the old bead and loose compound
Start by carefully scoring along the edge of the failed corner with a utility knife. This helps to break the bond between the bead and the drywall without damaging the surrounding area. Use a pry bar gently but firmly to lift out the bead, working your way around the entire perimeter. If you encounter stubborn spots, switch to a multi-tool with a blade attachment for finer control.
Once the bead is removed, scrape away any loose compound from the edges and corners using the same tools. Be thorough; leaving bits of old compound can cause new beads to pull away or crack over time. Check base compaction as you go—loose areas need to be addressed before applying fresh compound.
Avoid hammering or forcing tools into tight spots, which can lead to cracks in the drywall. If there’s any doubt about the condition of the wall behind the bead, take a moment to inspect it closely. A little extra care now saves headaches later when you’re ready to install new trim.
Checking the underlying drywall condition
Before you start installing new bead, take a moment to inspect the drywall. Look for any cracks or damage in the paper that could affect your corner bead work. If there’s an issue with the drywall itself, fix it now before moving forward.
Check base compaction. Make sure the framing is solid and not wobbly. Loose framing can cause problems down the line, so tighten up any screws or nails that are loose. This step might seem small but it’s crucial for a long-lasting repair.
If you find damaged drywall, patch it up with new pieces as needed. Use mesh tape over cracks and apply joint compound to smooth everything out. Let it dry thoroughly before proceeding with your corner bead installation. Skipping this step can lead to bigger headaches later on.
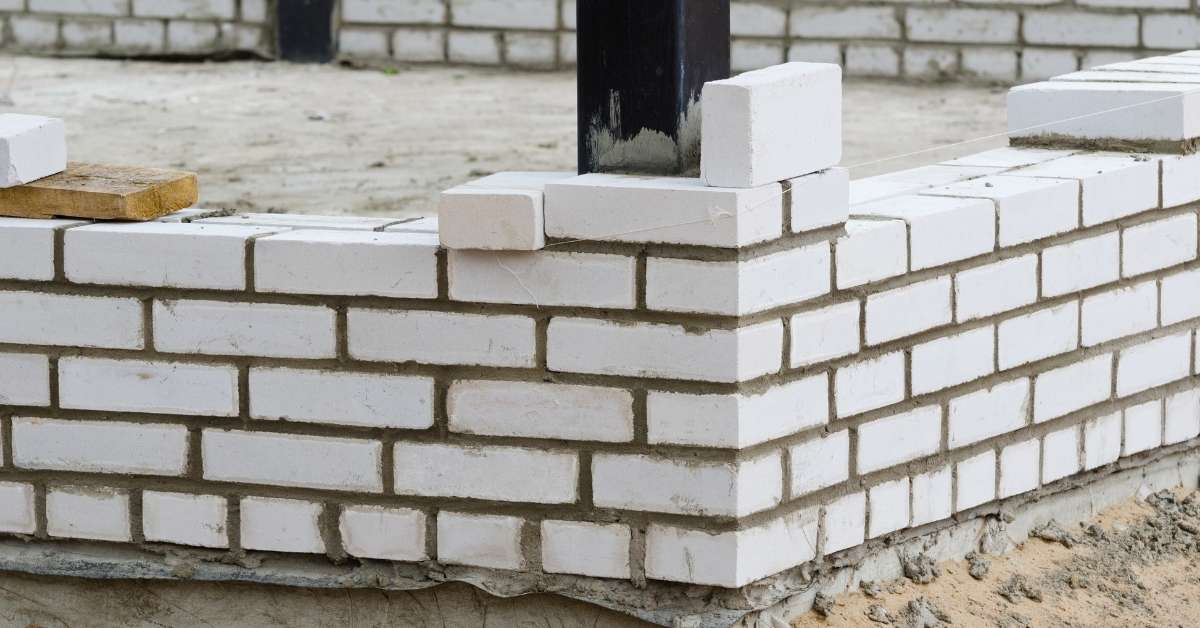
Choosing and cutting the right corner bead
Choose the right corner bead by profile and length, measure the corner, and cut or mitre for inside and outside corners. Make straight cuts on standard corners and account for curved or irregular corners with careful fitting. Always test fit before fastening.
Correct bead selection keeps joints clean and durable, and proper cutting prevents gaps and cracks later. Measuring accurately and, if needed, using a coping or flexible bead helps on curved edges. Skipping steps leads to awkward corners and extra work, so do it right on the first try.
How to measure and mark accurately
Start by setting up a plumb line at each corner where the bead will go. Use a level to make sure it’s straight, then snap chalk lines on both walls for reference. Check these marks at the top, middle, and bottom of your wall sections.
Measure from the floor or base plate up to the point where you want your corner bead to start. Mark this spot clearly with a pencil or marker. Double-check that it’s level and plumb before moving on. A few minutes here can save hours later when you’re pouring concrete.
If you’re working in an area with existing concrete, make sure to check the base compaction before marking your lines. Uneven ground will mess up your measurements and cause problems down the line.
Cutting and trimming techniques
To cut metal corner bead, use tin snips for precision. For vinyl bead, a sharp utility knife works best. Avoid hacksaws as they can leave rough edges that need extra filing.
After cutting, file down any burrs or rough spots with a fine-grit sandpaper to ensure a snug fit against your wall and ceiling surfaces. This prevents gaps where cracks might form later on.
Trimming should be done carefully to avoid over-cutting. Measure twice, mark once, and then cut slowly to get it right the first time. Over-trimming can lead to weak corners that won’t hold up under stress.
Fastening the corner bead correctly
Fastening the corner bead correctly means choosing the right method and spacing and seating it tight to the drywall. You can use corrosion-resistant nails or screws for metal beads, or a strong adhesive for light-duty jobs, but spacing matters: about 8-12 inches apart with nails; screws can be spaced a bit closer if you want a tighter fit. Do not skip seating; press the bead flat and snug against the corner to eliminate gaps and ridges.
Too many DIYs rush the bead and end up with gaps that show up after mudding. A tight, properly fastened bead seals the corner and makes the joint simple to finish, saving time and rework. Use corrosion-resistant fasteners on metal beads and avoid cheap hardware that will corrode in humidity or over time.
Using nails or screws: spacing and placement
When fastening corner beads, you want to space your nails or screws correctly. For nails, aim for about 6 inches apart. Screws can go a bit further at around 8-10 inches. This keeps the bead tight without overloading.
Sink them just enough so they hold but don’t deform the metal. A nail should be flush with the surface, while screws need to sit slightly proud—about 1/32 inch above for easy plastering later. Overdriving fasteners can crimp or tear the bead, ruining your corner.
Remember, a good base means better corners. Check base compaction before you start and ensure everything is level and square. This saves time fixing mistakes later on.
When to use adhesive or mud-set bead
If you’re working with a concrete slab that’s still settling, go for mud-set bead. This stuff is designed to handle movement and won’t come loose as the slab shifts. For drywall corners over wood framing, construction adhesive works just fine.
When using mud-set bead, make sure your base is compacted and stable before you start. If it’s not, you’re setting yourself up for cracks and gaps later on. With adhesive, check that your surface is clean and free of dust or grease to ensure a strong bond.
Mud-set bead needs time to set properly, so plan ahead. Don’t rush the process by applying too much pressure or adding weight before it’s fully cured. This will save you from headaches down the road when things start to shift.
First coat technique: embedding and feathering
This first coat is about embedding tape if you need it and feathering the edges to a straight, even plane. Use a corner trowel to keep a clean corner and maintain a straight line as you go. Smear on a thin, consistent layer and press the tape in so it disappears under the mud.
Build a solid base now and the finish coats go faster. A straight plane hides flaws and reduces joint marks, saving time on cleanup and sanding. If you rush this step, you’ll fight bulges and ridges later and you’ll pay in extra work.
Tools and motions for a clean first coat
To get that smooth, professional look on your first coat, you need to know how to handle the taping knife and corner tools right. Start by holding the taping knife at a 45-degree angle. This keeps the mud from building up too much on one side.
As you move the tool across the wall or ceiling, keep your hand pressure even. Too light, and you’ll leave ridges; too hard, and you risk tearing the tape. Move in long strokes, not short jerks. For corners, use a corner tool to get into tight spots without leaving gaps.
One common mistake is rushing through feathering edges. Take your time here—this sets up how well everything blends later on. Feather out at least six inches from the edge of each board or patch for that seamless look. And don’t forget, always check base compaction before you start to avoid any surprises mid-job.
Curing times and when to sand or recoat
After laying your first coat, whether it’s premix or setting compound, you need to wait for the concrete to cure properly. Premix typically needs around 24 hours of drying time before you can start embedding and feathering again. Setting compounds are faster; aim for at least 6-8 hours. Check base compaction by gently pressing on the surface with your finger—if it doesn’t leave a mark, it’s ready.
Sanding is only necessary if there are high spots or rough patches that need smoothing out. Wait until after the initial curing period to avoid damaging the fresh concrete. If you decide to sand, do so lightly and evenly across the entire surface to maintain consistency.
For recoating, ensure the previous layer is fully cured but not overly dry—too much drying can lead to cracking when new material is added. A good rule of thumb is if it feels slightly cool to touch but no longer wet or sticky, you’re ready to go back in with another coat. Always test a small area first to make sure your timing is right.
Second and finishing coats: shaping a crisp edge
Apply a second coat to fill gaps and tighten the edge. Then skim with light pressure, refine the bevel, and feather further onto the surrounding wall to keep the corner sharp. Finish with careful sanding that avoids rounding the corner.
This work matters because a crisp edge looks professional and lasts longer. Building the edge properly prevents nicks from showing and makes future coats go smoother. Don’t rush or skip the feathering; sloppy work here undermines the whole job.
Sanding without losing the crisp edge
Once you’ve got that sharp corner down, sanding is all about finesse. Start with 180-grit paper to smooth out any rough spots but be gentle around those edges. Move up to 220-grit for a finer touch, still being careful not to round off your crisp edge.
Check the joint every few minutes as you sand. If it starts looking soft or rounded, back off and reassess. You can always go over it again but once that sharp corner is gone, it’s hard to get back.
Remember, less is more when it comes to sanding crisp edges. Don’t rush the job; take your time and you’ll end up with a professional-looking finish that stands out.
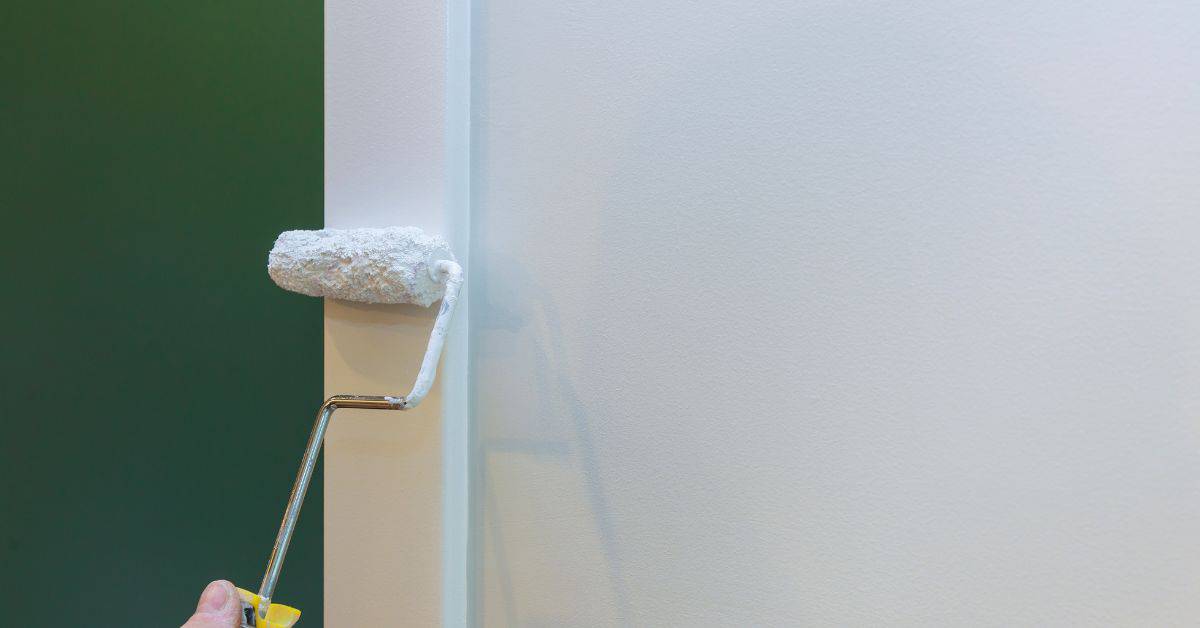
Spot priming and paint prep
Before you hit the wall with a roller, give it a quick spot prime over any joint compound. This stops uneven absorption and keeps your paint job looking sharp. If you missed spots or have imperfections from sanding, now’s the time to catch them.
Inspect carefully. Look for any dips, bumps, or rough patches that might show through once painted. A good light source helps—try a flashlight at an angle to highlight low spots. If you find issues, touch up with more compound and sand lightly until smooth.
Final check: Make sure your edges are crisp and clean. Any stray marks or smudges can be easily fixed now before the paint goes on. A quick wipe down with a damp cloth will also help remove any dust that might interfere with adhesion.
Visual checkpoints and quality control
Visual checkpoints and quality control mean you verify each stage by sight and touch. Do straightness and plumb tests, check the shadow line, look for uniform bead adhesion, and confirm a paintable surface. Run quick tests to catch hollow spots or gaps before moving on.
These checks save you from rework and bad finishes. They give you confidence on the job and make coatings stick longer. If something looks off, fix it now rather than blaming the material later.
Using a level and sightline tests
Before pouring concrete, use this checklist to ensure corners are straight and true.
- Check corner squareness: Use a long level or light-line across the corner. Confirm it forms a perfect 90-degree angle. Skip at your peril: misaligned corners lead to wasted material and rework.
- Verify straight edges: Run a string line along the edge of the form. Ensure no high or low spots exist by checking with a level every few feet.
- Test plumb lines: Drop a plumb bob from each corner to ensure they align vertically. Confirm all corners are at the same elevation.
- Sightline across forms: Stand back and sight along the form edges. Look for any visible misalignment or curvature.
- Level on top of forms: Place a level horizontally on top of the concrete forms to ensure they’re perfectly flat before pouring.
- Check corners with laser: Use a laser level to project a line across the corner. Confirm it’s square and true.
- Double-check angles: Measure each angle at least twice, using both a carpenter’s square and a digital angle finder.
- Sight from multiple points: Walk around the perimeter of your pour area to check sightlines from different angles. Catch any misalignment early.
Quick rule: Always double-check corners with both a level and a sightline test for peace of mind.
Common finish flaws and how to fix them
This checklist helps you spot common issues right after concrete placement or finishing. Use it to catch problems early before they become costly fixes.
- Ridges on surface: Look for raised lines where screeds were used. Confirm by running a straightedge across the ridges; should be smooth and even. Skip this, and you’ll have an uneven finish that’s hard to sand down later.
- Low spots: Check with a level or sightline test for dips in the slab. Fill low areas immediately with concrete patch mix. If ignored, these can lead to water pooling and structural issues over time.
- Hairline cracks: Inspect edges and corners where stress is highest. Use a hair dryer on cracks to see if they open; should be tight without gaps. Skip this step, and you risk bigger cracks forming later.
- Bubbles or voids: Look for air pockets in the concrete surface. Confirm by poking with a screwdriver; should feel solid underneath. Fill small voids immediately to prevent water damage.
- Uneven edges: Check slab perimeters and corners against straightedge. Should be flush with forms or other surfaces. If not corrected, uneven edges can lead to tripping hazards.
- Excess bleed water: Look for standing water on the surface after finishing. Confirm by waiting a few hours; should dry up naturally. Remove excess water immediately to avoid weak spots in concrete.
- Inadequate curing: Check that curing compound is evenly applied and not missed any areas. Should be uniformly spread across the slab. Skip this, and your concrete will cure unevenly leading to durability issues.
- Uneven color or texture: Inspect for patches of lighter or darker concrete. Confirm by comparing with a freshly poured section; should match in tone and finish. Apply additional finishing coats if necessary.
Quick rule: If it looks off, test it right away to avoid bigger problems later on the jobsite.
Troubleshooting common problems and mistakes
Common bead problems—popping, a lumpy finish, or mismatched profiles and moisture failures—usually point to poor fastening or substrate movement. The cure is simple: fix the root cause, reattach or reseat the bead, and tighten or replace fasteners as needed. Do it with clean, dry surfaces and check for movement before you set the bead again.
Why it matters: ignored issues lead to cracking, leaks, and costly repairs. Knowing the root causes helps you spot problems early and prevent failures before they become big fixes. Keep fasteners tight, check the substrate for movement, and use the right bead profile for the job.
What to do if the bead keeps separating
If your concrete edge bead is coming loose, it’s a sign of bigger issues. First off, remove the bead completely. This might sound drastic but you need to get at the underlying problem.
Next, take a look at both the framing and drywall behind where the bead was. Check for any signs of weakness or movement. If things aren’t tight back there, it’s probably why your bead is coming loose. You may need to add some back-blocking or use better fasteners.
Finally, once you’ve got everything squared away and solid, go ahead and reattach the bead with a good quality adhesive. If you follow these steps, you should be able to keep that bead in place without any more trouble.
Fixing paint cracking or visible seams after finishing
If you notice cracks or visible seams in your freshly painted concrete, it’s usually due to either insufficient drying time before painting or improper skim coating techniques. Don’t rush the process; let the base layer cure properly. If you’ve already applied paint and issues appear, sand down the affected areas gently until smooth.
Next, use a setting compound to fill in any cracks or seams that are still visible after sanding. This compound will help blend the surface more seamlessly with your existing concrete finish. Once it sets, give it a good primer coat before repainting for better adhesion and coverage.
Avoid common mistakes like applying paint too soon after pouring or not using enough skim coats to hide imperfections. These shortcuts can lead to unsightly results that waste both time and materials. Take your time, do it right the first time, and you’ll save yourself headaches later on.
When to call a pro and cost/time estimates
If the repair involves only small trim and a simple reseat, it’s a DIY weekend job. Use this as a quick filter: if you see any of the following, stop and call a pro instead: extensive water intrusion or staining not limited to a single spot, visible mold growth, rust or corrosion on metal corner bead, warped or sagging framing, large or repeating cracks around the corner, signs of structural movement, pest damage to framing, multiple adjacent corners failing, or any nearby electrical/plumbing concerns. For a typical residential corner rebuild, expect a weekend or two for DIY work, with materials costs from roughly $50-$150 for basic supplies, and a total project cost range from a few hundred dollars up to a few thousand for more involved DIY. Pro work usually runs several days and into the thousands, depending on scope.
Why it matters: a botched corner can leak, settle, and fail under load. A pro will save you time, money, and headaches by doing it right the first time; for DIY, know your limits and stage safety.
Signs you need a drywall contractor or carpenter
If you spot extensive mold, it’s time to call in the pros. Mold can be tricky and dangerous, especially if it’s spread across multiple walls or ceilings. A professional knows how to safely remove it and prevent future issues.
When framing is damaged—whether from water damage, pests, or structural stress—it’s best left to a carpenter. Damaged framing isn’t just unsightly; it can compromise the safety of your home. Don’t risk cutting corners here.
If you notice multiple adjacent corners failing in drywall, this indicates deeper issues that go beyond simple repairs. Complex trim integration also falls into the realm of professional work. Trying to DIY these could lead to more problems down the line.
DIY time and budget breakdown
If you’re tackling a single outside corner, plan for about 2 to 4 hours of work. For multiple corners, add an hour per additional corner. Materials costs will vary based on concrete mix and formwork needs but expect around $50-$100 for the basics.
- Safety first: wear eye protection, a dust mask or respirator for mold/mibro dust, hearing protection as needed, and gloves. If you’re working with wet concrete, use appropriate PPE and ensure good ventilation.
- Pre-work checks: shut off nearby utilities if you suspect any service lines near the corner; inspect surrounding framing for rot or movement with a level and straightedge; check moisture levels if you have lingering dampness.
- Concrete and forms: verify substrate flatness, compact base or sill, and use forms that provide a true right angle. Allow proper curing time per product instructions (often 24–72 hours) before finishing trim.
- Scope decision: if mold, rot, or significantly compromised framing is found, stop and call a pro—don’t proceed to finish work.
Check base compaction before you start pouring; it’s crucial for a solid foundation. Also, don’t forget to factor in drying time which can take 24-72 hours depending on weather conditions and concrete type.
If your project involves more than three corners or complex shapes, seriously consider calling in the pros. They’ll save you time and ensure quality work that lasts.
Long-Term Maintenance to Prevent Future Problems
Long-term maintenance means checking and fixing small issues before they grow. Do regular inspections, address leaks, wear now, and replace worn parts before they fail.
When you spot early warning signs, act fast to save time and money on bigger repairs later. Consistency matters: routine checks create safer, longer-lasting results on the jobsite and at home.
Scheduled Inspections and Early Warning Signals
Use this checklist every six months to catch issues early before they become costly repairs.
- Crack Width Check: Measure cracks with a ruler. Should be less than 1/8 inch wide. What goes wrong: Cracks wider than this can let water in, causing damage.
- Bead Bonding Inspection: Look for gaps between the concrete and sealant bead. No gaps should exceed 1/4 inch. What goes wrong: Gaps allow water to seep under the slab.
- Corners Movement Check: Corners of slabs should not move more than 1/8 inch from adjacent sides. Use a straight edge or level for verification. What goes wrong: Excessive movement can lead to structural issues.
- Water Intrusion Signs: Look for damp spots, efflorescence (white powder), or moss growth on the concrete surface. These indicate water penetration. What goes wrong: Ignoring these signs leads to deterioration and weakening of the slab.
- Rebar Exposure Check: Inspect exposed rebar for rusting or corrosion. No visible rust should be present. What goes wrong: Corrosion weakens the concrete structure over time.
- Drainage Pathway Inspection: Ensure water flows away from your foundation and towards storm drains. Look for any blockages in gutters or downspouts. What goes wrong: Poor drainage can cause pooling, leading to slab cracking and erosion.
- Pavement Level Check: Use a level to check if the pavement is even with no dips or bumps greater than 1/4 inch. What goes wrong: Uneven surfaces can lead to tripping hazards and structural instability.
- Surface Spalling Prevention: Look for signs of surface spalling (chips, flakes) which indicate wear and tear. Address these areas immediately with a patching compound. What goes wrong: Ignoring spalling can lead to deeper concrete damage.
Quick rule: If you see any sign of water or movement, act fast to prevent bigger problems later on.
Timely Repairs: Patch vs. Rebuild Decision Process
When you spot a problem with your corner bead, the first step is to assess whether it needs patching or rebuilding. Start by checking base compaction. If the ground beneath isn’t solid and level, no amount of patchwork will fix the issue long-term.
If the damage is minor—like a small crack or two—you can likely get away with patching. Use high-quality concrete mix to fill in the gaps, making sure it matches the existing surface as closely as possible. But if you see major cracks, bulging, or signs of water seepage, rebuilding might be your only option.
Remember, ignoring these issues can lead to bigger headaches down the road. If you’re unsure about tackling a rebuild yourself, don’t hesitate to call in a pro before things get worse.
Safe Maintenance Toolkit and Best Practice Procedures
To keep your concrete in top shape, you need the right tools and a solid plan. Start by gathering essential gear like a chipping hammer, broom, shovel, and sealant applicator. Don’t forget protective gloves, goggles, and dust masks for safety.
When tackling maintenance tasks, always check base compaction first. If it’s loose or uneven, the concrete will crack sooner than later. Fix any issues with a solid base before applying new layers or patches. This step is crucial but often overlooked by DIYers.
Avoid cutting corners on repairs. A small patch job might seem quicker and cheaper, but if it doesn’t address the root cause, you’ll end up spending more in the long run. Follow your patch vs. rebuild decision process to make smart choices that save money and hassle.
Conclusion
Getting outside corners right matters for safety, durability, and a clean, professional look. When corners fail, water, cracks, and chipped edges follow—fix it now to prevent bigger damage and costly repair later.
Make it a simple, step-by-step routine: start with a clean, dry skin surface and the correct corner bead, cut the bead to fit, embed and bed the bead with the first coat, feather and shape while the mud stays workable, apply the second coat to seal and crisp the edge, then inspect for a sharp line and true alignment. Take it one corner at a time, test as you go, and don’t rush curing times or skim coats.
Common mistakes to avoid are skipping prep or cleaning the corner, using the wrong bead size or type, over-tightening fasteners, and trying to rush the first coat before the mud is workable. Safety rules are simple: wear eye protection and a dust mask, keep your work area stable and well lit, use the right ladder or scaffold, and test fixes on a small area before committing to the whole corner. If something feels off, back off, reassess, and rework rather than forcing a bad result.
If the corner still looks off after a careful pass—or you’re dealing with warped framing, persistent cracks, or moisture issues—call a pro rather than pushing ahead. A quick professional check can save time, money, and repeated repairs. With careful prep and steady hands, you’ll rebuild corners that stay true, look sharp, and resist future leaks and damage. Stay methodical, stay safe, and you’ll finish strong.
FAQ
What are the common signs that a corner bead has failed on an outside corner?
Look for peels, cracks, or a dented edge that runs along the outside corner. You’ll also see tape pulling away from the wall or a visible wobble when you press on the corner. If the bead moves or the mud cracks at the edge, it’s time to fix it.
Can I just patch the corner instead of rebuilding it?
Patching can work for small cracks, but it’s not a long-term fix on outside corners. The corner takes daily abuse from doors, weather, and movement. Rebuild the corner properly for a clean, durable finish.
What steps should I follow to rebuild an outside corner bead?
First, remove loose or damaged material from the corner. Reinstall a new corner bead and secure it with screws or nails, then skim with joint compound and sand smooth. Build up a few thin coats and feather the edges into the walls for a tight, straight corner.
What mistakes should I avoid when rebuilding an outside corner?
Avoid skipping the prep work or skipping sealing gaps. Don’t overbore holes or drive fasteners too deep, which can dent the bead. Do not rush the mud; let coats dry properly and keep the line straight with a sharp trowel. Avoid using the wrong size bead for that wall.