
Introduction
Proper prep is essential to prevent cracks and safety hazards when pouring concrete at home.
This guide explains how to assess the site, prepare the base and forms, and plan for curing to ensure a solid, durable pour.
You’ll learn practical steps, safety considerations, and rules of thumb that help you execute a successful project with predictable results.
Key takeaways
- Assess project fit, budget, timeline, and access to space for a safe pour.
- Wear appropriate PPE and establish a safety plan before any mixing.
- Obtain permits and verify utilities to prevent strikes and penalties.
- Check soil type and drainage to inform base, grading, and compaction.
- Prepare site by clearing vegetation, debris, and unsuitable topsoil for stability.
- Choose stable base: gravel, sand, and geotextile for drainage and frost protection.
- Plan proper reinforcement type—mesh, rebar, or fiber—for crack control long-term.
Table of Contents
- Introduction
- Key takeaways
- Quick At‑A‑Glance: Is This Project Right for You?
- Basic Safety Protocols and Required PPE
- Understanding Permits, Codes, and Utility Checks
- Site Assessment: Soil Type and Ground Evaluation
- Clearing the Site: Vegetation, Debris and Topsoil Removal
- Grading and Slope Planning for Drainage
- Excavation Depth and Edge Preparation
- Creating a Stable Base: Gravel, Sand, and Geotextile Options
- Compaction Techniques and Equipment
- Reinforcement Choices: Mesh, Rebar, or Fiber?
- Expansion, Control, and Isolation Joints
- Concrete Mix Selection and Ordering
- Weather and Temperature Management
- Pour Day Checklist and Crew Coordination
- Pouring Techniques: Placing, Screeding, and Leveling
- Finishing Methods: Troweling, Edging, and Texturing
- Curing Best Practices and Hydration Control
- Protecting a New Pour from Weather and Traffic
- Pouring Next to an Existing Foundation: Special Risks and Mitigation
- Common DIY Failure Modes and How to Diagnose Them
- Budgeting and Practical Cost Estimates
- Tools and Materials Checklist (What to Buy or Rent)
- Timeline Planner: From Prep to Full Cure
- When and How to Consult a Professional
- Visual Checkpoints and Inspection Guide Before Covering
- Repair and Maintenance: Extending the Life of Your Slab
- Conclusion
- FAQ
Quick At‑A‑Glance: Is This Project Right for You?
Is this project DIY‑friendly? For small slabs, sidewalks, and driveways with simple formwork, you can handle it, but don’t push into load‑bearing or near existing structures without professional help. Set clear boundaries on thickness, reinforcement, curing, and how it ties into utilities—if any doubt exists, call a pro. Be honest about your time, skill, and the money you’re willing to invest, because wrong pours waste material, time, and credibility fast.
This matters because a DIY pour isn’t just mixing concrete; it’s site prep, proper formwork, drainage, curing, and safety all at once. You’ll benefit from a quick self‑check of your skills, weather windows, access, and gear before you start, so you pick a scope you can actually finish correctly. Use a simple pre‑assessment flow or checklist to decide whether to proceed, adjust the plan, or bring in a licensed contractor, and lock in a realistic schedule, material costs, and potential hidden expenses before you mix. If your soil is unstable, you’ve got complex formwork, poor drainage, or utility proximity, don’t press your luck—shift to a pro and save a bigger headache later.
Project suitability checklist
Measure the slab area and planned thickness. If the pour is under 100 sq ft or a simple 4–6 in. slab for foot traffic, it’s usually DIY-friendly. Larger areas, heavy vehicle loads, or slabs over 6 in. need professional input.
Check site access, tools, and manpower. Can you rent a mixer, compactor, screed, and handle a same-day pour? Do you have at least one helper for consolidation and finishing? Be realistic about physical ability and a full workday of labor.
Assess ground and weather: stable, well-draining soil and a 24–48 hour dry window are minimums. If you can’t confirm soil bearing or anticipate rain, hold off or get a pro inspection.
Quick gauge: small sidewalk, patio, or shed slab with simple forms and no buried utilities — go ahead. Anything beyond those limits should move to the next section.
When to call a contractor
Call a contractor when the job affects structural systems. If the pour ties into foundation walls, load-bearing elements, or requires engineered footings, you need licensed expertise and stamped plans.
Red flags include unstable or undocumented soils, steep or terraced grades, nearby utilities, or drainage conflicts. Those conditions carry safety and liability risks beyond DIY scope. Don’t guess on utility locations or permit requirements.
Also hire pros for large pours, tight access where concrete trucks or pumps are needed, complex reinforcement or embedded items, or when timelines are unforgiving. Wrong timing or form failure costs far more than the hire.
When unsure, get a consultation. A short site visit can save money and prevent major fixes later.
Basic Safety Protocols and Required PPE
Basic Safety Protocols and Required PPE for a home concrete pour mean you start with the right gear and a plan. Wear safety glasses or goggles, chemical-resistant gloves, long sleeves and pants, closed-toe boots, and a proper NIOSH-approved respirator or dust mask for silica, adding a hard hat if overhead work is part of the job. Identify hazards like uneven ground, loose tools, rebar, wet surfaces, and overhead formwork, and set up clear barricades or cordons to keep kids and pets out of the work zone.
Concrete work is unforgiving if we skip steps, so this section reinforces how to mix, handle, and pour safely with a dedicated area away from living spaces, a stable setup for bags and tools, and proper lifting techniques or aids to prevent strains. It also covers exposure management—keep water nearby, take frequent breaks, and use skin barrier cream to reduce contact with wet cement and cement dust—plus practical emergency procedures, eyewash if available, access to warm water, and quick contacts for local emergency services. Following these practices saves skin, eyes, and money, and it keeps you legal and out of trouble when inspections or accidents happen.
Personal protective equipment list
Wear the right gear every minute on site. Each item protects a specific hazard from dust to wet concrete burns.
- Safety glasses/goggles Protects eyes from splashes and dust. Choose impact-rated or splash-proof goggles. Keep a spare pair nearby; disposable safety glasses cost under $5 each.
- Chemical-resistant gloves Stops caustic cement paste from contacting skin. Use neoprene or nitrile gloves rated for alkalis. Change gloves if torn; heavy-duty rebar gloves can be rented or bought for $10–$30.
- NIOSH respirator Blocks silica dust during mixing. Use an N95 at minimum; P100 for extended work. Fit-test at home by checking seal and replace filters per manufacturer.
- Long sleeves & pants Limits skin contact with wet concrete. Use breathable cotton or work denim. Tuck sleeves and rinse clothing after splashes.
- Closed-toe boots Prevents foot injuries and burns. Rubber boots are best for wet concrete; steel-toe if heavy handling. Keep them clean of hardened concrete.
- Hard hat Protects from overhead formwork hazards. Required if you have any overhead work or falling tools. Basic hard hats run $15–$40.
- Skin barrier cream Reduces chemical burns on exposed skin. Apply before work and after breaks. Not a substitute for gloves.
Site safety and traffic control
Secure the pour area before you mix a single bag. Block off the driveway or yard with physical barricades and clear, visible signage to keep neighbors and passersby away.
Use cones, temporary fencing, or sawhorses with bright tape. Position signs reading “Work Area — Keep Out” and “Wet Concrete” at all access points. Keep a responsible adult stationed to watch for children and pets during the pour.
Plan a single entrance route for workers and material delivery. Keep tools, rebar, and hoses out of walk paths and mark any trip hazards. If public access is nearby, notify neighbors in advance and post expected start/finish times.
Understanding Permits, Codes, and Utility Checks
Permits aren’t optional for every small concrete job, and rules vary by town. For residential slabs, walks, or minor concrete work, know when a permit is actually needed, what documents you must have, and typical inspection milestones. Also, understand the code basics—minimum thickness, reinforcement, control joints, edge forms, frost considerations, and proper slope and drainage—and make utility locating a non-negotiable first step.
Calling 811 or your local utility locator before any digging saves you from outages and dangerous strikes. Potholing, marking lines, safe distances, and documenting compliance keep inspections on track and prevent after-the-fact changes. Use a practical pre-pour checklist to confirm site assessment, base prep, setback clearances, permit-ready plans, and who handles the work.
How to check for required permits
Start by calling or visiting your local building department. Ask specifically about concrete work: driveway aprons, slabs, walkways and retaining edges each can trigger different rules. Give them project dimensions, proposed thickness and location so they can tell you if a permit is required.
If a permit is needed, the office will list required documents: a site plan, slab details (thickness, reinforcement, control joints) and drainage notes. Expect a plan review and staged inspections—typically footing/base, pre-pour reinforcement, and a final inspection after curing. Keep copies of stamped plans and the permit on site.
For DIYers, confirm contractor limits and whether a licensed pro must perform portions of the job. Failing to permit can require costly undoing or affect property value, so get written confirmation from the authority before you dig or pour.
Locating underground utilities safely
Before any excavation, call 811 or your local utility locator. They will mark public utility lines at no cost. Treat those marks as the starting point, not the final answer. Ask for a written ticket or confirmation number and observe the marked lines on site.
For added safety, use private locators or perform potholing (hand-digging or vacuum excavation) to physically verify critical lines and depths. Maintain safe distances from marked utilities and clearly flag edges of the excavation. If you find an unmarked or unexpected utility, stop work and contact the utility owner and the building department.
Keep a site record of markings, photos and the 811 ticket. Never assume location accuracy beyond the marked tolerance—plan your base depth and form positions to avoid conflicts.
Site Assessment: Soil Type and Ground Evaluation
Before you pour a residential slab, you must assess the site soil type, bearing capacity, drainage, and stability. Identify whether you’re on clay, silt, sand, or loam and run quick tests you can do on the job site—feel the texture, do a jar test, look for stickiness and drainage rate. Note indicators of weak soils right away and decide base material and any stabilization or replacement steps before you touch concrete. If tests show signs of poor drainage, high water table, or frost risk, adjust the footing design now.
In practice, you’re planning the base: loose vs compacted soil, level and well-drained surfaces, and a base you can trust. Choose a gravel or crushed stone layer with proper compaction, add drainage solutions or a geotextile if the site demands it, and be ready to remove or replace problematic pockets. Check the soil for stability issues like expansive clays, organic matter, peat, or root zones. Outline when to call in a soils engineer or a contractor and what permits or frost-depth rules apply, and keep in mind that good prep prevents costly failures. Document findings and decisions for safety and inspections.
How to identify soil types on site
Grab a handful of moist soil and work it between your fingers. Sandy soils feel gritty, fall apart and won’t hold a ribbon when squeezed. Clay feels sticky, smears on your fingers and will form a short ribbon before breaking. Loam is a balanced mix — slightly gritty and slightly cohesive. Silt feels smooth and floury when dry and holds water longer than sand.
Do a simple jar test: put soil in a clear jar with water, shake, let settle. Sand drops first, then silt, then clay on top. Note drainage in place — standing water or very slow infiltration points to fine particles or a high water table. Mark areas with roots, peat, or dark organic layers; those need removal or replacement before you pour.
Signs of poor soil performance
Soft spots, depressions, or uneven settlement after light traffic are red flags. These indicate low bearing capacity or buried organic matter that will compress under a slab. Repeated puddling after rain or a consistently wet surface suggests poor drainage or a high water table — both will undermine concrete long term.
Cracking, heaving in freeze/thaw climates, and sudden changes in grade point to expansive clays or frost-susceptible soils. Swelling clays lift slabs; organic soils decay and settle. If you see any of these signs, plan for soil removal, stabilization (lime or cement treatment), improved drainage, or consult a pro for bearing-capacity tests before pouring.
Clearing the Site: Vegetation, Debris and Topsoil Removal
Clearing the site means more than pulling weeds. You assess soil depth to stable subsoil, check for organic material and frost risk, and lay out a stripping plan that safely removes vegetation and topsoil while preserving a clean, workable base. Then you choose a proper sub-base, schedule compaction, and set up drainage and grading so the future slab sits on a solid, moisture-controlled foundation.
Doing this right reduces movement and future cracks. A clear workflow protects the work area, minimizes waste, and keeps stockpiles away from edges to avoid contamination. With a solid base, proper moisture management, and checked utilities, you get a predictable pour and long-lasting results that stand up to load, weather, and time.
Tools and technique for clearing
Pick the right kit and use conservative excavation. Work to expose stable subsoil without removing more than necessary.
- Spade and mattock Manual digging and root removal. Cheap and precise; around $25–$60. Use for small roots and tight spots to avoid over‑digging.
- Mini excavator Fast trenching and topsoil stripping. Rent about $200–$400/day; ideal for larger areas. Keep bucket depth shallow and check grade frequently.
- Plate compactor Compact sub‑base after removal. Rent $50–$100/day; use multiple passes. Don’t compact wet clay — let moisture equalize first.
- Root saw or chainsaw Cut heavy roots and root mats. Expect $150–$400 for a saw or rental; use PPE and cut from both sides for control.
- Wheelbarrow and tarps Move spoil and stockpile topsoil. Inexpensive; tarps keep material contained. Place stockpiles away from slab edges to prevent slumping.
- Laser level or transit Check depth to stable subsoil and slope. Rent $40–$100/day; set a reference line before stripping. Recheck often while you work.
Disposal and erosion control
Decide what to keep and what to discard before you dig. Topsoil with good organic matter should be stockpiled for landscaping, while root‑filled spoil and invasive species should be removed from site or hot‑composted offsite.
Contain stockpiles on tarps and slope them away from the slab. Install temporary silt fences or straw wattles if there’s any chance of runoff. These simple measures prevent topsoil loss and keep neighboring areas clean.
Cover exposed areas with geotextile or mulch if rain is expected. For longer jobs, grade temporary swales to divert water away from the base and prevent washout. Note utility and local disposal rules — some municipalities restrict organic waste or require specific haulage.
Grading and Slope Planning for Drainage
A proper slope away from the foundation is non-negotiable. Aim for at least 1/4 inch per foot to direct water away from the house and slab.
Before pouring, assess site topography and soil conditions (drainage patterns, clay vs. sand) and plan to extend grading 5–10 feet beyond the slab. Tie in downspout extensions, splash blocks, or rain gardens so water continues moving away. Have a string line, laser level, stakes, and compacted fill handy, and run a water test to verify slope and drainage.
Recommended slope percentages and directions
Keep concrete surfaces sloping away from the house so water never pond against the foundation. Aim for at least 1/4 inch per foot on slabs adjacent to the foundation. For walkways and patios where a gentler fall is acceptable, 1/8 inch per foot can work, but avoid anything flatter near grade changes.
Driveways should shed water toward the street or a dedicated drain. A cross-slope of 1/4 inch per foot to the low side is common; for wide drives consider a center crown with 1/8–1/4 inch per foot to either edge. Mark your fall direction with stakes and a string line, then verify with a laser or spirit level before forming.
Set slopes continuously for at least 5–10 feet beyond the slab edge so runoff doesn’t re-enter the foundation. Slopes in the wrong direction or interrupted by flat spots are a common cause of future leaks and frost heave.
Routing drainage and downspouts
Keep roof runoff off new concrete. Route downspouts away from the slab using extensions, buried piping, or splash blocks that direct water to a safe discharge point. If possible, connect downspouts to a buried drain that leads to the street or a storm system.
Use shallow swales or a rain garden where grading alone won’t carry water far enough. These options slow and absorb runoff before it reaches the foundation. Where space is tight, tie into an existing storm lateral but verify local codes first.
Before you pour, run a water-test from downspout discharge points while observing the slope. Adjust extensions or add compacted fill to fix any backflow toward the house. Small checks now prevent costly repairs later.
Excavation Depth and Edge Preparation
Excavation depth depends on what the slab will be used for, so plan different depths for sheds, patios, parking pads, or living space, and always respect the frost line and local code. Check soil bearing, drainage, and compaction; if the soil is weak or clayey, you’ll need thicker slabs or substantial soil replacement, plus granular sub-base and backfill so the edge stays stable during the pour. Outline edge forms and protection—stakes, forms, chamfers, or metal edging—and plan drainage away from the slab, damp-proofing as needed, and a clean, stable edge that won’t crumble when you pour.
Mark utilities, verify permits, and plan hand-dig near existing lines; weather delays can wreck forms, so build in time for rework and keep forms square and sturdy. Backfill with a granular sub-base, slope away from the slab, and ensure frost protection at the edge to prevent water intrusion and frost heave. Finally, plan inspection steps: measure depth, verify level and edge alignment, document deviations for the pour crew, and confirm all forms are secure before concrete goes in.
Depths for walkways, patios, driveways
For light use areas like garden walkways and basic patios, excavate to a finished slab thickness of 4″ to 6″. Backfill with a minimum 3″ to 4″ compacted granular base and a 4″ slab or 2″ base plus thicker concrete depending on finish. This handles foot traffic and occasional light furniture.
Driveways and parking pads need more depth. Expect a 6″ to 8″ concrete slab over a well-compacted 4″ to 6″ granular base for passenger cars. Heavier loads or frequent truck traffic require 8″ to 12″+ concrete or thickened edges and a deeper base. Match depth to load and local frost-depth requirements; where frost heave is a concern, extend excavation to below the frost line or add insulation.
Rule of thumb: increase slab and base thickness for poor soils, weak bearing capacity, or if inspections require it. When in doubt, test-bearing or consult local code for frost depth and structural recommendations.
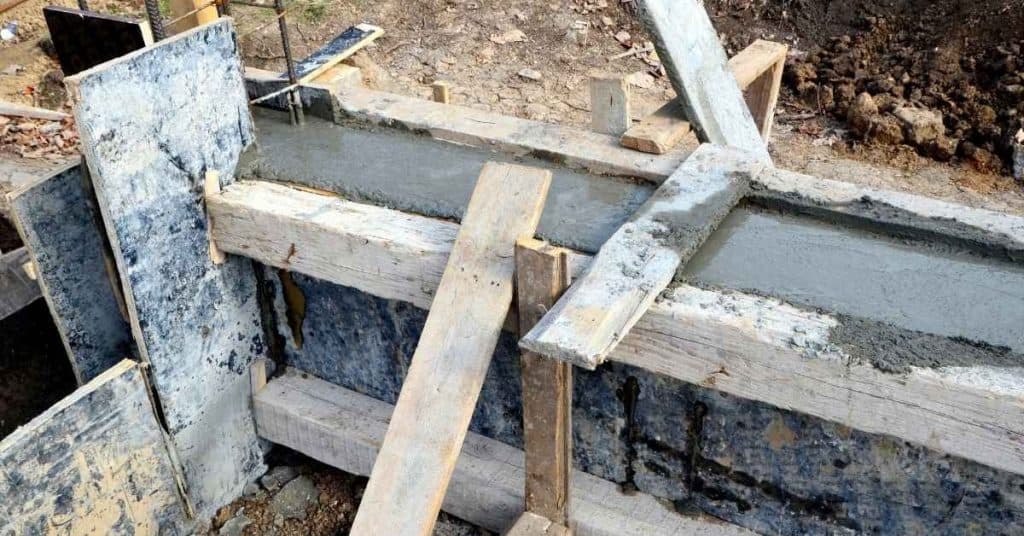
Formwork and edge support
Set rigid forms on a stable, compacted sub-base. Use straight, 2x lumber or metal forms staked every 12″ to 24″ to prevent blowout during the pour. Check that forms are level and square; measure diagonals and brace corners with solid stakes and cross-bracing.
For clean, durable edges use a chamfer or metal edging where traffic will strike the slab. Nail or clamp edging to the form to hold position while concrete vibrates. For thicker edges or footings, build a stepped form or blockout rather than relying on thin form boards.
Tips: drive stakes flush with the outside of the form, cut edges on occupied sides for a finished look, and protect forms with release oil. Verify forms again right before the pour—small shifts mean big headaches once concrete flows.
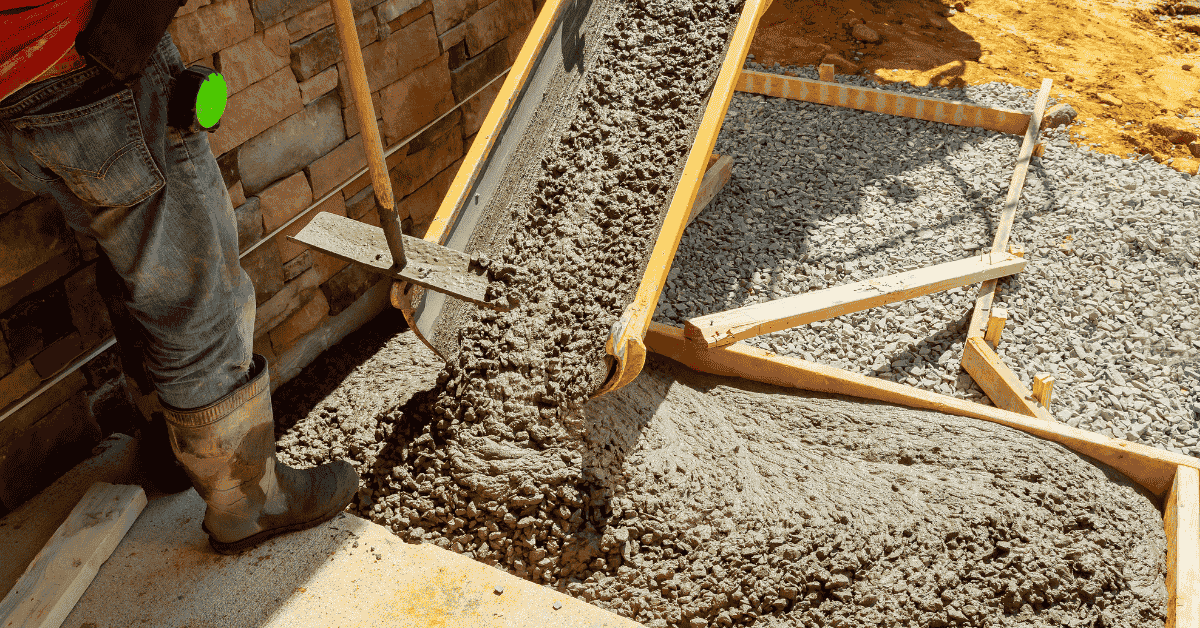
Creating a Stable Base: Gravel, Sand, and Geotextile Options
For a stable base, start with a crushed stone or clean gravel base, then a sand bedding, and only use geotextile membranes when soils are weak or prone to mixing. Aim for 4–6 inches of base for light loads, thicker if you expect heavier traffic, and compact each layer as you go. Install geotextile carefully to separate soils and improve drainage without bridging or wrinkling.
Good drainage, proper slope away from the structure, and solid compaction save you from future puddling and settling. Check levels with pre-screed and edge-brace techniques, and verify with a simple hand tamp or plate compactor before pouring. This isn’t glamorous, but it prevents cracking and rework later—do it right the first time.
Recommended base materials and thicknesses
Pick the right base and thickness and the slab behaves. The wrong aggregate or too-thin layer guarantees settlement, cracking or staining of your finished concrete.
- 3/4″ crushed stone Use angular, clean 3/4″ crushed rock as the primary base. It locks together under compaction and gives good drainage. Avoid rounded river rock — it shifts and causes settling.
- Clean gravel Use well-graded, washed gravel when drainage is important. Look for minimal fines to prevent capillary moisture. Excess fines lead to poor bond and surface discoloration.
- Crusher run/DGA Use dense grade aggregate (crusher run) where a compactable matrix is needed. It contains fine particles for tight compaction. Too many fines, however, can trap water and weaken the slab.
- Sand bedding Place 1/2″–1″ of concrete sand for a level screed bed. It helps get a flat surface before pouring. Don’t use soft river sand — it can wash out and cause voids.
- Thickness guidelines Standard: 4–6″ for patios/walkways, 6–8″ for driveways, more for heavier loads. Increase thickness on poor or frost-prone soils. Underbuilding leads to bending and cracking.
- Compaction targets Achieve 95% modified proctor where possible; hand tamp for small jobs, plate compactor for larger areas. Test by firm feel and minimal movement under load. Poor compaction equals future settlement and cracked concrete.
- Edge support Compact aggregate right to form edges and use a finer tamp near forms. Proper edge support prevents edge spalling. Weak edges will chip and fail first.
When to use geotextile or stabilization additives
Use geotextile fabrics when the subgrade is soft, mixed with organics, or when you need separation between silty soil and your aggregate base. Nonwoven fabrics are best for drainage and filtration; woven fabrics give more tensile strength on slopes and high-traffic approaches.
Install fabric directly on the prepared subgrade, pull it tight with no wrinkles, and overlap seams by 12″–18″. Pin or staple it so it can’t shift during aggregate placement. Do not let the fabric bridge across depressions — that causes localized failures.
Stabilization additives like lime, cement, or polymer stabilizers are for seriously marginal clays or high frost-heave risk. They change the soil chemistry and increase bearing capacity but require proper mixing, curing time, and sometimes lab guidance. Use additives when reworking or full removal isn’t practical; otherwise remove poor soil and replace with engineered aggregate.
Compaction Techniques and Equipment
Compaction is about getting the slab density right—target a solid, low-air-void mix and enough strength to keep the slab from shifting or cracking. Start with a good base: proper moisture, soil bearing capacity, and a well-prepared subbase so you don’t trap soft spots. Choose the right machine, usually a plate compactor, and know when to use vibration or impact for the soil you’re dealing with. Plan the pass count, overlap, speed, and how you’ll handle edges and corners so you don’t leave voids or feathering that ruin the finish.
Verifying density matters because you can’t tell by sight alone. Use simple field checks for feel and sound, and back it up with formal tests like a nuclear gauge, sand-cone, or core samples to confirm you hit the target specs. Keep safety and quality in mind: stay away from nearby structures, watch trench and formwork damage, and account for weather and temperature that slow curing or change how the soil settles. If you skip the prep, overwork the soil, or rush edges, you’ll pay later with a soft, cracked slab that never lasts.
How to compact in layers
Compact the base in thin lifts to get even density. Aim for 50–100 mm (2–4″) lifts for gravel or sand; thicker lifts trap voids and won’t reach target density.
Start at the edges and work inward with overlapping passes. For a DIY job, rent a 200–400 lb plate compactor; it balances weight and control. Run each lift until the surface shows uniform sheen and the plate no longer sinks.
Finish each lift by checking for soft spots and feathering the edges into the next pass. If soil is damp, let it dry to crumbly before compacting — overly wet fills won’t firm up.
Testing compaction without lab equipment
Use simple, repeatable checks to confirm a firm, level base before pouring concrete.
- Walk-and-listen stomp the area and listen for hollow sounds. Solid base gives a dull thud. Note any thin, resonant spots and recompact them.
- Straight-edge test lay a board across the surface and look for dips. Any gap over 6 mm (1/4″) needs attention. Mark and rework low spots.
- Thumb-press check press a handful of compacted gravel; it should not deform easily. If it crumbles or dents, add passes with the compactor.
- Ball-bearing test roll a small steel ball or marble on the surface. It should not track or change course. If it wanders, there are soft zones.
- Rental penetrometer borrow a pocket penetrometer or cone tester from rental shops (~$30–$70/day). Use it in several spots for comparative readings.
- Sand-cone DIY perform a simple sand-fill on a small patch to estimate density. It’s cheap and gives a rough confirmation of adequacy.
Reinforcement Choices: Mesh, Rebar, or Fiber?
Reinforcement choice comes down to the slab type and expected loads, so use mesh for light residential floors and patios, rebar for garage slabs or heavier-duty slabs, and synthetic fibers to help control cracking when you’re chasing a fast, simple pour. Mesh gives you quick, easy coverage but limited spanning strength, rebar provides real structural continuity but bangs up your install time and cost, and fibers help with micro-cracking control and workability without needing tight spacing. In short, match the plan to the load, and don’t try to squeeze a high-performance system into a light residential slab without understanding the trade-offs.
This matters on the job because placement rules drive durability: ensure minimum cover, keep mesh chairs under every mat, space rebar as required, and dose fibers according to the mix while watching for edge and column clearances. You’ll win by planning overlaps, tying, and edging early, coordinating with control joints, and confirming consistent thickness so you don’t end up with weak spots or cold joints. Do the upfront checks, respect corrosion resistance and maintenance needs, and stay honest about what your DIY crew can crew through—bad reinforcement choices bite back in the first freeze or after a heavy truck rolls through.
Wire mesh vs. rebar pros and cons
Wire mesh, rebar, and synthetic fibers each work for different slabs and loads. Keep it simple: mesh and fibers are fine for light slabs and crack control. Rebar is the go-to for vehicle loads and long spans.
Pros
- Wire mesh: inexpensive, fast to install for residential floors and patios.
- Rebar: excellent structural strength for garage slabs and driveways carrying vehicles.
- Fibers: reduce plastic shrinkage cracking, no tying, resists corrosion issues.
- All: improve toughness and load distribution compared with unreinforced concrete.
Cons
- Wire mesh: loses effectiveness if placed at the slab bottom; limited for heavy loads.
- Rebar: costlier, needs tying and accurate placement; more labor.
- Fibers: less structural capacity—don’t replace rebar for heavy loads or where code requires steel.
- Corrosion risk for steel unless proper cover is maintained.
Use mesh or fibers for residential floors, patios, and light-use slabs. Use rebar for garage slabs, driveways, or where building code or heavy loads demand it.
Chairs, spacing, and cover requirements
Support and position matter more than the type you choose. Use chairs or concrete blocks to hold mesh or rebar at the specified mid-depth so reinforcement sits in the tension zone, not on the subbase.
Follow minimum cover rules: typically 2″ for exterior slabs and 1–1.5″ for interior floors, but check local code. Space rebar per design—common DIY patterns are #3–#4 bars at 12″–18″ centers for garage slabs; mesh commonly comes in 6″x6″ panels. Calculate overlap: mesh should lap at least one full grid width or as specified; rebar requires 40–60 bar diameters overlap.
Do a dry run before pouring: walk the slab with a tape, check chair placement, and maintain consistent slab thickness. Proper spacing and cover protect steel from corrosion and ensure the reinforcement performs as intended.
Expansion, Control, and Isolation Joints
Expansion, control, and isolation joints are there to let concrete move without cracking. Expansion joints handle thermal movement, control joints keep cracks from spreading, and isolation joints separate slabs from walls or structures. Place them where movement is expected and differentiate usage by location and purpose to avoid fighting the concrete.
Keep the spacing decisions practical: edge joints, interior joints, near walls, around penetrations, and beside adjoining structures follow slab thickness and anticipated movement. Use preformed expansion joints, backer rods, quality sealants, and moisture barriers, selecting materials compatible with curing concrete and climate. Prepare and install by groove cutting at the correct depth and width, clean and dry surfaces, and coordinate with any reinforcement or post-tension systems to prevent debris, overfill, or poor adhesion from ruining the joint’s function.
Joint spacing and patterns
Control joints relieve tensile stress and guide cracking. A simple rule: spacing in feet = 2 to 3 times the slab thickness in inches. That means a 4″ slab gets joints roughly 8–12 ft apart; a 6″ slab, 12–18 ft.
Lay joints in a regular grid for large areas, keeping panels as square as possible to reduce corner stresses. Place edge joints within a foot of fixed objects (walls, footings) and keep joints at least the slab thickness away from sawed or grooved edges to prevent weak corners. Use expansion joints where slab meets fixed structures or other slabs to isolate movement; these need compressible filler and a full-depth break.
Materials for filler and edge isolation
Pick materials that compress, resist weathering, and bond (or not bond) where needed. The right backer rod and sealant combo prevents water intrusion and allows movement without tearing the concrete.
- Preformed expansion joints Use closed-cell foam or bituminous preformed strips between slab and foundation. Look for full-depth, compressible units rated for expected movement. Wrong product can crush or wick water into the joint.
- Backer rod Install closed-cell polyethylene rods to set sealant depth. Choose diameter slightly larger than the joint. Using no backer rod wastes sealant and causes three-sided adhesion failure.
- Polyurethane sealant Use a high-modulus, concrete-compatible polyurethane for long-lasting seals. Check for ASTM C920 and UV resistance. Low-quality caulk will crack or lose adhesion.
- Bond breakers Apply tape or wax where sealant must not stick to the bottom. Ensures one-sided adhesion and proper movement. Skipping this causes split seals and tearing.
- Moisture barriers Use polyethylene or membrane at interfaces with wood or foundations. Look for 6–10 mil or thicker where required. Wrong barrier can trap moisture and stain or weaken concrete edges.
Concrete Mix Selection and Ordering
Choose the right concrete mix for a DIY pour by selecting a clear target strength, dialing in the slump you can place and finish, and deciding between bagged mix or ready-mix based on project size and access. For residential slabs, plan around a suitable PSI range and match the mix to wall thickness, footer details, and anticipated loads, then think about whether you need a structural or non-structural formula and how much admixture you’ll actually run through.
Also decide early if you need air-entraining agents for freeze-thaw durability, retarders to slow setting on hot days, or accelerators to speed early strength, and how these choices affect cure time, workability, and weather tolerance. Practical targets to guide DIY pours include a slump in the 2–4 inch range for typical flatwork and about 3–5 inches when extra workability is needed in tight forms or with plastic forms. If exterior exposure or deicing salts are a concern, specify an air-entrained mix aiming for roughly 3%–5% air by volume to improve durability.
Admixtures change workability and curing, but avoid mixing incompatible products or stacking too many additives into one pour, as that can weaken the bond or cause unpredictable set. For better predictability, specify a water-cement ratio target (often around 0.45–0.60 for residential slabs) and confirm their recommended slump and air content for your exact mix. When ordering, plan batch sizes, lead times, delivery, and contingency for weather delays so you aren’t stuck waiting or paying extra. Do the site checks—water-cement ratio targets, aggregate size, subgrade readiness, rebar spacing, and formwork—then verify codes, tests, and curing steps to keep the project moving safely and cost-efficiently. If you anticipate hot weather, plan for extra time or retarders; in cold weather, verify that the supplier can provide an accelerator-compatible mix and protective curing methods.
Specifying mix strength and additives
Pick concrete strength based on use. For typical residential slabs and walks, aim for 2,500–4,000 psi. Use 2,500–3,000 psi for non-structural flatwork and light foot traffic; choose 3,500–4,000 psi where vehicle loads, steps, or structural ties are expected. If you need higher early strength due to a tight schedule or cold weather, consult the supplier about an accelerator-compatible mix and the appropriate dosage, but avoid over-accelerating which can increase cracking risk.
Decide on additives after you know exposure conditions. Add air-entrainment for freeze-thaw cycles or deicing salts. Use retarders in hot weather to keep the mix workable; use accelerators in cold weather to speed set. Keep admixtures simple on DIY pours—avoid combining multiple specialty products unless the supplier confirms compatibility. For exterior slabs, consider a surface retarder to preserve finishing lines and help with later troweling, and discuss a bonded or broom finish compatibility with the chosen mix and air content.
Coordinate strength and additives with slab thickness, reinforcement, and the substrate already prepared. Tell the supplier your intended finish and placement method so they can recommend slump and compatible admixtures. If you’re uncertain, request a trial mix or a test cylinder to verify early strength and curing behavior before pouring the full project.
Calculating volume and ordering tips
Measure length × width × depth in feet and divide by 27 to get cubic yards. Add a contingency buffer of 5–10% for over-excavation, waste, and uneven forms; for irregular pours or inexperienced crews, push that to 10–15%. For small DIY jobs, bagged mix gives control; for anything over about 1–2 cubic yards, ready-mix is usually faster and more consistent. If you plan to use ready-mix, verify that your access height, driveway clearance, and turning radius on slabs will accommodate the truck; consider scheduling a front-gager or pump if your site is tight.
Confirm lead times, minimum delivery amounts, and truck access with the supplier. Ask about delivery waiting time and extra charges for small loads. Schedule delivery to match your crew and pumping or wheelbarrow plan; a late start wastes concrete and risks cold joints. For DIY sites with limited time windows, arrange a short delivery window and have a backup plan (extra bags on site or a second truck) to prevent delays.
Always verify calculated yield against the supplier’s yield chart before you order. Plan a short extra window for weather delays and have a backup plan (extra bags on site or contact for a second truck) to avoid a short pour.
Weather and Temperature Management
Ambient temperature and the temperature of the concrete mix have a big impact on how fast the concrete cures, how strong it becomes, and whether it develops cracks. Keep pours within a safe range for mixing, placing, and finishing, and log temperatures on-site so you can track trends and catch problems early. Use cold-weather measures like pre-warming mix water, heated aggregates, insulation, and blankets, and hot-weather tactics like shading, misting, chilled water, rapid finishing, and wind control, plus clear plans to pause or reschedule if a freeze or severe storm is forecast.
This matters on every job because the wrong temps wreck strength and surface quality, especially for DIY projects where you don’t have crews to scramble to fix a bad pour. By watching real-time air and concrete temperatures and keeping a simple log, you can prevent cracks, reduce shrinkage issues, and keep curing moisture in check so you finish with a durable, smooth surface that actually lasts.
Cold-weather precautions
Cold slows strength gain and can freeze the mix before it gets a chance to cure. Target a concrete temperature at delivery of at least 10°C (50°F) when possible, and maintain a minimum curing temperature of 5°C (40°F) for the first 48–72 hours. Keep an on-site thermometer and log both air and mix temperatures every few hours during placement and initial curing.
Warm water, warmed aggregates, or accelerating admixtures help raise initial mix temperature. Heat the subgrade and use insulated forms, thermal blankets or a heated enclosure for larger pours. Protect edges and ends first; cover the slab immediately after finishing. If a freeze is forecast within 24 hours or the overnight low dips below -2°C (28°F) for critical pours, postpone — the risk to long-term strength and surface scaling is high.
Record all warming steps and temperatures for quality control. That documentation prevents surprises if problems appear later.
Hot-weather precautions
Heat accelerates hydration and increases evaporation, which can cause plastic shrinkage cracking and poor finishing. Plan pours for early morning or late evening when air and surface temperatures are lowest. Aim for mix delivery temperatures under 25°C (77°F) when practical and monitor slump retention during placement.
Use chilled or ice water, cooled aggregates, or liquid cooling agents to lower mix temperature. Provide shade over stockpiles and the placement area, and control wind with temporary screens. Keep water available for misting exposed surfaces but avoid over-wetting during finishing; use wet-curing methods or evaporation-reducing compounds immediately after finishing to maintain moisture.
Speed up placement and finishing without rushing workmanship. If rapid set is occurring, communicate with the supplier about retarders or adjusted mix design and document ambient and surface temps for the record.
Pour Day Checklist and Crew Coordination
Treat the pour day like a tight flight plan: map a single-day window with milestones for forms set, rebar checks, the pour itself, screeding, and finishing, then build in weather buffers and access realities so you’re not chasing time later. Create a clear crew roster with roles you can lean on—lead pour supervisor, screed crew, finisher, pump operator if used, and backup players for no-shows—and spell out shift lengths, break expectations, and handoff points so transitions stay clean. Verify tool, form, and material staging first, designating zones for forms, rebar, concrete, vibration tools, wheelbarrows, trowels, floats, water, PPE, and cleanup, and map access routes and cleanup stations to prevent chaos on the way to a good finish.
A solid plan saves you from delays and poor cure quality by forcing pre-pour briefings, simple signals or radios, and a single decision point so a hiccup doesn’t derail the whole day, even if something unexpected crops up. Remember that weather, site access, and hydration aren’t afterthoughts—adjusting for heat or cold, setting a rain plan, and protecting cure with proper sequencing keeps strength and finish quality intact and minimizes patchwork. Without this coordination, you’ll spend more time firefighting problems and you risk cold joints or weak edges that are costly to fix later, so stick to the plan and keep the crew informed and ready to roll.
Expand the safety plan on pour day to cover explicit fall and trenching risk controls around excavation edges, rebar protection, and buried utilities. Include a simple safety plan you can reuse on site: designate a site safety lead, establish exclusion zones around open edges and rebar, require guard rails or fall protection where needed, verify buried utilities with a utility locate before any digging, and review emergency procedures with the crew at the start of the day.
Tool and material staging plan
Stage tools so crews never backtrack. Place materials by work zones and keep a clean path from the truck to the pour edge.
- Main staging area Set a single central zone for bags, admixtures, and extra rebar. Keep it sheltered and within 20–30 ft of the pour to cut carry time. Flag the area and keep it off the travel lane.
- Wheelbarrow pit Park filled barrows near the pour edge but out of finishers’ path. Standard wheelbarrows hold 6 cu ft; rent extra if moving large volumes. Beware tipping—keep handles visible.
- Tool racks Use racks for floats, trowels, and screeds to avoid lost tools. Mark racks by trade so crews grab the right tool fast. Secure sharp tools when not in use.
- Screed staging Pre-position screeds and straightedges in order of use. Aluminum screeds cut down weight for long pulls; expect rental rates $10–25/day for long screeds. Lay them on padded blocks to stay straight.
- Vibration zone Place internal and external vibrators where operators can reach all pours. Check power or compressor specs before start. Run a quick test to confirm reach.
- Water and curing Keep hoses, sprayers, and curing blankets at a nearby station. Have cold-water and sun-shade options ready for hot weather. Secure containers to prevent runoff.
- Safety and PPE Stock hard hats, gloves, boots, and eye protection at the gate. Replenish often—crew members without PPE should not enter the pour area. Post PPE rules visibly.
- Cleanup station Set a wheelbarrow wash and trash zone downwind. A small pump or hose and a squeegee keep tools usable. Don’t let concrete harden on tools—plan 10 minutes per clean cycle.
Roles and timing for helpers
Assign clear tasks and timelines before the truck arrives. For a typical single-car driveway slab (300–500 sq ft) plan a 4–6 hour window from first pour to initial finish. Smaller slabs (under 200 sq ft) can move faster; larger pours need staged teams and 6–10 hours of coordinated work.
Key roles: a lead pour supervisor to call lifts, 1–2 placers to move concrete to the edge, a screed crew of two to three for leveling, and one experienced finisher to control surface texture. Helpers rotate between placing, floating, and cleanup. Keep at least one backup person to cover breaks or no-shows.
Timing beats speed. Start with a quick 10–15 minute briefing on signals and handoffs. Call each lift size (wheelbarrow or pump load) and schedule short 20–30 minute checkpoints—adjust crew positions if concrete stiffens faster than expected. If weather or delays hit, the lead must decide on holding a partial pour or pausing to protect cure quality.
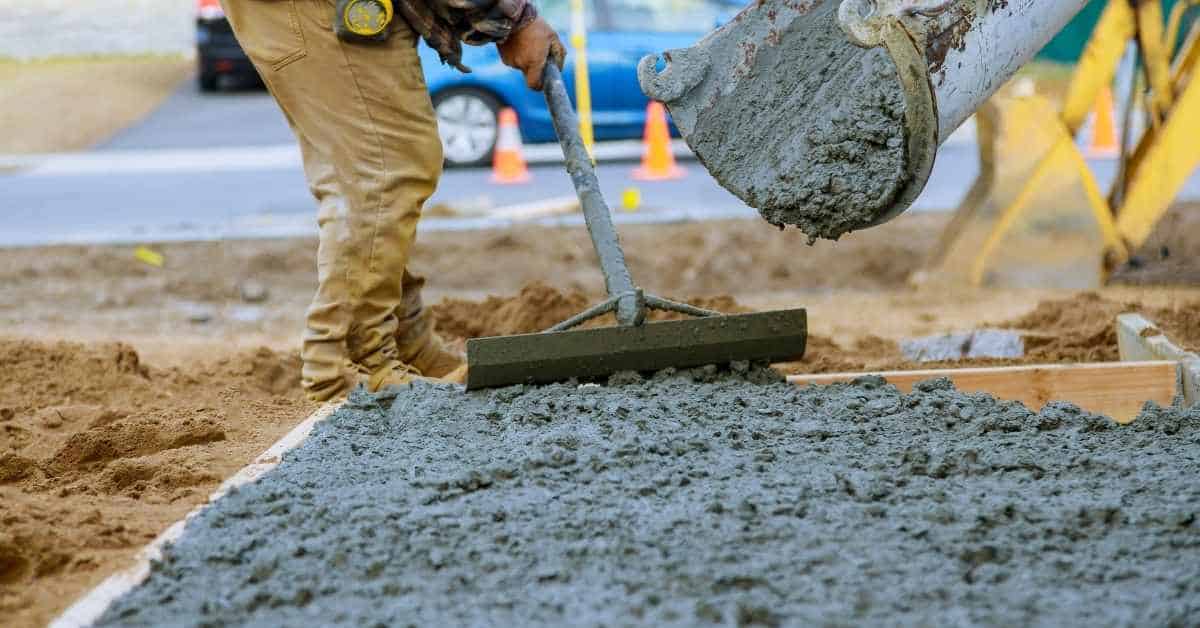
Pouring Techniques: Placing, Screeding, and Leveling
Pouring concrete starts with a clear sequence: place the mix, consolidate to reduce voids, and move quickly into screeding with the goal of full contact with the subgrade and minimal segregation. Use the chute or skip for controlled placement, and bring in vibration to settle the mix while avoiding overworking near rebar or mesh. Plan for a smooth transition to screed and avoid cold joints by keeping the pour continuous enough to maintain integrity.
This matters because good placement and proper screeding set the stage for a flat, durable surface and fewer finish problems later. You’ll need the right tools—straightedges, screeds, and a mix that isn’t too stiff—plus careful weather and temperature checks to prevent laitance and premature drying. When you fail here, you see roller marks, hairline cracks, or delamination after the initial set; do it right, and the finish comes easier with fewer fixes and faster curing.
Techniques for uniform placement
Start the pour in shallow, continuous lifts rather than dumping deep pockets. Place concrete close to its final position using a chute, skip or wheelbarrow to avoid long drops that cause segregation. Move steadily along the form so each area gets similar time and slump.
Consolidate as you go with a vibrator, but don’t overwork the mix. Brief, overlapping passes ensure full contact with the subgrade and around reinforcement. Watch for bleed water and adjust pace — faster finishing if the surface is drying, slower if bleed is heavy.
Tip: Keep mix consistency uniform by checking slump frequently and communicating with the truck operator. If you see coarse aggregate rising or paste separating, slow placement and increase consolidation in that zone.
Screeding and bull-floating tips
Establish target elevations with your stringlines or reference points and pull a straightedge across the forms using a sawing motion. Start screeding immediately after placement while the top is still plastic. Work in systematic passes from high to low, cutting off excess concrete and filling low areas.
Follow screeding with the bull float as soon as bleed water dissipates. Use the float to embed aggregate slightly and bring cream to the surface—don’t over-float or you’ll trap air and delay final finishing. Angle the float to avoid gouging and keep passes long and continuous.
Tip: If the substrate is uneven, shave low spots during screed and pack extra mix where needed. Stop screeding or floating near rebar to prevent disturbing reinforcement alignment.
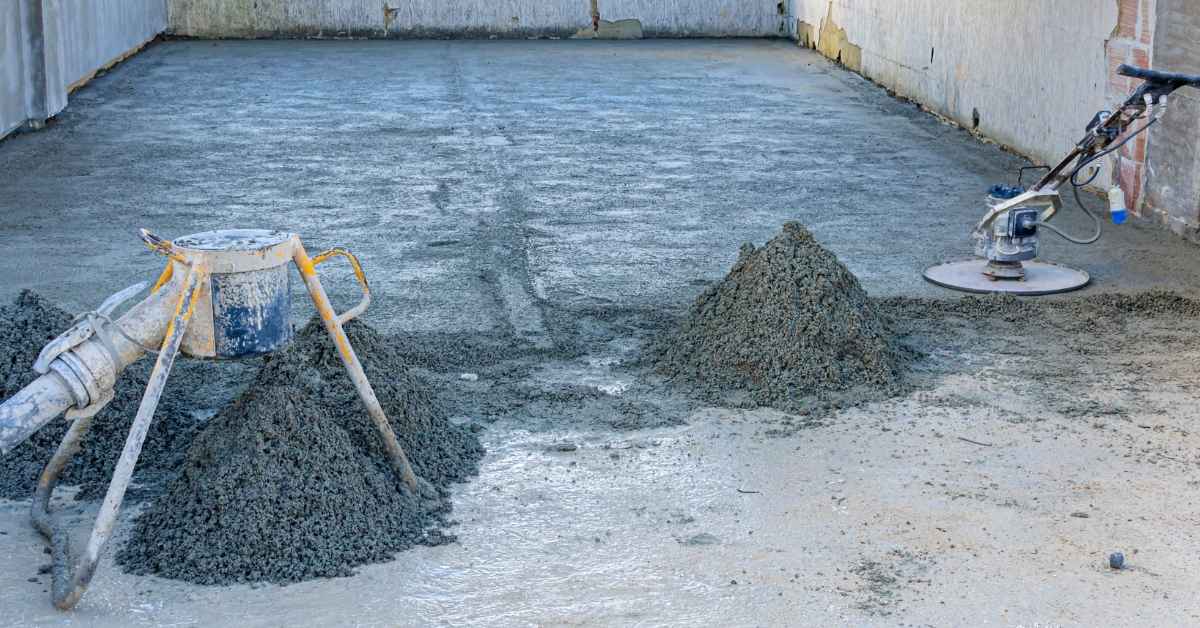
Finishing Methods: Troweling, Edging, and Texturing
When to trowel vs leave broom finish
Watch the bleed water. Start edging and light floating as soon as the surface sheen dulls and water stops pooling — usually after initial set but before the slab feels sticky underfoot. If you can press a thumb and leave a slight imprint, you’re in the trowel window.
Choose broom when traction matters: driveways, steps, ramps, or wet areas. Drag the texture broom across the surface with even pressure after a light float pass. For a smooth trowel finish, wait until the slab supports the weight of a finisher and the concrete firms enough to accept multiple steel trowel passes without ‘pulling’ or smearing.
Don’t rush. Troweling too early causes tear-out; too late gives a dusty, hard-to-finish surface. Use short, controlled passes and monitor temperature — heat speeds set time and changes your finish window.
Edging and joint tooling
Proper edging and jointing prevent chips and random cracking. Tool edges after the first float pass, then cut control joints at recommended spacing before final set.
- Edge tool Rounds slab edges to reduce chipping. Use a 1/4″–1/2″ radius setting. Work lightly and avoid digging into soft concrete.
- Grooved darby Levels high spots and lines up for troweling. Use after screeding and before floats. Rent one for about $20–40/day if you don’t own it.
- Steel trowel Creates smooth surface and compacts the top layer. Use light to medium pressure and multiple passes. Keep the blade clean to avoid drag marks.
- Edging wheel Fast, uniform edge finish for sidewalks and slabs. Set wheel width to match slab edge. Beware of rolling too soon; it can crumble weak edges.
- Control joint saw Cuts joints after initial cure to depth of 1/4 slab thickness. Rent saws for $75–150/day. Time cuts to avoid raveling—too early and concrete tears, too late and cracks form uncontrolled.
- Tooling boss Handy for small joints on patios. Guides a straight groove with consistent depth. Use as a low-cost alternative to saw cutting on small jobs.
- Hand groover Creates contraction joints while concrete is plastic. Match groove depth to slab thickness. Keep strokes straight and continuous to prevent step-offs.
Curing Best Practices and Hydration Control
Curing keeps concrete moist long enough to gain strength and control shrinkage. The goal is to maintain adequate moisture for about 7–14 days using wet curing, curing compounds, or blankets, and to avoid rapid moisture loss. If it dries out, you’ll see weaker strength, more cracking, and dusty surfaces.
Use wet methods (sprinklers, misting, damp burlap) for as long as needed, but keep the surface from pooling and avoid dusting. Curing compounds and moisture-retaining sealers act as a shield on top of the concrete and work across overlays, especially with different blends. In cold or windy days, use curing blankets or insulated covers and re-cover or remove them based on temperature and heat buildup; monitor moisture and extend curing if conditions dry out or heat up too fast.
Curing timelines and milestones
Think of curing as time the concrete needs to gain strength — not as a single event. You can allow light foot traffic after about 24–48 hours for ordinary mixes and mild weather. Avoid heavy loads during that window.
For vehicle traffic, most DIY slabs need at least 7 days before cars, and 14 days for heavier trucks or concentrated loads. The first week is critical: keep the surface moist to avoid early strength loss and shrinkage cracking.
Full design strength continues to develop up to 28 days. Many practical decisions are made at 7–14 days: if the concrete looks dull, dry, or has surface dusting, extend wet curing or reapply compound. Use those milestones to plan when to strip forms, finish landscaping, or load the slab.
Curing compound vs wet curing
Wet curing (sprinklers, continuous mist, or damp burlap) holds moisture directly on the slab. It’s simple and reliable for the first 7–14 days and gives the best protection against shrinkage cracking. Keep covers secure so they don’t blow off and check for puddles that can wash fines from the surface.
Curing compounds are film-forming sprays or coatings that seal in moisture. They’re fast and low-labor — good when water access is limited or for exposed finishes. Apply as soon as surface bleed water dissipates and surface can support equipment. Check product compatibility if you plan overlays, coatings, or adhesives; some compounds must be removed before bonding.
Decision rule: use wet curing when maximum strength and minimal shrinkage matter and water is available. Use a curing compound when logistics or finishing make wet curing impractical. If conditions are windy or hot, combine methods: wet cure initially, then protect with a compound or blanket as needed.
Protecting a New Pour from Weather and Traffic
Protecting a new pour means shielding it from rain, wind, sun, temperature swings, and early traffic. Set up temporary covers, insulating blankets, and barriers, then stage a simple plan with a clear timing window for setup and cure.
Know when to use tarps, plastic sheeting, or a sturdy awning based on forecast and pour size, and keep people and vehicles out with fencing and signs. Keep the pour moist to cure properly with misting, curing compounds, or wet curing as appropriate, and make sure slopes drain away to prevent ponding. A quick pre-pour weather check and a brief post-cure reopen cue will save you from costly cracking.
Emergency weather protection
When a storm or sudden freeze shows up, move fast but stay practical. Cover the pour with heavy-duty plastic sheeting or contractor tarps, anchored around the edges with sandbags or boards so wind can’t lift them. Avoid laying anything directly on a still-tacky finish; instead prop a light frame of 2x4s or saw horses a few inches above the surface before draping the cover.
For cold snaps, add insulating blankets over the plastic or use electric concrete heaters placed outside the perimeter under a ventilated shelter. For hot, windy conditions, mist the surface lightly under the cover to maintain moisture without pooling. Do not drag tarps across the slab or place hot equipment directly on fresh concrete—both will mar the surface and compromise strength gain.
Loading limits and ramping access
Keep traffic off the new slab until it reaches at least 50% of design strength for light foot traffic and higher for vehicles. If limited access is unavoidable, spread loads with 3/4″ plywood or OSB sheets laid flat across the area to distribute weight. Stagger the plywood joints so loads don’t focus on one seam.
Build temporary ramps with lumber and non-slip plywood to guide vehicles onto adjacent hard surfaces without forcing them onto the slab. Mark a clear perimeter with cones or temporary fencing and post weight-limit signs. Check the slab at regular intervals; if the surface shows impressions or cracking, remove traffic and extend protection until strength recovers. When in doubt, delay—it’s cheaper than repairing a ruined pour.
Pouring Next to an Existing Foundation: Special Risks and Mitigation
Pouring next to a house foundation means you must treat the old wall as a live boundary. Plan isolation joints and expansion joints, prevent bonding to the old wall, and pick compatible mixes so the new slab moves without tugging on the footing. Waterproofing, flashing, proper sealants, and drainage provisions are non-negotiable to stop water from finding a path between the slab and the foundation.
This matters because a sloppy interface can trap moisture, cause frost heave, and ruin your new concrete. Getting the grading right, trenching properly, and backfilling with materials that breathe (and aren’t mud) keeps water away from the base. Follow clear steps for formwork, joint depth and spacing, temperature controls, cure near the foundation, and required inspections so the job holds up long term rather than looking good for a week.
Isolation and expansion joint installation
Keep the new slab independent of the existing foundation. Use a full-depth isolation strip — 1/4–1/2 in. closed-cell foam or factory-made isolation panels — between the new concrete and the wall to prevent rigid bond and stress transfer. Position the strip against the foundation face before placing concrete.
Plan joint spacing and depth to match slab thickness: generally every 8–12 ft for residential slabs, with expansion joints at any fixed restraint. For contraction control, use saw cuts or preformed contraction joints at one-quarter slab depth within 24 hours of finishing. Install a bond-breaker sealant where slab meets foundation piers or ledges. Use a compressible filler at vertical interfaces and a surface seal over the top to keep mortar out of the gap. Correct placement prevents crack loads from transferring to the house.
Waterproofing and drainage at the wall interface
Don’t let water sneak between new and old work. Apply a vertical waterproofing membrane on the foundation face up to the new slab level or use a self-adhesive flashing strip lapped under the slab edge. Seal the joint with a compatible elastomeric sealant after the slab cures enough to avoid disturbance.
Grade the finished surface to slope away from the foundation a minimum of 1/4 in. per foot for the first 5 ft. Place a small gravel trench or perforated drain under the slab edge tied into your site drainage to collect any seepage. Backfill with free-draining material (clean crushed stone) rather than clay. Good flashing and positive slope are the simple fixes that keep the foundation dry and avoid costly repairs.
Common DIY Failure Modes and How to Diagnose Them
Common DIY concrete failures come in a handful of telltale patterns—cracking from shrinkage or thermal stress, hollow spots from poor subgrade or thin pours, popouts where air or moisture pockets surface, finishing and curing faults that let dusting or crazing happen, and edge or joint gaps that show up as cracks along the perimeter—so the real work is learning to recognize each sign, trace it to the root cause, and apply fixes like adding or tightening joints, re-curing or sealing, patching, or reworking formwork and joint depth before the next pour.
This matters because spotting a problem early saves time, money, and rework on your project, and it depends on practical checks you can do on the job—plumb checks, straightedges for flatness, probing for soft subgrades, and evaluating curing conditions—so you can choose the right corrective action, from re-compacting the base and patching to adjusting joint layout and pour thickness for future work.
Why cracks form and when they matter
Cracks are normal, but not all are equal. Hairline shrinkage cracks that appear within the first few days and remain thin are usually cosmetic. Wide, stepping, or through-thickness cracks that open with temperature swings or grow over time signal structural issues.
Look at timing and pattern. Random hairline networks after rapid drying point to excess water or fast finishing. Straight, long cracks radiating from loads or edges suggest poor joint planning or movement. If cracks run under joints or along reinforcement, they merit repair.
Fix or prevent by addressing the root: add or re-cut control joints, improve curing, and avoid overworking the surface. For structural cracks, consult a pro for epoxy injection or partial removal and replacement to restore load-bearing capacity.
Signs of poor compaction or base failure
Settling and hollow spots usually come from a weak subgrade. Look for low spots, visible sagging near edges, or areas that bounce under foot. Use a straightedge to find dips and tap the slab—hollowness gives a dull sound.
Probe suspicious spots with a rebar or screwdriver. Soft soil or easy penetration beneath the slab confirms poor compaction. Thin sections or underrun thickness at the pour also show up as localized failures.
Repair options range from filling pockets with controlled grout or polyurethane foam to removing and re-pouring problem bays. Prevent recurrence by properly compacting the subgrade, using the specified slab thickness, and placing reinforcement where edges or loads demand it.
Budgeting and Practical Cost Estimates
We’ll break the project cost into three clear parts: materials (cement, sand, aggregate, reinforcement), rental gear (concrete mixer, wheelbarrows, screeds, compactor), and optional labor, with unit prices and typical usage shown for patio, walkway, and driveway sizes. A practical budget hinges on base materials, formwork and edging, site prep, delivery, waste disposal, and a contingency of 10–20% to cover cure time and weather delays. Track these elements for each project size so you can compare options without guessing.
This approach helps you plan ahead, spot savings, and decide when DIY makes sense versus when to hire pros for critical joints or adjacent structures. You’ll see how many days or weeks equipment is needed, whether delivery is available, and how fuel costs factor in, so you can avoid surprises on setup and teardown. I’ll flag common risk factors like using faster-setting mixes, reusing forms, or choosing pre-mixed bags, and I’ll warn where permits or inspections might bite you, plus a quick, printable checklist to tailor estimates to location, scope, and timeline.
Cost factors that influence price
Slab thickness and finish level are primary drivers. A 4″ patio uses far less concrete than a 6″ driveway. Thicker slabs need more cement, aggregate, and often heavier reinforcement, which raises material and labor time.
Site access and groundwork change costs quickly. Tight yards, long carries from the street, steep grades, or poor soils add time, equipment (compactors, haul-offs), and sometimes engineered base material. Reinforcement type—wire mesh versus rebar or fiber—also shifts price and installation effort.
Remember add-ons: edge formwork, delivery fees, waste disposal, and contingency for delays or extra pours. These soft costs typically add 10–20% to direct material and rental lines.
DIY vs hire cost comparison
DIY cuts labor charges but transfers time, risk, and some rental costs to you. For small projects you might save 20–40% versus a contractor if you already own basic tools and can handle formwork, mixing, and finishing. Expect longer workdays and a steeper learning curve.
Hiring pros increases upfront cost but reduces risk of mistakes that cause costly repairs later—poor compaction, bad joints, or improper slump are common DIY pitfalls. Contractors bring crews, trucks, and experience to finish quickly and often include warranty work.
Balance savings against complexity: choose DIY for simple, accessible pours. For thicker structural slabs, adjacency to foundations, or tight schedules hire a pro. When safety or water management is on the line, hiring is usually worth it.
Tools and Materials Checklist (What to Buy or Rent)
This section lays out a practical, task-by-task checklist for tools and materials, grouped into prep, pour, finish, and cure, with clear buy versus rent guidance and simple rental duration tips to keep your project on schedule. It covers concrete mix options, additives, bonding agents, rebar or mesh where needed, and the essential safety gear, so you can see at a glance what you need and what to borrow or buy for each phase. You’ll also find basics on site prep, forms, drainage, and the calibration and setup steps that prevent costly rework later.
Why it matters to a DIY homeowner: planning this shopping list by stage saves you time, money, and headaches by avoiding last‑minute runs to the store or a rental yard. A well‑structured matrix helps you balance consumables with durable tools, set realistic timelines, and protect against common mistakes like undersizing mixes or misordering form materials. In short, a thorough, staged checklist reduces surprises, keeps the crew safe, and lets you hit target finishes with fewer delays.
Small tools vs heavy equipment
Choose gear based on slab size, soil condition and timeline. Small tools keep costs down on tight jobs; heavy kit speeds big pours and improves consistency.
- Plate compactor Firms base and reduces settlement. Choose 5–8 kN plates for patios; rent daily (~$60–$120) for best value. Don’t skip passes—move slowly and overlap.
- Concrete mixer Hands-fed mixers beat wheelbarrow-mixing for 1–4 m3. Look for 5–9 cu ft capacity; rent or buy if you’ll pour more than once. Keep consistent batch times to hit slump targets.
- Wheelbarrow Hauls mix and tools on site. Steel tub, pneumatic tire preferred; buy under $150. Watch load balance to avoid spills on slopes.
- Power trowel Finishes large slabs faster and flatter. Rent by day for slabs >40 m2 (~$80–$200/day). Avoid on small pours—hand-float where edges need control.
- Plate vibrator Helps consolidation for deeper pours with rebar. Rent for spot use; use short bursts to prevent segregation.
- Hand tools Floats, shovels, rakes and edgers. Buy these—quality pays off. Keep extras on hand to avoid downtime.
Consumables and spare items to keep on hand
Stock extra bags of concrete mix—at least 10–20% above estimate—and a small reserve of bulk mix if using delivery. Weather or waste eats quantity fast.
Plastic sheeting and curing blankets protect fresh concrete from sun, wind and rain; keep several 6×10 m sheets. Extra anchor nails, form screws and wooden stakes prevent form failure; double the fasteners you think you need.
Bring sealant, bond adhesive and a backup supply of reinforcement (wire mesh or a few rebar pieces) for last-minute repairs. Finally, spare PPE—gloves, masks and eye protection—keeps the crew working and reduces stoppages.
Timeline Planner: From Prep to Full Cure
We’re aiming for a clear day-by-day timeline template you can actually follow: prep, pour, initial set, finishing, curing, and final inspection, with buffer days built in for weather delays. Include a weather contingency plan that spells out acceptable temperature and humidity ranges, forecast review points, and backup dates to keep cold joints or rapid moisture loss from derailing the project. Tie in site readiness checks like soil stability, formwork, reinforcement placement, moisture barriers, and equipment checks so you’re not chasing tasks on the day of the pour.
This matters because a well-planned schedule reduces guesswork and doubles as a safety and quality checklist for DIY jobs. It helps you stage curing milestones, decide when to cover with the right material, and choose watering versus misting strategies without guessing, so you don’t trap moisture or cause cracking. With practical examples for slabs, elevated decks, or patches, you’ll see how contingency buffers, safety gear, and inspection signs translate into fewer reworks and a smoother, safer pour from start to finish.
- Cost planning snapshot: For a typical 10×10 ft patio at 4 in thick, expect material costs in the ballpark of concrete (roughly 1.25 cubic yards) plus forms, reinforcement, and curing supplies. Concrete price varies by region and mix design; budget a broad range (e.g., $120–$180 per cubic yard for plain concrete, plus $2–$4 per sq ft for forming and $0.35–$0.75 per sq ft for reinforcement). Add 10–20% contingency for weather, material delays, and minor rework.
- Starter budget worksheet: List items (concrete, sub-base gravel, forms, vapor barrier, reinforcement, curing blankets or misting system, edging tools, sealant or texture finish, wheelbarrow/mixer rental, PPE). Estimate quantities based on your plan and add line items for delivery fees, waste disposal, and rental durations. Update daily as you confirm suppliers and crews.
- Equipment and trades planning: If you don’t own a mixer, calculate rental days and crew needs (single-person mixing vs. two-person pour). Include costs for compaction equipment if you’re grading your sub-base, and a vibrator or screed for finish quality. Factor in delivery windows and timing with the pour crew to avoid idle rental days.
We’re keeping the core sequence intact: prep, pour, initial set, finishing, curing, and inspection, with weather contingency and site readiness checks woven through. The added budgeting and scheduling guidance helps you forecast cash flow, lock in dates, and avoid delays that punch holes in the plan.
Ideal schedule for a 10×10 patio
Day 0: site strip and excavation (4–6 hours). Remove topsoil, check levels and compaction. Day 1: sub-base and edge formwork (3–5 hours). Lay and compact gravel to specified depth and confirm form alignment.
Day 2: reinforcement, vapor barrier and final sweep (2–4 hours). Place rebar or wire mesh, install a moisture barrier and check anchors. Day 3: pour and screed (4–8 hours depending on crew). Finish edges and apply your chosen texture. Protect with plastic immediately after finishing.
Days 4–7: initial cure and protected moist curing. Keep surface damp or covered; avoid foot traffic for 24–48 hours and vehicle loads for 7 days. Full structural cure at 28 days. Track progress with simple milestones: ready base, poured, initial set, and 7/28-day checks.
Handling weather delays and rebooking concrete
Check forecasts 72 and 24 hours before your pour. If temperatures drop below 5°C (40°F) or rise above 30°C (86°F) with low humidity, postpone. Notify your ready-mix supplier early; most will hold a booking one to two days without penalty.
If rain threatens during curing, cover fresh concrete immediately with plastic or insulated blankets and maintain moisture underneath. For partially completed bases, keep exposed soil compacted and covered to avoid washout. If a pour is delayed, mark and protect formwork and rebar to prevent contamination.
Keep stakeholders informed: give the crew and neighbors a confirmed backup pour date and a contact. Have a backup window of at least two days to avoid rushed pours that cause cold joints or rapid drying.
When and How to Consult a Professional
Know when a pro is truly needed: if there are structural concerns, load-bearing changes, unknown soil conditions, drainage or weather-related risks, or anything that could affect safety, hire a licensed contractor rather than DIY and do not pretend you can safely handle the critical bits without professional judgment. Verify essential qualifications—license, insurance, bonding, permits where your jurisdiction requires them, and verifiable references or solid case studies—to avoid scams, incompetence, or projects that fail to meet code. Ask each contractor about scope, timeline, material choices, code compliance, frost and thaw considerations, and warranties, and judge their answers for clarity, thoroughness, and willingness to put details in writing.
Watch for red flags in estimates or contracts: vague scope, vague pricing, unusually low bids, missing permits, or waivers of responsibility, and insist on change orders, defined payment schedules, and proven liability coverage before you sign anything. Follow a quick vetting workflow: gather project details, request bids from 2–3 pros, compare apples to apples, check online reviews and past project photos, and demand a written, itemized proposal that aligns with actual work and materials. Define the homeowner’s role: prepare the site, provide site access, separate DIY elements from professional duties, and coordinate with other trades so you don’t derail the project with half measures or conflicting expectations.
Vetting contractors and getting multiple bids
Start by collecting basic project specs: dimensions, thickness, finish, any reinforcement, and drainage notes. Give the same brief to at least two or three contractors so you get apples‑to‑apples quotes. Ask for a written, itemized proposal that breaks out labor, materials, forms, reinforcement, finishes, permits, and disposal.
Verify credentials before you pick a low price. Check for current licensing, proof of insurance and bonding, and local permit familiarity. Request three recent references or photos of completed jobs similar to yours and call those homeowners. A solid bid will include scope, timeline, payment schedule, change‑order language, and warranty terms. If an estimate is vague or the contractor resists a written scope, treat that as a red flag and move on.
Tasks to always hire out
Leave structural and high‑risk work to pros. Anything affecting load paths — footing alterations, foundation ties, or new load‑bearing slabs next to a house — should be designed and poured by a licensed contractor or engineer. Soil that’s unknown or unstable and jobs requiring underpinning or deep excavation are not DIY territory.
Complex drainage solutions, integrated footings with retaining walls, heated slabs, or projects in frost‑heave zones also belong to specialists who understand local code and frost/thaw details. In short, if a mistake can compromise the structure, utilities, or your property line, hire a pro. Expect them to handle permits, inspections, and coordination with other trades so the job is watertight from start to finish.
Visual Checkpoints and Inspection Guide Before Covering
Before you pour, do a thorough visual check of the reinforcement and embeds. Verify correct placement, spacing, and cover to the formwork, and make sure chairs, ties, and dowels are secure, corrosion‑resistant, and not displaced; snap a simple photo checklist for proof later. Check formwork geometry and level—forms must be square, plumb, broom-clean—and confirm horizontal and vertical alignment with strings or laser levels; inspect stake integrity, brace tension, and foam joints so nothing leaks or shifts during the pour.
Inspect the subgrade and base readiness too—look for proper soil compaction, moisture, drainage slopes, and a stable base with clean edge and slab transitions. Make sure surface finishes are ready, with correct form-to-slab interfaces, control joints, expansion gaps, and accessible edges for tooling and safety. A clear weather and curing plan, plus a simple sign‑off with photos and notes, keeps the job moving and helps you catch issues before they ruin your pour or force a redo.
Acceptance checklist for homeowners
Before you sign off or let the crew cover the work, walk the slab and confirm visible reinforcement, ties and chairs are in the right place and not touching the ground. Check form edges are straight, stakes tight and the slab perimeter has correct spacing for control joints and expansion gaps.
Probe for soft spots at the subgrade edge and verify slopes for drainage. Look for obvious debris, oil or standing water on the base. Verify access and safety items are staged: temporary walkways, non-slip surfaces and PPE available for crew entry.
Sign off only when photos are taken, deviations are noted and the responsible person initials the checklist. That gives you leverage if corrections are needed after the pour.
Documenting the pour for warranties or inspections
Take a consistent set of photos: wide shots of the entire form, close-ups of reinforcement spacers and embedded items, and images of level checks or laser readings. Date-stamp or catalog images by location so later comparisons are immediate.
Record measurements and readings on a simple form: reinforcement spacing, concrete mix ID (batch ticket), ambient temperature and wind. Note the pour window and any weather interruptions. Keep copies of supplier tickets and curing method used.
File everything in one folder—digital and a printed copy—so warranty claims or future repairs have clear evidence of pre-pour conditions and the contractor’s compliance.
Repair and Maintenance: Extending the Life of Your Slab
Regular upkeep is the key to a long-lasting slab. Do pre-pour and post-pour checks, watch for cracks, spalling, and moisture trends, and then fill or seal as needed. Use the right sealant—penetrating sealers for protection, or membrane sealers where staining and wear are high—and fix small cracks before they grow.
Keeping up with cleaning, sealing cadence, and proper drainage saves big repair costs later. If you spot large cracks, active movement, or persistent moisture, plan repairs with the right materials (epoxy/injection, polyurethane, patch mortars) and consider professional help when necessary.
Seasonal maintenance checklist
Start each season with a quick walk-around. Look for new hairline cracks, spalled edges, settled joints and any standing water along the slab perimeter. Note changes from your pre-pour and post-pour condition checks so you can spot trends.
Spring and fall are the best times for deeper cleaning and resealing. Power-wash loose dirt and algae, let the slab dry fully, then apply a penetrating or membrane sealer depending on the slab’s exposure. Reseal every 2–5 years based on product instructions and wear.
Before winter, clear gutters and downspouts, regrade where runoff pools, and reseal joints if compressible filler is failing. Remove deicing salts when possible and use sand for traction to reduce freeze-thaw damage.
When to resurface vs replace
Choose resurfacing for cosmetic defects, shallow spalls (less than 1 inch), and surface scaling when the slab is still level and structurally sound. A bonded overlay or micro-topping restores appearance, hides stains and adds protection at a fraction of replacement cost.
Replace the slab when cracks are wide (over 1/4 inch with movement), there is widespread honeycombing, exposed rebar, significant settling, or drainage and foundation issues. Those are signs of compromised structural integrity that overlays won’t fix.
Factor in long-term cost: resurfacing can extend life by years but may mask underlying problems. If you see recurring cracks or shifting, plan for replacement and address subgrade or drainage defects first.
Conclusion
Finish with a slab that stands up to use, weather, and time by sticking to the prep, testing, and protection steps that prevent cracks, heaves, and moisture damage. A well‑executed pour starts with solid ground rules, careful material handling, and vigilant monitoring from the first scoop to the final cure.
Read the checks you did during planning as a living checklist: confirm permits and utility clearances, confirm soil and drainage plan, verify base materials and compaction, review joint placement and reinforcement, confirm weather windows and pour sequencing, and verify the curing plan before you pour again. Stay within your limits, keep your crew aligned, and document any adjustments so you can reproduce or fix them if needed.
Avoid these common missteps: rushing the prep or pour during unsuitable weather, skipping edge preparation or proper base materials, and neglecting curing or protection. Maintain strict safety: PPE on, power down when handling forms or machinery, test small areas first, and never pour over a compromised edge or unstable ground. If anything feels off—poor ground, bad drainage, missing permits, or unfamiliar concrete mixes—pause and recheck before moving forward.
If the project exceeds your comfort zone or local code requirements, call in a professional for a quick review or a partial scope change. With solid prep, careful execution, and disciplined curing, you’ll get a durable, good‑looking slab and the confidence to tackle the next job with less guesswork and more control.
FAQ
What should I do before mixing concrete?
Clear the area and level the ground. Set up the forms to hold the slab shape and a proper slope. Gather tools and make sure the water supply is ready so you don’t pause mid-pour.
Why are forms and reinforcement crucial?
Forms hold the edge and keep the slab from spreading. Reinforcement like rebar or wire mesh stops cracks from forming as it dries. Skip them and you’ll end up with a weak, cracked slab you’ll regret later.
How do I pour and screed safely?
Mix to the right consistency and pour in planned sections. Use a screed board to level the concrete, then work quickly and steadily. Don’t walk on the fresh surface or you’ll create divots and weak spots.
What about weather and curing?
Avoid pouring in extreme heat, wind, or heavy rain. Cover the slab and keep it moist to cure slowly; premature drying causes cracks. Don’t skip curing steps or you’ll regret the finish.