
Introduction
Plaster crack monitoring is watching cracks to see if they move over time before deciding to patch.
Mark the crack and check it again after a short period to see if the gap changed. Keep the marks simple and document any movement by noting the crack’s location and new markings, then compare to prior notes.
If you see movement, compare the current mark to the previous position and consider ongoing settling rather than a one-off issue. Check the product label, manufacturer instructions, and local rules for acceptable monitoring methods, and know when to call in a pro. Keep a simple log of dates and changes and avoid patching until movement stops or guidelines say it’s OK.
Key takeaways
- Mark cracks with pencil or painter’s tape to track movement clearly.
- Decide monitoring versus immediate action using duration, rate of change, and context.
- Use non-damaging markers and gentle washes; avoid peeling plaster or finish.
- Create simple monitoring schedules and templates to log crack changes weekly.
- Identify visual signs like widening, new hairline cracks, or gaps behind trim.
- If movement seems active, stop work near the area and secure safety.
Table of Contents
- Introduction
- Key takeaways
- Why Cracks Form and What They Look Like
- Decide Whether to Monitor or Act Now
- Simple Marking Methods That Won’t Damage Plaster
- Timing Your Monitoring: Schedules and Practical Templates
- Visual Signs and Examples to Look for
- Tools and Materials Checklist
- Interpreting Movement: What Stable, Slow, or Active Looks Like
- Repair Timing and Avoiding Premature Patching
- Conclusion
- FAQ
Why Cracks Form and What They Look Like
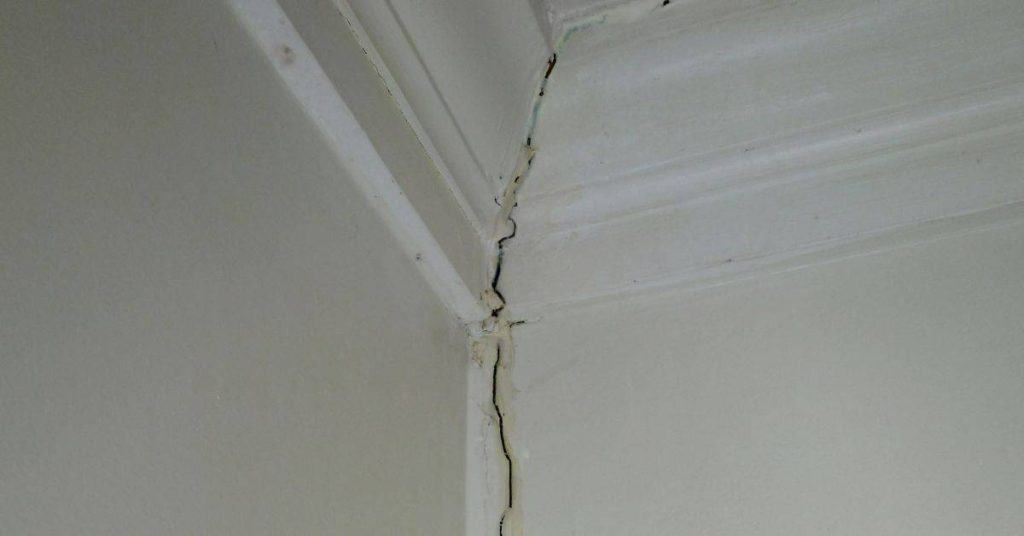
Common causes of plaster cracks include settlement, thermal movement, moisture, and potential structural issues. Visual cues help you guess the origin and whether the crack needs urgent attention.
Look for hairline, stepped, and long-running cracks and learn how to classify them. This helps you decide if monitoring is appropriate or if immediate action is needed.
Common crack types and likely causes
Plaster cracks aren’t one-size-fits-all. Here’s what to look for:
Hairline cracks – Thin, usually less than 1mm wide. Often caused by minor settlement or thermal movement.
Stepped cracks – Irregular, zigzag pattern. Indicates significant movement, possibly due to structural issues or moisture problems.
Long-running cracks – Long, straight lines running the length of walls or ceilings. Could be due to settlement, thermal expansion/contraction, or even structural failure.
When a crack is likely cosmetic versus structural
Not all cracks demand immediate action. Here’s how to tell:
A cosmetic crack is usually hairline, doesn’t run the full length of a wall/ceiling, and isn’t accompanied by other signs like bulging walls or doors sticking.
A structural crack, on the other hand, is often wider, runs the full length, and may be accompanied by other symptoms. If you notice these, don’t wait – get a professional assessment.
Remember, it’s always better to err on the side of caution. If in doubt, seek expert advice.
Decide Whether to Monitor or Act Now
Consider factors such as how new the crack is, its location, and how wide it appears. Note any symptoms like doors sticking or gaps that have recently formed.
There are situations that warrant immediate professional evaluation, such as rapid changes or cracks in critical structural areas. Use these cues to choose monitoring over patching when in doubt.
Quick triage checklist for homeowners
Use this checklist when you first spot a crack in your plaster. It’ll help you decide whether to monitor or act now.
- Newness: When did the crack appear? Recent cracks need closer attention.
- Location: Where is the crack? Cracks near windows, doors, or corners may indicate settlement issues.
- Width: How wide is it? Wider cracks need more immediate attention.
- Appearance: Is it jagged or smooth? Jagged cracks often indicate structural issues.
- Symptoms: Are there other signs like sticking doors, new gaps, or sloping floors?
- Movement: Can you see any movement when you push on the wall gently?
- Crack pattern: Is it a single crack or part of a pattern? Multiple cracks may indicate more serious issues.
- Foundation visibility: Can you see the foundation? Cracks here could indicate structural problems.
Quick rule: If anything on this list seems off, it’s best to monitor closely or get professional advice.
Red flags that require urgent inspection
Use this checklist if you notice any of these red flags. They could indicate serious issues that need immediate attention.
- Rapid widening: Has the crack widened significantly in a short time? This could indicate structural instability.
- Multiple new cracks: Are there several new cracks appearing at once? This could mean your home is settling unevenly.
- Visible foundation gaps: Can you see gaps around your foundation? This could indicate serious settlement issues.
- Diagonal cracks: Do you see cracks running diagonally across walls or ceilings? These often indicate structural problems.
- Cracking at joints: Are there cracks at corners, where walls meet the ceiling, or around windows and doors? This could mean your home is settling unevenly.
- Sticking doors or windows: Do doors or windows stick or become hard to open/close? This could indicate structural issues.
Quick rule: If you spot any of these red flags, don’t wait. Contact a structural professional immediately for an inspection.
Simple Marking Methods That Won’t Damage Plaster
Choose low-impact marking options like paper tabs, painter’s tape with a pencil mark, epoxy crack monitors, or removable adhesives. These methods leave repairs easy and clean later.
For each option, weigh the pros and cons in terms of visibility, precision, and impact on future patching. Pick what suits your wall type and ease of use.
DIY Paper/Tape Marks and Pencil References
For simple, low-cost marking, use paper tabs or painter’s tape. Here’s how:
Paper Tabs: Cut small strips of paper, place them across the crack, and secure with a bit of removable adhesive. Mark reference lines on both ends using a pencil.
Painter’s Tape: Apply short pieces of tape directly onto the plaster, straddling the crack. Use a pencil to mark your references. Keep lengths short to avoid adding stress.
Affordable Commercial Crack Gauges and Digital Options
When you need more than simple DIY marks, consider these affordable crack monitors:
Mechanical Gauges: These are like tiny rulers with a pointer. Stick one end to the plaster on either side of the crack. Mark the initial position of the pointer.
Tell-Tale Strips: These are thin, flexible strips with markings. Apply them across the crack and mark your references. They’re easy to see if movement occurs.
Simple Digital Monitors: For high-tech tracking, use digital monitors that record crack width over time. They’re more expensive but offer precise data.
Timing Your Monitoring: Schedules and Practical Templates
Set a monitoring cadence based on crack behaviour and the level of risk you assess. Start with a simple observation period and adjust as needed.
Use straightforward templates for initial checks and longer-term reviews. Know when to increase frequency or stop monitoring altogether.
Sample monitoring schedules you can adapt
Use these adaptable schedules as a starting point. Customize based on your crack’s behavior.
- First week: Check daily to establish initial movement pattern.
- Week 2-4: Check every other day to monitor changes.
- After month 1: Reduce checks to once a week if no significant movement.
- Every 3 months: Increase frequency again for closer monitoring.
Quick rule: If crack movement accelerates or becomes unpredictable, increase check frequency.
How long before you decide to repair or call a pro
Use this checklist to determine when it’s time to act on your crack.
- Consistent stability: If no movement for 6 months, consider repair.
- Clear cessation of movement: If no change over 3 months, consider repair.
- Continuing/accelerating change: If movement increases or becomes unpredictable, call a pro immediately.
Quick rule: If unsure about your crack’s behavior, consult an expert to avoid costly mistakes.
Visual Signs and Examples to Look for
Document with dated photos, simple measurement notes, and environmental observations like weather or recent work. This ensures you have useful context over time.
Be consistent about camera angle, distance, and lighting to compare changes accurately. Consistency makes trends easier to spot.
Taking repeatable photos and visual checkpoints
Use this checklist when setting up your initial photo documentation to ensure consistency for future comparisons.
- Choose a consistent angle: Stand at the same spot each time. Use a tripod if possible.
- Keep distance steady: Maintain the same distance from the wall or crack. A measuring tape can help.
- Use natural lighting: Try to take photos at the same time of day for consistent light levels.
- Include scale references: Use a ruler, coin, or other small object in each photo to provide context and show size changes over time.
- Frame the crack clearly: Ensure the entire crack is visible and not cut off by edges of the frame.
- Avoid reflections: If possible, turn off lights or close curtains to prevent reflections that can obscure details.
- Capture all relevant cracks: Make sure each photo includes only one crack. This helps track individual crack movements.
- Date and label photos: Include date and a brief description in the file name or notes to keep them organized.
Quick rule: Consistency is key. If you can’t replicate your setup, you won’t see changes accurately.
Simple written log fields to track
Keeping a simple, consistent log helps you monitor cracks effectively. Here’s what to include:
Date and time: When was the observation made? This helps track changes over time.
Observer: Who made the observation? If multiple people are involved, this helps keep records clear.
Weather conditions: What were the weather conditions like at the time of observation? This can help identify environmental factors affecting crack movement.
Activity in the house: Were there any recent activities or work done that might have caused or affected the cracks? Note these down for context.
Measurement or mark status: Describe the current state of your marks or measurements. Have they changed since the last observation?
Tools and Materials Checklist
Have a basic set of tools and materials: tape, pencil, camera, level, simple gauge, and a notebook. These cover marking, measuring, and recording data.
When needed, check product specs and safety labels before purchase and consider a commercial gauge or digital monitor if the project calls for it. Choose something practical for a homeowner job.
Low-cost DIY supplies and setup tips
Before you start, gather these low-cost items to mark, measure, and track your plaster cracks.
- Masking tape: Use it to mark crack edges without damaging the surface. Don’t skip this; it helps keep measurements accurate.
- Pencil: Mark crack lengths and any changes over time. A simple pencil works fine, but use one that won’t smudge or fade.
- Camera: Take photos to document initial conditions and track progress. Any smartphone camera will do.
- Level: Ensure your measurements are straight up and down. A simple torpedo level works great.
- Simple gauge (ruler or measuring tape): Measure crack widths and lengths. A basic ruler or measuring tape is all you need.
- Notebook: Record measurements, observations, and dates. A spiral-bound notebook is easy to use on-site.
- Sharpie marker (optional): For marking crack edges where they meet walls or other surfaces that tape won’t stick to.
- Clamp meter (optional): If you suspect electrical issues, a clamp meter can help detect current flow through cracks.
Quick rule: Keep your supplies simple and easy to find. Focus on marking, measuring, and documenting for accurate tracking.
Choosing a commercial crack monitor or digital sensor
If you need more precision or remote monitoring, consider these factors when choosing a commercial crack monitor or digital sensor.
- Measurement range: Ensure the device can measure the expected crack width in your home. Don’t buy one that’s too sensitive or not sensitive enough.
- Readout type: Choose between analog (needle-based) or digital (LCD/LED) displays based on your preference and ease of reading.
- Ease of installation: Some devices are simpler to install than others. Consider how easy it is to mount the device and take readings.
- Power source: Check if the device runs on batteries or needs a power supply. If battery-powered, ensure they’re easily replaceable.
- Data logging (digital sensors): Some digital sensors can log data over time. This feature can be useful for tracking long-term trends.
- Remote monitoring (digital sensors): If you want to monitor cracks remotely, ensure the device has wireless connectivity or can integrate with a home automation system.
- Manufacturer specs and warranty: Always check the manufacturer’s specifications to ensure the device meets your needs. Also, review the warranty to understand what’s covered and for how long.
- Safety labels and certifications: Ensure the device carries relevant safety certifications (like CE or UL) and follows local electrical codes if it requires power.
Quick rule: Choose a commercial crack monitor that suits your needs, is easy to use, and comes from a reputable manufacturer with good customer support.
Interpreting Movement: What Stable, Slow, or Active Looks Like
Translate monitored changes into actionable interpretations: stable means no change, slow or seasonal links to humidity and temperature, and active means steady widening or new cracks.
Get clear next steps for each scenario and plan temporary measures if movement continues. Let the data guide what you do next rather than guessing.
Seasonal and Environmental Influences to Factor In
Plaster cracks can widen or narrow with changes in temperature and humidity. This is normal, but it’s crucial to note these fluctuations in your log.
Temperature: Warmer weather causes materials to expand. So, cracks may close up in winter and reopen in summer.
Humidity: High moisture levels can cause plaster to swell, opening up cracks. Low humidity does the opposite.
Also consider building use. Heavy foot traffic or furniture movement can cause localized stress and minor crack widening.
Patterns That Indicate Progressive Or Structural Movement
Some cracks show consistent, steady widening. This could be due to ongoing settlement or other structural issues. Here’s what to look for:
1. Consistent widening: If a crack is getting wider over time, it might indicate progressive movement.
2. Propagation: New cracks appearing near an existing one could signal that the original issue hasn’t been resolved and may be worsening.
3. Adjacent cracks: If multiple cracks are forming in a small area, it might indicate a localized structural problem.
If you notice any of these patterns, stop monitoring and consult a professional. They can assess the situation and recommend appropriate action.
Repair Timing and Avoiding Premature Patching
Patching moving cracks can fail if the crack continues to move after repair. Make sure movement has stopped before attempting a permanent fix.
Provide temporary cosmetic fixes while monitoring continues and use the collected data to time permanent repairs. The goal is to repair only after movement has ceased or stabilized.
Temporary cosmetic fixes that are reversible
While you’re monitoring your plaster cracks, you don’t want them to be an eyesore. Here are some temporary fixes that won’t interfere with your observations:
1. Paint over tape: Use painter’s tape and a touch-up paint color to cover the crack temporarily. This is cheap and easy to remove later.
2. Flexible fillers: For wider cracks, use a flexible filler designed for hairline cracks. These are usually paintable and won’t hide movement.
Remember, these fixes are just to tidy up the appearance. They shouldn’t be used as permanent repairs.
Planning a durable repair once movement stops
Before you start any repairs, ensure that the crack has stopped moving. Here’s how to plan for a lasting fix:
1. Assess the cause: Understand why the crack formed in the first place. Was it settling, moisture, or something else? The repair should address this root issue.
2. Choose appropriate materials: Based on your assessment, select the right repair materials. This could be anything from spackling compound to specialized repair mortars.
3. Confirm stability: Before committing to a permanent repair, wait for several weeks or even months to ensure that the crack isn’t moving anymore. Use your monitoring tools and records to confirm this.
If you’re unsure about any part of the process, don’t hesitate to call in a professional. It’s better to be safe than sorry.
Conclusion
Cracks move for a reason, and your best protection is watching them closely, acting only when the signs line up with a real issue. This approach keeps your walls stable, your patching honest, and your home safer from hidden damage.
Start by confirming you’ve marked clearly, then follow a simple progression: verify the crack hasn’t already widened during a controlled test spot, check the surrounding plaster for new movement after a few weeks, compare against your templates, and decide whether to monitor longer or patch. Do the checks in a calm sequence, not all at once, and document every change in a single, easy-to-reference log. safety first means test small areas, wear eye protection, and avoid leaning or prying on loose plaster; test first to avoid creating new damage.
Common mistakes to avoid are patching too soon, ignoring ongoing movement, and trying to fix every tiny crack at once. Stick to the plan: if movement stays stable or slows consistently, monitor longer; if it speeds up or is accompanied by new cracking, escalate with a proper repair or call a professional. If you’re ever unsure, or if moisture, mold, or structural concern is suspected, get a pro involved and keep your documentation handy for a faster, safer outcome.
FAQ
How should I place marks and record movement without damaging the plaster?
Use pencil marks or painter’s tape chips that won’t peel off paint. Place a small, clearly labeled mark across the crack and document the position with a photo. Keep the marks visible but not thick enough to cause extra stress on the plaster.
How do I decide when to act if cracks appear to be moving?
Compare current marks to earlier photos or notes. If the crack widens, changes angle, or the marks shift, reassess the situation. When in doubt, err on the side of monitoring more closely and check for underlying causes.
What details should I record at each check?
Note the date, crack length and width (as visible at the marked point), direction of any movement, and any relevant weather or vibration events. Include a quick description of the crack’s surroundings, like nearby doors, windows, or new loads.
What should I do if I see active movement after rain or seasonal changes?
Don’t panic patching yet. Re-check after a few days of consistent conditions. If movement continues, plan a professional assessment or follow local guidelines for repairs rather than cracking ahead with patching. Check product labels or manufacturer instructions for any recommended next steps.