
Introduction
Repairing a Concrete Slab That’s Sinking at One Corner: DIY Foam vs. Mudjacking Basics means choosing a DIY-friendly way to lift a sunken corner using either foam injection or mud-based slurry under the slab. The goal is to restore level support by filling voids and stabilizing the edge that has dropped. You should always check manufacturer instructions and local rules before starting.
Both methods aim to raise the slab and seal gaps, and they share the principle of adding material beneath the concrete to push it back toward level. The main differences are the materials used and how they are installed, so you’ll want to read product labels and installation guides carefully. For the DIYer, plan for access to the work area, the right patience for the mix or foam setup, and a clear understanding of how to proceed safely under the slab.
Key takeaways
- Overview of mudjacking and foam repair for sinking concrete slabs.
- Both methods stabilize by lifting and leveling, reducing further settlement risks.
- Mudjacking uses slurry to fill voids; foam uses polyurethane foam.
- Installation steps involve locating voids, drilling, and injecting materials carefully.
- Wear eye protection and avoid overhead hazards during injections and drilling.
- Assess structural causes, choose method based on crack patterns and access.
Table of Contents
- Introduction
- Key takeaways
- When a Corner Sinks: Signs, Causes, and Urgency
- Mudjacking Basics
- Polyfoam Injection (Polyjacking/Foam Leveling) Basics
- What Mudjacking and Foam Share — Core Similarities
- Direct Comparison — Strengths, Weaknesses, and Durability
- Cost, Project Sizing, and Homeowner Planning Guide
- DIY Feasibility, Safety Precautions, and Tools Checklist
- Environmental Impact, Maintenance, Alternatives, and Common Mistakes
- Conclusion
- FAQ
When a Corner Sinks: Signs, Causes, and Urgency
A sinking corner usually shows up in plain sight: cracks radiating from the corner, an uneven or sloping surface, and doors or windows that catch or stick when they shouldn’t. You might also notice gaps around trim or framing and water pooling near the base of the corner after rain. These are the first clues something underneath is shifting.
Common causes are soil movement from settling or erosion, poor initial compaction, drought or frost heave, and tree roots or drainage problems. Previous repairs failing or inadequate subgrade prep can also set the stage for later movement. Act quickly if you see changes after storms or seasonal cycles, and don’t wait months to check again.
Common causes (soil erosion, compaction, roots, drainage)
When a corner of your slab sinks, it’s usually due to voids forming underneath. Here are the most common culprits:
Soil Erosion: This happens when water washes away soil under your slab. Check for signs of poor drainage around your property and ensure your gutters and downspouts are directing water away from the foundation.
Compaction Issues: If the base under your slab wasn’t properly compacted, it can settle over time, leading to voids. To check this, look up ‘base compaction’ in your local building codes or consult a professional.
Roots: Trees and shrubs with invasive root systems can push up against your slab, causing it to lift and eventually sink when the roots recede. Keep large trees away from your foundation and monitor any plants that show signs of aggressive root growth.
Drainage Problems: Poor drainage can lead to water buildup under your slab, washing away soil and creating voids. Ensure your property has adequate grading and consider installing a French drain if necessary.
Visual checkpoints to evaluate severity (tilt, gaps, trip hazards)
Use this checklist when you suspect a corner of your concrete slab has sunk. It’ll help you determine if it’s a minor issue, needs leveling, or requires professional inspection.
- Check for visible tilt: Look at the corner from all sides. If one side is noticeably lower than the other, there’s a tilt. Confirm by placing a long level on the slab.
- Measure gap size: Use a tape measure to check gaps between the slab and adjacent surfaces (like walls or other slabs). Gaps wider than 1/4″ indicate significant settling.
- Check for trip hazards: Look for uneven edges that could cause tripping. A height difference of more than 1/2″ is a trip hazard. Confirm with a level or step gauge.
- Inspect control joints: Check if control joints (slots cut into the concrete) are still visible and aligned. If they’re cracked or misaligned, it could indicate further settling.
- Look for cracks: Cracks wider than 1/8″ can indicate significant movement. Measure crack widths with a crack gauge or use a penny as a reference (a crack wider than a penny is too wide).
- Check drainage paths: Ensure water drains away from the slab. Standing water can exacerbate sinking problems. Look for proper grading and clear drain paths.
- Inspect expansion joints: Check if expansion joints (between slabs) are still intact and aligned. If they’re filled with debris or misaligned, it could indicate movement.
- Check for soft spots: Use a probe (like a long screwdriver) to test the ground around the slab. Soft spots can indicate soil erosion or compaction issues.
Quick rule: If you find any of these issues, and they’re causing visible tilt, gaps wider than 1/2″, trip hazards, or multiple cracks, it’s time to call a professional. These signs could indicate serious structural problems that need immediate attention.
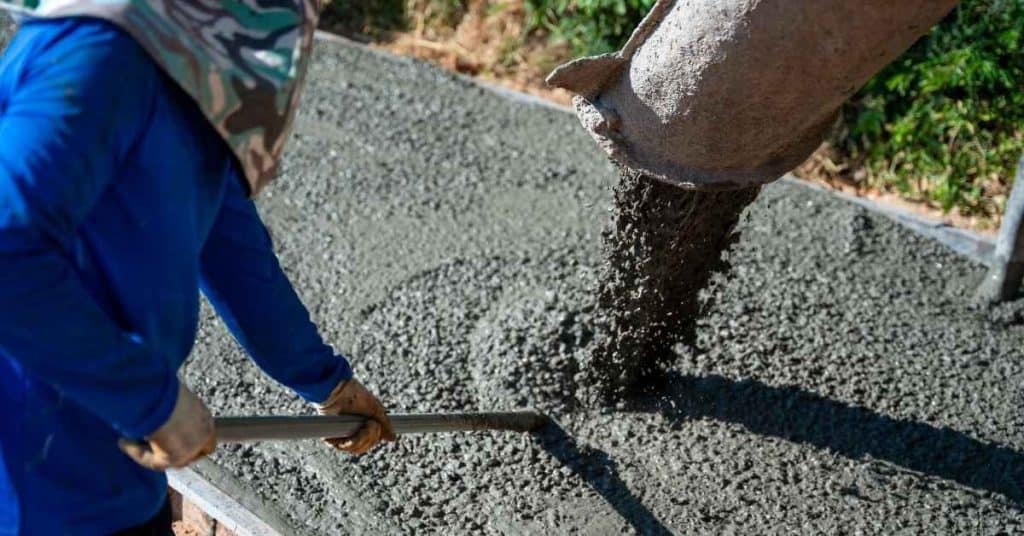
Mudjacking Basics
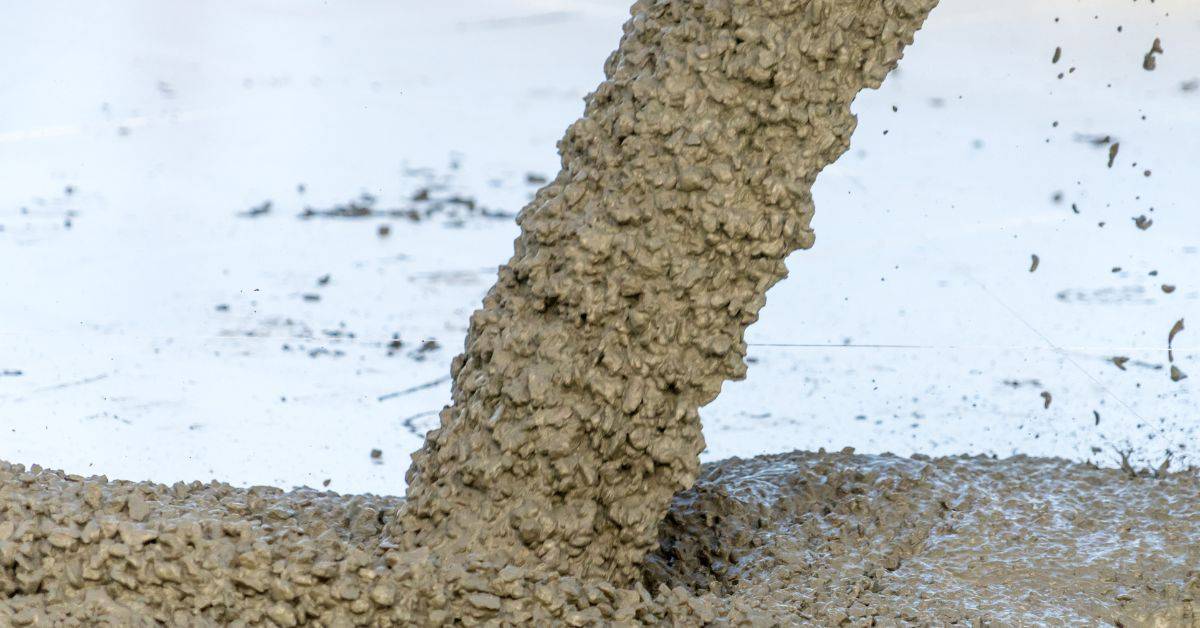
Mudjacking is a backfill approach that uses a cementitious slurry to lift sunken slabs. Pros typically choose this method for concrete that has settled unevenly and needs a solid underlayment to restore level. It differs from foam methods in material composition and lift dynamics.
Common materials are slurry mixes spread over the existing subgrade, sometimes with added aggregates, and they ride on the soil or existing slab. These properties influence how much lift is achieved, how stable the repair feels, and how long the cure takes before traffic can resume.
Materials and installation process
The right materials ensure your mudjacking job lasts and looks good. Here’s what you need:
- Cement: The base of your slurry. Look for Type I or II Portland cement, which are common and strong.
- Sand: Sharp sand works best. It should have a fine to medium grain size for good bonding.
- Soil: You’ll use some of the excavated soil in your mix. Check it’s not too clay-rich, as that can cause cracking later.
- Water: Clean water is all you need. Don’t use salty or contaminated water.
- Drill and bits: A cheap homeowner drill will do. You’ll need a 1″ or 1-1/4″ bit for drilling holes.
- Pump: Rent or buy a mudjacking pump. Cheaper, DIY alternatives can cause weak lifts and leaks.
- Hose and nozzle: For injecting the slurry. A flexible hose and adjustable nozzle are essential.
- Trowel and patching compound: After pumping, use a trowel to smooth the patched area. Use a matching patching compound for best results.
Pro tip: Buy your materials from the same batch or bag where possible. This ensures color consistency when patching. Keep cement and sand dry until use, and mix small batches at a time to avoid waste.
Features, strengths, and typical use cases
Mudjacking’s main strength is filling voids under concrete slabs. It’s like giving your slab a new foundation. It’s strong too – it can bear the weight of your home or driveway.
It works best on: Flat surfaces like driveways, walkways, and garage floors. Also, areas with stable soil conditions. Check your soil type in the local building codes or ask a pro.
Mudjacking isn’t perfect though. It’s not ideal for slopes or areas with unstable soil. It might not fix deep settling issues either. If you’re unsure, consult a structural engineer. They can check your slab and soil conditions.
Polyfoam Injection (Polyjacking/Foam Leveling) Basics
High-density polyurethane foam is used to lift and stabilize a sinking slab by injecting foam through holes drilled in the surface. This method generally aims for a quicker return to service with less surface disturbance than traditional mudjacking. It’s important to understand where foam is preferred to avoid over- or under-lifting.
Foam formulas vary in density and expansion, and the equipment includes specialized nozzle kits and mixers. Safety gear and proper drilling locations are part of the prep, and post-injection surface checks help confirm level and surface finish needs.
Materials and installation process
The right materials ensure a durable, long-lasting polyfoam injection job. Here’s what you need:
- Two-part polyurethane foam: This is your main material. Look for a high-density, fast-curing foam with a density of at least 2 lb/ft³ and a cure time under 60 seconds. Avoid low-quality foams that can break down over time.
- Injection equipment: You’ll need an injection gun (hire or rent if you don’t own one) and small-diameter injection holes drilled into the slab. Use a masonry bit, around 3/8″ to 1/2″, depending on your foam’s recommended hole size.
- Personal protective equipment: Safety first! Get a respirator, gloves, and safety glasses. Some foams can cause skin irritation or respiratory issues.
- Cleaning supplies: After injection, you’ll need to clean the holes. A wire brush and vacuum will do the trick.
- Finishing materials: Once cured, you’ll need a patching compound to fill any remaining holes and sandpaper for smoothing. Choose a compound that matches your slab’s color and texture.
Pro tip: Always follow the manufacturer’s guidelines for mixing, injection rates, and safety precautions. Cheap foams or improper mixing can lead to weak, unstable slabs and voids under the surface. Store materials properly to maintain their effectiveness.
Features, strengths, and typical use cases
Polyfoam injection, also known as polyjacking or foam leveling, is a quick and lightweight solution for lifting and stabilizing concrete slabs. It’s not your granddaddy’s mudjacking.
Lower material weight. Foam is lighter than the cement grout used in traditional mudjacking. This means less stress on your slab and underlying soil, making it a good choice for older or weaker slabs. It’s also easier to carry around the jobsite.
Fast curing. Within minutes of injection, foam reaches 90% of its final strength. This allows you to use the area again quickly, unlike mudjacking which can take days to cure. Perfect for driveways and walkways where downtime is a no-no.
Polyfoam isn’t always the answer though. It’s less suitable for heavy loads like vehicle traffic on soft soils or when you need to raise slabs more than 3 inches. Always check soil conditions and consult local building codes before deciding.
What Mudjacking and Foam Share — Core Similarities
Both methods rely on injecting material beneath the slab to raise it rather than removing and rebuilding the entire slab. They serve as alternatives to full replacement, preserving the existing concrete where feasible. That shared concept guides most homeowner decisions.
Homeowners typically gain reduced disruption, potential cost savings, and quicker repair timelines with either option. The choice framework often hinges on local conditions, access, and the contractor’s approach to crack sealing and drainage maintenance.
Shared goals and outcomes
Both mudjacking and foam leveling share a core concept: lifting and stabilizing sunken concrete slabs. They’re viable alternatives to full replacement, offering several benefits:
Cost savings: Reusing the existing slab is cheaper than replacing it.
Reduced disruption: These methods are less invasive, keeping your outdoor spaces usable during repair.
Faster timelines: Lifting and leveling can be done in a day or two, compared to weeks for replacement.
Common limitations to watch for
While both methods are effective, they share some limitations:
Major slab damage: Neither mudjacking nor foam leveling can fix major structural damage. Severe cracks or breaks may require additional repair.
Potential future settling: While these methods stabilize the slab, they don’t address underlying soil issues. Regular maintenance is key to prevent re-sagging.
Site-specific soil constraints: Both methods rely on injecting material into the soil. If your soil is unstable or has a high clay content, results may be compromised.
Direct Comparison — Strengths, Weaknesses, and Durability
Both foam and mudjacking lift a sunken corner, but they distribute weight differently. Foam tends to provide faster setting and less surface mess, while mudjacking often handles larger voids with a heavier, cement-based lift. Practical load-bearing outcomes depend on site conditions and installation quality.
Void-filling capabilities and long-term stability vary: foam expands to fill voids and can stabilize quickly, whereas mudjacking fills voids with slurry and may require more curing time. Consider the soil response and potential for re-sag when planning maintenance or future repairs.
Strengths vs. weaknesses (mudjacking)
Mudjacking, also known as slab jacking, has its pros and cons when it comes to lifting sunken concrete slabs.
Pros: Mudjacking uses a heavy mixture of cement-based grout to fill voids. This makes it great for filling large volumes and providing long-lasting support. It’s also cost-effective compared to other methods.
Cons: The heavier material can put more stress on the slab, potentially causing further damage if not done right. Plus, mudjacking takes longer to cure, so you’ll have to wait before using the area again.
Strengths vs. weaknesses (polyfoam)
Polyfoam injection, or polyjacking, is another method to lift sunken slabs with its own set of advantages and disadvantages.
Pros: Polyfoam is lightweight, which reduces stress on the slab. It also expands rapidly and precisely, allowing for a quick and controlled lift. Plus, it cures quickly, getting you back to using the area in no time.
Cons: While polyfoam is great at filling voids, its cost can be higher compared to mudjacking. Also, its effectiveness can vary depending on soil type. In some cases, it might not bond completely with underlying soils, which could affect long-term stability.
Cost, Project Sizing, and Homeowner Planning Guide
Start by outlining the affected corner, slab dimensions, and the target final level to guide whether you’re lifting or planning later replacement. These factors influence method choice and set the groundwork for budgeting. Avoid guessing; collect real measurements from the site.
Costs depend on slab size, thickness, soil conditions, drainage, accessibility, and chosen method. Gather data by measuring area, height differentials, number of access points, and surface condition to generate apples-to-apples quotes and realistic project windows.
How to estimate and compare quotes
When comparing quotes, ask contractors for itemized breakdowns. Here’s what to look for:
Materials: Ask about the type of foam or grout used, its quality, and quantity needed.
Labor: Inquire about the number of crew members, their experience, and estimated hours required.
Mobilization: Check if there are additional costs for equipment, access, or travel. Also, ask about any prep work or cleanup.
Warranty: Compare warranties to ensure you’re getting a fair deal and long-term protection.
Get multiple quotes with these details to make an informed decision.
Small-scale vs. large-scale project considerations
For small corner fixes, mudjacking or foam leveling may be suitable:
– Minor settlement: If only one corner is sinking slightly, these methods can lift it back into place.
– Accessibility: If the area is easy to access and work on, these repairs are straightforward.
However, for larger-area settlement or when replacement becomes more cost-effective:
– Widespread settlement: If multiple areas are sinking, it might be better to replace the entire slab to ensure even support.
– Cost-effectiveness: Replacement may be cheaper in the long run if frequent repairs are needed due to ongoing soil issues.
DIY Feasibility, Safety Precautions, and Tools Checklist
Some tasks are within a DIYer’s reach, such as surface prep, basic leveling, and small foam lifts, while deeper underpinning or large mudjacking jobs require pro-grade equipment and expertise. Be honest about your limits and the project scope before starting.
Prioritize safety and legality: PPE, fall protection, utility awareness, temporary shoring, permits, and licensing as required. Have a clear plan for tools, workspace setup, cleanup, and what to do if you uncover hidden damage during work.
Can you DIY mudjacking or foam injection?
Before you start, check this list to see if your project’s a good fit for DIY.
- Equipment: Do you have access to necessary tools like a concrete saw, jackhammer, and proper safety gear? Without these, you’ll struggle.
- Chemical handling (foam): Can you safely handle foam chemicals according to manufacturer’s instructions? Improper handling can cause harm or damage.
- Proper lift control: Understand how much lift you need and can safely achieve. Too little, the slab won’t be level; too much, it might crack.
- Slab size: Can you manage the scale of your project? Small slabs are easier to DIY than large ones.
- Soil conditions: Are soil conditions stable and well-understood? Unstable soils may require professional evaluation.
- Structural integrity: Can you assess if the slab’s structure is sound? If not, call a pro to avoid further damage.
- Permits/licensing: Check local requirements. Some areas need permits or licensed contractors for these jobs.
- Time commitment: Do you have the time to complete the project? DIY takes longer than pro work.
Quick rule: If you’re unsure about any of these, it’s safer and often cheaper to call a professional.
Tools, materials, and visual checkpoints for DIY attempts
Use this checklist to gather necessary tools, materials, and monitor your lift.
- Measuring tools: Tape measure, level, and string line to ensure accurate measurements and lifts.
- PPE (Personal Protective Equipment): Safety glasses, gloves, ear protection, and a dust mask for your safety.
- Injection/Jacking equipment: Foam injection kit or mudjacking rig, depending on chosen method. Ensure it’s in good working order.
- Concrete cutting/sawing tools: Concrete saw or jackhammer for accessing voids and making necessary cuts.
- Shoring/temporary supports: Wooden planks, adjustable wrenches, and other supports to prevent collapse while working.
- Visual checkpoints (foam): Monitor foam expansion during injection. Ensure it’s filling voids and lifting the slab evenly.
- Visual checkpoints (mudjacking): Watch for even lift and settling of the slab as material is injected. Adjust as needed.
- Product instructions: Always follow manufacturer’s guidelines for safe use and application of materials.
- Local codes: Check local building codes to ensure your project complies with safety standards.
Quick rule: Regularly check your work and make adjustments as needed. DIY success depends on careful monitoring.
Environmental Impact, Maintenance, Alternatives, and Common Mistakes
Environmental considerations cover how foam versus mudjacking affects energy use, site disturbance, and potential material reuse. Weigh long-term sustainability as part of your repair decision. Look for contractor guidance on waste handling and cleanup.
After leveling, schedule regular inspections for new settlement or cracks and maintain drainage to prevent re-subsidence. Be mindful of common mistakes like neglecting drainage, underestimating curing needs, or prioritizing upfront price over long-term value.
Environmental and Maintenance Considerations
The environmental impact of your chosen repair method is crucial. Foam leveling uses polyurethane, a synthetic material that doesn’t biodegrade but can be recycled in some cases. Mudjacking uses cement-based grout, which is more eco-friendly but still contributes to CO2 emissions during production.
Both methods require careful site preparation and minimal disturbance to surrounding landscaping. Long-term sustainability depends on proper maintenance after leveling. Regularly inspect your slab for signs of new settlement or cracking. Reseal joints or cracks as needed, and ensure proper drainage and landscaping to prevent re-subsidence.
Pro tip: Always call a professional if you notice significant new settling or cracking after leveling.
Alternatives and Homeowner Decision Checklist
Before deciding on foam or mudjacking, consider other repair alternatives. This checklist helps you choose the best option for your situation.
- Slab replacement: Consider if the slab is beyond repair or has extensive damage. It’s labor-intensive but may be necessary in some cases.
- Stone slurry/grout: This can be used to fill voids and stabilize soil, but it’s not suitable for lifting slabs.
- Drainage fixes: If poor drainage is causing the settlement, fixing this issue might solve your problem without leveling.
- Polyjacking: Similar to foam leveling, but uses a different type of foam. It’s suitable for smaller slabs and light-duty applications.
- Soil stabilization: This involves improving soil compaction or using chemical stabilizers to prevent further settlement.
- Cost: Consider your budget. Foam is generally cheaper, but mudjacking may be more cost-effective in the long run due to its durability.
- Accessibility: If the slab is hard to access or surrounded by structures, foam leveling might be a better choice due to its minimal disruption.
- Time constraints: Foam leveling can be done quickly, while mudjacking takes longer to cure. Consider your timeline when deciding.
Quick rule: Always consider the root cause of settlement before choosing a repair method.
Conclusion
The core idea is simple: fix the sinking corner now with a solid plan, protect structure and safety, and pick a method that fits your concrete and budget. A careful, staged approach reduces the risk of new cracks or uneven settling and keeps the finish looking right for years.
To move forward, start with a quick assessment of the corner and any accessible edges, verify loading and drainage issues, check for moisture sources, and size the project before choosing between mudjacking or foam leveling. Begin with small tests in a hidden or less visible area if you can, verify the lift results, and then apply the chosen method in measured, progressive steps. If you feel unsure about the calculations, the risk of over-lift, or soil conditions, pause and compare the two methods against your situation before committing more material.
Common mistakes to avoid are rushing the lift, skipping safety gear or permit checks, and attempting a full-grade fix without testing a small area first. Always secure utilities, protect nearby surfaces, and monitor for new cracks or voids after each test lift. A clear safety rule is to stop if you see unstable soil, liquid fills, or unusual movement—these signals mean scope or method needs revisiting before proceeding.
If the project demands uncertain soils, unusual drainage, or repeated under-performance after a first attempt, plan a professional evaluation. A pro can confirm soil type, select the appropriate method, and minimize risk to the slab and foundation. Stay practical, stay safe, and you’ll finish with a stable, smooth edge that lasts.
FAQ
What’s the quick difference between mudjacking and foam repair?
Mudjacking uses a cementitious slurry pumped under the slab to fill voids and lift it. Foam repair uses a polyurethane foam that expands to fill voids and raise the slab. Foam is lighter and usually dries faster, but both need proper drill holes and clean voids to work.
How do I decide which method to choose for my sinking corner?
Look at the slab condition, depth of the voids, and access. Consider cost options, cure times, and how much weight the surrounding soil can handle. Always check manufacturer instructions, product labels, and local rules before proceeding.
What does the installation process involve for each method?
Both start with a site check and locating voids, then drill access holes and insert the chosen material. Mudjacking pours slurry; foam injects expanding foam through the holes. Afterward, holes are sealed and the surface is cleaned up per product guidance and safety practices.
What are the main pros and cons I should know?
Foam usually lifts quickly, creates less mess, and is lighter on the subgrade, but it can be more expensive and may require precise matching of foam properties. Mudjacking is often cheaper and heavier-duty but can leave more disturbance and takes longer to cure. Verify material specs and installer recommendations for your specific situation.