
Introduction
Clay plaster is a traditional, breathable finish made from clay and water that you apply to walls. It’s forgiving and doable for DIY projects when you work in small, manageable steps. Check the bag or supplier instructions for how to blend, the right water amount, and any additives.
Apply in thin coats, letting each layer set before the next one goes on. Cracks usually come from movement, moisture changes, or too-thick layers, so keep mixes consistent and cure them gradually. Always verify local guidelines and read material labels to ensure compatibility with your substrate and climate.
Key takeaways
- Organize all tools and materials before starting to avoid stopping mid job.
- Test plaster mix on scrap board to preview adhesion and work time.
- Prepare substrate with clean, damp surface for best plaster grip.
- Apply thin, even coats and let each dry to minimize cracking.
- Crack prevention hinges on proper joint gaps, moisture control, and design choices.
- Wear gloves, masks, and goggles; work in ventilated area to stay safe.
Table of Contents
- Introduction
- Key takeaways
- Quick Overview and Benefits of Clay Plaster
- Tools and Materials Checklist for a DIY Project
- Material Specs, Simple Testing, and Safe Mix Guidance
- Preparing Surfaces and Substrates for Good Adhesion
- Mixing Clay Plaster — Step-by-Step for Homeowners
- Application Techniques and Layering System
- Crack Causes, Prevention Strategies, and Design Considerations
- Repair Methods for Cracks and Surface Damage
- Conclusion
- FAQ
Quick Overview and Benefits of Clay Plaster
Clay plaster is a natural, breathable finish used on walls and ceilings. It relies on earth-based materials and traditional mixing techniques. This intro highlights what it is and why homeowners may consider it in the right spaces.
Benefits include improved indoor air quality, moisture buffering, and a warm, tactile aesthetic. It also offers sustainability and can be a low-odor option for sensitive spaces. Practical limits include compatibility with certain substrates and climates, so verify suitability for your project before committing.
What clay plaster is and how it works
Clay plaster is a natural, breathable finish made from a mix of clay, aggregate (like sand or finely crushed shells), and sometimes a fiber or stabilizer. It’s different from lime or gypsum plasters in that it doesn’t harden by chemical reaction but rather dries out as the water evaporates.
Clay is the key ingredient here. It’s naturally hygroscopic, meaning it absorbs and releases moisture. This makes clay plaster excellent at regulating indoor humidity levels, which can help prevent mold growth and maintain a comfortable environment.
Unlike other plasters, clay doesn’t become rock-hard when dry. Instead, it remains slightly flexible, helping to accommodate minor movements in the substrate without cracking. This is due to its high clay content (around 20-40%) which gives it unique properties.
Pros and cons for homeowners
Clay plaster offers a range of benefits, but it’s not always the best choice. Let’s weigh the pros and cons.
Pros
- Improves indoor air quality by regulating humidity and absorbing toxins.
- Provides excellent thermal mass, helping to stabilize room temperatures.
- Offers a warm, natural aesthetic that’s highly customizable with color and texture.
- Highly sustainable – it’s made from abundant, non-toxic materials and can be easily recycled or repurposed.
- Easy to repair and maintain. Small scratches or dents can be touched up with just a bit of clay slip.
- Applies directly over most existing surfaces without the need for primers or special preparation.
Cons
- Labor-intensive application process, requiring multiple thin coats.
- Slower drying time compared to other plasters, which can extend project timelines.
- Less suitable for areas with high moisture levels or direct water exposure (like bathrooms) due to its breathability.
- Requires some skill and practice to achieve a smooth, even finish. Expect a learning curve if you’re new to plastering.
- Color may darken slightly over time as the clay dries out completely.
Clay plaster is ideal for interior walls and ceilings in dry areas of your home. It’s particularly well-suited to climates with moderate humidity levels, where its moisture buffering capabilities can really shine.
Tools and Materials Checklist for a DIY Project
Start with a homeowner-focused list of essential tools and materials for clay plaster. Include mixing containers, trowels, floats, and basic measuring tools. This section keeps the kit simple and task-focused.
Include optional upgrades and safety gear, plus tips on buying small batches. Note common choices between renting versus buying for short projects. Always check product labels and instructions to ensure proper use and compatibility.
Essential tools and PPE
Before you start your concrete project, use this checklist to ensure you have all the necessary tools and personal protective equipment (PPE) on hand. This will help you work safely and efficiently.
- Tape measure: To accurately measure and mark out your area. Double-check measurements to avoid costly mistakes.
- Level: For ensuring your surface is flat and even. Use a 2′ or 4′ level for best results.
- Shovel: To mix, move, and place concrete. A square-nose shovel is ideal for this task.
- Wheelbarrow: For transporting mixed concrete to your work area. Ensure it’s in good condition to prevent spills.
- Concrete mixer (optional): If you’re pouring a large amount of concrete, consider renting or purchasing one. Check that it’s in working order before starting.
- Hammer: For breaking up any remaining concrete or for striking off the surface to ensure it’s level.
- Trowel: To finish and smooth the concrete surface. Use a straight edge trowel for best results.
- Safety glasses: To protect your eyes from debris and concrete dust. Ensure they fit well and provide adequate protection.
- Work gloves: For handling materials and tools. Check for any tears or weak spots before use.
- Steel-toed boots: To protect your feet from heavy objects and falling debris. Ensure they’re clean and in good condition.
- Ear protection (optional): If using power tools like a concrete mixer, consider wearing earplugs or earmuffs to protect your hearing.
Quick rule: Always prioritize safety first. Ensure all PPE is in good condition and fits properly before starting any work.
Materials and acceptable substitutes
Before you start mixing, use this checklist to ensure you have the right materials for your concrete project. Check each item off as you verify it.
- Cement: Look for ASTM C150 or equivalent standards on the bag. Check expiration date and store in a dry place.
- Water: Use clean, drinkable water. Avoid saltwater or polluted water as it can damage concrete.
- Aggregates (Rock/Sand): Check for suitable particle size distribution (usually 3/8″ to 1/2″ rock and fine sand). Avoid excessive fines or oversized particles.
- Admixtures: Follow manufacturer’s instructions. Common types include accelerators, retarders, air-entraining agents, and water reducers.
- Fibers (optional): Check for proper length (usually 1″ to 2″) and type (synthetic or natural). Avoid excessive fibers as they can cause segregation.
- Clay (if using): Ensure it’s clean, dry, and free from organic matter. Avoid expansive clays that can crack concrete.
- Stabilizers (if using): Check for compatibility with your cement type. Follow manufacturer’s guidelines on dosage rates.
- Reinforcement (if needed): Verify steel has a minimum yield strength of 60,000 psi and is properly prepared (clean, debonded).
Quick rule: Always check your materials before mixing. Using the wrong type or quality can lead to weak, cracked concrete that needs expensive rework.
Sourcing and quantities
Use this checklist before you start your DIY plastering project to ensure you’ve got everything you need from the right places.
- Cement: Check local builders’ merchants or cement suppliers. Confirm it’s fresh and meets BS EN 197-1 standards.
- Sand (sharp): Visit a mortar sand supplier. Ensure it’s clean, sharp, and free of organic matter. Ask for a sample if unsure.
- Lime (if using): Check garden centers or specialist lime suppliers. Confirm it’s hydrated lime (NHL) 3.5 or 5.
- Plasterboard: Measure room area, then calculate plasterboard quantity. Include waste allowance (around 10%).
- Jointing tape: Buy enough for your project. Check it’s compatible with your chosen plaster system.
- Jointing compound: Purchase ready-mixed or powdered, depending on preference. Ensure it matches your tape type.
- Scrim tape (if using): Buy enough for your project. Confirm it’s suitable for your chosen plaster system.
- Plaster (finishing coat): Calculate quantity based on room area and desired coat thickness (around 3mm). Include waste allowance.
- Reclaimed lath (if using): Source locally or online. Inspect for quality; ensure it’s dry, straight, and free of defects.
Quick rule: Always check product labels and manufacturer instructions to confirm you’re using the right materials for your project. Skipping this can lead to poor adhesion, cracking, or other costly issues.
Material Specs, Simple Testing, and Safe Mix Guidance
Discuss how clay type, sand grading, and fiber content influence performance and workability. Keep explanations practical and avoid firm numbers in this intro. Emphasize listening to manufacturer guidance for each material.
Offer basic home tests for plasticity and sand cleanliness, plus conservative test-mix ideas to guide small-batch experiments. Encourage consulting manufacturer data sheets or a professional if tests raise questions about suitability. Verify any critical specs on labels or data sheets before proceeding.
Identifying and testing your clay
Clay is the backbone of your plaster. Get it right, and you’re off to a great start.
First, check for plasticity. Knead a handful of damp clay like dough. It should form a smooth ball without cracking. If it crumbles or feels gritty, it’s too sandy or contaminated.
Next, roll it into a ‘snake’. A good clay will hold its shape without breaking. If it collapses, it’s likely too lean (low in clay).
If your clay passes these tests but you’re unsure, consider sending samples for professional testing or consulting with a local expert.
Sand grading and aggregate considerations
Sand is the other half of your plaster mix. It affects strength, shrinkage, and finish.
The size matters. Fine sand (0-2mm) gives a smoother finish but can lead to higher shrinkage and lower strength. Coarse sand (2-4mm) does the opposite.
Cleanliness is key too. Remove any organic matter, pebbles, or other contaminants that could weaken your plaster or cause cracking.
Before mixing large batches, test with small amounts of each sand type to see what works best for your clay and desired finish.
Fibers and stabilizers: when to use them
Fibers and stabilizers boost tensile strength and crack resistance. They’re not always necessary, but they can help in certain situations.
Common fibers include straw, hemp, or cellulose. Each adds unique benefits. Straw, for instance, improves thermal mass while reducing shrinkage.
Stabilizers like lime or cement increase bond strength and durability. They’re useful in high-traffic areas or where extra protection is needed.
Start with small amounts – around 1-2% by volume of clay. Test first to ensure they don’t compromise your plaster’s breathability or aesthetics.
Preparing Surfaces and Substrates for Good Adhesion
Outline preparation steps for common interior and exterior substrates like lath, masonry, and plasterboard. Include cleaning, wetting, and keying practices to maximize bond. Mention avoiding substrates known to delaminate or trap moisture.
Warn about substrates that are incompatible or require special treatment, and discuss vapor barrier considerations. Emphasize that proper surface prep is the foundation of lasting plaster performance. Always confirm with substrate manufacturer guidance or local code requirements if unsure.
Preparing common substrates
Each substrate needs specific prep. Here’s how:
Wood lath: Remove any loose or damaged pieces. Sand smooth.
Metal lath: Clean off rust, dirt. Lightly sand to remove sharp edges.
Masonry: Brush off dust and debris. Use a wire brush for tough spots.
Drywall: Sand lightly to remove gloss. Prime with clay-based primer.
Bonding coats, scratch coats, and keys
A good key ensures adhesion. Here’s how:
Bonding coat: Apply thin layer of clay plaster mixed with sand. Let dry.
Scratch coat: Next, apply thicker layer. Use a comb or brush to create grooves (keys) for better grip.
Keys: These help subsequent coats stick. Make sure they’re not too deep or wide.
Moisture, vapor, and substrate compatibility
Managing moisture is key:
Check for moisture: Use a moisture meter. Avoid applying clay plaster on wet surfaces.
Avoid vapor barriers: These trap moisture. Clay plaster needs to breathe.
Test dryness: Before final coats, test again. Let substrate dry out if needed.

Mixing Clay Plaster — Step-by-Step for Homeowners
Provide a clear workflow from batching and soaking to reaching a workable consistency. Compare hand mixing with mechanical mixing and note practical differences. Keep the process focused on small, manageable batches.
Include tips to avoid common mixing errors and stress testing small portions first. Remind readers to follow safety guidelines and to consult product instructions for any specific mix ratios or additives. Verify guidance on the label or data sheet before mixing.
Step-by-Step Process
This step-by-step guide walks you through mixing clay plaster, from preparation to final checks.
- Gather your materials and tools. Safety first: wear gloves, goggles, and a dust mask.
- Soak your clay and sand in water for 24 hours to improve workability.
- Main mix: Add water to the soaked clay and sand, then mix until you reach desired consistency (not runny, holds a pass).
- Add fibers or stabilizers if needed. Mix well to distribute evenly.
- Test your mix on a small area. Let it dry, check for cracks, and adjust as necessary before proceeding with the main job.
Batch sizing and soaking procedures
Size your batches right to avoid waste. Soaking improves workability, reducing mixing time and effort.
Rule of thumb: Mix enough for 10-20 sq ft at a time, depending on your application and working speed.
Soak clay and sand separately in water for 24 hours. This breaks down the particles, making them easier to mix and apply.
For larger projects or faster drying times, consider soaking for 48 hours or using a mechanical mixer.
Mixing methods and desired consistency
Hand mixing is fine for small batches. For larger jobs, use a mechanical mixer to save time and energy.
Mix until the plaster holds its shape when you scoop it up. It should not be runny or too stiff. Aim for a consistency similar to thick peanut butter.
Pro tip: If your mix is too runny, add more sand. Too stiff? Add more water.
Workflow for testing and adjusting mixes
Before applying to your walls, test your mix on sample boards to ensure it’s right.
Check for shrinkage by letting a small amount dry. If it cracks or pulls away from the board, adjust your sand-to-clay ratio (more clay reduces shrinkage).
Test adhesion by applying the mix to the board and letting it dry. Scratch it with a nail or coin. If it comes off easily, add more clay or fibers.
Make small adjustments at a time and retest until you get it right.
Application Techniques and Layering System
Describe a typical multi-coat system and the purpose of each coat in simple terms. Provide step-by-step methods for bond, body, and finish coats with practical timing cues. Include texturing options suitable for DIY work in small areas.
Share efficiency tips for working in tight spaces and for maintaining consistent thickness. Emphasize cleaning between coats and checking for adhesion before proceeding. Always refer to manufacturer instructions or local recommendations for coat thickness and drying guidance.
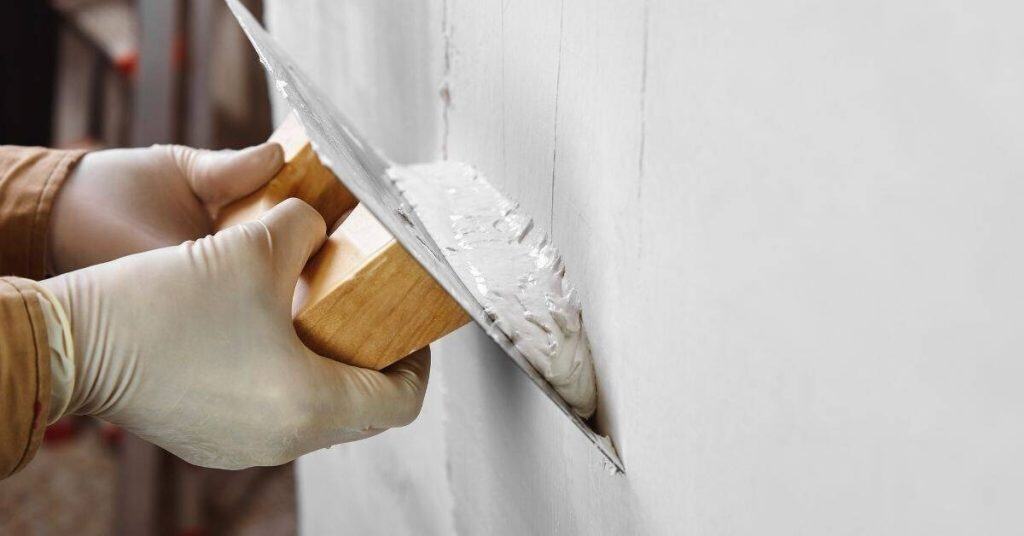
Scratch, Body, and Finish Coats Explained
The typical multi-coat system for clay plaster consists of three layers: the scratch coat, the body (or brown) coat, and the finish coat. Each serves a distinct purpose.
Scratch coat is the first layer applied over prepared surfaces to create mechanical keying for better adhesion of subsequent coats. It’s usually 1/4″ to 3/8″ thick.
Body (or brown) coat follows, building up the wall thickness to around 3/8″ to 1/2″. This layer provides bulk and helps hide minor substrate imperfections.
Finish coat, applied last, determines the final look and feel. It can be smooth or textured, ranging from 1/16″ to 1/4″ thick. Allow each coat to dry thoroughly before sanding lightly and applying the next.
Troweling, Float, and Texture Techniques
For smooth surfaces, use a straight trowel to apply clay plaster in thin layers. Hold the trowel at a 45° angle to the wall, applying even pressure. For textured finishes, use a hawk and trowel together, or add aggregates during mixing.
After applying each coat, float it using a magnesium float or steel trowel held flat against the wall. This evens out the surface and removes excess material. Be gentle to avoid damaging the underlying coats.
To prevent common finish flaws like holidays (missed spots) or orange peel texture, work in small sections at a time, keeping your trowel well-loaded with plaster. Practice makes perfect – don’t rush!
Working Corners, Reveals, and Openings
For clean corners, use a corner trowel or straight edge to apply plaster at a 45° angle. This creates a sharp, defined corner. Allow the plaster to set slightly before using a damp sponge to smooth any rough edges.
When bonding to trim, apply plaster up to the edge of the trim, then use a putty knife to press the plaster firmly against it. This creates a strong bond. For window and door reveals, use a flexible corner trowel or straight edge to apply plaster into these openings, ensuring full coverage.
To prevent weak spots, ensure each layer is well-bonded to the previous one. Don’t be afraid to use your fingers or a damp sponge to work plaster into corners and edges. Remember, a little extra time spent here can save you from costly repairs later on.
Crack Causes, Prevention Strategies, and Design Considerations
Identify common crack sources such as shrinkage, movement, substrate issues, and environmental changes. Keep the discussion actionable without overpromising outcomes. Frame prevention as a mix of material choices and proper detailing.
List practical prevention strategies including reinforcement and careful construction detailing. Stress the importance of diagnosing the root cause before attempting repairs. When in doubt, consult a professional or refer to project guidelines from the material manufacturer.
Typical crack types and what they indicate
Cracks in clay plaster can range from hairline to wide, structural cracks. Understanding these differences helps diagnose the cause and urgency of repairs.
Hairline cracks, less than 0.1mm wide, are usually minor and cosmetic. They often result from slight substrate movement or minor shrinkage during drying. These can be easily touched up with a small amount of plaster.
Structural cracks, wider than 0.2mm, suggest more serious issues like significant substrate movement, settlement, or excessive shrinkage. These require immediate attention and may need professional assessment before repair.
Design and installation practices to minimize cracking
Proper design and installation can significantly reduce the risk of cracking. Here are some key strategies:
Control joints: Incorporate control joints every 6-8 feet to allow for natural shrinkage and expansion. Use a jointing tool or a straight edge with a sharp blade.
Proper backing: Ensure the substrate is stable, level, and compatible with clay plaster. Use a bonding coat to improve adhesion and key the surface for better plaster grip.
Staged drying: Allow each layer of plaster to dry at a controlled rate before applying the next. This helps prevent rapid drying and excessive shrinkage that can lead to cracking.
Climate and seasonal considerations
The climate during cure significantly impacts clay plaster’s performance and crack risk. Plan your work accordingly:
Humidity: High humidity during cure can lead to excessive shrinkage as the plaster dries too quickly. Conversely, low humidity can cause rapid drying and cracking. Maintain a consistent humidity level around 50% for optimal curing.
Temperature: Ideal curing temperatures range between 60-80°F (15-27°C). Avoid applying plaster in extreme heat or cold, as these conditions can affect the plaster’s ability to cure properly and may lead to cracking.
Repair Methods for Cracks and Surface Damage
Offer step-by-step repair options for typical crack sizes and types, focusing on feathering and patching in place. Emphasize clean preparation, matching texture, and gradual rebuilds. Keep the guidance practical for homeowners performing small repairs.
Provide checkpoints to verify a successful repair and advise when to call a pro for larger or structural issues. Reinforce the need to follow safety practices and to consult manufacturer or local code guidance for any major remediation.
Small hairline crack repairs
First, clean the crack thoroughly using a stiff brush and water. This removes any loose material and ensures good adhesion.
If the crack is deep or wide, open it up with a chisel to create an undercut. This gives the filler more surface area to grip onto.
Mix a thin slurry or paste using your clay plaster mix and some water. Apply this to the crack using a small trowel or putty knife, pressing it well into the crack.
Once filled, use a damp sponge or trowel to blend the repair into the surrounding surface, ensuring a smooth finish.
Larger crack and delamination fixes
For larger cracks or areas of delamination, you’ll need to remove the damaged plaster. Use a chisel and hammer to carefully chip away the old material.
Once removed, clean the surface thoroughly with water to ensure good adhesion for your new plaster.
If the crack is wide or the delamination is extensive, consider using a reinforcement mesh or fiber additive in your mix. This will help prevent future cracking.
Apply your clay plaster as normal, ensuring you match the original finish and color. You may need to apply multiple layers to build up the depth.
When to call a professional
While many cracks can be repaired by the homeowner, there are times when you should consult an experienced contractor. If cracks are widening over time, this could indicate a structural issue.
Similarly, if you notice any signs of structural movement, such as doors or windows sticking, or cracks appearing in multiple places at once, this requires professional assessment.
Water damage is another sign that you need professional help. If your cracks are allowing water to penetrate the wall, this can lead to serious issues like mold growth and rot.
If you’re unsure about any crack or damage, it’s always best to err on the side of caution and contact a professional. They have the tools and knowledge to assess your situation properly.
Conclusion
Clay plaster is durable and looks right when you prep, mix, and cure with care, so lock in good surfaces, calm downs, and steady hands to avoid costly fixes later. When you follow proper steps, you protect your home from leaks, peels, and hard-to-repair patches while keeping the finish warm and authentic.
To move forward, check that you have clean, sound substrate; run a quick test patch or small area mix first; mix in the correct ratios and work in the right temperature and humidity window; apply in the planned layering system with stable trowel technique; protect the space from drafts and rapid drying; and clean up and inspect the surface after each stage for adhesion and uniform finish. Safety matters and test a small area first should guide every decision, and keep you from wasting material or making reversible mistakes. Use the right gloves, mask, and ventilation, and never skip surface prep or crack checks.
Two common mistakes to avoid are rushing the layers or over-wetting the plaster, which leads to adhesion failures or slow drying cracks; ignoring substrate moisture or hidden damage, which traps problems under the finish; and skipping a final cure check or outdoor exposure plan. Follow simple safety rules: work in a well-ventilated area, wear protective gear, mix only in small, manageable batches, and seal and cure as recommended before sanding or painting. Protect yourself and your work by testing first and keeping the workspace controlled.
If you encounter active cracks, persistent moisture, structural issues, or you’re dealing with large surfaces or unfamiliar substrates, consider a professional. Otherwise, stick with the plan, finish cleanly, and you’ll have a solid, attractive plaster surface you can be proud of. You’ve got this—steady hands, careful prep, and a finish you can count on.
FAQ
How do I know when the clay plaster is dry enough to finish or sand?
Don’t rely on time alone. Check for a consistent feel across the surface and no cool, damp spots. If you have a moisture meter, use it at several spots to confirm the reading has stabilized before moving to the next step.
If you see soft areas, wait and recheck. Rushing to finish while still damp can trap moisture and cause cracking or surface damage.
What should I do if I notice efflorescence or salt on the plaster?
Wipe or lightly scrub off loose white residue with clean water. Don’t push it back into the plaster. After cleaning, let the surface dry and recheck for new residue before applying a top coat.
If the problem repeats, identify moisture sources and address them first. Persistent salts can indicate ongoing moisture, which needs a fix before finish work.
Can I plaster over existing painted walls, and what checks should I make?
Paint can block adhesion. Test a small area by scraping a loose paint chip; if it peels, the surface isn’t ready. If the paint adheres firmly, you’ll need to remove or abrade it to create a key for the plaster.
Use a breathable, compatible coating primer if you plan to seal or finish the surface later. Always follow manufacturer instructions for any primer or sealant you use.
What are the best practices to prevent cracks during drying?
Keep the work area at a steady temperature and avoid sudden changes in humidity. Apply in consistent thickness and avoid overworking a single spot, which can trap movements.
Support the substrate as needed and plan for gradual curing. If cracks start, address them early with appropriate repair methods and check for underlying movement or moisture issues.