
Introduction
The timeline for repairing plaster key failure on wood lath can vary depending on the extent of damage, but understanding the process will help you plan effectively. This guide walks you through each step, from diagnosis to completion, with approximate time frames.
Before starting, gather your tools and materials, ensuring everything is in good working order to avoid delays. Let’s dive into the repair timeline.
For the full guide, see Plaster Key Failure on Wood Lath: Diagnosing, Re-Keying, and When to Add Mesh.
The Complete Repair Timeline: From Diagnosis to Completion
The entire plaster key failure repair process can take anywhere from a few days to over a week, depending on the size of the affected area and the complexity of the repairs. Here’s a step-by-step breakdown with approximate time frames:
- Diagnosis (1-3 hours): Inspect the damaged areas, probe for hollow spots, and assess lath condition.
- Preparation (2-6 hours): Remove loose plaster, clean the surface, and prepare the lath as needed. This step may take longer if you need to replace or secure compromised lath.
- Re-keying (3-8 hours per section): Apply new keys, back-butter, and compact the plaster in layers. Work in manageable sections to ensure proper adhesion and compaction.
- Drying Time (12-48 hours): Allow each coat to dry according to manufacturer recommendations before applying the next layer.
- Finishing and Blending (2-5 hours per section): Apply finish coats, feather edges, and blend with existing plaster. This step may take longer if you need to match texture or sheen.
Total repair time can range from 18 to 70+ hours, depending on the size of the project and any unexpected issues that arise. Keep in mind that these are rough estimates, and your specific situation may require more or less time.
Key takeaways
The preparation stage is crucial as it sets the foundation for a successful repair. Taking the time to properly clean and prepare the surface will help ensure that your new plaster adheres well and lasts longer, ultimately saving you time in the long run.
- Inspect lath condition before tearing out plaster to decide re-keying scope.
- Delaminated keys require careful removal and back-bracing to prevent wall collapse.
- Rekeying involves resetting plaster into grooves, using proper adhesive and compaction.
- Add metal mesh only where plaster has compromised keys and spans gaps.
- Install a dry, tight plaster bed and monitor for cracks during cure.
- Safety: support scaffolds, respirators, and dust control during removal and repair.
Table of Contents
- Introduction
- Key takeaways
- What Is Plaster Key Failure on Wood Lath?
- Diagnosing the Problem: Inspection and Tests
- Tools and Materials Checklist
- Re-Keying Techniques for Delaminated Plaster
- Replastering Sequence and Best Practices
- When to Add Mesh: Criteria and Placement
- Safety, Prep, and Common Pitfalls to Avoid
- Scope, Cost Considerations, and When to Hire a Pro
- Conclusion
- FAQ
What Is Plaster Key Failure on Wood Lath?
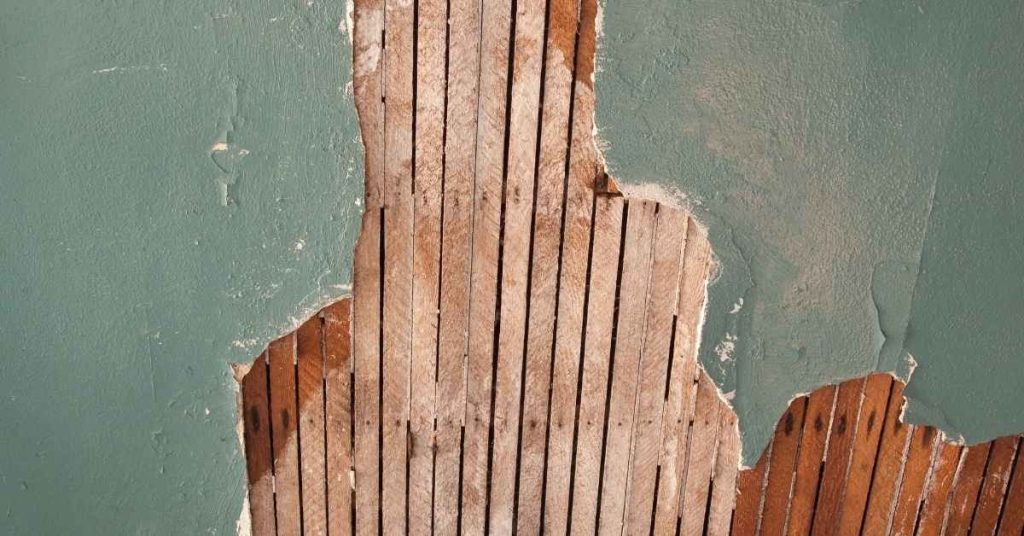
Plaster keying is the mechanical bite plaster makes into the gaps and hollows of a wood lath bed so the plaster locks in place as it cures. On traditional wood-lath walls and ceilings the lime or gypsum plaster squeezes through and around the strips of lath to form discrete “keys” that hold the coat to the substrate.
Key failure means those mechanical bites have lost grip: the plaster may crack, delaminate, sag (especially on ceilings), or sound hollow when tapped. Inspectors and DIYers should look for cracking patterns, visible gaps at edges, loose or missing keys, and check framing and lath for moisture, rot, or withdrawn fasteners to decide if simple re-keying will work or if more extensive repair is required.
How plaster adheres to lath
Plaster keying, also known as ‘key’, is how plaster grips wood lath. When applied, plaster seeps into the gaps between lath strips, forming small fingers of hardened material called keys. These keys anchor the plaster to the lath, much like how a key fits into a lock.
Gypsum or lime plasters are typically used for this purpose. They have a natural stickiness that allows them to grip the wood lath effectively. The lattice of wood strips provides plenty of gaps for the plaster to seep into and form these crucial keys.
The condition of the substrate and the original materials play a significant role in how well the plaster adheres. If the lath is rotten, damaged, or poorly installed, the plaster may not grip properly, leading to potential key failure.
Common patterns of failure
Key failure on wood lath can manifest in several ways. The most common are:
Delamination: This is when the plaster starts to peel away from the lath, often appearing as cracks or gaps along the surface. It usually indicates a loss of bond between the plaster and the lath, which could be due to moisture damage, poor initial installation, or inadequate repair attempts.
Hollow-sounding areas: When you tap on the plaster and it sounds hollow, it’s often an indication that the plaster has lost its bond with the lath and is no longer properly supported. This could be due to nail or screw withdrawal from the lath, or even rot in the wood itself.
Other patterns include sagging ceilings, which usually indicate movement or settling of the structure, and edge pull-away, where the plaster is pulling away from the edges of the wall or ceiling. These patterns can help diagnose the underlying cause of the key failure.
Diagnosing the Problem: Inspection and Tests
Start by mapping visible symptoms—crack lines, flaking, and hollow-sounding areas—and note whether they follow lath joints, stud lines, or known moisture paths. A systematic visual and tactile survey, marking damaged zones and photographing them, helps determine whether the issue is local or widespread.
Run a few non-destructive tests: tap the surface to locate hollows, use a moisture meter on the surface and, if possible, behind plaster, and consider infrared imaging to find hidden wet areas. Probe gently where safe, check surrounding framing for leaks or rot, and sketch a simple grid to guide whether you’ll re-key, add reinforcement, or remove sections for deeper investigation.
Visual and tactile checkpoints
Before you start any repairs or rework, use this checklist to identify the root causes of your concrete problems. It’s like a doctor checking your symptoms before prescribing treatment.
- Surface cracks: Look for hairline to wide cracks on the surface. Measure their width and length. Cracks wider than 1/8″ may indicate serious issues.
- Lath exposure: Check if any wire mesh or rebar is exposed. If so, measure the exposed area. Exposed lath can lead to rapid deterioration.
- Fastener corrosion: Inspect all nails, screws, and anchors. Look for rust stains or loose fasteners. Corrosion can cause concrete to crumble.
- Moisture stains: Check for discoloration or efflorescence (white powdery substance). Moisture issues can cause scaling and spalling.
- Delamination: Tap the surface with a hammer. Listen for a hollow sound, which indicates delamination – a serious problem where the concrete is separating from its base.
- Concrete disintegration: Look for crumbling or flaking concrete. This could be due to freeze-thaw cycles or improper curing.
- Uneven surfaces: Measure the slope of your concrete. It should be slightly sloped away from buildings to prevent water pooling and damage.
- Crack patterns: Note the shape and direction of cracks. Straight, vertical cracks often indicate settling issues, while diagonal cracks may suggest structural problems.
Quick rule: Always check for multiple causes when diagnosing concrete problems. Skipping this step can lead to expensive rework and recurring issues.
Simple on-site tests to assess key issues
Before you start tearing into your concrete, use this checklist to confirm the problem and avoid unnecessary damage.
- Check for cracks: Visually inspect the surface. Hairline cracks are common but can worsen over time. Use a magnifying glass if needed.
- Test crack width: Measure crack widths with a crack gauge or use a penny (if it fits, the crack is wider than 1/4″).
- Gently probe cracks: Use a screwdriver to gently probe cracks. If it goes in easily, the concrete may be delaminating.
- Check for spalling: Look for flaking or peeling concrete. This indicates a loss of bond between the aggregate and cement paste.
- Test rebound hardness: Use a Schmidt hammer to test the concrete’s surface hardness. A low reading may indicate deterioration.
- Check for moisture: Use a moisture meter to check for excess moisture, which can cause efflorescence and other issues.
- Test for delamination: Tap the surface with a hammer. A dull thud instead of a sharp sound may indicate delamination.
- Check expansion joints: Ensure they’re intact and functioning properly to prevent random cracking.
Quick rule: If you’re unsure about any findings, consult a professional before proceeding. It’s better to be safe than sorry when dealing with concrete.
When failure signals deeper issues
If your initial visual and tactile checks reveal signs of trouble, use this checklist to diagnose if the problem is more than just surface-level. Remember, catching these issues early can save you a lot of time, money, and headaches.
- Cracking along walls: Check if cracks are wider at top or bottom. If so, it could indicate structural movement (what goes wrong if you skip this: potential safety hazards).
- Diagonal cracks in corners: These often signal foundation issues. Measure crack width; more than 1/4″ may require professional attention.
- Doors and windows sticking: Check if they’re difficult to open or close. This could indicate framing movement (what goes wrong if you skip this: costly repairs down the line).
- Wet spots on interior walls: Look for water stains, mold, or mildew. These can indicate chronic moisture problems (what goes wrong if you skip this: potential health risks and structural damage).
- Warped or sagging floors: Check for uneven surfaces by placing a marble or level on the floor. If it rolls, there may be a problem (what goes wrong if you skip this: tripping hazards and reduced property value).
- Soft or spongy spots in flooring: Press firmly with your foot; if it feels soft, there could be rot or insect damage (what goes wrong if you skip this: costly repairs and potential safety hazards).
- Foul odors coming from walls or floors: This can indicate the presence of mold or insects. Use a moisture meter to check for dampness.
- Visible insect damage: Look for holes, sawdust-like debris, or damaged wood. Check for signs of termites or carpenter ants (what goes wrong if you skip this: extensive damage and costly repairs).
Quick rule: If you find any of these issues, don’t wait – consult a professional immediately. Early intervention can prevent small problems from turning into big, expensive ones.
Tools and Materials Checklist
Gather diagnostic and prep tools first: a bright flashlight, utility knife, pry bar, putty knife, stiff brush, moisture meter, magnet for nail locating, and a hammer for tapping tests. These let you find hollow areas, locate lath nails, and safely remove loose plaster without enlarging damage.
For repairs, assemble re-keying materials and confirm compatibility by reading product labels or data sheets for mix type, cure guidance, and indoor use. Typical items include patch plaster or lime-putty, bonding agent, trowels and hawk, mixing pail, plaster keys or through-dubs, optional mesh (fiberglass or metal) and appropriate fasteners, plus PPE and dust containment supplies—check each product’s instructions for specific preparation and safety notes.
Essential tools
Before you start, make sure you have the right tools for the job. Here’s a checklist to help you scope your repair correctly.
- Flashlight: Inspect dark corners and behind furniture.
- Utility knife: Carefully cut away damaged plaster.
- Pry bar: Gently lift off loose plaster to check lath condition.
- Putty knife: Scrape off old plaster and prepare the surface.
- Moisture meter: Detect hidden moisture that could cause future failures.
- Magnet: Locate wood lath and nails before cutting or drilling.
- Hawk and trowels (steel/scratch): Mix, apply, and smooth plaster.
- Scraper: Remove old keys and prepare the surface for re-keying.
- Stiff brush: Clean the surface and key the lath before applying new plaster.
Quick rule: Always double-check your tools before starting. Missing a crucial one can set you back hours.
Choosing compatible plaster and adhesives
Matching the repair compound to your original plaster is key to a successful fix. Here’s what to look for when choosing.
- Plaster type: Identify if your existing plaster is lime-based or gypsum-based.
- Cure time: Ensure the repair compound cures at a similar rate to avoid cracking.
- Compatibility with wood lath: Check that the new plaster adheres well to wood.
- Water/adhesion properties: Make sure the new plaster has good water resistance and adhesion.
- Indoor suitability: Confirm the repair compound is safe for indoor use.
- Breathability: Ensure the new plaster allows moisture to escape to prevent mold growth.
- Shelf life: Check the product’s shelf life and storage conditions.
- Warranty notes: Review the warranty information for coverage and claims process.
Quick rule: If unsure about your existing plaster type, take a small sample to a hardware store for identification.
Mesh and reinforcement options
Adding mesh or lath can strengthen your repair. Here are common choices and when to use them.
- Fiberglass mesh: Ideal for small repairs and areas with low stress. Easy to cut and apply.
- Metal lath/mesh: Suitable for larger repairs and high-stress areas like corners or near windows/doors. Requires more work to install but provides superior strength.
- Paper-backed mesh: Good for repairs where you want a smooth, seamless finish. Less durable than metal lath but easier to apply.
- Bond coats/plaster patch compounds: Some products are designed to accept mesh and provide extra adhesion.
- Adhesives/bonding primers: Use these to secure mesh in place before applying new plaster.
Quick rule: For most repairs, fiberglass mesh is a good starting point. Upgrade to metal lath if the area is large or under high stress.
Re-Keying Techniques for Delaminated Plaster
Begin by determining the delamination cause—moisture, split or missing lath, or failed keys—and assess whether the lath and framing are sound before choosing a method. Clear work areas, remove all loose plaster, and control dust so you can see and access attachment points for re-keying.
Minimal repairs use back-keying or through-dubs with a bonding agent to re-establish mechanical grip where lath is intact; moderate repairs may involve re-scoring, applying a scratch coat, and partial lath repairs. For severe or repeated failures replace damaged lath or install mesh and apply a multi-coat plaster system; always test adhesion after curing and address moisture sources to prevent repeat failures.
Traditional key-forming methods
To re-create plaster keys, we’ll use holes and toggle techniques. These methods restore mechanical grip to the lath.
Holes: Drill small holes (around 1/4″ diameter) through the delaminated plaster into the lath. Fill these with a high-adhesion plaster bonding agent or lime-putty, then embed fiber reinforcement if needed.
Toggle technique: Cut small slots (about 1/2″ deep) into the lath at regular intervals. Fill these with a suitable adhesive and embed fibers for added strength.
Refastening and substrate repair
Before re-keying, ensure your lath is securely fastened to the framing. If not, resecure it using appropriate fasteners.
If you find badly damaged or split lath sections, replace them entirely. For minor damage, add backing supports to reinforce the existing lath before re-keying.
Always check your framing’s integrity. If compromised, make necessary repairs before proceeding with re-keying.
Adhesive-only vs. mechanical solutions
Purpose-made plaster adhesives can be effective in minimal re-keying, but they’re not a cure-all. They work best when the lath is sound and moisture intrusion is under control.
Adhesive-only: Use high-adhesion bonding agents or lime-putty to re-establish key grip without full removal of plaster. This method is quick but may not last if underlying issues persist.
Mechanical solutions: Traditional key-forming methods (holes, toggles) provide better long-term grip but require more effort and time. They’re ideal when lath is sound and you want a robust repair.

Replastering Sequence and Best Practices
Prepare the substrate by removing loose material, repairing or replacing compromised lath, and fixing any moisture problems before applying new plaster. Clean and, where appropriate, dampen the lath and surrounding surface so the new coats adhere properly rather than pulling moisture from the fresh plaster.
Rebuild the key and bond in layers: establish a scratch or key coat, follow with a brown or leveling coat, and finish with a thin finish coat that matches texture and sheen. Work in controllable sections, feather edges to blend with existing plaster, observe manufacturer cure instructions, and allow proper drying between coats to avoid shrinkage cracks or bond failures.
Surface preparation and priming
Before you start replastering, clean the old surface thoroughly. Remove any loose plaster, dirt, or debris. Use a wire brush to scrub away any remaining particles.
Moisten the lath and backing lightly with a damp sponge. This helps new plaster bond better. But be careful not to oversaturate it; that can weaken the substrate.
If you’re using a bonding agent, apply it now according to the manufacturer’s instructions. It’ll help create a strong bond between old and new plaster.
Building coats: scratch, brown, finish
The three-coat system is tried-and-true for good reason. Each coat serves a purpose in building up a strong, durable surface.
Scratch coat: This first layer goes on thick (around 1/4 to 3/8 inch) and is roughened with a comb or trowel to create ‘keys’ for the next coat. Let it dry until it’s leather-hard – usually 24 hours.
Brown coat: Applied over the scratch coat, this layer (about 1/8 inch thick) smooths out imperfections and provides a base for the finish coat. Wait another 24 hours before applying.
Finish coat: The final layer (around 1/16 to 1/8 inch thick) gives your wall its final texture and sheen. Apply it when the brown coat is leather-hard, usually after another 24 hours.
Finishing and blending into existing surfaces
Feathering edges is crucial to make your repair blend seamlessly with the surrounding plaster. Use a damp sponge or trowel to gradually reduce the thickness of the final coat at the edges, tapering it down to nothing over an inch or two.
Apply a finish compound if needed to match the sheen and texture of the existing surface. Skim any high spots with a damp trowel to ensure a smooth, uniform surface.
Let your plaster cure slowly under controlled humidity (around 50%) and temperature (around 70°F or 21°C) for at least two weeks before painting. This helps prevent cracking and ensures a strong, durable finish.
When to Add Mesh: Criteria and Placement
Add mesh when keying alone won’t stop recurring cracking or when you see multiple hairline cracks, widened joints, or areas where keys are missing near edges and corners. The decision differs by location—ceilings and corners often need reinforcement sooner than stable wall fields—so base your choice on crack pattern, lath condition, and whether the substrate behind the lath is sound.
Install mesh as part of the scratch or brown coat, ensuring overlap and anchorage onto sound lath or backing; align and secure the mesh over cracks and feather the surrounding plaster to hide transitions. Verify mesh compatibility with your plaster system per product guidance, avoid trapping moisture behind reinforcement, and when in doubt or if rot/structural issues exist, get a professional opinion before relying solely on mesh.
Signs that indicate mesh is needed
Mesh reinforcement can save your plaster from further damage. Here are signs to look for:
Recurring cracks. If you’re seeing the same cracks reappear after repair, it’s time to add mesh.
Wide delamination areas. Large sections of peeling or flaking plaster need extra support.
Thin, brittle plaster. Plaster that’s too thin or has lost its flexibility over time benefits from added strength.
How to place mesh for best results
The key to effective mesh placement is distributing its support evenly. Here’s how:
Embed the mesh in specific coats – usually the scratch or brown coat – for best adhesion and strength.
Overlap mesh strips by at least 2 inches (5 cm) to ensure continuous reinforcement. Avoid creating stress points with tight bends or sharp corners.
Secure the mesh with appropriate adhesive or plaster, following the manufacturer’s instructions. Feather the edges to blend with surrounding plaster for a smooth finish.
Choosing mesh type by situation
The right mesh makes all the difference. Consider these factors:
Substrate and finish compatibility. Match your mesh to your plaster type (e.g., lime, gypsum) and desired finish (e.g., smooth, textured).
Verify corrosion resistance if using metal lath or mesh in areas prone to moisture. Check for paint adhesion if you plan to paint over the plaster.
If unsure, consult a professional or contact the manufacturer for advice tailored to your specific situation.
Safety, Prep, and Common Pitfalls to Avoid
Address safety first: test for lead paint if the house predates modern rules, control dust with containment and HEPA filtration, and use appropriate PPE for silica and airborne debris. Set up negative or targeted ventilation, cover floors and furniture, and create a clean-to-dirty path to limit contamination spread.
Don’t skip substrate checks—patching over active moisture, rotten lath, or loose keys causes repeat failure; likewise avoid using incompatible mixes or rushing cure times. Prepare materials and tools in advance, follow product directions for bonding and curing, and resist the temptation to feather huge patches too thinly—proper sequence and moisture control make the repair last.
Lead, Dust, and Containment
Before you start any plaster repair work, suspect lead paint if your home was built before 1978. Get it tested professionally to be safe.
Airborne dust from sanding or scraping can cause serious health issues. Use a HEPA vacuum and wet sanding techniques to minimize dust. Wear a respirator rated for lead and silica dust.
Set up containment using plastic sheets to seal off the work area from other parts of your home. Use negative or targeted ventilation to control dust spread. Cover floors and adjacent surfaces with drop cloths.
Moisture Control and Substrate Health
Before you patch, address any leaks or moisture issues. Plaster can’t stick to damp wood. Check for water stains, mold, or soft spots.
Ensure proper ventilation in the area. If there’s rot or termite damage, repair the frame and lath before patching. Let it dry out completely first.
If you’re unsure about moisture levels, use a moisture meter to test. Don’t skip this step; moisture causes plaster failure.
Common DIY Mistakes
Here are some common pitfalls to avoid when repairing plaster keys:
- Mismatched materials: Using the wrong plaster mix or primer can lead to poor adhesion and failure.
- Over-thick patches: Thick patches crack easily. Keep them thin for better strength.
- Insufficient keying: Without proper keying, new plaster won’t bond well with the old. Use appropriate techniques as mentioned earlier in this guide.
- Skipping curing time or control joints: Let patches cure properly and create control joints to prevent cracking.
- Neglecting recurrent issues: If you’re seeing repeated failures, address underlying moisture or structural problems first.
Avoid these mistakes for a successful, lasting repair.
Scope, Cost Considerations, and When to Hire a Pro
Define repair scope by inspecting how much plaster and lath are affected, whether moisture or rot is present, and if re-keying plus mesh will suffice or full relath/replastering is needed. Material choices, access (scaffolding), containment needs, and any lead or mold remediation are the main cost drivers to factor into planning.
Use a practical decision framework: small, localized key failures with sound lath are often DIYable; structural rot, active water intrusion, or hazardous materials work usually requires licensed trades. If uncertain, document findings, check specialist qualifications and product labels, and consult a professional for a formal assessment before committing to large removals or structural repairs.
Cost and time drivers
The cost of repairing plaster key failure varies greatly depending on several factors.
Extent of damage is the biggest driver. A small crack might need just a simple re-keying, while widespread delamination could require extensive repair or even full replastering.
Material choices also impact cost. Plaster is typically cheaper than patching compounds but requires more skill to apply. Access and scaffolding needs can add significant labor costs if the area is hard to reach.
Time estimates depend on these factors too. A simple re-keying might take a day, while extensive repairs could stretch into weeks.
When to call a professional
While many plaster key failures can be tackled by DIY homeowners, there are times when it’s wise to call in the pros.
If you see widespread delamination, it could indicate a larger structural issue that requires assessment by a structural carpenter. Similarly, if there’s suspected wood-lath rot, professional evaluation is crucial to prevent further damage.
Other red flags include signs of hazardous materials like lead or mold. In these cases, you’ll need a specialist in mold/lead abatement. High-value finishes or complex framing might also warrant a professional touch.
Lastly, if the repair is extensive and affects load-bearing walls or structural elements, it’s wise to get an inspection from your local building department to ensure any work done is up to code.
Conclusion
Addressing plaster key failure on wood lath right now protects your walls from further damage, keeps moisture out, and keeps the finish looking tight and solid. Stay focused on safe testing, correct re-keying, and proper prep to avoid costly retries.
Do this in order: confirm the delamination by careful tapping and probing in a small test area, inspect the lath for loose or damaged spots, gather the required tools and materials, perform the re-keying as described, then add mesh only where indicated and follow the replastering sequence. Finish with a controlled cure and test the repair as you go. Safety first and test a small area before committing to larger sections.
Common mistakes to avoid include trying to force loose plaster back without securing the lath, over-wetting plaster, and skipping mesh when you have significant delamination or movement. Keep PPE on, work methodically, and check for any signs of movement after each step. If the project starts to creep beyond your plan or you feel unsure, call a professional rather than pushing ahead and risking bigger damage. Stay practical, stay patient, and you’ll finish strong.
FAQ
What are practical signs that plaster keys on wood lath have failed and need rekeying?
Look for loose or crumbling plaster, hairline cracks that run across multiple laths, and sections that slide or detach from the lath. A soft, hollow sound when tapping often means the keys aren’t holding. If you see bulging or sagging plaster, stop and inspect the lath behind it.
How do I rekey plaster on wood lath without full replastering?
Remove loose material and clean the edge surfaces. Use a compatible bonding coat and soft-key the plaster into the lath with light, even press, making sure the edges lock into place. Apply a couple of thin, firm coats rather than one thick layer, and allow each coat to set before the next.
When should I add metal mesh, and how do I install it for best results?
Add mesh when the plaster key is weak or there are wide cracks that won’t stop. Staple or embed the mesh into a bonding coat on the repaired area, overlapping the edges by at least a couple of inches. Blend the mesh into a new plaster layer so the wall stays cohesive and flat.
What materials should I use for re-keying and prep, and what should I check on labels?
Choose products labeled for plaster on wood lath and follow the manufacturer’s instructions for prep and bonding. Check the label for suitable substrate, working time, and cure guidance. If in doubt, compare options and pick the one that specifies plaster-on-lath compatibility and re-keying use.