
Introduction
Repairing plaster at wall-to-ceiling corners helps stop re-cracking at the joint.
The guide explains common causes of corner cracks and why proper technique matters for a durable finish.
You’ll learn practical steps, tips for prep and finish, and rules of thumb to keep corners stable over time.
Key takeaways
- Inspect crack width and moisture before selecting repair method at joint.
- Use fiberglass mesh tape for movement-prone corners to prevent re-cracking.
- Apply multi-layer plaster skim coat, feathering edges beyond joint carefully.
- Prime repaired corner after drying to seal dust and improve adhesion.
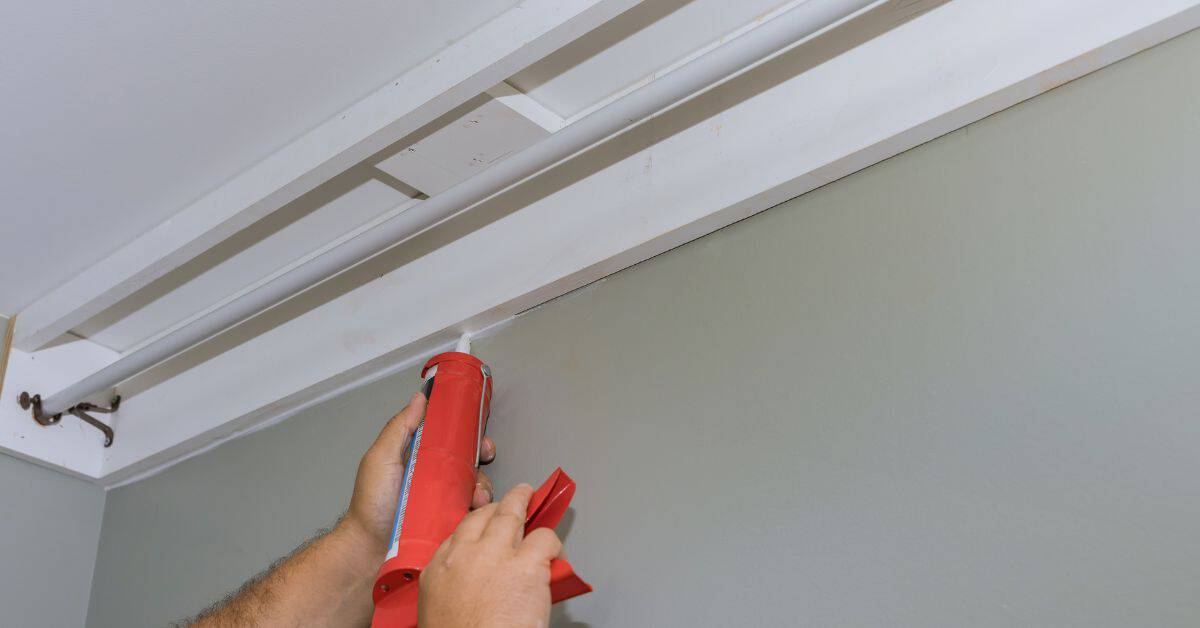
- Re-caulk joint with paintable acrylic caulk to allow movement over time.
- For severe cracks, consider reinforcing with backing plaster and joint compound.
Table of Contents
- Introduction
- Key takeaways
- Overview of wall-to-ceiling plaster cracks
- Tools and materials checklist
- Preparing the damaged corner for repair
- Choosing the right repair method for the joint
- Step-by-step repair procedures
- Techniques to prevent re-cracking at the joint
- Priming, finishing, and painting for a seamless result
- Post-repair maintenance and long-term prevention
- Common mistakes and troubleshooting
- DIY vs. hiring a professional: cost and decision guide
- Conclusion
- FAQ
Overview of wall-to-ceiling plaster cracks
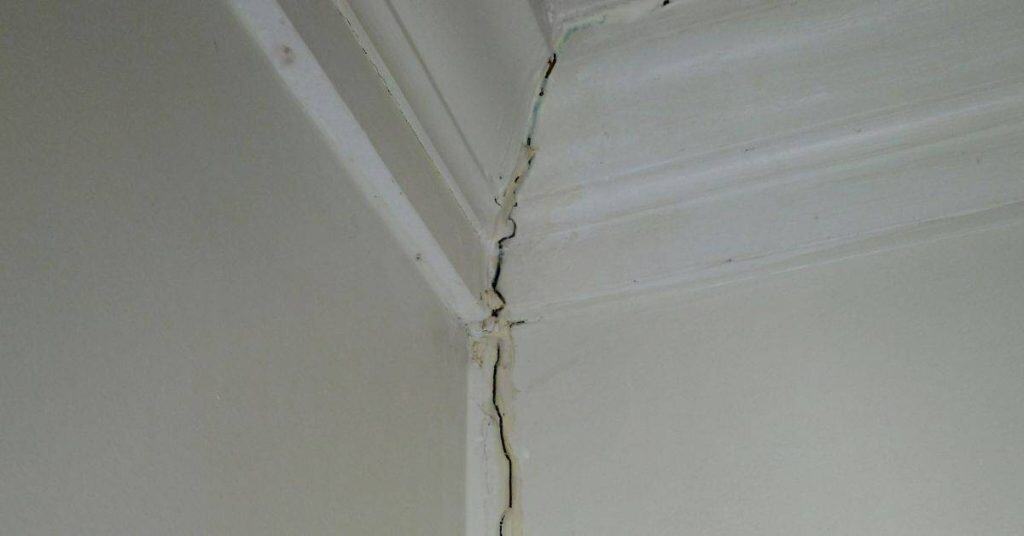
Wall-to-ceiling plaster cracks come in a few clear flavors that tell you where to steer a repair and plan your work pace. Most common are cosmetic hairline cracks, expansion or shrinkage gaps, diagonal or stepped cracks, and joints that bulge or separate, and recognizing them helps you gauge movement and moisture and what it means for safety. Knowing which type you have lets you pick a sane first repair and avoid wasting time on the wrong fix or over-repair.
These cracks form from settlement and structural movement, framing and drywall tweaks, moisture intrusion or humidity cycling, or imperfect initial joint treatment, and seasonal expansion can worsen them. Distinguish cosmetic from structural by size, pattern, location, changes over weeks, and whether the joint feels soft or deflects under touch, in corners and along ceilings where moisture tends to hide. Use a practical plan: assess substrate and joint condition, check whether tape or finish is failing, address moisture, choose compatible primer and patching materials, and decide if you can manage with DIY techniques or need professional help.
Common causes of corner cracks
Corners are where you’ll see most plaster cracks, and there’s usually a few reasons why. First off, settlement issues. If the ground under your house isn’t stable or if it settles over time, corners take the brunt of that movement.
Next up is thermal movement. Walls expand and contract with temperature changes, especially in corners where two walls meet. This can cause stress on the plaster, leading to cracks.
Poor workmanship or materials used during construction also play a role. If the original finish wasn’t done right, you’re setting yourself up for problems later down the line. Make sure to check base compaction and use quality materials when fixing these issues.
Vibration from heavy machinery near your home can shake things loose too. Keep an eye out if there’s construction happening nearby; it might be causing more than just noise.
When a crack is structural vs. cosmetic
Figuring out if a wall-to-ceiling plaster crack is just cosmetic or something more serious isn’t always easy, but it’s crucial for your safety and wallet. If the crack runs straight down from ceiling to floor and widens when you press on either end of the wall, that’s likely a structural issue. Also check if there are cracks in other parts of the house or if doors and windows stick suddenly—these could mean shifting foundations.
Cosmetic cracks usually appear after a big freeze or heat wave. They’re often small and don’t change over time. If you see hairline cracks that only show up at corners, it’s probably just plaster shrinking due to humidity changes. No need to panic if the crack is less than an inch wide and hasn’t grown in months.
When in doubt, call a pro. They can do tests like checking for base compaction or using moisture meters to see if there’s hidden water damage causing your cracks. DIY fixes won’t work on structural issues; you’ll just waste time and money. Better safe than sorry.
Tools and materials checklist
This section lists a complete tools and materials checklist for common wall repairs, covering spackle, drywall joint compound, quick-setting plaster, paper and fiberglass mesh tape, mesh reinforcements, and caulk or sealants, plus fasteners and safety gear. You’ll see recommended brands and types, plus approximate cost ranges so you can budget before you buy. Expect guidance on where each item fits, when to use each repair method, and how to mix or apply for solid, long‑lasting results.
Having the right mix of products and fasteners saves you from rework and weak fixes, especially at joints and wall‑to‑ceiling transitions. The list helps you plan prep work, masking, and cleanup, so you don’t scramble mid‑job or waste materials. It matters because choosing the wrong tape, using under‑ or over‑sized tooling, or skimping on PPE will cost you time, money, and a poor finish.
Essential hand and power tools
Use this checklist to ensure you have all the necessary tools before starting your concrete work. Missing a tool can lead to delays or poor quality.
- Putty knife set: Check for various sizes (2″, 4″, 6″). Confirm they are straight and sharp. Skip at risk of poor surface finish.
- Hawk: Ensure it is large enough to hold a full bag of mortar or concrete mix. Visually inspect for cracks or warping. Missing this can slow down your work significantly.
- Utility knife: Check blade sharpness and replace if dull. Test by cutting through tape easily. Skip at risk of damaging materials.
- Screw gun: Confirm it has a variety of bits (Phillips, flathead). Test with screws to ensure tight grip. Missing this can cause structural issues.
- Sanding block: Check for rough grit surface. Sand a small area to test effectiveness. Skip at risk of uneven surfaces.
- Corner trowel: Ensure it is sharp and straight. Test by pressing into concrete without leaving marks. Skip at risk of poor corner finishes.
Quick rule: Always have a backup tool for critical tasks to avoid delays.
Material options and price comparison
This checklist helps you compare costs and select the right materials for your drywall project. Use it when deciding between joint compound, setting-type plaster, flexible caulk, fiber tape, and ready-mixed spackle.
- Joint Compound: Check consistency; should spread easily without cracking. Confirm by applying a small test patch. Skip this and you risk cracks and uneven surfaces.
- Setting-Type Plaster: Verify quick drying time; should set in 10-20 minutes. Test with a sample application to ensure it adheres well. Omitting this test can lead to weak joints that may crumble.
- Flexible Caulk: Ensure it stretches without breaking when applied thinly between surfaces. Check by applying and stretching the caulk slightly. Skip checking flexibility, and you’ll have brittle seals prone to cracking.
- Fiber Tape: Confirm tape is strong enough to bridge gaps; should not tear easily. Pull on a small piece to test strength. If too weak, it won’t hold joints together properly.
- Ready-Mixed Spackle: Test for ease of application and drying time; should be smooth and dry within an hour. Apply a small amount to see how it performs. Skip this test, and you might end up with messy or slow-drying patches.
Quick rule: Always do a quick test application of each material before using extensively to avoid costly mistakes later on.
Safety gear and preparation supplies
Use this checklist before starting any concrete work to ensure you have everything needed for a safe and efficient job.
- Masks: Choose N95 masks. Confirm they fit snugly around the nose and mouth without gaps. Skip at your own risk; dust can cause respiratory issues.
- Eye protection: Wear safety goggles or a face shield. Check that there are no cracks or damage. Protecting eyes from debris is crucial to avoid injury.
- Drop cloths: Lay out tarps around the work area. Ensure they cover all surfaces and edges. Saves time cleaning up later; prevents concrete from damaging floors.
- Ladders/scaffolding: Inspect for stability and secure footing. Check that rungs are not slippery or broken. Improper setup can lead to falls and serious injury.
- Ventilation: Ensure adequate airflow in the work area. Open windows or use fans if necessary. Poor ventilation increases risk of breathing problems from dust.
- Hearing protection: Use earplugs or earmuffs during mixing and pouring. Confirm they fit snugly but comfortably. Noisy equipment can cause hearing damage over time.
- Work gloves: Wear durable gloves to protect hands from rough edges and chemicals. Check for proper fit without being too tight. Gloves prevent cuts, blisters, and chemical burns.
- Safety boots: Ensure they have steel toes and good traction. Test by walking on a slippery surface; should feel secure. Prevents foot injuries from dropped objects or uneven surfaces.
- First aid kit: Have it easily accessible with all necessary supplies. Check for bandages, antiseptic wipes, and splints. Avoid delays in treating minor injuries on site.
- Reflective vests: Wear if working near traffic or construction zones. Confirm they are visible from a distance. Increase visibility to prevent accidents with vehicles.
Quick rule: Always wear protective gear and set up safety measures before starting any concrete work.
Preparing the damaged corner for repair
Thorough prep is the foundation of a lasting corner repair, so start by cleaning the surface, removing loose plaster, feathering the edges, and controlling dust with proper barriers, drop cloths, and a HEPA-vacuum setup so debris never runs wild on the jobsite. Gently widen hairline cracks to admit adhesive and key the surface with a shallow V-groove, but stop before you compromise the lath or backing, because overzealous cutting invites more damage than it solves. Inspect moisture history, stabilize any loose lath, fill voids behind the joint, and plan for reinforcement if the lath shows significant deterioration to prevent future re-cracking or settlement.
This prep isn’t just about making the patch stick today; it creates a clean, ready bonding surface by vacuuming crevices and wiping with a damp cloth so bonding agents grip and cure properly for years. A solid stabilization plan—re-secure loose lath, address small gaps, and plan reinforcement if needed—saves you from costly callbacks and makes the repair more durable in the long run. Doing the prep right keeps the worksite safe, reduces dust exposure, and helps the repair withstand movement and moisture over time, so your DIY effort actually lasts as long as you expect.
Inspecting and stabilizing substrate
Before you start patching up that corner, take a good look at the lath and studs. Make sure everything is solid and secure. If any pieces are loose or wobbly, hammer in some screws to stabilize them. Don’t skimp on this step; it’s crucial for your repair job to last.
Check the ceiling framing too. Any sagging or movement can cause issues down the line. Use plaster washers if you need extra support—these little guys are great at holding things in place without damaging the lath. If you find any spots that feel unstable, reinforce them now before moving on to repairs.
Cleaning and creating a good bonding surface
Before you start patching, make sure the area is clean. Sweep away all dust and debris. If there’s any grease or oil from machinery, scrub it off with detergent and let it dry completely. Loose bits of concrete need to go too; they’ll just cause problems later.
If your substrate isn’t in great shape—like if it’s cracked or loose—you might want to use a bonding agent before you pour new concrete. This helps the repair stick better, but only use it as directed by the manufacturer. Don’t skip this step if needed; it could mean the difference between a good fix and another repair job.
Once everything is clean and dry, give your surface a quick once-over to make sure there are no hidden issues like cracks or soft spots. If you find any weak areas, address them now before moving on. A little extra work here can save you big headaches down the road.
Choosing the right repair method for the joint
Choosing the right repair method hinges on crack size, movement, and substrate condition, so you don’t waste time chasing the wrong fix. Tiny cracks with minimal or intermittent movement respond well to flexible fillers like spackle or caulk, which stay thin and paintable. For medium movement and cracking, tape plus joint compound provides better crack containment, while extensive or persistent movement calls for re-plastering or a skim-coat to get a stable, long-lasting finish.
Assess movement drivers, substrate condition, and moisture before you pick a method, and note any prior repairs that could complicate bonding. If you choose the wrong product, cracks can reopen, finishes can fail, and you’ll end up repainting sooner than you think. Watch for red flags like cracks widening after repair, moisture intrusion, or loose plaster—those mean you should escalate to re-plaster or bring in a professional.
Small and static hairline cracks (spackle)
For small, static hairline cracks in joints—cracks that don’t move with temperature changes or building settlement—you can use lightweight spackle. This method is quick but has its limits. Don’t use it for areas where the concrete moves a lot due to environmental factors.
Check base compaction before applying any patch, and make sure the crack isn’t part of a larger issue like shifting soil or poor foundation work. If you’re unsure about movement in your joint, consider consulting with a professional instead of risking future repairs.
Spackle is best for cosmetic fixes where structural integrity isn’t compromised. It won’t last long if applied to cracks that open and close over time due to temperature changes or settling. Use it wisely to avoid wasting materials on temporary solutions.
Movement-prone cracks (caulk and flexible sealants)
If you’ve got joints that move, forget about spackle. You need a flexible caulk. Look for silicone or polyurethane types; they stretch with the concrete without cracking. Don’t go cheap on this—good quality is worth it.
Preparation matters here: clean out the joint, making sure no debris blocks the sealant from bonding properly. Use a wire brush and vacuum to get it spotless. Also, check base compaction; if the ground shifts, your repair won’t last.
Painting over caulk can be tricky. Most flexible sealants are paintable, but you might need a primer first. Test a small area before going full-scale. And remember, don’t use regular spackle or joint compound for moving cracks—it’ll just crack and fail sooner than later.
Tape-and-compound vs. full plaster patch
When it comes to repairing joints, you’ve got two main options: tape and compound for smaller jobs, or a full plaster patch for bigger issues. Tape and joint compound is quick and easy but works best on small cracks that aren’t moving much. For larger areas or where the crack is shifting, go with a full plaster patch.
For tape-and-compound, you’ll need fiber tape to reinforce the area before applying several thin layers of joint compound. This method is good for hairline cracks but won’t hold up if there’s ongoing movement in the concrete. Make sure the base is solid and compacted well before starting.
A full plaster patch, on the other hand, involves cutting out damaged sections and rebuilding them with fresh plaster or mortar. This method takes more time and effort but gives you a stronger repair that can handle movement better. Use this approach if your crack is wide or runs through an area prone to shifting.
Step-by-step repair procedures
We’ll walk you through clear, numbered repair steps for three common crack fixes: hairline spackle, tape-and-compound, and re-plastering large cracks. Each method includes prep, the technique, and finishing steps. Follow the flow to decide which method fits crack width, moisture, and movement.
These procedures save time and prevent repeat cracks by addressing moisture, edge detailing, and proper curing. Good prep and patience keep paint matching and reduce touch-ups. Skip steps and you’ll chase cracks for years.
Step-by-Step Repair Process
This sequence will walk you through repairing a concrete surface, ensuring it’s done right and safely.
- Action: Clean the area thoroughly with water and detergent. Reason: Removes dirt and debris that can weaken bond between old and new concrete. Check: Surface feels dry and clean to touch, no loose particles. Professional Help: If surface is too damaged or has deep cracks, call a pro.
- Action: Apply a bonding agent according to the manufacturer’s instructions. Reason: Ensures new concrete adheres well to old surfaces. Check: Surface should be slightly tacky but not wet. Wait as per product label before applying new concrete.
- Action: Mix fresh concrete in a clean container, following the water-to-cement ratio on the bag. Reason: Proper mix ensures strength and durability of repair. Check: Concrete should be workable but not too runny; it should hold its shape when placed.
- Action: Trowel or float the concrete to level and smooth out any imperfections. Reason: Achieves a uniform surface that matches existing concrete. Check: Surface is even, with no visible gaps or high spots. If unsure about leveling, call in an expert.
- Action: Cure the repaired area by keeping it moist for at least 7 days using plastic sheeting or a curing compound. Reason: Ensures concrete reaches full strength and durability. Check: Surface should be firm to touch but still slightly damp under cover.
- Action: Test for moisture and cracks after curing; if dampness or new cracks appear, reassess moisture sources (like leaks) and consult a pro before painting. Reason: Hidden moisture or movement can undermine the repair. Check: No new movement in 72 hours of cure; if present, stop and seek guidance.
Pro tip: Use a hair dryer on low heat to speed up drying times if weather conditions are poor, ensuring the repair process stays on schedule. For safety, keep electrical devices away from damp areas and follow manufacturer safety instructions. Do not use open flame or high heat near curing materials.
Hairline spackle repair — quick method
For hairline cracks, you don’t need to dig deep. Just a quick skim coat will do. Start by cleaning the area with a wire brush and a damp sponge. Let it dry completely before moving on.
Fill in thin. Use spackle or joint compound for corners. Press it in firmly but keep it thin—no thicker than your pinky nail. For straight walls, use a putty knife; for corners, get a corner trowel. Smooth out any ridges as you go.
Once the repair is smooth and dry, give it a light sand with 220-grit paper. Wipe down the area to remove dust. Then prime and paint over it right away. Match your existing color or blend in with a slightly lighter shade for a natural look.
Safety and finish notes: Wear a dust mask when sanding. Use proper ventilation if using solvent-based primers or paints. Ensure the patch is fully dry before priming to minimize paint peeling.
Tape-and-compound for recurring cracks
When dealing with cracks that keep coming back, you need to do more than just spackle. Start by checking base compaction. If the ground isn’t stable, no amount of patching will fix it long-term. Once you’re sure the foundation is solid, choose your tape: paper or mesh. Mesh tape holds better over time but can be trickier to work with than paper tape.
To feather out compound properly, apply thin layers and sand between coats until the repair blends in seamlessly. Don’t rush this step; it’s where you make or break the job. If you’re working on corners, use a corner tool to get clean lines without leaving gaps.
Remember, multiple light coats are better than one thick coat. Thick compound can crack easily under stress. Sand each layer smooth and check for any low spots before applying the next coat. This method ensures durability and a professional finish that lasts.
Additional considerations: Work in a well-ventilated area; wear a mask when sanding or applying dust-heavy coats. Use a damp sponge to wipe between coats to minimize dust build-up. If you have textured walls, feather edges carefully to avoid flat spots. For moisture-prone areas, address humidity and leaks before finishing with primer and paint.
Re-plastering and patching major damage
When it comes to fixing big holes in your concrete, you’re looking at a three-step process: the scratch coat, brown coat, and finish coat. Start by mixing up your plaster with sand for that scratch coat. Use a trowel or float to create ridges on the surface; this helps the next layer stick better. Let it cure for 24 hours before moving on.
Next up is the brown coat. This one’s about filling in those ridges and smoothing things out. Make sure you blend it well with the scratch coat, but don’t overwork it or you’ll lose that texture. Again, give it a full day to set before tackling the finish coat.
The finish coat is all about getting that smooth surface back. Use a steel trowel and work in small sections. Pay attention to blending edges with existing textures; this will make your repair look seamless. Remember, curing takes time—let everything sit for at least 7 days before you think about painting or sealing.
Techniques to prevent re-cracking at the joint
Joints crack when the wall moves, moisture swells or shrinks materials, and different substrates fight each other, so you need a plan. To prevent re-cracking, focus on movement accommodation: set allowable gaps (about 1/16 to 1/8 inch where practical), use flexible compounds, and stage work so a little shaft movement can occur without stressing the joint; choose the right beads or mesh to maintain a continuous contour and avoid sharp corners that act as stress risers. Apply the compound in stages—backer first, then skim, then feather—so you avoid a stiff layer that will crack later, and make sure each layer cures properly before the next goes on.
Fastening and substrate prep matter as much as the mud. Use proper mechanical fasteners, correct screw types and spacing, and clean, solid surfaces to minimize pull‑out and adhesive failure at the wall‑to‑ceiling joint; control joints should be added or maintained where movement is expected. Flexible beads (foam or vinyl) beat rigid corner beads for absorption of movement, while the right mixing, curing, and finishing keep the joint looking smooth and crack‑free, and a quick post‑cure test helps flag weak spots before painting.
Installing corner beads and reinforcement
When it comes to preventing re-cracking at joints, installing the right corner bead is crucial. Metal corner beads are your go-to for strength and durability, but plastic or paper-faced options can work if you’re dealing with a lighter load. The key here is proper fastening. Make sure the bead is securely embedded in the concrete without any gaps.
Check base compaction before installing beads to ensure your foundation is solid and won’t shift under pressure. This step might seem small, but it’s a big deal for long-term stability. Also, avoid over-tightening screws or nails; they should be snug but not so tight that you risk damaging the bead.
Making sure your reinforcement—like mesh or rebar—is properly placed and tied to the corner beads is another critical step. This setup helps distribute stress evenly across the concrete slab, reducing the chance of cracks forming at joints later on.
Allowing for movement and thermal expansion
When pouring concrete, you gotta leave room for it to move. Use flexible sealants around the edges where your slab meets walls or other structures. Don’t skimp on this step; a good sealant will keep water out and let the concrete expand without cracking.
Also, make sure to cut control joints at regular intervals across your slab. These joints should be placed based on the thickness of your slab and local climate conditions. A rule of thumb is one joint for every 15 feet in hot climates or where there’s a lot of expansion potential. This helps isolate sections so they can move independently without causing major cracks.
Remember, when you’re pouring concrete, check base compaction. If the ground isn’t solid and level, your slab will settle unevenly over time, leading to cracks. Take a few minutes extra to get this right; it’s worth it in the long run.
Best practices for layering compound and drying
To prevent re-cracking, focus on applying thin coats of your repair compound. A thick coat is a weak coat, so spread it out in layers no more than 1/8 inch thick at a time. Let each layer dry completely before adding another.
Drying times vary based on weather and humidity, but generally allow at least 24 hours between coats. Check the base compaction to ensure your repair area is stable and won’t shift as you work.
Avoid over-sanding which can weaken the bond of your repair. Sand only when necessary for a smooth finish, and never sand down to bare concrete unless it’s part of your prep steps before applying compound.
Priming, finishing, and painting for a seamless result
Primers must be chosen for repaired plaster at joints, with enough coverage to seal porous edges and prevent edge telegraphing. Use texture-matching techniques and the right paint sheen to feather repairs and keep corners clean, with masking and careful edging to avoid trench lines. Follow a straight finish sequence: primer, skim/finish coat, then additional coats, with light sanding between coats.
This matters because you only get one shot to hide repair lines in corners and achieve a seamless look. Proper prep and testing on a hidden patch helps you match color and texture before the final coat, saving time and preventing rework, especially when aiming for a uniform field and a straight, invisible edge along the seam.
Primers and adhesion promoters
When it comes to priming, you’ve got two main types: regular primer for smooth surfaces like gypsum board, and bonding primers or PVA (polyvinyl acetate) for rougher stuff like plaster. Check base compaction before applying any primer; loose material won’t hold paint well.
For gypsum board, a standard oil-based primer does the trick. It seals the surface and gives you a solid base to work with. But if your walls are made of plaster or have rough patches, reach for a bonding primer or PVA. These stick better to porous surfaces and give you a smoother finish.
Remember, no matter what kind of primer you use, it’s crucial that the surface is clean and dry before applying. Don’t rush this step; it’ll save you headaches down the line when painting.
Matching texture and color at the corner
To match textures and colors at corners, start by checking that both sides of the corner are evenly primed. If one side is darker or has a different sheen, you’ll have trouble blending. Use a small roller or brush to touch up any uneven areas before painting.
For eggshell finishes, feather out edges with a drywall knife and light pressure on the paintbrush. For knockdown textures, lightly drag your finger over the wet paint to mimic existing patterns. Smooth finishes need careful masking around corners to avoid lines.
Blend colors by starting at the corner where both walls meet and work outward in thin layers. Use a slightly lighter shade for one side and darker on the other if needed. This helps hide any slight differences in texture or color once dried.
Final inspection checklist
Use this checklist after priming and painting to ensure your repair blends seamlessly with the existing surface.
- Joint depth check: Ensure joints are at least 1/4 inch deep. Use a ruler to measure. Skip this, and water may seep in causing damage.
- Surface texture match: Compare the repaired area with the surrounding surface for consistency. Run your hand over both areas to feel any differences. Mismatched textures stand out like a sore thumb.
- Color uniformity: Look at the repair from several angles under natural light to check color match. Refer back to earlier sections on matching texture and color if needed. Inconsistent colors draw attention and look unprofessional.
- Seamless transition: Inspect where the repair meets existing surfaces for smooth transitions. Look closely at corners and edges. A poorly done seam can ruin an otherwise good job.
- No visible cracks: Examine repaired areas for any hairline cracks that could compromise integrity. Use a magnifying glass if necessary. Catching these early saves future headaches.
- Proper primer coverage: Confirm the primer is evenly applied and covers all repair surfaces. Dampen your finger to test adhesion; it should stick without lifting off paint or primer. Inadequate priming means poor bonding and potential peeling later on.
- No gaps around edges: Check for any gaps between the repaired area and adjacent surfaces, especially at corners. Use a straight edge to find irregularities. Gaps can trap moisture leading to further damage.
- Dry time compliance: Ensure all materials have dried according to manufacturer’s instructions before applying final coats or sealing. Skipping this step leads to poor adhesion and potential failure of the repair.
Quick rule: If you can’t see it, feel it, or measure it, don’t call it done.
Post-repair maintenance and long-term prevention
Keep a clear post-repair monitoring plan that defines who checks the joint, how often, what to look for, and how to record it. Include a simple photo log and a checklist to record dates, observations, maintenance performed, and any changes in texture or crack width. Pair this with seasonal checks, humidity targets, and a practical re-sealing plan to stop cracks from returning and to catch problems before they spread.
Do this every year and before and after heating or cooling seasons, and after heavy rain or seismic events. It matters because movement, moisture, and hidden structural flaws drive re-cracking, so catching them early saves time, money, and a lot of frustration. A clear routine helps you spot hairline widening, tape or caulk failures, flaking paint, or new water stains, and it outlines a materials list, re-sealing schedule with flexible caulk, and when to call in a pro.
Routine checks and minor touch-ups
After repairs, it’s crucial to keep an eye on your concrete corners every three months. Look for signs of wear like cracks or chips. If you spot small shrinkage cracks, don’t ignore them; they can grow into bigger issues if left unchecked.
To handle minor touch-ups, start by cleaning the area around the crack with a wire brush and water to remove loose debris and dirt. Once clean, apply a concrete patch compound that matches your existing surface color. Smooth it out evenly and let it cure according to the manufacturer’s instructions. This quick fix can prevent bigger repair jobs down the line.
When to investigate underlying structural problems
If you notice cracks wider than 1/4 inch in your foundation walls, it’s time to call a professional. Also look for doors and windows that won’t close properly or floors that slope significantly. These are signs of bigger issues like uneven settling.
Water damage can also signal major problems if you see wet spots on ceilings or walls after heavy rain, especially if they persist days later. Check your roof for missing shingles and damaged flashing to prevent leaks.
Ignoring these signs could lead to costly repairs down the line. Don’t wait until things get worse—act now by hiring a structural engineer who can assess whether you need more than just cosmetic fixes.
Common mistakes and troubleshooting
Common mistakes at wall-to-ceiling joints show up as re-cracks, ridges, and popping paint, and they mostly come from overfill, improper substrate prep, material mismatch, or insufficient cure time. Fixes start with disciplined prep, proper tapes or netting, and using flexible bonding methods, plus a repeatable repair sequence that addresses movement and feathering to hide edges. Keep in mind that choosing plaster, joint compound, or flexible sealants matters—wrong combo stiffens the joint and wrecks adhesion, so adjust materials before you lay a skim coat.
This matters on a DIY job because a small misstep multiplies into visible flaws that peel or telegraph through finish coats, wasting time and money. Use a clear, repeatable workflow: score and abrade the joint, re-tape or add backing, apply a bonded skim coat with proper feathering, then cure, prime, and seal to reduce edge telegraphing and texture ridges. Quick fixes exist for overfill (sand flush and re-scratch) and ridges (re-sand and skim in thin passes), but you should also re-evaluate substrate and movement before declaring a repair complete.
Fixing a repair that re-cracked
If your concrete crack repair has come back, it’s time to dig deeper. First off, don’t just slap on more compound. That’ll just hide the problem for now and make things worse later.
The main culprits are usually poor base compaction or movement from nearby structures like trees or buildings. Start by removing all old repair material completely. Then, check base compaction to ensure it’s solid before you pour new concrete in the area.
If you suspect tree roots or building settlement is causing the issue, consider consulting a professional for advice on how to address these movement sources properly. Ignoring them means your repair will keep failing.
Avoiding visible seams and sanding pitfalls
These mistakes can ruin your concrete finish, so watch out for them.
- Inconsistent Sanding Grades: Using abrasive grades that are too coarse or skipping steps can leave marks. Stick to a gradual progression from rough to fine grits.
- Over-Sanding Edges: Too much sanding at the edges creates visible dips and weak spots. Feather out gently without overworking any one area.
- Poor Seam Alignment: Seams that don’t line up straight stand out like a sore thumb. Use stakes or string lines to keep seams perfectly aligned.
- Ignoring Low Spots: Failing to fill in low spots before sanding leaves visible imperfections. Always check and level the surface first.
Double-check your work on these points to avoid common pitfalls and achieve a smooth, professional finish.
DIY vs. hiring a professional: cost and decision guide
This guide helps you decide DIY vs hiring a pro with a simple cost and decision framework. Use crack severity (hairline vs spreading), changes in joint alignment, moisture, and access around high ceilings to pick the method. It shows when caulk or spackle suffices and when plaster repair, mesh reinforcement, or joint-skim is needed, plus sample DIY and pro cost ranges.
Expect a practical decision flow you can follow, and a quick quote checklist to gather scope, photos, and access issues. It matters because wrong moves can re-crack or fail moisture remediation, and safety is critical on ladders near electricals. You’ll get a DIY plan with a materials list and timeline, or a pro package with inspection, moisture assessment, and guarantee terms.
- Decision flow at a glance: Use this quick rubric to decide DIY vs. pro escalation.
- Crack width: hairline (<1/16 in) or single hairline cracks often DIY; cracks wider than 1/8 in or spreading require professional assessment.
- Span and reach: joint at ceiling line (high or hard-to-reach) increases risk; if you cannot safely access the joint with standard ladders, consider pro help or scaffold.
- Moisture indicators: any dampness, staining, or efflorescence means you should test moisture first and likely escalate to a pro for remediation and joint restoration.
- Joint movement: any visible offset, rotation, or repeating re-crack after repair indicates structural or framing issues that merit a professional evaluation.
- Material and finish: plaster-style finishes or decorative joints with embedding mesh require specialized technique; simpler spackle/caulk repairs are more DIY-friendly.
- Safety and access: if you’re uncomfortable on ladders, working near electricals, or handling wet plaster, choose professional service for safety and guarantees.
For a structured choice, follow this escalation matrix before committing: start with a DIY repair if cracks are hairline, dry, and the joint shows no movement; escalate to pro if any moisture is present, cracks widen, movement is detected, or you cannot safely reach the area. If you’re unsure after inspecting the site, err on the side of protection and obtain a professional assessment before purchasing materials.
Cost estimate examples and time investment
When it comes to corner repairs, the costs can vary widely depending on whether you go DIY or hire a professional. For materials alone, expect to spend around $50-$200 for low to high ranges, including concrete mix, rebar, and sealants. Tools like a tamper and trowel will add another $100 if you don’t already own them.
Hiring a contractor can cost anywhere from $300 to over $1000+ for labor alone, depending on the complexity of the job and your location. They’ll factor in their hourly rate plus materials, so it’s not just about who does the work but also what they bring to the table.
Time-wise, DIY projects can take a day or two if you’re prepared and have all tools ready. Professionals might finish quicker due to experience but will likely charge for setup and cleanup time too. Before starting any project, check base compaction and ensure your site is level to avoid future issues.
Choosing the right professional
When you’re looking to hire a pro for your concrete work, start by checking their references and past projects. Look at their portfolio online or ask for photos of recent jobs. If they’re good, they’ll have no problem showing off their work.
For plasterers and drywall contractors, ensure they have experience with the type of finish you want. A smooth, professional look takes skill and practice. Don’t settle for amateurs who promise quick fixes but lack the know-how to do it right.
If your project involves structural changes or complex concrete work, like pouring a new foundation, get an engineer involved. They can assess if the ground is stable enough with checks like base compaction and soil tests. Cutting corners here could mean big headaches down the line—like cracks in walls or uneven floors.

Conclusion
Fixing wall-to-ceiling cracks is about solid joints, steady prep, and finishing with care so the crack stays away and the room looks right. Prioritize safety, control dust, and test your approach in a small area before you commit to the whole corner.
Before you start, think through the work in practical steps: inspect the joint for movement, gather the right repair method and tools, clean and prep the surface, apply material with even pressure, let it cure, prime and paint, and finally monitor for any signs of movement or new cracking. Do each step in order, work steadily, and keep edges clean so you don’t trap dust or debris under the repair. Always test a small patch first to verify adhesion and finish before proceeding.
A few common mistakes to avoid are using the wrong product for joint movement, skipping proper surface preparation, and rushing the cure or paint layers. Safety first means cutting with the right eye protection and masks, securing any loose plaster, and never forcing material into a cracked joint. If movement continues after two repair attempts, or you’re unsure about the rate of movement, consider calling a professional rather than chasing a temporary fix.
When to call in a pro: persistent or large cracks, signs of structural movement, or if you’re unsure about the method and safety of the repair. If you decide to proceed, stay methodical, document your steps, and finish with a solid primer and coat for a durable, seamless result. You’ve got this—steady hands, a clear plan, and a solid finish are within reach.
FAQ
What causes plaster cracks at wall-to-ceiling corners?
Movement settles over time. Temperature changes and improper corner beads can also crack plaster at the joint.
How can I prevent re-cracking after fixing the corner?
Use a proper corner bead or control joint. Patch with multiple thin coats and keep your speed steady so the plaster cures evenly.
What is the best way to repair a crack at the joint?
Remove loose material. Apply a bonding agent, then fill with plaster or joint compound in thin layers, troweling smooth. Let each coat dry before the next one.
Should I remove and replace the entire corner bead?
If the bead is bent or corroded, yes. A sound bead gives you a clean, solid edge that resists future cracks.