

Introduction
Embarking on a DIY plaster reinforcement project? Understanding the timeline is crucial for successful results. Reinforcing plaster at material transitions involves careful planning and execution, with each step building upon the last.
To avoid common mistakes and ensure your finished surfaces don’t telegraph through, follow this comprehensive step-by-step timeline tailored to your specific transition needs.
For the full guide, see Reinforcing Plaster at Material Transitions: Mesh Choices That Don’t Telegraphed Through.
The Complete Timeline for Reinforcing Plaster at Material Transitions
From surface preparation to final finishing, here’s a detailed breakdown of the process with estimated timeframes:
- Surface Preparation (1-3 days): Inspect and clean substrates, chase out any imperfections, and apply primer. This step ensures optimal adhesion for your reinforcement mesh.
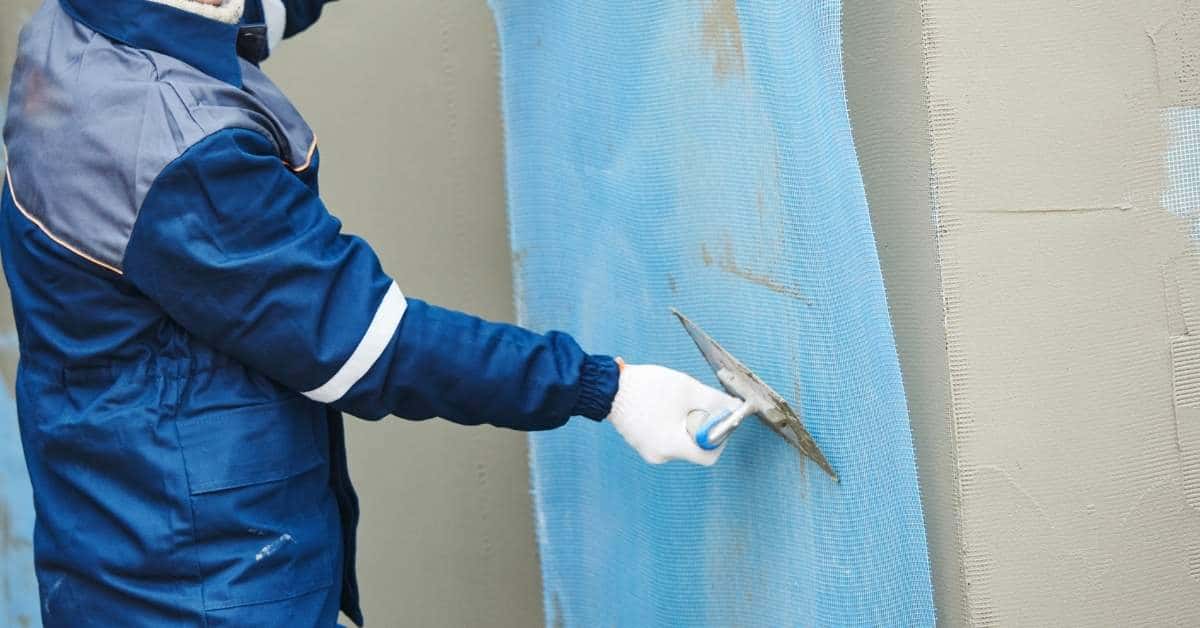
- Mesh Selection & Cutting (0.5-2 hours): Choose the right mesh type based on substrate, movement, and expected crack patterns. Cut the mesh to size, allowing for overlaps at transitions.
- Mesh Installation (1-3 days): Apply the mesh, embedding it flush with the plaster surface. Ensure it sits in the correct plane and overlaps adjacent layers properly. Allow for drying time between coats if using a multi-coat system.
- Plaster Application & Finishing (2-7 days): Mix and apply your chosen plaster type, feathering it over the edges of the mesh to avoid sharp lines. Smooth and finish the surface according to manufacturer guidelines, allowing for proper curing times between coats.
- Final Inspection & Touch-ups (0.5-2 hours): Once fully cured, inspect your work for any telegraphing or imperfections. Make touch-ups as needed before moving on to painting or other final finishes.
Total estimated time: 4 to 14 days, depending on project size, plaster type, and weather conditions.
Key takeaways
The timeline for reinforcing plaster at material transitions is influenced by the preparation of substrates. Thoroughly chasing and priming transition substrates before applying reinforcement can add an extra day or two to your overall schedule but ensures better adhesion and longevity.
- Choose mesh type based on substrate, movement, and expected crack patterns.
- Embed mesh flush with plaster to prevent telegraphing through finished surfaces.
- Avoid metal mesh in damp zones unless properly corrosion-guarded and isolated.
- Use jointed or fleece-reinforced meshes for transitions between masonry and drywall.
- Thoroughly chase and prime transition substrates before applying reinforcement.
- Safety: wear gloves, eye protection, and follow local code and manufacturer instructions.
Table of Contents
- Introduction
- Key takeaways
- Why Plaster Telegraphs at Material Transitions
- Types of Reinforcing Mesh and Their Properties
- Choosing the Right Mesh for Specific Material Transitions
- Application Methods at Material Transitions
- Tools and Materials Checklist
- Smoothing, Finishing, and Visual Checkpoints to Ensure no Telegraphing
- Safety, Handling, and Material Standards
- Cost Comparison, DIY Planning Checklist, and Common Mistakes to Avoid
- Conclusion
- FAQ
Why Plaster Telegraphs at Material Transitions
At every junction between different materials the key driver is differential movement: materials expand, contract, and shift by different amounts as moisture and temperature change. When two substrates move independently, that relative displacement concentrates stress at the joint and forces thin plaster skins to flex or crack along the weakest path.
Substrate stiffness contrast makes things worse; a rigid substrate next to a flexible one channels strains into a narrow line where the materials meet, producing hairline cracks, shadow lines, or embossed texture that track the underlying joint. Poor adhesion—surface contamination, variable moisture content, or wrong bonding method—lets micro-movements break the bond so those movements show as telegraphed lines, especially where reinforcement is missing or undersized.
Common causes of telegraphing
Plaster telegraphs due to various reasons. Let’s dive into the common culprits.
Substrate movement: Different materials expand and contract at varying rates. When they meet, this differential movement can cause plaster to crack or show underlying joints.
Improper substrate prep: Inadequate cleaning, priming, or sanding of the substrate can lead to poor adhesion, allowing movement to transfer through to the plaster.
Incompatible materials: Using incompatible materials at transitions, like applying plaster directly over a metal surface without proper preparation, can cause telegraphing due to differing properties and behaviors.
Inadequate joint details: Poorly designed or executed joints between different materials allow movement to transfer through, leading to visible lines or cracks in the plaster.
How movement and stiffness differences produce defects
Transitions between rigid and flexible substrates are high-risk zones for telegraphing. Here’s why:
Rigid to flexible transitions: When plaster meets a more flexible material, like drywall or lath, the rigid plaster wants to move less than the flexible substrate. This tension causes cracks or lines to appear at the transition.
Flexible to rigid transitions: Conversely, when plaster meets a more rigid material, like concrete or masonry, the flexible plaster wants to move more than the rigid substrate. This mismatch also results in visible defects.
Material transitions between wood, metal, and masonry are particularly vulnerable due to their contrasting stiffnesses and movement behaviors.
Early visual and tactile checkpoints
Spot telegraphing before it becomes a major issue with this simple checklist. Use it when inspecting newly plastered surfaces or existing ones showing early signs of trouble.
- Surface sheen: Check for areas where the plaster’s sheen is different from surrounding areas. This could indicate underlying movement.
- Hairline cracking: Look for fine, hairline cracks at material transitions. These can widen over time if not addressed.
- Shadow lines: Inspect for dark or light lines that follow the edges of adjacent materials. These often indicate poor adhesion or movement.
- Texture changes: Feel for any areas where the plaster’s texture is different from nearby surfaces. This could signify underlying issues.
- Joints and corners: Pay extra attention to joints, corners, and other high-stress areas. These are common places for telegraphing to start.
- Moisture content: Check for any signs of moisture, like dampness or efflorescence. This can affect adhesion and cause movement-related issues.
- Substrate condition: Inspect the substrate itself for any cracks, gaps, or other defects that could transfer through to the plaster.
- Lighting effects: Observe how lighting affects the appearance of the plaster at material transitions. Changes in appearance can indicate underlying movement.
Quick rule: If you notice any of these signs, don’t wait – address the issue promptly to prevent it from worsening over time.
Types of Reinforcing Mesh and Their Properties
Mesh choices fall into distinct families—alkali-resistant fiberglass, metal lath, woven scrim, and synthetic geotextiles—each with different flexibility, longevity, and plaster compatibility. Some are stiff and strong for heavy-duty ties; others are softer to accommodate movement and minimize ridging at transitions.
For transition zones consider how each handles movement, edge detailing, and exposure to moisture or alkaline mixes; installation method (embedded versus surface) changes performance and failure modes. Check product data sheets and verify compatibility with your plaster system, then plan overlaps, fastener patterns, and where to encase the mesh rather than lay it on top.
Alkali-resistant fiberglass and scrim meshes
Alkali-resistant (AR) fiberglass mesh is a popular choice for plaster reinforcement due to its durability, flexibility, and compatibility with common plasters. It’s made from glass fibers treated with a coating that resists alkali attack from cement-based plasters.
Durability: AR fiberglass mesh holds up well against moisture and water exposure. Its resistance to alkali deterioration makes it suitable for use in both cement and gypsum plasters. However, it’s not as tear-resistant as metal lath or some synthetic meshes.
Flexibility and Plaster Compatibility: AR fiberglass mesh is flexible enough to accommodate minor substrate movements without cracking the plaster. It can be embedded within the plaster for a seamless finish or secured over the surface with fasteners spaced 6-8 inches apart. For best results, use 1/2 inch or 3/4 inch mesh size.
AR fiberglass mesh performs well in transition zones where some movement is expected. It’s ideal for corners, edges, and joints due to its flexibility. However, it may not be the best choice for heavy render transitions or areas with high risk of impact damage.
Metal lath and expanded metal options
Metal lath is a traditional reinforcement option, typically made from galvanized steel. It’s preferred for heavy render or masonry transitions due to its stiffness and mechanical fixing capabilities.
Durability and Stiffness: Metal lath is highly durable and resistant to moisture and water exposure. Its stiffness helps distribute loads evenly across the plaster surface, reducing the risk of cracking. However, it’s less flexible than other mesh types, which can lead to cracking if not installed properly.
Expanded metal options offer similar benefits but with a lighter weight and more open design. They’re suitable for areas where ventilation is important or where a lighter, more breathable reinforcement is needed.
Fixing and Corrosion Considerations: Metal lath requires mechanical fixing using nails or screws spaced 4-6 inches apart. It’s important to use corrosion-resistant fasteners in areas exposed to moisture. Also, consider the risk of rusting over time, especially in humid environments. To mitigate this, use galvanized or stainless steel lath and ensure it’s properly encapsulated within the plaster.
Synthetic and polymer meshes
Synthetic and polymer meshes, such as polypropylene (PP) or polyester (PET), offer a balance between durability, flexibility, and breathability. They’re often used in moisture-prone areas or where some substrate movement is expected.
Durability and Flexibility: These meshes are resistant to moisture and water exposure but may not perform as well under high heat or direct sunlight. They’re flexible enough to accommodate minor movements without cracking the plaster, making them suitable for corners, edges, and joints. However, they may not be as durable as metal lath in heavy render transitions.
Some synthetic meshes are coated with a layer of plastic or resin to improve adhesion and alkali resistance. These options can be useful in areas where breathability is important but may have reduced flexibility compared to uncoated meshes.
Breathability and Adhesion Trade-offs: Synthetic meshes allow for better ventilation, which can help prevent moisture buildup behind the plaster. However, this breathability can also make them more susceptible to delamination if not properly adhered or encapsulated within the plaster. To ensure good adhesion, use a suitable bonding agent and secure the mesh with fasteners spaced 6-8 inches apart.
Choosing the Right Mesh for Specific Material Transitions
Pick mesh by matching the two substrates and the forces they’ll experience: wood assemblies with seasonal moisture swing need different reinforcement than masonry or gypsumboard transitions. Identify likely movement drivers—moisture cycling, thermal expansion, or structural deflection—and use that to prioritize strength versus flexibility when selecting mesh.
Prepare substrates to ensure adhesion: clean, profile, and use primers or bonding agents that the manufacturer recommends for both mesh and plaster. Follow recommended embedment depth, overlap, and fastening patterns for your chosen mesh and document expected failure modes so you can choose a mesh that mitigates those specific risks.
Wood, Timber Framing, or Plywood Transitions
When plaster meets wood, you’re dealing with a flexible substrate. Choose meshes that can move with it.
Fiberglass mesh is a good choice here. It’s flexible yet strong, and won’t rust like metal. Use 1/2″ or 3/4″ mesh size for best results.
Moisture’s a concern with wood. Apply a moisture barrier primer before meshing to prevent issues later on. Fasten the mesh using galvanized staples or nails, spacing them 6″-8″ apart.
For timber framing, consider using expanded metal lath. It’s rigid enough for timber’s strength but flexible enough to handle movement. Follow the same moisture barrier and fastening guidelines as above.
Masonry, Concrete, and Block Joins
For heavy, rigid substrates like masonry or concrete, you need a robust mesh. Metal lath is your best bet here – it’s strong and can handle the weight.
Thermal expansion and moisture transport are key concerns. Use expanded metal lath with 1/2″ or 3/4″ openings to allow for some movement and moisture evaporation.
Before meshing, ensure your substrate is clean and sound. Remove any loose material and apply a bonding agent to improve adhesion. Fasten the mesh using galvanized nails, spacing them 4″-6″ apart.
For concrete blocks, consider using welded wire fabric. It’s strong and can handle the block’s weight. Follow the same substrate prep and fastening guidelines as above.
Drywall, Plasterboard, and Gypsum Interfaces
When plaster meets drywall, use a mesh that can integrate seamlessly. Fiberglass scrim tape is ideal here – it’s flexible, strong, and won’t rust.
Apply the tape to the joint, embedding it into the plaster for a solid bond. Use a joint compound that matches your plaster’s base for best results.
For high-movement joints, consider using fabric netting. It’s flexible and can handle movement better than other meshes. Apply it in the same way as scrim tape.
Regardless of mesh choice, ensure your drywall surface is clean, smooth, and primed before applying. This will help prevent telegraphing and improve long-term performance.
Application Methods at Material Transitions
Decide whether to embed mesh in a basecoat or apply it over the surface based on substrate condition and expected movement; embedding generally gives better crack-bridging, while surface application can be useful for thin repairs. Proper overlap, alignment, and feathering reduce sharp edges that show through the finish and help transfers loads away from the joint.
Use backing or stop beads where you need a straight termination or support for thin edges, and follow a clear sequence: prep, primer where needed, basecoat, embed mesh, second coat, then final finish. Do routine quality checks—no air pockets, uniform thickness, and secure adhesion—and watch for common errors like over-wetting or skim-coating too thinly over a stressed joint.
Embedding mesh in basecoat layers
Bedding your mesh into the first basecoat layer is crucial for a smooth finish. It helps distribute the load evenly and prevents telegraphing.
Start by applying a thin, even layer of basecoat onto the substrate. This primes the surface and improves adhesion.
Lay the mesh into this wet basecoat, pressing it firmly to ensure full contact. Use a straight edge or trowel to smooth out any wrinkles or air pockets. Let it set for 15-30 minutes before applying the second coat.
Key: Ensure no voids are trapped under the mesh. This can cause telegraphing and weaken the plaster’s strength.
Overlap, feathering, and edge treatment
At material transitions, overlap your mesh by at least 2-3 inches (50-75mm). This provides continuous reinforcement and helps prevent cracks.
For corners, bend the mesh to follow the angle. Use a sharp tool to score and snap the mesh if needed. Ensure the bend is smooth and doesn’t create a stiff edge that could telegraph through.
Feathering involves tapering the edges of your mesh into the surrounding surface. This reduces visible edges and improves crack-bridging performance. Use a knife or trowel to gradually reduce the thickness of the basecoat under the mesh towards its edges.
Tip: Feather both sides of the transition for best results.
Mechanical fixings, movement joints, and beads
Use mechanical anchors to secure your mesh at material transitions. This helps isolate substrate movement and reduces telegraphing risk.
Flexible movement joints are crucial where there’s likely to be expansion or contraction. Apply these before embedding the mesh in the basecoat. They allow for minor movements without transferring stress onto the plaster.
Trim beads can help maintain straight lines and consistent thickness through transitions. Install them after applying the first basecoat but before embedding the mesh. This ensures a clean, even finish.
Remember: Always follow the manufacturer’s guidelines for specific products and applications.
Tools and Materials Checklist
Gather practical, jobsite-ready tools: a selection of trowels (including a narrow margin trowel), mixing paddle and bucket, snips for cutting mesh, and appropriate fasteners or stapler to hold mesh while the basecoat cures. A small on-belt organizer keeps consumables and cutters within reach and reduces trips back to the truck.
Stock a range of mesh types to match the job and a compatible bonding primer or adhesive; choose plaster or mortar mixes suitable for the substrate family rather than relying on a one-size product. Decide what to buy versus rent by frequency—invest in quality hand tools and buy disposable consumables—and follow simple maintenance: clean tools before material sets and store mesh flat to avoid kinks.
Essential hand and power tools
Before you start reinforcing transitions, make sure you’ve got the right tools for the job. Here’s a quick checklist to ensure you’re well-equipped.
- Trowels (2-4 sizes): For embedding mesh and finishing plaster. Skip this, and you’ll struggle with application.
- Hawks: To hold and transfer plaster onto your trowel. Can’t apply without one.
- Margin/putty knives (2-3 sizes): For cutting mesh and scraping off excess material. Miss this, and you’ll waste time and material.
- Utility knife: To cut plaster bags and clean edges. Don’t skip; it’s a lifesaver.
- Drill with paddle mixer: For mixing plaster. No drill, no mix.
- Mixing bucket (2-3 sizes): To hold mixed plaster. Without one, you’ll struggle to keep your work area clean.
- Sanding tools (orbital sander, sandpaper): For smoothing finished surfaces. Skip this, and your finish will be rough.
- Tape measure: To ensure accurate cuts and placement. Without it, you’ll make mistakes.
- Level or straight edge: To check alignment and ensure a smooth finish. Don’t skip; it’s crucial for a professional look.
Quick rule: If you’re unsure about any tool, ask at your local hardware store. They’ll help you choose the right one for your project.
Mesh and fasteners selection guide
Choosing the right mesh and fasteners is key to a strong, lasting transition. Here’s what to consider when selecting your materials.
- Mesh width: Match it to your transition width. Too narrow, and you’ll have weak spots; too wide, and you’ll waste material.
- Mesh gauge (weight): Heavier mesh for wider transitions, lighter for narrower ones. Skip this, and your reinforcement may not be strong enough.
- Fasteners or adhesives: Choose ones compatible with both substrate materials. Incompatibility leads to delamination over time.
- Sealing tape: Use it at mesh edges to prevent moisture ingress. Skip this, and you’ll risk mold growth.
- Mesh type: Choose based on your substrate pairings (see ‘Types of Reinforcing Mesh’ earlier). Wrong choice leads to poor adhesion or weak reinforcement.
- Mesh overlap: Ensure mesh overlaps at least 2-3 inches onto each substrate. Less than this, and you’ll have weak points.
- Mesh alignment: Keep it straight and level for a smooth finish. Misaligned mesh causes uneven surfaces.
Quick rule: Always test your chosen materials on a small area first to ensure compatibility and performance.
Optional pro-grade items for better results
For larger jobs or when you want that professional touch, consider these optional tools. They’ll save time and improve your finish.
- Mechanical mixer: For large batches of plaster. It’s faster and less tiring than a drill with paddle.
- Laser level: To ensure accurate alignment across long transitions. Without it, you may end up with uneven surfaces.
- High-quality floats (2-3 sizes): For smoothing plaster and achieving that professional finish. Cheap floats leave marks in your finish.
- Plastering machine: For large areas or when speed is crucial. It’s a significant investment, but it pays off on big jobs.
- Edge treatment tools (straight edges, corner beads): To create clean, sharp corners and edges. Without them, your finish will look amateurish.
- Movement joint filler: To prevent cracks at expansion joints. Skip this, and you’ll see cracks over time.
- Protective clothing (gloves, goggles): To keep yourself safe from plaster splashes and dust. Don’t skip safety gear.
Quick rule: Only invest in these tools if you’re planning multiple large-scale projects or want to take your DIY skills to the next level.
Smoothing, Finishing, and Visual Checkpoints to Ensure no Telegraphing
The finishing sequence should bury mesh edges and blend thickness so light doesn’t reveal underlying transitions: start with a properly embedded basecoat, follow with one or more skim coats, and feather each pass to taper into the existing surface. Use consistent trowel angles and material consistency to avoid ridges or flat spots that will catch raking light.
Sand progressively and control dust; don’t over-sand and expose mesh, and check in multiple lighting angles to spot any shadow lines or texture differences. Perform adhesion spot checks and keep a short defect log during inspection—note any areas that need rework before priming and painting to avoid surprises after finish coats are applied.
Skim Coat Layering and Drying Considerations
Before applying skim coats, ensure your basecoat is sound and dry. This checklist helps you plan layers to hide reinforcement without overworking the surface.
- Check basecoat: Ensure it’s fully cured (at least 7 days old) and free from cracks or imperfections.
- Use appropriate skim coat thickness: First layer: 1-2mm, subsequent layers: 0.5-1mm. Thicker coats can telegraph mesh.
- Apply bond coat (if needed): For better adhesion, apply a thin coat of bonding primer before skim coating.
- Allow drying time: Each layer should dry for at least 24 hours before sanding and applying the next. Rushing can cause shrinkage and telegraphing.
- Avoid over-sanding: Sand lightly between coats to avoid removing too much material, which can expose mesh.
- Check humidity: Ideal relative humidity for plasterwork is 40-60%. Too high or low can affect drying and adhesion.
- Monitor temperature: Plaster works best at temperatures between 18°C (65°F) and 27°C (80°F).
- Avoid direct sunlight: Sunlight can cause rapid drying, leading to cracks or poor adhesion.
Quick rule: Patience is key. Allow each layer to dry properly before moving on to avoid common issues.
Sanding, Filling, and Feathering for Invisible Joins
After skim coating, use this checklist to sand, fill, and feather joints for a seamless finish that hides reinforcement.
- Start coarse: Begin with 120-grit sandpaper to remove any high spots or ridges. Work in the direction of the grain.
- Progress to fine: Follow up with 150- and 220-grit for a smooth finish. Sand perpendicular to the last pass.
- Fill joints (if needed): Use joint compound to fill any gaps or voids, feathering out at least 3 inches on either side of the joint.
- Feather edges: At material transitions, reduce joint compound thickness gradually to blend with surrounding plaster.
- Sand filled joints: Lightly sand filled joints after drying to remove any excess compound and smooth the surface.
- Avoid flat spots: Be careful not to over-sand or create flat spots that can telegraph mesh.
- Control dust: Use a damp cloth or vacuum to clean up sanding dust between passes. Dust can settle in low spots and become visible.
- Check for gouges: Inspect the surface closely for any deep scratches or gouges that could reveal underlying mesh.
Quick rule: Gradual reduction of joint compound thickness is key to a seamless transition. Be patient and take your time feathering edges.
Visual Checkpoints and Test Patches
Before painting or decorating, use this checklist to inspect your work for any telegraphing issues. Catching problems early saves time and effort.
- Check under different lighting: Inspect the surface in natural light from various angles to catch any shadows or imperfections.
- Use a flashlight: Shine a light across the surface at a low angle to reveal any subtle defects.
- Test patch (recommended): Paint a small, inconspicuous test patch to see how it looks under final decoration. Check for telegraphing or discoloration.
- Check adhesion: Apply and remove a piece of painter’s tape from the surface. If paint comes off with it, re-sand and prime the area.
- Inspect for cracks: Look closely for any hairline cracks that could become more visible under paint.
- Check for discoloration: Ensure there are no stains or discolored areas that could show through paint.
- Look for ridges: Inspect the surface for any raised edges or lines that could indicate underlying mesh or substrate.
- Keep a defect log: Note any issues found during inspection. Address them before final decoration to avoid costly rework.
Quick rule: Thorough visual inspection is crucial. Don’t rush this step; it could save you from expensive mistakes.
Safety, Handling, and Material Standards
Wear appropriate PPE for plaster work and mesh handling—gloves, eye protection, and a respirator for dusty work—and choose protective clothing and footwear that resist cuts and splashes. Control dust with containment, wet methods, and ventilation; follow local rules for exposure limits and containment practices when cutting or grinding hardened material.
Review product safety data sheets and relevant standards cited by the manufacturer to verify chemical compatibility, alkali resistance, and fire performance before you buy or install materials. Check local building codes or permit requirements for structural transitions and keep a plan for safe storage, labeling, and disposal of leftover materials and waste.
Personal protection and dust control
Protecting yourself from plaster dust is crucial. Wear a respirator rated for silica dust, safety goggles, long sleeves, gloves, and sturdy boots.
Mandatory: Respirator with P100 filter or higher, goggles, gloves. Optional but recommended: Long sleeves, sturdy footwear.
Control dust with wet-cutting tools, ventilation, and containment. Follow local regulations for permissible exposure limits. Use vacuum cleaners with HEPA filters to clean up dry dust.
Material specs, standards, and compatibility checks
The right materials ensure a strong, durable finish. Check product data for alkali resistance, corrosion ratings, fire class, and recommended substrates.
- Alkali Resistance: Look for ASTM C1708 or EN 13139 standards. Avoid plasters with low resistance to prevent cracking.
- Corrosion Ratings: Check ASTM G85 or ISO 6270 standards. Ensure mesh won’t corrode and weaken over time.
- Fire Class: Verify fire performance data (e.g., Euroclass A1-A2). Follow local building codes for fire-rating requirements.
- Substrates: Check manufacturer datasheets for recommended substrates. Avoid plasters that stain or bond poorly to your substrate.
- Chemical Compatibility: Review MSDS/SDS sheets. Ensure plaster and mesh coatings won’t react negatively with each other.
Storage, disposal, and environmental precautions
Store plasters and meshes in a cool, dry place. Keep them off the ground to prevent moisture damage.
Disposal: Follow local waste management guidelines. Recycle empty containers where possible. Do not pour plaster or mesh waste down drains.
Spill Containment: Use spill kits for immediate clean-up. Absorb and contain spills to prevent environmental contamination. Dispose of contaminated materials responsibly.
Cost Comparison, DIY Planning Checklist, and Common Mistakes to Avoid
Frame costs into low-, mid-, and high-range scenarios to match project scope and desired longevity, but verify local prices and get professional quotes for large or structural transitions. Prepare a concise checklist: inspect and clean substrates, select compatible mesh and plaster system, assemble tools and PPE, and plan sequencing and curing times.
Top DIY mistakes include skipping surface prep, choosing the wrong mesh type, under-embedding the mesh, and rushing curing/setting times—each creates conditions for telegraphing. Request multiple local quotes for unfamiliar work, buy core reusable tools but buy consumables as needed, and document the plan so common errors are caught before the finish coat goes on.
Cost trade-offs of mesh and methods
Before you start your concrete project, use this checklist to understand the cost implications of different meshes and preparation methods. This will help you make informed decisions that balance quality and budget.
- Mesh type: Welded vs. Fibrous – Check product labels or manufacturer instructions. Welded mesh is stronger but more expensive, while fibrous mesh is cheaper but less durable. Consider the project’s demands before deciding.
- Mesh size: Check dimensions – Measure the mesh to ensure it matches your required spacing (e.g., 6×6, 4×4). Incorrect size can lead to weak concrete and costly rework.
- Mesh gauge: Verify thickness – Ensure the mesh’s gauge (thickness) is suitable for your project. Thinner mesh is cheaper but may not provide adequate strength. Check local building codes or consult with a professional if unsure.
- Rebar vs. Mesh: Consider both – Rebar provides higher strength but requires more labor and skill to install. Mesh is easier to use but offers less strength. Evaluate your project’s needs before choosing.
- Prep method: Formwork quality – Inspect formwork for any damage or gaps that could cause leaks or weak concrete. Properly prepared forms are crucial for a successful pour and can save you from expensive fixes later on.
- Base preparation: Check compaction – Ensure the base is well-compacted to prevent settling and cracking. Inadequate base preparation can lead to costly repairs or even project failure.
- Moisture control: Check drainage – Verify that the site has proper drainage to prevent water from pooling under the slab, which can cause cracks and other issues. Poor drainage can lead to expensive rework or even structural damage.
- Labor time: Estimate accurately – Accurately estimate labor time for mesh installation, formwork setup, and concrete pouring. Labor costs can significantly impact the overall project cost.
Quick rule: Always prioritize quality where it matters most – at joints, edges, and in high-stress areas. Skimping on these critical points can lead to expensive repairs or even structural failures down the line.
Step-by-step DIY planning and preparation checklist
Use this checklist before you start your concrete project to ensure a successful outcome. It’s best to go through these steps when you have all materials on hand and the weather is suitable for concrete work.
- Inspect substrate: Check existing surface for cracks, holes, or weak spots. Use a hammer to tap and listen for hollow sounds. What goes wrong if you skip this: Inadequate base can lead to cracking and delamination of new concrete.
- Measure area: Accurately measure the length and width of your project area. Multiply these numbers to find the square footage. This helps determine how much concrete mix you’ll need. What goes wrong if you skip this: Insufficient or excess concrete can cause delays and waste.
- Check slope: Ensure the surface has a slight slope (1/4″ per foot) away from structures to facilitate water runoff. Use a level or string line to verify. What goes wrong if you skip this: Improper drainage can lead to standing water, freezing, and thawing damage.
- Gather tools: Collect all necessary tools such as shovels, rakes, trowels, levels, tape measures, and safety gear (gloves, goggles, boots). What goes wrong if you skip this: Missing tools can cause delays and improper finishing.
- Prepare materials: Unbox and inspect your concrete mix. Check the bag labels for correct proportions and storage conditions. Keep bags dry until use. What goes wrong if you skip this: Using expired or incorrectly stored mix can result in weak, poorly curing concrete.
- Test patch: Before pouring, mix a small batch of concrete and apply it to an inconspicuous area. Observe its cure time, color, and texture. What goes wrong if you skip this: Unexpected results can lead to rework or unsatisfactory final product.
- Plan sequencing: Determine the order in which you’ll pour sections of your project. Start at the highest point and work downwards to avoid stepping on wet concrete. What goes wrong if you skip this: Improper sequencing can cause damage, delays, and improper curing.
- Check weather forecast: Verify that temperatures will remain within the recommended range (50-90°F) for at least 72 hours after pouring. Concrete cures best in consistent, warm conditions. What goes wrong if you skip this: Extreme temperatures can hinder curing and weaken concrete.
- Review local rules: Confirm that your project complies with local building codes and permits. Check for any specific requirements regarding concrete work in your area. What goes wrong if you skip this: Non-compliance can result in fines, delays, or project halts.
Quick rule: Always prioritize safety when working with concrete. Wear appropriate protective gear and follow manufacturer guidelines for handling and mixing materials.
Top common mistakes and how to prevent them
Use this checklist before you start pouring concrete to ensure a strong, durable slab that will last for years. Check each item carefully to avoid costly rework.
- Insufficient Overlap: Ensure overlapping edges of concrete are at least 2 inches wider than the thickness of the slab. Check with a tape measure and adjust if necessary. If skipped, overlaps may crack or delaminate.
- Poor Embedding: Make sure reinforcement bars (rebar) are properly embedded in the middle third of the slab’s thickness. Visual check from both sides to ensure rebar is centered. Poor embedding can lead to cracking and reduced structural integrity.
- Ignoring Movement Joints: Cut expansion and control joints every 2-5 feet to allow for natural concrete shrinkage and movement. Use a jointing tool or saw to create these grooves before pouring. Skipping this can cause random cracking.
- Inadequate Drying: Allow freshly poured concrete to cure properly, typically 7-28 days depending on temperature and humidity. Check product labels for specific curing times. Insufficient drying can weaken the slab and increase the risk of cracking.
- Improper Slump: Maintain a consistent slump (workability) throughout the pour to ensure even strength and finish. Test slump periodically using an abandoned cone test. Varying slump can result in inconsistent slab quality.
- Ignoring Subgrade Preparation: Ensure the base beneath your concrete is well-compacted, level, and free of debris. Visual check and use a screed to verify level. A poor subgrade can cause settling, cracking, or other issues over time.
- Not Considering Edges: Provide proper support for slab edges with formwork or other means to prevent edge spalling. Check that forms are secure and edges are supported. Unsupported edges can crumble or break off.
- Neglecting Concrete Testing: Conduct slump tests, air content tests, and other necessary quality control checks during the pour. Follow manufacturer instructions for testing procedures. Skipping these tests may result in a weak, inconsistent slab.
Quick rule: Always follow local building codes and consult with a professional if you’re unsure about any aspect of your concrete project to avoid costly mistakes.
Conclusion
Keep the core idea in plain sight: the right reinforcing mesh at transitions stops plaster from telegraphing and protects the finish, so the wall looks solid and durable while staying safe to use and cleanable for years.
Check in this order: assess the surface and material mix, pick the mesh that matches the transition, prep and prime the area, embed the mesh properly with plaster, smooth and cure in stages, and finally inspect with a tactile and visual test to confirm there are no stiff or shiny patches that betray a transition.
Avoid these mistakes: using the wrong mesh for the material, skipping edge detailing where movement occurs, not embedding the mesh fully or letting it bubble, and rushing curing or overworking the plaster. Safety first means wearing eye protection, gloves, and a dust mask, working in a well-ventilated area, and testing a small patch before committing to the full surface.
If the transition is complex, or the substrate is severely damaged, consider bringing in a pro rather than pushing on and risking cracks or failure. When you follow the steps above and stay disciplined about prep, embedment, and cure, you’ll finish with a robust, clean transition and confidence to move on to the next project. You’ve got this.
FAQ
What mesh material works best to stop telegraphing at plaster transitions?
Choose mesh based on the substrate and plaster type you’re using. Look for manufacturer instructions or label guidance on fiber content and mesh weave. If you’re unsure, ask at a supplier or check the product datasheet for recommended applications.
How do I apply mesh to minimize telegraphing across a transition between plaster and another material?
Embed the mesh firmly into a medium bed of plaster or bonding compound at the transition. Press it in flat and work out any wrinkles before the plaster sets. Follow the product’s instructions and avoid over-wetting or over-working the area.
What are the practical pros and cons of different mesh types for transitions?
Metal mesh adds rigidity but can rust if not protected; it’s good for stiff transitions. Plastic or fiberglass mesh resists corrosion and is easier to handle but may be less stiff. Always check the label for compatibility with your plaster type and substrate.
What safety steps should I take when installing mesh at transitions?
Wear gloves to protect hands from sharp edges and basic eye protection if cutting or trimming mesh. Keep the work area clean and dry to prevent slips. Follow local rules and product instructions for handling and disposal of materials.