

Introduction
Painting behind radiators can be a time-consuming task, but with the right plan and timeline, you can achieve a flawless finish that lasts. This step-by-step guide walks you through the process from start to finish, ensuring you allocate enough time for each stage.
Whether you’re tackling this project on your own or hiring a professional, understanding the timeline is crucial for scheduling and budgeting purposes. Let’s dive into the detailed timeline that covers everything from preparation to final touch-ups.
For the full guide, see Painting Behind Radiators: Tools, Edge Control, and Heat-Cycle Considerations.
The Complete Timeline: Painting Behind Radiators
Painting behind radiators requires careful planning and execution. Here’s a comprehensive timeline that breaks down each stage, helping you understand how long it takes to complete the project from start to finish.
- Preparation (1-3 days): Start by turning off the heat source, protecting nearby surfaces, and gathering your tools and materials. Cleaning and degreasing the radiator surface may take additional time if it’s particularly dirty.
- Radiator Removal or Preparation (0.5-2 days): If you decide to remove the radiator for painting, allocate time for safe disconnects, valve capping, and storing screws. Alternatively, prepare the area around the radiator for in-place painting.
- Surface Preparation (1 day): Clean and treat any rust on exposed surfaces, then apply a primer to ensure optimal adhesion.
- Painting (2-4 hours per coat): Allow 2-3 hours for each light, even coat of paint. The number of coats depends on your chosen product and desired coverage.
- Drying and Curing (1-7 days): Follow the manufacturer’s guidelines for drying and curing times between coats and after the final application. This step is crucial to ensure the paint adheres properly and lasts.
- Touch-ups and Final Inspection (0.5-1 day): After the paint has fully cured, perform touch-ups if necessary and conduct a final quality check to ensure a flawless finish.
Total estimated time: 4-12 days, depending on your chosen painting method, product, and any additional prep work required.
Key takeaways
The preparation stage is crucial for ensuring a successful paint job behind radiators. Proper cleaning, degreasing, and surface treatment can significantly impact the overall timeline by affecting how well the paint adheres and dries.
- Plan heat sources and ventilation to avoid fumes and condensation issues.
- Use painter’s tape and edge brushes for clean radiator edges and masking.
- When removing radiators, complete safe disconnects, cap valves, and store screws.
- Clean and rust-treat exposed surfaces before priming for adhesion.
- Test coating on a hidden area to verify heat-cycle compatibility.
- Inspect finished work for drips, even coverage, and cure readiness.
Table of Contents
- Introduction
- Key takeaways
- Planning and Safety Considerations
- Tools and Materials Checklist
- Surface Preparation: Cleaning, Rust Removal, and Priming
- Radiator Removal Versus Painting in Place
- Edge Control and Masking Techniques
- Painting Techniques: Brush, Roller, and Spray Options
- Heat-Cycle and Drying/Curing Considerations
- Troubleshooting, Maintenance, and Final Quality Checks
- Conclusion
- FAQ
Planning and Safety Considerations
Before you pick up a brush, run through a short pre-paint checklist focused on condition and safety. Confirm whether the surface is sound, look for flaky coatings, and note any mechanical issues that may need a pro.
If the existing paint could be lead-based or if the radiator system shows corrosion or leaks, pause and check the product label, data sheet, or local regulations for lead-safe work and plumbing/heating rules. Also verify any requirements for ventilation, respirators, or disposal with manufacturer instructions or local guidance before starting.
Inspecting the radiator and surrounding wall
Before you grab your paintbrush, take a close look at your radiator and the wall behind it. You’re checking for two main things: the condition of the existing paint and the type of surface materials.
Paint condition: If there’s old paint, check if it’s peeling, flaking, or chipping. This could mean moisture issues or poor prep work before. If you find any damaged areas, you’ll need to prep those spots properly before painting.
Surface materials: Radiators are usually made of metal – cast iron or steel. The wall behind might be plaster, drywall, or another material. Knowing this helps you choose the right paint and primer. For instance, you’d use a different primer for metal than for drywall.
Also, look out for signs of corrosion on the radiator or moisture damage on the wall. These could affect your paint choice and application. If you’re unsure about any damages, it’s best to consult a professional.
Lead paint, asbestos, and local rules to check
Older homes might have lead-based paint or asbestos behind those radiators. Both are hazardous and need special handling.
Lead paint: If your home was built before 1978, it’s likely to have lead paint. You can buy a test kit at hardware stores to check. If positive, don’t try to remove or paint over it yourself. Hire a certified professional to handle it safely.
Asbestos: Asbestos was used in insulation and other building materials until the 1970s. If you suspect asbestos – perhaps because of old insulation around pipes near your radiator – don’t disturb it. Contact local environmental health authorities immediately for advice.
Also, check local regulations regarding painting behind radiators. Some areas have specific rules about ventilation and safety measures during the job.
HVAC, plumbing and electrical safety steps
Safety first! Before you start painting, make sure your heating system is off to prevent any accidents. Here’s how:
HVAC: Turn off the central heating at the thermostat or boiler. Also, ensure no heat is coming from the radiator by feeling it. If it’s still warm, wait until it cools down before painting.
Plumbing: Check if there are any exposed pipes behind the radiator. If so, ensure they’re not leaking and won’t cause issues while you’re working or after you’ve finished painting.
Electrical: If your radiators have electrical components (like thermostats), make sure they’re turned off at the circuit breaker. Also, keep paint and solvents away from any electrical wires to prevent accidents.
If you’re unsure about any of these safety steps or find issues with plumbing or electrical work, don’t hesitate to call a professional plumber or electrician.
Tools and Materials Checklist
Gather tools and consumables prioritized by access: small-angle brushes, mini rollers or narrow foam rollers, masking supplies, degreaser, rust converter or primer, and appropriate topcoat. Include alternatives for tight spaces like offset brushes, extension handles, or aerosol touch-up cans.
Before you buy, check product compatibility with metal, existing coatings, and heat exposure by reading the label or product data sheet. Have basic safety gear on hand—gloves, eye protection, and masks as advised by the manufacturer or local safety guidance.
Brushes, rollers, and specialized applicators
Choose the right tools for behind-finned areas to ensure even coverage and prevent damage.
- Angled brush: For tight spaces between fins. Use it for edges and details.
- Mini roller: Covers large areas quickly. Ideal for wide, flat surfaces around radiators.
- Radiator roller: Designed for behind-finned areas. Has flexible cover to reach tight spots.
- Flexible radiator brush: For deep, narrow spaces between fins. Use it for hard-to-reach areas.
- Natural bristle brush: Suitable for oil-based paints. Don’t use on latex paints as they can absorb water and swell.
- Synthetic bristle brush: Works with both oil-based and latex paints. Durable, easy to clean.
- Avoid: Regular rollers or large brushes. They won’t reach behind fins and may cause damage.
Quick rule: Always check your tools match your paint type and the job at hand.
Masks, tapes, shields and fasteners
Protect floors and fixtures with these essentials to keep your workspace clean and paint-free.
- Painter’s tape: Blue or green. Apply along edges of radiators and walls. Removes easily without residue.
- Masking film: Plastic sheets. Protect floors, baseboards, and other fixtures from overspray.
- Shields: Metal or plastic. Place behind radiators to catch drips and protect walls.
- Standoffs: Plastic spacers. Keep tape off surfaces for easy removal and clean lines.
- Avoid: Regular masking tape. It can leave residue, pull off paint, or not stick well to surfaces.
Quick rule: Always test your tape on a small area first to ensure it doesn’t damage your surfaces.
Paints, primers and solvents — what to choose
Select the right products for your surface and heat conditions to ensure durability and safety.
- Primer (metal): Zinsser B-I-N or Kilz Premium. Seals metal, promotes paint adhesion.
- Primer (masonry): Kilz Masonry, Sunnyside 123. Bonds with masonry surfaces, seals pores.
- Heat-resistant paint: Rust-Oleum Universal or Valspar Latex Enamel. Withstands high temperatures up to 350°F (175°C).
- Topcoat (metal):Valspar Latex Enamel, Behr Premium Plus Ultra. Durable, easy to clean.
- Topcoat (masonry): Valspar Masonry & Stucco Paint, Glidden Masonry & Stucco. Bonds with masonry, resists moisture and mildew.
- Solvents: Mineral spirits or paint thinner for cleaning brushes and tools. Always follow manufacturer’s instructions on safety and disposal.
Quick rule: Always read labels and safety data sheets before using any product.
Surface Preparation: Cleaning, Rust Removal, and Priming
Effective prep starts with degreasing and removing loose paint, then treating any rust down to stable metal using mechanical or chemical methods. Fill gaps or pits with a suitable filler that the primer and topcoat will bond to and that tolerates heat cycles.
Choose a primer formulated for metal and compatible with the chosen topcoat—confirm suitability and heat tolerance on the product data sheet or label. Remember that adhesion and finish life depend on clean, dry, and properly primed surfaces, so don’t shortcut this stage.
Cleaning and degreasing behind radiators
Start by removing any dust with a soft brush. Use a vacuum to reach tight spaces.
Grease and grime can be tackled with a degreaser. Spray it on, let it sit, then scrub with a stiff-bristle brush. Wipe clean with a damp cloth.
For tough spots, use steel wool or a wire brush. Be careful not to damage the surface.
Treating rust, flaking paint and corrosion
For light rust, use a wire brush or sandpaper to remove it. Wear safety glasses.
For heavier rust, try a chemical rust remover. Follow the manufacturer’s instructions. Always wear gloves and eye protection.
If paint is flaking, scrape it off with a paint scraper. Sand any remaining rough edges smooth.
Use a rust converter if you want to seal the rust before painting. It turns rust into a stable compound that won’t spread.
Priming metal and adjacent wall surfaces
For bare metal, use a primer designed for metal. It seals the surface and prevents rust from forming under your paint.
If the metal is previously painted, clean it first to remove any loose paint. Use a primer that bonds well with existing paint.
For adjacent walls, use a latex primer if they’re plaster or drywall. This helps seal the surface and improves paint adhesion.
When priming, feather the edge of your primer onto the wall to avoid a harsh line when you paint.
Radiator Removal Versus Painting in Place
Decide whether to remove the radiator or paint it in situ by weighing access, risk, and time: removal allows full access and a more even finish but may require a tradesperson for draining and refitting. Painting in place is quicker and avoids plumbing work but makes edge control and underside access harder.
Use practical criteria—your comfort with plumbing, radiator weight, and the condition of pipes and valves—to choose a route, and check manufacturer instructions or consult a professional if unsure. If removal is chosen, verify any system shutdown and refilling procedures with manufacturer or local regulations before proceeding.
Pros and cons of removing the radiator
The decision to remove a radiator for painting depends on access, finish quality, and your skills.
Pros
- Better access to all surfaces for a thorough paint job.
- Easier to achieve a smooth, even finish.
- Allows for easier touch-ups in the future.
- Reduces the risk of dripping or running paint.
- Gives you the chance to inspect and maintain the radiator’s internal components.
Cons
- Requires professional skills to drain, cap, and refit the radiator.
- Involves turning off and potentially draining your heating system.
- Takes more time and effort than painting in place.
- Runs a higher risk of damaging the radiator or its connections during removal and reinstallation.
Removing the radiator makes sense when you want a perfect finish, have the necessary skills, and understand the risks involved.
How to safely isolate, drain and cap (when applicable)
Safety first: Always turn off your heating system at the main valve before starting. If you’re unsure about any part of this process, hire a qualified plumber.
First, isolate the radiator by closing its individual valves to prevent water from flowing through it while you work. Then, drain the radiator using a radiator key or adjustable wrench to loosen and remove the drain valve at the bottom.
If your system is sealed (pressurized), you’ll need to cap the radiator after draining. This involves installing a cap on the open end of the pipe where the drain valve was removed. Consult a professional if you’re unsure about this step.
Painting in place: setup and containment
When painting a radiator in place, focus on containing the paint and protecting nearby surfaces. Start by shielding any exposed piping with plastic or paper to prevent overspray.
Next, protect your floors and surrounding surfaces using drop cloths or painter’s tape and plastic sheeting. This will help you maintain a clean workspace and minimize cleanup later on.
If possible, tilt the radiator slightly to allow paint to flow evenly across its surface. Work in small sections, applying even coats with your chosen paint and brush or roller. Remember to follow the manufacturer’s instructions for application and drying times.
Edge Control and Masking Techniques
Achieve crisp radiator-to-wall lines by selecting tape suited to your substrate and finish—low-tack for delicate surfaces, stronger adhesion for textured walls—and press it down firmly to seal edges. For very narrow gaps, use a thin metal or plastic shield held against the radiator while cutting in with an angled brush.
Address common bleed issues by sealing porous surfaces with primer before taping and by removing tape while paint is still slightly tacky per the tape manufacturer’s guidance. If uncertain about tape choice or technique, check product labels and test on a hidden spot first.
Taping strategies and preventing bleed-through
Start by applying painter’s tape along the radiator-to-wall junction. Press down firmly with a putty knife or your fingers to ensure a good seal.
Use a release agent like a light mist of water or a commercial product on the tape edges before painting. This helps prevent paint from sticking to the tape and bleeding under it.
Pro tip: For best results, apply tape in the evening and let it sit overnight before painting the next day.
Cutting-in techniques and brush selection for edges
Choose a 1.5 to 2-inch angled sash brush with stiff bristles for tight edge control. Dip the brush into the paint, then tap off excess on the lip of your can.
Hold the brush at a 45-degree angle and use short, steady strokes to cut in along the tape line. Work slowly and carefully behind fins and pipes.
Remember: Patience is key when cutting in. Take your time to avoid sloppy edges.
Using shields, standoffs and custom templates
When to use: When you need extra protection for radiators or trim, or if the gap is too wide for tape alone.
- Metal or cardboard shields: Cut to size, place against the wall, and secure with painter’s tape. Keep paint off radiators.
- Painter’s pyramids: Place between the radiator and wall to create a gap for painting. Works best when the gap is consistent.
- DIY templates: Trace and cut cardboard or foam board to fit around pipes and fins. Tape in place before painting.
Quick rule: Always check your setup before painting. Make sure shields, standoffs, or templates are secure and won’t move when you’re working.
Painting Techniques: Brush, Roller, and Spray Options
Pick your method based on access and the finish you want: brushes give control in crevices, mini-rollers speed coverage on flat sections, and spray (HVLP or aerosol) delivers the smoothest result for complex fins. Prepare each method with the right thinning, tip size, or nozzle as recommended by the coating manufacturer.
Set up containment and ventilation appropriate to the method—especially for spraying—and follow the product data sheet for application conditions and technique tips. If you’re not sure which approach suits your radiator or paint, consult the technical data or a pro for guidance.
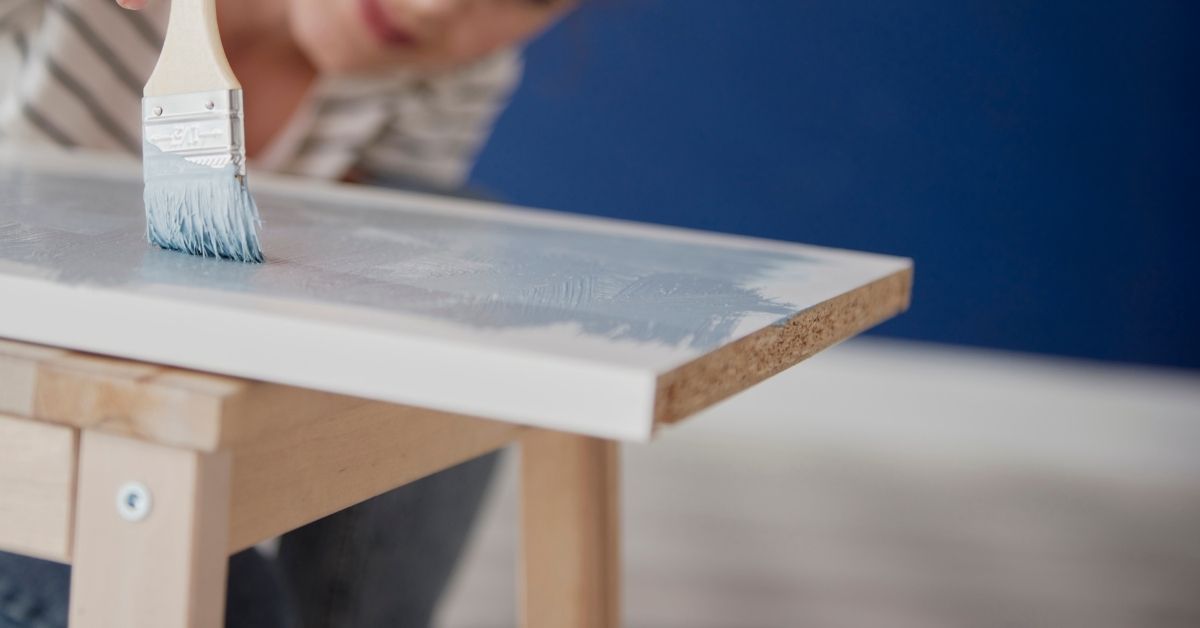
Brushing and Cutting In for Detail Work
When painting behind radiators, brushing is your best bet for detail work. You’ll need a good quality angled brush with stiff bristles to reach into tight spaces.
Load your brush about halfway – not too much paint or you’ll end up with drips and runs. Work in small sections, cutting in along the edges first before filling in the middle. This helps prevent lap marks.
Use slow, steady strokes, following the direction of the fins if possible. Be patient; it’s a tight space, so take your time.
Rollers and Specialty Radiator Rollers for Even Coverage
For larger areas between fins, a mini-roller or a roller with a contoured cover can help you achieve even coverage. These tools are designed to reach into tight spaces.
Load your roller lightly – again, not too much paint. Start at the top and work your way down, using long, smooth strokes. Keep the pressure consistent for an even finish.
Pro tip: If you’re using a contoured roller, make sure to rotate it as you roll to maintain consistent texture.
Spraying Behind Radiators: Setup and Ventilation
Spraying can be efficient for large areas, but it requires proper setup. You’ll need an HVLP sprayer or aerosol cans, along with the right nozzle to reach between fins.
Before you start, mask off the surrounding area to protect walls and floors from overspray. If you’re using an HVLP sprayer, set up your extraction fan according to the manufacturer’s instructions.
Choose a nozzle that matches the width of the spaces between your radiator fins. Work in small sections, keeping the nozzle moving at a consistent speed for even coverage. And remember, safety first – wear a respirator and protect your eyes.
Heat-Cycle and Drying/Curing Considerations
Consider how periodic heating will affect drying, chemical curing, and long-term adhesion; some coatings require full cure before repeated heating while others tolerate light warm-up sooner. Time your painting so the surface is cool and stable, and confirm cure behavior and recommended heat exposure on the product data sheet or label.
Avoid running the radiator at full temperature during initial drying unless the coating manufacturer states it is safe, and plan recoats around the manufacturer’s guidance for recoat windows. If in doubt about curing under heat cycles, consult product instructions or technical support for safe scheduling.
Timing paint work around the heating season
The heating season is your enemy when painting behind radiators. Hot, active radiators can mess up your paint job.
Here’s what you do: Plan your painting during the spring or fall, when the weather is mild and heating use is minimal. This gives the paint time to dry and cure without interference from heat cycles.
Never paint behind active radiators. Let them cool down first. You can turn off the heat for a few hours before you start painting.
Drying versus curing and how heat impacts each
Drying is when your paint’s surface hardens. Curing is when it fully sets, gaining strength and durability.
Heat speeds up drying, but it can also affect adhesion. It might cause the paint to flow too quickly or not set properly. Always follow the manufacturer’s instructions on your specific paint.
Here’s a tip: Use a small heater to control the temperature while painting. Keep it around 70°F (21°C) for best results.
Testing adhesion and visual checks after the first heat cycle
After your paint has dried, turn on the radiators. This is the real test of your work.
Check for any signs of failure: cracking, bubbling, or lifting. If you see any issues, address them immediately before they get worse.
Pro tip: Use a small mirror to check hard-to-see areas behind the radiators. It’s like checking your teeth with a dentist’s mirror.
Troubleshooting, Maintenance, and Final Quality Checks
After painting, inspect for common issues like runs, fisheyes, or poor adhesion and address them with sanding, spot-priming, and touch-up using compatible products. Keep a simple maintenance plan: periodic cleaning, watching for chips or corrosion, and touching up areas before rust develops.
Before reassembling or returning the radiator to service, run a final checklist: confirm cure per the manufacturer, ensure all masking is removed cleanly, and check valves and fittings if the radiator was disturbed. If any problem falls outside your skill set, consult manufacturer instructions or a qualified tradesperson.
Fixing drips, orange peel, and texture inconsistencies
Drips happen. Orange peel too. Here’s how to fix them:
Drips: Let it dry, then sand lightly with fine-grit sandpaper. Wipe off dust, recoat.
Orange Peel: Sand lightly, wipe clean, apply a thin second coat using a different technique (e.g., switch from roller to brush).
Texture Inconsistencies: Lightly sand, wipe clean, apply a thin, even second coat. Be patient, let it dry fully between coats.
Long-term maintenance and touch-up strategies
Maintaining your painted radiators keeps them looking fresh:
Cleaning: Wipe down with a damp cloth regularly. Avoid harsh chemicals.
Touch-ups: Paint fades over time. Touch up every 2-3 years, or when you notice wear. Keep extra paint for exact color matching.
Seasonal Care: In winter, be gentle with radiators. Don’t let snow or ice buildup damage the paint.
Visual checkpoints and a final QA checklist
Before reassembling, ensure your job’s ready:
- Edges: Check for missed spots or bleed-through. Touch up if needed.
- Adhesion: Gently scratch the paint with a nail. It should not flake off.
- Coverage: Ensure no bare spots. If so, recoat.
- Protection Removal: Check all tape and shields are gone. Remove any remaining residue.
- Heat Test: Turn on the heat briefly. Check for blistering or peeling.
- Dry Time: Ensure paint’s fully dry before reassembly.
- No Dust: Wipe off any dust or debris before reassembling.
- Final Look: Step back, check for any missed spots. Touch up if needed.
Quick rule: If in doubt, wait 24 hours after final touch-ups to ensure everything’s dry and cured.
Conclusion
Finish right, and your work lasts. Safety and a clean edge mean fewer call-backs and a better look behind every radiator. Stay deliberate about heat and cure times so the paint actually sticks and lasts.
Safety first. Test a small patch in a hidden spot, mask well, remove or protect any nearby finishes, clean and prime as needed, then choose your painting method and apply in light, even coats. Check in a rough order: verify the room is ventilated and power is off, prep the surface, mask edges, plan your paint strategy, then dry and cure before the next coat or use.
Common mistakes to avoid: rushing the masking and getting paint on trims or walls, overloading the brush or roller so runs form, and painting when the heater is cycling hot. Don’t skip testing heat-cycle and cure times, don’t skip surface prep, and don’t force a finish that isn’t compatible with the radiator’s temperature cycling. Use proper PPE, work in small sections, and let each coat dry fully before the next.
If the radiator is corroded badly, you’re unsure about removing it, or there are safety concerns with the heating system, call a professional. Otherwise, stick to the plan, stay patient, and you’ll end with a durable, clean finish that looks like it was done with care. You’ve got this—get to it and stay steady.
FAQ
How does heat cycling affect paint behind radiators, and how should I plan for it?
Paint behind radiators can suffer from repeated heating and cooling. Expect slower cure times in the panned area and be prepared for potential micro-cracking if the surface moves a lot. Check the paint label and manufacturer guidance for heat tolerance and cure windows before you start.
What edge-control tips work best when the radiator is still in place?
Masking is key. Use high-quality painter’s tape along the edge where the radiator meets the wall and around valve areas. Work with thin, even coats and use a small brush to edge tight spots, then back-roll gently to smooth.
Which tools help me reach tight spaces behind or beside radiators?
Short-handled brushes, detail brushes, and a thin extension pole can help get into narrow gaps. A flexible scraper and a small angle brush are handy for around valve covers. If you use spray, confirm clearance and coverage with a test spray on a hidden spot first.
How should I finish and cure paint after working near radiators?
Let the paint cure as your climate and product instructions allow, avoiding sudden temperature changes. If possible, ventilate well and keep the area at a steady gentle temperature during the initial cure. Always confirm curing times and heat tolerance on the product label or datasheet. If in doubt, check local rules or manufacturer instructions.